7 Configuring the Managed Attachments Solution
This chapter describes how to configure the Managed Attachments solution for Oracle E-Business Suite, Oracle PeopleSoft, or another business application. It describes how to run configuration scripts, configure Content Server components, customize the solution, integrate Oracle AutoVue and Oracle Distributed Document Capture, and configure authentication and security.
Note:
For background information on the Managed Attachments solution, see Section 1.4.
This chapter covers the following topics:
-
Section 7.1, "System Requirements for the Managed Attachments Solution"
-
Section 7.2, "Running Configuration Scripts to Enable Managed Attachments"
-
Section 7.4, "Configuring the Enterprise Application Adapter Framework"
-
Section 7.9, "Configuring Oracle Distributed Document Capture"
-
Section 7.12, "Uninstalling Adapter Components on Content Server"
7.1 System Requirements for the Managed Attachments Solution
In addition to all other requirements listed in Section 1.7, the Managed Attachments solution includes additional requirements. General Managed Attachments requirements are listed in this section, and supported configuration and certification information, such as browsers, is available at:
Oracle WebCenter Content: Imaging 11g Release 1 (11.1.1 or higher)
Installation of Imaging 11g is required, even if only configuring the Managed Attachments solution. This is because AXF is part of the Imaging deployment.
Note:
The Managed Attachments solution is supported on WebSphere Application Server when Content Server is running on WebSphere Application Server and Application Extension Framework (Imaging Server) is running on Oracle WebLogic Server.
Oracle WebCenter Content Server 11g Release 1 (11.1.1 or higher)
The Managed Attachments solution supports the following Content Server search engines.
-
Metadata Only Search
-
Database – Full Text Search
-
Oracle Text – Full Text Search
Note:
The Folders_g component by default sets a variable called AuthorDelete=true, which allows users without delete privileges on a security group to delete documents if they are the author. If using the Folders_g Content Server component with the Managed Attachments solution, be aware that this variable's setting may override Managed Attachments dPrivilege or AppAdapterGrantPrivilege deletion settings.
-
For Managed Attachments with Oracle E-Business Suite Forms-based entities, Managed Attachments requires that the EBS FND attachments framework be configured for the specific entity. Although Managed Attachments is an alternative attachments framework to FND attachments, Managed Attachments leverages the underlying FND attachments infrastructure.
-
For Managed Attachments with Oracle E-Business OAF-based entities, Managed Attachments requires that the OAF page associated with the entity have a Personalize Page option with the About this page link. The OAF page should support site level personalization so that the Managed Attachment button can be added manually. The About this page link obtains the OAF entity details, such as the primary key. OAF-based pages without this option are not supported for Managed Attachments.
7.2 Running Configuration Scripts to Enable Managed Attachments
This section describes running the configuration scripts listed in Table 7-1, following the steps described in the sections below. The first script configures AXF elements, and is required for all Managed Attachments configurations, including the Enterprise Application Adapter Framework. The remaining scripts apply to specific business applications as noted in Table 7-1.
-
Section 7.2.1, "Configuring AXF Elements for Managed Attachments"
-
Section 7.2.2, "Enabling Managed Attachments for Oracle E-Business Suite Forms Applications"
-
Section 7.2.3, "Enabling Managed Attachments for Oracle E-Business Suite OAF Applications"
-
Section 7.2.4, "Enabling Managed Attachments for Oracle PeopleSoft"
Table 7-1 SQL Scripts for Configuring Managed Attachments
| SQL Script | Applies To | Description |
|---|---|---|
|
AXF_ATTACHMENTS_CONFIG.sql |
|
AXF script that configures AXF elements such as solutions and commands. See Section 7.2.1. Run this script on the Oracle WebCenter Content middle tier as the user who owns the Imaging schema. |
|
AXF_EBS_ATTACHMENTS_CONFIG.sql |
Oracle E-Business Suite Forms only |
Populates the Oracle E-Business Suite Forms tables used by AXF for Managed Attachment access via the Zoom menu within the Oracle E-Business Suite Forms application. See Section 7.2.2. Run this script as the Oracle E-Business Suite plug-in schema user (AXF). |
|
OAF_AXF_EBS_ATTACHMENTS_CONFIG.sql |
Oracle E-Business Suite OAF only |
Provides a sample script that populates the Oracle E-Business Suite OAF tables used by AXF for Managed Attachments access. See Section 7.2.3. Run this script as the Oracle E-Business Suite plug-in schema user (AXF). |
|
AXF_PSFT_ATTACHMENTS_CONFIG.sql |
Oracle PeopleSoft only |
Provides a sample script that populates the PeopleSoft tables used by AXF for Managed Attachments access. See Section 7.2.4. Run this script as an Oracle PeopleSoft user with administrative privileges. |
7.2.1 Configuring AXF Elements for Managed Attachments
Follow these steps to run AXF_ATTACHMENTS_CONFIG.sql, an AXF script that configures AXF elements such as solutions and commands. This script is required for Managed Attachments for all business applications.
-
On the Fusion Middleware Home, locate the script in the folders specified below for your business application.
-
For Oracle E-Business Suite Forms:
MW_HOME/ECM_HOME/axf/adapters/ebs/R11/MW_HOME/ECM_HOME/axf/adapters/ebs/R12/ -
For Oracle E-Business Suite OAF:
MW_HOME/ECM_HOME/axf/adapters/ebs/oaf/ -
For Oracle PeopleSoft:
MW_HOME/ECM_HOME/axf/adapters/psft/ -
For Enterprise Application Adapter Framework:
MW_HOME/ECM_HOME/axf/adapters/framework/
-
-
Modify parameters in the AXF_ATTACHMENTS_CONFIG.sql script to match your environment.
-
Change the system name and port for the RIDC_CONNECTION_STR parameter to match your Content Server installation. The port number should correspond to that of the Content Server's Intradoc server port that receives RIDC calls. (To find the value for the Content Server port, locate the IntradocServerPort config value in config.cfg.)
-
Change the system name and port for the UCM_CONNECTION_STR parameter to match your Content Server installation. The port number should correspond to that of the Content Server's web server port.
-
Change the [Content ServerProfile] and [ResultTemplate] values in the UCM_CONNECTION_STR parameter for your configuration. These values are used in the Managed Attachments URL that invokes the Content Server attachments framework search, as described in Section C.1.4.
-
Profile values include: EBSProfile (default), PSFTProfile, and UniversalProfile (for the Enterprise Application Adapter Framework). For details about customizing profiles, see Section 7.6.5.
-
Result template values include: EBS_LIST (adapter_list_results_template.htm), PSFT_LIST (ps_adapter_list_results_template.htm), and Universal_LIST (universal_adapter_list_results_template.htm, for the Enterprise Application Adapter Framework). For details about customizing results templates, see Section 7.6.13.
Note:
If you are using the AXF for BPM infrastructure, open the AXF_ATTACHMENTS_CONFIG.sql file in any editor. Replace
.imaging.with.ecm.and save the file. -
-
-
On the Oracle WebCenter Content middle tier, log in to the AXF Configuration Database as the user who owns the Imaging schema and run the AXF_ATTACHMENTS_CONFIG.sql script.
To execute the script, enter:
@AXF_ATTACHMENTS_CONFIG.sqlNote:
For information about creating schemas before or after Oracle WebCenter Content installation, see "Creating Oracle WebCenter Content Schemas with the Repository Creation Utility" in Oracle WebCenter Content Installation Guide.
7.2.2 Enabling Managed Attachments for Oracle E-Business Suite Forms Applications
If configuring the adapter for Oracle E-Business Suite Forms, follow these steps to run AXF_EBS_ATTACHMENTS_CONFIG.sql, an Oracle E-Business Suite plug-in script that configures the Zoom menu to enable the Managed Attachments solution within the Oracle E-Business Suite system.
-
Locate the script corresponding to your release in the folder specified below.
MW_HOME/ECM_HOME/axf/adapters/ebs/R11/MW_HOME/ECM_HOME/axf/adapters/ebs/R12/ -
In the AXF_EBS_ATTACHMENTS_CONFIG.sql script, change the host name and port to match your Imaging server.
-
Log in to the Oracle E-Business Suite database as the Oracle E-Business Suite plug-in schema user (AXF) and run the appropriate script.
To execute the script, enter:
@AXF_EBS_ATTACHMENTS_CONFIG.sql -
Open the AXF_FND_MAP table and delete unneeded rows.
See Section C.2.3. The script inserts multiple rows, allowing you to keep the rows that apply to your particular configuration.
7.2.3 Enabling Managed Attachments for Oracle E-Business Suite OAF Applications
In order to link OAF page details with documents checked into Content Server, the OAF page's business entity and primary key values must be stored in the Oracle E-Business Suite OAF AXF database tables described in Section C.3. This configuration involves these steps:
-
Populating the database via the OAF_AXF_EBS_ATTACHMENTS_CONFIG.sql script, which populates the tables with values for certain sample OAF pages, as described in Section 7.2.3.1.
-
Modify the sample key values for your OAF pages, using values you identify in Section 7.2.3.2.
7.2.3.1 Populating the OAF AXF Database Tables With Sample Key Values
Table 7-2 lists the sample key values populated by the OAF_AXF_EBS_ATTACHMENTS_CONFIG.sql script for the specified OAF pages.
-
The OAF page location is used as the AXF_OAF_PAGE value in the OAF_AXF_CONFIGS Table (Oracle E-Business Suite OAF). See the example table in Section C.3.1.2.
-
The following key values are used in the OAF_AXF_CMD_PARAMS Table (Oracle E-Business Suite OAF). See the example table in Section C.3.4.2.
-
Entity (businessObjectType); for example, REQ_HEADERS
-
Primary Key (businessObjectKey1); for example, REQUISITION_HEADER_ID
-
View Object (businessObjectValue1); for example, ReqHeadersVO
-
View Attribute (businessObjectValue1 or labelValue1); for example, RequisitionHeaderId
-
Table 7-2 OAF Pages Configured By Sample OAF_AXF_EBS_ATTACHMENTS_CONFIG.SQL Script
| OAF Page | Navigation | Sample Key Values |
|---|---|---|
|
iProcurement Requisitions |
Choose iProcurement, then the Requisitions tab, then click Requisition Description |
OAF Page = /oracle/apps/icx/por/reqmgmt/webui/ReqDetailsPG
|
|
iProcurement Purchase Orders |
Choose iProcurement, then the Requisitions tab, then click Order Number |
OAF Page = /oracle/apps/pos/changeorder/webui/PosViewPOPG
|
|
Purchase Orders |
Choose Purchasing, then Buyer Work Center, then Orders, then click the Order number |
OAF Page = /oracle/apps/po/document/order/webui/OrderPG
|
|
Suppliers |
Choose Purchasing, then Supply Base, then Suppliers. Search by clicking Go, then click the Update icon |
OAF Page = /oracle/apps/pos/supplier/webui/QuickUpdatePG
|
|
Request for Quote (RFQ) Header |
Choose Purchasing, then Buyer Work Center, then Negotiations, then RFQ, then Header |
OAF Page = /oracle/apps/pon/negotiation/creation/webui/ponDefineHdrPG
|
|
Request for Quote (RFQ) Line |
Choose Purchasing, then Buyer Work Center, then Negotiations, then RFQ, then Lines. Click the GO button. |
OAF Page = /oracle/apps/pon/negotiation/creation/webui/ponItemHeaderPG
|
|
Projects |
Choose Project Manager, then Projects: Delivery, then Project List. Click Project name, then the Attachments tab |
OAF Page = /oracle/apps/pa/project/webui/ProjAttachmentPG
|
Follow these steps to run the script.
-
Locate the OAF_AXF_EBS_ATTACHMENTS_CONFIG.sql script in this folder:
MW_HOME/ECM_HOME/axf/adapters/ebs/oaf/ -
Log in to the Oracle E-Business Suite database as the Oracle E-Business Suite plug-in schema user (AXF).
-
In the script, replace the host name and port to match your Imaging server host name and port.
-
Run the OAF_AXF_EBS_ATTACHMENTS_CONFIG.sql script.
To execute the script, enter:
@OAF_AXF_EBS_ATTACHMENTS_CONFIG.sql
7.2.3.2 Identifying Key Values for Your OAF Pages
This section provides steps for identifying the primary field(s) to link the OAF page with Managed Attachments functionality, and identifying the page name and fields to use as labels.
How you identify the needed information depends on the OAF page's contents, as described in the following scenarios:
-
Section 7.2.3.2.1, "With Both Attachment Information and Primary Keys Present"
-
Section 7.2.3.2.2, "With Attachment Information Present, But Not Primary Keys"
-
Section 7.2.3.2.3, "With Neither Attachment Information Nor Primary Keys Present"
7.2.3.2.1 With Both Attachment Information and Primary Keys Present
Ideally, the needed Oracle E-Business Suite attachment and primary key details are present in the OAF page's XML file. In this case, follow these steps to locate required mapping information.
-
Navigate to the OAF page and click the About this page link at the bottom.
For example, navigate to Employee Self Service, then the Appraisals OAF page, and click the About this page link.
-
Note the full path of the page's XML file. For example:
/oracle/apps/per/selfservice/appraisals/webui/EmpMyAppraisalsPG
-
Search the XML file for an <oa:attachment> XML tag that contains view object name and primary key details for the business entity associated with the view.
For example, the following <oa:attachment> section provides these key values, highlighted in bold characters.
<oa:attachmentImage id="EMPInprogressJournal" prompt="Journal" viewName="EmpMyAppraisalsInProgressVO" autoCommitEnabled="true" enableDocumentCatalog="false">
   <oa:entityMappings>
   <oa:entityMap id="APPRAISEEentityMap" entityId="APPRAISEE_JOURNAL" showAll="false">
   <oa:primaryKeys>
   <oa:primaryKey id="primaryKey1" viewAttr="AppraisalId"/>
   <oa:primaryKey id="primaryKey2" viewAttr="AppraiseePersonId"/>
   </oa:primaryKeys>
   <oa:categoryMappings>
   <oa:categoryMap id="categoryMap1" categoryName="MISC"/>
   </oa:categoryMappings>
   </oa:entityMap>
   </oa:entityMappings>
   </oa:attachmentImage>
-
Note the identifying values. You use them in Section 7.2.3 to map OAF page details with Managed Attachments.
In the example, the following values were located:
-
Entity = APPRAISEE_JOURNAL
-
Primary Key = APPRAISAL_ID and APPRAISEE_PERSON_ID
-
View Object = EmpMyAppraisalsInProgressVO
-
View Attribute = AppraisalId and AppraiseePersonId
-
7.2.3.2.2 With Attachment Information Present, But Not Primary Keys
In this case, the OAF page's XML file contains attachment object information (view object and entity), but not the corresponding primary key. Follow these steps to determine the view object and entity name from the XML file, then query the FND_DOCUMENT_ENTITIES table to determine the primary key.
-
Navigate to the OAF page and click the About this page link at the bottom.
For example, navigate to iProcurement, then Requisitions, then the Requisition Details OAF page, and click the About this page link.
-
Note the full path of the page's XML file. For example:
/oracle/apps/icx/por/reqmgmt/webui/ReqDetailsPG
-
From the APPS schema, run the following query against the FND_DOCUMENT_ENTITIES table, replacing EntityName with the entity identified in the XML file.
SELECT * FROM FND_DOCUMENT_ENTITIES WHERE ENTITY_NAME=EntityNameFor example, the following xml file's <oa:attachment> section provides these key values, highlighted in bold characters:
<oa:attachmentLink id="Attachment" viewName="ReqHeaderVO" prompt="Attachment">
   <oa:entityMappings>
   <oa:entityMap entityId="REQ_HEADERS" id="entityMap1" insertAllowed="false" updateAllowed="false" deleteAllowed="false">
   <oa:categoryMappings>
   <oa:categoryMap categoryName="REQ Internal" id="ReqInternal"/>
   <oa:categoryMap categoryName="Approver" id="ToApprover"/>
   <oa:categoryMap categoryName="Buyer" id="ToBuyer"/>
   <oa:categoryMap categoryName="Receiver" id="ToReceiver"/>
   <oa:categoryMap categoryName="Vendor" id="ToSupplier"/>
   </oa:categoryMappings>
   </oa:entityMap>
   </oa:entityMappings>
   </oa:attachmentLink>
The following information is known:
-
Entity = REQ_HEADERS
-
View Object = ReqHeaderVO
-
-
Based on the primary key column, determine its corresponding view attribute.
-
Run the FND_DOCUMENT_ENTITIES query for the REQ_HEADERS entity.
SELECT * FROM FND_DOCUMENT_ENTITIES WHERE ENTITY_NAME='REQ_HEADERS'The query returns the primary key column name: REQ_HEADER_ID.
-
Click the About this page link, select View Object and find the corresponding attribute name, which matches the column name: RequisitionHeaderId.
-
Primary Key = REQUISITION_HEADER_ID
-
View Attribute = RequisitionHeaderId
-
-
-
Note the identifying values. You use them in Section 7.2.3 to map OAF page details with Managed Attachments.
In the example, the following values were located:
-
Entity = REQ_HEADERS
-
Primary Key = REQUISITION_HEADER_ID
-
View Object = ReqHeadersVO
-
View Attribute = RequisitionHeaderId
-
7.2.3.2.3 With Neither Attachment Information Nor Primary Keys Present
In this case, the XML file associated with the page does not contain any attachment information. Follow these steps to determine the needed information.
-
Navigate to the OAF page and click the About this page link at the bottom.
For example, navigate to Purchasing, then Buyer Work Center, then Orders, then click the Order Number. Click the About this page link.
Note the full path of the page's XML file. For example:
/oracle/apps/po/document/order/webui/OrderPG
The page's XML file does not contain any Oracle E-Business Suite attachment information.
-
Select Page Definition, then click the Expand All link.
-
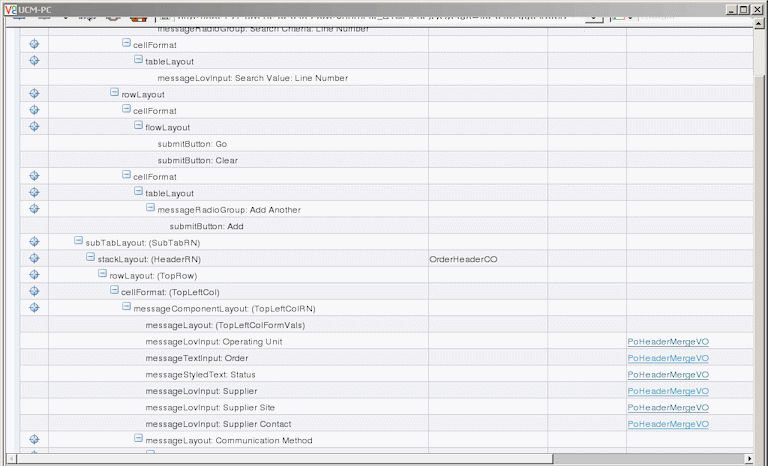
Determine the view object.
In the View Object column, locate the view object listed the maximum number of times. The view object used in the top-level region is the driving view object for the page. In the example shown in Figure 7-1, the view object is: PoHeaderMergeVO.
-
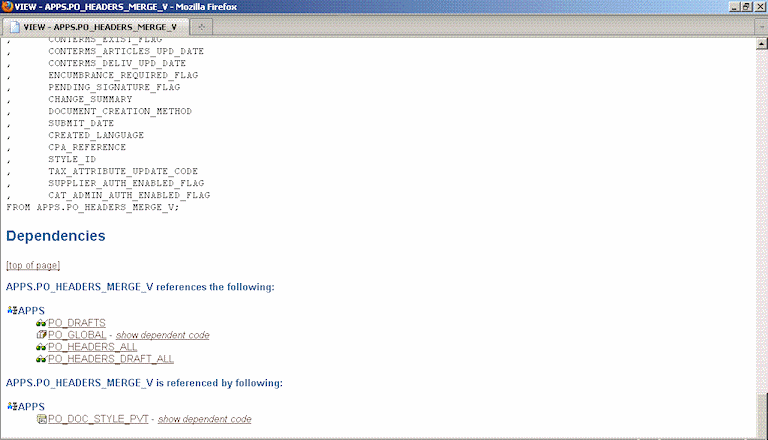
Determine the entity (driving table).
Click the view object link to display details for the view object. For example, the entity (driving table) for the PoHeaderMergerVO view object is PO_HEADERS_MERGE_V.
-
Determine the entity's primary keys.
-
See the Oracle E-Business Suite Electronic Technical Reference Manual at the following location:
-
Enter a search that includes the entity name to obtain the table details. For example, for the PO_HEADERS_MERGE_V entity, enter:
-
From the search results, display the view or table details. The example shown in Figure 7-2 provides view details.
-
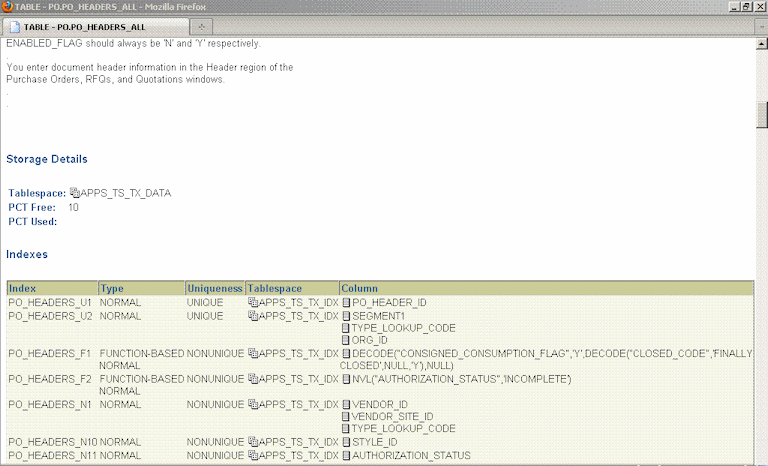
Select the table that best describes the selected view (in this example, PO_HEADERS_ALL).
-
Figure 7-3 shows the primary key details associated with the table. Determine its primary key (in this example, PO_HEADER_ID).
-
-
Based on the primary key, obtain its corresponding view attribute.
Return to the OAF page, clicking the About this page link and clicking the Expand All link. Select the view object that displays most often (PoHeaderMergeVO, for example). From the Attributes list that displays, determine the attribute name, which typically varies only slightly from the primary key name (for example, PO_HEADER_ID versus PoHeaderId).
-
Note the identifying values. You use them in Section 7.2.3 to map OAF page details with Managed Attachments.
In the example, the following values were located:
-
Entity = PO_HEADERS_MERGE_V
-
Primary Key = PO_HEADER_ID
-
View Object = PoHeaderMergeVO
-
View Attribute = PoHeaderId
-
7.2.4 Enabling Managed Attachments for Oracle PeopleSoft
The main configuration steps include:
-
Configuring each Oracle PeopleSoft entity's primary key values in the Oracle PeopleSoft AXF database tables, described in Section C.4. The AXF_PSFT_ATTACHMENTS_CONFIG.sql script is provided as a starting point. It contains sample values for PeopleSoft entities such as work order, sales contract, and purchase requisition. You can modify the sample key values to reflect your Oracle PeopleSoft pages, using the primary keys you noted in Section 3.3.
-
Specifying an Oracle PeopleSoft role to grant users permission.
Follow the steps in this section to enable Managed Attachments for Oracle PeopleSoft.
-
Locate the AXF_PSFT_ATTACHMENTS_CONFIG.sql sample script in this folder:
MW_HOME/ECM_HOME/axf/adapters/psft/ -
Log in to the Oracle PeopleSoft database as a user with administrative privileges.
-
Modify the sample script to include the values you identified for your Oracle PeopleSoft entities in Section 3.3, then run the script.
To execute the script, enter:
@AXF_PSFT_ATTACHMENTS_CONFIG.sql -
Specify an Oracle PeopleSoft role in the PS_AXF_COMMANDS Table to grant users permission to use a specified user interface item. For example, you might change the
Employeevalue toPeopleSoft Useror an appropriate Oracle PeopleSoft user role. See Section C.4.2.2.
7.3 Configuring the Content Server Components
Follow the sections listed below to configure Content Server components for the Managed Attachments solution for Oracle E-Business Suite or Oracle PeopleSoft, and test the completed solution.
Note:
To configure the Managed Attachments solution for another business application, see the instructions provided in Section 7.4.
7.3.1 Enabling Content Server Components
Table 7-3 lists Content Server components for the Managed Attachments solution.
Table 7-3 Content Server Components for Managed Attachments
| Content Server Component | Description |
|---|---|
|
AppAdapterCore.zip |
Required for all Managed Attachments configurations |
|
AppAdapterEBS.zip |
Required for Oracle E-Business Suite Forms and OAF integrations |
|
AppAdapterPSFT.zip |
Required for Oracle PeopleSoft integrations |
|
AppAdapterUniversal.zip |
Required for other business application integrations, as described in Section 7.4. |
Follow these steps to enable the Content Server components using Component Manager.
-
If upgrading from an earlier installation of the adapter, back up previous customizations, as described in Section 7.3.1.1.
-
Log in to Content Server as an administrator.
-
Choose Admin Server from the Administration menu.
The Component Manager page displays.
-
Choose Integration.
The Content Server components described in Table 7-3 are listed as Integration options.
-
Select the AppAdapterCore component to enable it.
-
Select the appropriate business application component:
-
AppAdapterEBS.zip for Oracle E-Business Suite
-
AppAdapterPSFT.zip for Oracle PeopleSoft
-
AppAdapterUniversal.zip for other business applications, as described in Section 7.4.
-
-
Click Update.
-
Restart Content Server.
-
Check the Content Server and database logs to ensure that no application adapter install errors occurred.
7.3.1.1 Backing Up Customizations Before Upgrading
If upgrading from a previous version of the adapter (Managed Attachments solution), perform these additional upgrade steps if needed before installing Content Server components, as indicated in step 1 in Section 7.3.1.
-
Back up Content Server rule and profile customizations.
Installing the new adapter overwrites existing rules and profiles. If your previous installation includes customizations to Content Server rules and profiles, back up these rules and profiles using a CMU bundle before installing Content Server components. After installation, create new rules and profiles, and manually apply any customizations.
-
Back up the config.cfg file.
This adapter release stores environment variables using a preferences.hda file instead of config.cfg. After installation, manually copy configuration preferences from config.cfg to preferences.hda.
-
Back up any other template or resource include customizations and modifications.
Some resource includes and templates have changed in this release. Manually set these customizations after installation.
7.3.2 Verifying Required Content Server Components and Configuration
Follow these steps to verify that required Content Server components are enabled.
-
Log in to Content Server as an administrator.
-
Click the Configuration for [Instance] link in the content server Administration tray.
-
In the Features And Components section, click Enabled Component Details.
-
From the details shown, verify that the following components are enabled. If a component is not listed, install and enable it according to its installation documentation.
The following components must be at or above the version level included with the installed Content Server 11g release:
-
YahooUserInterfaceLibrary
-
CheckoutAndOpenInNative
-
CoreWebdav
-
NativeOsUtils
-
ContentFolios
-
-
In the User Admin applet, ensure that the roles below have the correct access level to the corresponding security groups.
In Content Server, choose the Administration option from the main menu, choose Admin Applets, then User Admin. Select Security, then Permissions by Role.
-
AFAdmin: AFDocuments (RWDA) and no permissions on any other groups
-
AFDelete: AFDocuments (RWD) and no permissions on any other groups
-
AFWrite: AFDocuments (RW) and no permissions on any other groups
-
AFRead: AFDocuments (R) and no permissions on any other groups
-
7.3.3 Testing the Managed Attachments Solution
Test the configuration for your selected business application by following the steps listed in the Oracle WebCenter User's Guide for Application Adapters.
7.4 Configuring the Enterprise Application Adapter Framework
In addition to Oracle E-Business Suite and Oracle PeopleSoft components, the adapter provides a generic component, called Enterprise Application Adapter Framework, for customizing the Managed Attachments solution for use with another business application. This component contains similar settings to the Oracle E-Business Suite and Oracle PeopleSoft component zip files.
In Section 7.2.1, you ran the AXF_ATTACHMENTS_CONFIG.sql script, which configured AXF tables for the UCM_Managed_Attachments solution. Follow the steps listed in these sections to configure the business application/Managed Attachments integration.
-
Section 7.4.1, "Deploying the AppAdapterUniversal Component on Content Server"
-
Section 7.4.2, "Configuring the SOAP Service Call and Managed Attachments URL Display"
7.4.1 Deploying the AppAdapterUniversal Component on Content Server
Before deploying the AppAdapterUniversal.zip component, you can optionally rename the component files and customize the framework layout, images, and profile, as described later in this section.
From Component Manager, install the component, enable it, and restart the Content Server. For more information, see Section 7.3.1 or "Creating Components Using the Component Wizard" in Oracle Fusion Middleware Administering Oracle WebCenter Content.
7.4.1.1 Optionally Renaming Component Files
If you opt to rename files, follow these steps to unzip the component, rename certain files for your business application, and zip the files into a newly named file. You will need an uppercase business application name (for example, BIZAPP), a lowercase name (for example, bizapp), and a long name (for example, ExampleBusinessApp).
-
Back up the AppAdapterUniversal.zip file.
The zip file is located at:
ECM_HOME/ucm/Distribution/AppAdapter -
Unzip the AppAdapterUniversal.zip file.
-
Replace the word
Universalin the file name with the business application name, matching case (for example, replaceUniversalwithBIZAPP).Note that this string is used in the ResultTemplate name used in the Managed Attachments URL (for example,
ResultTemplate=BIZAPP_LIST). For details about the result template, see Section 7.6.13. -
Locate the universal_AppAdapter_strings.htm file and replace all occurrences of the string
Applicationwith your business application long name (for example, replaceApplicationwithExampleBusinessApp). -
Search each file for instances of the string
Universaland replace them with the name you specified in step 3, matching case (for example,BIZAPP). -
Search each file for instances of the string
universaland replace them with your business application's lowercase name (for example,bizapp). -
Zip the files into the newly named file (for example,
AppAdapterBuzzApp.zip).
7.4.1.2 Optionally Customizing the Framework Layout, Images, and Profile
-
To change the look-and-feel of the result template file, customize the result template file (originally named Universal_LIST, universal_adapter_list_results_template.htm). See Section 7.6.13.
-
To customize images, replace the images in the resources\publish\images folder.
-
To customize the Content Server profile used, change the UniversalProfile file. See Section 7.6.5.
7.4.2 Configuring the SOAP Service Call and Managed Attachments URL Display
Follow the steps in this section to configure the business application to call AXF and receive the Managed Attachments URL.
-
Configure the business application to provide an application entity context link, button, or menu item to call AXF via the SOAP service and to pass the Managed Attachments attributes listed in Table 7-4.
-
Example 7-1 provides a sample SOAP XML file for calling AXF and Table 7-5 describes fields in the AXFRequest.
-
Example 7-2 provides a sample AXFResponse and Table 7-6 describes fields in the AXFResponse.
The SOAP response contains the Managed Attachments page's URL. If an error occurs during the grant call, an AXF Error Page URL is returned. The WSDL URL is:
http://Imaging Hostname:Imaging Port/axf-ws/AxfSolutionMediatorService?wsdlTable 7-4 Attributes to Pass Via SOAP Call to AXF
Managed Attachments Attribute Key Description Example Value application (required)
Specifies the business application instance name, providing a unique identifier to differentiate between instances.
BIZAPP_instanceA
businessObjectType (required)
Specifies the business application's object type, typically the name of the record where the business object data is stored.
REQ_HEADERS
businessObjectKey1...businessObjectKey5 (one pair required)
Specifies the ObjectKey portion of key-value pairs that uniquely map business application record fields to Content Server.
One key-value pair is required, and up to 5 pairs are supported.
REQUISITION_HEADER_ID
businessObjectValue1...businessObjectValue5 (one pair required)
Specifies the ObjectValue portion of key-value pairs that uniquely map business application record fields to Content Server.
One key-value pair is required, and up to 5 pairs are supported.
1234
labelValue1...labelValue5 (optional)
Specifies labels to be displayed in the Managed Attachments page's title. Use these labelValue fields to pass text constants and record data that will allow the end user to see, via the user interface, the specific application entity record to which the Managed Attachments apply.
Labels are optional, and up to 5 label values are supported.
Business Unit
US001
Requisition ID
1234
extraParamName (optional; for example, extraxReqNum)
Extra parameter to be passed as metadata from the business application to Content Server in check-in or scan forms. (For details, see Section 7.6.16.1.)
1234
Example 7-1 Sample SOAP XML File for Calling AXF
<soapenv:Envelope xmlns:soapenv="http://schemas.xmlsoap.org/soap/envelope/" xmlns:ser="http://service.axf.imaging.oracle/">
      <soapenv:Header>
            <Security xmlns="http://docs.oasis-open.org/wss/2004/01/oasis-200401-wss-wssecurity-secext-1.0.xsd">
            <UsernameToken>
                  <Username>weblogic</Username>
                  <Password>welcome1</Password>
            </UsernameToken>
            </Security>
      </soapenv:Header>
      <soapenv:Body>
            <ser:execute>
                  <request>
                        <solutionNamespace>UCM_Managed_Attachments</solutionNamespace>
                        <commandNamespace>UCM_Managed_Attachments</commandNamespace>
                        <conversationId></conversationId>
                        <systemName></systemName> <!-- future use -->
                        <role></role> <!-- future use -->
                        <userContext></userContext> <!-- future user -->
                        <username>jcooper</username>
                        <requestParameters>
                              <entry>
                                    <key>application</key>
                                    <value>BIZAPP_instanceA</value>
                              </entry>
                              <entry>
                                    <key>businessObjectType</key>
                                    <value>REQ_HEADERS</value>
                              </entry>
                              <entry>
                                    <key>businessObjectKey1</key>
                                    <value>BUSINESS_UNIT</value>
                              </entry>
                              <entry>
                                    <key>businessObjectValue1</key>
                                    <value>US001</value>
                              </entry>
                              <entry>
                                    <key>businessObjectKey2</key>
                                    <value>REQUISITION_HEADER_ID</value>
                              </entry>
                              <entry>
                                    <key>businessObjectValue2</key>
                                    <value>1234</value>
                              </entry>
                              <entry>
                                    <key>extraxReqNum</key>
                                    <value>1234</value>
                              </entry>
                        </requestParameters>
                  </request>
            </ser:execute>
      </soapenv:Body>
</soapenv:Envelope>
Table 7-5 AXFRequest Attributes
AXFRequest Attributes Description Example solutionNamespace
SolutionNamespace in which to execute the command.
UCM_Managed_Attachments
commandNamespace
Command to execute within the specified SolutionNamespace.
UCM_Managed_Attachments
conversationID
Currently opened conversation created by AXF. This attribute is blank if it is the first call and is not used by the Managed Attachments solution.
systemName
Reserved for future use.
role
Reserved for future use.
userContext
Reserved for future use.
userName
Business application user name.
(Note that for the Managed Attachments solution, the USERNAME_PASS_THROUGH parameter must be set to TRUE if used with AXF for BPEL. For more information about USERNAME_PASS_THROUGH, see Section 7.6.19.)
jcooper
requestParameters
A collection of key/value pairs providing the command parameters.
<entry> <key>application</key> <value>BIZAPP_instanceA</value> </entry><S:Envelope xmlns:S="http://schemas.xmlsoap.org/soap/envelope/"> <S:Body> <ns2:executeResponse xmlns:ns2="http://service.axf.imaging.oracle/"> <response> <conversationId>b80ce79b-6b46-4302-ab59-ddb91e30692b</conversationId> <responseCommands> <command>OPEN_BROWSER</command> <value>http://imaging.example.com:16200/cs/idcplg/-UniversalProfile?IdcService=GET_SEARCH_RESULTS_FORCELOGIN&ResultTemplate=Universal_LIST&afGuid=00000132-b540-810e-63f4-00e94577f990</value> </responseCommands> </response> </ns2:executeResponse> </S:Body> </S:Envelope>Table 7-6 AXFResponse Attributes
AXFResponse Attributes Description conversationId
Current conversation created by AXF to help maintain state/context for the transaction.
responseCommands
A collection of key/value pairs providing a command for the business application to execute with a single parameter. In most cases, it is the OPEN_BROWSER command, which provides a URL that the business application must open.
-
-
Display the URL returned by the AXF SOAP call in a new browser window or iFrame.
-
Optionally, configure SOAP over SSL security for the call, as described in Section 7.4.2.1.
7.4.2.1 Securing Communications Through SSL (Other Business Applications)
Follow these main steps to implement web server SSL encryption for the Enterprise Application Adapter Framework:
-
Install web server-based digital certificates.
In your business application documentation, refer to information about configuring certificates on the business application's web server environment.
-
Enable SSL on Oracle WebLogic Server on the Oracle WebCenter Content side.
For information, see "Configuring SSL for Oracle WebCenter Content Applications" in Oracle WebCenter Content Installation Guide.
-
Exchange server certificates between the web servers.
For information, see "exportKeyStoreObject" in Oracle Fusion Middleware Administrator's Guide.
7.5 Configuring Managed Attachments Settings
After configuring the Content Server components as described in Section 7.3, use the Managed Attachments administration interface to configure its settings. This section provides general configuration information, and Section 7.6 provides detailed customization instruction and examples.
The order of precedence of the configuration settings is as follows.
-
role specific (highest)
-
business context specific
-
application entity specific
-
application instance specific
-
global (lowest)
Keep this order of precedence in mind when configuring attachment settings. For example, configuring a role that enables scanning results in scanning disabled for all other roles.
Note:
This section describes how to edit Managed Attachments settings in the administration interface. As an alternative, you can customize settings by directly editing the preferences.hda file configuration file where the settings are stored, as described in Section 7.5.2.
-
On Content Server, choose Managed Attachments from the Administration menu.
The Configure Managed Attachments page displays, as shown in Figure 7-4.
Figure 7-4 Configure Managed Attachments Page
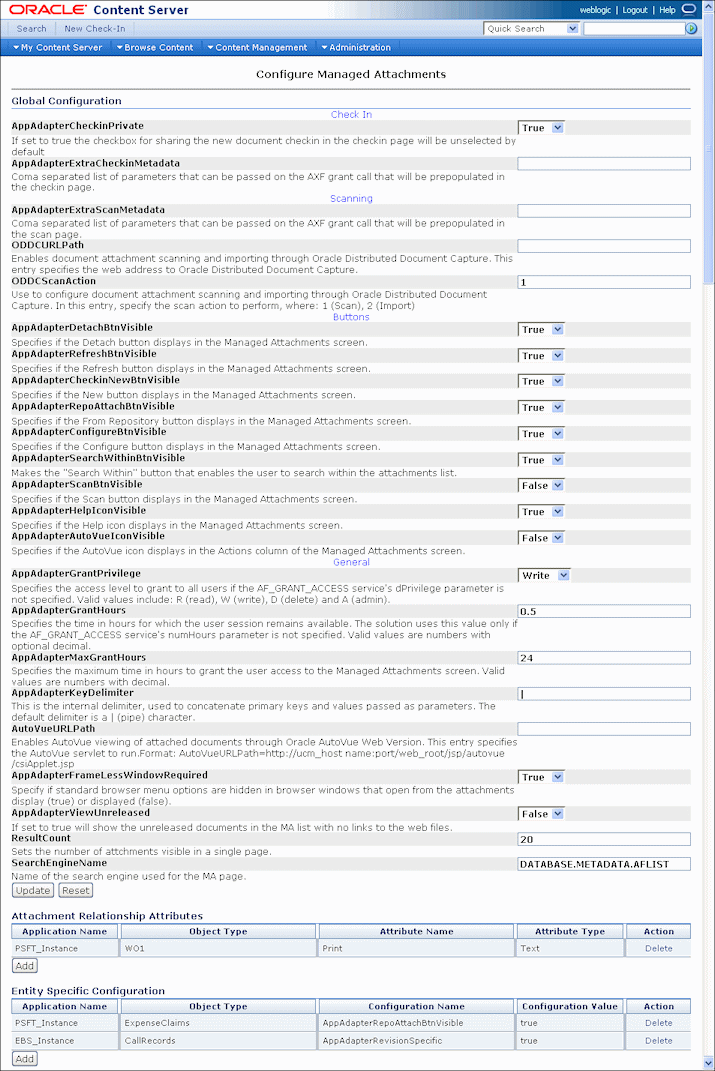
Description of "Figure 7-4 Configure Managed Attachments Page"
-
Edit Global Configuration variables if needed, and click Update.
Use these settings to configure Content Server environment variables for the adapter, as described in Section 7.5.1 and Section 7.6.
-
Add, edit, or delete Attachment Relationship Attributes.
Use this area to configure custom relationships between attached documents and business entities, as described in Section 7.6.10. For example, enable users to print document attachments for certain business entities but not for others.
-
Add, edit, or delete Entity Specific Configurations.
Use this area to override global settings for a specified business entity or application, as described in Section 7.6.3. For example, override a global setting that displays the From Repository button and hide the button for a specified business entity.
-
Add, edit, or delete Role Specific Configurations or Business Context Specific Configurations.
Use these areas to configure which Managed Attachments features and buttons are displayed and available, based on either:
-
the user's assigned role, as described in Section 7.6.1. For example, configure all users granted a read role to have read-only Managed Attachments access.
-
the user's business application context, as described in Section 7.6.2. For example, display and enable the Scan button only when the businessObjectContext passed from the business application=ScanContext.
-
7.5.1 Working With Global Configuration Variables
Use the Global Configuration section of the Configure Managed Attachments page to change global environment variables from their default values.
Global configuration variables are grouped on the page as follows:
-
Check-In variables (Table 7-7)
-
Scanning variables (Table 7-8)
-
Button variables (Table 7-9)
-
General variables (Table 7-10)
| Field | Default Value | Description |
|---|---|---|
|
AppAdapterCheckinPrivate |
true |
If set to true, the Share Document field on the Content Check-In and Scan Document pages is deselected by default. This setting configures documents for private check-in, although users can select the field for shared check-in. See Section 7.7.3. |
|
AppAdapterExtraCheckinMetadata |
null |
Specify a comma-separated list of parameters to optionally pass on the AXF grant call to be prepopulated on the Checkin page (leaving no space after a comma before the next value). For more information, see Section 7.6.16. |
| Field | Default Value | Description |
|---|---|---|
|
AppAdapterExtraScanMetadata |
null |
Specify a comma-separated list of parameters to optionally pass on the AXF grant call to be prepopulated on the Scan Document page (leaving no space after a comma before the next value). For more information, see Section 7.6.16. |
|
ODDCURLPath |
Enables document attachment scanning and importing through Oracle Distributed Document Capture. For configuration instructions, see Section 7.9. This entry specifies the web address to Oracle Distributed Document Capture. Format:
Example:
|
|
|
ODDCScanAction |
1 |
Use to configure document attachment scanning and importing through Oracle Distributed Document Capture, as described in Section 7.9. In this entry, specify the scan action to perform, where:
|
| Field | Default Value | Description |
|---|---|---|
|
AppAdapterDetachBtnVisible |
true |
Specifies if the Detach button displays on the Managed Attachments page. |
|
AppAdapterRefreshBtnVisible |
true |
Specifies if the Refresh button displays on the Managed Attachments page. |
|
AppAdapterCheckinNewBtnVisible |
true |
Specifies if the New button displays on the Managed Attachments page. |
|
AppAdapterRepoAttachBtnVisible |
true |
Specifies if the From Repository button displays on the Managed Attachments page. |
|
AppAdapterConfigureBtnVisible |
true |
Specifies if the Configure button displays on the Managed Attachments page. |
|
AppAdapterSearchWithinBtnVisible |
true |
Specifies if the Search Within button that enables users to search within the attachments list displays on the Managed Attachments page. |
|
AppAdapterScanBtnVisible |
false |
Specifies if the Scan button displays on the Managed Attachments page. |
|
AppAdapterHelpIconVisible |
true |
Specifies if the Help icon displays on the Managed Attachments page. |
|
AppAdapterAutoVueIconVisible |
false |
Specifies if the AutoVue icon displays in the Actions column on the Managed Attachments page. For more information, see Section 7.8. |
| Field | Default Value | Description |
|---|---|---|
|
AppAdapterGrantPrivilege |
W |
Specifies the access level to grant to all users if the AF_GRANT_ACCESS service's dPrivilege parameter is not specified. Valid values include: R (read), W (write), D (delete) and A (admin). For more information, see Section C.5.1. |
|
AppAdapterGrantHours |
0.5 |
Specifies the time in hours for which the user session remains available. The solution uses this value only if the AF_GRANT_ACCESS service's numHours parameter is not specified. Valid values are numbers with optional decimal. For more information, see Section C.5.1. |
|
AppAdapterMaxGrantHours |
24 |
Specifies the maximum time in hours to grant the user access to the Managed Attachments page. Valid values are numbers with decimal. For example, suppose AppAdapterGrantHours is set to 1 hour and AppAdapterMaxGrantHours is set to 24 hours. If the user accesses the Managed Attachments page from the business application at 12:00 (noon), dExpirationDate in the AFGrants Table is set to 13:00 and dMaxExpiration is set to 12:00 (noon) the next day. If at 12:30, the user performs an action (such as checking in a document), dExpirationDate changes to 13:30, and so on. The result is that the user can have access to the Managed Attachments page up to 24 hours if at any given time the gap between two requests is less than one hour. Regardless, when 24 hours is reached, access is denied. This setting prevents a user from keeping access open for very long periods of time without user action, and prevents access from expiring if a user is actively using the system. |
|
AppAdapterKeyDelimiter |
| |
Specifies the internal delimiter used to concatenate primary keys and values passed as parameters. For more information, see Section C.5.1. The default delimiter is a | (pipe) character. |
|
AutoVueURLPath |
Enables AutoVue viewing of attached documents through Oracle AutoVue Web Version. For configuration instructions, see Section 7.8. This entry specifies the AutoVue servlet to run. Format:
Example:
|
|
|
AppAdapterFrameLessWindowRequired |
true |
Specifies if standard browser menu options are hidden in browser windows that open from the attachments display (true) or displayed (false). |
|
AppAdapterViewUnreleased |
false |
If set to true, displays documents in the attachments list before they are released, without links to the web files. |
|
ResultCount |
20 |
Specifies the number of attachments to display per page on the Managed Attachments page. If the number of results exceeds ResultCount, previous and next page controls display on the page. |
|
SearchEngineName |
DATABASE.METADATA.AFLIST |
Specifies the search engine to use. You can choose:
Note: If Database Full Text Search or Oracle Full Text Search is configured in Content Server, then the specified search engine is used only when users click the From Repository button. |
7.5.2 Alternatively Editing Settings in the Preferences.hda File
The Managed Attachments Administration settings are stored in a configuration file called preferences.hda.
You can edit settings using the Managed Attachments Administration interface, as described in Section 7.5. Alternatively, you can follow the steps in this section to directly modify the preferences.hda file.
Notes:
You must restart the Content Server after modifying the preferences.hda file.
You can add or delete application and business entity configuration entries as needed, but do NOT delete global configuration entries from the preferences.hda file.
-
Open the preferences.hda file in the following directory:
UCM_Instance/data/appadapterThis file provides Managed Attachments configuration options in the ResultSet sections described in Table 7-11.
Table 7-11 ResultSet Sections in Preferences.hda File
Section Description AFEnvironmentConfiguration
Use to configure Content Server environment variables for the adapter.
For more information, see Table 7-7 and Section 7.6.
AFRelationshipAttributes
Use to configure custom relationships between attached documents and business entities.
For more information, see Section 7.6.10.
AFRevisionSpecificEntities
Use to enable users to access the document version that was attached, even if the document was later updated.
For more information, see Section 7.6.11.
-
Scroll to the AFEnvironmentConfiguration ResultSet section, and edit the entries described in Section 7.5.1 as needed. For more information about customizing the Managed Attachments solution using these variables, see Section 7.6.
7.6 Customizing the Managed Attachments Solution
This section describes methods of customizing the Managed Attachments solution. It covers the following topics:
-
Section 7.6.1, "Customizing Settings Based on Users' Assigned Roles"
-
Section 7.6.2, "Customizing Settings Based on Users' Business Context"
-
Section 7.6.3, "Customizing Settings at Business Entity or Application Levels"
-
Section 7.6.4, "Customizing the Document Type Used For New Attachments"
-
Section 7.6.5, "Customizing the Content Server Profile Used"
-
Section 7.6.6, "Hiding or Displaying Managed Attachments Page Buttons"
-
Section 7.6.8, "Customizing Managed Attachments Page Images"
-
Section 7.6.10, "Configuring Attachment Relationship Attributes"
-
Section 7.6.15, "Enabling the Paperclip with Attachments (Oracle E-Business Suite Forms Only)"
-
Section 7.6.16, "Passing Extra Metadata Values From a Business Application to Content Server"
-
Section 7.6.17, "Resizing Oracle PeopleSoft Popup Solution Windows"
-
Section 7.6.18, "Configuring an Entity's Private Attachments Security Group"
-
Section 7.6.19, "Restoring Business Application User Pass Through for Managed Attachments"
-
Section 7.6.20, "Renaming the Managed Attachments Button For OAF Entities"
7.6.1 Customizing Settings Based on Users' Assigned Roles
You can customize settings based on user role using Managed Attachments Administration. (For general information, see Section 7.5.) This enables you to retain a global value while customizing settings for specific user roles. For example, you might use this feature to limit Managed Attachments access to read-only for Content Server users who are assigned a read-only role.
-
On Content Server, choose Managed Attachments from the Administration menu.
The Configure Managed Attachments page displays.
-
Scroll to the Role Specific Configuration settings in the lower portion of the page and click Add.
-
In the Add Role Specific Configuration page shown in Figure 7-5, enter fields to customize a Managed Attachments variable based on user role and click Update. This example specifies the following settings:
-
Configuration Name: AppAdapterGrantPrivilege
-
Value: R
-
Role: readRole
The AppAdapterGrantPrivilege variable specifies the access level to grant to users. This example assumes that you have configured and assigned the user role (readRole, in this example) using User Admin functions in Content Server.
Figure 7-5 Example Role Specific Configuration

Description of "Figure 7-5 Example Role Specific Configuration"
-
7.6.2 Customizing Settings Based on Users' Business Context
You can customize settings based on user's business context using Managed Attachments Administration. (For general information, see Section 7.5.) This enables you to retain the global value while customizing it for specific business contexts. For example, you might use this feature to display and enable the Scan button only when the user's business context (businessObjectContext passed from the business application) is a certain value (such as ScanContext).
-
On Content Server, choose Managed Attachments from the Administration menu.
The Configure Managed Attachments page displays.
-
Scroll to the Business Context Specific Configuration settings in the lower portion of the page and click Add.
-
In the Business Context Specific Configuration page shown in Figure 7-6, enter fields to customize a Managed Attachments variable based on business context, and click Update.
The example shown in Figure 7-6 configures the Scan button to display when the businessObjectContext passed from the business application equals ScanContext. This example specifies the following settings:
-
Configuration Name: AppAdapterScanBtnVisible
-
Value: true
-
Role: ScanContext
Figure 7-6 Example Business Context Specific Configuration

Description of "Figure 7-6 Example Business Context Specific Configuration"
-
-
Configure the business application table to pass in the ScanContext value from the business application, just as you would configure key labels/values (labelValues).
-
For each Oracle PeopleSoft page to be configured, insert a row in the PS_AXF_CMD_PARAMS table that passes ScanContext. In Table C-36, see the row in which AXF_PARAM_NAME=businessObjectContext and AXF_CONSTANT_VALUE=ScanContext.
-
For each Oracle E-Business Suite OAF page, insert a row in the OAF_AXF_CMD_PARAMS table that passes ScanContext. In Table C-30, see the row in which AXF_PARAM_NAME=businessObjectContext and AXF_CONSTANT_VALUE=ScanContext.
-
7.6.3 Customizing Settings at Business Entity or Application Levels
You can customize settings at application and business entity levels using Managed Attachments Administration. (For general information, see Section 7.5.) This enables you to retain the global value while customizing it for specific business entities. For example, you might enable the Scan button to permit scanning globally, but disable it for a specific business entity by hiding the button.
-
On Content Server, choose Managed Attachments from the Administration menu.
The Configure Managed Attachments page displays. Currently selected global settings are displayed under the Global Configuration heading.
-
Scroll to the Entity Specific Configuration settings in the lower portion of the page and click Add.
-
In the Add Entity Specific Configuration page shown in Figure 7-7, enter fields to override the global setting for an entity or application.
-
To override at the business entity level, complete all fields. The example values below configure the From Repository button to display for the ExpenseClaims business entity only, regardless of the global setting.
-
To override at the application level, leave the Object Name field blank. Doing so in the example below would display the From Repository button for all business entities of the EBS_Instance application, regardless of the global setting.
Field Description Example Application Name
Identifies the business application
EBS_Instance
Object Name
Identifies the business entity
ExpenseClaims
Configuration Name
Global configuration variable to set for business entity
AppAdapterRepoAttachButtonVisible
Configuration Value
Variable value to set for business entity
true
Figure 7-7 Example Entity Specific Configuration
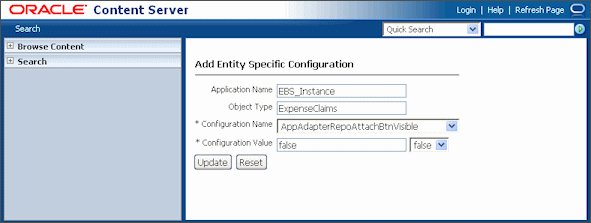
Description of "Figure 7-7 Example Entity Specific Configuration"
Note:
You must complete either the Application Name or Object Type field. Entering an object type without an application name applies the setting to the business entity of all applications with that object type.
-
7.6.4 Customizing the Document Type Used For New Attachments
A Content Server document type is selected by default when users click the New button to attach and check in a document. Using preferences.hda settings, you can specify a different default document type. In addition, you can specify document types on a global, application, or business entity level. For example, you might want to check in all new documents for an expenses business entity using a custom document type geared toward expense attachments.
Follow these steps.
-
On Content Server, create or modify a document type.
For more information about document types, see the Content Server documentation.
-
In the preferences.hda file, add a new row in the AFEnvironmentConfiguration resultset. For general information, see Section 7.5.2.
-
Insert an entry that identifies the document type to use as the default type for a specified business entity, where:
-
name: afDocType
-
value: document type key
-
dAFApplication: Application to which to assign this document type
-
dAFBusinessObjectType: Business entity within application to which to assign document type
Example 7-3 sets the document type ExpenseClaimsType as the default type when users attach documents to the ExpenseClaims business entity (within the PSFT_Instance application).
-
-
Restart the Content Server.
7.6.5 Customizing the Content Server Profile Used
The adapter provides a default Content Server profile for each business application:
-
EBSProfile for Oracle E-Business Suite
-
PSFTProfile for Oracle PeopleSoft
-
UniversalProfile for the Enterprise Application Adapter Framework
You set the profile when running the AXF_ATTACHMENTS_CONFIG.sql script in Section 7.2.1. You can copy and customize the profile, then assign it using one of the following methods, depending on customization needs. For example, you might want to add metadata fields to the profile.
Note:
If you use custom profiles, generic error messages display by default instead of application-specific error messages. To display custom error messages, override the resource include - af_custom_error_msg_display. In the overridden resource include, set the error message to afErrorMsg.
7.6.5.1 Changing the Profile Globally
Follow these steps to change the global profile used.
-
From the Content Server Configuration Manager, copy the default profile provided (EBSProfile, PSFTProfile, or UniversalProfile). To view these profiles, navigate to the Profiles tab in Configuration Manager.
-
Add new rules as needed. For example, add new metadata fields.
-
In the UCM_CONNECTION_STR parameter (trigger value) of the AXF_SOLUTION_PARAMETERS table, modify the URL to point to the new profile.
For more information, see Section C.1.4.
7.6.5.2 Specifying a Profile For a Specific Business Entity or Application
Follow these steps to modify the profile for a specific business entity or application.
-
From the Content Server Configuration Manager, copy the default profile provided (EBSProfile, PSFTProfile, or UniversalProfile). To view these profiles, navigate to the Profiles tab in Configuration Manager.
-
Add new rules as needed. For example, add new metadata fields.
-
In the preferences.hda file, add a new row in the AFEnvironmentConfiguration resultset. For general information, see Section 7.5.2.
-
Insert an entry that identifies the Content Server profile to use for a specified business entity, where:
-
name: dpTriggerValue
-
value: Key of new Content Server profile
-
dAFApplication: Application to which to assign this profile
-
dAFBusinessObjectType: Business entity within application to which to assign the profile
Example 7-4 sets a profile called OrderPayableProfile to use when users attach or scan documents in the OrderPayables business entity within the EBS_Instance application.
-
-
Restart the Content Server.
7.6.6 Hiding or Displaying Managed Attachments Page Buttons
You can choose to enable (display) or disable (hide) the buttons listed in Table 7-12 to users on the Managed Attachments page, by changing their variable setting to true or false, respectively. For details about Managed Attachments variables, see Section 7.5.1.
Table 7-12 Variables For Displaying or Hiding Managed Attachments Buttons
| Button Variables | Description |
|---|---|
|
AppAdapterRepoAttachBtnVisible |
Displays or hides the From Repository button |
|
AppAdapterRefreshBtnVisible |
Displays or hides the Refresh button |
|
AppAdapterConfigureBtnVisible |
Displays or hides the Configure button |
|
AppAdapterDetachBtnVisible |
Displays or hides the Detach button |
|
AppAdapterCheckinNewBtnVisible |
Displays or hides the New button |
|
AppAdapterScanBtnVisible |
Displays or hides the Scan button |
|
AppAdapterAutoVueIconVisible |
Displays or hides the AutoVue button in the Actions column |
|
AppAdapterSearchWithinBtnVisible |
Displays or hides the Search Within button |
|
AppAdapterHelpIconVisible |
Displays or hides the Help icon |
Follow these steps to hide or display a button globally, or for a specific business entity or application.
-
On Content Server, choose Managed Attachments from the Administration menu.
-
Under Global Configuration, change a button's global setting to false to hide it, or true to display it.
-
To configure a button's display at a business entity level, create an entity-specific configuration by clicking Add under Entity Specific Configurations and completing fields as described in Section 7.6.3.
7.6.7 Customizing Scanning
This section describes methods of customizing scanning functionality using Oracle Distributed Document Capture. To customize scanning, you must also configure standard scanning options, as described in Section 7.9. It includes the following topics:
-
Section 7.6.7.2, "Configuring an Alternate Scan Profile For a Business Entity"
-
Section 7.6.7.3, "Modifying the Document Classification Used"
7.6.7.1 Enabling or Disabling Scanning
You can enable or disable scanning at the global, application, or business entity level. For example, you might disable scanning globally, then add an entity specific configuration to enable scanning for an OrderPayables business entity only, using the following Entity Specific Configuration settings:
-
Application Name: EBS_Instance
-
Object Type: OrderPayables
-
Configuration Name: AppAdapterScanBtnVisible
-
Configuration Value: true
7.6.7.2 Configuring an Alternate Scan Profile For a Business Entity
The adapter provides these default business application scan profiles. Each points to an application-specific field:
-
EBSScanProfile references the EBSAppScanProfiles application field
-
PSFTScanProfile references the PSFTAppScanProfiles application field
-
UniversalScanProfile references the UniversalAppScanProfiles application field
You can customize the scan profile used, by copying the profile appropriate for your business application, modifying it to reference another application field, and configuring it for one or more business entities, as described in the following steps.
-
Copy the scan profile that applies to your business application, saving it with a new name.
-
Create all required schema elements, including the AppScanProfiles application field, table, and view.
To change the application field reference, log in to Content Server. In Configuration Manager, navigate to the Rules tab. Select PSFTScanRule, EBSScanRule, or UniversalScanRule, click Edit on the Side Effects tab, and update the ScanProfileKey field to point to another application field.
-
In the preferences.hda file, add a new row in the AFEnvironmentConfiguration resultset.
-
Insert an entry that includes the afScanProfile setting, identifies the scan profile to use, and the application and business entity in which it applies.
Example 7-5 shows a scan profile called MyPIMScanProfile enabled for the PIM business entity only.
7.6.7.3 Modifying the Document Classification Used
The adapter provides the default business application document classifications for scanning listed in Table 7-13. Each classification includes a set of Content Server application fields, a table, and a view.
Table 7-13 Default Documentation Classifications Provided
| Business Application | Content Server Fields | Table | View |
|---|---|---|---|
|
Oracle E-Business Suite |
EBSAppScanProfiles |
EBSDocClass |
EBSDocClassView |
|
Oracle PeopleSoft |
PSFTAppScanProfiles |
PSFTDocClass |
PSFTDocClassView |
|
Enterprise Application Adapter Framework |
UniversalAppScanProfiles |
UniversalDocClass |
UniversalDocClassView |
To modify the classification:
-
Log in to Content Server. In Configuration Manager, navigate to the EBSDocClassView, PSFTDocClassView, or UniversalDocClassView.
-
Edit the document classification and scan type values. For more information, see Section 7.9.4.
7.6.8 Customizing Managed Attachments Page Images
The adapter provides standard images for Managed Attachments display, which you can customize. For example, you might replace the Oracle blue waves image with one specific for your organization. To change images, override the resource include af_ebs_define_image_locations. For sample implementations, see AppAdapter_JS_resource.htm for Oracle E-Business Suite or ps_AppAdapter_Js_resource.htm for Oracle PeopleSoft.
Note:
Customizing images for Managed Attachments requires advanced knowledge of Content Server configuration and customization. Be sure to back up the appropriate files before making modifications.
7.6.9 Customizing the Style Sheet (CSS) Used
The adapter provides a standard style sheet for the Managed Attachments page. You can change it by overriding resource includes. For sample implementations, see AppAdapter_CSS_resource.htm for Oracle E-Business Suite or ps_AppAdapter_CSS_resource.htm for Oracle PeopleSoft.
Note:
Customizing style sheets for Managed Attachments requires advanced knowledge of Content Server configuration and customization. Be sure to back up the appropriate files before making modifications.
7.6.10 Configuring Attachment Relationship Attributes
Attachment relationship attributes allow you to store relationship metadata (information about relationships between a document and its business entity) upon attaching documents in Managed Attachments.
For example, suppose you have one document attached to two work order entities (WO1 and WO2), and want to allow users to print the document from WO1, but not from WO2. In this case, you would create a print attribute as an application field on Content Server, and then specify a print relationship attribute for the WO1 business entity in Managed Attachments Administration (or in the preferences.hda file). The print attribute would be displayed on the Update page to end-users for the WO1 entity only, allowing them to print the attached document.
Important Points About Attachment Relationship Attributes
-
You can configure attachment relationship attribute for new document check-in, but not for documents attached through scanning.
-
Adding a relationship attribute creates a new Application field in Content Server for the relationship attribute if one does not exist. You can update the Application field using Content Server Admin Applets - Configuration Manager. Adding a relationship attribute also adds an entry in the AFRelationshipAttributes section of the preferences.hda file described in Section 7.5.2.
-
At run-time, attachment relationship attribute values are stored in the AFRelationshipAttributes table; see Section C.5.3.
Follow these steps to configure attachment relationship attributes.
-
On Content Server, open Configuration Manager and navigate to the Application Fields tab.
-
Add one or more application fields.
-
Navigate to the Rules tab.
-
Edit the AFRelationshipAttributes rule. Add the application fields you added in step 2 to this rule.
-
On Content Server, choose Managed Attachments from the Administration menu.
-
On the Configure Managed Attachments page, scroll to the Attachment Relationship Attributes settings in the lower portion of the page, and click Add.
The Add Attachment Relationship Attribute page displays.
Figure 7-8 Add Attachment Relationship Attribute Page
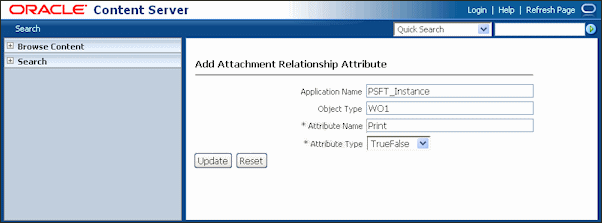
Description of "Figure 7-8 Add Attachment Relationship Attribute Page"
-
Complete fields for the attribute and click Update. The example in Figure 7-8 shows a relationship attribute (Print) configured for an WO1 business object for an Oracle PeopleSoft application.
Element Description Example Application Name
Business application for which the relationship attribute is configured.
PSFT_Instance
Object Type
Business object for which to enable the relationship attribute
WO1
Attribute Name
Relationship attribute
Print
Attribute Type
Attribute's type. Available types include: Text, Long Text, Date, Memo, Integer, and TrueFalse.
TrueFalse
7.6.11 Configuring Revision-Specific Mode
By default, each attachment on the Managed Attachments page provides access to the most recent revision of the document. In certain cases, however, you may want to configure one or more business entities to provide access to the revision that was attached, even if the document was later updated on Content Server. In this mode, users can see that a more recent revision exists, and if needed, view it and make it the attached revision.
Follow these steps to configure a business entity to display the attached revision instead of the most recent revision.
-
On Content Server, choose Managed Attachments from the Administration menu.
-
On the Configure Managed Attachments page, scroll to the Entity Specific Configuration settings in the lower portion of the page, and click Add.
The Add Entity Specific Configuration page displays.
Figure 7-9 Configuring Revision Specific Mode in the Add Entity Specific Configuration Page
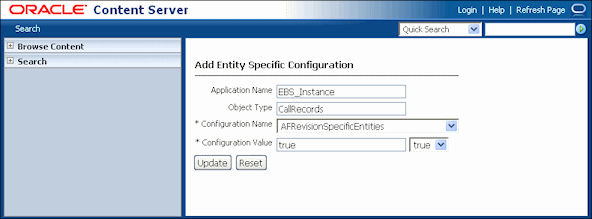
Description of "Figure 7-9 Configuring Revision Specific Mode in the Add Entity Specific Configuration Page"
-
Complete fields for revision specific mode, choosing AFRevisionSpecificEntities for the Configuration Name field, and click Update. The example in Figure 7-9 shows revision specific mode configured for a CallRecords business object for an Oracle E-Business Suite application.
Element Description Example Application Name
Business application for which the relationship attribute is configured.
EBS_Instance
Object Type
Business object for which to enable the relationship attribute.
CallRecords
Configuration Name
To configure revision specific mode, choose AFRevisionSpecificEntities.
Print
Field Type
To configure revision specific mode, choose true.
true
Alternatively, follow these steps to configure revision-specific mode using the preferences.hda file.
-
Open the preferences.hda file, and add a new row in the AFRevisionSpecificEntities resultset. (For general information, see Section 7.5.2.)
Each row in the resultset represents one business entity for which to enable revision specific attachments, where:.
-
dAFApplication refers to the business application for which to enable the revision feature.
-
dAFBusinessObjectType refers to the business object for which to enable the revision feature.
Example 7-6 shows revision-specific mode configured for a CallRecords business object for an Oracle E-Business Suite application.
-
7.6.12 Changing the Result Count
The Managed Attachments page displays a specific number of attachment results per page (referred to as ResultCount). If the number of results exceeds ResultCount, previous and next page controls display on the page. You can change it to another number (such as 20) by specifying a new ResultCount value in Managed Attachments configuration. See Section 7.5.1.
7.6.13 Changing the Result Template
The Managed Attachments page uses a result template to determine its display. The Content Server result template specifies the Managed Attachments user interface. The adapter provides these result templates:
-
The Oracle E-Business Suite template, adapter_list_results_template.htm, is referred to as EBS_LIST.
-
The Oracle PeopleSoft template, ps_adapter_list_results_template.htm, is referred to as PSFT_LIST.
-
The Enterprise Application Adapter Framework template, universal_adapter_list_results_template.htm, is referred to as Universal_LIST. See Section 7.4.1.2.
Follow these steps to identify an alternate result template for an application or business entity.
Note:
Customizing the result template requires advanced knowledge of Content Server administration and customization.
-
Create a copy of the appropriate default result template and register the template with a new name, preferably in a new component.
-
The Oracle E-Business Suite template is located at:
UCM_HOME/custom/AppAdapterEBS/adapter_list_results_template.htm -
The Oracle PeopleSoft template is located at:
UCM_HOME/custom/AppAdapterPSFT/ps_adapter_list_results_template.htm -
The Enterprise Application Adapter Framework template is located at:
UCM_HOME/custom/AppAdapterUniversal/universal_adapter_list_results_template.htm
-
-
In the preferences.hda file, add an entry in the AFEnvironmentConfiguration section as follows:
ResultTemplate
Template Reference
Application Name
Business Entity
In Example 7-7, all requests to Managed Attachments for the WorkOrder business entity would use the EBS_WORK_ORDER_LIST custom result template instead of the default Oracle E-Business Suite template.
7.6.14 Setting Default Columns
You can specify the default columns to display to users in the Managed Attachments page. (When the user clicks Reset in the Configure Fields for Display page, default columns are listed in the Main Information section of the page.)
The column defaults are title, type, author, date, and revision as follows:
dDocTitle,dDocType,dDocAuthor,dInDate,dRevision
To set alternate default columns for an application or business entity, follow these steps.
-
In the preferences.hda file, add an entry in the AFEnvironmentConfiguration section.
-
Set the value of the AppAdapterDefaultDisplayColumns configuration variable as a comma-delimited list containing Content Server metadata field names.
In Example 7-8, the first entry sets document title, type, author, and date as the default columns for the EBS_Instance application. The second entry overrides this setting for the CallRecords business entity by adding the revision column (dRevision) as a default column.
7.6.15 Enabling the Paperclip with Attachments (Oracle E-Business Suite Forms Only)
By default, the Oracle E-Business Suite paperclip attachment option is disabled as part of Managed Attachments configuration. To use this native Oracle E-Business Suite attachments feature in coexistence with the Managed Attachments solution, you must reenable the paperclip icon as described as follows.
Note:
This section applies to Oracle E-Business Suite Forms use only.
-
Add the following row to the AXF_PROPERTIES table:
Table 7-14 AXF_PROPERTIES Values For PaperClip Use
PROPNAME PROPVALUE AXF_PAPERCLIP
Set to
TRUEto enable the paperclip option, orFALSE(default) to disable it. (The value must be in uppercase characters.)For more information, see Section C.2.2.
7.6.16 Passing Extra Metadata Values From a Business Application to Content Server
You can configure the Managed Attachments solution to pass extra metadata values from the business application to Content Server to store with attached documents. For example, you might pass a claim number from a Claims application so that when users attach or scan documents, a Claim Number field on the Content Check In and Scan Document pages is prepopulated with the value.
This feature works as follows:
-
The business application field whose metadata value is to be passed to Content Server must exist in the business application. For example, you might pass a business record's service request number or primary key.
-
Using Content Server's Managed Attachments administration variables (Table 7-7 and Table 7-8), you specify the field whose value will be passed when users either check in or scan a document. This prepopulates the specified field in the Content Check In or Scan Document page for users.
-
In the business application's command parameters table, you identify the extra metadata field to be passed.
Follow these steps to configure passing extra metadata values.
-
From Content Server, choose Managed Attachments from the Administration menu.
-
Under Global Configuration, enter one or more field names to pass, using a comma to separate multiple names.
-
Enter field names in the AppAdapterExtraCheckinMetadata field to pass their values directly to the Content Check In page.
-
Enter field names in the AppAdapterExtraScanMetadata field to pass their values directly to the Scan Document page.
-
-
Access the command parameters table for your business application.
-
For an Oracle E-Business Suite Forms configuration, access the AXF_COMMAND_PARAMETERS Table (Oracle E-Business Suite Forms).
-
For an Oracle E-Business Suite OAF configuration, access the OAF_AXF_CMD_PARAMS Table (Oracle E-Business Suite OAF).
-
For a PeopleSoft configuration, access the PS_AXF_CMD_PARAMS Table.
-
For an Enterprise Application Adapter Framework configuration, see Section 7.6.16.1.
-
-
Add entries in the table for the extra values to be passed to Content Server, similar to adding labelValue rows. See the example command shown in Example 7-9 and the example table shown in Table 7-15.
Add a row for each metadata value, prepending the Content Server field name with
extra. For example,xReqNumbecomesextraxReqNumanddDocTitlebecomesextradDocTitle.Note:
Typically, Content Server extra information fields have an x character in front of them and standard ones have a d character in front of them. For more information, refer to the section on standard metadata fields in the Oracle Fusion Middleware Managing Oracle WebCenter Content.
Example 7-9 Inserting Extra Metadata Field into OAF Command Parameters Table
Insert into OAF_AXF_CMD_PARAMS (AXF_CMD_PARAMS_ID, AXF_CMDS_ID, AXF_PARAM_NAME, AXF_DATASOURCE,AXF_VIEW_OBJ_NAME, AXF_ATTRIBUTE_NAME,AXF_CONSTANT_VALUE) values (OAF_AXF_CMD_PARAMS_SEQ.NEXTVAL,v_cmdId,'extraxReqNum','DATA','ReqHeaderVO', 'ReqNum',null);Table 7-15 Example OAF_AXF_CMD_PARAMS Table With Extra Metadata Field Specified
AXF_CMD_PARAMS_ID AXF_CMDS_ID AXF_PARAM_NAME AXF_DATASOURCE AXF_VIEW_OBJ_NAME AXF_ATTRIBUTE_NAME AXF_CONSTANT_VALUE 1
1
application
CONSTANT
EBS_instanceA
2
1
businessObjectType
CONSTANT
REQ_HEADERS
3
1
businessObjectKey1
CONSTANT
REQUISITION_HEADER_ID
4
1
businessObjectValue1
DATA
ReqHeaderVO
RequisitionHeaderId
5
1
labelValue1
DATA
ReqHeaderVO
PreparerName
6
1
labelValue2
DATA
ReqHeaderVO
ReqNum
7
1
extraxReqNum
DATA
ReqHeaderVO
ReqNum
7.6.16.1 Passing Values Via Enterprise Application Adapter Framework
For the Enterprise Application Adapter Framework, pass the extra metadata values as part of the request parameters section of the SOAP envelope body, prepending the Content Server field name with extra (xReqNum becomes extraxReqNum and dDocTitle becomes extradDocTitle). For example:
<entry><key>extraxReqNum</key><value>123456</value></entry>
7.6.17 Resizing Oracle PeopleSoft Popup Solution Windows
You can change the default system-wide size for all Oracle PeopleSoft popup windows that display as part of solutions. Note the following:
-
The default popup window size is 600 pixels high by 800 wide, set in the PS_AXF_PROPERTIES Table. When a size is set in this table, users cannot set and save popup window size themselves.
-
To change window size, enter new values in the table, as shown in Section C.4.4.
-
To remove the popup window size and allow individual users to change and save popup window size using standard browser controls, remove the WINDOW_HEIGHT and WINDOW_WIDTH rows from the PS_AXF_PROPERTIES Table.
7.6.18 Configuring an Entity's Private Attachments Security Group
When users check in documents through Managed Attachments, they can choose private or shared access for them, as described in Section 7.7.3. Private documents are automatically assigned to a special Content Server security group called AFDocuments.
On a per entity level, you can optionally override the security group for private attachments, and assign documents to an alternate security group, by following these steps.
-
On Content Server, choose Managed Attachments from the Administration menu.
-
On the Configure Managed Attachments page, scroll to the Entity Specific Configuration settings in the lower portion of the page, and click Add.
The Add Entity Specific Configuration page displays.
Figure 7-10 Configuring Entity Level Private Attachments Security Group
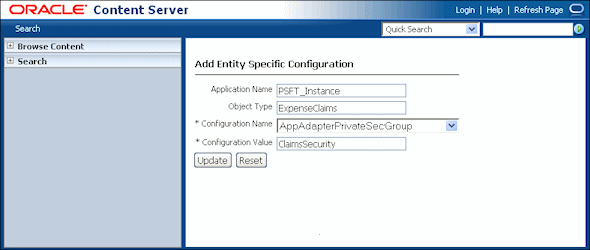
Description of "Figure 7-10 Configuring Entity Level Private Attachments Security Group"
-
In the Add Entity Specific Configuration page shown in Figure 7-10, complete the fields, identifying the AppAdapterPrivateSecGroup variable and the alternate security group to use for a specified business entity, where:
-
Application Name: Application for which to assign alternate security group
-
Object Type: Business entity for which to assign alternate security group
-
Configuration Name: AppAdapterPrivateSecGroup
-
Configuration Value: Alternate security group
The example values shown in Figure 7-10 set ClaimsSecurity as the security group when users attach private documents to the ExpenseClaims business entity (within the PSFT_Instance application).
-
-
Assign the following roles to the specified security group (must be the same as those assigned to the AFDocuments security group): AFRead, AFWrite, AFDelete, and AFAdmin.
-
In the config.cfg file, add the alternate security group to the SpecialAuthGroups configuration variable.
7.6.19 Restoring Business Application User Pass Through for Managed Attachments
Note:
This section applies only if using Managed Attachments with the AXF for BPEL infrastructure. It does not apply if using the AXF for BPM infrastructure.
As described in Section 6.4.2, the BPEL Imaging solution allows you to configure the authenticated Oracle WebLogic Server user to perform tasks, rather than the user passed from Oracle E-Business Suite or Oracle PeopleSoft. This option is provided through a USERNAME_PASS_THROUGH parameter in the AXF_SOLUTION_ATTRIBUTES Table, where:
-
TRUE (default): Uses the passed-in user from Oracle E-Business Suite or Oracle PeopleSoft to perform tasks.
-
FALSE: Uses the authenticated Oracle WebLogic Server user to perform tasks.
Note:
If no value is provided, the value defaults to FALSE.
The Managed Attachments solution requires that the passed-in user from Oracle E-Business Suite or Oracle PeopleSoft perform tasks. The AXF_ATTACHMENTS_CONFIG.SQL script that you ran in Section 7.2.1 for Managed Attachments sets the USERNAME_PASS_THROUGH value to TRUE. If needed at any point, restore the parameter's value to TRUE, as shown in Table 7-16 and Section C.1.2.
7.6.20 Renaming the Managed Attachments Button For OAF Entities
To rename the Managed Attachments button for Oracle E-Business Suite OAF entities, such as for localization purposes:
-
Open the ManagedAttachmentButtonRN.xml file, which was imported into the MDS repository on the Oracle E-Business Suite OAF side during setup.
-
Locate the following line and replace
Managed Attachmentswith a localized name.<oa:button id="MAButton" prompt="Managed Attachments"/>
-
Using the import command, reimport the file into MDS.
7.7 Configuring Authentication and Security
This section provides instructions on managing authentication and security for the Managed Attachments solution. It covers the following topics:
-
Section 7.7.1, "Configuring a CSF Credential for Managed Attachments"
-
Section 7.7.4, "Securing Communications Between AXF and Content Server"
-
Section 7.7.5, "Managing Business Application and Content Server Users"
7.7.1 Configuring a CSF Credential for Managed Attachments
You must store the administrator user credentials in a credential store framework (CSF), a user name/password pair that is keyed by an alias and stored inside a named map in the CSF. The user name stored in the CSF is compared with the user name sent by Oracle E-Business Suite, Oracle PeopleSoft, or a custom plug-in calling the Enterprise Application Adapter Framework in the web services call. If the administrator user names do not match (see Section C.1.4), access to the Managed Attachments page is prevented.
You can create a credential through Enterprise Manger (EM) or through WebLogic Scripting Tool (WLST).
7.7.1.1 Creating a Credential Using Enterprise Manager
-
Log in to Enterprise Manager.
-
Right-click on your domain under WebLogic Domain.
-
Click Security and then Credentials.
-
Select the oracle.wsm.security map. If it does not exist, follow these steps:
-
Select Create Map.
-
Enter
oracle.wsm.securityin the map field and click OK.
-
-
Expand the oracle.wsm.security map.
-
Click Create Key. The key is now available for selection.
-
Enter
MA_CSF_KEYas the key name. -
Select password in the Type field.
-
Enter a user name and password for a valid Oracle WebLogic Server administrator (for example,
weblogicandWelcome1).The user name and password are passed by the business application to AXF, and were previously configured for the Web Services call from Oracle E-Business Suite (see Section 2.4.1), Oracle PeopleSoft (see Section 3.2.2.1), and a custom plug-in calling the Enterprise Application Adapter Framework (see Section 7.4.2).
-
Click OK.
7.7.1.2 Creating a Credential Using WLST
-
Execute the following command, where
usernameandpasswordrefer to a valid Oracle WebLogic Server administrator passed by the business application to AXF, and were previously configured for the Web Services call from Oracle E-Business Suite (see Section 2.4.1), Oracle PeopleSoft (see Section 3.2.2.1), and a custom plug-in calling the Enterprise Application Adapter Framework (see Section 7.4.2).createCred(map="oracle.wsm.security", key="MA_CSF_KEY", user=[username], password=[password])Example:
createCred(map="oracle.wsm.security", key="MA_CSF_KEY", user="weblogic", password="Welcome1") -
Execute the following command to verify that the credential was created properly:
listCred(map="oracle.wsm.security",key="MA_CSF_KEY")
7.7.2 Configuring User Authentication
Business application users must have a Content Server account to display the Managed Attachments page within the supported business application entity. In addition, the authentication model configured for Content Server and the business application determines how users are authenticated the first time they activate managed attachments from a business application record:
-
Content Server configured for single sign-on: If the business application is not configured for single sign-on, the Content Server single sign-on login prompt displays. (If the business application is configured for single sign-on, the user has been authenticated so no login prompt displays.)
-
Content Server not configured for single sign-on: The Content Server login prompt displays, regardless of the selected business application authentication model.
Note:
No user authentication is needed for AXF if security checks are properly configured, as described in Section 7.7.
7.7.3 Configuring Document Security
When checking documents into Content Server through the Managed Attachments user interface, users specify their access by choosing one of two modes:
-
private (not shared): Users can access these documents only through their associated business application entity screens through the Managed Attachments user interface. Users (including the user who checks in a document) cannot search for or access a private document using any other standard Content Server user interface. This is the default security mode when checking in a new document through the Managed Attachments user interface.
Note:
The AppAdapterCheckinPrivate global configuration variable determines if the Share Document field on the Content Check-In page is deselected by default (set for private check-in). For more information, see Section 7.5.1.
Note:
Private (not shared) documents are automatically assigned to a special security group called AFDocuments, and users who have access to the business application entity are granted temporary access to the documents when they invoke the Managed Attachments user interface. The AppAdapterPrivateSecGroup variable enables you to override on a per entity level the security group to use for private attachments, and assign them to an alternate group. For more information, see Section 7.6.18.
In certain exceptional cases, an administrator might grant special users direct access to the AFDocuments security group by permanently assigning the AFRead, AFWrite, AFDelete, or AFAdmin roles for the AFDocuments security group, in which case the user could access a private document through any standard Content Server user interface.
-
shared: These documents are more easily accessed than private documents, because their security is managed by Content Server. In addition to access through their associated business application entity screens through the Managed Attachments user interface, any Content Server user with a document's assigned security group access can search for and access the document using any standard Content Server user interface.
Note:
Users can view shared documents only in AutoVue (if configured). They cannot view private documents. For details, see Section 7.8.
7.7.4 Securing Communications Between AXF and Content Server
Follow these steps to enable trusted communication between the host on which AXF is running and the Content Server. On the Content Server, you have two options for this configuration step: either using the System Properties application or by editing the config.cfg file.
7.7.4.1 Using the Content Server System Properties Application
-
Open the System Properties utility for the Content Server instance.
-
Select the Server tab.
-
Identify the AXF host by either entering a name in the Hostname Filter field or an address in the IP Address Filter field.
-
Click OK and restart Content Server.
7.7.5 Managing Business Application and Content Server Users
Keep the following guidelines in mind when managing Oracle E-Business Suite, Oracle PeopleSoft, or other business application users for Managed Attachments access (for example, when managing users in a central repository using single sign-on):
-
In order for business application users to access Managed Attachments functionality, their Oracle E-Business Suite, Oracle PeopleSoft, or other business application user names MUST match their Content Server user names.
-
When creating Content Server users (global or local), do NOT assign the AFRead, AFWrite, AFDelete, or AFAdmin roles.
The adapter dynamically assigns roles to the user: Roles are granted to the user based on dPrivilege's value when the AF_GRANT_ACCESS service is invoked (see Section C.5.1); or, if not specified, based on the configuration variable AppAdapterGrantPrivilege's value (see Section 7.5). Depending on the privilege (R, W, D, or A), a predefined role is dynamically assigned to the user.
Caution:
Do not delete the AFRead, AFWrite, AFDelete, AFAdmin roles from the system.
7.8 Configuring Oracle AutoVue Document Viewing
This section covers the following topics:
7.8.1 About Configuring Oracle AutoVue
The default document viewing option for the Managed Attachments page is the standard web rendition provided by Content Server. For enhanced viewing options, the adapter also supports Oracle AutoVue through VueLink for Content Server, where non-private attachments of virtually any document type are available for viewing, printing, collaboration, annotation, and mark up, delivered securely using Web technologies.
Important Points About the AutoVue/Adapter Integration
-
If configured, users can view all non-private attachments through AutoVue. For details on shared versus private documents, see Section 7.7.2.
-
The VueLink integration serves as a bridge that securely streams documents from the Content Server repository to AutoVue for viewing, digital markup and collaboration. Digital markups are saved in the Content Server repository and associated with the attached document.
-
By default, AutoVue is turned off in the Managed Attachments solution. You activate it on the Configure Managed Attachments page, by displaying the AutoVue icon and identifying the URL to the AutoVue servlet to launch when the user clicks the View in AutoVue icon.
-
As with other preferences settings, you can enable the AutoVue integration at the global, application, and business entity levels.
-
AutoVue trusts the user authentication against Content Server. Once authenticated to Content Server, no further authentication to AutoVue is required for users to view attached documents using AutoVue.
-
Viewing or annotating a document in AutoVue does not check it out or prevent it from being edited by others. Annotations are contained in a separate layer from their corresponding document.
7.8.2 Requirements For Oracle VueLink for Content Server
This section lists requirements for integrating AutoVue viewing with Content Server. For specific release requirements, see the configuration and certification information at the following location:
Note:
The requirements listed in this section apply only if providing optional document viewing with the adapter through Oracle AutoVue.
Note:
The AutoVue option for Managed Attachments is not supported on WebSphere Application Server.
Requirements include:
-
Oracle AutoVue (and any applicable service packs).
-
Oracle VueLink for Content Server, the AutoVue VueLink integration for Content Server. (Also see the system administrator documentation for this integration.)
7.8.3 Enabling AutoVue For the Adapter
Follow these steps to enable and configure AutoVue document viewing globally, or for a specific application or business entity.
-
Configure the Content Server/AutoVue integration.
Follow the procedures outlined in the Oracle VueLink 20 for Oracle UCM System Administrator Manual.
-
On Content Server, choose Managed Attachments from the Administration menu.
-
On the Configure Managed Attachments page, enable display globally of the AutoVue icon by setting the AppAdapterAutoVueIconVisible variable to True. For general information, see Section 7.5.
-
In the AutoVueURLPath field, specify the AutoVue servlet to run, using the following format:
http://ucm_host name:port/web_root/idcplg?IdcService=VIEW_IN_AUTOVUEFor example:
http://ucm1.example.com/cs/idcplg?IdcService=VIEW_IN_AUTOVUE
-
Optionally specify application or business entity settings by adding new rows in the AFEnvironmentConfiguration resultset for the AppAdapterAutoVueIconVisible and AutoVueURLPath variables, where:
-
dAFApplication: Application in which to display or hide button
-
dAFBusinessObjectType: Business entity within application in which to display or hide button
Example 7-9 contains several AutoVue settings. It assumes that the View in AutoVue icon is set to false globally. The first two entries enable and display the icon for the PSFT_Instance_A application. The last two entries enable and display the icon for the PSFT_Instance_B application, but only within its PIM business entity.
Figure 7-11 Example AutoVue Document Viewing

Description of "Figure 7-11 Example AutoVue Document Viewing"
-
7.9 Configuring Oracle Distributed Document Capture
This section covers the following topics:
-
Section 7.9.1, "About Document Scanning Using Oracle Distributed Document Capture"
-
Section 7.9.2, "Oracle Distributed Document Capture and Related Components Requirements"
-
Section 7.9.3, "Configuring Oracle Distributed Document Capture For the Adapter"
-
Section 7.9.4, "Configuring Content Server for Distributed Document Capture Via Adapter"
-
Section 7.9.5, "Testing the Oracle Distributed Document Capture Via Adapter Configuration"
Note:
For installation requirements specific to Oracle Distributed Document Capture use with this adapter, see Section 7.9.2.
7.9.1 About Document Scanning Using Oracle Distributed Document Capture
The Oracle Distributed Document Capture application enables an application such as the adapter to direct it to scan a document and pass in document index values. This allows users to scan documents or import scanned image files from the Managed Attachments page and attach them to the selected business application record.
When configured for the adapter, document scanning works as follows:
-
A Scan button is added to the Managed Attachments page. The user clicks the button, and selects options such as a document classification, which is assigned to an Oracle Distributed Document Capture scan profile. For example, the user might select a classification of Identity Documents to scan a photocopy of a driver's license or passport. (An Oracle Distributed Document Capture scan profile specifies scanning, importing, and indexing settings.) The user also specifies whether the document should be shared, and if so the user specifies a security group for the shared document from those to which the user has access.
-
When the user clicks the Scan Document button, Oracle Distributed Document Capture's remote client launches in a new window, automatically authenticates and logs in the user (if configured), and passes in parameters such as the scan profile to use and business application entity values for later attachment.
-
Within the Oracle Distributed Document Capture client, the user reviews the document, makes changes as needed, completes any index fields configured in the scan profile, then sends the batch. Sending the batch commits the new document to Content Server 11g using a commit profile specified for the scan profile. (A Capture/Content Server commit profile specifies connection information and field mappings between Capture and Content Server metadata fields.)
-
Upon successful sending, the user returns to the Managed Attachments page and refreshes the display to view the newly scanned document or imported scanned image file.
7.9.2 Oracle Distributed Document Capture and Related Components Requirements
This section lists requirements for implementing scanning and importing functionality with Oracle Distributed Document Capture. For complete system requirements, such as browsers, see the configuration and certification information at the following location:
Note:
The requirements listed in this section apply only if using Oracle Distributed Document Capture for optional scanning functionality.
Requirements include:
-
Oracle Distributed Document Capture Release 10.1.3.5.1 or later, including the Oracle UCM 11g Commit Driver, which is provided for installation in this release. The Oracle UCM 11g Commit Driver is required to commit documents from Oracle Distributed Document Capture to Oracle WebCenter Content Server 11g.
-
Internet Explorer 6 or above for end-users.
Note:
The Mozilla Firefox browser is not supported for scan functionality via Oracle Distributed Document Capture, which currently requires Internet Explorer.
7.9.3 Configuring Oracle Distributed Document Capture For the Adapter
Follow these steps to configure attachment scanning on the Oracle Distributed Document Capture side.
-
Optionally set Oracle Distributed Document Capture for automatic login.
On the System Settings tab of the Distributed Document Capture Server Configuration application shown in Figure 7-12, select Web Server Authenticated Access from the Authentication Methods options. This setting enables the client to launch automatically without users needing to log in. For details, see the section on authentication in the Installation Guide for Oracle Distributed Document Capture.
Figure 7-12 Distributed Document Capture Server Configuration, System Settings Tab
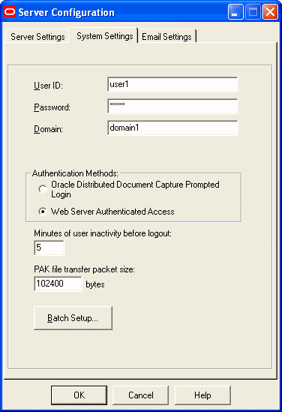
Description of "Figure 7-12 Distributed Document Capture Server Configuration, System Settings Tab"
-
In Capture Administration, add index fields to a selected file cabinet for capturing values for new documents, as shown in Figure 7-13. For details, see the section on Capture Administration in the Administrator's Guide for Oracle Distributed Document Capture.
-
Create index fields for values to save with attached documents on the Content Server. For example, you might configure a Doc Type pick-list index field for users to select from standard document types.
-
Create the following alphanumeric index fields to contain the business application entity values and required fields:
-
dAFApplication
-
dAFBusinessObjectType
-
dAFBusinessObject
-
dSecurityGroup
-
Title
Figure 7-13 Capture Administration, Index Fields
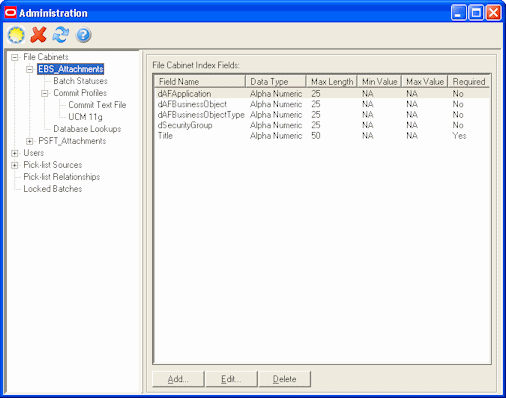
Description of "Figure 7-13 Capture Administration, Index Fields"
-
-
-
In Oracle Distributed Document Capture's Profile Administration, create a scan profile, as shown in Figure 7-14. You later associate this scan profile with one or more document classifications, so that when a user selects a classification, the associated scan profile's settings are used. For details, see the section on scan profiles in the Administrator's Guide for Oracle Distributed Document Capture.
-
On the General pane, select 2 - Scan and Index Documents in the Scanning Type field. This scanning type includes indexing, and scans or imports pages into a single document in a batch. Specify a file cabinet and batch prefix.
Figure 7-14 Scan Profiles, Oracle Distributed Document Capture Profile Administration
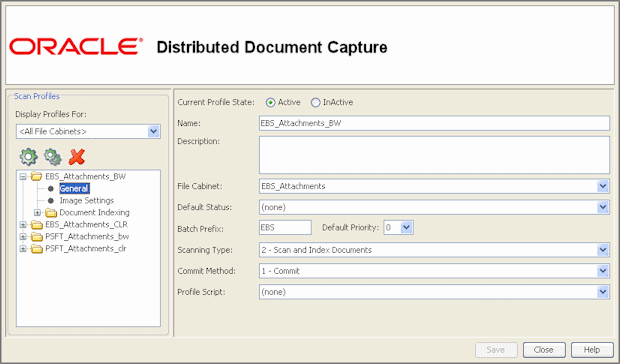
Description of "Figure 7-14 Scan Profiles, Oracle Distributed Document Capture Profile Administration"
-
On the Document Indexing pane, move all fields to display to users to the Selected Fields box. It is recommended that you display the Title field for users to enter, and make the field required.
Note:
Typically, you would not select the business application entity fields (dAFBusinessObject, for example) for display to users. If you choose to display them, lock them on the Field Properties pane to prevent users from changing their values.
Figure 7-15 Scan Profiles, Oracle Distributed Document Capture Profile Administration
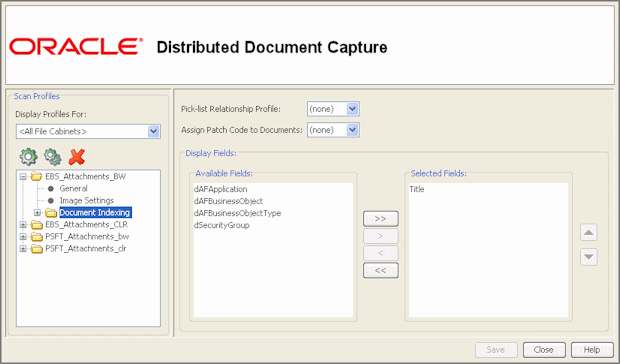
Description of "Figure 7-15 Scan Profiles, Oracle Distributed Document Capture Profile Administration"
-
On the Field Properties, Auto Populate, and Database Lookup panes, configure any pick-lists, database lookups, or autopopulating needed for indexing. Save the scan profile.
-
-
In Capture Administration, create an Oracle UCM 11g (Content Server) commit profile to commit the scanned or imported documents to Content Server when users send a completed batch.
This commit profile specifies how to connect to the Content Server and how the business application and Capture values are passed to the Content Server. For information about creating Content Server commit profiles, see the section on commit profiles in the Administrator's Guide for Oracle Distributed Document Capture.
-
Select Oracle UCM 11g Commit Driver in the Commit Driver field. For this integration, it is recommended that you select PDF - Image Only in the Document Output Format field. Click the Configure button adjacent to the Commit Driver field.
-
On the Login tab, specify settings for logging in to the Content Server instance. (The other tabs become active after you log in.) Use the following format for the Content Server URL:
http://Content Server host name or IP address:WebServerPort/ucm web root/idcplgThe specified Content Server user must be assigned the AFWrite role for the AFDocuments security group. It is recommended that you create a special Capture user specific to the Managed Attachments solution for this purpose to ensure regular users do not gain write access to the AFDocuments security group, which is reserved for the Managed Attachments solution. For details about the AFDocuments group, see Section 7.7.3.
-
On the Check-In tab, choose Assign values dynamically and By Field Mappings fields, as shown in Figure 7-17. Also specify how you want documents named in the Document Title field. It is recommended that you use the Title field.
Figure 7-17 Capture Administration, Check-In for Content Server Commit Settings
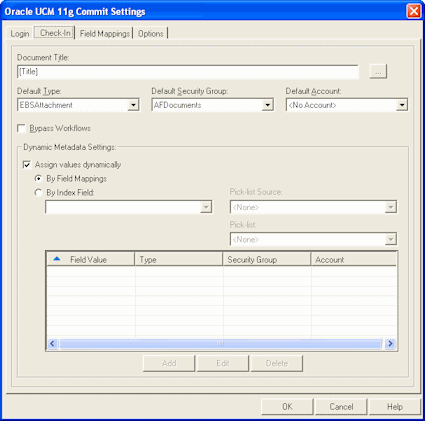
Description of "Figure 7-17 Capture Administration, Check-In for Content Server Commit Settings"
-
On the Field Mappings tab, click the Add/Edit Custom Fields button, and add the following custom fields in the Add/Edit Custom Fields dialog box shown in Figure 7-18:
-
dAFApplication
-
dAFBusinessObjectType
-
dAFBusinessObject
Figure 7-18 Capture Administration, Add/Edit Custom Fields
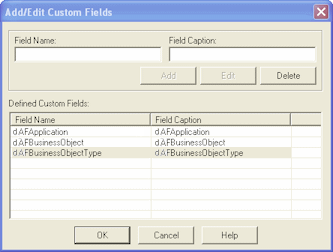
Description of "Figure 7-18 Capture Administration, Add/Edit Custom Fields"
Click OK. The custom fields you added now display on the Field Mappings tab shown in Figure 7-19. Map these custom fields to the corresponding index fields you created in step 2, as they are required to attach the new Content Server document to the business application entity. Also map other Capture fields whose values you want written to Content Server fields. Click OK.
-
-
Activate the business application-Content Server commit profile by clicking Commit Profiles from the Administration tree and selecting the Active check box for the commit profile.
Figure 7-19 Capture Administration, Field Mappings for Content Server Commit Settings
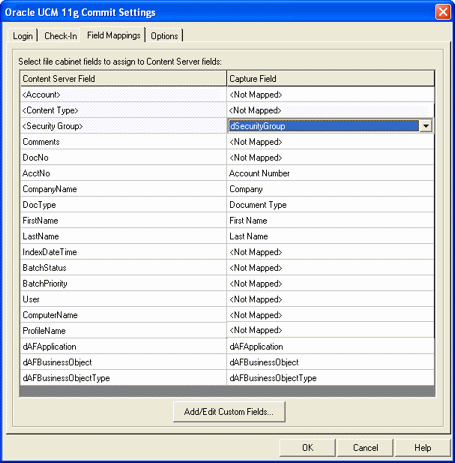
Description of "Figure 7-19 Capture Administration, Field Mappings for Content Server Commit Settings"
-
7.9.4 Configuring Content Server for Distributed Document Capture Via Adapter
Follow these steps to configure attachment scanning on the Content Server side.
-
On Content Server, edit the following configuration variables for Oracle Distributed Document Capture, if you have not done so. See Section 7.5.
-
ODDCURLPath

http://
ODDC_host/ODDC_webcapture_address -
ODDCScanActionODDC Scan Action -
AdapterAppScanBtnVisible

true
-
-
Restart Content Server.
-
On Content Server, configure document classification and scan types.
-
From the Administration tray in Content Server, click the Admin Applets link.
-
Select the Configuration Manager applet. The Configuration Manager displays.
-
Click the Views tab, select the appropriate document classification view from the alphabetical list (EBSDocClassView for Oracle E-Business Suite, PSFTDocClassView for Oracle PeopleSoft, or UniversalDocClassView for Enterprise Application Adapter Framework), and click Edit Values.
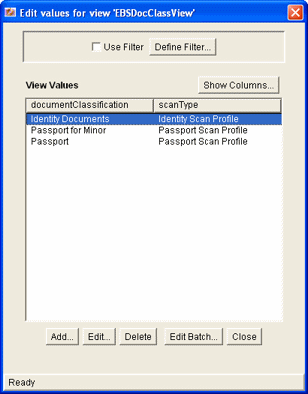
Description of the illustration doc_class1.gif
-
-
In the Edit Values dialog box, click Add and add document classifications and their corresponding scan profile. Note that documentClassification entries must be unique, but a scan profile can be used multiple times. Click Close when done.
-
From the Options menu, choose Publish schema to publish the data.
7.9.5 Testing the Oracle Distributed Document Capture Via Adapter Configuration
Follow these steps to test the configuration as an end-user. For more information, see the Oracle WebCenter User's Guide for Application Adapters.
-
Refresh the Managed Attachments results page. You should see a Scan button beside the New button.
-
Click the Scan button. In the Scan Document page, select a document classification and security group, and click Scan Document. The Oracle Distributed Document Capture client launches.
Note:
You can attach one document only via scanning or importing at a time.
Notice that the URL reflects the settings you specified to run the client. It also passes the scan profile, scan action (1 = Scan and 2 = Import), and index data containing the Oracle E-Business Suite or Oracle PeopleSoft entity values.
-
Within the Oracle Distributed Document Capture client, review, index, and send the document.
Note:
If you decide to cancel a document scan or import, you must close the Oracle Distributed Document Capture window and return to the Managed Attachments page and perform a new scan or import. This ensures that index values are properly set for attachments.
-
Return to the Managed Attachments page and click Refresh. The newly scanned document or imported scanned image file should display in the list. (It may take a few minutes to display.)
7.10 Testing the Managed Attachments Solution
To test functionality, you can launch the Managed Attachments solution from the Command Driver page instead of a business application.
Follow these steps to use the command driver.
-
Display the command driver page using the following URL form:
http://IPM Host:IPM Port/imaging/faces/Driver.jspxNote that you must log in to this page as the user set up in the CSF Credential for Managed Attachments (for example, weblogic), as described in Section 7.7.1.
-
In the command driver options that display, complete the Input Parameters and Request Parameters fields. In the UserName field, enter the name of a valid user already configured in Content (for example,
operations). See examples in Figure 7-20. Leave the ConversationId field blank.Figure 7-20 Example Parameters for the Managed Attachments Driver Page
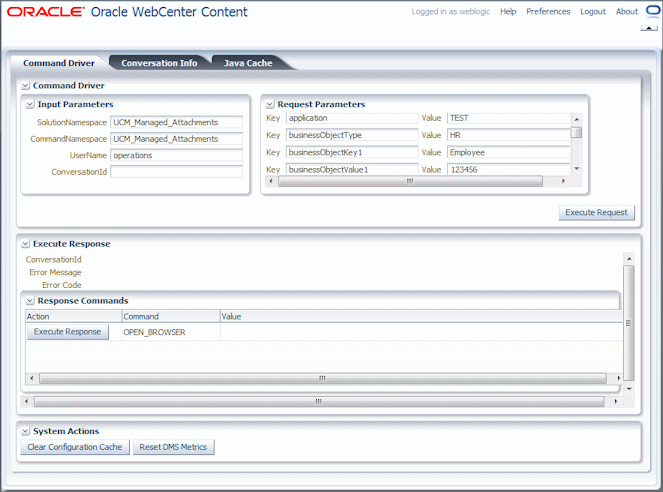
Description of "Figure 7-20 Example Parameters for the Managed Attachments Driver Page"
-
Click the Execute Request button.
A conversation starts, as indicated by entries in the conversationId and other response fields.
-
Under Response Commands, click the Execute Response button.
A new browser window opens and displays the Managed Attachments page.
7.11 Configuring Content Server Logging
For information about Content Server logging, see the Oracle Fusion Middleware Administering Oracle WebCenter Content.
7.12 Uninstalling Adapter Components on Content Server
Follow these steps to disable and then uninstall the following adapter components on the Content Server.
-
AppAdapterCore
-
AppAdapterEBS
-
AppAdapterPSFT
-
AppAdapterUniversal
For details about these components, see Section 7.3.1.
-
Log in to Content Server as an administrator.
-
Choose Admin Server from the Administration menu.
The Content Admin Server page displays.
-
Select the name of the Content Server instance from which to uninstall the component.
The Content Admin Server <instance_name> page displays.
-
Click Component Manager.
The Component Manager page displays.
-
Select an adapter component in the Enabled Components list and click Disable.
-
Repeat step 5, selecting and disabling the remaining adapter components.
-
Click Start/Stop Content Server.
The Content Admin Server <instance_name> displays.
-
Click Restart.
-
Click Component Manager.
The Component Manager displays.
-
Select an adapter component in the Uninstall Component field and click Uninstall. Click OK to confirm uninstalling the component.
-
Repeat step 10, uninstalling the remaining adapter components.
-
Select the link to return to the Component Manager.
The Component Manager page displays.
-
Click Start/Stop Content Server.
The Content Admin Server <instance_name> page displays.
-
Restart Content Server to apply the changes.
