65 Creating Pagelets with Oracle WebCenter Portal's Pagelet Producer
A pagelet is a reusable user interface component. Any HTML fragment can be a pagelet, but pagelet developers can also write pagelets that are parameterized and configurable, to dynamically interact with other pagelets, and respond to user input. Pagelets are similar to portlets, but while portlets were designed specifically for portals, pagelets can be run on any web page, including within a portal or other web application. Pagelets can be used to expose platform-specific portlets in other web environments.
Oracle WebCenter Portal's Pagelet Producer (previously known as Oracle WebCenter Ensemble) provides a collection of useful tools and features that facilitate dynamic pagelet development. This chapter includes detailed information about pagelet development and configuration using the Pagelet Producer. For additional information see the Pagelet Producer blog (https://blogs.oracle.com/ensemble/).
-
Section 65.1, "About Server Communication and the Proxy": This section explains how the Pagelet Producer acts as a proxy server, brokering transactions between client computers and external resources.
-
Section 65.2, "Using Pagelets in Web Applications": This section explains how to use pagelets in your WebCenter Portal applications.
-
Section 65.2.1, "Adding a Pagelet to a JSF Page in Oracle JDeveloper": This section explains how to use Oracle JDeveloper to drag and drop pagelets onto a JSF page.
-
Section 65.2.2, "Adding a Pagelet to a Web Page": This section explains how to insert a pagelet into a proxied or non-proxied page using JavaScript or REST.
-
Section 65.2.3, "Adding a Pagelet to a Page in WebCenter Portal: Spaces": This section explains how to add a pagelet to a space using Composer.
-
-
Section 65.3, "Building Pagelets Using the Pagelet Producer": This section provides detailed information about building pagelets using the Pagelet Producer.
-
Section 65.3.1, "Using the Adaptive Pagelet Scripting Framework": This section explains how the adaptive pagelet scripting framework can be used to create a coordinated page with dynamic, interactive functionality.
-
Section 65.3.2, "Using Pagelet Producer Credential Mapping": This section explains how to configure security settings for pagelets and resources to manage authentication for users.
-
Section 65.3.3, "Modifying Pagelet Functionality at Runtime": This section explains how to use custom web injectors and parsers to modify pagelet functionality at runtime.
-
Section 65.3.4, "Debugging Pagelets": This section explains how to access advanced logging traces for debugging pagelets.
-
-
Section 65.4, "Working with WSRP and Oracle JPDK Portlets": This section explains how the Pagelet Producer can be used to present WSRP and Oracle JPDK portlets for use in any web application.
-
Section 65.4.1, "Using Pagelet Chrome": This section explains how to use pagelet chrome to modify markup at runtime in WSRP or Oracle JPDK portlets.
-
-
Section 65.5, "Working with OpenSocial Gadgets": This section summarizes Pagelet Producer support for standard OpenSocial APIs and explains how to use gadgets to store preferences and retrieve user information from WebCenter Portal using OpenSocial APIs.
-
Section 65.6, "Using Pagelets to Integrate Markup from Portlets, ADF Taskflows, and Oracle Applications into Oracle WebCenter Sites": This section describes how to use pagelets as a content source in Oracle WebCenter Sites.
65.1 About Server Communication and the Proxy
The Pagelet Producer acts as a proxy server, brokering transactions between client computers and external resources.
Services on external resources communicate with the Pagelet Producer via HTTP. For example, when a browser requests a page, the Pagelet Producer makes simultaneous requests to each external resource to retrieve the pagelet content for the page. The external resource reads the current user's preferences from the HTTP headers sent by the Pagelet Producer and sends back the appropriate HTML. The Pagelet Producer inserts the HTML into the page markup. Any images stored in the Image Service are retrieved and displayed by the browser.
65.1.1 The Pagelet Producer Proxy
A proxy server acts as a middleman, brokering transactions between a client computer and another server. This configuration is typically used to serve content to clients that would otherwise be unable to access the external resource, but it can be used to impose additional security restrictions on the client, including the use of policies. The proxy hides the external resource; to the end user, the content appears to come directly from the proxy server.
This architecture makes the Pagelet Producer the single point of access for content, and allows external resources to reside on a private network or behind a firewall. As long as the Pagelet Producer can connect to the external resource, users can view the content, even if they cannot access it directly. To the browser, the Pagelet Producer appears to be the source of content on the external resource.
When a user interacts with a service, any request made to a URL in the proxy is automatically rerouted through the Pagelet Producer. To the user, the content appears to come from the Pagelet Producer; the external resource is an unknown back-end system.
There are many benefits to this configuration. The most useful to services are:
-
Dynamic functionality and personalization: The Pagelet Producer intercepts requests from pagelets, which allows it to include information stored in the MDS in HTTP requests and responses.
-
Security: Services can allow users to access content that is not publicly available. Files stored on a secure server can be made available by including specific URLs in the configuration of the proxy.
Note:
The proxy is a powerful feature, and can compromise security if incorrectly configured. Allowing direct access to a external resource that hosts unprotected private content could create a dangerous security gap.
-
Performance: The Pagelet Producer caches proxied content, decreasing response time for end users and improving performance on the external resource. While proxying works efficiently for content like HTML, it is generally not appropriate for binary data like static images. Images do not need to be transformed, and proxying large images can adversely affect performance. This is one reason the Image Service should be used to prevent routing static images through the proxy.
The collection of URLs that should be proxied for a service is configured in the Resource editor. All URLs that use the Internal URL prefix configured for the resource or point to other proxied CSP or web resources will be proxied unless Enable URL Rewriting is deselected.
Keep the following warnings and best practices in mind when implementing services that use the proxy:
-
URL transformation: The Pagelet Producer must transform code so that proxied URLs open correctly. Before the Pagelet Producer sends a response, it parses the HTML and looks for any URLs that use the Internal URL prefix configured for the associated producer resource. The Pagelet Producer transforms any URLs that should be proxied before returning the response to the client. Relative URLs are transformed to point to the correct location.
-
Scripting limitations: JavaScript constructs that dynamically create URLs can cause problems, because they are run after content is already transformed. VBScript is not transformed by the proxy; you can continue to use dynamic scripts and VBScript as long as your code is proxy-aware. Parsers and web injectors can be used to implement targeted control over URL rewriting. For details on configuring parsers and web injectors, see the Managing Oracle WebCenter Portal's Pagelet Producer chapter in the Oracle Fusion Middleware Administrator's Guide for Oracle WebCenter Portal.
-
URL encoding: It is a best practice to encode all headers that are URLs to prevent unexpected transformation. In JSP, encode all URLs that are written. If the code writes URLs in the body of a page (for example, a link to a preferences page) it should be encoded. The standard Java servlet command response.encodeURL() is the preferred method, but you can also use URLEncoder.encode(url). In the .NET Framework, the HttpUtility.URLEncode class provides the necessary functionality.
65.1.1.1 About Pagelets and the Proxy
All pagelets are designed to be displayed with other pagelets. As explained in the previous section, the Pagelet Producer acts as a proxy, processing and combining pagelets from multiple applications to create a single, unified page with a range of functionality.
The code returned by a pagelet is parsed by the Pagelet Producer server and inserted into the HTML markup that makes up the page. Pagelets from the same back-end application can interact with each other within the page.
Note:
In .NET, there is no need to encode the redirect URL; this is handled automatically on the back end.
65.1.2 About HTTP and CSP
HTTP is a protocol used mostly for transferring web page content and XML between a server and a client. CSP is a platform-independent protocol based on the open standard of HTTP 1.1 that defines the syntax of communication between the Pagelet Producer and external CSP resources.
65.1.2.1 HTTP
HTTP communication is made up of Requests and Responses. Requests and Responses are essentially lists of name-value pairs of metadata in headers, along with an optional body. The body is the data that is being transferred (an HTML page or XML file). The metadata in the headers is information about the Request or Response itself (what language the content is in, or how long the browser should cache it). The Request and Response each contain specific information, outlined next. For more detailed information on HTTP, see RFC 2616 (http://www.faqs.org/rfcs/rfc2616.html).
The client sends the server an HTTP Request, asking for content. The Request body is used only for requests that transfer data to the server, such as POST and PUT.
HTTP Request Format:
[METHOD] [REQUEST-URI] HTTP/[VERSION]
[fieldname1]: [field-value1]
[fieldname2]: [field-value2]
[request body, if any]
HTTP Request Example:
GET /index.html HTTP/1.1
Host: www.xmlns.oracle.com
User-Agent: Mozilla/3.0 (compatible; Opera/3.0; Windows 95/NT4)
Accept: */*
Cookie: username=JoeSmith
The server sends back an HTTP Response that contains page content and important details, such as the content type, when the document was last modified, and the server type. The Response contains an error message if the requested content is not found.
HTTP Response Format:
HTTP/[VERSION] [CODE] [TEXT]
[fieldname1]: [field-value1]
[fieldname2]: [field-value2]
[response body, if any (document content here)]
HTTP Response Example:
HTTP/1.0 200 Found
Last-modified: Thursday, 20-Nov-97 10:44:53
Content-length: 6372
Content-type: text/html
<!DOCTYPE HTML PUBLIC '-//W3C//DTD HTML 3.2 Final// EN'><HTML>
...followed by document content...
Custom HTTP headers can be configured to include specialized information.
Note:
Header size limits are controlled by the server that hosts the code. The standard limit for IIS/ASP is 60K. Java Application Servers range from 2K to 10K. These limits are generally configurable; see your server documentation for details.
Services can also access standard HTTP headers, such as the Set-Cookie header or HTTP 1.1 basic authentication header. If you want to investigate HTTP further, you can view all the headers being passed back and forth between your browser and Web server using logging (as described in Section 65.3.4, "Debugging Pagelets"). HTTP is used in conjunction with SSL to serve up secure content. Single Sign-On (SSO) also uses HTTP headers for basic authentication.
65.1.2.2 CSP
CSP extends HTTP and defines proprietary headers to pass settings between Pagelet Producer and external CSP resources (i.e., Oracle WebCenter Interaction portlets). CSP outlines how these services use HTTP to communicate and modify settings. The latest version is 1.4, and is available here: http://download.oracle.com/docs/cd/E13158_01/alui/wci/docs103/devguide/references/CSP1.4.pdf.
The custom CSP headers used to communicate system and user configuration variables can also be used by pagelets.
Table 65-1 Pagelet Producer Headers
| Header Name | Description |
|---|---|
|
User ID |
The User ID of the currently logged in user. This value can be used to determine if the session has expired. If UserID=2, the default 'Guest' user is logged in; any other user's session has ended. |
|
User Name |
The name of the logged in user. The user's name can be used to personalize display or pre-fill form fields. |
|
Image Service URL |
The URL to the root virtual directory of the Image Service in the user's implementation of the Pagelet Producer. This location should be used for all static images used in services. |
|
Stylesheet URL |
The URL to the current user's style sheet. In each implementation of the Pagelet Producer, the UI is customized. In some portals, users can choose between a selection of stylesheets. Using these styles ensures that pagelets appear in the style of the current user's implementation of the Pagelet Producer. |
|
Pagelet ID |
The ID for the current resource (pagelet), and the instance ID for the current pagelet. This value is useful for appending to the names of HTML forms and client-side JavaScript functions to ensure unique form and function names on the page to avoid name conflicts. |
|
Host Page URL |
The URL to the page that hosts the pagelet. Preference pages need this URL to return the user to the correct page after settings are configured. This value can also be used to allow a single pagelet to display different content on different pages. |
65.2 Using Pagelets in Web Applications
This section describes how to add pagelets to a JSF page in JDeveloper, to any web page, or to a page in WebCenter Portal: Spaces. Before you can add a pagelet to any web application, you must deploy and configure the resource and pagelet in the Pagelet Producer as described in the Oracle Fusion Middleware Administrator's Guide for Oracle WebCenter Portal.
This section includes the following subsections:
-
Section 65.2.1, "Adding a Pagelet to a JSF Page in Oracle JDeveloper"
-
Section 65.2.3, "Adding a Pagelet to a Page in WebCenter Portal: Spaces"
65.2.1 Adding a Pagelet to a JSF Page in Oracle JDeveloper
Oracle JDeveloper allows you to drag and drop pagelets onto a JSF page. In this section, you will register the Pagelet Producer with your WebCenter Portal: Framework application, add a pagelet to a JSF page, and view the page in a browser to test the pagelet.
This section includes the following subsections:
65.2.1.1 Registering the Pagelet Producer with a WebCenter Portal: Framework Application
Before you can add a pagelet to a JSF page, you must register the Pagelet Producer with your application. You can register a Pagelet Producer in two ways:
-
Register a producer with a specific application. By default, the IDE Connection option is selected in the New Pagelet Producer dialog that creates the connection under the Application Resources panel.
-
Register a producer using the Resource Palette. This option enables you to use the producer's pagelets in multiple applications. A pagelet that is available in the Resource Palette can be added to any of your Framework applications by dropping it on the page. When you add a pagelet from the Resource Palette, its producer gets registered with the application if that producer is not already registered with the application. You can drag and drop a whole producer connection from the Resource Palette into the Application Resources panel of the Application Navigator. This registers the producer with the application. Alternatively, you can right-click a producer in the Resource Palette and choose Add to Application from the context menu to register the producer with the currently open application
To register a Pagelet Producer through Oracle JDeveloper:
-
In the Application Resources panel of the Application Navigator, right-click Connections, choose New Connection and then choose Pagelet Producer.
For other methods of invoking the wizard, such as from the Resource Palette, see Section 1.6.2, "How Do I Access the Connection Wizards?"
-
In the Name field of the New Pagelet Producer dialog, enter a meaningful name for your producer. For example,
myPageletProducer. -
In the URL field, enter the URL of your Pagelet Producer in the format:
http://hostname:portnumber/pagelets. -
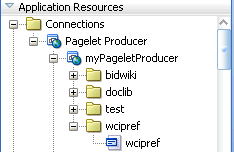
Click OK. In the Application Resources panel, the Pagelet Producer is created under the Pagelet Producer directory in the Connections directory, as shown in Figure 65-1.
Figure 65-1 Pagelet Producer in the Application Resources Panel
Description of "Figure 65-1 Pagelet Producer in the Application Resources Panel"
65.2.1.2 Adding a Pagelet to a JSF Page
To add a pagelet to a page:
-
In JDeveloper, open your JSF page in Design View, if it is not open already.
-
Go to the Application Resources panel or the IDE Resources panel in the Resource Palette. Under Pagelet Producer, expand your producer to display its contents.
-
From the producer's contents, drop a pagelet onto the JSF page.
-
In the Add Pagelet to Page dialog, choose Yes in the Use IFrame section if you would like to enable IFRAME for this pagelet.
-
In the IFrame Height field, specify the required height in pixels or leave it blank. You can also specify the height as "auto" to use automatic resizing. (To use this option, you must add the IFrame resizing page to the project. For details, see Section 65.2.2.3, "Using Automatic Resizing with IFrames.") Click OK.
-
In the Edit Task Flow Binding dialog input parameters are specified by default. Change any parameters, if required, and then click OK.
-
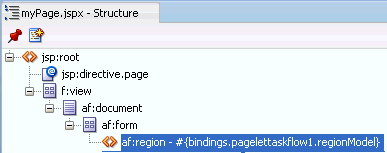
Save the page. In the Structure window, the page looks like Figure 65-2.
Figure 65-2 Pagelet in the Structure Window
Description of "Figure 65-2 Pagelet in the Structure Window"
-
In the Application Navigator, right-click your JSF page under Projects, and choose Run.
-
If presented with a login page, enter user name and password so you can view the pagelet. Figure 65-3 shows a sample pagelet in a browser window.
65.2.1.3 Securing a Pagelet
For information about securing pagelets, see the section "Policy" and the section "Configuring Oracle Single Sign-On (OSSO)" in Oracle Fusion Middleware Administrator's Guide for Oracle WebCenter Portal.
65.2.2 Adding a Pagelet to a Web Page
Once you have deployed a pagelet, you can insert it into a proxied or non-proxied page using JavaScript or REST.
This section includes the following subsections:
-
Section 65.2.2.1, "Inserting Pagelets Using Javascript": The Pagelet Producer allows you to insert pagelets into non-proxied pages using a simple JavaScript function.
-
Section 65.2.2.2, "Accessing Pagelets Using REST": Pagelet Producer REST APIs allow remote web services to retrieve information about resources and pagelets from the Pagelet Producer, and inject pagelets into proxied and non-proxied pages.
-
Section 65.2.2.3, "Using Automatic Resizing with IFrames": The pagelet inject function can automatically resize the IFrame that encapsulates pagelet content.
65.2.2.1 Inserting Pagelets Using Javascript
You can insert pagelets into non-proxied pages using a simple JavaScript function.
To activate this feature, add the following HTML snippet in the <HEAD> section of the page.
<script type="text/javascript" src="http://proxy:port/pagelets/inject/v2/csapi">
</script>
This script injects all CSAPI and pagelet inject functions into the page to display the pagelet. One of the sections injected is the following function:
function injectpagelet(library, name, iframe_options, payload, params, context_id, element_id,  is_in_community, chrome, forward_params)
{
    ...
}
This function injects a pagelet as a widget into the parent page. The method interface uses the following parameters:
-
library: Required. A string representing the library name of the pagelet to inject. Accepts Unicode letters and numbers only; no spaces.
-
name: Required. A string representing the name of the pagelet to inject. Accepts Unicode letters and numbers only; no spaces.
-
iframe_options: Specifies whether to use IFRAME around the pagelet content. Sample IFRAME options:
iframe width=100% height=auto frameborder=0. If omitted or left blank, the pagelet content is rendered inline. -
payload: The XML payload to send with the pagelet request.
-
params: The pagelet parameters in query string format. For example,
'param1=value1¶m2=value2¶m3=value3'. -
context_id: The external identifier of the pagelet instance, used to scope preferences on the Pagelet Producer server. Must be an integer.
-
element_id: The HTML element ID in which the pagelet content is injected. If omitted or left blank, the pagelet content is injected using
document.write()when theinjectpageletcall is evaluated. -
is_in_community: Specifies whether this pagelet is on a community or group page. If the value is set to
true, it sends thecontext_idin the community ID header to the pagelet. Defaults tofalse. -
chrome: Specifies the name of the chrome template to use for WSRP/JPDK pagelets. To suppress chrome, use a value of
none. -
forward_params: Specifies whether to forward query string arguments from the consuming page to the back-end server. To suppress this functionality, use a value of
false.
Note:
These arguments are positional; they must be provided in the given order. If you do not want to specify a particular argument, but do want to specify an argument that follows it, you must pass in an empty value ('') for the former. All arguments are optional except for library and name.
The script also creates a new <div> with a unique name that includes a reference to the injectpagelet function. Several examples are shown below:
<div>
    <script type="text/javascript">
        injectpagelet('library', 'name');
    </script>
</div>
<div>
<script type="text/javascript">
injectpagelet('library', 'name', 'iframe', 'payload', 'param1=value1¶m2=value2¶m3=value3');
</script>
</div>
<div>
    <script type="text/javascript">
    injectpagelet('library', 'name', 'iframe width=100% height=200', 'payload');
    </script>
</div>
65.2.2.1.1 Adding a Preference Editor Using Javascript
The injecteditor function lets you add preference editors that enable users to set personal and shared preferences for pagelets that support this capability. This functionality is analogous to personalization and customization functionality in Oracle WebCenter Portal.
injecteditor(library, name, type, iframe_options, context_id, element_id, is_in_community, chrome)
where:
-
library: Required. The library name of the pagelet to inject. Accepts Unicode letters and numbers only; no spaces.
-
name: Required. The name of the pagelet to inject. Accepts Unicode letters and numbers only; no spaces.
-
type: The editor type. This argument supports these values: 'admin', 'pagelet', 'community'. In case of the 'community' argument,
context_idis sent to pagelet in the community ID CSP header. -
iframe_options: Specifies whether to use IFRAME around the pagelet editor content. Sample IFRAME options:
iframe width=100% height=auto frameborder=0. If omitted or left blank, the editor content is rendered inline. -
context_id: The external identifier of the pagelet instance, used to scope preferences on the Pagelet Producer server. Must be an integer.
-
element_id: The HTML element ID in which the pagelet content is injected. If omitted or left blank, the pagelet content is injected using
document.write()when theinjecteditorcall is evaluated. -
is_in_community: Specifies whether this pagelet is on a community or group page. If the value is set to
true, it sends thecontext_idin the community ID header to the pagelet. Defaults tofalse. -
chrome: Specifies the name of the chrome template to use for WSRP/JPDK pagelets. To suppress chrome, use a value of
none.
Note:
These arguments are positional; they must be provided in the given order. If you do not want to specify a particular argument, but do want to specify an argument that follows it, you must pass in an empty value ('') for the former. All arguments are optional except for library and name.
65.2.2.2 Accessing Pagelets Using REST
REST stands for Representational State Transfer and is a simple way of providing APIs over HTTP. The basic principles of REST are:
-
API URLs point to the resource rather than a generic method endpoint.
-
Requests use standard HTTP verbs for simplified CRUD methods. This is a read-only API and allows GET requests only.
-
Every request returns a full representation of the object retrieved (pagelet or resource).
Pagelet Producer REST APIs provide the following functionality:
-
Inject pagelets into non-proxied pages, allowing the Pagelet Producer to act as a portlet provider for Oracle WebCenter Interaction, Oracle WebLogic Portal, or other third-party portals. For details, see Section 65.2.2.2.1, "Pagelet Inject API".
-
Allow remote web services to retrieve information about resources and pagelets from the Pagelet Producer. For details, see Section 65.2.2.2.2, "Data Retrieval APIs".
65.2.2.2.1 Pagelet Inject API
The pagelet inject URL can be used in portals to specify the location of a remote portlet (this is how a pagelet can be used as a portlet). The inject URL can also be used as the src attribute of an IFrame tag in any HTML page.
The URL must use the following format:
http://host:port/pagelets/inject/v2/pagelet/libraryname/pageletname?content-type=html
where libraryname and pageletname refer to the library and pagelet configured in the Pagelet Producer.
Note:
When using the pagelet inject API as the URL for a Portlet Web Service in Oracle WebCenter Interaction, you must switch "pagelet" to "portlet" in the URL. For example, the above URL would become:
http://host:port/pagelets/inject/v2/portlet/libraryname/pageletname?content-type=html
The query string arguments to the above call define how the pagelet is to be returned. The following parameters are defined:
-
instanceid: Optional. The instance ID of the pagelet, used to uniquely identify the pagelet on the page to facilitate inter-pagelet communication. Must be unique to the page.
-
context: Optional. The external identifier of the pagelet instance, used for scoping preferences on the Pagelet Producer server. Must be an integer.
-
content-type: The return type. Three types are supported:
-
javascript: Returns injectable code.
-
html: Returns the pagelet markup with its associated PTPortlet object.
-
iframe: Returns an IFrame that points back to the inject api, filling the IFrame with the pagelet content, instead of directly inline with the page. The IFrame can be styled by providing a set of query string parameters.
Parameter Description Default ifwidth
Sets the width of the IFrame; can be specified in percent '%' or pixels 'px', for example: ifwidth=500px. Can be set to 'auto' to automatically resize the IFrame to fit the content within. For details, see Section 65.2.2.3, "Using Automatic Resizing with IFrames".
100%
ifheight
Sets the height of the IFrame; can be specified in percent '%' or pixels 'px', for example: ifheight=500px. Can be set to 'auto' to automatically resize the IFrame to fit the content within. For details, see Section 65.2.2.3, "Using Automatic Resizing with IFrames".
No default
ifborder
Sets the border of the IFrame.
'none'
ifalign
Sets the align rule within the IFrame, for example: ifalign=center.
No default
ifdesc
Sets the description of the IFrame.
No default
ifmarginheight
Sets the margin height; can be specified in percent '%' or pixels 'px', for example: ifmarginheight=500px.
No default
ifmarginwidth
Sets the margin width; can be specified in percent '%' or pixels 'px', for example: ifmarginwidth=500px.
No default
ifscrolling
Sets the scrollbars of the IFrame. Accepted values: yes/no/auto.
auto
ifstyle
Sets the CSS style of the IFrame
No default
ifclass
Sets the CSS class of the IFrame.
No default
-
-
csapi: Optional. Sets whether the CSAPI will be included with the pagelet response (true or false). Including the CSAPI is optional, but the pagelet included in the response relies on the CSAPI libraries being present on the page where the pagelet is to be rendered. If csapi=false, then the CSAPI libraries must be included with the parent page (usually in the HEAD section).
-
onhtttperror:: Optional. When a pagelet request results in a 403, 404 or any other error code, the Pagelet Producer can forward the error code and the error page itself to the browser for display to the user. The onhttperror parameter accepts the following values:
-
comment (default): The Pagelet Producer will create an HTML comment in place of the failing pagelet (the failing pagelet will simply not be displayed).
-
inline: The pagelet error along with the server error page will be displayed inline where the pagelet would normally be shown on the page.
-
fullpage: The http error will consume the whole page. This mode is only available if the Pagelet Producer controls the parent page.
-
For example, the following URL points to the linkspagelet in the samples library:
http://host:port/pagelets/inject/v2/pagelet/samples/linkspagelet?content-type=iframe&csapi=true&ifheight=123px&ifclass=myclass
This URL should result in markup similar to the code below.
Note:
The IFrame source points back to the inject API, but this time the content-type parameter is set to html. This feature adds an additional step in the pagelet retrieval. The csapi parameter is set to true on the subsequent call to get the IFrame contents so that the required CSAPI content is included in the IFrame (if this was not the case, JavaScript resolve errors would be returned because the pagelet code cannot access any CSAPI script included outside the IFrame).
<html>
<head>
</head>
<body>
<iframe frameborder="none" class="myclass" width="100%" height="123px" scrolling="auto" src="http://proxy:port/inject/v2/pagelet/samples/linkspagelet?asdg=asdfgas¶m=true&content-type=html&jswrap=false&csapi=true">
<html>
<head>
<script src="http://proxy:loginserverport/loginserver/ensemblestatic/imageserver/plumtree/common/private/js/jsutil/LATEST/PTUtil.js" type="text/javascript"> </script>
<script src="http://proxy:loginserverport/loginserver/ensemblestatic/imageserver/plumtree/common/private/js/jsutil/LATEST/PTDateFormats.js" type="text/javascript"></script>
<script src="http://proxy:loginserverport/loginserver/ensemblestatic/imageserver/plumtree/common/private/js/jsxml/LATEST/PTXML.js" type="text/javascript"></script>
<script src="http://proxy:loginserverport/loginserver/ensemblestatic/imageserver/plumtree/common/private/js/jsportlet/LATEST/PTPortletServices.js" type="text/javascript"></script>
</head>
<body>
<div id="pt-pagelet-content-1" class="pagelet-container" style="display: inline;">
<span xmlns:pt="http://www.xmlns.oracle.com/xmlschemas/ptui/">
Pagelet links:
<br/>
<a href="http://proxy:port/inject/RP_PID393219_I1/headpagelet1.html">The first pagelet</a>
<br/>
<a href="http://proxy:port/inject/RP_PID393219_I1/headpagelet2.html">The second pagelet</a>
<br/>
<a href="http://proxy:port/inject/RP_PID393219_I1/csapipagelet.html">The csapi pagelet</a>
<br/>
<a href="http://proxy:port/inject/RP_PID393219_I1/linkspagelet.html">This pagelet</a>
<br/>
</span>
</div>
</body>
</html>
</iframe>
</body>
</html>
65.2.2.2.2 Data Retrieval APIs
Two REST APIs are available to retrieve data from the Pagelet Producer:
-
Pagelet API: Allows remote applications to retrieve pagelet data from the Pagelet Producer. (See Example 65-1, "All Pagelets" and Example 65-2, "Pagelets By Library and Name".)
-
Resource API: Allows remote applications to retrieve resource data from the Pagelet Producer. (See Example 65-3, "All Resources" and Example 65-4, "Resource By Name".)
The base URL for all requests is http://host:port/pagelets/restservice/pageletproducer/.
http://host:port/pagelets/restservice/pageletproducer/pagelets/
http://host:port/pagelets/restservice/pageletproducer/pagelets/?format=xml
Example 65-2 Pagelets By Library and Name
http://host:port/pagelets/restservice/pageletproducer/pagelet/libraryname/pageletname/
http://host:port/pagelets/restservice/pageletproducer/pagelet/libraryname/pageletname/?format=xml
http://host:port/pagelets/restservice/pageletproducer/resources/
http://host:port/pagelets/restservice/pageletproducer/resources/
65.2.2.3 Using Automatic Resizing with IFrames
The Pagelet Producer pagelet inject API can automatically resize the IFrame that encapsulates pagelet content. The resizing is done so that the IFrame stretches to fit the content within. To use this feature, the ifwidth and ifheight parameters must be set to 'auto' as shown in the example below:
http://proxy:port/inject/v2/pagelet/samples/linkspagelet?content-type=iframe&csapi=true&ifheight=auto&ifwidth=auto&ifclass=myclass
In addition, this feature relies on an external page on the same domain as the consumer page. This page is included into the pagelet IFrame as an internal hidden IFrame. This page collects the sizing information and passes it on to the parent consumer page. This page must be deployed in the same directory as the consumer page.
The example below resizes the pagelet IFrame after it finishes loading. To add dynamic auto-resizing capabilities to user interaction activities after the initial load, simply add more event listeners for mouse and keyboard events.
<html>
  <head>
    <title>Resizing Page</title>
    <script type="text/javascript">
  function onLoad() {
    var params = window.location.search.substring( 1 ).split( '&' );
    var height;
    var width;
    var iframe;

    for( var i = 0, l = params.length; i < l; ++i ) {
      var parts = params[i].split( '=' );
      switch( parts[0] ) {
        case 'height':
          height = parseInt( parts[1] );
          break;
        case 'width':
          width = parseInt( parts[1] );
          break;
        case 'iframe':
          iframe = parts[1];
          break;
      }
    }
  window.top.updateIFrame( iframe, height, width );
  }

  if (window.addEventListener) {
    window.addEventListener("load", onLoad, false)
  } else if (window.attachEvent) {
     window.detachEvent("onload", onLoad)
     window.attachEvent("onload", onLoad)
  } else {
    window.onload=onLoad
  }
  </script>
 </head>
<body>
</body>
</html>
65.2.3 Adding a Pagelet to a Page in WebCenter Portal: Spaces
In WebCenter Portal: Spaces, you can add a pagelet to a page using Composer. By default, pagelets appear in the Mash-Ups folder in the Resource Catalog. To add a pagelet to a page, navigate to the pagelet in the Resource Catalog and select it.
For detailed information about how to add resources to pages in Spaces, see the section "Adding Resource Catalog Components to Pages" in Oracle Fusion Middleware User's Guide for Oracle WebCenter Portal: Spaces.
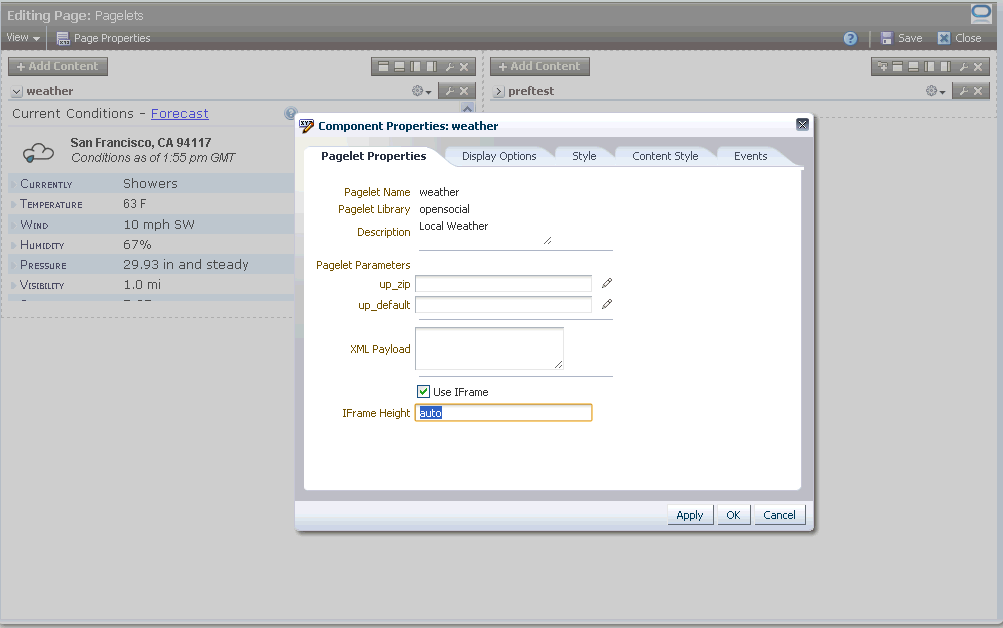
To configure a pagelet within a page, view the page in Edit mode and click the edit button (wrench icon) for the pagelet. The Pagelet Properties tab in the Component Properties dialog allows you to define pagelet parameters and IFrame options.
Figure 65-4 Component Properties Dialog: Pagelet Properties
Description of "Figure 65-4 Component Properties Dialog: Pagelet Properties"
65.3 Building Pagelets Using the Pagelet Producer
This section provides information on building pagelets using the Pagelet Producer.
65.3.1 Using the Adaptive Pagelet Scripting Framework
The Adaptive Pagelet Scripting Framework is a client-side JavaScript library that provides services to CSP pagelets and proxied pages. This section explains how to use the scripting framework to implement dynamic functionality in pagelets.
-
Section 65.3.1.1, "Handling Structured HTTP Responses": The adaptive pagelet scripting framework can be used as a client-side response handler for structured HTTP, typically encoded as XML.
-
Section 65.3.1.2, "Using Event Notification": A pagelet can respond when specific events happen, such as when the page loads or when the browser focus changes.
-
Section 65.3.1.3, "Using In-Place Refresh": Pagelets can reload their internal content without refreshing the page.
-
Section 65.3.1.4, "Using Session Preferences": Browser-level variables can be stored and shared among pagelets, even if they are not on the same page. For example, a value entered by the user in one pagelet can be retrieved by another. The scripting framework acts as an intermediary, allowing all pagelets access to all values stored in a common session.
For a full list of classes and methods, see the JSPortlet API documentation.
For additional information on adaptive pagelets, see Section 65.3.1.5, "Adaptive Pagelet Development Tips".
65.3.1.1 Handling Structured HTTP Responses
In many cases it can be expensive and inefficient to send large amounts of HTML back in response to some HTTP request, if only a small part of the user interface needs to be changed. This is especially true with more complex user interfaces. In these cases, the response can be encoded in XML. The client-side response handler can then parse the XML, and update the user interface (or perform some other action) based on that response. Use the Structured Response design pattern to redraw a small area of the user interface after making an HTTP request, or to access a simple HTTP/URI type web service from a pagelet. The example code below (structuredresponse_portlet.html) accesses an RSS feed from a selection of news sites.
<!-- jsxml includes -->
<a id="imgServerHref" href="/images/plumtree" style="display:none"></a>
<script type="text/javascript"
src="/images/plumtree/common/private/js/PTLoader.js"></script>
<script type="text/javascript">
var oImgServer = new Object();
oImgServer.location = document.getElementById('imgServerHref').href;
var imageServerURL = document.getElementById('imgServerHref').href;
var imageServerConnectionURL = oImgServer.location;
new PTLoader(imageServerURL, imageServerConnectionURL).include('jsxml','en');
</script>

<!-- jscontrols includes -->
<link rel="stylesheet" type="text/css" href="/portal-remote-server/js/jscontrols/styles/css/PTMenu.css"/>
<link rel="stylesheet" type="text/css" href="/portal-remote-server/js/jscontrols/styles/css/PTRichTextEditor.css"/>
<script type="text/javascript" src="/portal-remote-server/js/jscontrols/strings/PTControls-en.js"></script>
<script type="text/javascript" src="/portal-remote-server/js/jscontrols/PTControls.js"></script>

<!-- Inline JS helper functions -->
-->

<script defer type="text/javascript" id="structured-response-portlet-A-script">
// Function that gets the RSS XML feed found at the specified url
getRSSFeed = function(url)
  {
  // First clear out any existing rows in the table
  channelTable.clearRows();

  // Force the transformer to fix up the url
  var oURL = new Object();
  oURL.location = url;

  // Do the http get
  var get = new PTHTTPGETRequest(oURL.location, handleRSSResponse);
  get.invoke();
  }

// Function that handles the RSS XML response and updates the table based on the RSS items
handleRSSResponse = function(response)
  {
  // Get the rss xml
  var xml = response.responseText;
  if (!xml || xml.indexOf('<?xml') == -1) { return; }

  // Parse into a dom, and get the channel node
  var xmlDOM = new PTXMLParser(xml);
  var rssNode = xmlDOM.selectSingleNode('rss');
  var channelNode = rssNode.selectSingleNode('channel');

  // Get the channel title and set the status bar text in the table
  var channelTitle = channelNode.selectSingleNode('title').getNodeValue();
  channelTable.statusBarText = '<b>Loaded Channel</b>: ' + channelTitle;

  // Get channel item nodes
  var itemNodes = channelNode.selectNodes('item');

  // Build table rows
  channelTable.rows = new Array();
  for (var i=0; i<itemNodes.length; i++)
    {
    var itemNode = itemNodes[i];

    // Get channel item properties
    var itemTitle = itemNode.selectSingleNode('title').getNodeValue();
    var itemLink = itemNode.selectSingleNode('link').getNodeValue();
    var itemDescription = itemNode.selectSingleNode('description').getNodeValue();
    if (itemNode.selectSingleNode('author'))
      var itemAuthor = itemNode.selectSingleNode('author').getNodeValue();
    if (itemNode.selectSingleNode('category'))
      var itemCategory = itemNode.selectSingleNode('category').getNodeValue();
    if (itemNode.selectSingleNode('pubDate'))
      var itemPubDate = itemNode.selectSingleNode('pubDate').getNodeValue();

    // Create a row and add it to the table
    var row = new PTRow();
    row.parent = channelTable;
    row.id = i;
    row.uid = i;
    row.previewText = itemDescription;
    row.link = itemLink;
    row.columnValues[0] = new PTTextColumnValue(itemTitle);
    row.columnValues[1] = new PTTextColumnValue(itemCategory);
    row.columnValues[2] = new PTTextColumnValue(itemAuthor);
    row.columnValues[3] = new PTTextColumnValue(itemPubDate);
    channelTable.rows[channelTable.rows.length] = row;
    }

  // Redraw the table
  channelTable.draw();
  }
</script>

<b>Select RSS Feed:</b>
<a href="#" onclick="getRSSFeed('http://www.wired.com/news/feeds/rss2/0,2610,,00.xml'); return false;">Wired News</a>
<a href="#" onclick="getRSSFeed('http://news.com.com/2547-1_3-0-5.xml'); return false;">CNET News.com</a>
<a href="#" onclick="getRSSFeed('http://partners.userland.com/nytRss/nytHomepage.xml'); return false;">NY Times</a>
<br><br>

<!-- Set up a table control to display channel items -->
<div id="channelTableContainer"></div>
<script defer type="text/javascript">
  var channelTable = new PTTableControl();
  channelTable.locale = 'en_US';
  channelTable.objName = 'channelTable';
  channelTable.container = 'channelTableContainer';
  channelTable.baseURL = '/imageserver/plumtree/common/private/portal-remote-server/js/jscontrols/1/';
  channelTable.statusBarText = 'No RSS Feed Selected';
  channelTable.rowDetailAction = new PTJavaScriptAction('window.open(\'${ROW.link}\');');
  channelTable.columns[0] = new PTColumn();
  channelTable.columns[0].name = 'Title';
  channelTable.columns[0].width = '40%';
  channelTable.columns[1] = new PTColumn();
  channelTable.columns[1].name = 'Category';
  channelTable.columns[1].width = '20%';
  channelTable.columns[2] = new PTColumn();
  channelTable.columns[2].name = 'Author';
  channelTable.columns[2].width = '20%';
  channelTable.columns[3] = new PTColumn();
  channelTable.columns[3].name = 'Publication Date';
  channelTable.columns[3].width = '20%';
  channelTable.areColumnsResizable = true;
  channelTable.clientSortEnabled = true;
  channelTable.scrollHeight = 250;
  channelTable.init();
  channelTable.draw();
</script>
</div>
65.3.1.2 Using Event Notification
The adaptive pagelet scripting framework allows pagelets to respond to both page-level events and custom events raised by other pagelets.
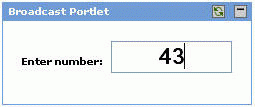
The registerForWindowEvent and registerOnceForWindowEvent methods in the scripting framework provide pagelets with access to page-level events. For a complete list, see Section 65.3.1.2.1, "Page-Level Events for Use with the Scripting Framework". To register for notification of these events, pass in the name of the event and the name of the method that should be called when it occurs. When a page-level event is raised, the JavaScript event object is passed to the event handler as an argument. The scripting framework also allows pagelets to raise and respond to custom events using raiseEvent and registerForEvent. The Broadcast-Listener design pattern illustrates an important example of using notification services with session preferences. Users can select an item or perform some other action in a "broadcast" pagelet, which causes the content in other related "listener" pagelets to be redrawn. In the following example, the broadcast pagelet displays a form that allows you to enter a number in a text box.
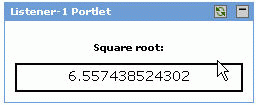
When the user enters a number in the text box, the values in the listener pagelets change. The first listener pagelet displays the square root of the number entered in the broadcast pagelet.
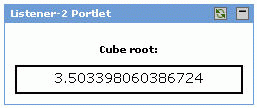
The second listener pagelet displays the cube root of the number entered in the broadcast pagelet.
The following steps summarize how the pagelets work:
-
On load, each listener pagelet calls its own instance method (
registerForEvent) to register for events of type 'onBroadcastUpdate'. -
On each onkeyup event that occurs in the "Enter number" text box, the broadcast pagelet sets a session preference to the value entered in the text box, and calls its own instance method (
raiseEvent) to raise an event of type 'onBroadcastUpdate'. -
When the onBroadcastUpdate event is raised or the page is reloaded, each listener pagelet retrieves the session preference set by the broadcast pagelet and computes a new value to display based on the value of the preference.
Broadcast Pagelet
<div style="padding:10px;" align="center">
<p><b>Enter number:</b>
<input type="text" style="font-size:22px;font-weight:bold;text-align:center;"
id="broadcast_prefName" value="4" size="7" onkeyup="broadcast_setPrefs(this.value)"></p>
<br>
</div>
<script type="text/javascript">
function broadcast_setPrefs(val)
{
var prefName = 'broadcastNumber';
var prefValue = val;
PTPortlet.setSessionPref(prefName,prefValue);
var broadcastPortlet = PTPortlet.getPortletByGUID('{D9DFF3F4-EAE7-5478-0F4C-2DBD94444000}');
if (!broadcastPortlet)
{
broadcast_debug('Could not locate PTPortlet object which corresponds to <b>Broadcast Portlet</b> on page.');
return;
}
broadcast_debug('<b>Broadcast Portlet</b> raising onBroadcastUpdate event.');
broadcastPortlet.raiseEvent('onBroadcastUpdate',false);
}
function broadcast_debug(str)
{
if (window.PTDebugUtil)
{
PTDebugUtil.debug(str);
}
}
</script>
Listener Pagelet #1
<div style="padding:10px;" align="center">
<p><b>Square root:</b>
<div style="height:21px;border:2px solid black;padding:2px;overflow:visible;font-size:14px;"id="listener1-swatch">
</div>
</div>

<script>
function listener1_update()
{
    var broadcastNumber = parseFloat(PTPortlet.getSessionPref('broadcastNumber'));
    if (isNaN(broadcastNumber))
    {
        listener1_error('<b>Listener-1 Portlet</b> cannot parse number from session pref broadcastNumber');
        return;
    }

      listener1_debug('<b>Listener-1 Portlet</b> computing square root of ' + broadcastNumber);
      var swatch = document.getElementById('listener1-swatch');
    swatch.innerHTML = Math.sqrt(broadcastNumber);
}

function listener1_debug(str)
{
    if (window.PTDebugUtil)
    {
        PTDebugUtil.debug(str);
    }
}

function listener1_error(str)
{
    if (window.PTDebugUtil)
    {
        PTDebugUtil.error(str);
    }
}

function listener1_getPortlet()
{
    var portletGUID = '{D9DFF3F4-EAE7-5478-0F4C-2DBDB4F4A000}';
    var listener1Portlet = PTPortlet.getPortletByGUID(portletGUID);
    return listener1Portlet;
}

var listener1Portlet = listener1_getPortlet();
if (listener1Portlet)
{
    listener1Portlet.registerForEvent('onBroadcastUpdate','listener1_update');
    listener1_debug('<b>Listener-1 Portlet</b> registered refreshOnEvent for event onBroadcastUpdate');
    listener1Portlet.registerForEvent('onload','listener1_update');
}

</script>
Listener Pagelet #2
<div style="padding:10px;" align="center">
<p><b>Cube root:</b>
<div style="height:21px;border:2px solid black;padding:2px;overflow:visible;font-size:14px;"id="listener2-swatch">
</div>
</div>

<script>
var listener2_oneThird = (1/3);
function listener2_update()
{
    var broadcastNumber = parseFloat(PTPortlet.getSessionPref('broadcastNumber'));
    if (isNaN(broadcastNumber))
    {
        listener2_error('<b>Listener-2 Portlet</b> cannot parse number from session pref broadcastNumber');
        return;
    }

    listener2_debug('<b>Listener-2 Portlet</b> computing square root of ' + broadcastNumber);
    var swatch = document.getElementById('listener2-swatch');
    swatch.innerHTML = Math.pow(broadcastNumber,listener2_oneThird);
}

function listener2_debug(str)
{
    if (window.PTDebugUtil)
    {
        PTDebugUtil.debug(str);
    }
}

function listener2_error(str)
{
    if (window.PTDebugUtil)
    {
        PTDebugUtil.error(str);
    }
}

function listener2_getPortlet()
{
    var portletGUID = '{D9DFF3F4-EAE7-5478-0F4C-2DBDCA1C7000}';
    var listener2Portlet = PTPortlet.getPortletByGUID(portletGUID);
    return listener2Portlet;
}

var listener2Portlet = listener2_getPortlet();
if (listener2Portlet)
{
    listener2Portlet.registerForEvent('onBroadcastUpdate','listener2_update');
    listener2_debug('<b>Listener-2 Portlet</b> registered refreshOnEvent for event onBroadcastUpdate');
    listener2Portlet.registerForEvent('onload','listener2_update');
}

</script>
65.3.1.2.1 Page-Level Events for Use with the Scripting Framework
The scripting framework automatically has access to the following page-level events.
| Event | Triggered: |
|---|---|
|
onload |
immediately after the browser loads the page |
|
onbeforeunload |
prior to a page being unloaded (browser window closes or navigates to different location) |
|
onunload |
immediately before the page is unloaded (browser window closes or navigates to different location) |
|
onactivate |
the page is set as the active element (receives focus) |
|
onbeforeactivate |
immediately before the page is set as the active element (receives focus) |
|
ondeactivate |
when the active element is changed from the current page to another page in the parent document |
|
onfocus |
when the page receives focus |
|
onblur |
when the page loses focus |
|
oncontrolselect |
when the user is about to make a control selection of the page |
|
onresize |
when the size of the page is about to change |
|
onresizestart |
when the user begins to change the dimensions of the page in a control selection |
|
onresizeend |
when the user finishes changing the dimensions of the page in a control selection |
|
onhelp |
when the user presses the F1 key while the browser is the active window |
|
onerror |
when an error occurs during page loading |
|
onafterprint |
immediately after an associated document prints or previews for printing |
65.3.1.3 Using In-Place Refresh
To refresh pagelet content in place, without affecting other content on the page, use the scripting framework to implement in-place refresh.
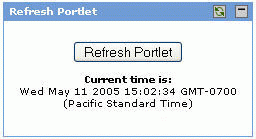
Many pagelets display data that is time sensitive. In some cases, users should be able to navigate across links within a pagelet without changing or refreshing the rest of the page. You can refresh pagelet content on command, associate the refresh action with an event (refreshOnEvent), or program the pagelet to refresh at a set interval (setRefreshInterval). The scripting framework also contains methods for expanding and collapsing pagelets. In the simplified example below, the refresh pagelet displays a "Refresh Portlet" button. Clicking the button updates the date and time displayed in the pagelet.
The in-place refresh is executed by calling the refresh() method on the pagelet object instance. You can also set a new URL to be displayed within the pagelet upon refresh. (The title bar cannot be altered on refresh.)
<div style="padding:10px;" align="center">
<p><button onclick="refresh_portlet()">Refresh Portlet</button></p>
<p><b>Current time is:</b><br> <span id="refreshTimeSpan"></span></p>
</div>

<script type="text/javascript">
function refresh_portlet()
{
var refreshPortlet = PTPortlet.getPortletByID($PORTLET_ID$);
if (!refreshPortlet)
  {
  refresh_debug('Could not locate PTPortlet object which corresponds to <b>Refresh Portlet</b> on page.');
  return;
  }
refresh_debug('<b>Refresh Portlet</b> calling refresh() method.');
refreshPortlet.refresh();
}

function refresh_debug(str)
{
if (window.PTDebugUtil)
  {
  PTDebugUtil.debug(str);
  }
}

var t = new Date();
document.getElementById('refreshTimeSpan').innerHTML = t;
</script>
65.3.1.4 Using Session Preferences
To store and share settings within the client browser, use session preferences.
Pagelets can use preferences to communicate with each other, but accessing preferences usually requires a round trip to a database. Session preferences provide a way to store and share settings in the user's session within the client browser. The Master-Detail design pattern illustrates the most basic usage of session preferences. This design pattern splits control and display between two pagelets. For example, the "master" pagelet could summarize data in list form, and the "detail" pagelet could display details on each data item in response to user selection. In the example below, the master pagelet displays a form that allows you to enter a color code in a text box.
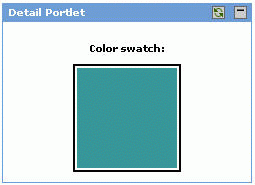
When the user enters a color code in the text box, the color in the detail pagelet changes.
For each onkeyup event that occurs in the "Enter color" text box in the master pagelet, the following steps are executed:
-
The master pagelet sets the session preference using the current value of the text box.
-
The master pagelet calls an update method on the detail pagelet.
-
The detail pagelet retrieves the session preference to get the color value.
-
The detail pagelet redraws its color swatch area to reflect the new color value.
Note:
Shared session preferences must be specified by name on the Preferences page for the pagelet in the Pagelet Producer Console or they will not be sent to the pagelet.
The adaptive pagelet scripting framework provides an easy way to detach the relationship between pagelets and use a common event interface for communication.
Note:
The example below is oversimplified; the master pagelet makes a direct call to a JavaScript method of the detail pagelet. Unless the master pagelet takes extra measures to ensure that the detail pagelet is actually present on the same page, calls from master to detail could generate errors.
Master Pagelet
<div style="padding:10px;" align="center">
<p><b>Enter color:</b>
<input type="text" style="font-size:22px;font-weight:bold;text-align:center;" id="master_prefName"
value="#FFFFFF" size="8" onkeyup="master_setPrefs(this.value)"></p><br>
</div>
<script type="text/javascript">
function master_setPrefs(val)
{
var prefName = 'masterColor';
var prefValue = val;
PTPortlet.setSessionPref(prefName,prefValue);
master_debug('<b>Master Portlet</b> called PTPortlet.setSessionPref(\'masterColor\',\'' + prefValue + '\').');
if (window.detail_update)
{
master_debug('<b>Master Portlet</b> calling detail_update().');
detail_update();
}
else
{
master_debug('Could not locate portlet <b>Detail Portlet</b> on page.');
}
}
function master_debug(str)
{
if (window.PTDebugUtil)
{
PTDebugUtil.debug(str);
}
}
</script>
Detail Pagelet
<div style="padding:10px;" align="center">
<p><b>Color swatch</b>
<div style="width:100px;height:100px;border:2px solid black;padding:2px;"id="detail-swatch"></div>
<script>
function detail_update()
{
var color = PTPortlet.getSessionPref('masterColor');
detail_debug('<b>Detail Portlet</b> received value="' + color + '" for PTPortlet.getSessionPref(\'masterColor\')');
var swatch = document.getElementById('detail-swatch');
if (swatch)
{
swatch.innerHTML = '<div style="background-color:' + color + ';width:100%;height:100%;"></div>';
}
else
{
detail_debug('<b>Detail Portlet</b> cannot find \'detail-swatch\' DIV element.');
}
}
function detail_debug(str)
{
if (window.PTDebugUtil)
{
PTDebugUtil.debug(str);
}
}
</script>
65.3.1.5 Adaptive Pagelet Development Tips
These tips apply to most pagelets that use the adaptive pagelet scripting framework.
-
Use unique names for all forms and functions. Use the GUID of a pagelet to form unique names and values to avoid name collisions with other code on the page.
-
Proxy all URLs. You cannot make a request to a URL with a host/port that is different from that of the calling page. All URLs requested through JavaScript must be proxied. For details, see Section 65.3, "Building Pagelets Using the Pagelet Producer"
-
If you are using the adaptive pagelet scripting framework, check for support. It is good practice to include code that determines whether or not the component is present. Ideally, your pagelet should be able to handle either situation. The simplest solution is to precede your code with an If statement that alerts the user if the scripting framework is not supported.
<script> if (PTPortlet == null) { if (document.PCC == null) { alert("This pagelet only works in portals that support the JSPortlet API . The pagelet will be displayed with severely reduced functionality. Contact your Administrator."); } } else { [scripting code here] } </script> -
Close all popup windows opened by a pagelet when the window closes. The scripting framework can be used to close popup windows using the
onunloadevent. -
Add all required JavaScript to the page in advance. Browsers might not process script blocks/includes added to the page through the
innerHTMLproperty.-
Microsoft Internet Explorer: Add the defer attribute to the script tag.
-
Netscape: Use RegExp to parse the response and look for the script, then eval it.
-
-
JavaScript HTTP and proxied HTTP must use the same authentication credentials. JavaScript brokered HTTP requests send the same authentication token (cookie) as when you make a normal gatewayed HTTP request.
65.3.2 Using Pagelet Producer Credential Mapping
The Pagelet Producer manages authentication with each proxied application based on the settings defined for the associated resource.
The Pagelet Producer provides an API for creating custom mappings to external credential stores, allowing you to authenticate users against a custom credential source.
The IVendorCredentialMapper interface defines the Pagelet Producer interface for objects capable of obtaining an appropriate set of credentials needed for secondary authentication for a particular user in an application. To implement this interface, follow the directions below.
-
Create a java class that implements the
com.plumtree.runner.credentialmapper.IVendorCredentialMapperinterface. -
Map the
getCredentialandsetCredentialmethods of this interface to your credential vault. The simplified example below uses an internal class calledVConnectorand callsVConnector.getInstance(). getCredentialsForDomain. Note: This step is vendor-specific. It will probably include a network hop, since the credential store will most likely reside on another server. You must give the mapper a unique name, and localized ones if necessary. See the IVendorCredentialMapper API documentation for all required names. -
Compile the class into a jar. The build process must link to
common.jar, included with the Pagelet Producer distribution. -
Load the custom vault into the Pagelet Producer. For details, see the Oracle Fusion Middleware Administrator's Guide for Oracle WebCenter Portal.
-
Restart the Pagelet Producer server (both proxy and adminui if they are on separate servers). The custom credential vault should show up in the list of credential sources on the Credential Mapping page of the Resource editor.
The example below is simplified for illustration purposes.
package com.oracle.credentialvault;
import com.oracle.connector.CredentialsSet;
import com.oracle.connector.VConnector;
import com.plumtree.runner.credentialmapper.Credential;
import com.plumtree.runner.credentialmapper.IVendorCredentialMapper;

public class OracleCredentialVault implements IVendorCredentialMapper {

  /*
  * Pagelet Producer will pass credential types as following:
  * Runner_*, where * is what the credential value type associated with this login
  * form in the adminui. For example, if the credential value type is
  *  'username' then "Runner_username" will be passed to the mapper.
  */
  public Credential getCredential(String initiator, String credType)
  {
     System.out.println("OracleCredentialVault::getCredential, initiator: " + initiator + ", credType: " + credType);

    /*
     * Since this vault stores credentials per user and domain, we need to devise
     * a scheme to map Pagelet Producer's credential type to a domain.
     * One way to do this is to specify the credential type as something like:
     * "domain_type", which would translate to credTypes like:
     * Runner_domain.com_username and Runner_domain.com_password
     */

    String username = initiator.toLowerCase(); // assume that the vault stores all usernames in lowercase
    String domain = "oracle.com"; //getDomain(credType);
    String type = credType; //getType(credType);

    CredentialsSet credSet = VConnector.getInstance().getCrededentialsForDomain(username, domain);
    if( credSet != null ) {
        System.out.println("OracleCredentialVault::getCredential, found vault set: " + credSet.toString() + ", returning type = " + type);
        return new Credential(credSet.getCredential(type));
    } else {
       System.out.println("OracleCredentialVault::getCredential, found null vault set");
       return null;
    }
  }

  public String getDescription(String userLocale)   {
    return "Test mapper that mimics a mapper between Pagelet Producer and a credential vault that associates credentials with a username/domain relationship";
  }

  public String getName() {
     return "OracleCredentialVault";  }

  public String getName(String userLocale) {
     return "OracleCredentialVault"; }

  public String getVendorName(String userLocale) {
     return "Oracle"; }

  public boolean setCredential(String initiator, Credential credential, String credType)
  {
     System.out.println("OracleCredentialVault::setCredential, initiator: " + initiator + ", credType: " + credType + ", Credential: " + credential.getCredentialValue());

     String username = initiator.toLowerCase(); // assume that the vault stores all usernames in lowercase
     String domain = "oracle.com"; //getDomain(credType);
     String type = credType; //getType(credType);

     System.out.println("OracleCredentialVault::setCredential setting username: " + credential.getCredentialValue());
     CredentialsSet userCredSet = VConnector.getInstance().getCrededentialsForDomain(username, domain);
     userCredSet.setCrededential(type, credential.getCredentialValue());
     VConnector.getInstance().setCrededentialsForDomain(username, domain, userCredSet);
     return true;
  }

  public boolean supportsCredentialsEditing()
  {
        // We can set new credentials using this vault
        return true;
    }
  /*
  private String getDomain(String credType)
  {
     int dstart = credType.indexOf("_");
     int dend = credType.indexOf("_", dstart+1);
     String domain = credType.substring(dstart+1, dend);
     System.out.println("TestMapper::getDomain, reading domain as: " + domain);
     return domain;
  }
  */
  /*
  private String getType(String credType)
  {
     int dstart = credType.indexOf("_");
     dstart = credType.indexOf("_", dstart+1);
     String type = credType.substring(dstart+1, credType.length());
     System.out.println("TestMapper::getType, reading type as: " + type);
     return type;
  }
  */
  /*
  private String doGetPropertyValue(String principal, String property)
  {
     return doGetPropertyValue(principal, property, ",", "=");
  }
  */
  /*
  private String doGetPropertyValue(String principal, String property, String propDelim, String valueDelim)
  {
     int propertyindex = principal.toLowerCase().indexOf(property.toLowerCase());
     String uname = null;
     if( propertyindex != -1)
     {
        // found a property occurence
        int beginIndex = propertyindex;
        int endIndex = principal.toLowerCase().indexOf(propDelim.toLowerCase(), beginIndex);
        String prop = null;
        if(endIndex != -1)
        {
           prop = principal.subSequence(beginIndex, endIndex).toString().trim();
         } else {
           prop = principal.subSequence(beginIndex, principal.length()).toString().trim();
         }
         if( prop != null )
         {
           int valueIndex = prop.toLowerCase().indexOf(valueDelim);
           if(valueIndex != -1)
           {
              uname = prop.subSequence(valueIndex + valueDelim.length(), prop.length()).toString().trim();
           }
         }
     }
     return uname;
  }
   */
}
For details on configuring resources to use credential mappings, see the section "Creating Pagelet Producer Resources and Pagelets" in the Oracle Fusion Middleware Administrator's Guide for Oracle WebCenter Portal.
65.3.3 Modifying Pagelet Functionality at Runtime
The Pagelet Producer allows you to modify pagelet functionality at runtime using custom injectors and parsers.
65.3.3.1 Creating Web Injectors
A web injector inserts content into a specified location in the proxied resource page. The content may be any text, including HTML, CSS, JavaScript, and pagelet declarations. An empty injector may also be used to remove unwanted content from a page. Injectors cannot be created for OpenSocial resources. While injecting simple HTML content has a limited use case, you can also inject JavaScript that directly modifies the pagelet's HTML markup.
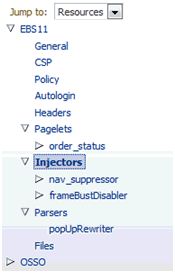
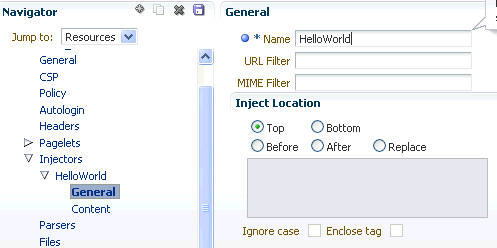
To create a web injector, select the Injectors section under the resource you want to use and click the Create icon in the toolbar.
The injector can be applied to a subset of the resource by typing a URL pattern into the URL Filter field. The injector will be applied only to those URLs within the resource that begin with the text in the URL Filter box. If the box is empty or contains only a '/', the injector will be applied to the entire resource.
To restrict the injector to specific kinds of content, type a comma separated list of MIME types in the MIME Filter box. For example, text/html restricts the injector to HTML content, while text/css only restricts the injector to CSS content.
Define where in the resource's output the injection will be made:
-
Top puts the content first in the page. Do not use this option to inject pagelet declarations.
-
Bottom puts the content last in the page.
-
The Before/After/Replace options put the content into the page relative to the unique string specified in the field provided. You can choose to ignore the case of the string by selecting Ignore case.
The Enclose tag option identifies the unique string and replaces both the text and the enclosing tag with the content specified on the next page.
Figure 65-11 Pagelet Producer Console: Injectors - General Page
Description of "Figure 65-11 Pagelet Producer Console: Injectors - General Page"
Enter the content to be injected on the Content page. This content may be any text, including HTML, CSS, JavaScript, and pagelet declarations.
For example, the following code could be injected at the top of a page. This example registers a handler function with the page load event and then uses the handler to modify the page markup (by finding and hiding the header and footer).
<script type="text/javascript">
if (window.addEventListener) {
  window.addEventListener('load', hideHeaderFooter, false);
} else if (document.attachEvent) {
  window.attachEvent('onload', hideHeaderFooter);
}
function hideHeaderFooter() {
  var header = null;
  // find the header table by class
  if (document.getElementsByClassName) {
    header = document.getElementsByClassName('page_header')[0];
  } else {
    // for older versions of IE
    var tables = document.getElementsByTagName('table');
    for (var table in tables) {
      if (table.class == 'page_header') {
        header = table;
        break;
      }
    }
  }
  if (header != null) {
    header.style.display = 'none';
  }
  // now find and hide the footer (easier to find, since it has an id)
  var footer = document.getElementById('t23PageFooter');
  if (footer != null) {
    footer.style.display = 'none';
  }
}
</script>
65.3.3.2 Creating Custom Parsers
Custom parsers allow you to supplement or change built-in logic for parsing content and finding URLs. When the built-in parsers fail to identify URLs or identify sections that must not be rewritten as URLs, custom parsers can be used to change the default behavior. Parsers cannot be created for WSRP or Oracle JPDK portlet producers or for OpenSocial gadget producers.
To create a custom parser, select the Parsers section under the resource you want to use and click the Create icon in the toolbar.
-
Enter a Name for the parser.
-
The parser can be applied to a subset of the resource by typing a URL pattern into the URL Filter box. The parser will be applied only to those URLs within the resource that begin with the text in the URL Filter box. If the box is empty or contains only a '/', the parser will be applied to the entire resource.
-
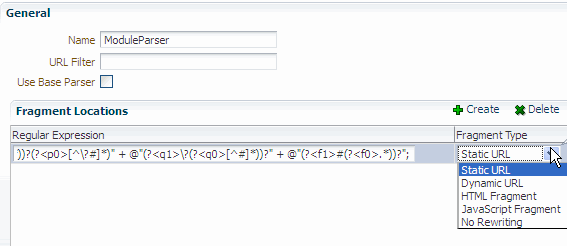
To add a new parsing rule, click Create to add a new row to the Fragment Locations section.
-
In the Regular Expressions column, enter the regular expression for identifying the URL fragment that should be transformed. The first grouping expression (in parentheses) identifies the fragment, and the rest of the expression provides the context for finding it.
-
Choose the Fragment Type to define how the selected location should be parsed:
-
Static URLs are transformed on the server.
-
Dynamic URLs are transformed using JavaScript on the client.
-
HTML Fragment and Javascript Fragment types are used for content that is embedded in another content type, such as XML.
-
No Rewriting specifies a location that should not be searched for URLs. This option is used to prevent rewriting of markup mistakenly identified as URLs.
-
-
Click the Save icon in the navigator toolbar.
Figure 65-12 Pagelet Producer Console: Parsers - General Page
Description of "Figure 65-12 Pagelet Producer Console: Parsers - General Page"
For example, the regular expression XMLFile=(.*?)" would identify URLs to XML files defined within a tag, as in <embed src="/i/flashchart/anychart_5/swf/OracleAnyChart.swf?>XMLFile=http://apex.oracle.com/pls/apex/apex_util.flash?p=53557:1:74175370346201:FLOW_FLASH_CHART5_R45192463162785599619_en".
65.3.4 Debugging Pagelets
The Pagelet Producer provides advanced logging traces for debugging pagelets. Logging is configured in the Settings section of the Pagelet Producer Console, where you can define different levels of logging for each Pagelet Producer component. (For details on Pagelet Producer configuration settings, see Managing the Oracle WebCenter Portal's Pagelet Producer in the Oracle Fusion Middleware Administrator's Guide for Oracle WebCenter Portal.)
Figure 65-13 Pagelet Producer Console: Settings - Logging
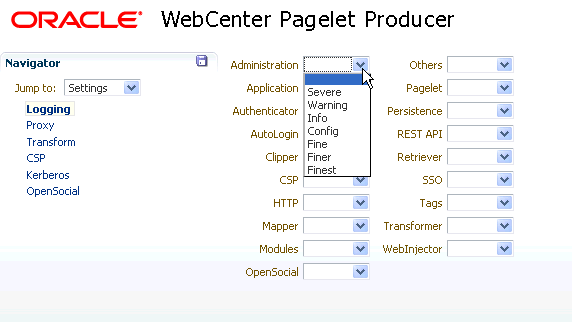
Description of "Figure 65-13 Pagelet Producer Console: Settings - Logging"
The Pagelet Producer logs messages to the standard Oracle Diagnostic Logging facility. In Oracle WebLogic Server, the logs are stored at user-projects/domains/ <domain>/servers/<server>/logs/<server>-diagnostic.log.
65.3.4.1 HTTP Tracing
To view the HTTP requests and responses received and sent by the Pagelet Producer, set the HTTP component on the Logging Settings page to Finest. The example traces below were captured from a test environment.
Example 65-5 HTTP Request Received By Pagelet Producer
URL: http://10.148.118.211:7001/pagelets/bidwiki/includes/js/ajax.js
METHOD: GET
SESSION ID: GdYGNJzMhxy1CJBMVTX8xTNq32GmLXYNY9VqFBcdprFnhcyQtzdp!1377086614!1305769149498
HEADERS:
  Host: 10.148.118.211:7001
  Connection: keep-alive
  Referer: http://10.148.118.211:7001/pagelets/bidwiki/dashboard.action
  User-Agent: Mozilla/5.0 (Windows; U; Windows NT 5.1; en-US) AppleWebKit/534.16 (KHTML, like Gecko) Chrome/10.0.648.205 Safari/534.16
  Accept: */*
  Accept-Encoding: gzip,deflate,sdch
  Accept-Language: en-US,en;q=0.8,ru;q=0.6,it;q=0.4
  Accept-Charset: ISO-8859-1,utf-8;q=0.7,*;q=0.3
  If-None-Match: W/"736-1124953206000"
  If-Modified-Since: Thu, 25 Aug 2005 07:00:06 GMT
COOKIES:
  JSESSIONID: GdYGNJzMhxy1CJBMVTX8xTNq32GmLXYNY9VqFBcdprFnhcyQtzdp!1377086614
Example 65-6 HTTP Response Sent By Pagelet Producer
URL: http://10.148.118.211:7001/pagelets/bidwiki/styles/main-action.css
Response Code: 200
Reason:
HEADERS:
  Date: Thu, 19 May 2011 01:39:14 GMT
  Content-Type: text/css;charset=UTF-8
  Server: Apache-Coyote/1.1
BODY:
.sidebar {
    /*background-image: url(http://10.148.118.211:7001/pagelets/bidwiki/download/ resources/leftnav_bg.jpg);*/
    /*background-repeat: repeat-y;*/
    background-color: #F0F0F0;
    /*border-bottom:1px solid #F0F0F0;*/
} ...
Example 65-7 HTTP Request Sent By Pagelet Producer
URL: http://xmlns.oracle.com/includes/js/ajax.js
METHOD: GET
HEADERS:
  CSP-Ensemble-REST-API: http://10.148.118.211:7001/pagelets
  X-Client-IP: 10.148.118.211
  User-Agent: Mozilla/5.0 (Windows; U; Windows NT 5.1; en-US) AppleWebKit/534.16 (KHTML, like Gecko) Chrome/10.0.648.205 Safari/534.16
  CSP-Session-Username: weblogic
  Accept-Language: en-US,en;q=0.8,ru;q=0.6,it;q=0.4
  CSP-Gateway-Type: Proxy
  PT-Proxy-Passes: 1
  If-Modified-Since: Thu, 25 Aug 2005 07:00:06 GMT
  CSP-Protocol-Version: 1.4
  Accept-Charset: ISO-8859-1,utf-8;q=0.7,*;q=0.3
  Accept-Encoding: gzip,deflate,sdch
  Referer: http://10.148.118.211:7001/pagelets/bidwiki/dashboard.action
  If-None-Match: W/"736-1124953206000"
  Accept: */*
  CSP-Aggregation-Mode: Single
  PT-Proxy-instance0: {DECBB085-D891-72CF-2B75-005E7FE20000}
  CSP-Gateway-Specific-Config: PT-User-Name=weblogic,PT-Guest-User=0,...
Example 65-8 HTTP Response Received By Pagelet Producer
Original URI: http://xmlns.oracle.com/styles/main-action.css
Effective URI: http://xmlns.oracle.com/styles/main-action.css
Status Code: 200
Reason: OK
Version: HTTP/1.1
HEADERS:
  Content-Type: text/css;charset=UTF-8
  Content-Length: 29178
  Server: Apache-Coyote/1.1
  Date: Thu, 19 May 2011 01:39:14 GMT
TRAILERS:
BODY:
body, p, td, table, tr, .bodytext, .stepfield {
  font-family: Verdana, arial, sans-serif;
  font-size: 11px;
  line-height: 16px;
  color: #000000;
  font-weight: normal;
}
65.3.4.2 Transformation Tracing
To view the content proxied by the Pagelet Producer before and after transformation, set the Transform component on the Logging Settings page to Finest. The purpose of these traces is to log response content at different stages of transformation, allowing you to compare them and view the result of different transformers.The example traces below were captured from a test environment.
Example 65-9 Untransformed Markup
Original request: URL: http://10.148.118.211:7001/pagelets/bidwiki/styles/main-action.css
METHOD: GET
SESSION ID: GdYGNJzMhxy1CJBMVTX8xTNq32GmLXYNY9VqFBcdprFnhcyQtzdp!1377086614!1305769149498
HEADERS:
  Host: 10.148.118.211:7001
  Connection: keep-alive
  Referer: http://10.148.118.211:7001/pagelets/bidwiki/dashboard.action
  User-Agent: Mozilla/5.0 (Windows; U; Windows NT 5.1; en-US) AppleWebKit/534.16 (KHTML, like Gecko) Chrome/10.0.648.205 Safari/534.16
  Accept: text/css,*/*;q=0.1
  Accept-Encoding: gzip,deflate,sdch
  Accept-Language: en-US,en;q=0.8,ru;q=0.6,it;q=0.4
  Accept-Charset: ISO-8859-1,utf-8;q=0.7,*;q=0.3
COOKIES:
  JSESSIONID: GdYGNJzMhxy1CJBMVTX8xTNq32GmLXYNY9VqFBcdprFnhcyQtzdp!1377086614

Untransformed content:
body, p, td, table, tr, .bodytext, .stepfield {
  font-family: Verdana, arial, sans-serif;
  font-size: 11px;
  line-height: 16px;
  color: #000000;
  font-weight: normal;
}
Example 65-10 Transformed Markup (Transformed by Transformer Class)
Transformed by: class com.plumtree.server.impl.portlet.transformers.CSSTurboParser
  Original request: URL: http://10.148.118.211:7001/pagelets/bidwiki/styles/main-action.css
METHOD: GET
SESSION ID: GdYGNJzMhxy1CJBMVTX8xTNq32GmLXYNY9VqFBcdprFnhcyQtzdp!1377086614!1305769149498
HEADERS:
  Host: 10.148.118.211:7001
  Connection: keep-alive
  Referer: http://10.148.118.211:7001/pagelets/bidwiki/dashboard.action
  User-Agent: Mozilla/5.0 (Windows; U; Windows NT 5.1; en-US) AppleWebKit/534.16 (KHTML, like Gecko) Chrome/10.0.648.205 Safari/534.16
  Accept: text/css,*/*;q=0.1
  Accept-Encoding: gzip,deflate,sdch
  Accept-Language: en-US,en;q=0.8,ru;q=0.6,it;q=0.4
  Accept-Charset: ISO-8859-1,utf-8;q=0.7,*;q=0.3
COOKIES:
  JSESSIONID: GdYGNJzMhxy1CJBMVTX8xTNq32GmLXYNY9VqFBcdprFnhcyQtzdp!1377086614

Transformed content:
body, p, td, table, tr, .bodytext, .stepfield {
  font-family: Verdana, arial, sans-serif;
  font-size: 11px;
  line-height: 16px;
  color: #000000;
  font-weight: normal;
}
65.4 Working with WSRP and Oracle JPDK Portlets
The Pagelet Producer can be used to present WSRP and Oracle JPDK portlets for use in any web application. For details on configuring the Pagelet Producer to connect to a WSRP or Oracle JPDK portlet producer, see Managing the Oracle WebCenter Portal's Pagelet Producer in the Oracle Fusion Middleware Administrator's Guide for Oracle WebCenter Portal. The Pagelet Producer can also modify portlet markup at runtime as explained in the next section, Section 65.4.1, "Using Pagelet Chrome."
65.4.1 Using Pagelet Chrome
Pagelet chrome allows you to modify markup at runtime in pagelets created from portlets imported from a WSRP or JPDK portlet producer.
A pagelet chrome template is an HTML file that specifies:
-
How portlet markup should be rendered stylistically
-
How to display the portlet title
-
How to render mode switching options
The default chrome template displays the portlet name and a dropdown menu that allows the user to switch into different modes. The dropdown menu is dynamically populated with all the standard modes supported by the underlying portlet. Templates uses the following reserved tokens to identify key portlet elements, which the Pagelet Producer substitutes at runtime.
Table 65-3 Pagelet Chrome Template Tokens
| Token | Description |
|---|---|
$$PORTLET TITLE$$ |
Portlet title |
$$REPEAT MENU ITEM$$ |
Used to indicate the beginning of a repeating section for navigational items |
$$END REPEAT MENU ITEM$$ |
Used to indicate the end of a repeating section for navigational items |
$$MENU ITEM URL$$ |
Navigation URL (to switch portlet modes or window states) |
$$MENU ITEM$$ |
Display name of navigational item (for example, Customize) |
$$TOKEN$$ |
Unique identifier for pagelet instance on the page |
$$PORTLET CONTENT$$ |
Portlet content |
pt://images |
Tag used to indicate the imageserver URL |
The example below is a very simple pagelet chrome template:
<script type="text/javascript">
function goto(url)
{
  document.location = url;
  return false;
}
</script>
<div style="border: 1px solid">
<span><b><!-- $$PORTLET TITLE$$ --></b></span>
<span style="align: right">
  Switch Mode:
  <select size="1" name="mode">
    <!-- $$REPEAT MENU ITEM$$ -->
    <option onclick="goto('$$MENU ITEM URL$$')"><!-- $$MENU ITEM$$ --></option>
    <!-- $$END REPEAT MENU ITEM$$ -->
  </select>

</span>
</div>
<!-- $$PORTLET CONTENT$$ -->
Note:
The pagelet chrome template file must be hosted on the classpath of the Pagelet Producer web application.
If you configured Pagelet Producer to use an external image server, copy the files from ensemblestatic.war/imageserver/yahoo to your image server to properly render the default chrome template.
To implement the chrome template, add it as a parameter to the pagelet inject URL (REST or JavaScript). For details on pagelet inject URLs, see Section 65.2.2, "Adding a Pagelet to a Web Page." For example:
-
REST:
/inject/v2/pagelet/pagelet_lib/pagelet_name?chrome=mychrome.html -
JavaScript:
injectpagelet(library, name, iframe_options, payload, params, context_id, element_id, is_in_community, chrome)
The value of the chrome parameter can be the name of the file containing the chrome template or the special reserved value "none", which suppresses all chrome and sends back portlet markup only. If the chrome parameter is omitted, the default chrome is returned with the portlet markup. The default chrome template uses YUI menu control to display a gradient title bar and a DHTML dropdown menu for switching modes. (When ADF content is detected, a different chrome template is used by default. This template can be overridden with a custom template or with the standard default template by setting chrome=chrometemplate.html.)
65.5 Working with OpenSocial Gadgets
Any OpenSocial gadget reachable by the Pagelet Producer server can be registered as a pagelet and used in any web application, including a portal. For details on registering OpenSocial pagelets with the Pagelet Producer, see Managing the Oracle WebCenter Portal's Pagelet Producer in the Oracle Fusion Middleware Administrator's Guide for Oracle WebCenter Portal.
The Pagelet Producer supports most of the standard OpenSocial APIs excluding OAuth. The complete OpenSocial API reference documentation can be found here: http://docs.opensocial.org/display/OSD/Javascript+API+Documentation.
The Pagelet Producer also allows gadgets to store preferences, retrieve WebCenter Portal profile and connection information, and access a user's activity stream using OpenSocial APIs. For more details on using these features, see the sections that follow.
65.5.1 Configuring Authentication
In order for gadgets to request user-level data (preferences or people connections), the end user's identity must be established. If any OpenSocial gadgets need to access user-level data from the server, you must configure a security policy for the parent OpenSocial resource in the Pagelet Producer Console. The first time a user accesses an OpenSocial gadget, a login page will be presented. After the initial login, subsequent requests for OpenSocial gadgets will use the established user identity.
For details on configuring a security policy for a Pagelet Producer resource, see the Managing Pagelets chapter in the Oracle Fusion Middleware Administrator's Guide for Oracle WebCenter Portal
65.5.2 Storing User Preferences
OpenSocial gadgets may use user preferences to store data at the container. User preferences are scoped to a particular user and may optionally be scoped to an appId (the gadget appId is the pagelet context ID). If you choose to use the OpenSocial gadget.Prefs API, the user preferences will be scoped to the user and pagelet instance. Alternatively, you may use the opensocial.DataRequest API to manage preferences at the user level that can be shared with other pagelets.
When registered as a pagelet, a gadget's user preferences are treated as pagelet preferences. In WebCenter Portal, for example, non-hidden user preferences can be edited by the end user using the Personalize button. Additionally, to simulate preferences shared between users, you may pass in user preferences via pagelet parameters. Note that a pagelet preference, if set, will always override the corresponding pagelet parameter (in other words, personalization takes precedence over customization).
Outside of WebCenter Portal, gadget-backed pagelets are provided with a simple chrome that displays the gadget title and buttons for accessing the preference editor and minimizing/maximizing the gadget. The chrome may be suppressed by passing in the value of 'none' to the chrome parameter in the Pagelet Inject API. The preference editor UI supports all four types of user preferences:
-
string: rendered as a text field
-
bool: rendered as a checkbox
-
enum: rendered as a dropdown list
-
list: rendered as a text field (values must be separated with a pipe "|" character)
65.5.3 Accessing WebCenter Portal Profile Information
OpenSocial gadgets can query the current user's profile data and people connections via the standard OpenSocial APIs. To use this feature, you must manually target the WebCenterDS data source to the WC_Portlet server as described in Managing the Oracle WebCenter Portal's Pagelet Producer in the Oracle Fusion Middleware Administrator's Guide for Oracle WebCenter Portal.
Note:
The OpenSocial API cannot be used to update profile or connection information.
The supported user profile fields are listed in the table below.
Table 65-4 User Profile Fields
| OpenSocial Field | Type | Description |
|---|---|---|
|
aboutme |
string |
A general statement about the person. |
|
addresses |
Plural-Field <Address> |
A physical mailing address for the person. |
|
appData |
Plural-Field <AppData> |
A collection of AppData keys and values, used for preferences. |
|
birthday |
Date |
The birthday of the person. The value MUST be a valid Date. The year may be set to 0000 when the age of the person is private or the year is not available. |
|
emails |
Plural-Field <string> |
E-mail address for the person. |
|
location |
string |
Physical address for the person. |
|
name |
Name |
The broken-out components and formatted version of the person's real name. |
|
organizations |
Plural-Field <Organization> |
Current or past organizational affiliation of the person. |
|
phoneNumbers |
Plural-Field <string> |
Phone number for the person. In addition to the standard canonical values for type, this field defines the additional values mobile, fax, and pager. |
|
photos |
Plural-Field <string> |
URL to a photo of the person. The value MUST point to an actual image file (e.g. a GIF, JPEG, or PNG image file) rather than to a web page containing an image. Note that this field SHOULD NOT be used to send down arbitrary photos taken by this user, but specifically profile photos of the contact suitable for display when describing the contact. |
|
preferredUsername |
string |
The preferred username of this person on sites that ask for a username (e.g. jsmarr or daveman692). |
|
status |
string |
The person's status, headline or shoutout. |
|
thumbnailUrl |
string |
The person's photo thumbnail URL, specified as a string. This URL MUST be fully qualified. |
65.5.4 Accessing a User's Activity Stream
OpenSocial gadgets can operate on a user's activity stream using OpenSocial APIs. The following operations are supported:
-
get activities
-
create activity
The following operations are not supported:
-
update activity
-
delete activity
The supported activity stream fields are listed in the table below.
Table 65-5 Activity Stream Fields
| OpenSocial Field | Type | Description |
|---|---|---|
|
appId |
Object-Id |
The application with which the activity is associated. |
|
body |
string |
An optional expanded version of the activity. Bodies may only have the following HTML tags: <b> <i>, <a>, <span>, but this formatting may be ignored. |
|
externalId |
Object-Id |
An optional ID generated by the posting application. |
|
id |
Object-Id |
An ID that is permanently associated with the activity. |
|
postedTime |
string |
The time at which the activity took place in milliseconds since the epoch. |
|
priority |
number |
A number between 0 and 1 representing the relative priority of the activity in relation to other activities from the same source. |
|
title |
string |
The primary text of the activity. Titles may only have the following HTML tags: <b> <i>, <a>, <span>, but this formatting may be ignored. |
|
userId |
Object-Id |
ID of the user for whom the activity is defined. |
65.5.5 Using Gadget Eventing
The Pagelet Producer supports the OpenSocial pubsub inter-gadget eventing model. A gadget may publish events over any number of arbitrary channels (defined by simple string names) in JavaScript. On the receiving end, a gadget may subscribe to receive events over any number of channels, again in JavaScript, and take appropriate actions based on the events.
function connSelected(element) {
  var connId = element.id;
  var connName = element.lastChild.textContent;
  gadgets.pubsub.publish(channel, {id: connId, name: connName});
For a complete JavaScript reference to the supported eventing API, see http://docs.opensocial.org/display/OSD/Javascript+API+Documentation. Also see http://docs.opensocial.org/display/OSD/Core-Gadget+-+PubSub.
65.5.6 Example: Consuming an External OpenSocial Gadget
The example that follows is simplified for illustration. For details on Pagelet Producer Console settings, see the Managing Oracle WebCenter Portal's Pagelet Producer chapter in the Oracle Fusion Middleware Administrator's Guide for Oracle WebCenter Portal.
-
Using the Pagelet Producer Console, create a new Resource and choose OpenSocial as the type. Define URLs and policies as necessary. Save the new Resource.
-
Using the Pagelet Producer Console, create a new pagelet and enter the location of the gadget XML schema in the Gadget URL field.
-
To import the gadget name and any user preferences defined for the gadget, click the Import Gadget Metadata button. If any of the preferences are editable, the Pagelet Producer will create a preference editor using the imported preferences.
-
To configure or customize the generated preference editor, go to the Pagelet Parameters page.
-
-
Go to the Documentation page to view sample code to access the pagelet and preference editor using either the JavaScript or REST API.
-
Save the new pagelet.
65.5.7 Example: Consuming a Local OpenSocial Gadget
The example that follows is simplified for illustration. For details on Pagelet Producer Console settings, see the Managing Oracle WebCenter Portal's Pagelet Producer chapter in the Oracle Fusion Middleware Administrator's Guide for Oracle WebCenter Portal.
-
Using the Pagelet Producer Console, create a new Resource and choose OpenSocial as the type. Define URLs and policies as necessary. Save the new Resource.
-
Create or upload the gadget file.
Note:
If you choose to host OpenSocial gadget XML files, the files must be placed under an anonymous resource (with no security policy) or gadget functionality will not work correctly.
-
Select the Files section under the resource and click the Create icon in the toolbar.
-
On the General page, enter the relative path to the file in the Name field. Do not use a leading forward-slash ("/"). For example, "gadgets/activities.xml". Any path and name can be used; the path is a 'virtual' URL that the Pagelet Producer will use to serve the file. The visual directory structure of the Files collection in the navigator is updated to match the path to the file.
-
Go to the Content page to upload or create the gadget file.
To upload a gadget file, enter the path to the file or click the Browse button to navigate to the file, then click the Upload button to upload the file to the Pagelet Producer server.
To create a gadget file, use the editor on the Content page to enter and edit content.
-
Click the Save icon in the navigator toolbar.
-
-
Create or upload any other files required by the gadget (JavaScript, images, etc.) in the Files section of the resource. Define paths for the files that match the paths in the gadget code. For example, if the gadget uses JavaScript files in a subfolder called "js", include that directory in the Name field when you upload the files, e.g., "gadgets/js/activities.js".)
-
Using the Pagelet Producer Console, create a new pagelet and enter the relative path to the gadget XML schema (created or uploaded in step 2) in the Gadget URL field. For local files, this is the same path defined in the Name field for the file object; for example, "gadgets/activities.xml".
-
To import the gadget name and any user preferences defined for the gadget, click the Import Gadget Metadata button. If any of the preferences are editable, the Pagelet Producer will create a preference editor using the imported preferences.
-
To configure or customize the generated preference editor, go to the Pagelet Parameters page.
-
-
Go to the Documentation page to view sample code to access the pagelet and preference editor using either the JavaScript or REST API.
-
Save the new pagelet.
65.6 Using Pagelets to Integrate Markup from Portlets, ADF Taskflows, and Oracle Applications into Oracle WebCenter Sites
This section is aimed at developers who need to integrate content into Oracle WebCenter Sites 11g pages, including existing WSRP portlets or elements of web UI exposed by backend applications such as Oracle EBS. Developers should be familiar with Oracle WebCenter Sites and Oracle WebCenter Pagelet Producer and have a solid understanding of web technologies.
This section includes the following subsections:
-
Section 65.6.3, "Propagating Identity from the Pagelet Producer to the Backend Application"
-
Section 65.6.5, "Consuming WebCenter Portal Services as Pagelets in Sites"
-
Section 65.6.6, "Consuming Applications as Pagelets (An Example Using EBS11i)"
65.6.1 Adding Pagelets to Oracle WebCenter Sites
Once a pagelet and its related resources are configured, you can insert it into a web page using JavaScript or REST. For more information, see Section 65.2.2, "Adding a Pagelet to a Web Page."
Here, we'll use an approach in which pagelets are added directly to a page template in Oracle WebCenter Sites using an iFrame with a REST URL for accessing pagelets as a content source. This requires an addition to the page template script tag to load the CSAPI JavaScript library (which adds necessary functions into the parent page), as well as the actual iFrame that loads pagelet content:
<script type="text/javascript" src="http://%PAGELET_PRD_HOST%/pagelets/inject/v2/csapi"/>
<iframe id="pt-pagelet-iframe-1" width="100%" frameborder="0" src="http://%PAGELET_PRD_HOST%/pagelets/inject/v2/pagelet/lib_name/pagelet_name?content-type=html&consumepage=true&ifheight=auto"></iframe>
Where lib_name and pagelet_name refer to the library and pagelet configured in the Pagelet Producer. For more information about parameters, see Section 65.2.2.2, "Accessing Pagelets Using REST."
65.6.1.1 Enabling IFrame Auto-Resizing
To provide a more seamless integration of the pagelet into the consuming page, you can make the pagelet iFrame behave more like inline markup by dynamically resizing to accommodate its content. To enable this feature, some extra configuration is required in both Sites and the Pagelet Producer.
This section uses the AviSports sample site shipped with WebCenter Sites. To add any new asset to this site, you must log in to the Sites Administration page and open the Dev section in the left hand navigation as shown below:
First, create a new template with the following settings:
-
Name
-
Name: iFrameResizeRelay (or name of your choice)
-
For Asset Type: Applicable to various asset types (typeless)
-
-
Element
-
Usage: Element defines a whole HTML page and can be called externally
-
Element Storage Path/Filename: iframe-resize.html (or name of your choice)
-
Element Logic:
<html>
  <head>
    <title>Resizing Page</title>
    <script type="text/javascript">
function onLoad() {
var params = window.location.search.substring( 1 ).split( '&' );
var height;
var width;
var iframe;
for( var i = 0, l = params.length; i < l; ++i ) {
var parts = params[i].split( '=' );
switch( parts[0] ) {
case 'height':
height = parseInt( parts[1] );
break;
case 'width':
width = parseInt( parts[1] );
break;
case 'iframe':
iframe = parts[1];
break;
}
}
window.top.updateIFrame( iframe, height, width );
}
if (window.addEventListener) {
window.addEventListener("load", onLoad, false);
} else if (window.attachEvent) {
window.detachEvent("onload", onLoad);
window.attachEvent("onload", onLoad);
} else {
window.onload=onLoad;
}
    </script>
  </head>
  <body>
  </body>
</html>
-
-
Site Entry
-
Cache Rules: Cached (default)
-
-
Save
-
Record SiteCatalog Pagename as
%PAGENAME%(if you used the default name, this would be<site_name>/iFrameResizeRelay)
The new template is addressable as follows:
http://%SITES_HOST%/cs/Satellite?pagename=%PAGENAME%
Make a note of this URL; it will be used to configure the Injector for the pagelet.
Next, apply the iFrame resizing feature by adding a new Injector to the pagelet via the Pagelet Producer Administration Console. Open the pagelet, select Injectors and create a new Injector with the following settings:
-
General
-
Name: auto_resizer (or name of your choice)
-
URL Filter: <none>
-
MIME Filter: text/html
-
Inject Location: Before </head>
-
-
Content: Select Text (default) and copy the JavaScript below into the text area
Replace SITES_RESIZE_RELAY_PAGE in the JavaScript below with the URL to the template you created in the previous step.
<script type="text/javascript">
var SITES_RESIZE_RELAY_PAGE = "http://%SITES_HOST%/cs/Satellite?pagename=%PAGENAME%"; // CHANGE ME!

if (window.addEventListener) {
    window.addEventListener("load", calculateSizeFixed, false);
} else if (window.attachEvent) {
    window.attachEvent("onload", calculateSizeFixed);
} else {
    window.onload=calculateSizeFixed;
}
function calculateSizeFixed() {
  var PTResizeIFrame = PTResizeIFrame || {};
  if (PTPortalPage && PTPortalPage.portlets) {
    for (var i in PTPortalPage.portlets) {
      if ( PTPortalPage.portlets[i].id != "page") {
        PTResizeIFrame.pageletInstanceID = PTPortalPage.portlets[i].id;
        break;
      }
    }
  }
  else if (!PTResizeIFrame.pageletInstanceID) {
    PTResizeIFrame.pageletInstanceID = 1;
  }

  if (!PTResizeIFrame.pageletResizePage) {
    var match = window.location.search.match(/resizepage=[^&]*/);
    if (match != null && match.length > 0) PTResizeIFrame.pageletResizePage = unescape(match[0].substr("resizepage=".length));
    else PTResizeIFrame.pageletResizePage = SITES_RESIZE_RELAY_PAGE;
  }
  var agent = navigator.userAgent;
  var ffversion = agent.indexOf("Firefox") >= 0 ? agent.substring(agent.indexOf("Firefox")).split("/")[1] : -1;
  var FFextraHeight = parseFloat(ffversion)>=0.1? 25 : 0;
  var scrollHeightExtra = 15;
  if (agent.indexOf('MSIE') > 0) {
    scrollHeightExtra = 35;
  }
  if (FFextraHeight > 0) scrollHeightExtra = FFextraHeight;
  var wrapper = document.getElementById( 'pt-inner-iframe-wrapper-' + PTResizeIFrame.pageletInstanceID);
  if (wrapper == null) wrapper = createRelayIFrame(PTResizeIFrame.pageletInstanceID);
  var iframe = document.getElementById( 'pt-inner-iframe-' + PTResizeIFrame.pageletInstanceID);
  var height = 0;
  var width = 0;
  var iframename = '';

  if( (document.contentDocument) && (document.contentDocument.documentElement.offsetHeight) ) {
    height = document.contentDocument.documentElement.offsetHeight + FFextraHeight;
  } else if( (document.contentDocument) && (document.contentDocument.body.offsetHeight) ) {
    height = document.contentDocument.body.offsetHeight+FFextraHeight;
  } else if (document && document.documentElement.scrollHeight ) {
    height = document.documentElement.scrollHeight + scrollHeightExtra;
  } else if( document && document.body.scrollHeight ) {
    height = document.body.scrollHeight + scrollHeightExtra;
  } else {
    height = wrapper.offsetHeight;
  }
  width = wrapper.offsetWidth;
  iframename = 'pt-pagelet-iframe-' + PTResizeIFrame.pageletInstanceID;
  var qsSeparator = PTResizeIFrame.pageletResizePage.indexOf("?") >= 0 ? "&" : "?";

iframe.setAttribute("src", PTResizeIFrame.pageletResizePage + qsSeparator + 'height=' + height + '&' + 'width=' + width + '&' + 'iframe=' + iframename);
}

function createRelayIFrame(pageletInstanceId) {
  var wrapper = document.createElement("div");
  wrapper.id = "pt-inner-iframe-wrapper-" + pageletInstanceId;
  var iframe = document.createElement("iframe");
  iframe.id =  "pt-inner-iframe-" + pageletInstanceId;
  iframe.setAttribute("height", 0);
  iframe.setAttribute("frameborder", 0);
  iframe.setAttribute("width", 0);
  wrapper.appendChild(iframe);
  document.body.appendChild(wrapper);
  return wrapper;
}
</script>
Add the pagelet to the page template in Sites using a REST URL within an IFrame. In the IFrame, the id parameter should use the unique number identifying the pagelet IFrame (for example, "pt-pagelet-iframe-1"). You must add the following query string parameters to the pagelet URL to support IFrame auto-resizing:
-
resizepage=http://%SITES_HOST%/cs/Satellite?pagename=%PAGENAME% -
ifheight=auto
For example:
<script type="text/javascript" src="http://%PAGELET_PRD_HOST%/pagelets/inject/v2/csapi"/>
<iframe id="pt-pagelet-iframe-1" width="100%" frameborder="0" src="http://%PAGELET_PRD_HOST%/pagelets/inject/v2/pagelet/lib_name/pagelet_name?content-type=html& consumepage=true&resizepage=http://%SITES_HOST%/cs/Satellite?pagename=%PAGENAME%&ifheight=auto">
</iframe>
Note:
In certain situations automatic resizing may not work properly when multiple pagelets are present on a page. This is known to occur with pagelets that require form auto-login to external authentication servers. In this case, only one pagelet can be configured for auto-resizing, while the others should use static IFrame sizing.
65.6.1.2 Changing Pagelet Styling
To make a pagelet fit better visually in a consuming WebCenter Sites page, an Injector may be used to add styles that override the original CSS. In order for the override to work correctly, it is important that the style definitions supplied by the Injector come after the styles defined by the backend application. The following example does this by injecting replacement CSS into the end of the <HEAD> section.
To restyle a pagelet, add a new Injector to the pagelet via the Pagelet Producer Administration Console. Open the pagelet, select Injectors and create a new Injector with the following settings:
-
General:
-
Name: new_styles (or name of your choice)
-
URL Filter: <none>
-
MIME Filter: text/html
-
Injector Location: Before </head>
-
-
Content
Injector Location: Before </head>
Section 65.6.6, "Consuming Applications as Pagelets (An Example Using EBS11i)" includes a working example of an Injector used to re-style the EBS UI to match the sample AviSports site in WebCenter Sites.
65.6.2 Using Identity Propagation
The core purpose of the Pagelet Producer is to proxy backend applications. Since the Pagelet Producer acts as a "middle-man" between the browser and the backend application, identity propagation must be broken into two parts:
-
Section 65.6.2.1, "Establishing Identity in the Pagelet Producer"
-
Section 65.6.2.2, "Using a Login Page Supplied by Pagelet Producer"
65.6.2.1 Establishing Identity in the Pagelet Producer
The Pagelet Producer typically injects web content into WebCenter Sites using an IFrame as shown in Figure 65-15.
Figure 65-15 Pagelet Producer Content as IFrame in Sites

Description of "Figure 65-15 Pagelet Producer Content as IFrame in Sites"
Since the content is injected as an IFrame, user identity must be established in both the Sites container and the Pagelet Producer container as shown in Figure 65-16. Note that Figure 65-16 leaves out the user directory that is assumed to be shared between the two authentication schemes.
Figure 65-16 Different authentication schemes for Sites and Pagelet Producer
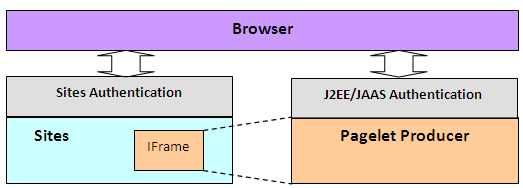
Description of "Figure 65-16 Different authentication schemes for Sites and Pagelet Producer"
The ideal way to manage identity between the browser and the two containers would be to use Oracle Access Manager (OAM) as shown in Figure 65-17. Note that Figure 65-17 leaves out the user directory that is assumed to be shared between the two authentication schemes, and excludes the OAM access server. Note also that this configuration is not supported for pre-11g versions.
Figure 65-17 Ideal Frontend Authentication Configuration Using OAM
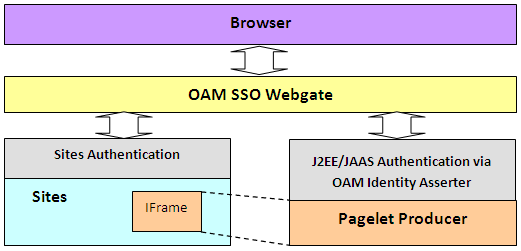
Description of "Figure 65-17 Ideal Frontend Authentication Configuration Using OAM"
To set up OAM for WebCenter Sites 11g, refer to the chapter on "Oracle Access Manager Integration Setup" in Oracle WebCenter Sites Configuring Supporting Software.
65.6.2.2 Using a Login Page Supplied by Pagelet Producer
Before setting up OAM, it is sometimes useful to test the integration of the Pagelet Producer in Sites. Without OAM, users must authenticate separately with the Pagelet Producer and with Sites (see Figure 65-16). This section describes how to configure separate authentication with the Pagelet Producer.
If OAM SSO is not present on either the Pagelet Producer or Sites, the authentication scheme shown in Figure 2 must be supported by ensuring that the Pagelet Producer provides a login form. To force the Pagelet Producer to display a login form:
-
Identify a J2EE role to restrict access to the pagelet(s) or create a new role in the J2EE application server hosting the Pagelet Producer.
This example uses the global WebLogic Server (WLS) "Anonymous" J2EE role that is present in a default WLS installation.
-
Log in to the Pagelet Producer Administration Console, navigate to the resource(s) containing the pagelet(s) that must be surfaced in Sites and add the role you chose in step 1.
Roles are defined on the Policy page for the resource.
Figure 65-18 Pagelet Producer Administration Console - Policy Page
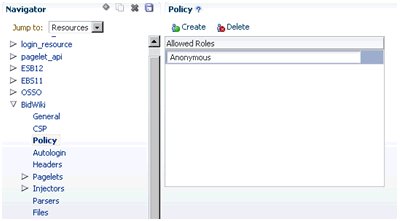
Description of "Figure 65-18 Pagelet Producer Administration Console - Policy Page"
65.6.3 Propagating Identity from the Pagelet Producer to the Backend Application
The way in which identity is established depends on the type of application as described in the following sections:
-
Section 65.6.3.2, "Stand-alone Backend Application Protected with Native Authentication (Non-SSO)"
-
Section 65.6.3.4, "Stand-alone Backend Application Protected with SSO"
-
Section 65.6.3.5, "Reference: Common Auto-Login Configurations"
65.6.3.1 WSRP/JPDK Portlet
WSRP portlets must use WSS tokens for identity propagation. For details on configuring security tokens, see "Registering WSRP and Oracle JPDK Portlet Producer" in the Oracle Fusion Middleware Administrator's Guide for Oracle WebCenter Portal, and Section 65.6.4, "Consuming WSRP Portlets as Pagelets."
Each Oracle JPDK portlet that requires an identity will be passed credentials based upon information supplied by the external application's login form. For details, see "Managing External Applications" and "Registering Oracle JPDK Portlet Producers" in the Oracle Fusion Middleware Administrator's Guide for Oracle WebCenter Portal.
65.6.3.2 Stand-alone Backend Application Protected with Native Authentication (Non-SSO)
The Pagelet Producer has a feature called Autologin that allows the Pagelet Producer to interact with the "native" authentication mechanism established by a backend application.
65.6.3.3 Identity Propagation with Autologin
Since each backend application has its own means of authentication, a separate login prompt must be initiated by the Pagelet Producer to collect any required credentials. Pagelet Producer resources can be configured to send credentials to backend applications as basic authentication headers, NTLM tokens, or Kerberos tokens, as well as manage forms-based authentication (typically via session cookie). For details, see "Autologin" in the Oracle Fusion Middleware Administrator's Guide for Oracle WebCenter Portal.
Note:
Set the Username and Password fields to use the User Vault so that each user will be prompted for his or her own unique credentials to access the backend application.
65.6.3.4 Stand-alone Backend Application Protected with SSO
Determining the proper Autologin settings for a backend application can be very challenging. Doing so requires looking at request headers, identifying redirects, and examining markup (sometimes dynamically generated). This inspection and configuration process can be daunting if there are multiple applications for which Autologin is required. Therefore, if Oracle Access Manager (OAM) SSO or Oracle SSO (OSSO) is available, it is highly recommended that one of these SSO solutions be used to protect backend applications.
Once the backend application is protected with OAM, there are two ways that the Pagelet Producer can supply credentials as described in the following subsections:
-
Section 65.6.3.4.1, "Using Direct Identity Propagation to OAM Protected Backend Application"
-
Section 65.6.3.4.2, "Using Identity Propagation with Autologin and SSO"
65.6.3.4.1 Using Direct Identity Propagation to OAM Protected Backend Application
An OAM 11g WebGate is an Apache module running on Oracle HTTP Server (OHS) that manages all validation of user credentials with the OAM server. Once it has established the validity of a user it sends the OAM_REMOTE_USER header to the web application on the application server that OHS is proxying. The application server will have an OAM identity asserter running on it that will set the JAAS user principal name to the OAM_REMOTE_USER header value.
If the Pagelet Producer is protected with an OAM 11g WebGate it will receive an OAM_REMOTE_USER header. All web applications that it proxies will also receive this header. If the web application it proxies is on an application server with the OAM Identity Asserter, then the OAM Identity Asserter will use the OAM_REMOTE_USER header value passed from the Pagelet Producer to set the user principal. This will all work as long as the Pagelet Producer is not trying to proxy the URL to the WebGate for the protected web application. The rest of this section describes in details how this can be achieved in the context of Sites integration.
This example assumes that both WebCenter Sites and the Pagelet Producer are protected by OAM WebGate as illustrated in Figure 65-18 above, and the following hosts and ports are used by the applications:
-
OAM SSO WebGate:
www.example.com:80 -
WebCenter Sites:
sites_host:8080 -
WebCenter Pagelet Producer:
pp_host:8889 -
Backend application:
backendhost:8001 -
Full URL to backend application as viewed from browser (via WebGate)
http://www.example.com/backend/console -
Full URL to backend application if accessed directly through application server (available only in internal network)
http://backendhost:8001/console
Set up the Pagelet Producer resource to use the direct URL to the backend application, thus bypassing the WebGate (i.e., http://backendhost:8001/console).
Figure 65-19 Pagelet Producer Administration Console - General Properties Page
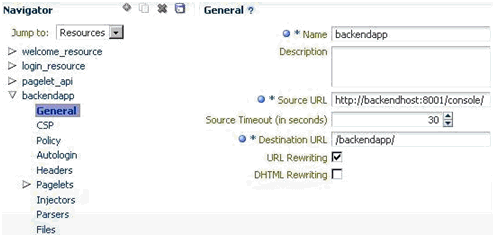
Description of "Figure 65-19 Pagelet Producer Administration Console - General Properties Page"
By setting up the Pagelet Producer to call directly into the backend application (bypassing the WebGate) all the OAM secure headers that the Pagelet Producer receives are passed to the OAM Identity Asserter on the application server hosting the backend application. Once the OAM Identity Asserter on the application server hosting the backend application receives the OAM headers it will set the proper user principal (see Figure 65-19). Note that Figure 65-19 leaves out the user directory that is assumed to be shared between the two authentication schemes. It also excludes the OAM access server.
Figure 65-20 Pagelet Producer Calling the Backend Application Directly
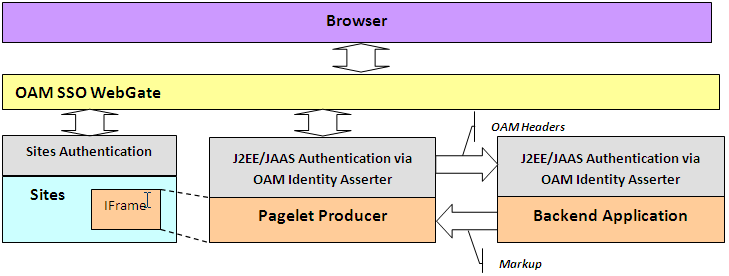
Description of "Figure 65-20 Pagelet Producer Calling the Backend Application Directly"
Note:
Although setting up the Pagelet Producer to bypass the WebGate will achieve single sign-on, this solution should not always be applied. In cases where the OHS server hosting the WebGate is also managing load balancing for the backend application, bypassing the WebGate will also bypass load-balancing. All traffic to the application will be routed to one server. In this case we recommend configuring Pagelet Producer for Autologin as described in Section 65.6.3.4.2, "Using Identity Propagation with Autologin and SSO."
65.6.3.4.2 Using Identity Propagation with Autologin and SSO
If bypassing the OAM WebGate (as described in Section 65.6.3.4.1, "Using Direct Identity Propagation to OAM Protected Backend Application") is not a feasible option then credentials can still be supplied using the Autologin feature of the Pagelet Producer. The advantage of utilizing Autologin with an Oracle SSO solution (OAM or OSSO) login page as opposed to individual login forms for each backend application (see Identity Propagation with Autologin) is that Autologin only has to be set up once and the configuration steps are the same for every implementation.
The steps for setting up Autologin with OSSO are detailed in the Configure Autologin section of Example 1: Consuming E-Business Suite 11i in this document. In a production environment, these steps can be followed as is with one exception: the ssousername and password form fields should be linked to the "User Vault".
Backend applications protected with OAM can also be set up following the steps described for OSSO in the Configure Autologin section in this document with the following exceptions:
-
The login form URL will be a set location (e.g., http://oam11g.mycompany.com:14100/oam/server/obrareq.cgi).
Be sure to remove the query string after the fixed location argument when setting the Autologin form identification URL.
-
The form action URL will be a different value, but it should be a static value. Inspect the OAM form to determine the form action URL.
-
The username and password fields may be different values. Inspect the OAM form fields to determine these values.
-
Include the following two generated values: "request_id" and "OAM_REQ".
65.6.3.5 Reference: Common Auto-Login Configurations
This section provides a quick reference of autologin settings in the Pagelet Producer for common backend SSO scenarios.
65.6.3.5.1 Oracle Access Manager (OAM)
Login Form Identification:
-
URL:
http://%OAM_ROOT%/server/obrareq.cgi
Form Submit Location:
-
URL:
/oam/server/auth_cred_submit
Form Fields:
-
actionURL : static :
/oam/server/auth_cred_submit -
request_id : Generated
-
username : Static or Credential Vault
-
OAM_REQ : Generated
-
password : Static or Credential Vault
65.6.3.5.2 Oracle SSO (OSSO)
Login Form Identification:
-
URL:
%OSSO_HOST%/sso/jsp/login.jsp
Form Submit Location:
-
URL:
%OSSO_HOST/sso/auth - POST
Form Fields:
-
appctx: Generated
-
locale: Generated
-
password : Static or Credential Vault
-
site2pstoretoken : Generated
-
ssousername: Static or Credential Vault
-
v: Generated
65.6.4 Consuming WSRP Portlets as Pagelets
Pagelet Producer incorporates the WebCenter Common Consumer and therefore can expose WSRP and Oracle JPDK portlets as pagelets for use in WebCenter Sites or any other web container that does not include a WSRP consumer.
The WSRP Portlet Producer can be registered with Pagelet Producer using Enterprise Manager, WLST or the Pagelet Producer Administrative Console. For details see "Registering WSRP and Oracle JPDK Portlet Producers in the Pagelet Producer" in the Oracle Fusion Middleware Administrator's Guide for Oracle WebCenter Portal. Once registration is complete, the WSRP producer will appear as a resource in the Pagelet Producer Administrative Console, and the portlets associated with the WSRP endpoint will be listed in the pagelets collection for the resource.
Note:
Auto-generated WSRP resources and pagelets cannot be modified. To create a version that can be modified, choose the resource in the Pagelet Producer Administrative Console and click Copy. The cloned version of the resource can be edited and various elements such as Injectors can be added to customize pagelet functionality. For example, a custom Injector could be used to inject CSS classes to modify portlet markup to make it look and feel like the Sites that will host the pagelet.
If the WSRP Producer that you are registering with Pagelet Producer requires authentication, the following steps are required:
-
Configure WS-Security between Pagelet Producer and the WSRP Producer as described in Configuring WS-Security in the Oracle Fusion Middleware Administrator's Guide for Oracle WebCenter Portal. You must ensure that the Java Key Store (JKS) is properly configured between the WSRP producer and the Pagelet Producer; for details, see Setting Up the WebCenter Portal Domain Keystore in the Configuring WS-Security chapter.
-
During the WSRP Producer registration, select the appropriate Token Profile in the Security section and enter the necessary configuration information. The path to the keystore must be absolute
65.6.4.1 Exposing Custom ADF Taskflows as WSRP Portlets
Although it is possible to consume an ADF taskflow in the Pagelet Producer by 'clipping' it out of the page on which it is hosted, this is not the recommended approach. Considering the complexity of the markup generated by an ADF page and potential dependencies on other taskflows or ADF page parameters, the recommended approach is to create a WSRP portlet based on the taskflow and then consume the portlet in the Pagelet Producer. One advantage of this approach is that ADF taskflow parameters become portlet parameters that can be mapped to pagelet parameters, allowing information to be passed from the Sites page to the taskflow. For step-by-step instructions on how to make a portlet from an ADF taskflow, see Section 58.2.3, "How to Create a JSF Portlet Based on a Task Flow."
After the ADF taskflow is exposed as a portlet, deploy a new WSRP Producer to a managed server in your WLS domain (for example, the WC_Portlet server on your WebCenter domain). Obtain the WSDL URL from the info page (http://%PRODUCER_HOST%/%APP_CONTEXT%/info) and make note of it. To register the new WSRP Producer with the Pagelet Producer, see "Registering WSRP and Oracle JPDK Portlet Producers in the Pagelet Producer" in the Oracle Fusion Middleware Administrator's Guide for Oracle WebCenter Portal.
65.6.4.1.1 Exposing WSRP Portlets Developed for Oracle WebLogic Portal
Oracle WebLogic Portal (WLP) supports a variety of portlet types, including Java Portlets, Java Server Faces Portlets, Java Server Page and HTML Portlets (for a complete list see "Portlet Types" in the Oracle Fusion Middleware Portlet Development Guide for Oracle WebLogic Portal). Remote (Proxy) Portlets are WSRP portlets and can be directly exposed as pagelets by registering the WSRP Producer with the Pagelet Producer. This section describes how to expose local WLP portlets such as JSF, JSP or Java Portlets as pagelets for use in Sites.
65.6.4.1.2 Exposing WLP Portlets Using WLP as WSRP Producer
WLP can expose Java, Page Flow, JSP, JSF, and Struts Portlets as a "complex producer" that includes the required WSRP interfaces, optional interfaces and some extended interfaces (for details see "WebLogic Portal Producers" in the Oracle Fusion Middleware Federated Portals Guide for Oracle WebLogic Portal). Consequently, native WLP portlets can be consumed by the Pagelet Producer as any other WSRP portlets. Configuration and best practices for WSRP interoperability between WLP and the WebCenter Common Consumer are described in "WSRP Interoperability with Oracle WebCenter Portal and Oracle Portal" in the Oracle Fusion Middleware Federated Portals Guide for Oracle WebLogic Portal.
Note:
WLP portlets are WSRP-enabled by default since version 9.2. In earlier versions, you must edit the portlet properties and set the "Offer as Remote" property to true.
65.6.4.1.3 Configuring WS Security between WLP WSRP Producer and WebCenter Consumer
To consume WSRP portlets exposed by WLP in the WebCenter Common Consumer (Pagelet Producer), configuration is required on both the producer and consumer sides.
Typically it is impossible to consume WSRP portlets exposed by WebLogic Portal as an anonymous user, so it is necessary to configure SAML security on WLP for the producer and the WebCenter Common Consumer. Step-by-step instructions can be found in "SAML Security Between a WebCenter Portal: Framework Application Consumer and a WebLogic Portal Producer" in the Oracle Fusion Middleware Federated Portals Guide for Oracle WebLogic Portal. These instructions are comprehensive, with the following adjustments:
-
In section 5 of Configuring the Producer, the steps for configuring keystore information on the WSRP consumer are executed in JDeveloper. You must complete this step in the WebCenter Common Consumer (Pagelet Producer). You can specify the signing alias and keystore password through WLST or Oracle Enterprise Manager. For details, see Configuring the Keystore Using WLST or Configuring the Keystore Using Fusion Middleware Control in the Oracle Fusion Middleware Administrator's Guide for Oracle WebCenter Portal.
Note:
Once you have configured the keystore values you must restart both the managed server hosting the Pagelet Producer (by default WC_Portlet) and the WLS Admin Server for the JPS configuration changes to be picked up.
-
In section 4 of Configuring the Producer, the instructions do not emphasize the importance of the issuer name. The name placed here must match that sent by the consumer. For Oracle JPS, the default issuer ID sent is
www.oracle.com.
65.6.4.1.4 Registering the WLP WSRP Producer in the Pagelet Producer
To register the WLP WSRP Producer in the Pagelet Producer, follow the standard steps for creating and configuring a new WSRP Producer described in "Registering WSRP and Oracle JPDK Portlet Producers in the Pagelet Producer" in the Oracle Fusion Middleware Administrator's Guide for Oracle WebCenter Portal). Make sure to include the following settings:
-
WSDL URL:
http://%WLP_HOST%/%PORTAL_APP_NAME%/producer/wsrp-1.0/markup?WSDL -
Security:
Token Profile: Select "WSS 1.0 Token with Message Integrity"
After registration, a new Pagelet Producer resource is automatically created and populated with pagelets to represent the WLP portlets associated with this WSRP endpoint.
Note:
To allow user identity propagation to the portlets, both WLP and the Pagelet Producer should be configured as described in Section 65.6.3, "Propagating Identity from the Pagelet Producer to the Backend Application." (For testing purposes or for portlet content that can be accessed without authentication, you can specify a valid username in the Default User field under Security.)
65.6.4.1.5 Adding WLP WSRP Portlets to Sites
To add WLP WSRP portlets to a page in Sites, follow the steps in Section 65.6.1, "Adding Pagelets to Oracle WebCenter Sites." The URL to use for the src attribute in the IFrame tag that loads pagelet content can be found under "Documentation" in Section 65.2.2.2, "Accessing Pagelets Using REST."
Auto-generated WSRP resources and pagelets cannot be modified. To use Pagelet Producer features to alter the markup of the WLP portlet such as modify look and feel of the portlet UI by injecting custom CSS styles, you must create a new version of the resource. Choose the resource that was created for your WLP WSRP Producer in the Pagelet Producer Administrative Console and click Copy. The cloned version can be modified, including adding elements such as Injectors to customize pagelet functionality.
65.6.5 Consuming WebCenter Portal Services as Pagelets in Sites
WebCenter Portal includes tools, such as announcements and documents, that can be used to facilitate user collaboration in WebCenter Sites. For an overview of these tools, see "Services: Announcements through Links" and "Services: Lists through Worklist" in the Oracle Fusion Middleware User's Guide for Oracle WebCenter Portal: Spaces.
The recommended approach for exposing these services in Sites is to consume the associated WSRP portlets in the Pagelet Producer by leveraging the Services Producer component included with Oracle WebCenter Portal (11.1.1.6 and above).
The following portal tools are exposed as WSRP portlets by default:
-
Activity Stream
-
Discussion Forums
-
Mail
-
Polls Manager
-
Document Manager
-
Lists
-
Tag Cloud
-
Blogs
-
Work list
-
Polls
-
Announcements
Note:
Additional tools can be exposed by extending the Services Producer to a new JSPX page and then adding the taskflow to the page.
65.6.5.1 Requirements
Install WebCenter Portal following the instructions in the Oracle Fusion Middleware Installation Guide for Oracle WebCenter. Make sure that all dependent components are also installed and configured, including WebCenter Content, the Discussions server, and Pagelet Producer.
By default the Services Producer is automatically deployed to the WC_Portlet managed server in the WebCenter Portal domain. If the WC_Portlet managed server was not created during installation or there is a requirement to run the Services Producer separately, the Oracle WebCenter Portal 11.1.1.6 release added a custom Services Producer template that can be uses to create the WC_CustomServicesProducer managed server. This managed server contains the Oracle WebCenter Services Producer component as well as pre-configured JDBC data sources for accessing the Portal, Activities, and MDS schemas. For details, see "Oracle WebCenter Custom Services Producer Template" in the Oracle Fusion Middleware Domain Template Reference.
65.6.5.2 Configuring Security and Single Sign-On
There are two prerequisites to allow access to WebCenter Portal services from a Sites-driven web site:
-
Create a common user base between the web site and WebCenter Portal
-
Establish user identity propagation from the web site to WebCenter Portal
These are described in the following subsections:
-
Section 65.6.5.2.1, "Creating a Common User Base: LDAP Integration"
-
Section 65.6.5.2.2, "Establishing User Identity Propagation: OAM Configuration"
-
Section 65.6.5.2.3, "Configuring the GUID Attribute in the Identity Store"
-
Section 65.6.5.2.4, "Configuring SSO for Discussions Server"
65.6.5.2.1 Creating a Common User Base: LDAP Integration
Creating a common user base requires configuring a common LDAP repository to be used by WebCenter Sites and all WebCenter Portal components. When selecting an LDAP server, make sure it is compliant with the WebLogic Server that runs WebCenter Portal components.
Things to remember when configuring security on WLS:
-
Set the priority of the Authenticators to SUFFICIENT
-
Set the Control Flag (in parenthesis) and order of authentication providers as follows:
-
OAM Identity Asserter (REQUIRED)
-
LDAP Authenticator (SUFFICIENT)
-
Default Authenticator (SUFFICIENT)
-
Default Identity Asserter (SUFFICIENT)
-
65.6.5.2.2 Establishing User Identity Propagation: OAM Configuration
To establish user identity propagation, we recommend configuring the SSO solution for WebCenter Sites and WebCenter Portal using Oracle Access Manager (OAM).
If you are using OAM, make sure it is configured to pass the user principal name in the ORACLE_REMOTE_USER header. Both ObSSOCookie and OAM_REMOTE_USER must be set to active on the OAM Identity Asserter on the WebLogic Server.
65.6.5.2.3 Configuring the GUID Attribute in the Identity Store
Specify the GUID attribute value to ensure that the value that is used in the identity store matches the value configured in the LDAP authentication provider. This value is configured in the jps-config.xml file.
Set the GUID for your LDAP authenticator in the jps-config.xml file.
<serviceInstance provider="idstore.ldap.provider" name="idstore.ldap">
<property value="oracle.security.jps.wls.internal.idstore.WlsLdapIdStoreConfigProvider" name="idstore.config.provider"/>
<property value="oracle.security.idm.providers.stdldap.JNDIPool" name="CONNECTION_POOL_CLASS"/>
<property value="GUID=uuid" name="PROPERTY_ATTRIBUTE_MAPPING"/>
</serviceInstance>
65.6.5.2.4 Configuring SSO for Discussions Server
To use discussions, configure the Discussion server for SSO before ordering the Authenticators in WebLogic Server (using the Default Authenticator and Default Identity Asserter). It is also possible to use WLST to configure SSO for the Discussion server. For details, see "Configuring the Discussions Server for SSO" in the Oracle Fusion Middleware Administrator's Guide for Oracle WebCenter Portal.
65.6.5.3 Registering WebCenter Services Exposed as WSRP Portlets
To import the WSRP portlets that expose WebCenter Services into the Pagelet Producer, simply register the Services Producer as a WSRP Producer in the Pagelet Producer using Enterprise Manager, WLST or the Pagelet Producer Administrative Console.
The screenshot below is an example of WSRP endpoint registration in the Pagelet Producer Administrative Console. For details, see "Registering WSRP and Oracle JPDK Portlet Producers in the Pagelet Producer" in the Oracle Fusion Middleware Administrator's Guide for Oracle WebCenter Portal.
Figure 65-21 Pagelet Producer Administrative Console - Registering WSRP Endpoint
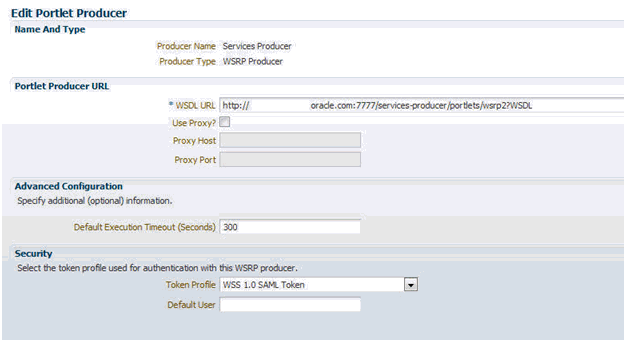
Description of "Figure 65-21 Pagelet Producer Administrative Console - Registering WSRP Endpoint"
The Token Profile in the Security section of this page must be set to WSS 1.0 SAML Token to support the Services Producer. You should also enter a suitable execution timeout for requests made by the Pagelet Producer to the Services Producer (the default is 30 seconds).
Once registration is complete, the Services Producer will appear as a resource in the Pagelet Producer Administrative Console and all WSRP portlets exposed by the Producer will be listed in the pagelets collection for the resource:

65.6.5.3.1 Adding Pagelets to Sites Pages
Any pagelet exposing WebCenter Services can be added to a WebCenter Sites page following the steps described in Adding Pagelets to Oracle WebCenter Sites. Figure 65-22 shows the Document Manager Service embedded into a page of the AviSports sample site in WebCenter Sites.
Note:
Auto-generated WSRP resources and pagelets such as the ones associated with the Services Producer cannot be modified. To add an Injector or make other modifications, you must create a version that can be edited. Choose the resource in the Pagelet Producer Administrative Console and click Copy. The cloned version of the resource can be edited and various elements such as Injectors can be added to customize pagelet functionality.
65.6.6 Consuming Applications as Pagelets (An Example Using EBS11i)
This section provides detailed instructions for consuming the Oracle E-Business Suite 11i Order Information module UI as a pagelet. It covers autologin, navigation suppression, restyling, and URL rewriting.
This example was created using an EBS 11i instance that is protected with Oracle SSO. The following common terms and variables are used in the example:
-
%EBS_HOST%: root URL of the EBS host (for example,
http://my-ebs.company.com:port/) -
%OSSO_HOST%: root URL of the OSSO host (for example,
http://sso.company.com:port/)
This section contains the following subsections:
65.6.6.1 Creating a Resource for Basic URL Mapping (Proxy)
The following steps set up the basic URL mapping for a new EBS resource in the Pagelet Producer:
-
Create new "Web" resource with the following settings:
-
Name: EBS 11 (or your choice)
-
Source URL: %EBS_HOST%
Make sure the URL is not more specific to avoid missing URLs used in the UI
-
Destination URL: /ebs11/ (or your choice)
-
URL Rewriting: on
-
DHTML Rewriting: on
-
-
Click Save.
65.6.6.2 Configuring Autologin
This step assumes that the EBS System is protected by OSSO and that the Pagelet Producer will be configured to provide form Autologin rather than participate in SSO (a common scenario if the web site is not protected by SSO). EBS credentials may be shared for all users (good for testing) or stored in the Pagelet Producer credential vault for each user.
-
Create a new "Web" resource with the following settings:
-
Name: OSSO (or your choice)
-
Source URL: %OSSO_HOST%
-
Destination URL: /osso/ (or your choice)
-
URL Rewriting: on
-
DHTML Rewriting: off
-
-
Click Save.
-
Under the newly created OSSO resource, configure Autologin using the Form Login option as follows:
-
Login Form Identification: URL - %OSSO_HOST%/sso/jsp/login.jsp
-
Form Submit Location: URL - %OSSO_HOST/sso/auth - POST
-
Form Fields:
appctx: Generated
locale: Generated
password: Static or User Vault
site2pstoretoken: Generated
ssousername: Static or User Vault
-
v: Generated
-
-
Click Save.
Note:
The names of login form fields are usually obtained by investigating the HTML source for the login page that protects the backend resource.
65.6.6.3 Creating a Pagelet
This step associates a pagelet with the Order Status page in the EBS Order Information module. To create a new pagelet, select the Pagelets section under the EBS resource you created and click the Create icon. Create the new pagelet with the following settings:
-
Name: order_status (or your choice)
-
Library: ebs11 (or your choice)
-
URL Suffix: OA_HTML/RF.jsp?function_id=1005664&resp_id=22480&resp_appl_id=660&security_group_id=0&lang_code=US
-
Refresh Inline: off
You can test the configured pagelet by accessing it via the REST link on the Documentation page. You should be taken to the Sales Order page without logging in (unless the pagelet uses the User Vault to store credentials and you are accessing it for the first time). From this page, you can use Simple Search to locate orders, using '%' as a wildcard character.
65.6.6.4 Making Corrective Configurations
After a pagelet has been created, it often requires additional features (Parser, Injector and/or Clipper) to either address issues with URL re-writing in the proxied markup, or simply to modify the markup for style or to hide unnecessary elements. This section describes corrective configurations that were applied to the sample pagelet that exposes the Order Information UI in EBS.
Creating a Pluggable Parser for Popup URL Rewriting
Parsers allow you to supplement or change the built-in logic for parsing content and finding URLs that need to be rewritten. When built-in parsers fail to identify URLs, custom parsers can be used to correct this failure. In the case of the EBS 11i UI, this step is required to fix popup handling in Advanced Search.
Under the EBS Resource, create a new Parser with the following settings:
-
Name: popupRewriter (or your choice)
-
URL Filter: *.jsp*
-
Use Base Parser: on
-
Fragment Locations
-
var _jspDir='(.*?)';(type Static URL) -
<frame .? src="(.?)(type Static URL)
-
Figure 65-23 shows the settings for the popupRewriter.
Creating an Injector to Disable Frame-busting
Injectors insert content into a specified location in the proxied resource page. The content can be any text, including HTML, CSS, JavaScript, and pagelet declarations. An empty injector may also be used to remove unwanted content from the page. The following injector was created for the EBS pagelet to prevent it from taking over the page, which was happening on the first displayed page where the user is asked to choose responsibility.
Under the EBS resource create a new Injector with the following settings:
-
General
-
Name: frameBustDisabler
-
URL Filter: <none>
-
MIME Filter: text/html
-
Inject Location: Replace
target=_top
-
-
Content: (Text)
alt=''
Figure 65-24 shows the parameter settings for the new Injector.
Creating an Injector to Auto-Resize the iFrame
In order to provide a more seamless integration into the consuming page, the pagelet iFrame can be configured to behave more like inline content by dynamically resizing to accommodate its contents. For details, see Enabling IFrame Auto-Resizing in this document.
Setting Up Clipping by JavaScript Injection
One option for suppressing page elements exposed as a pagelet is to create a clipper using graphical or RegEx-based clipping, available in the Pagelet Producer. However, the recommended approach is to use custom JavaScript that is injected into the proxied page. This approach is often more flexible as it can easily accommodate the need to dynamically adjust rules that identify the element(s) to suppress or accommodate rules for suppressing multiple elements on the page.
Custom JavaScript can be added to the proxied resource page using an injector. To suppress EBS 11i standard header and navigation elements, use the following injector definition to insert a snippet of JavaScript that hides the unnecessary elements at page load time. (The standard Clipper feature in the Pagelet Producer is not used due to the complexity of the EBS web UI.)
Under the EBS Resource, create a new Injector with the following settings:
-
General:
-
Name: nav_suppressor (or your choice)
-
URL Filter: <none>
-
MIME Filter: text/html
-
Inject Location: Before
</body>
-
-
Content: (Text - copy and paste the content below)
<script type="text/javascript">
// this script is injected into the page by ensemble
// it hides header and footer tables at page load

// register handler function to the page load event
if (window.addEventListener) {
  window.addEventListener('load', hideHeaderFooter, false);
} else if (document.attachEvent) {
  window.attachEvent('onload', hideHeaderFooter);
}

// this function does the actual hiding
function hideHeaderFooter() {
  var form = document.forms[0];
  if (typeof(form) == 'undefined') return;
  // main span is form's second child span
  var spansFound = 0;
  var mainSpan = null;
  for (var i = 0; i < form.childNodes.length; i++) {
    var child = form.childNodes[i];
    if (child.tagName && child.tagName.toLowerCase() == 'span') {
      if (++spansFound == 2) {
       mainSpan = child;
       break;
      }
    }
  }
  if (typeof(mainSpan) != "undefined" && mainSpan != null) {
    for (var i = 0; i < mainSpan.childNodes.length; i++) {
      var child = mainSpan.childNodes[i];
       if (child.tagName && child.tagName.toLowerCase() == 'table') {
         child.style.display = 'none';
       }
    }
  }
}
// call this function directly
hideHeaderFooter();
</script>
Creating an Injector for Pagelet Restyling
To make the EBS pagelet fit better visually in the consuming page, an injector can be used to add styles to override the original CSS.
The example injector definition below shows how to implement restyling for the AviSports sample web site in WebCenter Sites.
Note:
In order for the override to work correctly, it is important that the style definitions supplied by the injector come after the styles defined by the backend application. In the example below, the content is injected into the end of the <HEAD> section on the page.
Under the EBS Resource, create a new Injector with the following settings:
-
General:
-
Name: avisports_styles
-
URL Filter: <none>
-
MIME Filter: text/html
-
Inject Location: Before
</head>
-
-
Content: (Text - copy and paste the content below)
<style>
* {
  font: 11px Arial,Helvetica,sans-serif;
}
body {
  background: url("http://sites-host:port/cs/avisports/images/BlueSliver.png") repeat-x scroll center bottom transparent;
}
.OraTableCellText, .x1l, .OraTableCellNumber, .x1n, .OraTableCellIconButton, .x1p, .OraTableCellSelect, .x55,
.OraTableControlBarTop, .x1i, .OraTableControlBarBottom, .x1j {
    background-color: #eceef1;
    border-color: #0b2a55;
}
.OraTableColumnHeader, .x1r, .OraTableSortableColumnHeader, .x20, .OraTableSortableHeaderLink, .x23 {
    background-color: #0b2a55;
    border-color: #F7F7E7;
    color: #336699;
}
.OraTableHeaderLink, .x24, .OraTableColumnHeaderNumber, .x1s, .OraTableColumnHeaderIconButton, .x1t {
    background-color: #0b2a55;
    color: #ffffff;
}
.p_InContextBrandingText, .x2l, .OraHGridNavRowInactiveLink, .x3v, .OraNavBarInactiveLink, .x42,
.OraBINavBarInactiveLink, .x7n, .OraBINavBarInactiveLink_small, .x7o {
    color: #000000;
}
.OraLink:link, .xd:link, .OraBreadCrumbs, .xh, .OraBulletedList a, .xj a, .OraLinkText, .x2v,
.OraHGridNavRowActiveLink, .x3u, .OraNavBarActiveLink, .x41, .OraBINavBarActiveLink, .x7l, .OraBINavBarActiveLink_small, .x7m {
    color: #0b2a55;
}
.OraBreadCrumbs a, .xh a {
    color: #0b2a55;
}
</style>
The EBS11 resource now includes the pagelet, the custom injectors, and the custom parser as shown in Figure 65-25.
Test the pagelet by browsing to the Documentation page and using the URL shown below, substituting the local host ID for "example.com."
http://example.com:8889/pagelets/inject/v2/pagelet/ebs11/order_status?content-type=iframe&csapi=true&ifheight=300px
If some images are not rendered properly, make sure DHTML rewriting is enabled. (The DHTML Rewriting setting is on the General page for the resource.)
The following screenshots show the EBS 11i Order Information screens embedded into a page of the AviSports sample site in WebCenter Sites using a REST URL for pagelet access in an iFrame:
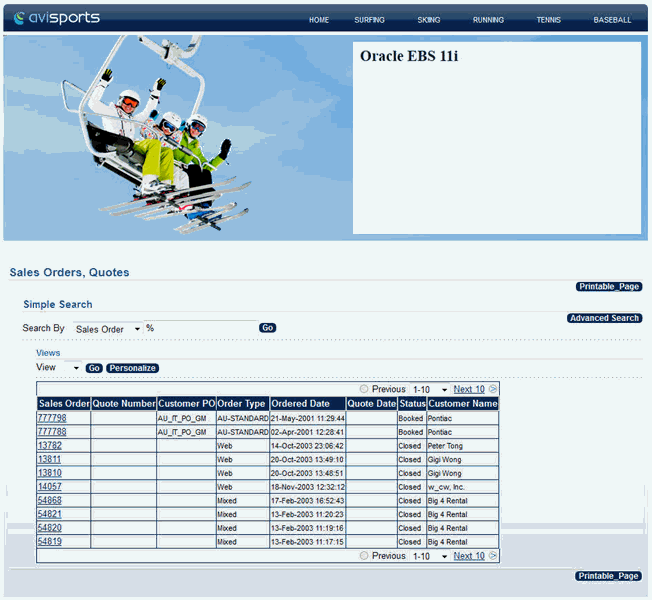
Description of the illustration jpsdg_sites14.gif
Description of the illustration jpsdg_sites15.gif
Description of the illustration jpsdg_sites16.gif

