| Oracle® Fusion Middleware Installation and Configuration Guide for Identity Synchronization for Windows 6.0 11g Release 1 (11.1.1.7.0) Part Number E28963-01 |
|
|
PDF · Mobi · ePub |
| Oracle® Fusion Middleware Installation and Configuration Guide for Identity Synchronization for Windows 6.0 11g Release 1 (11.1.1.7.0) Part Number E28963-01 |
|
|
PDF · Mobi · ePub |
Identity Synchronization for Windows provides information about the installation and configuration status, the day-to-day system operations, and any error conditions that are related to your deployment.
This chapter explains how to access and understand this information in the following sections:
You can view various types of information from the Status tab of the Identity Synchronization for Windows Console.
If you select one of the following nodes in the navigation tree pane (on the left), the content presented on the Status tab changes to provide specific information about that item.
Directory Source: Select a directory source node (such as dc=example,dc=com) to view status information about that directory source.
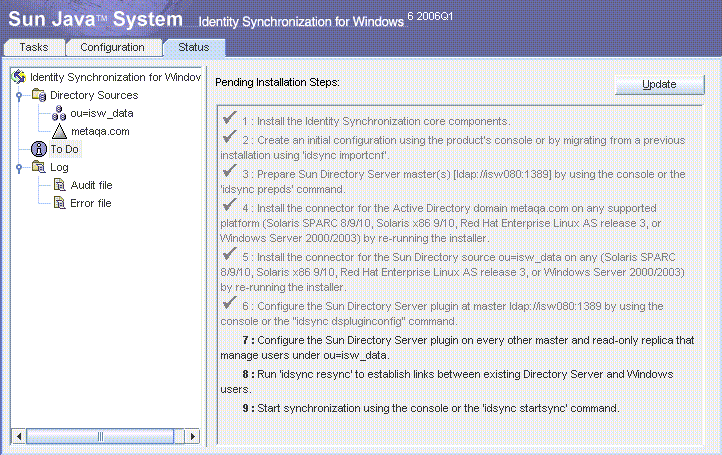
To Do: Select this node for a list of the steps you must complete to successfully install and configure Identity Synchronization for Windows (the program greys-out all completed steps).
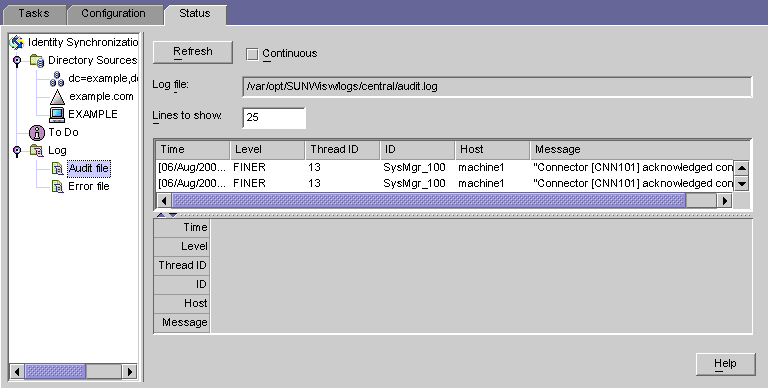
Audit File: Select this node for information about day-to-day system operations (including error conditions).
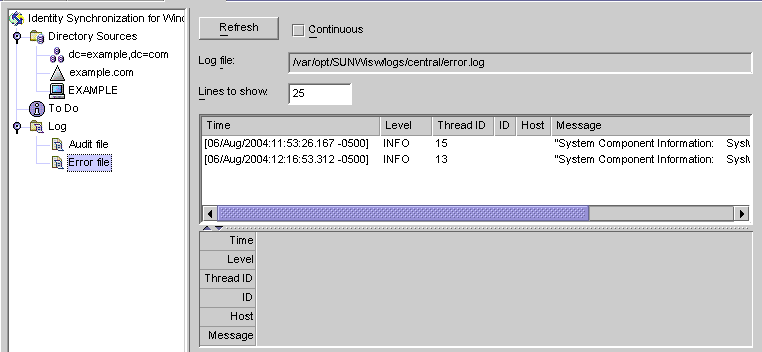
Error File: Select this node for information about error conditions on your system. (The Error log essentially acts as a filter in which only the error entries are displayed.)

This section describes the different kinds of logs that are available for Identity Synchronization for Windows:
As long as Identity Synchronization for Windows components can access Message Queue, all audit and error messages will be logged in the Identity Synchronization for Windows central logger. Consequently, these central logs (which include messages from all components) are the primary logs to monitor.
The centralized logs are located on the machine where Core is installed, in the following directories:
On Solaris: /var/opt/SUNWisw/logs
On Linux: /var/opt/sun/isw/logs
On Windows: installation_root/isw-machine_name /logs/central/
Table 9-1 Log Types for Identity Synchronization for Windows
| Log Name | Description |
|---|---|
|
A superset of |
|
Each central log also includes information about each component ID. For example,
[2003/03/14 14:48:23.296 -0600] INFO 13
"System Component Information:
SysMgr_100 is the system manager (CORE);
console is the Product Console User Interface;
CNN100 is the connector that manages
[example.com (ldaps:// server1.example.com:636)];
CNN101 is the connector that manages
[dc=example,dc=com (ldap:// server2.example.com:389)];"
In addition to the central logger, each component has it's own local logs. You can use these local logs to diagnose problems with the connector if it cannot log to the central logger.
Each connector, the system manager, and the central logger have the following local logs:
Table 9-2 Local Logs
These local logs are located in the following subdirectories:
On Solaris: /var/opt/SUNWisw/logs
On Linux: /var/opt/sun/isw/logs
On Windows: installation_root/isw-machine_name /logs/central/
The sysmgr and clogger100 (central logger) directories are on the machine where Core is installed.
Identity Synchronization for Windows rotates these local component logs daily by moving the current log to a log file that includes the date, as follows:
audit_2004_08_06.log
The following Windows NT subcomponents also have local logs:
Password Filter DLL
These subcomponent logs are located in the SUBC1XX (for example, SUBC100) subdirectories of the following directory:
installation_root/isw-machine_name/logs/
Identity Synchronization for Windows limits these files to 1 MB in size, and keeps only the last 10 logs.
The Directory Server Plug-in logs information through the Directory Server connector to the central log and through the Directory Server logging facility. Consequently, local Directory Server Plug-in log messages will also be saved in the Directory Server error log.
Directory Server saves information into the error log from other Directory Server Plug-ins and components. To identify messages from the Identity Synchronization for Windows Directory Server Plug-in, you can filter out lines containing the isw string.
By default, only minimal Plug-in log messages are displayed in the error log. For example:
[14/Jun/2004:17:08:36 -0500] - ERROR<38747> - isw - conn=-1
op=-1 msgId=-1 - Plug-ins unable to establish connection to DS Connector
at attila:1388, will retry later
You can change the default verbosity level of the Directory Server error log through DSCC as follows:
Log in to Directory Service Control Center.
On the Directory Servers tab page, click the server whose log level you want to configure.
Select the Server Configuration tab, then the Error Logging tab.
In the General > Additional Items to Log section, select Plug-Ins.
Click Save.
You can enable plug-in logging using the command line.
$ dsconf set-log-prop errors level:err-plugins
For more information about Directory Server logging, refer to Chapter 14, Directory Server Logging, in Administrator's Guide for Oracle Directory Server Enterprise Edition.
Every log message includes the following information:
Time: Indicates when (time and date) the log entry was generated. For example:
[13/Aug/2004:06:14:36:753 -0500]
Level: Indicates the severity and verbosity of the log message. Identity Synchronization for Windows uses the following log levels:
Table 9-3 Log Levels
Thread ID: Displays the Java thread ID of the function causing the event.
ID: Identifies the component (console, system manager, and so forth.) causing the event.
Host: Displays the name of the host causing the event.
Message: Displays audit or error information associated with the event. Some examples include:
"Resetting Central Logger configuration ..."
"System manager is shutting down."
"Processing request (ID=ID_number
 from the console to stop synchronization."
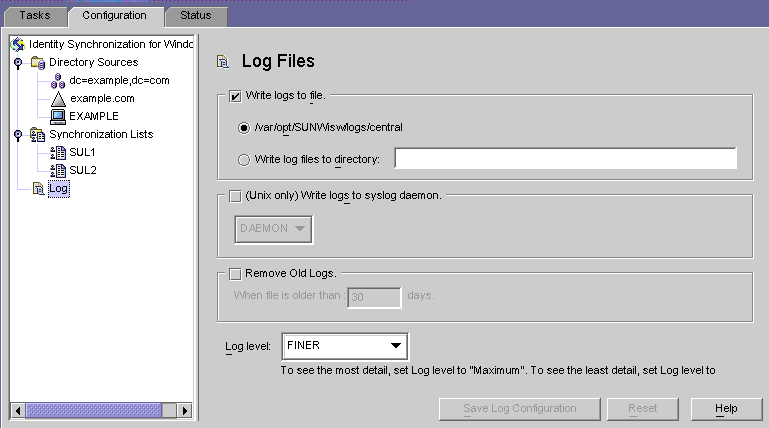
Open the Console and select the Configuration tab.
In the navigation tree pane, and expand nodes until you see the Logs node.
Select the Logs node and the Log Files panel is displayed on the Configuration tab.

Use the Log Files pane to configure your log files, as follows:
Write logs to file. Enable this option to write logs to a file on the Core host.
After selecting this option you can:
Enable the default log directory and file (for example, /var/opt/SUNWisw/logs/central ), or
Enable the Write log files to directory option, and then specify a path and file name for the log file.
Note:
The Console does not verify whether a specified log file location actually exists. The central logger will try to create the log directory if it does not exist. Consequently, there is no indication that you specified and saved a nonexistent log location until you try to view the logs. After several attempts to view the logs, a message displays to report the Console's inability to find logs at the specified location.
On Solaris Only — Write logs to syslog daemon: Enable this option if Identity Synchronization for Windows resides on a Solaris platform. Use the drop-down list to select a category for writing the log. (Default is DAEMON)
Note:
When you select this option, Identity Synchronization for Windows logs everything to the syslog; however, the syslog is configured by default to log WARNING and SEVERE messages only.
To configure syslog to log INFO messages, edit /etc/syslog.conf and change the following line:
*.err;kern.debug;daemon.notice;mail.crit /var/adm/messages
to
*.err;kern.debug;daemon.notice;daemon.info;mail.crit /var/adm/messages
After making this change, you must restart the syslog daemon as follows:
/etc/init.d/syslog stop ; /etc/init.d/syslog start
To enable FINE, FINER, and FINEST logging, include daemon.debug in the semicolon separated list.
Remove Old Logs: The number of log files will continue to grow (one per day) indefinitely. To avoid running out of disk space, enable this option and specify when the program can delete old logs from the central log file.
For example, if you specify 30 days, Identity Synchronization for Windows will delete all files when they become 31 days old.
Log Level. Use the drop-down list to select the level of detail you want to see in your system logs. (Review Reading the Logs)
Click the Save Log Configuration button to create log files based on the selected options.
From the Identity Synchronization for Windows Console, select the Status tab.
In the navigation tree pane, expand the Directory Source node, and then select the directory source node (such as dc=example,dc=com).
The Status tab content changes to provide information related to the selected directory source.

Note:
When viewing the Directory Source status you are essentially viewing the status of the connector associated with that Directory Source.
Click Update to refresh the information on this tab. The following information is provided on the Status tab:
State: Reflects the current state of the directory source. Valid states include:
Uninstalled: The connector has not been installed.
Installed: The connector is installed, but is not ready for synchronization because it has not received its runtime configuration yet. If the connector remains in this state for more than a minute, something is probably wrong.
Ready: The connector is ready for synchronization, but it is currently not synchronizing any objects. A connector remains in the Ready state if synchronization has not been started or if synchronization has been started but not all subcomponents have established connections with the connectors.
Syncing: The connector is synchronizing objects. There might still be errors, so consult the error log if you notice that changes are not synchronized.
Active: Indicates whether the directory source is active or down.
Last Communication: Indicates the time of the last response from this directory source's connector.
From the Identity Synchronization for Windows Console, select the Status tab.
In the navigation tree pane, expand the To Do node.
The Status tab content changes to provide a checklist of the installation and configuration steps (for example, see Viewing Directory Source Status).

Click the Update button (upper right) to refresh the list.
Completed steps will be check-marked and greyed-out. You must complete the remaining steps to successfully complete the installation and configuration process.
From the Identity Synchronization for Windows Console, select the Status tab.
In the navigation tree pane, expand the Audit File or the Error File node.
The Status tab content changes to display the current logs.

Click Refresh to load the latest audit or error information.
The following information is provided on the Status tab:
Continuous: Updates and displays the latest audit or error information constantly.
Log File: Displays the full path name of the audit or error log being read; for example:
C:\Program Files\Sun\MPS\isw-hostname\logs\central\audit.log
Lines to show: Specifies how many audit or error entries to display. (Default is 25.)
If you have a Windows NT machine in your deployment, verify that auditing is enabled or Identity Synchronization for Windows cannot log messages from that machine.
From the Windows NT Start menu, select Programs> Administrative Tools> User Manager for Domains.
When the User Manager dialog box is displayed, select Policies> Audit from the menu bar.
The Audit Policy dialog box is displayed.
Enable the Audit These Events button and then enable the Success and Failure boxes.
Click OK to close the dialog box.
These settings will remain in effect until you change them again.