| Oracle® Fusion Middleware Developer's Guide for Oracle SOA Suite 11g Release 1 (11.1.1.6.3) Part Number E10224-15 |
|
|
PDF · Mobi · ePub |
| Oracle® Fusion Middleware Developer's Guide for Oracle SOA Suite 11g Release 1 (11.1.1.6.3) Part Number E10224-15 |
|
|
PDF · Mobi · ePub |
This chapter describes how to create and use Oracle Business Activity Monitoring (Oracle BAM) data controls, which are binding components in the Oracle ADF Model with support for Active Data Services. It describes how to add Oracle BAM Server connections in Oracle JDeveloper and create projects and web pages that use Oracle BAM data controls. Information is also included about how to use parameters to create Oracle BAM data control queries for displaying data in flat lists or in trees and charts using groups and aggregates of data.
For more comprehensive information about using Oracle ADF Model data binding and Active Data Services, refer to Oracle Fusion Middleware Fusion Developer's Guide for Oracle Application Development Framework.
This chapter contains the following topics:
Section 54.2, "Creating Projects That Can Use Oracle BAM Data Controls"
Section 54.4, "Exposing Oracle BAM with Oracle ADF Data Controls"
Section 54.7, "Deploying Applications With Oracle BAM Data Controls"
Oracle BAM data control allows ADF developers to build applications with a dynamic user interface that changes based on real-time business events. Oracle BAM data control is used to bind data from Oracle BAM data objects to databound UI components in an ADF page.
Oracle BAM data control abstracts a query on Oracle BAM data objects using standard metadata interfaces to describe the Oracle BAM data collections. Using JDeveloper, you can view that information as icons which you can drag and drop onto a page. Using those icons, you can create databound UI components (for JSF JSP pages) by dragging and dropping them from the Data Controls panel onto the visual editor for a page. JDeveloper automatically creates the metadata that describes the bindings from the page to the Oracle BAM data objects. At runtime, the ADF Model layer reads the metadata information from appropriate XML files for both the data controls and bindings and implements the connection between your user interface and Oracle BAM data objects. Oracle BAM data control is read-only.
For general information about Oracle ADF data controls, and information about ADS (active data services), see Oracle Fusion Middleware Fusion Developer's Guide for Oracle Application Development Framework.
Oracle BAM data control must to be hosted by a valid ADF web application. Also, a limited set of ADF Faces components support active data, therefore a limited set of ADF Faces components can make use of the main functionality of an Oracle BAM data control. Refer to Oracle JDeveloper ADF documentation for information about creating ADF web applications, including a list of components that support active data.
An Oracle BAM data control can still be used by view components that do not support active data.
Oracle BAM data control requires that the project contain the ADF Faces and ADF Page Flow technologies. The Fusion Web Application (ADF) template in JDeveloper contains these technologies.
You must create a connection to Oracle BAM to browse the available data objects in JDeveloper. This connection information is automatically used during deployment and runtime. See Section 53.4, "Creating a Design Time Connection to an Oracle BAM Server" for details on creating the connection.
Note:
Oracle BAM data control only uses connections that appear in the Application Resources panel. It does not find connections in the Resource Palette. Oracle JDeveloper facilitates copying connections from Resource Palette to the Application Resources panel of your application.
Note:
To create an Oracle BAM data control against an SSL-enabled Oracle BAM Server Oracle JDeveloper must be started with the -J-Djavax.net.ssl.trustStore option, which should point to the location of the key store. The connection to Oracle BAM Server cannot be created without this option.
Example:
C:\jdevrc1\jdeveloper\jdev\bin>jdev -J-Djavax.net.ssl.trustStore=C:\jdevrc1\wlserver_10.3\server\lib\DemoTrust.jks
Each Oracle BAM data control has an associated Oracle BAM connection. When a connection has changed name or has been removed from the application resources, you get an error when you attempt to use any data controls that are associated with the connection. You can do one of the following to resolve the lost connection:
Create a new Oracle BAM connection with the same name as the connection that is referred to by the data control. See Section 54.3, "Creating Oracle BAM Server Connections" for more information.
Update the current project's DataControls.dcx file with the name of a new or existing Oracle BAM connection. See Section 54.3.1.1, "How to Associate a BAM Data Control with a New Oracle BAM Connection" for more information.
To change the Oracle BAM connection associated with a particular data control you must edit the DataControls.dcx file in the current project. Change the connection attribute of the BAMDataControl element with the name of the desired Oracle BAM connection.
To modify the Oracle BAM connection in an Oracle BAM data control:
Optionally, create a new Oracle BAM connection in the application.
If you do not have a BAM connection in the Application Resources to use for this data control, create a new one. See Section 54.3, "Creating Oracle BAM Server Connections" for more information.
Locate the DataControls.dcx file in the project, and open it for editing.
The DataControls.dcx file is located in the Application Sources directory under the node named for the project.
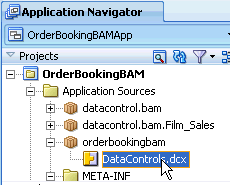
Each project in a ADF application has a DataControl.dcx file associated with it. Each DataControls.dcx file may have one or more data control definitions. If the current project does not contain the definition for the data control you want to modify, look through the other projects in the current application to locate it.
In the Source view, locate the appropriate data control definition, and locate the BAMDataControl element within it.
In the source view find the AdapterDataControl block with the id that matches the display name of your data control.
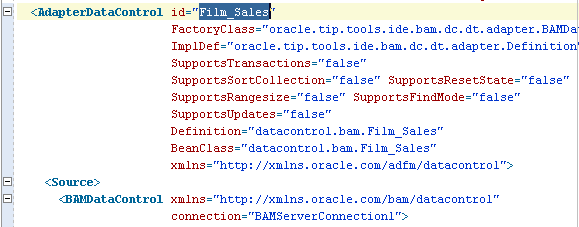
Change the connection attribute to the name of the new Oracle BAM connection.
Save and close the DataControls.dcx file.
Once you have created your Oracle BAM data objects and established a connection to an Oracle BAM server from JDeveloper, you can use JDeveloper to create data controls that provide the information needed to declaratively bind UI components to those data objects. Data controls consist of many XML metadata files that define the capabilities of the service that the bindings can work with at runtime.
See Chapter 55, "Defining and Managing Oracle BAM Data Objects" for information about creating Oracle BAM data objects. For information about creating a connection to your Oracle BAM instance, see Section 54.3, "Creating Oracle BAM Server Connections."
You create Oracle BAM data controls from within the Application Navigator of JDeveloper.
To create a data control:
In the Application Navigator, Application Resources panel, expand the data object folders in the Oracle BAM Server connection.
Right-click the Oracle BAM data object for which you want to create a data control, and select Create Data Control from the context menu.
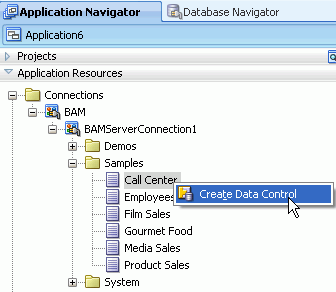
Complete the BAM Data Control wizard to create the data control query.
See Section 54.5, "Creating Oracle BAM Data Control Queries" for more information.
When you create a data control based on an Oracle BAM data object, the data control contains a representation of a query on all of the selected fields that is constructed based on the groupings, aggregates, filters, parameters, and additional calculated fields that you configure using the BAM Data Control wizard in JDeveloper.
For the data control to work directly with the service and the bindings, JDeveloper creates the following metadata XML files:
Data control definition file (DataControls.dcx)
Structure definition files for every structured object that this service exposes
Design time XML files
JDeveloper also adds the icons to the Data Controls panel that you can use to create data bound UI components.
The Data Controls panel lists all the data controls that have been created for the application's business services and exposes all the queries that are available for binding to UI components. The panel is a direct representation of the structure of the data to be returned by the data control. By editing the data control, you can change the elements displayed in the panel.
Figure 54-1 Data Controls Panel in Oracle JDeveloper
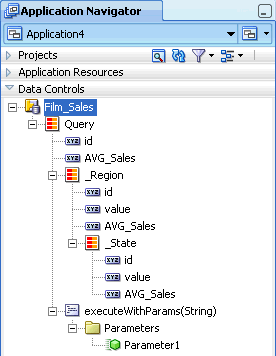
You can design a databound user interface by dragging an item from the Data Controls panel and dropping it on a page as a specific UI component. When you use Oracle BAM data controls to create a UI component, JDeveloper automatically creates the various code and objects needed to bind the component to the data control you selected.
You can create an Oracle BAM data control query using the Oracle BAM Data Control wizard. The wizard lets you choose between creating a flat query or a group query.
The following sections explain how to use each page in the wizard to create your query:
On the Name page of the Oracle BAM Data Control wizard, in addition to naming the data control and selecting the metadata XML files location, you can choose to create either a flat query or a group query.
In the BAM Data Control Name field, enter a display name for the data control.
In the Directory Name field, enter the directory in which the data control metadata XML files are saved.
The Data Object path displays the location of the data object from which the query is built.
Select Group Query when you want to create groups and aggregates of data to display in trees or charts. The Collapsed checkbox, enabled only when Group Query is selected, makes the structure of the group query flat.
Select Flat Query when you want to show the data in a flat table or list.
In New records position select whether the new records are added to the beginning or end of the graph. For example, if you want new bars to appear on the right side of a bar graph, select At the end. If you want new rows inserted at the top of a list, select At the beginning.
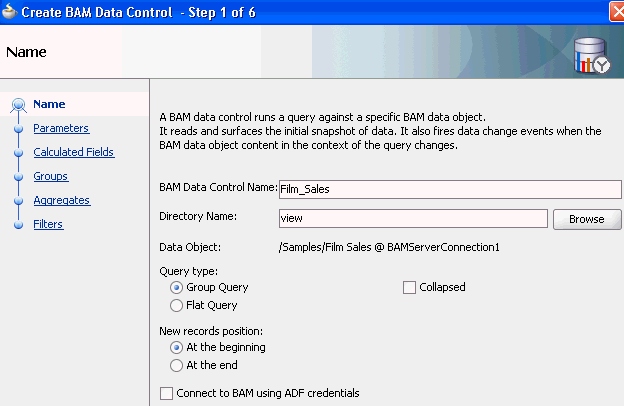
Select the Connect to BAM using ADF credentials checkbox to connect to Oracle BAM Server at runtime using the credentials in the ADF application containing the Oracle BAM data control. This feature takes advantage of row-level security provided by Oracle BAM Server by using the ADF application user's identity to display only the data that the user is permitted to see.
To use this feature, both Oracle BAM Server and the ADF server must use the same credential store. When this feature is disabled (unchecked) the runtime connects to Oracle BAM Server using the credentials provided in the Oracle BAM connection, specified in Oracle JDeveloper or Oracle Enterprise Manager Fusion Middleware Control.
For more information about row-level security, see Section 55.6, "Creating Security Filters."
On the Parameters page of the Oracle BAM Data Control wizard you can create parameters that are used to pass values to filters on the Filters page of the wizard. For more information about creating filters see Section 54.5.6, "How to Create Filters."
For information about passing values to parameters, see Section 54.5.3, "How to Pass Values to Parameters."
To create parameters:
Click Add to add a parameter.
Click the Add icon above and to the right of the Parameters box.

To rename the parameter enter the text in the Name field.
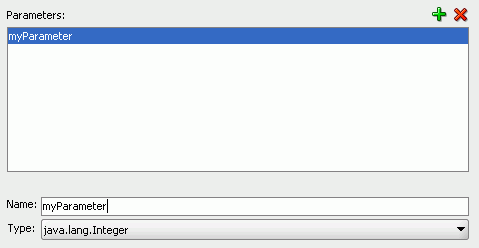
Select the data type from the Type list.

Table 54-1 Oracle BAM and Java Type Mapping
| Java Type | Oracle BAM Type |
|---|---|
|
java.lang.Integer |
Integer |
|
java.lang.String |
String |
|
java.util.Date |
DateTime, Timestamp |
|
java.lang.Boolean |
Boolean |
|
java.lang.BigDecimal |
Decimal |
|
jave.lang.Double |
Float |
|
Field* |
*The Field parameter type is used in charts for specifying groups at runtime. This parameter type allows the user to choose which field in the data object to group by. See the following topics for more information:
To provide a default value for the parameter when loading the data control query, select Enable Default Value and choose a default value.
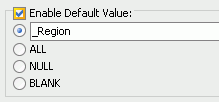
To enter a default value for the parameter, select one of the available defaults, or select the first option and enter a value in the field.
ALL returns rows containing all values.
NULL returns rows containing null values.
BLANK returns rows containing blank string values.
The operation setParameters appears in the Oracle BAM data control structure every time an Oracle BAM data control query is created with parameters.
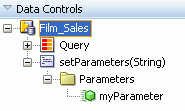
To pass parameters to an Oracle BAM data control, the setParameters operation must be called in Oracle BAM data control before the query is executed.
One of the many ways that can be done is by using an ADF parameter form. For more information, see Oracle Fusion Middleware Web User Interface Developer's Guide for Oracle Application Development Framework.
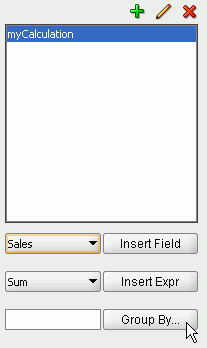
Calculated fields allow you to create new columns based on data derived from existing fields without updating the physical data object. Use the Oracle BAM Data Control wizard Calculated Fields page to create them.
To create calculated fields:
Click Add to add a calculated field.
Click the Add icon above and to the right of the box.
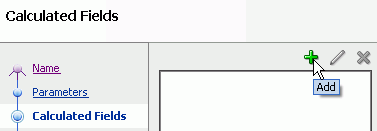
The new default field name appears in the list of calculations. You can rename it later, after entering a valid expression.

To enter an expression, choose an expression from the expressions list, and click Insert Expr.
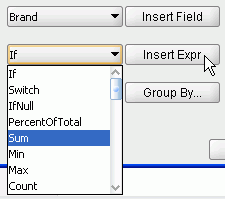
Complete the expression in the right-hand box, and click Validate to check the syntax of your expression.

There are several preformed expressions available. See Oracle Fusion Middleware User's Guide for Oracle Business Activity Monitoring for examples and more information about each expression.
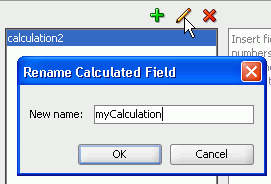
Click Rename to change the display name of a calculated field.
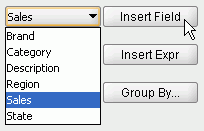
To use a data object field in a calculation, select the field from the field list, and click Insert Field.
You can create groups in the calculations page.
To create groups on calculations:
Select a calculation in the calculations list.
Click Group By.
Choose a field to group by, and click OK.
You can use the up and down arrows to change the group order.
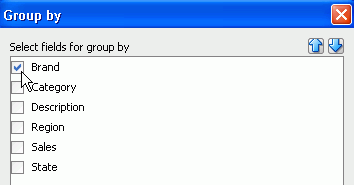
To deselect all of the fields, uncheck the ALL checkbox, and select individual fields.
The field at the top of the list appears in the left-most column of the final table in the ADF page. To change the order in which the fields appear, select a field and use the blue arrows to move it up or down the list.
To apply sorting on a field, click the sorting type in the Sorting column, and choose a new sorting type from the list.
Note:
If you use Active Data, sorting is preserved on Update, Upsert operations, but not on Insert operations.
You can apply filters to both Group Query and Flat Query types of Oracle BAM data controls. Add combinations of entries and headers to create complex filter expressions.
To create a sub-header under an existing header:
In the Filters page of the Create BAM Data Control wizard, select a header under which to add the sub-header, and click Add Header.
You can select the main header at the top of the filter expression to create a sub-header under it.
To change the operator (default ALL), select the header, and click Edit. For the following operator options, data is returned when:
ALL. All of the included entries are true.
NONE. None of the included entries are true.
AT LEAST ONE. At least one and maybe more of the included entries are true.
NOT ALL. Some or none of the included entries are true, but not all of the included entries are true.
Select an operator from the Filters list, and click OK.
To create a filter entry:
In the Filters page of the Create BAM Data Control wizard, select a header under which to add the filter entry.
For information about creating headers in the filter expression see Section 54.5.6.1, "How to Create Filter Headers."
Click Add Filter Entry.
The Add Filter Entry dialog opens.
Choose a field from the Field list.
Choose an expression from the Comparison list. Choices include:
is equal to returns rows containing an exact value match.
See Section 54.5.6.3, "Entering Comparison Values" for information on configuring comparison values.
is not equal to returns rows containing all values except specified value.
is less than returns rows containing values less than specified value.
is less than or equal to returns rows containing values less than or equal to specified value.
is greater than returns rows containing values greater than specified value.
is greater than or equal to returns rows containing values greater than or equal to specified value.
is like returns rows containing values that match a string pattern. Include an underscore (_) as a wildcard for a single character in a string and a percent symbol (%) as a wildcard for one character or more. Wildcard characters can be combined, for example, %mm _00 would return all columns (35mm 200, 35mm 400, 35mm 800). Do not enter any spaces in the expression since spaces are treated as characters in the data match.
is not like returns rows containing values that do not match a string pattern.
is null returns rows containing values where the column is null. If you select this comparison, your filter configuration is complete. Click OK to create the filter. For numeric data types, nulls are not returned for filters returning values equal to zero. In other words, zeroes are not treated as null values. A null represents missing data in the field.
is not null returns rows containing values where the column is not null. If you select this comparison, your filter configuration is complete. Click OK to create the filter. For numeric data types, nulls are not returned for filters returning values equal to zero. In other words, zeroes are not treated as null values. A null represents missing data in the field.
is in list returns rows containing values included in a list. To build a list, click Edit. Type a value in the field and click Add to add it to the list. Add as many values as needed. Click Browse to choose values currently present in the Data Object. Click Remove to remove a value. Click OK to close the dialog.
is not in list returns rows containing values not included in the list. To build a list, click Edit. Type a value in the field and click Add to add it to the list. Add as many values as needed. Click Browse to choose values currently present in the Data Object. Click Remove to remove a value. Click OK to close the dialog.
is within a time interval returns rows containing values that occur within the specified time interval. Configure the time interval using the provided lists. Select a Type, enter a multiplier in the field and select a Unit.
When filtering on a datetime or timestamp field, you can enable Active Now to keep the displayed time interval current as time passes. Configure the Active Now Interval to specify how often to refresh the display. See Section 54.5.6.4, "Using Active Now" for more information.
is within the current time period returns rows containing values that occur within the current specified time unit. Select a Unit from the list.
When filtering on a datetime or timestamp field, you can enable Active Now to keep the displayed time period current as time passes. See Section 54.5.6.4, "Using Active Now" for more information.
is within a time period returns rows containing values that occur within the specified time period. Configure the time period using the provided lists. Enter a value in the Offset field, select a Unit, and select a Type.
When filtering on a datetime or timestamp field, you can enable Active Now to keep the displayed time period current as time passes. See Section 54.5.6.4, "Using Active Now" for more information.
Click OK to add the entry to the filter expression.
For most Comparison values you must choose Value, Field, or Calculation from the Value list.
Only the following comparisons do not require a comparison value:
is null
is not null
is in list
is not in list
is within a time in interval
is within the current time period
is within a time period
If you select Value, do one of the following:
Click Browse to see a list of values present in the data object. Select a value from the list. Up to 50 values display in the list. The field can be left blank to create a filter on a blank string.
Note:
If there are more than 50 values in the field, not all of the values are shown in the Browse list. Your Oracle Business Activity Monitoring administrator can configure the number of rows to display in the list. See the Oracle Business Activity Monitoring Installation Guide for more information.
Manually enter a value in the field.
If you select Calculation, enter an expression in the field to compare with the first field.
For example, if you create a list view using the sample Call Center data object and create a filter with the following attributes:
Field. Total
Comparison. is equal to
Value. Calculation
Calculation field. Quantity*2
This filter yields only those rows where the value in the Total column is equal to twice the value in the Quantity column.
If you select Field, select a field from the last list to compare with the field selected in the Field list.
If you select Parameter, select a parameter from the list at the right. Creating a filter using a parameter allows the user to change the filter values at runtime.
The list contains the parameters you created in the Parameters step of the Create Oracle BAM Data Control wizard. For more information about creating parameters see Section 54.5.2, "How to Create Parameters."
The Active Now feature in data filtering enables you to display in your views a segment of the data that is always within a defined time window. As time passes, the view is updated with the data within the defined time interval in the filter. Older data is removed from the view and newer data is added as time passes.
Active Now is available when you choose one of the following comparison expressions:
is within a time interval
is within the current time period
is within a time period
Active Now behaves differently depending on which comparison expression you choose.
When you choose is within a time interval, you can control how often the data is refreshed using the Active Now Interval setting.
For example, if you create a filter using is within a time interval, previous type, 1, Hours unit, and Active Now, set the Active Now Interval to 60 seconds, and the current time is 3:25 p.m., data from 2:25 p.m. - 3:25 p.m. is displayed in the view. When the current time changes to 3:26 p.m., data from 2:26 p.m. - 3:26 p.m. is displayed in the view. Every 60 seconds the oldest minute of data is removed from the view and the newest minute is added.
When you choose is within the current time period or is within a time period, the data is refreshed when the time period changes.
For example, when you create a filter using is within the current time period, the Hours unit, and Active Now, and the current time is 3:25 p.m., only data from 3:00 p.m. - 3:59 p.m. is displayed in the view until the current time is 4:00 p.m. At 4:00 p.m. all the data from 3:00 p.m. - 3:59 p.m. is removed from the view, and data that accumulates during the 4:00 p.m. - 4:59 p.m. time interval is displayed in the view.
In the Groups page of the Create BAM Data Control wizard, select one or more fields in the Group Fields list.
If you created a Field parameter, it appears in the list. See Section 54.5.2, "How to Create Parameters" for more information about creating field parameters.
To group by numeric fields, first select Show Numeric Fields at the bottom of the list.
To change the display order in which the groups are presented in a graph, select a sorting option from the Sorting list for any selected field.
If a datetime field is selected in the Fields list, several options are enabled for configuring Time Groups on the right side of the wizard page.
See Section 54.5.7.1, "How to Configure Time Groups and Time Series" for more information.
You can create a chart where the grouping (x axis) is based on a datetime field.
To configure time groups:
In the Groups page of the Create BAM Data Control wizard, select a single field of type datetime in the Group Fields list.
This action enables the Time Groups options on the right side of the wizard page.
Select Continuous Time Series to display empty groups for time intervals where no data is available.
There may be time gaps where the data object did not have entries. The Continuous Time Series feature adds groups to the result whose values are zero, so that when the results are shown on the graph, the x axis represents a smooth time series.
Continuous Time Series is valid only if you have chosen a single datetime field to group by. Continuous Time Series is not supported if any additional group fields are selected.
Select either Use Time Series or Use Time Groups.
Use Time Series displays the data from the first datetime data point available in the data object to the last in the configured time interval.
Use Time Groups displays data grouped into a set number of time intervals. For example, if you select Month from the time unit list, all data from January from all years where data is available are grouped in one data point on the chart.
Select a time unit from the list.
If you selected Use Time Groups, the groups are described in the following list.
Year displays groups for all of the years where data is available.
Quarter displays four groups representing the quarters of a year (January-March, April-June, July-September, and October-December).
Month displays twelve groups representing the months of the year.
Week displays 52 groups representing the weeks in a year.
Day of Year displays groups representing the 365 possible days in a year.
Day of Month displays 31 groups representing the possible days of a month.
Day of Week displays seven groups representing the days of the week.
Hour displays 24 groups representing the hours of a day.
Minute displays 60 groups representing the minutes in an hour.
Second displays 60 groups representing the seconds in a minute.
Enter a quantity of the time unit to group by. For example, entering a 2 next to the Month time unit displays the groups in two month increments (January and February are grouped as one data point on the chart).
Click Next or Finish.
To specify an aggregate on a field:
In the Aggregates page of the Create BAM Data Control wizard, select a field in the Fields list.
The valid Summary Functions for the data type of that field are enabled.
Select one or more valid Summary Functions.
The expressions appear in the Summary Values list.
Oracle BAM data controls can be used in all ADF Faces components. Only a subset of ADF Faces components are ADS (active data service) capable. Refer to Oracle Fusion Middleware Web User Interface Developer's Guide for Oracle Application Development Framework for information about ADF Faces components that support ADS.
Oracle BAM data control instances use the resources of the Oracle BAM Server instance they are connected to. Those resources are released when the data control is released. In order to release those resources in a timely fashion it is required that you use Oracle BAM data controls within bounded ADF task flows with Data Control Scope set to isolated. It is recommended that you set the session time out in web.xml to a reasonable value so that resources are released in a timely way. Refer to Oracle Fusion Middleware Web User Interface Developer's Guide for Oracle Application Development Framework for information about the general life cycle of data controls.
Note:
Oracle BAM data control instance sharing is not supported. When two or more ADF Faces components must display the same data, and are bound to the same Oracle BAM data control definition, make sure to wrap each ADF Faces component in a bounded ADF task flow, and set the Data Control Scope to isolated. See Oracle Fusion Middleware Web User Interface Developer's Guide for Oracle Application Development Framework for more information.
When using an Oracle BAM data control with setParameters inside the task flow, you must pass the parameter to the task flow and ensure that the method gets called before the query call.
To use an Oracle BAM data control in a JSF page:
Set the default browser:
In the JDeveloper Tools menu, select Preferences.
In the Preferences dialog, select Web Browser and Proxy.
Choose a default browser by entering the path to the browser's executable in the Browser Command Line field, enter any applicable proxy information, and click OK.
Create a bounded ADF Task Flow:
Right click project, select New, select JSF under the Web Tier category, and select ADF Task Flow in Items list.
Make sure the Create as Bounded Task Flow option is checked.
Drag and drop View from Components in the Component Palette to the ADF Task Flow editor.
Drag and drop data-control-scope under Source Elements in the Component Palette to the ADF Task Flow editor.
Change the Data Control Scope to isolated in the Property Inspector.
Create a JSF Page Fragment by double-clicking in the View you previously dropped in the ADF Task Flow editor.
Drag and drop an accessor node from the Data Controls panel to the JSF page editor.
Select a data visualization component.
A subset of ADF components support active data. See the Oracle Fusion Middleware Fusion Developer's Guide for Oracle Application Development Framework for more information about binding data controls with data visualization components.
Save all, and in the Oracle JDeveloper toolbar, click Run Project.
At runtime, Oracle BAM data control must use the Oracle BAM connection to connect to Oracle BAM Server.
Deployment to the Integrated WebLogic Server is automatic; however, deployment to a standalone Oracle WebLogic Server requires some extra steps. See Section 54.7.1, "How to Deploy to Oracle WebLogic Server in Development Mode," and Section 54.7.2, "How to Deploy to a Production Mode Oracle WebLogic Server," for more information
See Oracle Fusion Middleware Fusion Developer's Guide for Oracle Application Development Framework for more information about deploying Fusion Web applications.
Before deployment to a development-mode Oracle WebLogic Server, verify that the Java system property jps.app.credential.overwrite.allowed to true during Oracle WebLogic Server startup.
Add the following to the JAVA_PROPERTIES entry in the ORACLE_HOME/user_projects/domains/domain/bin/setDomainEnv.sh file:
-Djps.app.credential.overwrite.allowed=true
Post-deployment configuration is not required.
Before and after deploying an ADF application with Oracle BAM data controls to a production-mode Oracle WebLogic Server you must do the following steps:
The application must be deployed using MDS (Metadata Data Services). To enable MDS:
Create and/or register your MDS Repository.
Edit the adf-config.xml file to add the following block:
<adf-mds-config xmlns="http://xmlns.oracle.com/adf/mds/config">
  <mds-config xmlns="http://xmlns.oracle.com/mds/config" version="11.1.1.000">
    <persistence-config>
      <metadata-store-usages>
        <metadata-store-usage default-cust-store="true" deploy-target="true" id="myRepos">
        </metadata-store-usage>
      </metadata-store-usages>
    </persistence-config>
  </mds-config>
</adf-mds-config>
Deploy the application to Oracle WebLogic Server after choosing the appropriate repository during deployment from the MDS Repository dialog that opens.
After deployment, the Oracle BAM connection must be re-created in Oracle Enterprise Manager Fusion Middleware Control.
Go to the ADF Connections Configuration page, and create a BAM connection.
Open Oracle Enterprise Manager Fusion Middleware Control (http://host:port_number/em).
In the left pane select Deployments, then select your application.
In the right pane, select Application Deployment and select ADF -> Configure ADF Connections in the menu.
Select BAM in the Connection Type list.
Enter the Connection Type to be the same as the one defined in Oracle JDeveloper.
Select Create Connection to add a new row under BAM Connections.
Select the new connection and click the Edit icon, specify the appropriate values for all connection parameters in the dialog, and click OK.
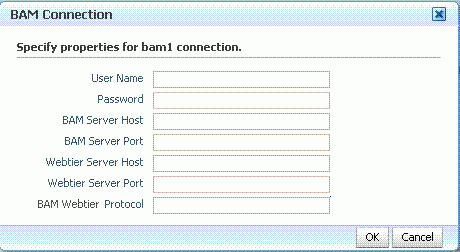
The Oracle BAM Web Tier is the location where report server is running. The valid values for BAM Webtier Protocol are http and https.
You must enter the same Connection Name as the Oracle BAM connection that was configured for design time (see Section 53.4, "Creating a Design Time Connection to an Oracle BAM Server").
Click Apply and re-run the page.