| Oracle® Fusion Middleware Installation and Configuration Guide for Oracle Business Intelligence Applications 11g Release 1 (11.1.1) Part Number E16814-06 |
|
|
PDF · Mobi · ePub |
| Oracle® Fusion Middleware Installation and Configuration Guide for Oracle Business Intelligence Applications 11g Release 1 (11.1.1) Part Number E16814-06 |
|
|
PDF · Mobi · ePub |
This section explains how to use Oracle BI Applications Configuration Manager and Functional Setup Manager to administer and maintain functional configuration data.
This section contains the following topics:
Section 6.1, "About Maintaining and Administering Functional Configuration Data"
Section 6.2, "Roadmap for Setup Data Maintenance and Administration"
Section 6.4, "About Working With Domains and Domain Mappings"
Section 6.8, "How to Change Configuration Values Using Oracle BI Applications Configuration Manager"
Section 6.9, "How to Locate Unmapped Domain Values in Oracle BI Applications Configuration Manager"
During an Oracle BI Applications deployment project, you use Oracle BI Applications Configuration Manager and Functional Setup Manager to manage and make changes to configuration values for Data Load Parameters, Domains and Mappings, and Reporting Parameters.
For Functional Configuration road map information, see Section 6.2, "Roadmap for Setup Data Maintenance and Administration".
The list below provides a high-level roadmap for Setup Data Maintenance and Administration.
High-Level Setup Data Maintenance and Administration Roadmap
During the Functional Configuration stage, you typically use Oracle BI Applications Configuration Manager to monitor the setup data values.
To monitor Domain Mappings, in Oracle BI Applications Configuration Manager, select the Manage Domains and Domain Mappings link from the Tasks bar to display the select Manage Domains and Domain Mappings dialog.
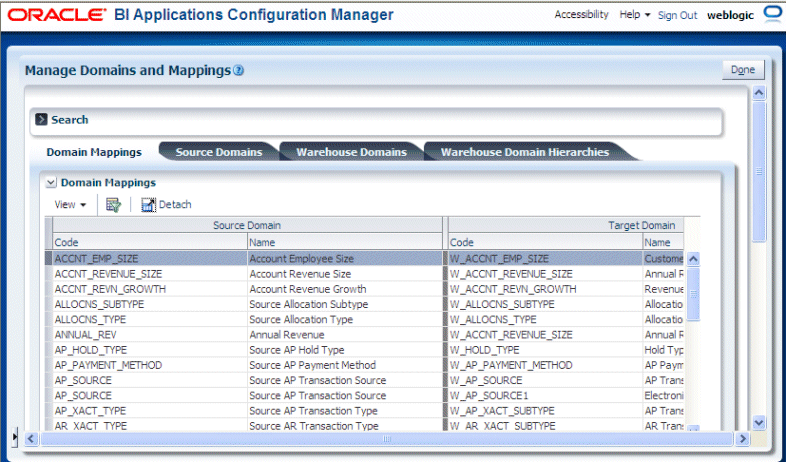
Note: Alternatively, in Functional Setup Manager, select the Go to Task link for a Task that updates a Domain or Domain Member mappings. For example, the Task name 'Manage Domains and Member Mappings for Employee Dimension' updates Domain and Domain Member Mappings.
To monitor Data Load Parameters, select the Data Load Parameters link from the Tasks bar to display the select Manage Data Load Parameters dialog.
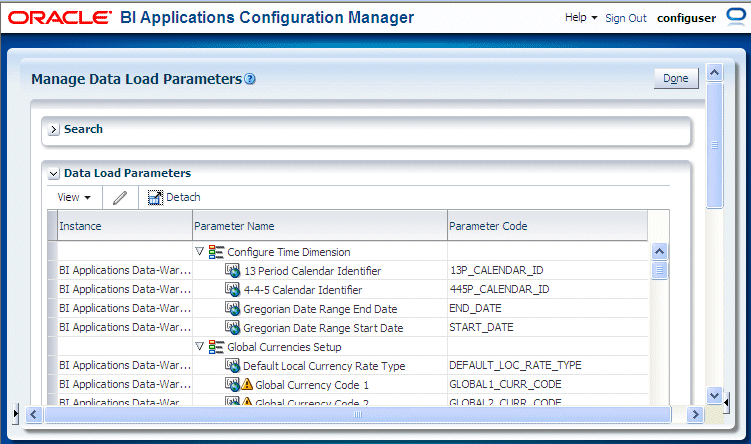
Note: Alternatively, in Functional Setup Manager, select the Go to Task link for a Task that updates a Data Load Parameter value. For example, the Task named 'Configure Data Load Parameter Workforce Adjusted Service Date' updates a Data Load Parameter value.
To monitor Reporting Parameters, select the Manage Reporting Parameters link from the Tasks bar to display the select Manage Reporting Parameters dialog.
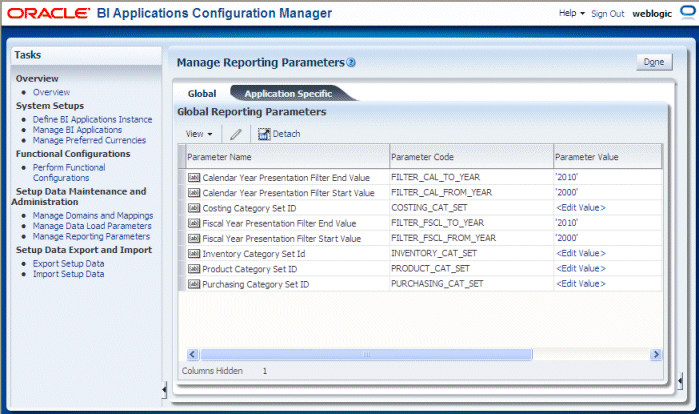
Note: Alternatively, in Functional Setup Manager, select the Go to Task link for a Task that updates a Reporting Parameter. For example, the Task named 'Configure Reporting Parameters for Year Prompting' updates a Reporting Parameter.
Tip:
Domain values can be used to define delivered business metrics; therefore, you must review the delivered domain member values and map them to the correct source values.
During Functional Configuration of purchased Offerings, you use Functional Setup Manager to monitor the status of Tasks and the setup data values that have been set.
For example, you might use the Implementation Project page in Functional Setup Manager to assess the number of completed tasks.
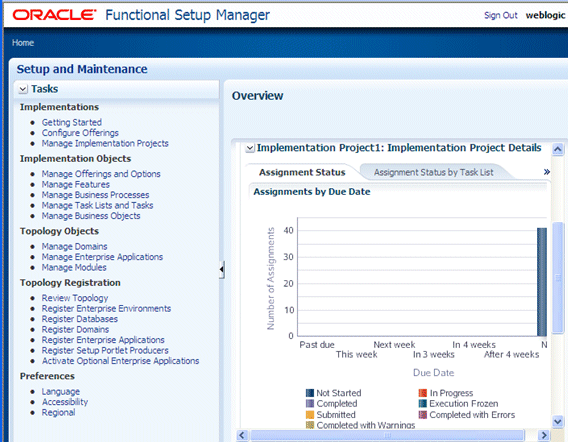
If required, you use Oracle BI Applications Configuration Manager to make changes to the configuration values. For more information, see Section 6.8, "How to Change Configuration Values Using Oracle BI Applications Configuration Manager".
If required, you use Oracle BI Applications Configuration Manager to add Domains or Domain Member values. For more information, see Section 6.11, "About Adding Target Domain Members".
Functional Configuration Data for Oracle BI Applications is information about the following:
Domains and Mappings (for more information, see Section 6.4, "About Working With Domains and Domain Mappings").
Data Load Parameters (for more information, see Section 6.5, "About Working With Data Load Parameters").
Reporting Parameters (for more information, see Section 6.6, "About Working With Reporting Parameters").
Functional Configuration Data for Oracle BI Applications is:
configured using Functional Tasks in Functional Setup Manager.
monitored and updated using Oracle BI Applications Configuration Manager.
Domains are pre-seeded dimensional values that help define business metrics. For example, in Financial Analytics, domains store information about the General Ledger accounts.
To manage Domains, you use the Manage Domains and Mappings dialog (see the following screenshot).
To display the Manage Domains and Mappings dialog, do one of the following:
In Oracle BI Applications Configuration Manager, select the Manage Domains and Mappings link in the Tasks pane.
In Functional Setup Manager, select the Go to Task link for a Task that updates a Domain and Domain Member mappings.

The Manage Domains and Mappings dialog contains the following tabs:
Domain Mappings - this tab shows how data fields in the Source System map to data fields in Oracle Business Analytics Warehouse (for more information, see Section 6.4.1, "About Domain Mappings and Domain Member Mappings").
Source domains - this tab shows data fields and Domain Members in the Source System (for more information, see Section 6.4.2, "About Source Domains").
Warehouse Domains - this tab shows data fields and Warehouse Members in Oracle Business Analytics Warehouse (for more information, see Section 6.4.3, "About Warehouse Domains").
Warehouse Domain Hierarchies - this tab shows Domains that have been organized into hierarchies to enable the data to be more effectively analyzed (for more information about this tab, see Section 6.4.4, "About Warehouse Domain Hierarchies").
Domain Mappings specify how data in a source system is extracted and loaded into Oracle Business Analytics Warehouse. For example, the data in domain Source Group Account (BI_GROUP_ACCOUNT) extracts and loads into the domain Group Account (W_GL_GROUP_ACCOUNT).
The following screenshot shows example domain mappings for Oracle Financial Analytics.

Domain Member Mappings specify how domain member data in a source system is extracted and loaded into domain member data in Oracle Business Analytics Warehouse. For example, in Oracle HR Analytics, domain Gender (W_SEX_MF_CODE) has a source value 'Male' that is mapped to a domain member value 'M' in Oracle Business Analytics Warehouse.
There are two types of Domain, as follows:
Regular Domains
Regular Domains have members consisting of a single value. For example, members for a Purchase Order Status domain might have the following members:
Cancelled
Closed
Incomplete
These single values map to single member values in the target system. For example, Cancelled maps to Cancelled, Closed maps to Closed, and so on.
Band Domains
Band Domains have members consisting of two values (Range Start, and Range End) that specify a range. For example, an Account Employee Size domain might have the following members:
1, 5000
5001, 10,000
10,001, 1,000,000.
Each range maps to a single target Domain Member. For example, 1, 5000 maps to Small, 5001, 10,000 maps to Medium, and so on.
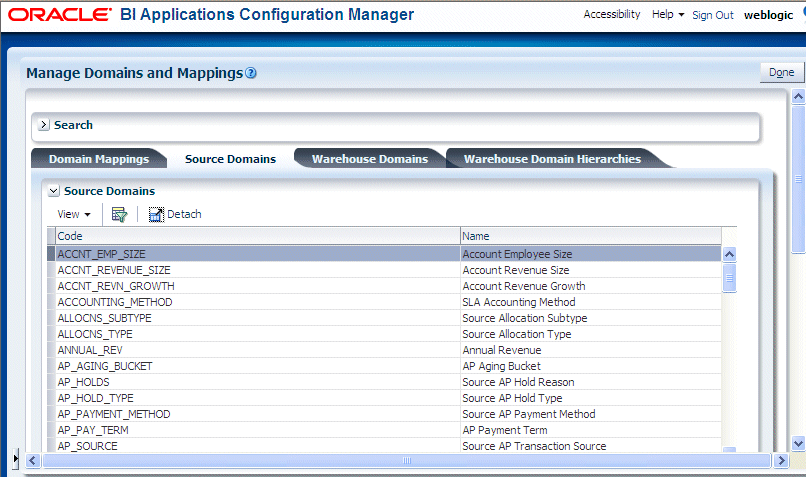
Data fields in a Source System application are referred to as Source Domains. Data fields in Oracle Business Analytics Warehouse are referred to as Warehouse Domains.
The following screenshot shows example source domains for Oracle Financial Analytics.
Note: Source Domains displayed on the Source Domains tab are read-only.
Domain Members are the permitted values for a Source or Warehouse Domain. For example, the Domain Members for MARITAL_STATUS include D for Divorced, M for Married, S for Single, and so on.
Tip:
Domain values can be used to define delivered business metrics; therefore, you must review the delivered domain member values and map them to the correct source values.
Domain Mappings specify how entities in a Source System application are loaded into Oracle Business Analytics Warehouse.
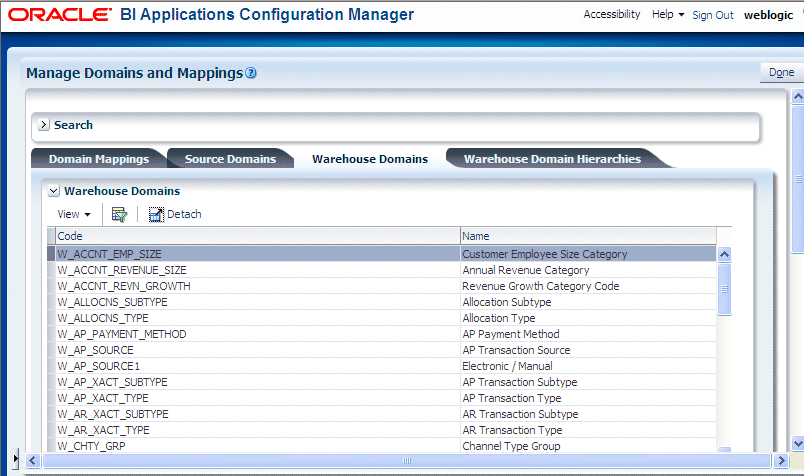
Data fields in Oracle Business Analytics Warehouse are referred to as Warehouse Domains.
The following screenshot shows example warehouse domains for Oracle Financial Analytics.
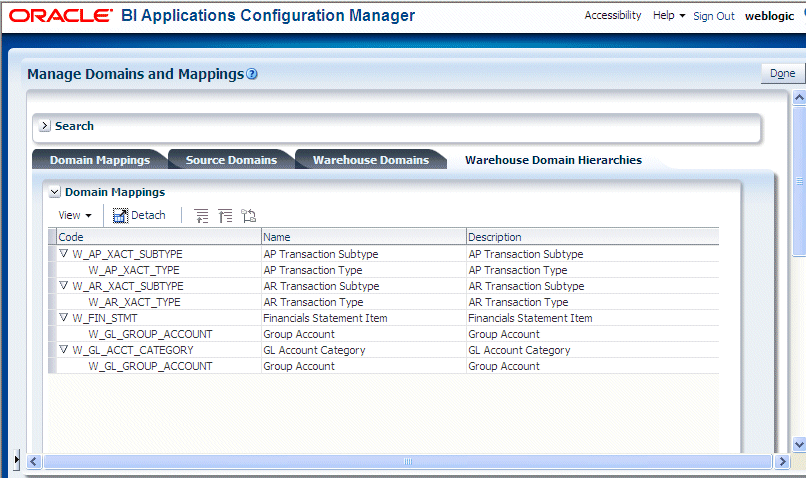
Warehouse Domain Hierarchies are Domains that have been organized into hierarchies to enable the data to be more effectively analyzed. For example, in Oracle HR Analytics, you might need to have a workforce event hierarchy: Event Group -> Event Sub-group -> Event Detail.
Note:
Domain Hierarchies are displayed in inverted format, that is in the following format:
<Child 1>\
<Child n>\
<Parent>.
For more information, see Section 6.12, "Viewing Domain Hierarchies".
The following screenshot shows example warehouse domain hierarchies for Oracle Financial Analytics.
Oracle Business Intelligence Applications ships default domain value mappings that map the seeded BI Application domain values to the seeded configuration data in Oracle Enterprise Resource Planning applications.
When you configure your Offerings, you need to review the default mappings for domain values, and if necessary update them to suit the categories that you want to use to report on your data.
For example, in Oracle HR Analytics, the default domain values for Performance Range might be similar to the following:
0 - 50: PERF_RANGE_1
50 - 60: PERF_RANGE_2
60 - 70: PERF_RANGE_3.
If you want to use these default categories, you do not need to make any changes to these mappings before you start your ETL processes.
If you want to make changes to default mappings, then you use the Domain Mappings tab to implement these changes.
For example, you might want to change the range for PERF_RANGE_1 from 0 - 50 to 0 - 100. Or you might want to add a new category named PERF_RANGE_4 and assign the range 100 - 500 to the new PERF_RANGE_4 category.
To edit a Domain Member Mapping:
Navigate to the Domain that you want to edit, using the "Manage Domains and Mappings: Domain Mappings tab".
To display the Domain Mapping tab, do one of the following:
In Oracle BI Applications Configuration Manager, select the Manage Domains and Mappings link in the Tasks pane, display the Domain Mappings tab, then select a Domain.
In Functional Setup Manager, select the Go to Task link for a Task that updates a Domain or Domain Member Mappings.
Scroll down to the Domain Member Mappings pane.
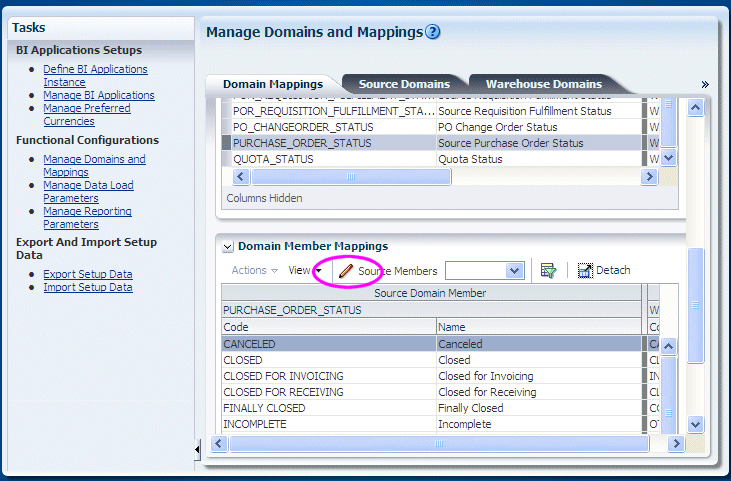
Click the Edit Domain Member Mappings icon to display the "Edit Domain Member Mappings dialog",
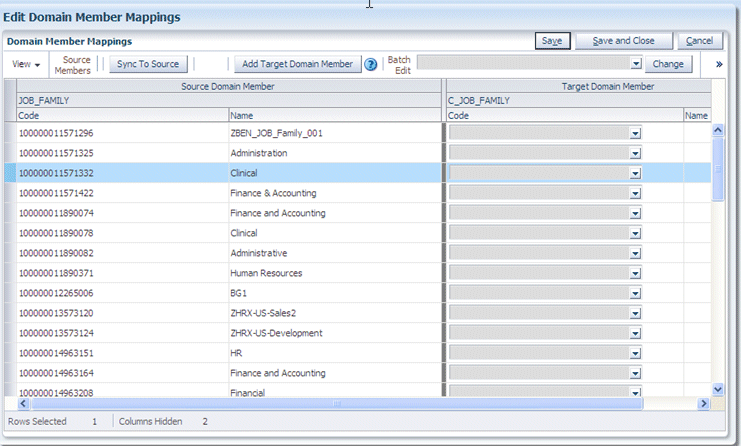
Use the "Edit Domain Member Mappings dialog" to edit the domain mapping values.
To add a Range Member Mapping:
Navigate to the Domain that you want to edit, using the "Manage Domains and Mappings: Domain Mappings tab".
To display the Domain Mapping tab, do one of the following:
In Oracle BI Applications Configuration Manager, select the Manage Domains and Mappings link in the Tasks pane, display the Domain Mappings tab, then select a banded (or ranged) Domain.
In Functional Setup Manager, select the Go to Task link for a Task that updates a banded or ranged Domain or Domain Member Mappings.
Scroll down to the Domain Member Mappings pane.

Click the Edit Domain Member Mappings icon to display the "Edit Domain Member Mappings dialog",
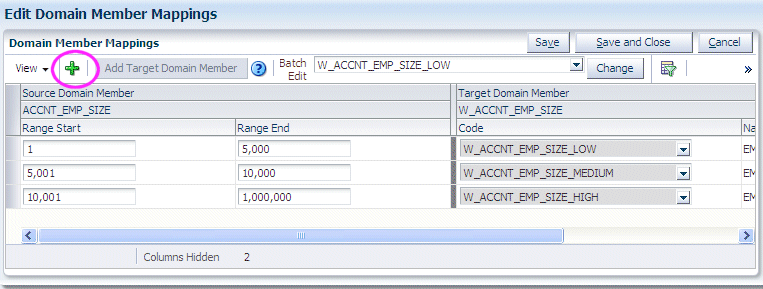
Click the Add Range Member Mapping (+) icon and specify values in the Range Start, Range End, and Target Domain Member - Code fields.
Tip: Before you create a new range, you might first want to use the Add Warehouse Member button to first create a target Warehouse Member, which is then available as an option in the Target Domain Member - Code list. For example, you might add a Warehouse Member called 'Greater than 250,000' to map to the range 250,000 to 1,000,000.
To add a Target Domain Member:
Navigate to the Domain that you want to edit, using the "Manage Domains and Mappings: Domain Mappings tab".
To display the Domain Mapping tab, do one of the following:
In Oracle BI Applications Configuration Manager, select the Manage Domains and Mappings link in the Tasks pane, display the Domain Mappings tab, then select a Domain.
In Functional Setup Manager, select the Go to Task link for a Task that updates a Domain or Domain Member Mappings.
Scroll down to the Domain Member Mappings pane.

Click the Edit Domain Member Mappings icon to display the "Edit Domain Member Mappings dialog",
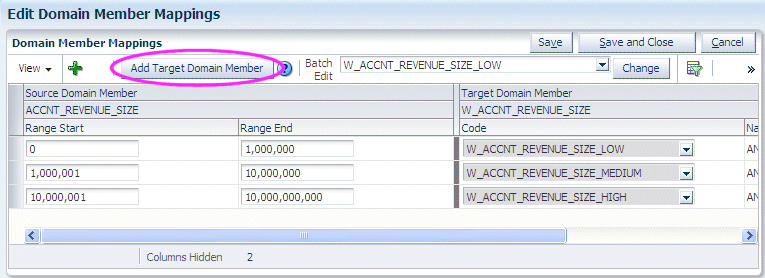
Click Add Target Domain Member to display the Add Target Domain Member dialog, which enables you to specify a Name, Code, and optional Description.
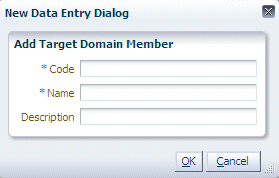
For example, you might add a Warehouse Member called 'Greater than 250,000' to map to the range 250,000 to 1,000,000.
Note: If the Add Target Domain Member option is grayed out or not displayed, then the domain is non-extensible (for more information, see Section 6.4.7, "Why are some domains non-extensible?").
When you click OK to return to the "Edit Domain Member Mappings dialog", you can map a Source Domain to the Target Domain that you just created.
If you added a new domain member and it requires localization, follow the procedure in this section.
To add string localizations for Oracle BI Applications Configuration Manager metadata:
Open a database administration tool, and connect to the Oracle Business Analytics Warehouse schema.
Query for the table C_DOMAIN_MEMBER_TL and the new domain member record you added in Section 6.4.5.3, "How to add a Target Domain Member."
You can query for the new domain member record by using the query filter on the columns CREATED_BY and CREATION_DATE.
Each new domain member record will have 28 rows in the C_DOMAIN_MEMBER_TL table.
Update the LANGUAGE_CODE column to match the localized deployment language:
Identify the language code for the localized language using the following SQL:
SELECT LANGUAGE_CODE, NLS_LANGUAGE, NLS_TERRITORY
FROM FND_LANGUAGES_B
WHERE INSTALLED_FLAG IN ('B', 'I');
Update the domain member name, description, and source language code strings for the localized language using the following SQL.
In this example, the localized language is Arabic, and the LANGUAGE_CODE is AR.
UPDATE C_DOMAIN_MEMBER_TL
SET DOMAIN_MEMBER_NAME = '<Arabic translated string for domain member name>', DOMAIN_MEMBER_DESCR = '<Arabic translated string for domain member description>', SRC_LANGUAGE_CODE = 'AR'
WHERE DOMAIN_KEY = '<Domain key value for the record you want to update>'
AND DOMAIN_MEMBER_CODE = '<Domain member code value for the record you want to update>'
AND LANGUAGE_CODE = 'AR';
Exit the database administration tool.
Restart the Oracle WebLogic Server.
If you added a new domain member, follow this procedure to add string localizations in the Oracle BI Repository metadata.
To add string localizations for Oracle BI repository metadata:
Stop the OPMN services.
Use the command: opmnctl stopall.
Open a database administration tool, and connect to the Oracle Business Analytics Warehouse schema.
Identify the strings for the following presentation objects:
- Subject area
- Presentation table
- Presentation hierarchy
- Presentation level
- Presentation column
For example, for the subject area Payables Invoices - Prepayment Invoice Distributions Real Time, you would enter the following strings:
For each subject area, externalize the strings for localization and generate custom names for the presentation objects:
In the Oracle BI Administration Tool, right-click the subject area and select Externalize Display Names, and then select Generate Custom Names.
Save your work.
For more information about localizing strings, see "Localizing Metadata Names in the Repository," in Oracle Fusion Middleware System Administrator's Guide for Oracle Business Intelligence Enterprise Edition.
Check the consistency of the repository, and remove any inconsistencies.
For instructions, see "Checking the Consistency of a Repository or Business Model," in Oracle Fusion Middleware Metadata Repository Builder's Guide for Oracle Business Intelligence Enterprise Edition (Oracle Fusion Applications Edition).
Enter the custom name of one of the presentation objects into the table C_RPD_MSGS:
INSERT INTO C_RPD_MSGS(MSG_ID, CREATED_BY, CREATION_DATE)
VALUES('<CUSTOM NAME OF PRESENTATION OBJECT>', 'CUSTOM', SYSTIMESTAMP);
COMMIT;
Note: To view the values for custom names and logical columns in the Administration Tool, right-click the presentation object and select Properties. The data in the "Custom display name" field appears in the format VALUEOF(NQ_SESSION.VALUE, where VALUE is the custom name for a presentation object, or the logical value for a presentation column. This value is the value that you need to enter in the VALUES section of the SQL statement above.
Enter the localized string for the presentation object in the previous step into the table C_RPD_MSGS_TL:
INSERT INTO C_RPD_MSGS_TL(MSG_ID, MSG_TEXT, LANGUAGE_CODE, CREATED_BY, CREATION_DATE)
VALUES('<CUSTOM NAME OF PRESENTATION OBJECT>', '<LOCALIZATION OF THE STRING'>, '<LANGUAGE CODE FOR TRANSLATED LANGUAGE>', 'CUSTOM', SYSTIMESTAMP);
COMMIT;
To identify the language code for a particular language, use the following SQL:
SELECT LANGUAGE_CODE, NLS_LANGUAGE, NLS_TERRITORY
FROM FND_LANGUAGES_B
WHERE INSTALLED_FLAG IN ('B', 'I');
Enter additional details about the presentation object into the table C_RPD_MSGS_REL as indicated by the following SQL:
INSERT INTO C_RPD_MSGS_REL(MSG_ID, MSG_NUM, MESSAGE_TYPE, CREATED_BY, CREATION_DATE)
VALUES('<CUSTOM NAME OF PRESENTATION OBJECT>', '<TRANSLATION OF THE STRING'>, '<LANGUAGE CODE FOR TRANSLATED LANGUAGE>', 'METADATA','CUSTOM', SYSTIMESTAMP);
COMMIT;
Repeat steps 6 through 8 for each presentation object requiring localization.
Validate that the physical connection of the session initialization block INIT_USER_LANGUAGE_CODE is operable:
In the Oracle BI Administration Tool, select Manage, Variables, Session Initialization Block.
Right-click INIT_USER_LANGUAGE_CODE.
In the Properties dialog, click Edit Data Source.
Click Test, and input the value for the language code. Then, click OK.
For example, for Arabic enter 'AR'.
The value USER_LANGUAGE_CODE = '<language code>' should be returned.
If this value is not returned, the TNS entry for the data source is not properly configured.
Restart the OPMN services.
Verify the localized strings in Oracle BI Answers. On the login page, specify the appropriate language.
In some scenarios, you might only know what target Domain member values should be when you deploy Oracle BI Applications. For example, in Order Management or Supply Chain Analytics, UOM (Unit of Measurement) is typically not known until deployment time. You can set up a non-ranged target domain using the Sync to Source option to automatically synchronize a target domain with values from the source domain. This process inserts new target members from the source domain, and automatically generates 1:1 mappings. This is useful for large domains with many member mappings that might otherwise take a long time to set up.
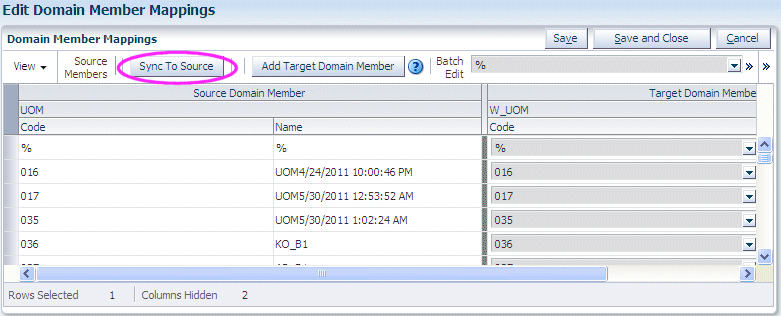
Note: Sync to Source is only available for extensible non-ranged Domains.
How to synchronize a Target Domain with a Source Domain:
Navigate to the Domain that you want to synchronize.
If you are in Oracle BI Applications Configuration Manager, from the Tasks bar click Manage Domains and Mappings, display the Domain mappings tab, select the Domain that you want to edit, then click the Edit Domain Member Mappings icon in the Domain Member Mappings pane to display the "Edit Domain Member Mappings dialog".
If you are in Functional Setup Manager, when you click Go to Task for the Task that is updating a Domain, you display the "Edit Domain Member Mappings dialog" dialog.

Click Sync to Source.
At the Warning dialog, click OK.

Note: If you click OK to continue, then you commit changes to the target Domain members, even if you do not click 'Save' or click 'Save and Close' on the Edit Domain Member Mappings dialog.
Target Domain member values are generated. In the example below, the target codes for C_JOB_FAMILY are automatically synchronized with the Source member codes.
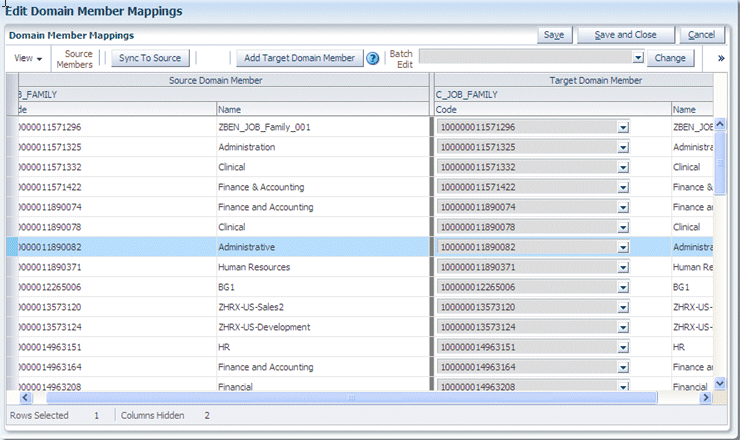
You can set up a target domain using the Batch Edit option to update multiple target domain members with the same value. This is useful for large domains with many member mappings that require the same value.
To use Batch Edit to update multiple Target Domain Member Values:
Navigate to the Domain that you want to edit.
If you are in Oracle BI Applications Configuration Manager, from the Tasks bar click Manage Domains and Mappings, display the Domain mappings tab, select the Domain that you want to edit, then click the Edit Domain Member Mappings icon in the Domain Member Mappings pane to display the "Edit Domain Member Mappings dialog".
If you are in Functional Setup Manager, when you click Go to Task for the Task that is updating a Domain, you display the "Edit Domain Member Mappings dialog" dialog.
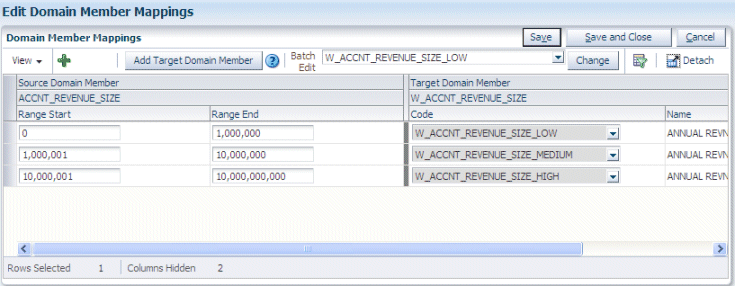
Multi-select one or more rows in the table.
Tip: To multi-select, use Ctrl + click to select multiple rows.
Select a value from the Batch Edit drop down list.
Click Change to apply the value selected in the Batch Edit drop down list to all specified members.
Oracle BI Applications Warehouse Domains are organized into hierarchies. You might want to modify a hierarchy to enable data to be more effectively analyzed. For example, you might change the order of items in a hierarchy.
To create or edit a Warehouse Domain Hierarchy:
In the Domain mappings list, select the Domain Mapping that you want to edit.
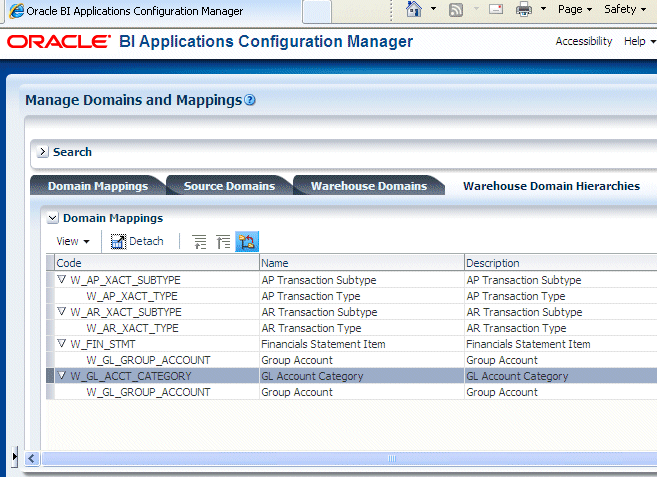
Use the options at the top of the Domain Mapping list to change the hierarchy.
To maintain data integrity in Oracle Business Intelligence Applications, some domains have been designed as non-extensible, and are therefore read-only.
If a domain is non-extensible, then when the domain is selected, the following options are greyed out:
the Edit icon in the Domain Member Mappings pane (on the "Manage Domains and Mappings: Domain Mappings tab" or "Manage Domains and Mappings: Warehouse Domain Hierarchies tab").
the Add Target Domain Member button (on the "Edit Domain Member Mappings dialog").
the Add Warehouse Domain Member button (on the "Manage Domains and Mappings: Warehouse Domains tab"\Warehouse Members pane).
Data Load Parameters are configuration values that specify how Source System data is loaded into Oracle Business Analytics Warehouse. For example, the cost time grain parameter COST_TIME_GRAIN specifies whether costs are aggregated weekly, monthly, or quarterly, during the data loading process.
When you work with Data Load Parameters in Oracle BI Applications Configuration Manager, note the following key points:
Data Load Parameters can be either Global or Application Specific, as follows:
Global parameters apply to all applications, and are indicated with the (ab) and globe icon:
Global Data Load Parameters can also be associated with specific Fact Groups or Dimension Groups.
Application Specific apply to specific applications, and indicated with the (ab) icon:
Application Specific Data Load Parameters are always associated with one or more Fact Groups or Dimension Groups.
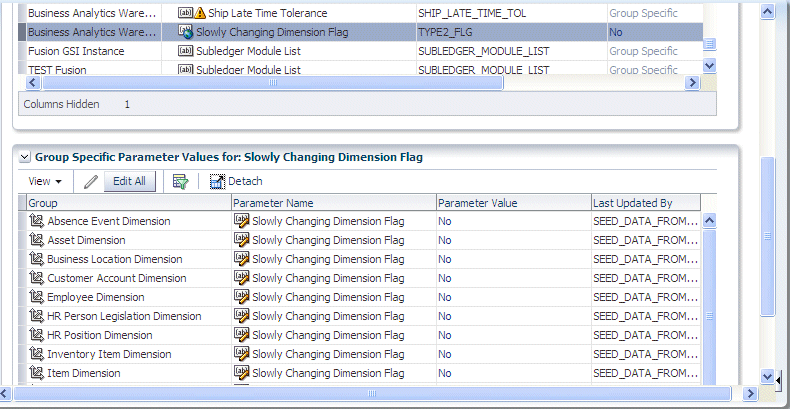
If a Global Data Load Parameter is associated with one or more Fact Groups or Dimension Groups, then each Fact Group or Dimension Group can have a different value. For example, the value of Slowly Changing Dimension Flag for Absence Even Dimension might be Yes, and the value of Slowly Changing Dimension Flag for Asset Dimension might be No.
Values for Global Group-specific parameters are always overridable, and are indicated by the Overridable Parameter icon (that is, the (ab) icon with a pencil):
The example below shows the Global parameter 'Slowly Changing Dimension Flag' with associated Group-specific values displayed in the lower pane.
For Application Specific Data Load Parameters, values for associated Fact Groups or Dimension Groups can either be Overridable or Non-Overridable, as follows:
Overridable - each associated Fact Group or Dimension Group can have a different value. Overridable parameters are indicated by the Overridable Parameter icon (that is, the (ab) icon with a pencil):
Non-Overridable - each associated Fact Group or Dimension Group must have the same value. Non-Overridable parameters are indicated by the Parameter icon (that is, the (ab) icon without a pencil):
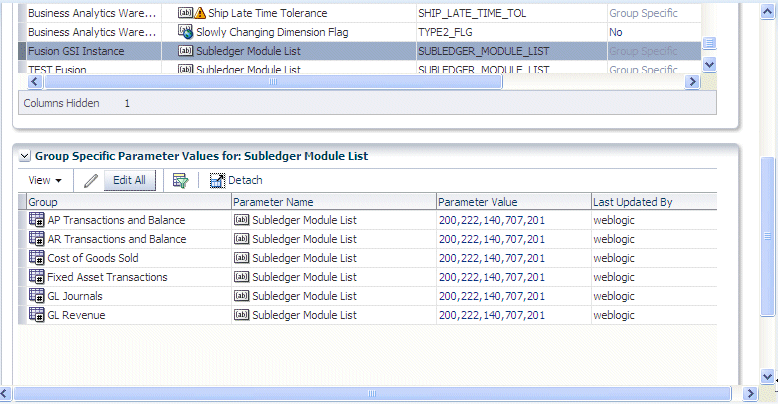
The example below shows the Application Specific parameter 'Product Category Set ID 3' with associated Group-specific values displayed in the lower pane. Note that the Group-specific values in this example cannot be overridden.
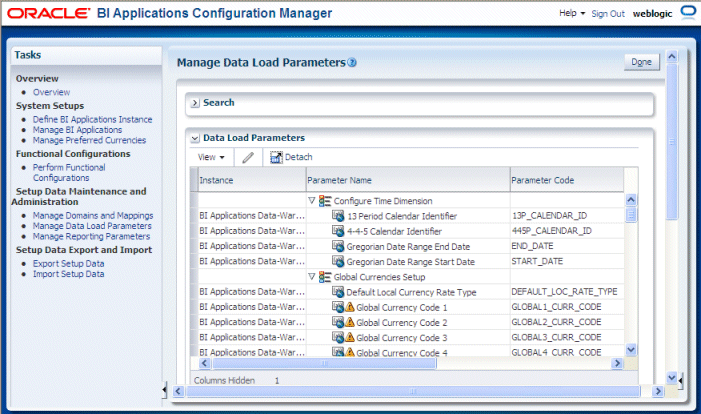
You edit Data Load Parameters (whether they are Global or Application Specific) using the Data Load Parameters dialog, which is displayed in Functional Setup Manager when you edit a Data Load Parameter (see the following screenshot). The Data Load Parameters list above (or master table) displays the parameters and values, and the Group Specific Parameter Values list below displays associated Fact Groups or Dimension Groups (if there are any).

To display Data Load Parameters in Oracle BI Applications Configuration Manager, select the Manage Data Load Parameters link on the Tasks bar to display the "Manage Data Load Parameters dialog".
To edit the value of a Global Parameter, select the record in the Data Load Parameters master table, and then either click the Edit icon in the table toolbar or click on the link in the Global Parameter Values column.
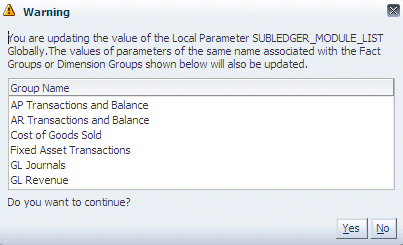
If the Global Parameter that you edit is associated with Fact Groups or Dimension Groups, then a warning message is displayed to verify that you want to update the value for all associated Fact Groups and Dimension Groups. If you click Yes at the warning message, then the values of all occurrences of the parameter at the Group level will be updated to the new value.
For example, if you click the Edit icon or the link in the Parameter Value column for the parameter SUBLEDGER_MODULE_LIST in the Data Load Parameters master table, then the following Warning dialog is received:
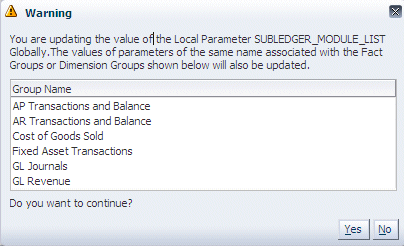
Clicking Yes allows you to continue with the edit of the parameter value. A change to the parameter value is applied to all parameter occurrences at the Group level.
To change the value of parameter for a specific Fact Group or Dimension Group, select the Global Parameter in the Data Load Parameters master table, and then select the parameter in the Group Specific Parameter Values for: <Parameter Name> detail table. Click on the Edit icon in the table tool bar or the link in the Parameter Value column to open the Parameter Value Edit dialog.
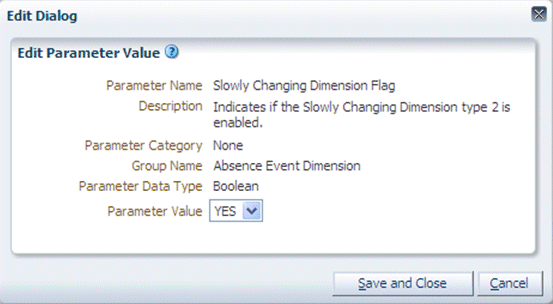
Changing the parameter value in the above Edit Dialog updates the parameter value for the Slowly Changing Dimension Flag parameter associated with the Absence Event Dimension Group.
You use the Edit option to edit the value of a Fact Group or Dimension Group that is associated with an Application Specific parameter (if the parameter is overridable).
You use the Edit All option to edit the value of all Fact Groups and Dimension Groups that are associated with an Application Specific parameter.
If you attempt to edit the value of a specific Fact Group or Dimension Group, then:
if the parameter is overridable at the Group level, then you update only that specific Fact Group or Dimension Group.
if the parameter is Non-Overridable at the Group level, then a Warning dialog displays a list of Fact Groups and Dimension Groups that will be affected if you click Yes to edit the value.
You edit Data Load Parameters using the Manage Data Load Parameters dialog.
To display the Manage Data Load Parameters dialog, do one of the following:
In Oracle BI Applications Configuration Manager, select the Manage Data Load Parameters link in the Tasks pane.
In Functional Setup Manager, select the Go to Task link for a Task that updates a Data Load Parameter (for example, Configure Initial Extract Date).
To edit a Data Load Parameter:
Select the parameter in the Data Load Parameters list.
If the parameter is a Global parameter, then the Global Parameter Value field displays the actual value (for example, 'MONTHLY').
If the parameter is a non-Global parameter, then the Global Parameter Value field displays the text 'Group Specific').
Do one of the following:
To update a Global parameter, in the Data Load Parameters list click the value displayed in the Global Parameter Value field to display the "Edit Parameter Value dialog (for Data Load Parameters)", and edit the value. Alternatively, select the row and click the Edit icon.
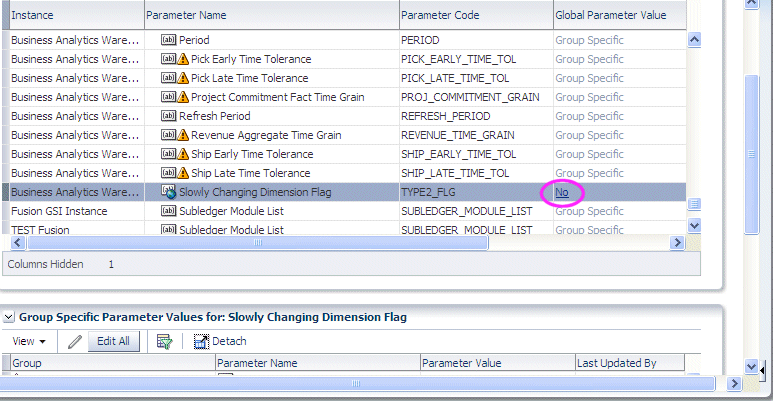
If a Global parameter is associated with Fact Groups or Dimension Groups, you can override the Global value for specific Fact Groups or Dimension Groups by editing the parameter value in the Group specific Parameter Values for pane.
To update an Application Specific parameter, select the parameter in the Data Load Parameters list, scroll down to the Group Specific Parameter Values for list, and click either the Edit icon, or the value in the Parameter Value column (or select the parameter row and click the Edit icon).
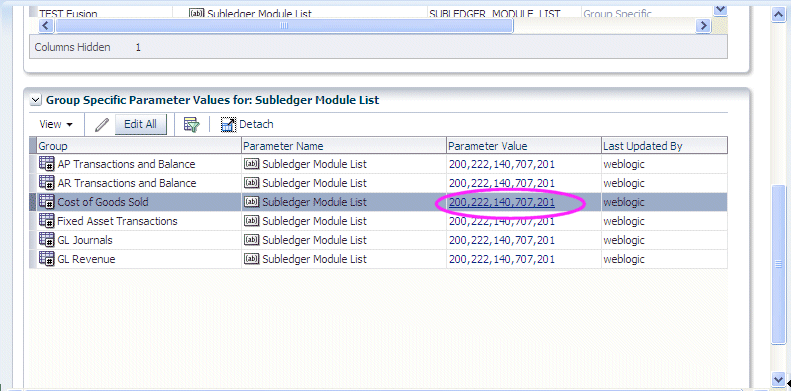
If the parameter is overridable at the Group level, then you update only that specific Fact Group or Dimension Group using the Edit Parameter Value dialog.
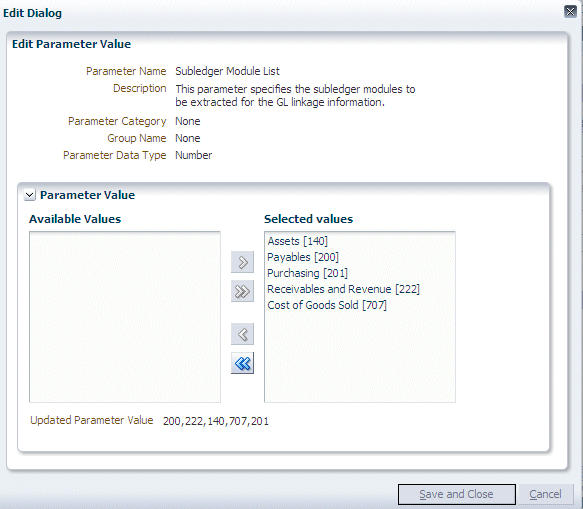
If the parameter is Non-Overridable at the Group level, then a Warning dialog displays a list of Fact Groups and Dimension Groups that will be affected if you click Yes to edit the value.

To update the parameter value for all Fact Groups and Dimension Groups in the Group Specific Parameter values for list, click Edit All to display the Edit Parameter Value dialog.

Reporting Parameters are configuration values that specify how data is presented in Business Intelligence dashboards.
There are two categories of Reporting Parameter:
Global, which apply to all applications. These are displayed on the Global tab.
Application Specific, which apply to specific applications. These are displayed on the Application Specific tab.
You manage and edit Reporting Parameters using the "Manage Reporting Parameters: Global/Application Specific tab" (see the following screenshot).

You display the "Manage Reporting Parameters: Global/Application Specific tab" by doing one of the following:
In Oracle BI Applications Configuration Manager, select the Manage Reporting Parameters link in the Tasks pane.
In Functional Setup Manager, select the Go to Task link for a Task that updates a Reporting Parameter.
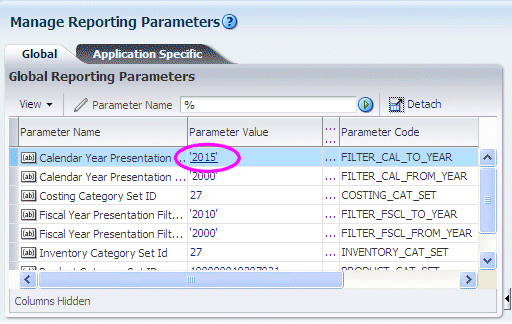
To edit a Reporting Parameter, select the parameter in the parameter list, then either click the Edit icon, or click the value in the Parameter Value column.
During a functional configuration project, you monitor Setup Data to ensure that your Offerings are being correctly configured. For example, you might use the Alerts pane on the Overview page to check for unmapped domain values.
You can monitor set up data in the following ways:
In Oracle BI Applications Configuration Manager, you can monitor the status of the underlying set up data values, as follows:
Use the pages and tabs in the Setup Data Maintenance and Administration area on the Tasks bar.
From the Tasks bar, select one of the links in the Setup Data Maintenance and Administration area. For example, select the Data Load Parameters link to display the Data Load Parameters page.

Use the Alerts pane on the Overview page.
Display the Overview page, and view the Alerts panes Data Load Parameters with No Values (see the following example screenshot), and Domain Maps with Unmapped Source Members.
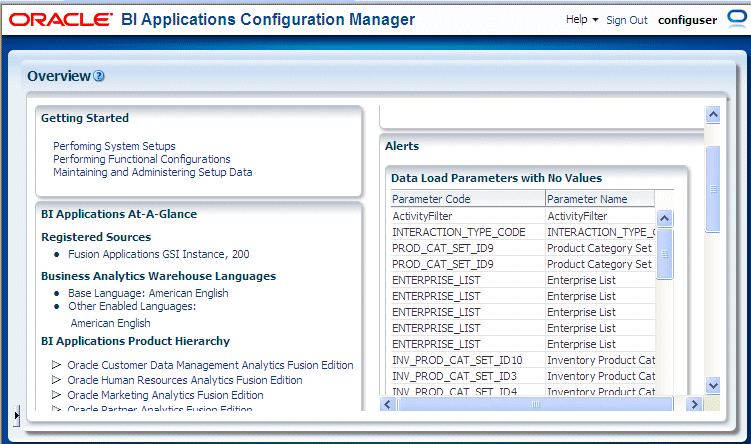
The Alerts pane only displays alerts for 'enabled' Offerings.
If you need to make configuration changes after an Implementation Project has been completed in Functional Setup Manager, you can use Oracle BI Applications Configuration Manager to update setup data. To change setup data values, you use the options in the Setup Data Maintenance and Administration area on the Tasks bar.
To change configuration values using Oracle BI Applications Configuration Manager:
In Oracle BI Applications Configuration Manager, use options in the Setup Data Maintenance and Administration area on the Tasks bar as follows:
To make changes to domain mappings, select Manage Domains and Mappings and display the tab for the domain type that you want to edit. To edit a Domain Mapping, select a domain in the Domain Mapping list and click the Edit icon in the Domain Member Mappings pane.

To make changes to data load parameters, select Manage Data Load Parameters and use the Search pane to locate the parameters that you want to edit. To edit the value of a Global Data Load Parameter, click the value in the Global Parameter Value column (or select the row then click the Edit icon) to display the "Edit Parameter Value dialog (for Data Load Parameters)".

For Application Specific parameters, select the parameter in the Data Load Parameters list, scroll down to the Group Specific Parameter Values for list, and click either the Edit icon or the value in the Parameter Value column (or select the parameter row and click the Edit icon).

To make changes to reporting parameters, select Manage Reporting Parameters, and display either the Global tab or the Application Specific tab. To edit the value of a Reporting Parameter, click the value in the Parameter Value column (or select the row then click the Edit icon) to display the "Edit Parameter Value dialog (for Reporting Parameters)".
Tip:
For information about locating unmapped domain values, see Section 6.9, "How to Locate Unmapped Domain Values in Oracle BI Applications Configuration Manager".
You locate unmapped Domain Values to enable you to make sure that you have mapped all of your source system domain values.
Tip: You can also use the Alerts pane on the Overview page in Oracle BI Applications Configuration Manager to identify target domains with one or more unmapped source members. Display the Overview page, and navigate to the Domain Maps with Unmapped Source Members pane.
How to locate unmapped domain values:
Start Oracle BI Applications Configuration Manager.
Do one of the following:
From the Tasks bar, select Manage Domains and Mappings to display the Manage Domains and Mappings dialog.
Display the "Manage Domains and Mappings: Domain Mappings tab".
In the Domain Member Mappings pane, select Unmapped from the Source Members list.
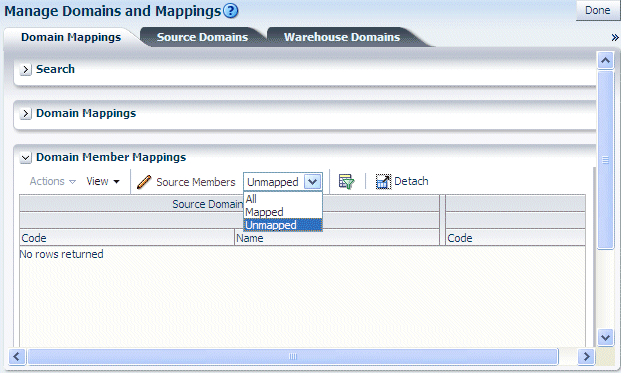
From the Tasks bar, select Manage Domains and Mappings to display the Manage Domains and Mappings dialog.
Display the "Manage Domains and Mappings: Warehouse Domain Hierarchies tab".
In the Domain Member Mappings pane, select Unmapped from the Source Members list.
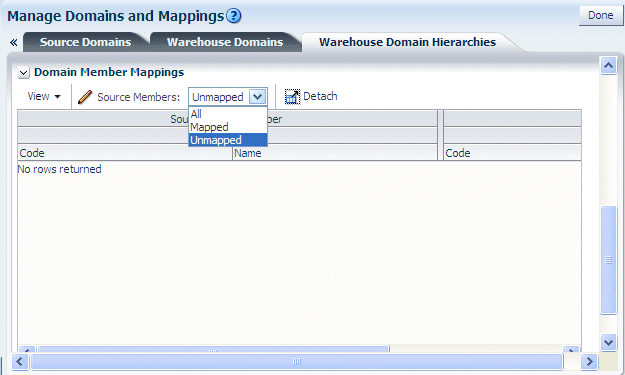
You locate Data Load Parameters with no values to check all Tasks in Functional Setup Manager relating to Data Load Parameters have been completed correctly.
How to locate Data Load Parameters with no values:
Start Oracle BI Applications Configuration Manager.
Do one of the following:
From the Overview page, use the Data Load Parameters with no Values list in the Alerts pane.
From the Tasks bar, select Manage Data Load Parameters to display the "Manage Data Load Parameters dialog", which enables you to view and edit parameters.
You add Target Domain Members to extend Oracle Business Analytics Warehouse. For example, you might want to create a new salary category called 'Range 5' so that you can map salary values to this new category.
You add a target domain member to extend Oracle Business Analytics Warehouse.
To add a Target Domain Member:
Display the Warehouse Domains tab.
In Functional Setup Manager, the Warehouse Domain tab is displayed when you perform a Task that edits a Warehouse Domain value.
In Oracle BI Applications Configuration Manager, from the Tasks bar, select Manage Domains and Mappings to display the Manage Domains and Mappings dialog.
In the Warehouse Members pane, click Add Warehouse Domain Member, to display the "Add Warehouse Domain Member/Add Target Domain Member dialog".
Use the "Add Warehouse Domain Member/Add Target Domain Member dialog" to specify the details.
Click OK to save the details and close the dialog.
To view Domain Hierarchies, select the Manage Domains and Mappings link on the Tasks bar, then display the Warehouse Domain Hierarchies tab.
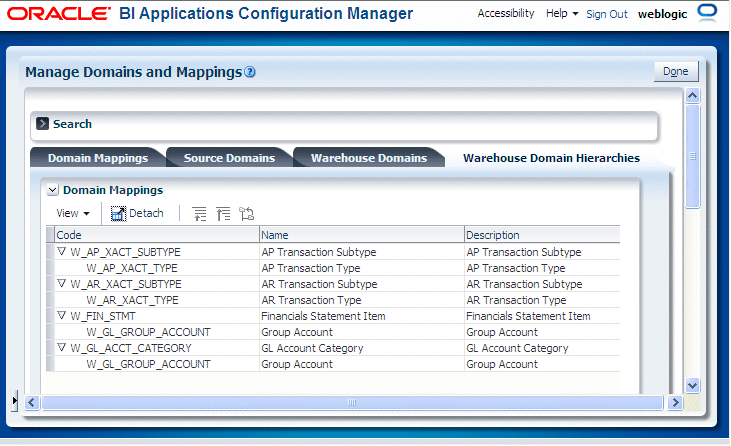
Notes
Domain Hierarchies are displayed in inverted format, that is in the following format:
<Child 1>\
<Child n>\
<Parent>.
For example, in the screenshot above, the child node AP Transaction Subtype is shown above and to the left of the parent node AP Transaction Type.
Domain Hierarchies are read-only. However, you can change the domain mappings.
For field level help for the Warehouse Domains Hierarchies dialog, see Section C.21, "Manage Domains and Mappings: Warehouse Domain Hierarchies tab".
You export and import Setup Data for Oracle BI Applications Configuration Manager to:
make a backup of your configuration settings for security purposes. For example, you might keep a record of the configuration changes that you have made.
migrate the Setup Data for Oracle BI Applications Configuration Manager from one environment to another environment. For example, you might move the configuration changes that you have made from a Test environment to a Production environment.
When you export Setup Data, you export the changes that you have made to the values of the following objects:
Data Load Parameters
Domains and Mappings
Reporting Parameters
Unchanged configuration values are not exported. In other words, if you only change the value of DEFAULT_CURRENCY from USD to Euro and then you export your data, then the export ZIP file that is produced will only contain columns for 'DEFAULT_CURRENCY=Euro'.
Note: Other Oracle BI Applications Configuration Manager data (for example, Source System configuration settings, Oracle Business Analytics Warehouse configuration settings) is not included in export files. In other words, before you import on the target system, you must first re-specify the Source System and Oracle Business Analytics Warehouse.
When you import Setup Data from a ZIP file, you import whatever configuration changes were exported to that ZIP file. For example, if you first export only Reporting Parameters to a ZIP file, then you import only the changes that were made to Reporting Parameters.
To migrate Setup Data, you do the following:
In the source environment, export the Oracle BI Applications Configuration Manager Setup Data as a ZIP file. For more information about exporting Setup Data, see Section 6.13.5, "How to Export Setup Data".
Copy the ZIP file from the source environment to the target environment.
In the target environment, import the Oracle BI Applications Configuration Manager Setup Data from the ZIP file. For more information about importing Setup Data, see Section 6.13.6, "How to Import Setup Data".
Note: The data source number in the target system must be the same as the data source number in the source system.
To back-up Setup Data, you do the following:
In the source environment, export the Oracle BI Applications Configuration Manager Setup Data as a ZIP file. For more information about exporting Setup Data, see Section 6.13.5, "How to Export Setup Data".
Store the ZIP file in a secure location.
In the target environment, make sure that you have installed Oracle BI Applications Configuration Manager, which installs the default setup data. Note: The data source number in the target system must be the same as the data source number in the source system.
To restore the backed-up data, you import the Oracle BI Applications Configuration Manager Setup Data from the ZIP file. For more information about importing Setup Data, see Section 6.13.6, "How to Import Setup Data".
You export Setup Data to back-up or migrate a Oracle BI Applications Configuration Manager environment.
To export Setup Data:
In the source environment, start Oracle BI Applications Configuration Manager.
From the Tasks bar, select Export Setup Data to display the "Export Setup Data dialog".
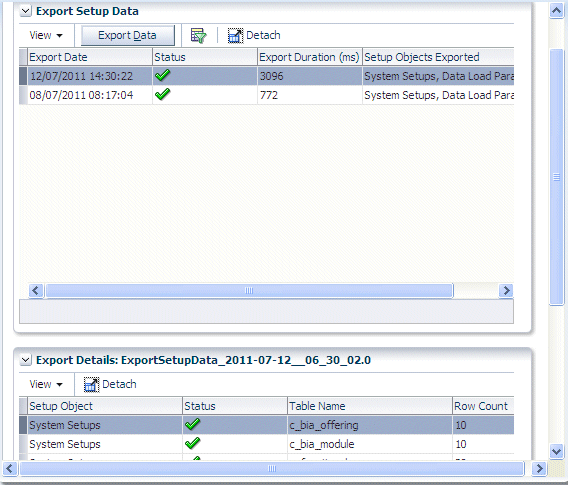
Click Export Data to display the "Export Data dialog".
Use the "Export Data dialog" to specify the setup objects that you want to export.
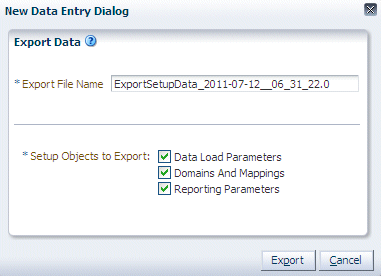
Click Export.
When the File Download dialog is displayed, click Save to save the ZIP file to a location that you specify.
If you first click Open at the File Download dialog to open the ZIP file, then make sure that you save the ZIP file in the ZIP program that you are using.
The Export Setup Data table is updated with the export details.
You import Setup Data to restore or migrate Setup Data. Before you import Setup Data, you must copy the previously exported ZIP file to a file location that is accessible from the machine that is running the Oracle BI Applications Configuration Manager client.
Note: When you import Setup Data, the data source number in the target system must be the same as the data source number in the source system.
To import Setup Data:
In the source environment, start Oracle BI Applications Configuration Manager.
From the Tasks bar, select Import Setup Data to display the "Import Setup Data dialog".
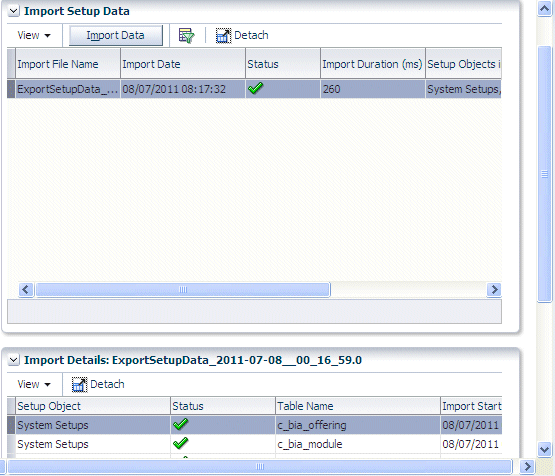
Click Import Data to display the "Import Data dialog".
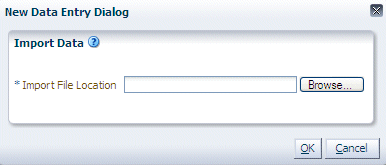
Use the "Import Data dialog" to specify the location and name of the ZIP file that contains the configuration changes that you want to import.
Click OK.
The Setup Data is imported from the ZIP file, and the Import table is updated with the details.