8 Configuring E-Mail Notifications and Distribution Lists
This chapter describes how to configure e-mail notifications and templates and manage distribution lists.
This chapter includes the following sections:
8.1 Overview
Oracle Enterprise Repository supports automatic e-mail to a variety of participants in the asset registration process. E-mails are sent based on repository events, whether the events are triggered by interaction with OER via the user interface, or by OER automated workflows. Automatic e-mails can be enabled or disabled and templates for these e-mails can be configured for a particular OER instance. Recipients of both automated notifications and discretionary subscriber e-mail have the ability to designate an e-mail distribution list for e-mails that come to them from OER.
8.1.1 Using E-Mail Notifications and E-Mail Distribution Lists
Users can create e-mail distribution lists so that the list members are automatically copied on certain e-mail notifications that are generated as part of the asset registration process. Distribution lists can help automate the asset registration workflow because members of the distribution list are notified about asset registration events that the list owner is involved in as an asset reviewer or approver. For example, if a list owner is expecting to be absent, they can "delegate" asset review and approval responsibility by adding other authorized users to their e-mail distribution list.
8.2 Setting Up E-Mail Notification
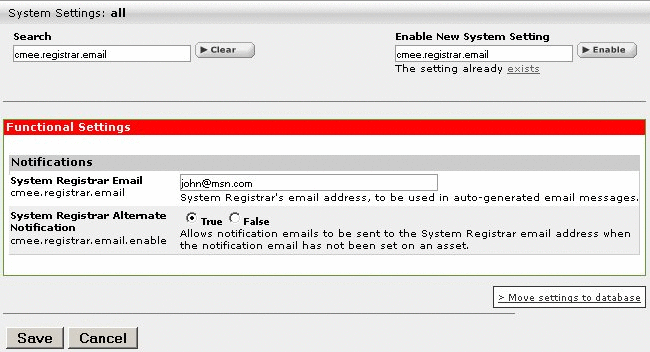
To receive e-mail notification when a new version of an asset is created, you need to enter the cmee.registrar.email system setting with the e-mail address. To update the cmee.registrar.email system setting with an e-mail address, navigate to the Admin page, System Settings. Enable the system setting, if you already have not, by entering cmee.registrar.email in the Enable New System Setting field, and then click Enable. If the setting already exists, then enter cmee.registrar.email in the Search field. In the Notifications section, enter the e-mail address in the System Registrar E-mail field, as shown in Figure 8-1. Click Save to save the settings.
8.3 Managing E-mail Distribution Lists
Distribution lists are created on a user's MyStuff -> Configuration Options -> Manage E-mail Notifications page. Existing Oracle Enterprise Repository users can be selected for a distribution list, as well as external e-mail addresses, but only if that option is permitted by the Oracle Enterprise Repository administrator.
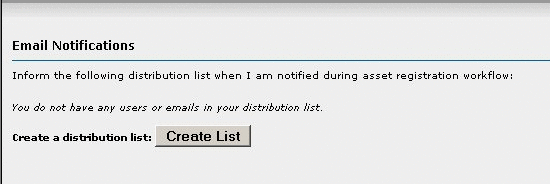
These procedures are performed in the E-mail Notifications section on the My Stuff page, as shown in Figure 8-2.
Perform the following steps to create an e-mail distribution list.
-
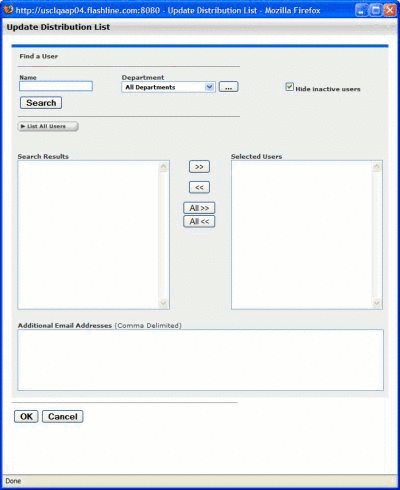
Click Create List to open the Update Distribution List dialog, as shown in Figure 8-3.
-
Click Create List to open the Update Distribution List dialog.
-
Enter appropriate text in the Name text box.
-
Use the Department list to narrow the search.
-
Click Search.
Search results appear in the list in the Search Results column.
-
-
Add users to the distribution list by using the >> and << icons to move users from the Search Results column to the Selected Users column. To add or remove all users from either column, use the All >> and All << buttons.
Note:
Distribution list can contain a maximum of 20 members.
-
To add external users to the list, type the e-mail addresses in the Additional E-mail Addresses box, using commas as delimiters.
For example: jack@msn.com,jill@yahoo.com,jake@comcast.net
-
Click OK to save the distribution list.
8.3.1 Updating a Distribution List
Follow these steps to update an e-mail distribution list.
-
Click Update List to open the Update Distribution List dialog.
-
Add new members or remove members following the instructions in Creating a Distribution List.
-
Click OK to save the distribution list.
8.4 Working with E-Mail Templates
Certain specific events within Oracle Enterprise Repository trigger automated e-mail responses. For instance, when a new asset is submitted, an e-mail notification is sent to the registrar. The various templates are described below.
-
All Asset Tabs Approved: Notifies the registrar and the users assigned to the asset that all tabs have been approved.
An asset's tabs can be approved in the Asset Editor. Each tab, with the exception of the Administration tab, has an Approve button. This button will not be available until the asset is has been accepted, which can be done under the Administration tab.
-
Asset Accepted: Notifies the submitter that the asset has been accepted.
An asset can be accepted in the Asset Editor under the Administration tab. The Accept option is not available until the asset has been submitted.
-
Asset Active: Notifies the submitter and subscribers that the asset has been marked active.
An asset can be marked as Active in the Asset Editor under the Administration tab under the Status section.
-
Asset Assign: Notifies users that the asset has been assigned to them for processing.
An asset can be assigned to a user in the Asset Editor under the Administration tab within the Assign Users section.
-
Asset Deletion: Notifies the submitter and subscribers that the asset has been deleted.
An asset can be deleted in the Asset Editor under the Administration tab within the Status section.
-
Asset Editor Submission: Notifies the registrar of an asset submission via the Asset Editor.
Assets can be submitted within the Asset Editor by either selecting File->New or File->Copy/Migrate.
-
Asset Inactive: Notifies the submitter and subscribers that the asset has been marked inactive.
An asset can be marked inactive in the Asset Editor under the Administration tab within the Status section.
-
Asset Registered: Notifies the submitter that an asset has been registered.
An asset can be registered in the Asset Editor under the Administration tab. Assets must be submitted and accepted before they can be registered.
-
Asset Retired: Notifies the submitter and subscribers that the asset has been retired.
An asset can be retired in the Asset Editor under the Administration tab within the Status section.
-
Asset Submission Rejection: Notifies the submitter that the asset has been rejected.
An asset can be rejected by the Registrar in the Asset Editor.
-
Asset Tab Approved: Notifies the Registrar that a specific tab has been approved.
An asset's tabs can be approved in the Asset Editor. Each tab, with the exception of the Administration tab, has an Approve button. This button will not be available until the asset is has been accepted, which can be done under the Administration tab.
-
Asset Tab Unapproved: Notifies the Registrar that a specific tab has been unapproved. For unregistered assets, the users assigned to the asset are also notified.
An asset's tabs can be unapproved in the Asset Editor. Each tab, with the exception of the Administration tab, has an Approve or Unapprove button, depending on the state. This button will not be available until the asset has been accepted, which can be done under the Administration tab.
-
Asset Unaccepted: Notifies the submitter that the asset has been unaccepted.
An asset can be unaccepted in the Asset Editor under the Administration tab. An asset must have been submitted before the accept/unaccept option is made available.
-
Asset Unassign: Notifies users that were previously assigned to an asset that they have been unassigned.
A user can be unassigned to an asset in the Asset Editor under the Administration tab within the Assign Users section.
-
Asset Unregistered: Notifies the submitter that an asset has been unregistered.
An asset can be unregistered in the Asset Editor under the Administration tab. Assets must be submitted and accepted before they can be registered/unregistered.
-
Asset Unsubmitted: Notifies the submitter that the asset has been sent to the Unsubmitted queue.
An asset can be unsubmitted in the Asset Editor under the Administration tab. An asset must be unaccepted before it can be unsubmitted.
-
Repository Submission: Notifies the registrar of an asset submission.
An asset can be submitted from the Web Tool under the Assets tab by selecting Submit an Asset.
-
Usage Query 1: Queries the asset consumer regarding the intended user off an asset.
This is a notification to remind the user to submit a survey regarding this asset. The survey can be found in the Web Tool under the My Stuff tab within the Consumed Assets section. In the detail of the given asset is a button called Update Survey Status. This button will only be available if the Consumer Survey system setting is enabled. The setting is cmee.extraction.consumer-survey.enable.
-
Usage Query 2: Depending on the response to Usage Query 1, asset consumers may receive a second query regarding the intended use of the asset.
This is a notification to remind the user to submit the survey regarding this asset. The survey can be found in the Web Tool under the My Stuff tab within the Consumed Assets section. In the detail of the given asset is a button called Update Survey Status. This button will only be available if the Consumer Survey system setting is enabled. The setting is cmee.extraction.consumer-survey.enable.
8.4.1 Viewing E-Mail Templates
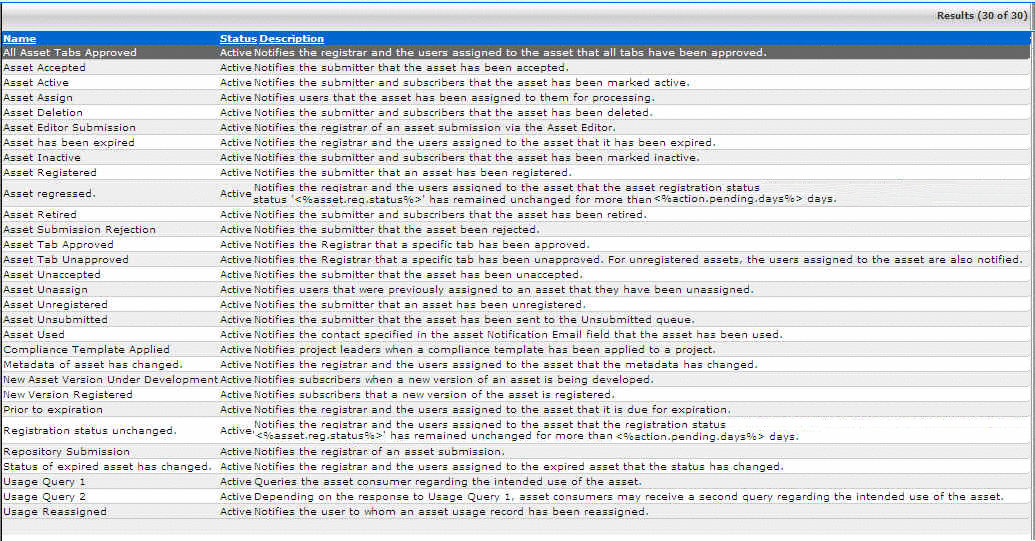
You can configure e-mail notifications in the E-mail Templates section of the Admin tab. Each E-mail Template has a list of valid substitutions, which are available for use, in that given template. The examples of substitutions are <%asset.name%>, which populates the template with the name of an asset. The list of valid substitutions varies for each of the 30 templates available in Oracle Enterprise Repository. To view the e-mail notifications in Oracle Enterprise Repository, perform the following steps:
-
Log in to Oracle Enterprise Repository using your login credentials. The Oracle Enterprise Repository home page is displayed.
-
Click Admin. The Admin page is displayed.
-
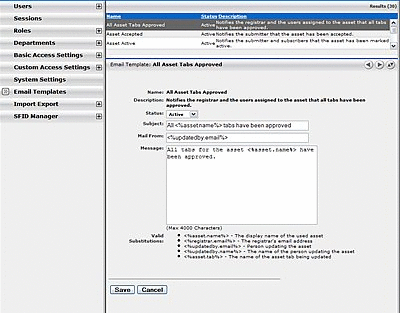
Click E-mail Templates. The list of E-mail Templates along with its status and description is displayed, as shown in Figure 8-5.
-
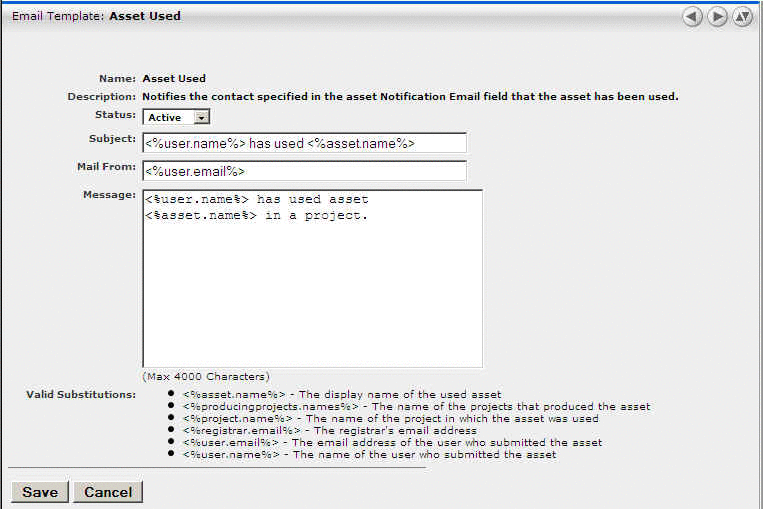
Click any template to display the details of that E-mail Template in the pane below. For example, click Asset Used. Figure 8-6 describes the "Asset Used" e-mail template, which is sent to notify the contact specified in the asset Notification E-mail field that the asset has been used.
-
Click Save.
-
Similarly, you can view the details of the other E-mail Templates.
8.4.2 Editing E-Mail Templates
The procedure begins on the Oracle Enterprise Repository Admin screen.
-
Click E-mail Templates in the Admin sidebar. The list of e-mail templates appears in the upper frame of the main pane.
-
Select the e-mail template to be edited from the list. The E-mail Template edit screen opens in the bottom frame.
Figure 8-8 E-mail Template: All Asset Tabs Approved
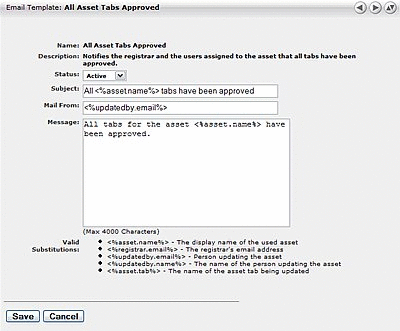
Description of "Figure 8-8 E-mail Template: All Asset Tabs Approved"
-
Use the Status list to activate/deactivate the e-mail message.
-
Edit the template information as necessary.
-
The Status field can be set to Active or Inactive. When inactive, no e-mail notification is sent for the specified event. Active is the default status.
-
Substitutions are dynamic variables that can be placed within the subject, message, and Mail From e-mail address. When the notification is sent, these variables is replaced with the appropriate values. The following example demonstrates the syntax for entering a substitution for the name of the asset:
You have submitted the asset called <%asset.name%>
A list of acceptable substitutions is displayed with each e-mail notification on the E-mail Templates screen.
