2 Creating an Inline Service
This is the introductory chapter in a tutorial section which describes, step by step, how to create and configure an Inline Service. It introduces the main Inline Service elements - data sources, entities, informants, advisors, choice groups, models, decisions - and shows how to create and test them in Decision Studio.
The tutorial section is designed to demonstrate how to configure an Inline Service that monitors a specific process and its characteristics on a real-time and continuous basis. This type of Inline Service guides business users in the analysis of various business events and how drivers of those events change over time.
The Inline Service for this tutorial is based around a credit card company's call center. The Inline Service will collect data about the customer and the call center operational system and will analyze information about the call and its resolution.
The goal of this Inline Service is to analyze the patterns about calls, reasons for calling, and customers. In later sections, we will extend the capability of this Inline Service to provide recommendations to the CRM system on cross selling offers and then to add feedback to the service on the success of its recommendations.
This chapter contains the following topics:
2.1 About the Inline Service Tutorial
An Inline Service is created using the Decision Studio development tool. In general, an Inline Service is created in the following fashion:
-
A project is started in Decision Studio.
-
Elements are added to that project and then configured to support the desired business process.
-
Logic is added in the form of Java scriptlets to certain elements that perform operations.
-
The Inline Service is deployed to the Decision Server, where it runs.
-
Reports generated from the use of the Inline Service are viewed through Decision Center.
In this tutorial the following elements are added and configured:
-
Application: The Application element establishes any application level settings that are needed, as well as defines security for the Inline Service. An Application element is automatically created for every Inline Service.
-
Performance Goals: Performance Goals represent organizational goals composed of metrics that are optimized using scoring. For instance, revenue and call duration are performance metrics. An organizational goal would be to maximize revenue while minimizing call duration.
-
Data source: The data source element acts as a provider of data from an outside data source. The structure and format of data from data sources can vary. For example:
-
Rows and columns of a RDBMS table
-
Output values and result row sets from a stored procedure
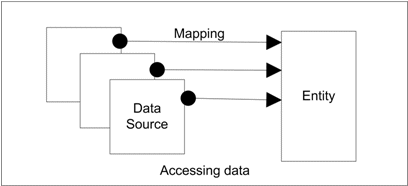
A data source is a provider of data that you can map to Entity elements to supply the data for those elements.
For example, in this tutorial we add a data source that connects to a table in the database. This table contains customer data.
-
-
Entity: The Entity is a logical representation of data that can be built from one or more data sources. Entities serve the following purposes:
-
To organize the data into objects for organizational, analytical, and modeling purposes.
-
To allow relatively easy and intuitive access from Java code of data from various sources.
-
To hide the details by which the data is obtained so that those details can change without requiring the logic to change.
-
To hide the mechanisms by which the data is obtained to save the user of this data from needing to deal with the APIs that are used to obtain the data.
-
To support sharing of objects when objects need to be shared. For example, an object representing a service agent could be used in multiple sessions.
Attributes of an entity can be key values. The entity key is used to identify an instance of an entity.
For example, in this tutorial we create an entity to represent a customer. The attributes of that entity are mapped to the data source for values. The customer ID is chosen as the key for the customer entity.
Later we will also create an entity that represents a Call.
-
-
Session Entity: A session in Oracle RTD represents an interaction with the front end application that is unique to a single instance. For example, when a customer calls into a call center, the single customer's interaction with that agent could be a session. Likewise, a web visit by customer and that customers navigating through several pages on the visit would also be an example of a session.
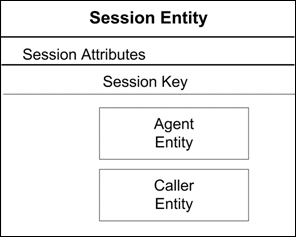
The Session entity is a special entity of an Inline Service. The Session entity represents a container for attributes that are specific to a particular defined Session. The Session key uniquely identifies each individual session.
Entities that have been defined can be associated with the session by being made attributes of the Session Entity. Only Entities that are Session attributes can have their keys marked as session keys.
For example, in this tutorial we add the Customer entity to the Session entity as an attribute, and then we choose the Customer key value, Customer ID, as a Session key.
-
Informant: An Informant is an Integration Point configured in the Inline Service. Informants allow a front end client to provide data to Oracle RTD about the business interactions as they occur, and can trigger business logic on the Decision Server. Informants represent one-way feeds that enable Oracle RTD to "watch" a process; they do not interact with it.
In this tutorial, we first create a testing Informant, and then create an Informant that gathers completion of service data from a CRM system.
Later in the tutorial, we create an Informant that provides feedback to the Inline Service on the success or failure of the predictions of the model.
-
Choice Groups: Choice Groups are used to create a logical hierarchy for choices in the Inline Service. They provide a way to organize targets of study, such as offers, used for Oracle RTD modeling and decisions.
For example, in this tutorial we first create Choice Group that organizes the reason for calls. When we extend the Inline Service to include an Advisor, a Choice Group is used to organize cross sell offers that are recommended to the service center agent.
-
Models: Built-in analytical models allow self-learning and automatic analysis. Models can be used to simply analyze data, or to generate likelihood scores used in making recommendations to the business process.
In this tutorial, we create a model that analyzes the reasons for calls, and then later a model which helps to determine the most likely cross sell offer to be accepted by the customer.
-
Decision: A Decision is used by an Advisor to determine eligible Choices, score those Choices dynamically, weight the scoring according to segments of the population and its designated performance goals, and present the ranked list of choices back to the Advisor.
-
Advisors: An Advisor is an integration point that returns information back to the business process that calls it. Advisors call Decisions in the Inline Service that returns one or many ranked choices.
In this tutorial, we will create a Choice Group of offers that can be made to callers to the credit card service center. The Advisor calls on a Decision to determine the best offer for the caller based on information about the call and caller. The Advisor passes that cross sell recommendation to the front end application, so that the call center agent can make the offer.
2.2 About Deployment and Decision Center Security
To be able to deploy your Inline Service to Real-Time Decision Server, and to see the results from the Inline Service in Decision Center, you must have the necessary roles, which are provided through a user name and password.
For this tutorial, it is assumed that an available user login and password has been created for you with the assigned roles of BIConsumer and BIAuthor.
If necessary, contact the administrator responsible for installing and setting up your Oracle RTD system. For more information, see the chapter "Security for Oracle Real-Time Decisions" in Oracle Fusion Middleware Administrator's Guide for Oracle Real-Time Decisions.
2.3 About Naming and Descriptions
Element names and descriptions are used extensively in Decision Center, the user interface for business users. Therefore, it is very important that as you create elements you take the time to name them intuitively and to write good descriptions for all elements.
Before you begin, ensure that Real-Time Decision Server is started. For more information, see the section "Starting and Stopping Oracle Real-Time Decisions" in Oracle Fusion Middleware Administrator's Guide for Oracle Real-Time Decisions.
To configure the Application element:
-
Open Decision Studio by running RTD_HOME
\eclipse\eclipse.exe. After Decision Studio opens, choose File > New > Inline Service Project to begin a new project.Note:
This tutorial assumes you are using a new installation, with the original preferences set. If Decision Studio or Eclipse has been used in the past, you may want to switch to a new workspace. To switch to a new workspace, choose File > Switch Workspace and choose a new workspace folder.
-
Enter the name for the project,
Tutorial, and choose the Basic template. Click Finish. If you are asked about upgrading the Inline Service, select Yes. The Inline Service project is created in the Inline Service Explorer. By default, the files for the project/Inline Service are stored in the Decision Studio workspace, in a folder with the same name as the project (for example,C:\Documents and Settings\Windows_user\Oracle RTD Studio\Tutorial). -
In Decision Studio, expand the Tutorial > Service Metadata folder. Double-click the Application element to bring up the element editor. In the element editor, type a description for the Tutorial Inline Service.
2.4 Accessing Data
In order to access organizational data, we will configure two elements:
-
Data source: The data source is the element that represents the structure of the data in the database.
-
Entity: The entity is a logical representation of data that can be populated by one or more data sources or contextual data retrieved by an Informant.
This section contains the following topics:
2.4.1 Adding a Data Source
Adding a data source involves creating the new data source, then importing the outputs for a data source.
This section contains the following topics:
2.4.1.1 Creating the New Data Source
To create a data source:
-
In Decision Studio, select Data Sources in the Inline Service Explorer and right-click it. Select New SQL Data Source. For the Display Label, enter
Customer Data Source, and click OK. The data source Editor appears. -
Under Description, add the following description for the data source:
Customer data from a database table.Good descriptions are very important. These descriptions are used in Decision Center and are essential for business users to identify components of reports and analysis.
Note:
You may notice that there are some other data sources already defined. These are part of the Inline Service framework and are not used in this tutorial.
2.4.1.2 Importing the Outputs for a Data Source
The outputs of a data source are the columns that are retrieved from the database. Outputs do not have to include all the columns in the table.
To import the outputs for a data source:
-
Click Import. Import Database Table appears. You server should appear next to Server. Click Next to connect to the server. Select Table or View appears.
-
For JDBC Data Source, select SDDS. Then, select CrossSellCustomers under Tables and Views. This table is created when you run the
InitAppDBscript for the CrossSell Inline Service, as described in "Populating the CrossSell Example Data" in Oracle Fusion Middleware Administrator's Guide for Oracle Real-Time Decisions. -
Click Finish.
-
All of the columns of the table are imported into the Output columns table.
-
Set the input column for the data source. The input is the column on which you will be matching to retrieve the data record. In this case, we can select the column name Id from the Output columns table and click the right arrow to move Id to the Input columns table. The data type is Integer.
-
Set the output columns for the data source. In the Output columns table, select and use Remove to remove all except the columns listed in Table 2-1.
-
Save your work by choosing File > Save All. If there are errors in your work, you will receive notification in the Problems View.
Note:
You can use Import to import the column names and data types to the Outputs for the data source. Remove any columns you will not be using with Remove.
2.4.2 Adding an Entity
Now that we have the data source defined, we can proceed to define a corresponding Entity. Entities are the objects that are used by the other elements in the configuration. Entities provide a level of abstraction from sources of data such as Data Sources or Informants. A single entity can have data coming from many data sources, or even computed values. For now, we will create a simple entity that maps directly to the structure of the data source.
This section contains the following topics:
2.4.2.1 Creating the New Entity
To create the new entity:
-
In the Inline Service Explorer, right-click the Entities folder and select New Entity. For Display Label, enter the name
Customerand click OK. The Entity Editor appears. EnterCustomer entityfor Description.Good descriptions for entity attributes are very important. Make sure you add a good description for every entity.
Note:
Object IDs are automatically made to conform to Java naming conventions: variables are mixed case with a lowercase first letter; classes are mixed case with an uppercase first letter. If you have spaces in your label name, they will be removed when forming the object ID.
Use the Toggle icon on the Inline Explorer task bar to toggle between the label of the object and its object ID:

-
Click Import to import the attributes names and data types from Customer Data Source. Leave the option Build data mappings for the selected data source selected.
-
In the column Default Value of the Definition tab, click to get an insertion point and add a default value for each of the attributes listed in Table 2-2. Values for String data types will be automatically surrounded by double quotes.
2.4.2.2 About Additional Entity Properties
You can modify additional settings about the attributes of an entity. For example, in more complex Inline Services, you may want to define categories of attributes. To do this, create a category element and assign it using the Category on the attribute's Properties. To view the properties of an attribute, select the attribute in the Definition tab, then right-click and choose Properties from the menu.
You may also want to indicate that an attribute should not be used for learning. This is applicable when you want to use the attribute for custom logic in the Inline Service, but you do not want the attribute to be used directly as a model input. As a more specific example, if you have the phone number of the customer, it does not make sense to have analytics on the phone number. In all of these cases, you would deselect Use for Analysis.
The Show in Decision Center option is used to control whether the attribute is visible in Decision Center. This is useful when an attribute has only technical meaning and no direct or interesting business meaning.
2.4.2.3 Adding an Entity Key
In order to fully map the entity object to the data source, we need an entity attribute to map to the key value of the data source and complete the mapping. To do this:
-
On the Definition tab of the Customer Entity, click Add Key to add a key attribute. Add Key appears. Enter
customerId(exactly as shown - this entry is case-sensitive) for Display Label. Add a description for the key value, change the data type to Integer, and click OK. -
Save your work using File > Save All. You may see several errors in the Problems View - this is expected because the mapping definition of the Customer entity attributes to its data source is incomplete. Proceed to the next section in order to complete the mapping definition.
2.5 About the Session Entity
The Session is the root of run time data for a unit of a process. Data is kept in memory during the duration of the session. In order to track data about an Entity, we associate it with the Session entity that is part of the Oracle RTD framework. To associate the Entity to the session, make it an attribute of the Session entity. A key is chosen for the session. When a unique instance of that key is detected, the session begins. As an example, consider a call center process being tracked by Oracle RTD. The Session contains entities that represent the Caller and the Agent. For the duration of the session (in other words, the call in this case) the data defined by those entities and the interaction between them is kept in memory and available for analysis and decision making.
This section contains the following topics:
2.5.1 Adding an Attribute to the Session Entity
To add an attribute to the Session entity:
-
In the Inline Service Explorer, double-click Session under Entities.
-
From the Definition tab, click Add Attribute. For Display Label, enter an attribute name,
customer, then add a Description. Note that the initial data type is type String. We'll change this in the next step. -
For Data type, select Other. A Type selection dialog appears. Under Entity Types, choose Customer. Click OK.
2.5.2 Creating a Session Key
To create a session key:
-
In Session Keys from Dependent Entities, click Select.
-
Expand the tree to see the keys of all entities associated with the Session. Expand customer and select customerId as a session key by checking the box. Click OK.
Tip:
Oracle RTD supports multiple session keys to enable the tracking of a session when different systems are sending Informants and Advisors to the same Inline Service. In this tutorial and in many real installations, only one session key is needed.
2.5.3 Mapping the Entity to the Data Source
We associate the Customer entity with the Customer Data Source through mappings defined in the Entity object editor. Our mapping of the Customer entity's attributes to the Customer Data Source output columns was automatically done when the attributes were imported from the Customer Data Source (see Section 2.4.2, "Adding an Entity" for more information). We need to now map the input column value for the Customer Data Source in the Customer entity.
To map the input column value for the Customer Data Source:
-
Open the Customer Entity and select the Mapping tab. Entity editors are identified by an E icon:

-
Because we used Import, the Customer Data Source attributes are already mapped to the Customer entity attributes. For attribute Age, the Source value should look like
Customer Data Source / Age(orCustomer Data Source.Ageif the Show Object ID icon is selected). If you had added additional attributes beyond the import, they are mapped by clicking the ellipsis under Source and locating the data source attribute. -
We need to identify the input column values for each Data Source (in this case, Customer Data Source) in the Attributes table. The input columns for the data source are the identifier (the
WHEREclause in a SQL select statement) by which records are retrieved. In the Customer Data Source, we had only one input column, Id, thus in the Mapping tab, we will see only one entry in the Data Source Input Values table, located below the Attributes table. In the Input Value cell of this entry, click the ellipsis to open the Edit Value dialog. -
For this Inline Service, we will select the Customer entity's key. Choose Attribute or Variable. Expand Customer, select customerId, then click OK.
Figure 2-2 Edit Value Dialog for Id Column

Description of "Figure 2-2 Edit Value Dialog for Id Column"
-
Save the Inline Service by choosing File > Save All.
2.6 Adding an Informant
Informants are a type of Integration Point that can send a message to Real-Time Decision Server containing information about a specific unit in a process. To test the Inline Service at this stage, we will create a testing Informant that prints out the age of the customer. To view the actual printed statement, we will need to deploy the Inline Service to Real-Time Decision Server and then call the Informant.If we get a number back, we will know that the entity, mappings, and data source have all been configured correctly.
This section contains the following topics:
2.6.1 Creating an Informant
To create an informant:
-
In the Inline Service Explorer, go to Integration Points and then select Informants. Right-click and select New Informant from the menu. Enter an object name,
Testing, then click OK. -
In the Testing Editor, add a description under Description.
-
Click Advanced next to Description. Deselect Show in Decision Center. This will make this Informant invisible to the business users of Decision Center. Click OK.
2.6.2 Adding Testing Logic to the Informant
To add testing logic to the Informant:
-
On the Testing Informant Editor, select the Request tab. Informants are identified by an i icon:

-
To add a session key, click Select under Session Keys. Choose customerId from Customer. Click OK.
Note:
When you configure an entity in Decision Studio, a class is generated. The generated classes have a property, getter, and setter for each attribute.
-
Choose the Logic tab. Under Logic, add the following scriptlet:
logInfo("Customer age = " + session().getCustomer().getAge() );The logInfo call allows us to output information to the Log subtab of the Test view and also the log file of the managed server where Oracle RTD is installed (which can be examined in Enterprise Manager). For more information, see "Searching and Viewing Server-Side Log Files" in Oracle Fusion Middleware Administrator's Guide for Oracle Real-Time Decisions. We will use the session to access the Customer object and get the contents of the age attribute.
-
Now we should be ready to deploy. Save the configuration by choosing File > Save All.
Figure 2-3 shows how the Testing Informant will access customer data when the Informant is called and a session created.
Figure 2-3 Tutorial Inline Service Objects
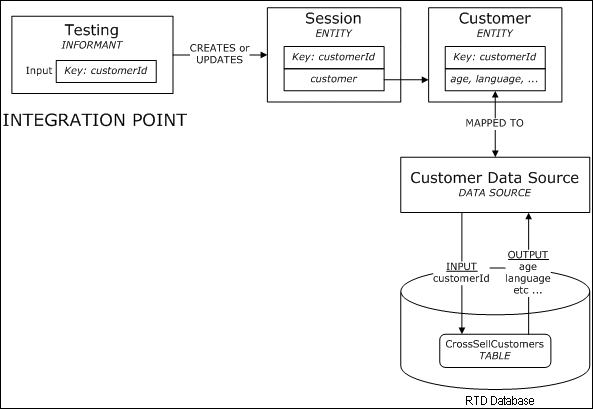
Description of "Figure 2-3 Tutorial Inline Service Objects"
2.7 Testing the Inline Service
To test the Inline Service, we deploy it, call the Informant with test data, and use the Test View to observe the results. Because Informants do not return value to their callers, the results will be seen in the Log tab of Test View.
To deploy the Inline Service for testing:
-
Click the Deploy icon on the taskbar to deploy the Inline Service:

You can also use the menu item Project > Deploy to deploy your Inline Service.
-
Click Select to select the server where you want to deploy. Deploy to the location of your Real-Time Decision Server. This defaults to
localhost, as does the default configuration of the installation. Enter the user name and password provided for you, as described in Section 2.2, "About Deployment and Decision Center Security." Use the drop-down list to select a deployment state, Development. Select Terminate Active Sessions (used for testing). Click Deploy.Deployment takes anywhere from about 10 seconds to a few minutes. A message 'Tutorial deployed successfully' will appear below the Inline Service Explorer when deployment is complete.
Note:
The reason we terminate active sessions is that we want to make sure we are testing against the latest deployed Inline Service. If there were active sessions and we used the same session id (in this case, it is also the customerId), testing of the Informant would be against an earlier version of the deployed Inline Service. If we terminate the currently active sessions, then we are guaranteed to be testing against the latest deployed Inline Service, regardless of the session id used.
-
In the Test View at the bottom of the screen, select Testing as the Integration Point to test. Enter a value for customerId by typing
7in the field. Click the Send icon:
Note:
The RTD Decision Server by default protects against Integration Point requests that originate from hosts other than the host that the RTD Decision Server is deployed to, as, for example, when you run Decision Studio on one host, and the RTD Decision Server is deployed on another host. This may result in an "Untrusted host" error when you execute the Informant.
You can resolve this through Oracle RTD MBeans by either disabling the trusted host option or by specifying the host running Decision Studio as a trusted client. For more information, see the section "About OracleRTD > SDClusterPropertyManager > Cluster" in Oracle Fusion Middleware Administrator's Guide for Oracle Real-Time Decisions.
-
Select the Log tab within Test View to see the results. Every printout coming from a
logInfocommand will be printed out with a timestamp.Your results should look similar to the following:
Jun 18, 2010 3:59:09 PM Tutorial INFO: Customer age = 38
2.8 Adding Functionality
We will now create an entity to hold information specific to the call. This is contextual information about the nature of the interaction with the customer. The data in this entity will come from Informants or be computed, but it will not be retrieved from any database.First we create an entity to represent a call, then an Informant that gathers data from calls.
Using this entity, we will explore the factors related to the reasons for calls, like the call lengths for each call reason, the most likely customer characteristics for these calls, and so on. In order to gather and analyze the call reasons gathered by the Informant, a self-learning analytical model will be added and reports will be displayed in Decision Center.
This section contains the following topics:
2.8.1 Creating a Call Entity
To create a call entity:
-
In the Inline Service Explorer, right-click the Entities folder and select New Entity. Enter the object name
Calland click OK. -
For each attribute listed in Table 2-3, do the following:
-
On the Definition tab of the Entity Editor, click Add Attribute. Add Attribute appears. Enter the values from the table and click OK.
-
Click in Type. Choose the proper data type for each attribute using the drop-down list.
-
-
In the Inline Service Explorer, double-click Session under Entities.
-
From the Definition tab, click Add Attribute. Enter an object name,
call. Note that the default type is String. We will change the default type in the next step. -
For Data type, select Other. In the Type dialog box, expand Entity types and select Call as the type, then click OK. Add a Description for 'call'. Click OK.
-
Save the changes to the Inline Service by choosing File > Save All.
2.8.2 Creating the Call Begin Informant
We will now create three Informants that will be called by the CRM application: Call Begin, Service Complete, and Call End. The first, Call Begin, will start the session. In this Informant, we could optionally preload and cache certain session attribute values so they can be accessed more quickly later. For example, we may want to preload the customer's profile if this information will be used later on and the loading of this information is expected to be slow due to database calls or other constraints.
Note that it is not necessary to preload session attribute values as they are automatically loaded whenever they are needed. For example, when we want to print the customer's Age, as the Testing Informant did in the previous section, Real-Time Decision Server will automatically populate the entire session's Customer entity attribute and return the Age value. In this Tutorial Inline Service, our Call Begin Informant will simply start the session, but will not pre-populate any session attribute values.
To create the Call Begin Informant:
-
In the Inline Service Explorer, under Integration Points, right-click the External Systems folder and select New External System. Object Name appears. Name the system
IVRand click OK. Give the element a description. Save this object. -
In the Inline Service Explorer, under Integration Points, right-click the Informants folder and select New Informant. Object Name appears. Name the Informant
Call Beginand click OK. -
Using the Informant Editor, enter a description for Call Begin.
-
To add a session key to the Call Begin Informant, click Select next to Session Keys in the Request tab. Choose customerId. Click OK.
-
While still in the Request tab, choose IVR from the External System drop-down list and enter
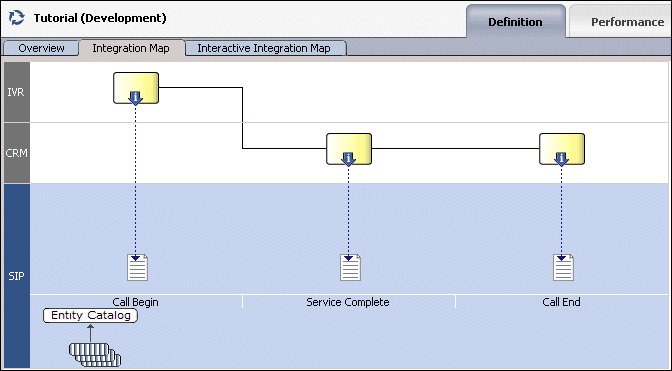
1in the Order box. Do not select Force session close. The External System and Order determine the display layout and order in Decision Center's Integration Map (see Section 4.8, "Viewing the Integration Map" for more information). When we have finished defining the three Informants and deployed the Inline Service, the Integration Map in Decision Center will look like the one shown in Figure 2-5.Figure 2-5 Decision Center Integration Map
Description of "Figure 2-5 Decision Center Integration Map"
-
In the Logic tab, add the following code:
/* Prepopulate customer data during start of call even though the information may not be used until much later. This is not explicitly necessary since the server will automatically retrieve the information whenever logic in the Inline Service needs it. */ //session().getCustomer().fill(); int CustomerID = session().getCustomer().getCustomerId(); logInfo("Integration Point - CallBegin: Start Session for customerID = " + CustomerID); -
Save the changes to the Inline Service by choosing File > Save All.
2.8.3 Creating the Service Complete Informant
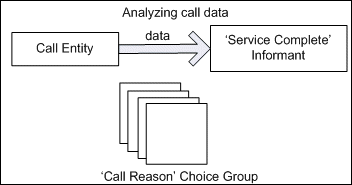
The second Informant will report on call information such as the agent that handled the call, the length of the call, and the reason for the customer's call. This Informant is called by the CRM application when the call center agent has responded to the customer's need, or in other words, when service is complete. The data that is gathered by the Informant will populate the Call entity.
To create the Service Complete Informant:
-
In the Inline Service Explorer, under Integration Points, right-click the External Systems folder and select New External System. Object Name appears. Name the system
CRMand click OK. Give the element a description. Save this object. -
In the Inline Service Explorer, under Integration Points, right-click the Informants folder and select New Informant. Object Name appears. Name the Informant
Service Completeand click OK. -
Using the Informant Editor, enter a description for Service Complete.
-
To add a session key to the Service Complete Informant, click Select adjacent to Session Keys in the Request tab. Select customerId and click OK.
-
While still in the Request tab, choose CRM from the External System drop-down list and enter
2in the Order box. Do not select Force session close. -
To add the additional pieces of data to the Informant, do the following for each incoming parameter listed in Table 2-4:
-
On the Request tab of the Informant Editor, click Add. Enter the name and then select the data type using the drop-down list. Click OK.
-
Under Session Attribute, click the ellipsis to use Assignment. Expand the Session folder, then expand call and then the select the call attribute that matches the incoming item.
Table 2-4 Data Types and Session Attributes for Incoming Parameters
Incoming Parameter Name Type Session Attribute agent
String
call / agent (or call.agent if the Show Object ID icon is selected)
length
Integer
call / length (or call.length if the Show Object ID icon is selected
reason code
Integer
call / reason code (or call.reason code if the Show Object ID icon is selected)
-
-
In the Logic tab, add the following code:
logInfo("Integration Point - Service Complete"); logInfo(" Reason Code: " + session().getCall().getReasonCode()); logInfo(" Agent: " + session().getCall().getAgent()); logInfo(" Call Length: " + session().getCall().getLength()); -
Save the changes to the Inline Service by choosing File > Save All.
2.8.4 Creating the Call End Informant
The third Informant will close the session and could be the last Informant called by the CRM application. In this Tutorial Inline Service, we will only use this Informant to close the session, but in a real system, you might perform additional processing or trigger learning for a model.
To create the Call End Informant:
-
In the Inline Service Explorer, under Integration Points, right-click the Informants folder and select New Informant. Object Name appears. Name the Informant
Call Endand click OK. -
Using the Informant Editor, enter a description for Call End.
-
To add a session key to the Call End Informant, click Select next to Session Keys in the Request tab. Select customerId and click OK.
-
While still in the Request tab, choose CRM from the External System drop-down list and enter
5in the Order box. We set the Order to5because we will add two more integration points (an Advisor and another Informant) later in this tutorial. -
Make sure the option Force session close is selected. Choosing this option will explicitly close the session once the Informant has been called and its logic processed. Note that if we do not explicitly close a session, the session will automatically close after some period of time - the default is 30 minutes and can be changed using the System MBean Browser for Oracle RTD.
-
In the Logic tab, add the following code:
logInfo("Integration Point - CallEnd"); logInfo("***************************"); -
Save the changes to the Inline Service by choosing File > Save All.
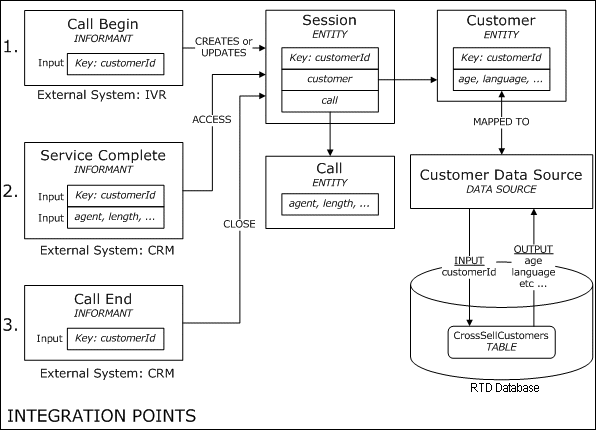
Figure 2-6 shows how the three Informants access and update the same session.
Figure 2-6 Tutorial Inline Service Objects: Integration Points
Description of "Figure 2-6 Tutorial Inline Service Objects: Integration Points"
2.8.5 Testing the Informants
We will now test a simple scenario where three Informants you just created are called, corresponding to 1) start of a call, 2) service completion, and 3) end of the call. We will use the Test View to call the Informants and view the log messages we had placed in the logic portions of the Informants.
To test the Informants:
-
Deploy to the server. Click the Deploy icon on the taskbar to deploy the Tutorial Inline Service:

Remember to select Terminate Active Sessions (used for testing).
-
In the Test view, located in the bottom portion of Decision Studio, select the Integration Point Call Begin. For the request input customerId, enter an integer value, say
7. Click the Send icon to send the request to the server:
In the Log tab within the Test View, you should see a message indicating that the Call Begin integration point was called.
-
Repeat the process for the other two integration points, Service Complete and Call End, in order and with the input values as shown in Table 2-5. Examples of what you should see in the Log tab are also shown in Table 2-5.
Table 2-5 Input Values for Integration Points with Log Results
Integration Point Request Inputs Log Tab Call Begin
customerId: 7
09:15:41,753 Integration Point - CallBegin:
Start Session for customerID = 7
Service Complete
customerId: 7
agent: John
length: 21
reason code: 18
09:17:51,845 Integration Point - Service
Complete
09:17:51,845 Reason Code: 18
09:17:51,845 Agent: John
09:17:51,845 Call Length: 21
Call End
customerId: 7
09:20:17,342 Integration Point - CallEnd
09:20:17,342 ***************************
Note that you could have called the Informants in any order. The Call Begin Informant is not needed to start a session and Call End is not needed to end the session. If we had called only the Service Complete Informant, the session would still be started correctly and the response would have been the same, although the session would then remain open. We are working with three Informants in this tutorial to demonstrate the different locations of a call center process that could make calls to Real-Time Decision Server.
Tip:
If there are errors in compilation, a dialog in Decision Studio shows these errors in the Problems View. Double-clicking the error takes you to the editor of the element that has the error.
Make sure that the server with which you are communicating is
localhost. Because Decision Studio remembers in the drop-downs the values previously entered, the default may not belocalhost.
2.9 Analyze Call Reasons
In the previous sections, we created three Informants. The second Informant, Service Complete, sends call information from the CRM application to Real-Time Decision Server. One of the pieces of call information is the call reason, or in other words, why the customer called. In this section, we will analyze the call reasons registered through the use of choices and a model. The objective is to able to view basic reports on call reasons - how many of each reason were recorded and how/if there were correlations between each call reason and session attributes.
This section contains the following topics:
2.9.1 About Using Choices for Analysis
Choices are used to create targets for analysis. In our case, we are first interested in focusing our analysis on the reasons for the calls. We will first create a choice group for the call reasons. Then, we will define an attribute for this choice group called code. The individual choices created within this group will then inherit the attribute definition, although the values can differ for each choice.
2.9.2 Adding a Choice Group
To add a choice group:
-
In the Inline Service Explorer, under Service Metadata, right-click the Choices folder and select New Choice Group. Name the group
Call Reasonand click OK. Add a description. -
In the Choice Group Editor for Call Reason, in the Choice Attributes tab, click Add next to the Attributes table. For Display Label, enter
code. Select the data type Integer, then select Overridable. Add the descriptionChoice codesand click OK.Note:
We made this a choice attribute as opposed to a group attribute. The difference between the two is that choice attributes are meant to be given values for each of the choices in the hierarchy, while group attributes are only given to the current group.
-
To create choices underneath the group, right-click the Call Reason choice group in the Inline Service Explorer and select New Choice. Add a Choice called
Check Balance.Repeat this step for the choices
Make Payment,Rate Inquiry, andOther. Add a description for each. -
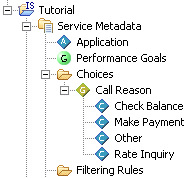
In the Inline Service Explorer, under Choices, expand the Call Reason group to show the choices.
Figure 2-8 Call Reasons in Inline Service Explorer
Description of "Figure 2-8 Call Reasons in Inline Service Explorer"
-
For each of the four choices, select the Choice in the Inline Service Explorer. In the Editor for that choice, under the Attribute Values tab, for the attribute code, set the Attribute Value as shown in Table 2-6.
-
Save the changes to the Inline Service by choosing File > Save All.
2.9.3 Adding an Analytical Model
A self-learning analytical Model is created to perform the automatic analysis of the reasons for calls. This model will track the reason for each call and correlate all the session attributes with these outcomes. Decision Center uses this model to build reports.
To add an analytical model:
-
In the Inline Service Explorer, under Service Metadata, right-click the Models folder and select New Choice Model. Name the model
Reason Analysisand click OK. Make sure to create a Choice Model, and not a Choice Event Model. -
Deselect Use for prediction.
-
To indicate that the target of analysis is the choice model attribute, select the Choice tab and choose Call Reason from the Choice Group drop-down list.
-
Select the Learn Location tab, then select On Integration Point.
-
Click Select, then select Service Complete and click OK.
-
Save the changes to the Inline Service by choosing File > Save All.
2.9.4 Adding Logic for Selecting Choices
When the Service Complete Informant is received, we need to select the choice that represents the corresponding reason for the call. We will do so by adding reasons to the model's choice array using the method of the Choice Model addToChoice.
To add reasons to the choice array of the model:
-
In the Inline Service Explorer, expand Integration Points. Under Informants, double-click Service Complete.
-
Select the Logic tab and enter the following logic. This adds the Object ID of the Choice that represents the reason for call to the model.
logInfo ("Integration Point - Service Complete. "); logInfo (" Reason Code: " + session().getCall().getReasonCode()); logInfo (" Agent: " + session().getCall().getAgent()); logInfo (" Length: " + session().getCall().getLength()); int code=session().getCall().getReasonCode(); switch (code) { case 17: ReasonAnalysis.addToChoice("CheckBalance"); logInfo (" CheckBalance was added to the model"); break; case 18: ReasonAnalysis.addToChoice("MakePayment"); logInfo (" MakePayment was added to the model"); break; case 19: ReasonAnalysis.addToChoice("RateInquiry"); logInfo (" RateInquiry was added to the model"); break; default: ReasonAnalysis.addToChoice("Other"); logInfo (" Other was added to the model"); break; } -
Save the configuration by choosing File > Save All.
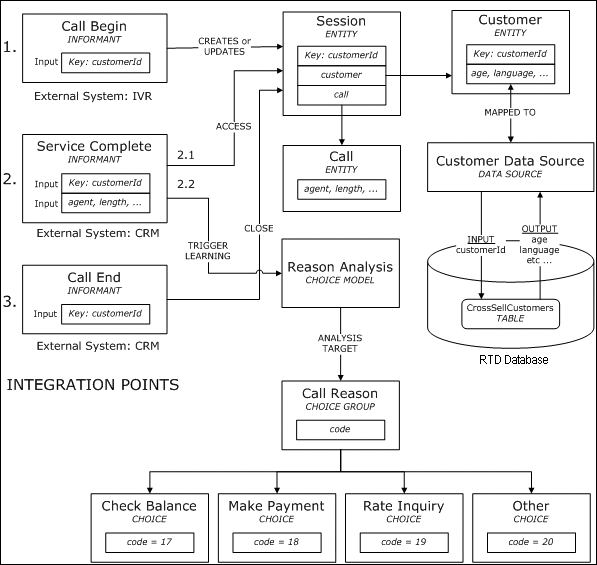
Figure 2-9 shows how the Reason Analysis model is updated when the Service Complete Informant is called.
Figure 2-9 Tutorial Inline Service Objects
Description of "Figure 2-9 Tutorial Inline Service Objects"
2.9.5 Testing It All Together
To test all the parts of the configuration:
-
Deploy the configuration to the server. Make sure there are no errors in deployment or compilation.
-
Use the Test view to test the Integration Point. Select Service Complete and set values for the different arguments:
customerId = 7,agent = John,length = 21, andreasonCode = 18. -
Click Send. You should see results similar to the following:
13:57:29,794 Integration Point - Service Complete.
13:57:29,794   Reason Code: 18
13:57:29,794   Agent: John
13:57:29,794   Length: 21
13:57:29,794   MakePayment was added to the model
When this Informant with the shown input values is called, the Call entity, which is an attribute of the Session, is populated with information about the agent, length of call, and reason code. The Informant logic then determines that since the reason code was 18, then the Make Payment choice will be added to the Reason Analysis model. That is, the count for the Make Payment choice will have been increased by one. Along with the count, the model also tracks all of the session attributes and correlation with the choices.
-
Change the values and test a few times to see that the correct Object ID is being added to the model for other reason codes.
