3 Migrating Enterprise Object Library Customizations
This chapter discusses how to migrate Enterprise Object Library (EOL) customizations from Oracle Application Integration Architecture (AIA) 2.4 or 2.5 to AIA 11 g Release 1 using the EOL Upgrade Utility.
This chapter includes the following sections:
Use of the EOL Upgrade Utility requires that you have customized the EOL using only the Custom*.xsd schema modules located in the following subdirectories of <AIA_HOME directory>/AIAComponents/EnterpriseObjectLibrary:
-
Core/Custom
-
Industry/<IndustryName>/Custom
-
Infrastructure/Custom
The purpose of the EOL Upgrade Utility is to migrate additions made to the Custom*.xsd schema modules from the old customized 2.4 or 2.5 AIA release installation (source) to the new 11g Release 1 AIA release installation (target).
3.1 EOL Migration Prerequisites
Read and understand the contents of this chapter completely. Understand the tasks involved in the migration process before starting the migration.
Make a back up copy of your target AIA 11g Release 1 EnterpriseObjectLibrary folder. This folder is located in <AIA_HOME directory>/AIAMetaData/AIAComponents.
3.2 Performing the Migration
This section includes the following topics:
3.2.1 Step 1: Copy Customized EnterpriseObjectLibrary Directory from the Old AIA Release Installation
Copy contents of the customized old EnterpriseObjectLibrary directory located in <AIA_HOME directory>/AIAComponents/EnterpriseObjectLibrary to a temporary directory within the new AIA release installation.
3.2.2 Step 2: Copy Uncustomized Old EnterpriseObjectLibrary Directory from the Old AIA Release Installation
Copy contents of the uncustomized old EnterpriseObjectLibrary to a temporary directory accessible from the target AIA 11g Release 1 installation.
Tip:
If a backup of the uncustomized EnterpriseObjectLibrary prior to customization is not available then you can obtain it from Oracle eDelivery, AIA Media Pack. Extract EnterpriseObjectLibrary from the downloaded installable, and obtain file named filegroup1.jar present at <zip file extract>/cd/Disk1/stage/Components/oracle.aia.fp.base/2.5.0.0.0/1/DataFiles. Unzip filegroup1.jar and find EnterpriseObjectLibrary at <extract of filegroup.jar>/AIAComponents/EnterpriseObjectLibrary.
3.2.3 Step 3: Grant Write Permission to the EnterpriseObjectLibrary Directory in the New AIA Release Installation
Grant write permission to files in the <AIA_HOME directory>/AIAMetaData/AIAComponents/EnterpriseObjectLibrary directory in the new AIA release installation. The migration process must be able to modify the Custom*.xsd files present in this directory.
3.2.4 Step 4: Execute the EOL Upgrade Utility
The EOL Upgrade Utility migrates each Custom*.xsd file from the old AIA release installation to the corresponding Custom*.xsd file in <AIA_HOME directory>/AIAMetaData/AIAComponents/EnterpriseObjectLibrary.
All allowed XML schema specification-compliant changes made to the Custom*.xsd schema module from the old AIA release are copied over to the corresponding Custom*.xsd schema module in the new AIA release installation.
This includes:
-
Customizations to Custom*Type complexType
-
Any additional global element, simpleType, complexType, group, and attributeGroup definitions in the old Custom*.xsd
-
Any additional includes and imports
-
Any additional namespace declarations
-
Any additional annotations and comments
The steps performed during the migration of each file are logged in the following output files, which are generated in a location you specify when you run the utility.
-
EOLMergeUtility_AutoLog_<TimeStamp>.log
Captures all automated (trivial) merges.
-
EOLMergeUtility_ManualActionLog_<TimeStamp>.log
Captures all conflicts and the manual actions the user must perform.
-
EOLMergeUtility_DetailedLog_<TimeStamp>.log
Captures a detailed merge report, including post-merge validations.
Output logs are created with timestamps. Each time the utility is run, a new set of log files are created.
Every trivial merge performed by the utility is prefixed with [AUTOMATED] in the EOLMergeUtility_AutoLog_<TimeStamp> log file.
If the EOL Upgrade Utility encounters any conflicts that it cannot automatically resolve, the merge encountering the conflict is prefixed with [MANUAL_ACTION_NEEDED] in the EOLMergeUtility_ManualAction_<TimeStamp> log file.
We recommend that you run the EOL Upgrade Utility in a two-step process.
-
Run the utility in Report mode, as shown in Example 3-1 and Example 3-2.
In this mode, the utility does not perform the actual merge, but it does generate output logs that reflect the results of the merge, has the utility been run in Upgrade mode.
Example 3-1 EOL Upgrade Utility Run in Report Mode for Linux, Solaris SPARC, IBM AIX, or HP-UX
source <AIA_HOME directory>\aia_instances\<aia_instance_name>\bin\aiaenv.bat

java -cp $AIA_HOME/lib/EOLUpgradeUtility.jar:$MW_HOME/oracle_common/modules/
oracle.xdk_11.1.0/xmlparserv2.jar oracle.apps.aia.core.extensiontracer.parser.
CustomExtnHandler <Customized Old EnterpriseObjectLibrary Directory> $AIA_HOME/
AIAMetaData/AIAComponents/EnterpriseObjectLibrary 'report' 'new'
<logFileLocation> <Un-customized Old EnterpriseObjectLibrary Directory>
Example 3-2 EOL Upgrade Utility Run in Report Mode for Windows
source <AIA_HOME directory>\aia_instances\<aia_instance_name>\bin\aiaenv.bat

java -classpath %AIA_HOME%\lib\EOLUpgradeUtility.jar:%MW_HOME%\oracle_common\
modules\oracle.xdk_11.1.0\xmlparserv2.jar oracle.apps.aia.core.extensiontracer.
parser.CustomExtnHandler <Customized Old EnterpriseObjectLibrary Directory>
%AIA_HOME%\AIAMetaData\AIAComponents\EnterpriseObjectLibrary 'report' 'new'
<logFileLocation> <Un-customized Old EnterpriseObjectLibrary Directory>
We recommend that you perform all of the changes suggested in the EOLMergeUtility_ManualActionLog before you perform the actual merge by running the utility in Upgrade mode.
For information about handling items listed in EOLMergeUtility_ManualActionLog, see Section 3.2.5, "Step 5: Review the Output File."
-
Run the utility in Upgrade mode, as shown in Example 3-3 and Example 3-4.
In this mode, the actual merge process is executed. If in the earlier step you performed the changes suggested in the EOLMergeUtility_ManualActionLog, this log should now be empty, indicating that the merge has completed successfully.
Example 3-3 EOL Upgrade Utility Run in Upgrade Mode for Linux, Solaris SPARC, IBM AIX, or HP-UX
source <AIA_HOME directory>/aia_instances/<aia_instance_name>/bin/aiaenv.sh

java -cp $AIA_HOME/lib/EOLUpgradeUtility.jar:$MW_HOME/oracle_common/modules/
oracle.xdk_11.1.0/xmlparserv2.jar oracle.apps.aia.core.extensiontracer.
parser.CustomExtnHandler <Customized Old EnterpriseObjectLibrary Directory>
$AIA_HOME/AIAMetaData/AIAComponents/EnterpriseObjectLibrary 'upgrade' 'new'
<logFileLocation> <Un-customized Old EnterpriseObjectLibrary Directory>
Example 3-4 EOL Upgrade Utility Run in Upgrade Mode for Windows
source  <AIA_HOME directory>\aia_instances\<aia_instance_name>\bin\aiaenv.bat

java -classpath %AIA_HOME%\lib\EOLUpgradeUtility.jar:%MW_HOME%\oracle_common\
modules\oracle.xdk_11.1.0\xmlparserv2.jar oracle.apps.aia.core.extensiontracer.
parser.CustomExtnHandler <Customized Old EnterpriseObjectLibrary Directory>
%AIA_HOME%\AIAMetaData\AIAComponents\EnterpriseObjectLibrary 'upgrade' 'new'
<logFileLocation> <Un-customized Old EnterpriseObjectLibrary Directory>
Here are descriptions of the variables that you need to supply:
-
<Customized Old EnterpriseObjectLibrary Directory>Provide the path to the copy of the customized EnterpriseObjectLibrary directory from the old AIA release installation that you created in step 1.
-
<Un-customized Old EnterpriseObjectLibrary Directory>Provide the path to the copy of the un-customized EnterpriseObjectLibrary directory from the old AIA release installation that you created in step 2.
-
<logFileLocation>Provide the location in which you want the process log file to be generated.
Example 3-5 provides code with all variables populated.
Example 3-5 Sample Run of EOL Upgrade Utility in Upgrade Mode for Linux, Solaris SPARC, IBM AIX, or HP-UX
source /slot6035/AIAHOME/aia_instances/devInstance/bin/aiaenv.sh

java -cp $AIA_HOME/lib/EOLUpgradeUtility.jar:$MW_HOME/oracle_common/modules/
oracle.xdk_11.1.0/xmlparserv2.jar oracle.apps.aia.core.extensiontracer.
parser.CustomExtnHandler 2.5EOL2/EnterpriseObjectLibrary PS3EOL2/
EnterpriseObjectLibrary 'upgrade' 'new' $AIA_HOME/EOLUpgrade/logs
2.5EOLOrig/EnterpriseObjectLibrary
3.2.5 Step 5: Review the Output File
This section includes the following topics:
Review the output file, EOLMergeUtility_ManualActionLog, created by the EOL Upgrade Utility. Resolve any conflicts that require manual resolution. These conflicts are prefixed with [MANUAL_ACTION_NEEDED] in the output file.
Following are two scenarios in which conflicts may arise.
3.2.5.1 Scenario 1: Namespace Declaration Conflicts
The customized old Custom*.xsd module has a namespace declaration that conflicts with a namespace declaration used in the new Custom*.xsd.
For example, assume that the AIA Foundation Pack 2.5 CustomCommonComponents.xsd file has been customized by adding a namespace declaration:
xmlns:corecomcust="http://xmlns.mycompany.com/common"
The AIA Foundation Pack 11g Release 1 CustomCommonComponents.xsd file has a an additional namespace declaration:
xmlns:corecomcust="http://xmlns.oracle.com/EnterpriseObjects/Core/Custom/Common
 /V2"
The namespace declarations are in conflict. When the EOL Upgrade Utility encounters this conflict, it generates an output message similar to the following:
[MANUAL_ACTION_NEEDED] Duplicate Prefix Notification :: xmlns:corecomcust
prefix is resolved to a different namespace
[http://xmlns.oracle.com/EnterpriseObjects/Core/Custom/Common/V2] in the
latest EOL Schema.
-->  Prefix being used needs to be changed for successful merge.
To resolve this conflict, make the following changes to the migrated file in <AIA_HOME directory>/AIAMetaData/AIAComponents/EnterpriseObjectLibrary/ in the new AIA release installation:
-
Change the namespace prefix in the customized namespace declaration to a unique name.
In this specific case, in CustomCommonComponents.xsd in the new AIA release installation, change the namespace prefix associated with the URI "http://xmlns.mycompany.com/common" to a unique name, such as "mycorecomcust."
-
Change all occurrences of the namespace prefix to the new name.
In this specific case, change all custom occurrences of the prefix "corecomcust" in the CustomCommonComponents.xsd in the new AIA release installation to "mycorecomcust."
-
Add the namespace prefix mentioned in the output log to the xsd:schema element in the file.
In this specific case, add the namespace declaration mentioned in the output log to the xsd:schema element of CustomCommonComponents.xsd in the new AIA release installation. For example:
xmlns:corecomcust="http://xmlns.oracle.com/EnterpriseObjects/Core/Custom/
Common/V2"
3.2.5.2 Scenario 2: complexType Name Conflicts
The old Custom*.xsd module has been customized by adding a new global complex type definition that has the same name as a new complexType definition delivered in the corresponding Custom*.xsd file in the new AIA release installation.
For example, assume that the AIA Foundation Pack 2.5 CustomCommonComponents.xsd has been customized with a new complex type definition named "CustomFinancialAccountReferenceType."
The new AIA release installation delivers CustomCommonComponents.xsd with a new complex type definition with the same name, "CustomFinancialAccountReferenceType."
There is a naming conflict with the custom type in the customized AIA Foundation Pack 2.5 EnterpriseObjectLibrary. When the EOL Upgrade Utility encounters this conflict, it generates an output message similar to the following
[MANUAL_ACTION_NEEDED] Duplicate CustomXXType Notification ::
CustomFinancialAccountReferenceType is being used in the latest EOL.
-->  CustomType name being used needs to be changed for successful merge
There are two methods for resolving this conflict. Select the method that is appropriate for your implementation and programming model.
-
Method 1: Make no changes and retain the custom type definition from the EOL in the old AIA release installation. If you decide to implement this approach, the customized content will appear in places in which it has not appeared in the past. For example, the customized content will appear in the content delivered in the new AIA release installation. This side effect can invalidate XML instances or implementations if any of the customized content includes constraints, such as a minOccurs attribute set to 1. To address this side effect, you must relax these constraints.
-
Method 2: Make the following changes to the migrated file in <AIA_HOME directory>/AIAMetaData/AIAComponents/EnterpriseObjectLibrary/ in the new AIA release installation:
-
Change the customized type you added in AIA Foundation Pack 2.5 to a unique name, ensuring that you do not start the name with "Custom."
-
Modify all occurrences of this customized type.
-
Add an empty type definition corresponding to what has been delivered in the new EOL custom schema module to the old EOL custom schema module. You can copy the empty definition from the backup copy of <AIA_HOME directory>/AIAMetaData/AIAComponents/EnterpriseObjectLibrary that you created as a prerequisite.
-
3.2.6 Step 6: Handling Imports and Includes of Non-AIA-Delivered Schema Modules
You may have customized the Custom*.xsd schema modules by adding additional imports or includes of schema modules that have not been delivered in the EOL.
For example, your implementation, "MyCompany," may have a central XSD components library named "MyCompanyComponents.xsd," which was not delivered as a part of AIA. The custom schema modules in the EnterpriseObjectLibrary from the old AIA release installation may include an import of the above file.
Ensure that the references to these non-AIA-delivered schema modules are accessible from the migrated EnterpriseObjectLibrary in the new AIA release installation.
If relative URLs are used in the schemaLocation attribute while importing or including non-AIA-delivered schema modules, you must upload these schema modules into the Oracle Metadata Service repository (MDS).
If absolute URLs are used in the schemaLocation attribute while importing or including non-AIA-delivered schema modules, ensure that these absolute URLs are accessible from the new AIA release installation.
3.3 Running Schema Validations
At this point, the EnterpriseObjectLibrary of the new AIA release installation has been updated with customized content migrated from the EnterpriseObjectLibrary from the old AIA release installation.
You must verify that the customizations made to Custom*.xsd files in the EnterpriseObjectLibrary from the old AIA release installation were migrated to the corresponding files in the EnterpriseObjectLibrary in <AIA_HOME> /AIAMetaData/AIAComponents/EnterpriseObjectLibrary in the new AIA release installation.
To do this, run schema validations. AIA recommends that you run schema validations for the entire schema library in the new AIA release installation.
You can use any XML schema validation tool or API to validate the contents of the EnterpriseObjectLibrary. For example, you can use the Oracle JDeveloper Audit feature to validate the entire Enterprise Object Library.
To use the Oracle JDeveloper Audit feature:
-
Access Oracle JDeveloper. Create a new SOA Application with a new SOA Project based on the Empty Composite template.
-
Make a local copy of the migrated EnterpriseObjectLibrary folder present at <AIA_HOME>/AIAMetaData /AIAComponents / of the new AIA release installation.
-
To avoid HTML from being validated in the Oracle JDeveloper validation, you can delete the all .html, .css, and .txt files from the local copy of the EnterpriseObjectLibrary folder used for validation.
-
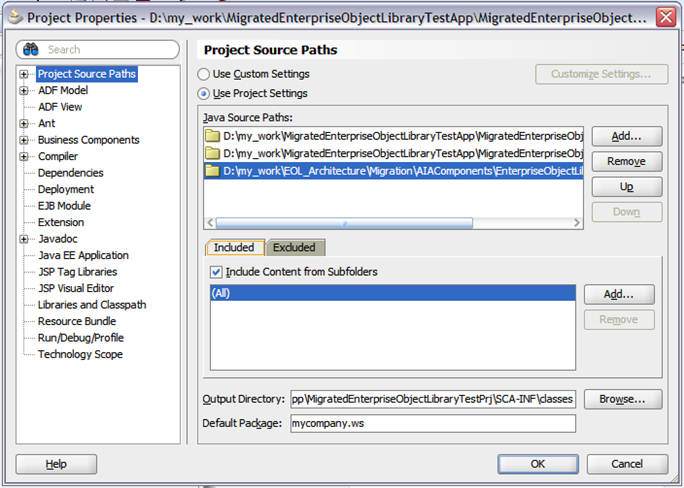
Edit the project properties of the newly created SOA project and add the local copy created previously to the Java Source Paths: list. Figure 3-1 shows that the contents of the EnterpriseObjectLibrary are now included in the project.
-
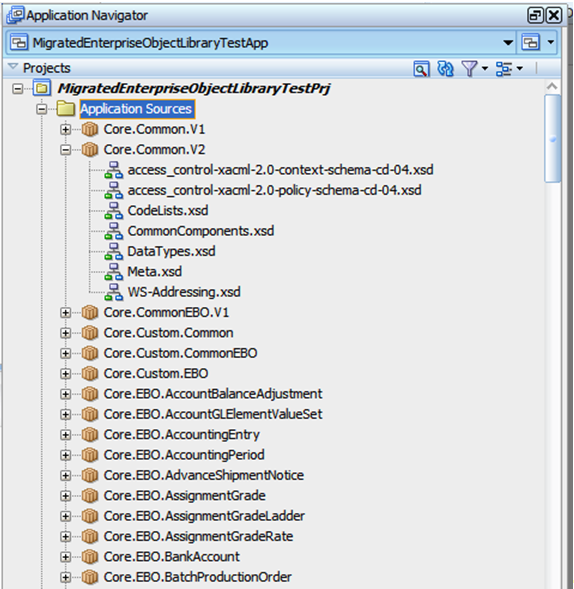
Navigate to the Application Navigator window. Select the Application Sources folder under the project name by clicking on it as shown in Figure 3-2.
-
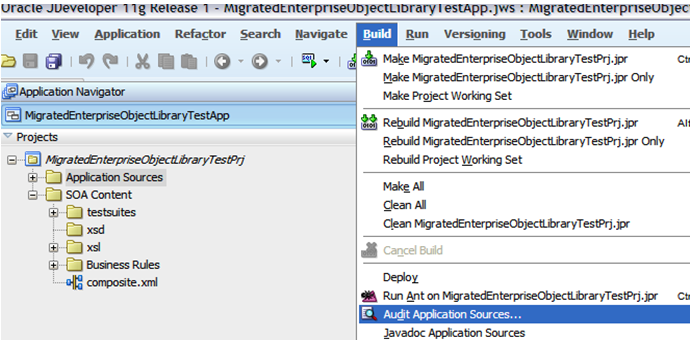
Keep the Application Sources folder highlighted and navigate to Build, Audit Application Sources as shown in Figure 3-3.
-
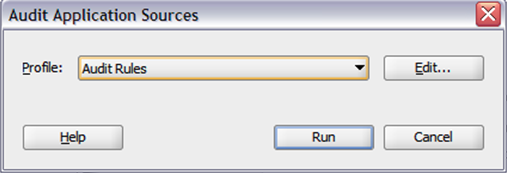
In the Audit Application Sources window, choose the default profile Audit Rules shown in Figure 3-4 and click Run.
-
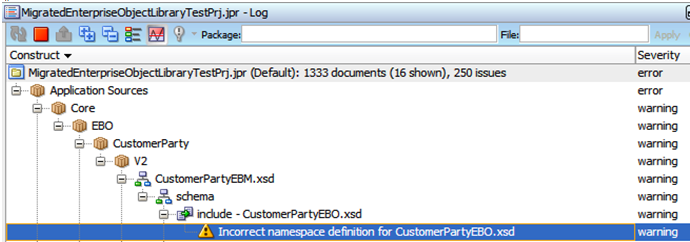
The Audit Log window shown in Figure 3-5 displays the status of the audit. The number of files audited is displayed in the report title. Any issues found in the audit are displayed below, grouped by the file in which the issues were found.
-
If there are any issues, correct them, and redo the migration, if necessary.
You can ignore errors related to HTML files.
3.4 Running XML Instance Validations
AIA recommends that you take sample XML instances that were created based on the old AIA release installation and run XML instance validations against the migrated version in the new AIA release installation, particularly for customized Enterprise Business Objects (EBOs).
You can skip this validation if you are going to put your migrated content through integration testing with schema validation turned On.
You can use any XML schema tool or API to validate the sample XML instance against its corresponding XSD schema.
To use Oracle JDeveloper 11g to validate an XML instance against its corresponding XSD schema:
-
Copy the sample XML instance file based on the old AIA release installation to the project directory of a new or existing Oracle JDeveloper project as shown in Figure 3-6.
-
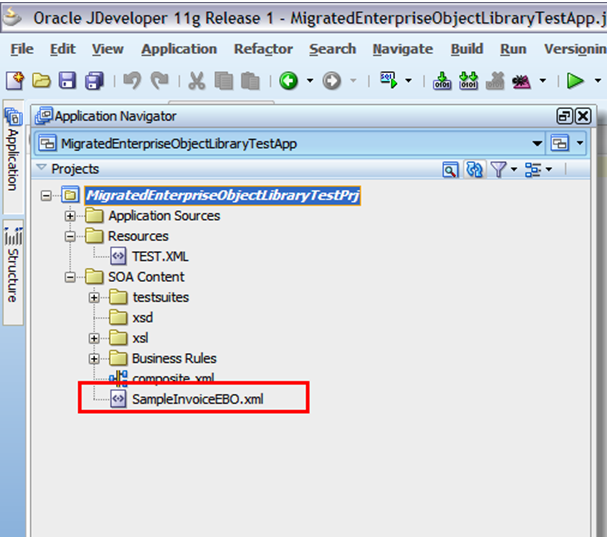
Open the project in Oracle JDeveloper and refresh the Application Navigator. Figure 3-7 shows the sample XML instance file displayed in the Application Navigator. If the Application Navigator pane is not visible, navigation to View, Application Navigator.
-
Double-click to open the sample XML instance. Add or modify the following information as appropriate to the root element of the XML instance, if it is not already present.
-
Namespace prefix declarations, such as the prefix of the EBO namespace.
For example:
xmlns:coreinvoice=<namespace of the XML instance or targetNamespace of
the schema>
xmlns:coreinvoice="http://xmlns.oracle.com/EnterpriseObjects/Core/EBO/
Invoice/V2"
-
Declaration of the XMLSchema-instance namespace prefix.
For example:
xmlns:xsi="http://www.w3.org/2001/XMLSchema-instance"
-
The XMLSchema-instance schemaLocation attribute.
For example:
xsi:schemaLocation="<namespace> <physical-schema location>"
The physical schema location should point to the .xsd file in the new AIA release installation:
xsi:schemaLocation="http://xmlns.oracle.com/EnterpriseObjects/Core/EBO/
Invoice/V2 file:///slot/dev001/AIA_HOME/AIAMetaData/AIAComponents/
EnterpriseObjectLibrary/Industry/Communications/EBO/Invoice/V2/
InvoiceEBO.xsd"
-
-
Save any edits you made.
-
In the Application Navigator, right-click the sample XML file and select Validate.
-
The XML Validation Errors - Log displays the validation results. If any issues are logged, correct them, and redo the migration, if necessary.
