20 Using the Code Compliance Inspector
This chapter provides an overview and describes how to use the Code Compliance Inspector (CCI). Adherence to open standards and the enforcement of good coding practices are key principles of SOA governance. CCI enables developers, architects, and QA engineers to develop integration projects that are in compliance with open standards and Oracle Application Integration Architecture (AIA) recommended best practices for design and coding.
This chapter includes the following sections:
-
Section 20.2, "Invoking Code Compliance Inspector from JDeveloper"
-
Section 20.3, "Running Code Compliance Inspector in JDeveloper"
-
Section 20.4, "Invoking Code Compliance Inspector from a Command Line"
-
Section 20.6, "Writing Custom Assertions for Code Compliance Inspector"
-
Section 20.7, "Executing Code Compliance Inspector for Integration Projects"
20.1 Overview
The Code Compliance Inspector uses a pre-defined set of assertions that are based on AIA Integration Developer guidelines and the Web Services Interoperability Organization Basic Profile (WS-I BP) to check SOA projects for design consistency and good coding and documentation practices. CCI qualifies code as Compliant, Conformant, or Fully Conformant to be in sync The Open Group Architecture Framework (TOGAF) standard guidelines based on the pass criteria of the highest priority assertions.
CCI is available as a JDeveloper extension and as a command-line utility. Developers will typically use the JDeveloper extension and will continuously check compliance on JDeveloper projects as they develop. The command line utility can be used to check compliance for large, multi-composite projects and produces a report that details the level of compliance, pass and failure percentages, and groups results by Priority and Policies.
CCI provides optional integration to Oracle Enterprise Repository (OER). When OER is present, CCI can synchronize results to the repository, enabling users to access the report from the OER console. Integrating compliance data into OER provides repository users with information about whether composites are compliant into the repository reports and individual asset metadata.
For more information about the optional integration with OER, see "Integration with Code Compliance Inspector" in the Oracle Fusion Middleware Integration Guide for Oracle Enterprise Repository.
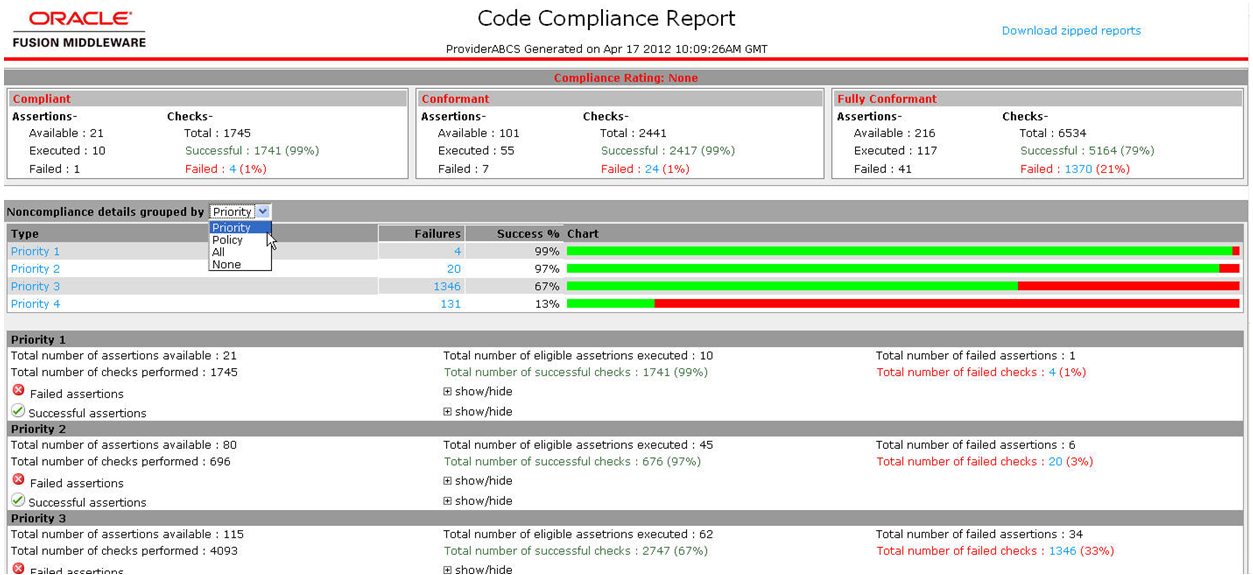
Figure 20-1 shows an example of the overall Code Compliance Report.
For more information about AIA integration development guidelines, see the Oracle Fusion Middleware Developer's Guide for Oracle Application Integration Architecture Foundation Pack.
20.1.1 Understanding the Terminology
Table 20-1 describes the labels and concepts for Code Compliance Inspector. For more information about new terminology, see Appendix B, "New Terminology".
| New Name | Description |
|---|---|
|
Assertion |
Assertions can be defined once within the AssertionCatalog.xml files and then used within one or more Policies in the Policies.xml files. For a list of the delivered assertions, see Section B.2, "Delivered Assertions". |
|
AssertionSet |
AssertionSet is informational only and is not surfaced in the JDeveloper Extension or in the Code Compliance By Policy Report. |
|
AssertionCatalog.xml |
There are two files: AssertionCatalog-AIA-<version>.xml and AssertionCatalog-WS-I-<version>.xml. |
|
Category |
Category is part of an Assertion's definition in AssertionCatalog.xml. Category is a tag within the definition of an Assertion that is largely just informational. For this release, existing Categories will become the Policy names; meaning that all Assertions tagged with a particular category will appear in the Policies.xml files using a Policy name that matches the Category. |
|
Policy |
Policies can be reused into more coarse-grained policy buckets using the <depends name=> tag. |
|
Polices.xml |
There are two files: Policies-AIA-<version>.xml and Policies-WS-I-<version>.xml. Within the Policies.xml provided by Oracle, the policy name must match the Catalog names used within the Assertions in the AssertionCatalog.xml. Customers can modify the Policies.xml including renaming and reorganizing the Policies & Assertions. |
|
Priority |
Priorities are defined as:
|
For more information, see Appendix B, "New Terminology".
20.1.2 Understanding the Delivered Catalogs
Code Compliance Inspector delivers two sets of Policies with CCI. The following Catalogs contain the Policies and Assertions that are used to check compliance for the AIA design and coding best practices:
-
AssertionsCatalog-AIA-<version>.xml
-
Policies-AIA-<version>.xml
The following Catalogs contain the Policies and Assertions that are used to check compliance for the WS-I Basic Profile.
-
AssertionsCatalog-WS-I-<version>.xml
-
Policies-WS-I-<version>.xml
The AIA catalogs and policies are for AIA customers. The WS-I catalogs and policies are for non-AIA composites. Assertions and policies are stored in these XML files. A list of pre-defined assertions can be viewed in the packaged Assertion Catalog XML files available under the ComplianceInspector/config directory.
The <version> placeholder represents the directory where assertions and policies are located. Delivered catalogs are named 10.x or 11.x, replacing <version>.
You can create custom policies and assertions in an upgrade safe manner. For more information, see Section 20.6, "Writing Custom Assertions for Code Compliance Inspector".
20.2 Invoking Code Compliance Inspector from JDeveloper
The External Tools menu option in JDeveloper provides a dialog that enables you to execute tools by adding command line executables and parameters. By adding menu and context menu options you can activate your extension.
Alternatively, you can download and install CCI as a JDeveloper extension from the JDeveloper Update Center. For more information, see "How to Set Up JDeveloper for AIA Development" in Oracle Fusion Middleware Developer's Guide for Oracle Application Integration Architecture Foundation Pack.
To invoke CCI from JDeveloper:
-
Select External Tools from the Tools menu in JDeveloper.
-
Click New to create a link to the external tool (in this case, Code Compliance Inspector).
-
Select External Program as the Tool Type, and click Next.
-
Click the Browse button, next to the Program Executable input field. Navigate to the location where you unzipped Code Compliance Inspector.zip, then browse to 'ComplianceInspector/bin' directory. Select the Code Compliance Inspector.bat file to open.
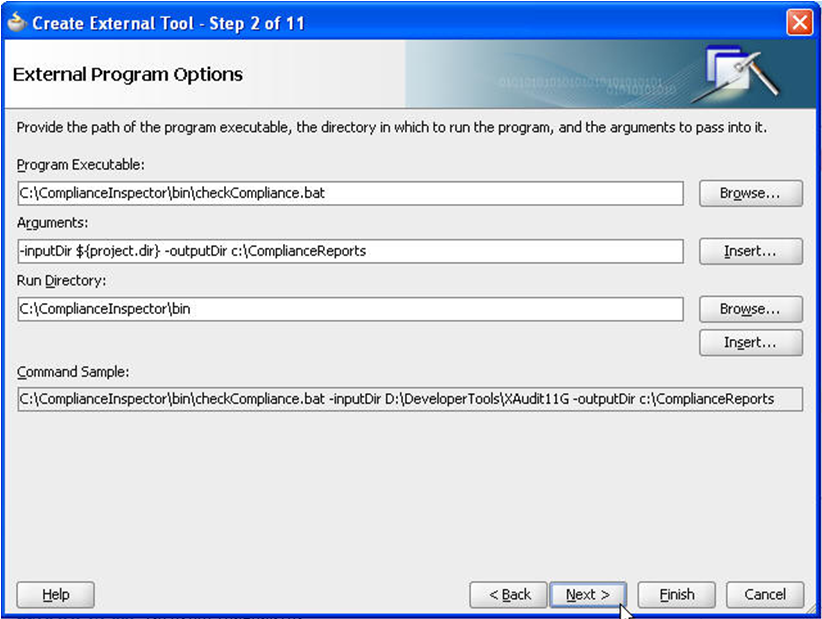
In the Arguments input field, give necessary arguments you need to run Code Compliance Inspector.
For example: -inputDir ${project.dir} -outputDir d:\PAoutput, as shown in Figure 20-2.
Note:
${project.dir} is a predefined variable in JDeveloper that refers to the currently opened project directory. You can give any other absolute path instead.
For more information about the Code Compliance Inspector arguments list, see Section 20.4, "Invoking Code Compliance Inspector from a Command Line".
-
Click Finish, and then click OK.
-
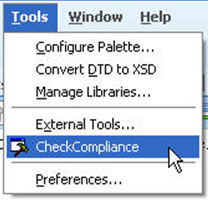
Verify that the CheckCompliance option appears in the Tools menu as in Figure 20-3.
Now you can run the Code Compliance Inspector from JDeveloper for the current project.
20.3 Running Code Compliance Inspector in JDeveloper
To run Code Compliance Inspector:
-
You can download and install Code Compliance Inspector (CCI) as a JDeveloper extension from the JDeveloper Update Center. To access the Update Center, within JDeveloper, navigate to Help > Search For Updates.
For more information about downloading and installing the extension, see "How to Set Up JDeveloper for AIA Development" in Oracle Fusion Middleware Developer's Guide for Oracle Application Integration Architecture Foundation Pack.
-
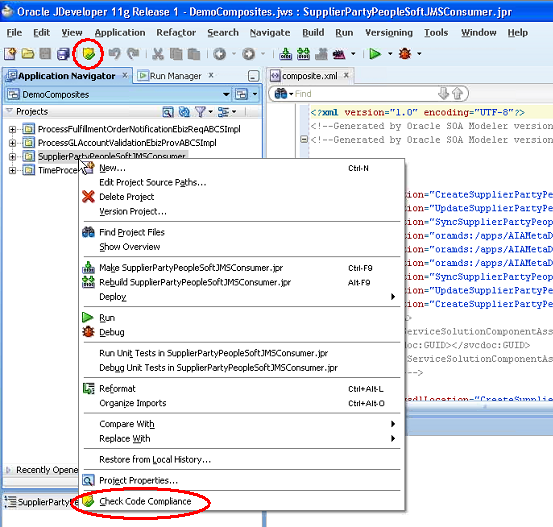
After installing the extension, run CCI by selecting a project and clicking the Check Code Compliance button in the JDeveloper toolbar or by right-clicking a project and selecting Check Code Compliance. These options are shown in Figure 20-4.
Finding and Fixing Compliance Issues
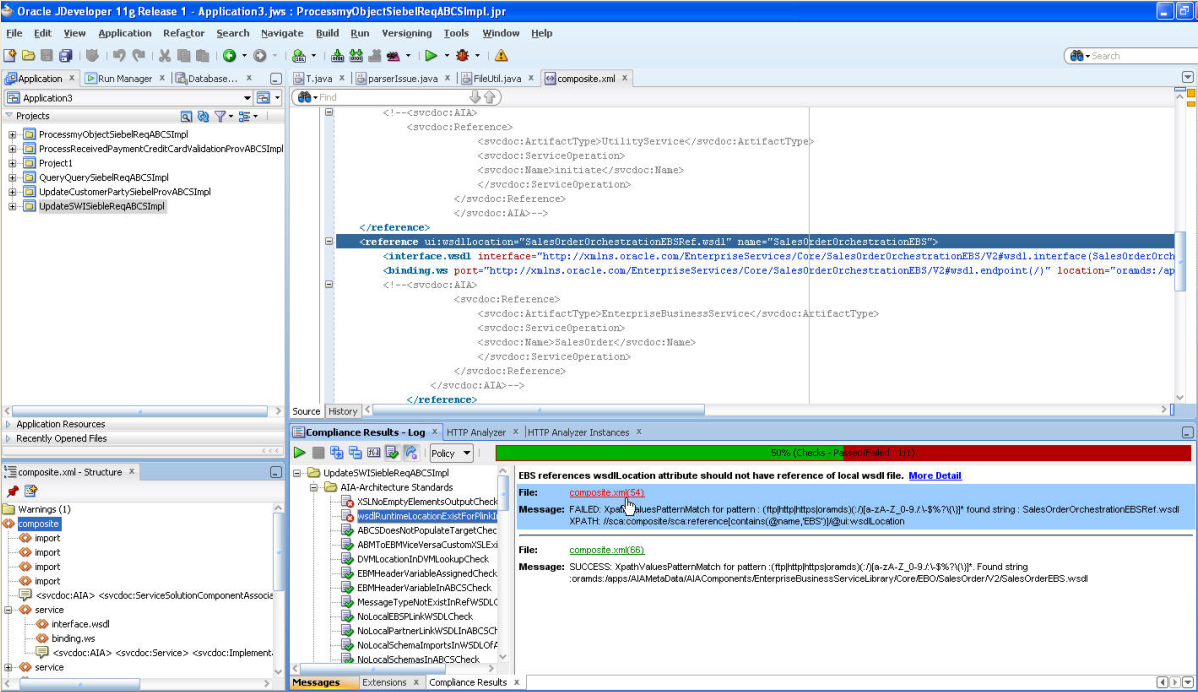
Figure 20-5 shows your projects and the compliance issues that have passed and failed.
Use this page to find and fix compliance problems. Table 20-2 describes the page elements.
Table 20-2 Code Compliance Page Elements
| Element | Description |
|---|---|
|
Projects List |
Your projects are listed in the tree. Click to view in the xml tab. |
|
Composite.xml tab |
Shows the XML for the selected project. |
|
Composite.xml - Structure |
This tab shows the structure of the composite: services, components, or references. |
|
Compliance Results - Log |
Use this tab to correct and recheck compliance issues. The buttons and fields are documented below. |
|
Start |
Click to restart after correcting. |
|
Stop |
Click to stop compliance checking in between processes. |
|
Expand |
Click to show all policies or priorities in the left-hand tree. |
|
Collapse |
Click to hide all policies or priorities in the left-hand tree. |
|
Regular Expression Tool |
Use the Regular Expression Tool button to check the value of a regular expression. Click on the assertion name in the tree and then click More Detail. Copy the XPath expression and paste it into the Regular Expression field, enter the Matching information, and click Validate. You can use this tool instead of running the whole CCI if you want. |
|
Show/Hide Success Detail |
Toggles to show or hide successful or failed and not executed processes. |
|
Show/Hide Not Executed |
Toggle on or off to show only non executed processes. |
|
Policy drop-down |
Select to view by Policy or Priority. |
|
Failures, Success, Skipped, Total |
CCI displays the counts and a bar chart. Skipped means that the assertion was not executed due any of the following reasons:
|
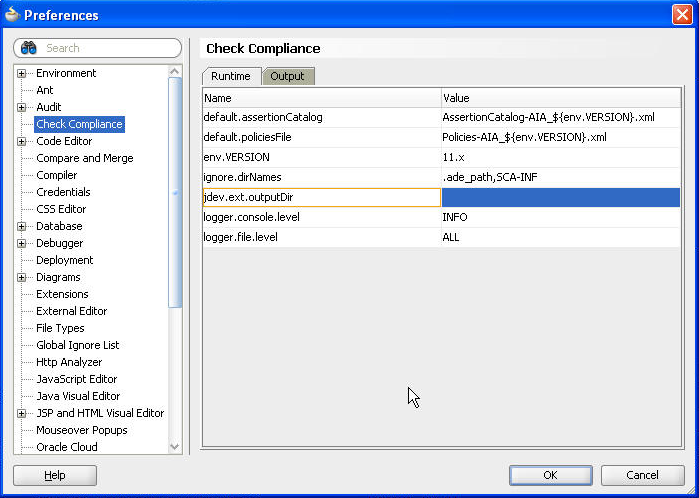
Use Preferences Figure 20-6 to set default versions, directory locations, and so forth.
-
Click Check Compliance in the left-hand tree to view the Runtime tab.
Runtime page elements are defined in Table 20-3:
Table 20-3 Runtime Page Elements
Element Description default.assertionCatalog
The value of this property is used as the default value for the -assertionFile switch. You can override the default value by passing the -assertionFile switch during execution of CCI.
default.policiesFile
The value of this property is used as the default value for the -testFile switch. You can override the default value by passing -testFile during execution of CCI.
env.VERSION
This is the version against which the tool is going to run. The value of this property can be overridden by introducing environment variable with name VERSION.
filepath.hyperlink.enable
The value of this property determines if the file paths in all reports will appear as links for each file or if they will appear as plain text. If set to true, the file paths will appear as links. If set to false, the file paths will appear as plain text.
ignore.dirNames
This property is a comma separated list of directories that should not be included in the validating process. You can provide a directory name as a regular expression.
jdev.ext.outputDir
Determines where CCI will put the reports. When the extension is first installed, the value here is blank. After CCI is first run, this value will be replaced with the user's working directory. CCI takes the value of the 'ide.work.dir' property and creates a directory called 'CCI_Report' under it. This will be the default value for 'jdev.ext.outputDir'.
logger.console.level
The value of this property is used as the default value for the console handler. CCI uses the console handler to show the execution status messages to users.
logger.file.level
The value of this property is used as the default value for the file handler. CCI uses the file handler to write log information into the checkCompliance.log file. You can limit the logging information by setting various logger levels.
For more information about these fields and to make other configurations, see Section 20.5, "Configuring Code Compliance Inspector".
-
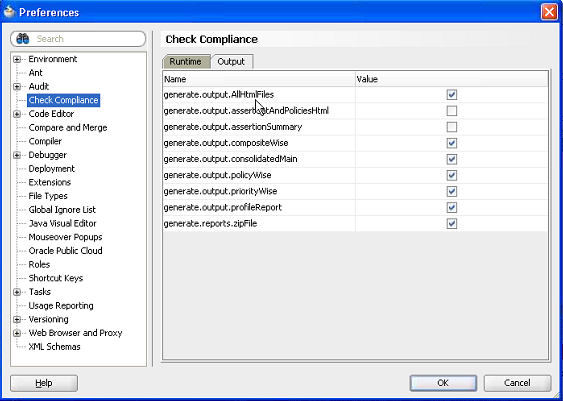
Click the Output tab. This tab enables you to set the output results of the html files generated by CCI. Select the Value check box to generate files, or clear the check box if you do not want to generate files. Page elements are defined in Table 20-4.
Table 20-4 Output Page Elements
Element Description generate.output.AllHtmlFile
generate.output.assertCatAndPoliciesHtml
generate.assertion.summary
generate.output.compositeWise
generate.output.consolidatedMain
generate.output.policyWise
generate.output.priorityWise
generate.output.profileReport
generate.reports.zipFile
If the value property is true, then only that report will be generated.
If the value is set to true, then only HTML reports will be generated. If the value is set to false, then no HTML report will be generated.
For more information about these fields and to make other configurations, see Section 20.5, "Configuring Code Compliance Inspector".
20.3.1 Understanding the Reports
These are the html reports that CCI generates:
-
AssertionCatalog.html and Policies.html
-
ComplianceReportByPolicies.html
-
ComplianceReportByPriority.html
-
ComplianceReportCompositeIndex.html
-
ContextProfilesReport.html
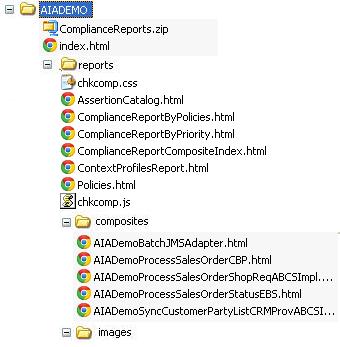
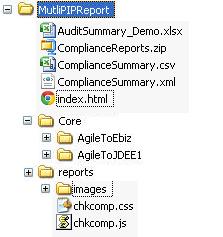
After you run CCI in a command line against a single integration project (PIP) or a directory of composites, the directory structure looks like Figure 20-8:
Figure 20-9 shows the directory structure that CCI generates after you run it against multiple integration projects (multiple PIPs):
In both examples, index.html is the main consolidated report.
For more information about running CCI from the command line, see Section 20.4, "Invoking Code Compliance Inspector from a Command Line".
20.3.1.1 Sharing the Reports
You can post report files to a server and share the compliance results with colleagues. Copy the report files to an HTTP server and notify others of its location.
20.3.1.2 Integration with Oracle Enterprise Repository
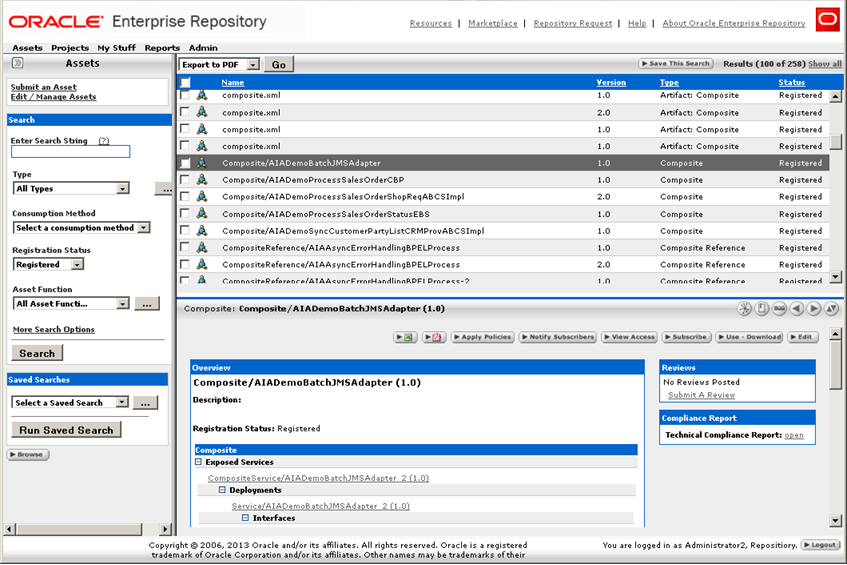
Individual composites can be viewed in the OER asset detail page, as shown in Figure 20-10.
For more information about the optional integration with OER, see "Integration with Code Compliance Inspector" in the Oracle Fusion Middleware Integration Guide for Oracle Enterprise Repository.
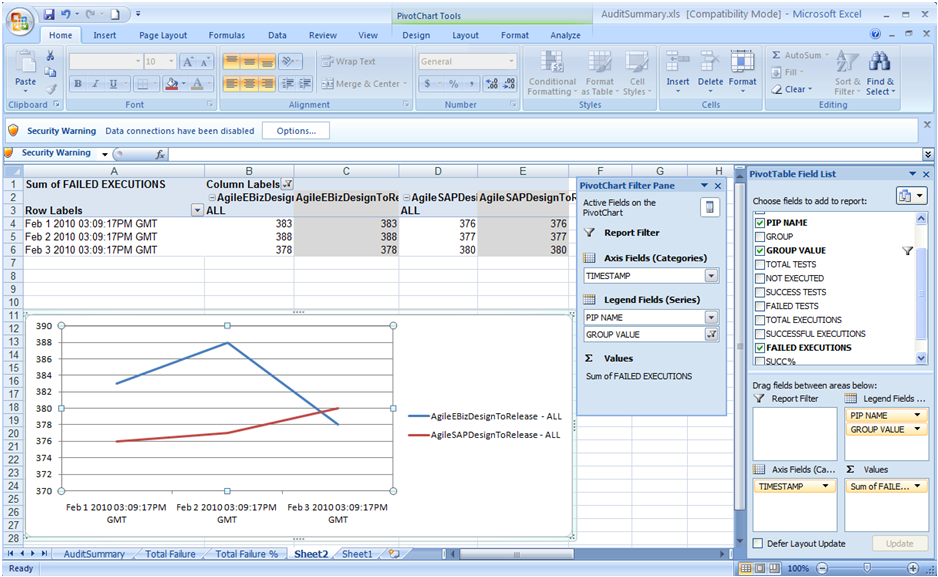
20.3.1.3 Generating a Trend Analysis Chart
You can generate a trend analysis chart from AuditSummary.csv. The trend analysis chart shows how a selected integration project has adhered to standards over various timelines.
To generate a trend analysis chart:
-
Create a new Excel spreadsheet.
-
Import the AuditSummary.csv into cell A1 of the newly created spreadsheet.
-
Insert a new pivot chart from the Insert menu, and then select the range of source data for which you want generate the chart in the popup wizard. (Note that you can select all of the imported data from step 2, and can filter it later while presenting the charts.)
-
In the Create Pivot table with pivot chart wizard choose the New Worksheet option to generate the chart and table in the new spreadsheet.
-
You can see the PivotTable field List panel along with the empty pivot table and chart sheet. Drag and drop the DATE field to the Axis field, the PIPNAME, and GROUP VALUE field to the Legend field and the FAILED EXECUTIONS Field to the Values from the Pivot Table Field List Panel.
-
Select the GROUP VALUE Filter and select ALL in the list.
Now you can see the trend chart as shown in Figure 20-11.
Note:
You can create different types of charts. For more information, see the help in Excel.
20.4 Invoking Code Compliance Inspector from a Command Line
The CCI can be invoked from a command line or from JDeveloper.
Customers who have Oracle Enterprise Repository can also use CCI. For more information, see "Integration with Code Compliance Inspector" in the Oracle Fusion Middleware Integration Guide for Oracle Enterprise Repository.
Invoke CCI with the checkCompliance.sh on Linux or checkCompliance.bat command on Windows using the following switches:
-
-inputDir {Absolute path to the folder that contains composite(s)}
This is a mandatory switch indicating where the input directory is located. If the -inputMetaFile switch is not specified, this input is not necessarily representative of a single integration project. If the -inputMetaFile switch is provided, this specifies the integration project root directory (the source folder containing the integration project folder from AIA_HOME).
-
-outputDir {Output folder where the compliance report will be generated}
This is a mandatory switch to indicate where the output reports will be stored. For example:
If your composites live here: /tmp/cci/composites/AIADemo
And you pass the output directory as: /tmp
Then CCI will put the produced files here: /tmp/AIADemo
-
-policiesFile {Policies file name}
Use this optional switch to indicate which policies file CCI should run against, for example, Policies-AIA_11.x.xml. The file should be available under ComplianceInspector/lib or ComplianceInspector/config (Tool class path) or embedded in compliance.policy.engine.jar.
-
-policy {Policy name}
This is an optional switch to specify the policy to execute. If not given, the default policy from Policies.xml will be executed.
-
-assertion {Assertion name}
Use this optional switch to indicate which assertion CCI should run against. This will run the tool for a specific assertion that you have defined, for example, ABCSTargetNameSpacesCheck.
-
-inputMetaFile {absolute path to the integration project MetaFile}
Use this optional switch if you want to run reports for a specific integration project. The input metafile contains paths pointing to the specific directories that Code Compliance Inspector needs to scan so that the output results are specific for the integration project. This file contains the names of all of the services that are used in a given integration project. When this option is specified, the -inputDir switch will point to the integration project root directory since the input metafile contains the directory path relative to this root. Here are some examples:
-inputDir=$AIA_HOME/aia -inputMetaFile <dir path of the file>/GenerateScriptInput.xml
-inputDir=$AIA_HOME/aia -inputMetaFile <dir path of the file>/MyPIPDP.xml
-
-inputMetaFile ALL
Use this optional switch if you want to run reports for all of the integration projects. When this option is specified, the -inputDir switch will point to the integration project root directory since the input metafile contains the directory path relative to this root.
For example: -inputDir=$AIA_HOME/aia -inputMetaFile ALL
Note:
The -inputDir parameter should be the parent folder of the location specified in //Service/@location element in the GenerateInputScript.xml or //Composite/@compositedir in DP.xml. The output directory contains ComplianceSummary.csv and consolidated index.html. The integration project specific output will be segregated according to Industry/Core PIPS.
Core PIPS will be placed under the <outputDir>/Core/<PIPName>.
Industry PIPS will be placed under <outputDir>/Industry/<IndustryName>/<PIPName>.
For 10g PIPs, the GenerateScriptInput.xml must be placed under the PIPS/Core/Setup/[PIP Name]/Install for Core PIPs and PIPS/Industry/[Industry Name]/Setup/[PIP Name]/Install for Industry specific PIPs for Code Compliance Inspector to process PIP specific reports.
For 11g PIPs, [PIPName]DP.xml must be placed under the pips/[PIP Name/DeploymentPlans for Code Compliance Inspector to process PIP specific reports.
-
-version
The -version flag tells you which version of CCI (CCI build date and time) you are using. This is an optional argument that displays the version information.
Examples of Invoking Code Compliance Inspector from a Command Line
Here are some examples for invoking the Code Compliance Inspector from a command line:
-
Windows: checkCompliance.bat -inputDir D:\AIA\demo -outputDir D:\ComplianceOut
-
Linux: sh checkCompliance.sh -inputDir /AIA/demo -outputDir /ComplianceOut
With inputMetaFile for a specific integration project:
-
Windows: checkCompliance.bat -inputDir D:\AIAPIP\aia -inputMetaFile <dir path of the file>/GenerateScriptInput.xml -outputDir D:\ComplianceOut
-
Linux: sh checkCompliance.sh -inputDir $AIA_HOME/aia -inputMetaFile <dir path of the file>/GenerateScriptInput.xml -outputDir /ComplianceOut
With inputMetaFile for all of the integration projects:
-
Windows: checkCompliance.bat -inputDir D:\AIAPIP\aia -inputMetaFile ALL -outputDir d:\ComplianceOut
-
Linux: sh checkCompliance.sh -inputDir $AIA_HOME/aia -inputMetaFile ALL -outputDir d:\ComplianceOut
20.5 Configuring Code Compliance Inspector
You can change the default configuration of the Code Compliance Inspector using the AuditorRuntime.properties file. This file can be found in the ComplianceInspector/config directory.
For example, you can generate specific html reports using the "generate" configuration properties in Table 20-5. Additionally, if you wanted to exclude directories from the process, then you can use the audit.ignore property.
Note:
If any property value contains ${another-property-name}, then this value will be substituted by another property, mentioned inside ${}, of the same file.
Table 20-5 Property Names and Values
| Property Name | Property Values (examples) | Description |
|---|---|---|
|
env.VERSION |
2.5 |
This is the version against which the tool is going to run. The value of this property can be overridden by introducing environment variable with name VERSION. |
|
default.policiesFile |
Policies-AIA_.${env.VERSION}.xml |
The value of this property is used as the default value for the -testFile switch. Users can override the default value by passing -testFile during execution of Code Compliance Inspector. |
|
default.assertionCatalog |
AssertionCatalog-AIA_${env.VERSION}.xml |
The value of this property is used as the default value for the -assertionFile switch. Users can override the default value by passing the -assertionFile switch during execution of Code Compliance Inspector. |
|
logger.console.level |
INFO |
The value of this property is used as the default value for the console handler. Code Compliance Inspector uses the console handler to show the execution status messages to users. |
|
logger.file.level |
INFO |
The value of this property is used as the default value for the file handler. Code Compliance Inspector uses the file handler to write log information into the pipaudit.log file. Users can limit the logging information by setting various logger levels. |
|
metafile.patterns |
GenerateInputScript.xml, DeploymentPlan.xml |
Code Compliance Inspector uses this property when users pass the switch -inputMetaFile ALL. Code Compliance Inspector will search metaFiles in given input directory (using the -inputDir switch) based on the property value. |
|
metafile.components.xpaths |
//Service/Location |
The input metafile contains paths pointing to the specific directories that Code Compliance Inspector needs to scan so that the output results are specific to the PIP. In order to get a list of directories, Code Compliance Inspector uses the property value as the XPath to execute in the meta file. |
|
metafile.logicalname.xpaths |
//PIPName|//ComponentName |
In order to get the PIP Name, Code Compliance Inspector uses property value as the XPath to execute in the meta file. |
|
metafile.locationName |
DeploymentPlans |
This is the directory name, where Code Compliance Inspector will look for metaFiles. Install for 2.x and DeploymentPlans for 10g. |
|
generate.output.consolidatedMain generate.output.profileReport generate.output.assertCatAndPoliciesHtml generate.output.priorityWise generate.output.policyWise generate.output.compositeWise |
true/false |
If the value is set to true, then HTML reports will be generated. If the value is set to false, then no HTML reports will be generated. |
|
audit.ignore.dirNames |
ade_path,SCA-INF |
This property is a comma separated list of directory names, which should not be included in the audit process. Users can give dirname as a regular expression too. |
|
generate.reports.zipFile |
true/false |
This flag decides whether Code Compliance Inspector generates the zip file for reports in output directory or not. |
Note:
In order for the Download zipped reports link to work, make sure that ComplianceReports.zip file is found in the same directory where index.html file is.
20.5.1 Considerations
Code Compliance Inspector reads the target namespace of a BPEL or ESB process and uses it as metadata to derive AIA-related information like application name, service name, service operation, industry, version, and so forth. So if the process target namespace has not been coded as per the standards, checks will not work correctly.
Running Code Compliance Inspector with inputDir as a mapped network drive (for example, a ClearCase mapped drive) can cause performance issues. The currently recommended method is to run Code Compliance Inspector against a local source folder.
20.6 Writing Custom Assertions for Code Compliance Inspector
Code Compliance Inspector uses the AssertionCatalog-<version>.xml file that contains assertions in a "native" assertion language, in XML format. The following sections describe assertions, assertion executors, policies, and assertion and policies files.
To create a custom assertion and to execute it, follow these steps:
-
Understand the structure of the assertion.
-
Select the appropriate assertion executor and operation.
-
Write assertion definitions and parameters required by the executor operation.
-
Include the newly created assertion in a policy in the Policies.xml.
20.6.1 Understanding the Assertion Structure
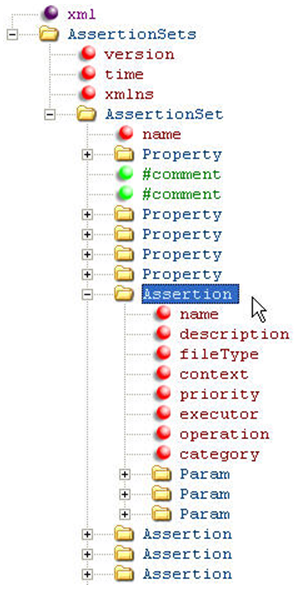
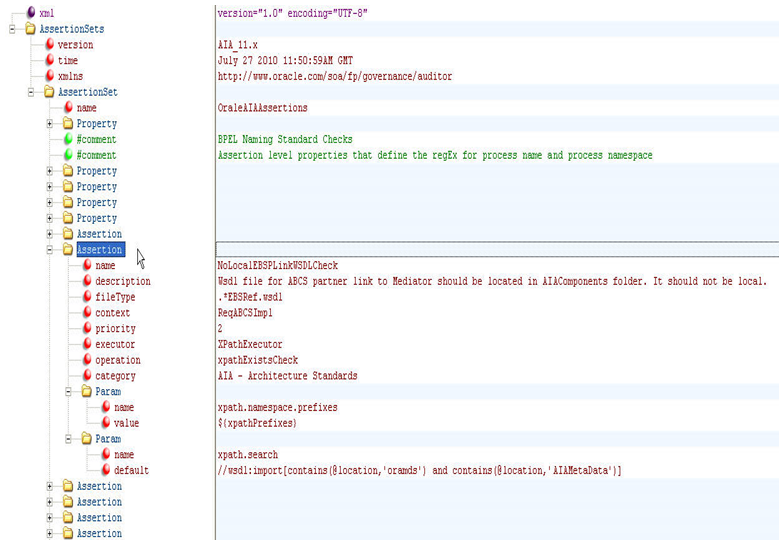
Figure 20-12 shows the structure of an assertion catalog file. An assertion catalog file primarily consists of AssertionSets. These AssertionSets in turn contain different assertions and common properties associated with the assertions.
Figure 20-12 is an example of the assertion structure at a high level. To see the elements in more detail, open the AssertionCatalog-<version>.xml file using an XML editor and it should look like Figure 20-13. The elements are described in the tables that follow.
Table 20-6 and Table 20-7 show the elements and attributes that make up AssertionSets and Assertions:
| Element | Description |
|---|---|
|
name |
The name of the assertion set. This is helpful if you want to group the assertions in different categories. |
|
Property |
Property consists of two attributes: name and value. These name value pairs are used to define properties that are shared by a few assertions within the AssertionSet. One such example is the XPath prefixes. There are many prefixes that are shared by all of the assertions written for XPathExecutor. So these prefixes form a property at the AssertionSet level that is used by all assertions. |
|
Assertion |
AssertionSet can contain various assertions. The Assertion Table describes various elements and attributes that make an Assertion. |
| Element | Description |
|---|---|
|
name |
The name of the assertion. Note that since we do not use any ID, the assertion name must be a unique name. This acts as an identifier for an assertion. |
|
description |
The description of an assertion is a plain text description of what the assertion checks. This helps an end user understand what is actually checked and what needs to be done in order to achieve compliance. |
|
executor |
The assertion engine executes the assertions using executors. In simple terms, executors provide the base infrastructure for an assertion developer to write assertions. Various operations can be performed on executors. For example, XpathExecutor provides the assertion writer with different operations that he can perform on an XPath. For more information, see Appendix B, "Code Compliance Inspector: New Terminology & Available Assertion Executors" which provides detailed information about the executors shipped with Code Compliance Inspector. |
|
operation |
The name of any one the executor operations supported by the executors that are shipped with Code Compliance Inspector. Each executor has a set of operations. For more information, see Appendix B, "Code Compliance Inspector: New Terminology & Available Assertion Executors" which provides detailed information about the executors and operations shipped with Code Compliance Inspector. |
|
fileType |
Every assertion works on either a file or a directory. fileType attribute gives a user flexibility to perform compliance checks on specific types of files. For example, fileType="*.wsdl" means that only files with .wsdl extensions are picked for the execution of a particular assertion. You can also only select folders with the help of a special character "*'. So FileType="*" selects only those folders. Note that FileType="*" is dependent on the executor. For example, you cannot use FileType="*" with XpathExecutor since you cannot perform XPath operations on a folder whereas you can use it with FSExecutor to perform file related operations. |
|
category |
Category is an attribute used to categorize the compliance results. When there are a lot of assertions, it is easy to maintain them if they are grouped. Category is used to group a set of assertions. It is a free text attribute. The compliance results can be viewed based on a category. |
|
priority |
Priority is another attribute to group the output of audit results. Numbers can be entered here since sorting is done on results. The priority of the assertion is based on its importance. For example, priority="1" is critical-all composites must comply with this assertion and produce only Compliant nodes in the _Audit.xml file. |
|
context |
Context is used for additional filtering of the matching files found in the input. For example, as an assertion writer you want to audit only utility BPEL processes for a certain assertion. Assuming that all utility processes have 'util' in the process name, you can specify filetype="*.bpel" and context="util". This selects only the utility bpel processes for auditing. |
Note:
Code Compliance Inspector executes a new assertion when the Policies-<version>.xml file has an 'Assertion' element with 'name' attribute set to be a new Assertion name. The 'Assertion' element is a child of the 'Policy' element, which is a placeholder for multiple assertions grouped together. While testing a new assertion, you can use UnitPolicy before a new test to find a place under the appropriate Policy.
For more information, see Section 20.6.6, "Writing Custom Assertions and Policies in a Policy File".
20.6.1.1 Assertion Parameters
Param is the element used to hold the assertion parameters. These are the parameters that are passed on to the executor during the execution of the Assertion. Any substitutions are performed before the parameters are sent for assertion execution.
<Param name=" " default=" " value=" "/>
Table 20-8 Assertion Parameters
| Parameter | Description |
|---|---|
|
name |
The name of the parameter. |
|
default |
The default value that needs to be passed. |
|
value |
Variable or expression, the result of which will give the value of this parameter. If null, then the value in the "default" attribute will be considered to be an actual value. |
20.6.2 Selecting an Appropriate Executor
An assertion executor is the underlying infrastructure provided by the Code Compliance Inspector to write new assertions. All of the assertions are executed by one of the executors that Code Compliance Inspector provides. These executors provide a common mechanism to execute checks. They expose different operations (as methods) that can be executed when supplied with a set of arguments (the XpathExecutor performs different XPath related operations on an XML file). For example, you can check if a value at a particular XPath location matches an input string and so on. Currently you can only write assertions using existing executors.
For more information, see Appendix B, "Code Compliance Inspector: New Terminology & Available Assertion Executors" to select the appropriate operations that will help you write your own assertion.
20.6.3 Understanding Profile Assertions
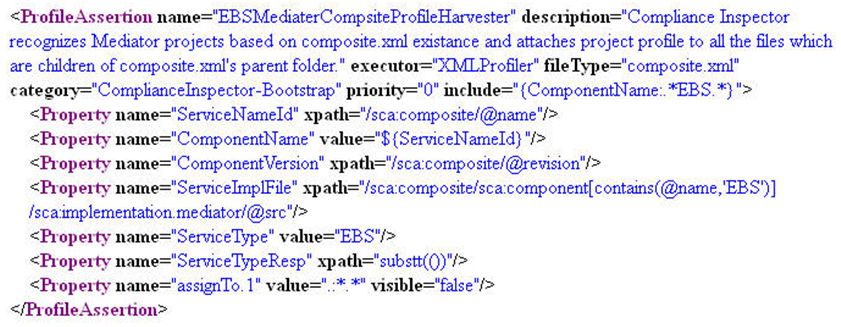
Profile Assertions are used to derive information that can be used by assertions during runtime. Profile Assertions are used to derive properties and associate them to files. These properties can then be used in assertions. Here is an example that shows how to write a Profile Assertion and what it contains.
The XML snippet in Figure 20-14 illustrates a sample profile assertion.
Things to note about profile assertions:
-
They are executed before any other assertions (with tag "Assertion") are executed.
-
They derive property values and associate these properties to a set of files. Files to be associated can be controlled using a property named "assignTo1."
-
All profile assertions must be included in an assertionset named "Bootstrap." Code Compliance Inspector executes all the profile assertions under the assertionset "Bootstrap" before executing any of the assertions. This can be compared to the functioning of a bootstrap class loader in Java.
-
Executors used in profile assertions are different from the ones used in assertions.
-
Apart from using the derived properties in assertions, these properties can also be used to analyze information about projects. All of the profile properties are written to a XML file named {Input dir name}_PDesc.xml which is generated in same folder that contains compliance reports. You can find out more information about your file or apply some custom style sheets to analyze the information.
Table 20-9 shows the elements and attributes that make profile assertions:
Table 20-9 Elements and Attributes for Profile Assertions
| Elements and Attributes | Description |
|---|---|
|
name |
This is the name of the profile assertion. Note that since we do not use any ID, the profile assertion name must be a unique name. This acts as an identifier for a profile assertion. |
|
description |
The description of an assertion is a plain text description of what the assertion checks. This helps an assertion writer understand the purpose of the profile assertion. |
|
executor |
Profile Assertions are executed by executors. These are different from the assertion executors. For example, XMLProfiler helps us derive all profiling information from XML files using simple XPaths. Currently, the only available executor is XMLProfiler. |
|
fileType |
Every profile assertion works on either a file or a directory. The fileType attribute gives users the flexibility to derive information from specific types of files. For example, fileType="*.wsdl" means that only files with a .wsdl extension are picked for the execution of a particular profile assertion. Note that since XMLProfiler is the only available executor, even though the fileType can be of any extension, it must ultimately be an XML file. |
|
category |
Category is only used for categorizing the profile assertions. |
|
priority |
If different profiles act on the same file and have the same parameter name, then the value will be derived for the assertion that has a higher priority. Ideally this should be avoided. It's better to have different parameter names in different profiles. |
|
include |
The include attribute is used for filtering along with the fileType attribute. You can use the parameter values derived from one of the parameters in the profile assertion for filtering. The format to use is {paramName:paramValue}. For example, include="{ServiceType:ABCSImpl}" will make sure that the profiler derives the parameter ServiceType first from the list of parameters, and only if the value is ABCSImpl, it will further process the profile assertion. |
|
exclude |
The exclude attribute is used to filter files that are not to be included. Suppose you want to exclude all 'ABCSImpl' files, then exclude="{ServiceType:ABCSImpl}" will make sure that the profiler derives the parameter ServiceType first from the list of parameters and if the value matches 'ABCSImpl', it will not further process the profile assertion. |
20.6.4 Profile Assertion Properties
Property is the element used to hold the profile assertion parameters. These are the parameters that are derived by the profile assertion executor and made available to assertions.
<Property name=" " file=" " value=" " xpath=""/>
Table 20-10 provides Property parameters.
| Property Name | Description |
|---|---|
|
Name |
The name of the parameter. |
|
Xpath |
XPath in case the value is derived from an XPath using an XML file. For example: <Property name="ServiceNameId" xpath="//BPELSuitcase/BPELProcess/@id"/> |
|
File |
The file from which the parameter must be derived. This can use a derived value as well. Examples: <Property name="ServiceImplFile" xpath="//BPELSuitcase/BPELProcess/@src"/> <Property name="ReceivePLinkName" file="${ServiceImplFile}" xpath="//bpel:receive[@createInstance='yes']/@partnerLink"/> |
|
Value |
The value for a property can be derived without the use of an XPath. It can be a hard coded value or a derivation using previously derived values. Example: <Property name="ServiceImplFilePath" value="${pwd}/${ServiceImplFile}"/> |
Certain parameters are available to every profile assertion by default. Table 20-11 shows the available parameters:
20.6.5 Using Properties from Profile Assertions in an Assertion
As described in previous sections, properties can be assigned to files using profile assertions. This section describes how to use them in an assertion.
Here is a sample assertion that uses the ServiceType property derived from the profile assertion from the above section (Profile : ESBServiceProfileHarvester).
The XML snippet in Figure 20-15 shows a sample assertion that uses a derived property.
The assertion above tries to use the context="ABCSImpl,{MEP:SYNC_REQ_RESPONSE}"
Review this part in the example: {MEP:SYNC_REQ_RESPONSE}
The first part 'ABCSImpl' tells the assertion to filter out all of the *.bpel files that have ABCSImpl in the name.)
MEP is the property name and SYNC_REQ_RESPONSE is the property value to check for.
So during the assertion execution, only those .esbsvc files that have a MEP of value "SYNC_REQ_RESPONSE" are picked up for audit. The primary intention is a second level filtering since sometimes you are not be able to write assertions purely relying on the naming of the files and filetypes.
20.6.6 Writing Custom Assertions and Policies in a Policy File
An assertion in a Policies-<version>.xml file is an invocation of an assertion from an assertion catalog by passing parameters to override it if required.
The simplest form of an assertion looks like this:
<Assertion name="NoHardWiringUnamePwdInEndpointURICheck"/>
The value of the attribute "name" must be the same name as that given in the "name" attribute of an assertion in the AssertionCatalog.xml file. Here no parameter values are passed from the assertion in the Policies.xml file and the default values from the assertion are taken.
Here is an example where the assertion in the Policies.xml file passes parameters to override for execution of an assertion.
Consider the sample assertion below:
<Assertion name="DocumentMinLengthCheck " description=" " executor=" " fileType=" " category=" " priority=" " context=" ">
 <Param name=" minLength" default=" 20" value=" "/>
</Assertion>
An assertion in policies.xml file can be written against the assertion in assertion catalog as:
     <Assertion name="DocumentMinLengthCheck ">
<Param name=" minLength" value=" 30" />
     </Assertion>
During the execution of the above test, the default value '20' for parameter minLength is overridden by '30'.
A policy is an element used to group assertions. The compliance results of the Code Compliance Inspector are also grouped by policies along with priority and category. So the grouping of assertions with the help of policies is helpful in terms of prioritizing the compliance results.
Here is an example of a policy:
<Policy name="FaultPolicyRelatedSuite">
    <Assertion  name="FaultPolicyEnabledforABCSAndEBFCheck"/>
    <Assertion  name="FaultPolicyFileExistsInABCSAndEBFCheck"/>
</Policy>
The attribute 'name' has to have a unique value. For example, the policy name has to be unique in a Policies-<version>.xml file.
A policy can also invoke other policies. This is used for the purpose of grouping. If you have already grouped assertions under policy elements according to some criterion and now you want a wrapper policy that holds these policies under one parent policy, here is how to do that:
<Policy name="AllPolicy">
  <depends policyName="ABCSsecuritySuite"/>
  <depends policyName="SeedDataAndConfigSuite"/>
  <depends policyName="ESBProjectContentSuite"/>
  <depends policyName="BPELProjectContentSuite"/>
    <Assertion name="FaultPolicyEnabledforABCSAndEBFCheck"/>
    <Assertion name="FaultPolicyFileExistsInABCSAndEBFCheck"/>
</Policy>
For the reference mechanism stated above, the element 'depends' is used. The attribute 'policyName' in the element must contain the name of the policy.
Also note that the policy 'AllPolicy' contains both 'depends' and 'Test' elements. This signifies that the policy can invoke other policies as well as tests. If you execute Code Compliance Inspector passing -policy AllPolicy, this command will execute all policies and tests from the above example.
20.6.7 Understanding the Custom AssertionCatalog File
An AssertionCatalog file is an XML file found either in the Code Compliance Inspector's classpath (ComplianceInspector/config) or embedded in the compliance.policy.engine.jar. The jar can be found at the following location: [CodeComplianceInspector install folder]/ ComplianceInspector/lib.
The AssertionCatalog XML file found in the ComplianceInspector/config takes precedence over the one found in the jar file. The assertion file delivered by Oracle is called AssertionsCatalog.<version>.xml. This delivered AssertionCatalog.xml file can have a corresponding optional (Custom_ <<base assertion catalog file name>>) custom assertion XML file found in the ComplianceInspector/config. Additionally, users can create an assertion xml by copying and renaming the Custom_AssertionCatalog-AIA_10.x.xml found in the ComplianceInspector/samples folder.
The AssertionCatalog.xml file contains Oracle delivered assertions that are executed by the Code Compliance Inspector. A new assertion or an override for existing assertions can be added to the Custom assertion xml file by inserting a new "Assertion" node as a child node of the "AssertionSet" element that with attribute name value same as original assertionset name. For example:
<AssertionSet name="OraleAIAAssertions" xmlns="http://www.oracle.com/aia/PIPvalidator/">
After changes to the assertion file have been made, a new Custom_AssertionsCatalog-<version>.xml file has to be placed at the following location:
[CodeComplianceInspector install folder]/ ComplianceInspector/config.
In order for a new assertion added to the Custom_AssertionsCatalog-<version>.xml to be executed, a corresponding Assertion needs to be added in the Custom_Policies-<version>. xml file. For more information about how to add a new test to a customer policy xml file, see Section 20.6.8, "Understanding the Custom Policies XML File".
There are three ways to override a delivered assertion:
-
Add the assertion to a custom assertion XML file found in the ComplianceInspector/config and modify the values for the parameters in the assertion. In this case, there is no need to have a test added to the custom policy XML file because there is already one in the delivered policy XML file found in the jar. By default, tests from the delivered policy XML file do not pass override parameters.
-
Add the test to a custom policy XML file found in the ComplianceInspector/config for an assertion you are going to override. Pass parameters with override values from the test for those parameters that have variables defined in the assertion. In this case, there is no need to have an assertion added to the custom assertion XML file.
-
As a less practical way of doing it, it is possible to have a combination of the above two methods where some parameters are overridden by passing them from the test in the custom policy XML file while others are overridden by directly changing them in the assertion added to the custom assertion XML file.
20.6.8 Understanding the Custom Policies XML File
A Policies.xml file is an XML file found either in the Code Compliance Inspector's classpath (ComplianceInspector/config) or embedded in the compliance.policy.engine.jar. The jar can be found at the following location: [CodeComplianceInspector install folder]/ComplianceInspector/lib. The Policies.xml file found in the ComplianceInspector/config takes precedence over the one found in the jar file. Oracle delivers a Policies-<version>.xml file for each major SOA release, for example 10g, 11g.
The delivered Policies.xml file contains a top level element called 'Validator.' This also has an attribute called 'default'. The value in the default attribute dictates which policy must be invoked by default when Code Compliance Inspector is run. This value can be overridden by the user while running Code Compliance Inspector by giving the '-policy' option and the name of the policy. Here is an example:
<Validator xmlns="http://www.oracle.com/aia/PIPvalidator/" default="all">
The delivered Policy.xml file can have a corresponding optional (Custom_<<base policy file name>>) custom policy file found in the ComplianceInspector/config. Users can create a customer policy by copying and renaming Custom_Policies-AIA_10.x.xml found in the ComplianceInspector/samples.
The Custom_policies xml file contains an overriding or new set of Assertions that need to be executed by Code Compliance Inspector in addition to those already found in the delivered Policies.xml. A new Assertion can be added by adding an Assertion node under an existing Policy. This way, the new Assertion will be executed under this policy in addition to existing assertions from this policy found in the delivered Policies.xml file.
In summary, the delivered Policies-AIA_11.x.xml file contains assertions that are executed when Code Compliance Inspector runs. An assertion from Policies-AIA_11.x.xml invokes an assertion from AssertionCatalog-AIA_11.x.xml. Parameters can be passed from an Assertion in Policies file to an Assertion in AssertionCatalog file if required. So, only those assertions from AssertionCatalog-AIA_11.x.xml for which there is a corresponding assertion in the Policies-AIA_11.x.xml are executed. Note that the same assertion can be invoked by multiple policies. This can be used if there is a need to pass different values to the same parameters of the same assertion. This will override the default values for these parameters.
20.6.9 Delivered Assertions & Policies
Oracle delivers dedicated Policies XML and Assertion Catalog XML files for every release. You can download release-specific Policies XML and Assertion Catalog XML files from the ComplianceInspector/lib directory. The dedicated release-specific files can be passed to Code Compliance Inspector using the -policiesFile command line option, accepting the policies xml file name as an argument. When you pass the -policiesFile, Code Compliance Inspector will try to identify the assertion catalog file name based on the policies file naming convention.
To avoid any annotations and merge/patch problems, we recommend that you only make changes in custom Policies XML and/or Assertion Catalog XML files that the engine will read as overriding files. Code Compliance Inspector will automatically identify custom files based on file naming patterns from the same location where Oracle delivered base test and assertion files are found, for example, in ComplianceInspector/config.
Some examples for policy and assertion file name matching patterns are:
Policies-AIA_11.x.xml (Custom_ Policies-AIA_11.x.xml)
AssertionCatalog-AIA_11.x.xml (Custom_ AssertionCatalog-AIA_11.x.xml)
For examples of adding and modifying assertions and policies, see the Custom_ AssertionCatalog-AIA_10.x.xml and Custom_ Policies-AIA_10.x.xml files found in the ComplianceInspector/sample folder.
20.6.10 Adding and Modifying Assertions in a Custom Assertion File
To add a new assertion for execution by Code Compliance Inspector, add it in the Custom Assertion file. A corresponding assertion needs to be added in the Custom Policies XML file in order for a new assertion to be executed.
To customize the Oracle delivered assertion, copy this assertion from the base Assertion file and paste it in the Custom Assertion file. Edit the parameters of the assertion as needed in the Custom Assertion file.
To remove an assertion from execution by Code Compliance Inspector, copy the assertion from the base Assertion file and paste it in the Custom Assertion file. Replace the value for the executor attribute of the pasted assertion to, for example, NAExecutor.
20.6.11 Adding and Modifying Assertions in a Custom Policies XML File
To add a new assertion under the existing policy, add an assertion node under the existing policy element in Policies XML file. To customize an Oracle delivered assertion, copy the assertion from the base Policies XML file and paste it in the Custom Policies XML file. Edit parameters as needed in the Custom Policies XML file.
To remove a test from execution by Code Compliance Inspector, copy the test from the base Policies XML file and paste it in the Custom Policies XML file. Add an active attribute with the value set to false, for example:
<assertion name="ABCSTargetNsCheck" active="false">.
The Assertions.html and Policy.html files found in the <<output directory>>/reports folder will have a different text style to display a new or customized assertion executed by Code Compliance Inspector.
20.6.12 Executing Newly Created and Customized Assertions
In order to execute newly created or customized assertions, make sure that the base and custom Assertion and Policies XML files are found in the ComplianceInspector/config folder. Code Compliance Inspector will automatically detect base and custom files and execute new assertions in addition to those available in the base Assertion file as well as customized assertions.
20.7 Executing Code Compliance Inspector for Integration Projects
This section describes how to host technical compliance reports in a central location for all of the integration projects in a release vehicle. Currently these files can only be executed on Linux.
File name: $CCI_Home/ComplianceInspector/bin/aia_setEnv.sh
This file is used to set up environment variable values to execute the Code Compliance Inspector. Table 20-12 describes the variables.
| Variable | Description |
|---|---|
|
VERSION |
This variable is used to specify the release number. For example: 2.5 or 3.1. |
|
INPUTDIR |
This variable is used to specify the path of the root directory where the AIA source is available. Example: /scratch/aia/AIASource/RV2.5/aia |
|
REPORT_STAGING_HOME |
This variable is used to specify the directory location where reports will be generated by the tool. Example: /scratch/aia/AIAReports_stage |
|
REPORT_PRODUC_HOME |
This variable is used to specify the directory where reports are copied to be viewed by report viewers. Example: /scratch/aia/AIAReports |
|
AIA_HOME |
This variable is used to specify the directory where the Code Compliance Inspector is installed. Example: /scratch/aia/ |
