5 Using Oracle Virtual Assembly Builder
This chapter describes how to use Oracle Virtual Assembly Builder, and includes the following sections:
5.1 Oracle Virtual Assembly Builder Interfaces
Oracle Virtual Assembly Builder provides the following user interfaces depending on which parts of the product you have installed:
-
When you have installed Oracle Virtual Assembly Builder Studio the following interfaces are supported:
-
Oracle Virtual Assembly Builder Studio graphical user interface
-
abctl, a command-line tool. -
Oracle Virtual Assembly Builder Studio and
abctlinteract with Oracle Virtual Assembly Builder Deployer as a Web client. In a suitably configured Oracle Virtual Assembly Builder Studio environment, you can perform deployment through the configured connection to Oracle Virtual Assembly Builder Deployer using either the graphical user interface or abctl.
-
-
When you have installed Oracle Virtual Assembly Builder Deployer the following interfaces are supported:
-
abctl, a command-line tool. -
A Web service API to interface with Oracle Virtual Assembly Builder Deployer Web service, as described in Oracle Virtual Assembly Developer's Guide.
When only Oracle Virtual Assembly Builder Deployer is installed, you can access only a subset of the commands. When Oracle Virtual Assembly Builder Studio is installed, or Oracle Virtual Assembly Builder Studio and Oracle Virtual Assembly Builder Deployer are installed, you can access all the commands. See Appendix A, "Command Line Reference".
-
Note:
You cannot launch two sessions of either the Oracle Virtual Assembly Builder Studio or abctl interfaces at the same time.
5.1.1 Accessing Oracle Virtual Assembly Builder Studio
Launch Oracle Virtual Assembly Builder Studio by executing the command:
$AB_INSTANCE/bin/abstudio.sh
Note:
For information on installation, see Oracle Virtual Assembly Builder Installation Guide.
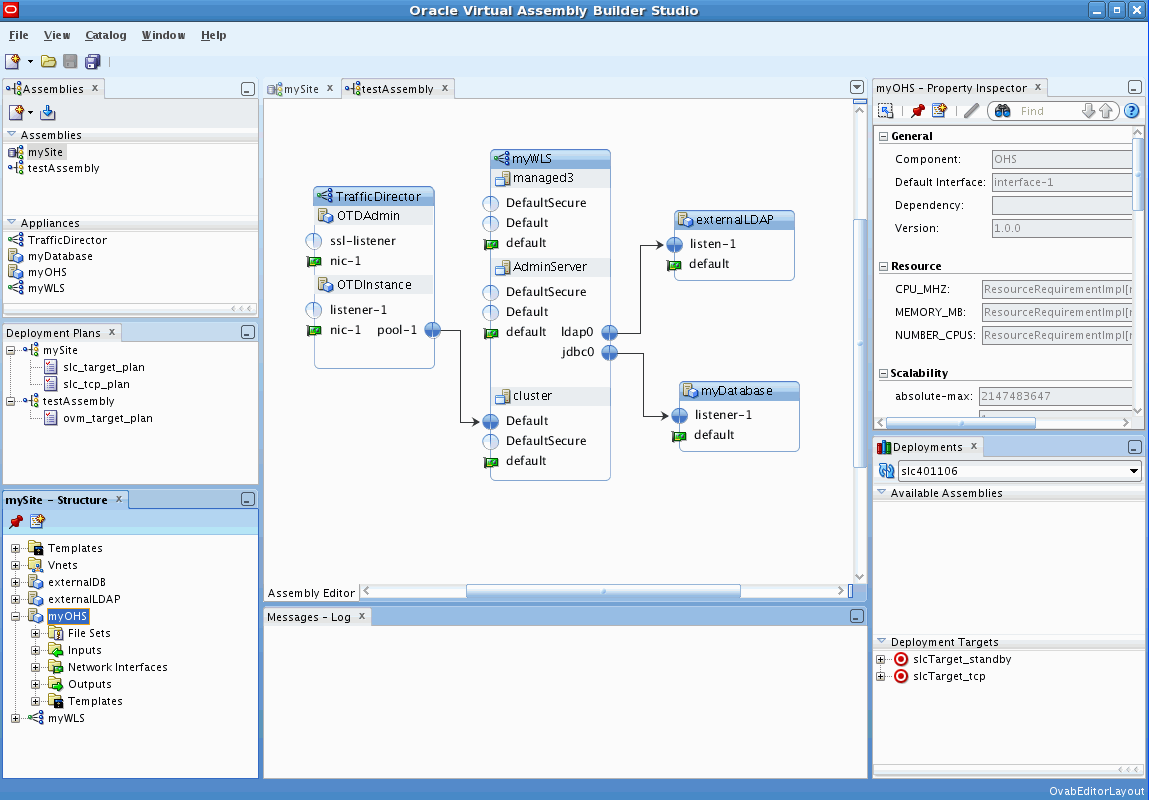
Figure 5-1 shows Oracle Virtual Assembly Builder Studio.
5.1.2 Accessing the abctl Command-Line Tool
Launch the abctl command-line tool by executing the command:
$AB_INSTANCE/bin/abctl
5.1.3 Accessing Logs
The log file is stored at $AB_INSTANCE/logs/assemblybuilder.log.
Access the log file manually, or view its messages through Oracle Virtual Assembly Builder Studio in the Messages window.
5.1.4 Differences Between the Interfaces
The Oracle Virtual Assembly Builder Studio and abctl interfaces complement each other but do not include identical functionality. Here are the main differences:
-
When running in Deployer-only mode only the
abctlinterface is supported. -
Only Oracle Virtual Assembly Builder Studio provides editing capability. That is, the following operations are not supported in
abctl:-
managing file set definitions: creating, updating and deleting file set definitions
-
managing target connections: creating, deleting or editing existing target connections
-
editing property values
-
creating/editing a deployment plan
-
-
In Oracle Virtual Assembly Builder Studio, you can introspect multiple reference systems and put the results into a new or existing assembly. In
abctl, you must introspect reference systems one-by-one and subsequently add them to an assembly. -
Only
abctlprovides the ability to create a 'target' connection to an Oracle VM 3.0 environment. Oracle Virtual Assembly Builder Studio does not have a connection wizard.Also, you can only make a Deployer connection using
abctl. -
External virtual machine templates can only be imported into the catalog as external appliances using
abctl.
These differences will be further detailed in Section 5.3, "Operations Related to Creating an Assembly".
5.1.5 Naming Rules
Any user-provided names must follow these rules:
-
The name must begin with an alphabetic character.
-
The name may only contain alphanumeric characters, or the underscore (_) or hyphen (-) characters.
-
The name must be 4 to 40 characters long.
5.1.5.1 Naming Conflicts
You may experience a name conflict between appliances or assemblies in a catalog if you import an appliance or assembly into a catalog where you already have an appliance or assembly with the same name. If you want to overwrite the existing appliance or assembly you can use the force option.
5.2 Typical Workflow
Users will typically use Oracle Virtual Assembly Builder in these ways:
-
Create assemblies and appliances:
-
introspect a reference system to capture the necessary metadata and configuration information for all components that make up the appliances within an assembly.
-
-
Edit assemblies and appliances to configure the relationships among the appliances and any external resources.
-
create networks within an assembly
-
create network interfaces within an appliance
-
bind appliance inputs to network interfaces and bind network interfaces to networks
-
create external resources from an appliance output
-
-
Prepare deployment artifacts necessary for the assembly:
-
Create bootable virtual machine disk images with customized Oracle Enterprise Linux operating system distributions and configurable metadata allowing for deploy-time customization of the software component
-
-
Deploy: deploy the assembly into your environment.
-
configure security: define the connection to Oracle VM or Oracle Exalogic backend endpoints and add deployment targets in the backend.
-
create and edit a deployment plan
-
register an assembly archive to a target
-
deploy assembly instances
-
perform other lifecycle operations on assembly instances
-
5.3 Operations Related to Creating an Assembly
This section details how you will use Oracle Virtual Assembly Builder Studio or abctl command line utility to perform operations related to creating an assembly.
-
Section 5.3.2, "Capture File Sets for an Appliance or an Assembly"
-
Section 5.3.3, "Create Templates for an Appliance or an Assembly"
-
Section 5.3.4, "Edit an Assembly Using Oracle Virtual Assembly Builder Studio"
5.3.1 Introspect a Reference System
The introspection operation results in appliance(s) and/or an assembly (if you performed the operation using Oracle Virtual Assembly Builder Studio and created an assembly) being created in the catalog.
During introspection, the metadata for appliances and assemblies is created in the $AB_INSTANCE/catalog/metadata directory. A unique ID (called the capture ID or cid) is generated for each appliance or assembly, and is stored in its metadata. In addition, a file set definition is created in the shared area of the catalog.
Note:
You should not change any configuration or content of the reference system between introspection and capturing file sets, as that may create undesired results. For instance, introspecting a reference system on one date and capturing file sets in the "same" reference system at some arbitrary future date is not supported.
For introspection to succeed, some introspection plug-ins have specific requirements for the reference system's running state. Table 5-1 lists the preconditions for the products supported by Oracle Virtual Assembly Builder.
Table 5-1 Introspection Plug-in Requirements
| Introspected Product | Running State Pre-Condition |
|---|---|
|
Oracle WebLogic Server |
Administration Server must be up and in the running state (not in the admin state). Managed Server(s) may be up or down. |
|
Oracle Coherence*Web |
Administration Server must be up and in the running state (not in the admin state). Managed Server(s) may be up or down. |
|
Oracle Forms*Web |
Administration Server must be up and in the running state (not in the admin state). Managed Server(s) may be up or down. |
|
Oracle SOA for WebLogic Server |
Administration Server must be up and in the running state (not in the admin state). Managed Server(s) may be up or down. |
|
Oracle HTTP Server (OHS) |
No requirement; Oracle HTTP Server may be up or down. |
|
Oracle Web Cache |
No requirement; Oracle Web Cache may be up or down. |
|
Oracle RDBMS (DB) |
In the introspection phase, the database can be up or down. |
|
Oracle RACDB |
In the introspection phase, the database can be up or down. |
|
Oracle Reports |
Administration Server must be up and in the running state (not in the admin state). Managed Server(s) may be up or down. |
|
Oracle Traffic Director |
In the introspection phase, the Oracle Traffic Director application can be up or down. |
|
Oracle Tuxedo |
In the introspection phase, the Tuxedo application can be up or down. |
5.3.1.1 No Support for Mounted NFS File Systems
Oracle Virtual Assembly does not support introspection or deployment of reference systems with mounted NFS file systems.
5.3.1.2 Custom Reconfiguration Scripts
Custom reconfiguration scripts provide you the ability to add custom scripts to an appliance that will be run on a virtual machine as part of deployment of the appliance. With this feature you can configure and operate a custom product or appliance that gets deployed with an Oracle product in an appliance.
To use this feature, place shell scripts in a well-known location on a reference system so that those scripts are picked up during introspection of that system. The captured scripts are executed on the VM when the corresponding operation is performed on the deployed Oracle product.
Note:
This feature is not supported for external virtual machine templates imported in Oracle Virtual Assembly Builder catalog as External Appliances.
5.3.1.2.1 Custom Scripts Directory
Place custom scripts into a set of sub-directories under a well-known root custom script directory named /ovab/scripts.d/. This directory is analogous to the Linux /etc/rc.d/ root directory which contains a set of sub-directories with well-known names (rc0.d/, rc1.d/, rc2.d/,...). Similar to /etc/rc.d/, each subdirectory contains a set of one or more scripts that get executed at the appropriate time. You can create the following subdirectories within the /ovab/scripts.d/ directory:
-
pre-config.d/
-
post-config.d/
-
pre-start.d/
-
post-start.d/
-
pre-stop.d/
-
post-stop.d/
Note:
It is not necessary to create the custom script directories that you do not need.
These directories correspond to three actions performed on the VM: config, start, and stop. Custom scripts located in directories that start with "pre-" get executed before the corresponding action is performed on the deployed Oracle product and custom scripts located in directories that start with "post-" get executed afterwards.
The "config" action is executed only once at initial deployment after the VM has fully started. The "start" action is executed after a "config" action and at any other time when the deployed Oracle product is started as part of assembly start operation initiated from Oracle Virtual Assembly Builder. The "stop" action is executed when deployed Oracle product is stopped as part of assembly stop operation initiated from Oracle Virtual Assembly Builder.
At the end of introspection, Oracle Virtual Assembly Builder checks for the existence of custom script directories on the reference system and adds any found scripts to the appliance.
Example 5-1 shows a root custom script directory:
Example 5-1 Root Custom Script Directory
/ovab/scripts.d/
    pre-config.d/
        00configthis.sh
        01configthat.sh
    post-config.d/
        00configotherthing.sh
    pre-start.d/
        00startthisfirst.sh
        01startthatsecond.sh
    post-start.d/
        00startotherthinglast.sh
    ...
The scripts are added automatically to the appliance template with the rest of the appliance metadata at introspection time.
5.3.1.2.2 Script Execution
Oracle Virtual Assembly Builder executes scripts as follows:
-
All scripts are launched as root at deploy time by Oracle Virtual Assembly Builder. Custom scripts are responsible for switching to another user as needed.
-
Scripts are executed one at a time in lexicographical order.
-
Custom scripts must complete in a timely fashion. The action being performed can only complete after all necessary custom scripts have executed and the action has also been performed against the deployed Oracle product.
-
No arguments are passed to scripts.
-
The exit status of custom scripts is ignored.
-
As scripts are launched, details of each launch is recorded on the VM in a file named "command.out" located in the
/assemblybuilder/logs/directory. The output of each script, unless otherwise redirected by the script, is sent to a separate file in the/assemblybuilder/logs/directory. The name of each file is recorded in "command.out" as each script is executed.
5.3.1.3 Custom Appliance Properties
This feature allows an introspection to pick up properties from one or more property file on the reference system during introspection, and for those properties to be added to the resulting appliance/assembly as user properties so they can be edited.
During deployment, the set of original properties including any modifications by the user are made available to scripts provided by the user to perform custom processing based on those properties.
5.3.1.3.1 Properties Directory
To get property files picked up automatically during dehydration, the user will need to place the property files in the well-known directory:
/ovab/scripts.d/properties/
This directory must reside on the same machine as the underlying product that is being captured. Within that directory, property files must conform to the following naming scheme:
<filename>.userprops
The <filename> must not contain ':' as this character will serve as a delimiter in property name generation.
Files within the properties directory that do not conform to the above naming scheme will be blindly transferred with the Appliance without reading it to generate additional user properties. This allows the user to provide additional files that may contain internal properties or other information to aid in the processing of user properties during reconfiguration.
5.3.1.3.2 Property File
A property file must consist of zero or more lines where each line must be a property declaration, a comment, or a blank line. More formally, a property file must comply with the following syntax:
property-file   = *line
line            = prop-decl | comment | blank-line
prop-decl       = name "=" value NL
comment         = *WS "#" *CHAR NL
blank-line      = *WS NL
name            = <any character in "a".."z", "A".."Z", "0".."9", "_", "-", ".">
value           = *XATTRCHAR
XATTRCHAR       = <any CHAR, escaped as necessary for XML element attribute interpretation>
CHAR            = <any character, excluding CTL (and NL), but including WS>
CTL             = <any control character (octets 0 -31) and DEL (127)>
NL              = <platform dependent line termination sequence>
WS              = <white space character>
Any property file that does not comply with the above syntax rules will result in an error and an appliance will not be created.
Property declarations must be contained on a single line. Ending a line with "\" will not result in line continuation.
All properties will be marked as "required" in the appliance metadata. Property declarations without any assigned value (nothing after "=") will be set to null in the appliance metadata requiring that the user assign a value to that property prior to deployment.
Whitespace is not permitted anywhere to the left of "=" in a property declaration. Whitespace to the right of "=" is assumed to be part of the intended value and will be preserved.
Comments and blank lines are preserved at dehydration and will be reproduced when the file is regenerated at rehydration.
5.3.1.3.3 Property Names
Each *.userprops file in the properties directory will be read and an appliance user property will be generated for each property in each file. Property names will be modified by adding a prefix to designate that the property is a custom property and that the property belongs to a specific properties file as follows:
custom:<filename>:<propname>
The <filename> part comes from the properties filename with the ".userprops" suffix removed. The <propname> part is copied directly without modification from the property name found in the property file.
The user, during editing, will see the entire property name. At reconfiguraiton when the property files are recreated, the "custom:<filename>:" prefix will be removed and will not appear in the property files (that is, the property names originally found in the files will be preserved in the recreated files).
5.3.1.3.4 Property Values
As indicated in the Property File section above, property values must conform to the requirements of XML element attributes. Any necessary escaping of characters in property values is the responsibility of the user when creating property files.
5.3.1.3.5 At Deployment
During reconfiguration, the user properties in the appliance will be traversed and all properties with a "custom:<filename>:" prefix will be added to a properties file under the indicated filename (with ".userprops" suffix added).
The order of properties and the comments within the original properties file are preserved in the regenerated properties file.
All generated properties files will be placed into the same directory. The full path to that directory will be passed to all reconfiguration scripts as an environment variable with the following name:
$AB_CUSTOMPROPS_DIR
5.3.1.4 Introspect Using Oracle Virtual Assembly Builder Studio
The Create Assembly dialog allows you to create a new assembly, name it, select which appliances to introspect, and provide values required by the Introspector for those appliances. You can access this dialog by selecting File > New > Assembly.
In the Name Assembly pane (Figure 5-2), enter information for the following fields:
-
Assembly Name: a name for the new assembly
-
Default Vnet Name: the default name of the Vnet
-
Description: Optional. Enter a textual description.
-
Empty Assembly: select to create an empty assembly. You do not define any appliances or properties for the assembly, but instead select Finish.
-
Overwrite: If an appliance or assembly with the same name already exists, and it has not been registered, you may overwrite it.
Figure 5-2 Create Assembly Wizard: Name Assembly
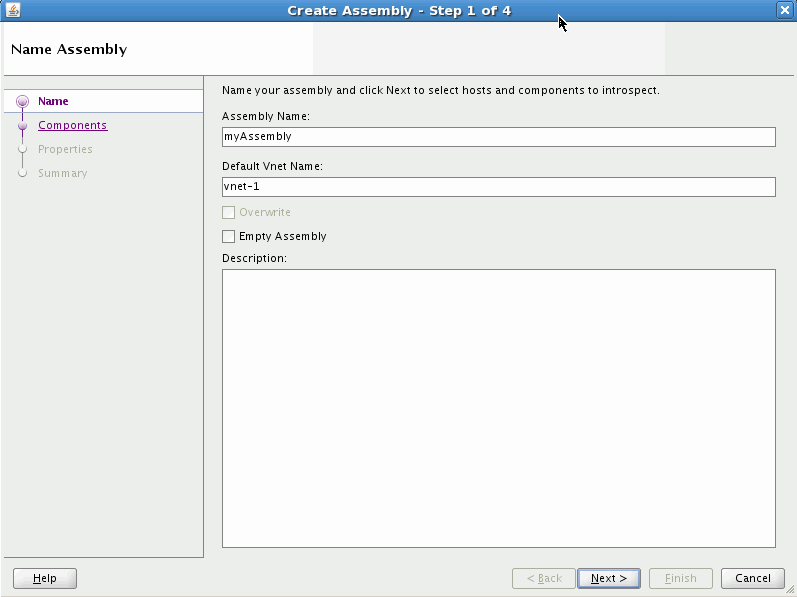
Description of "Figure 5-2 Create Assembly Wizard: Name Assembly"
Click Next to define appliances in the assembly for introspection.
In the Select Appliance to Introspect window (Figure 5-3), you can define one or more appliances in the new assembly.
Figure 5-3 Create Assembly Wizard: Select Appliances
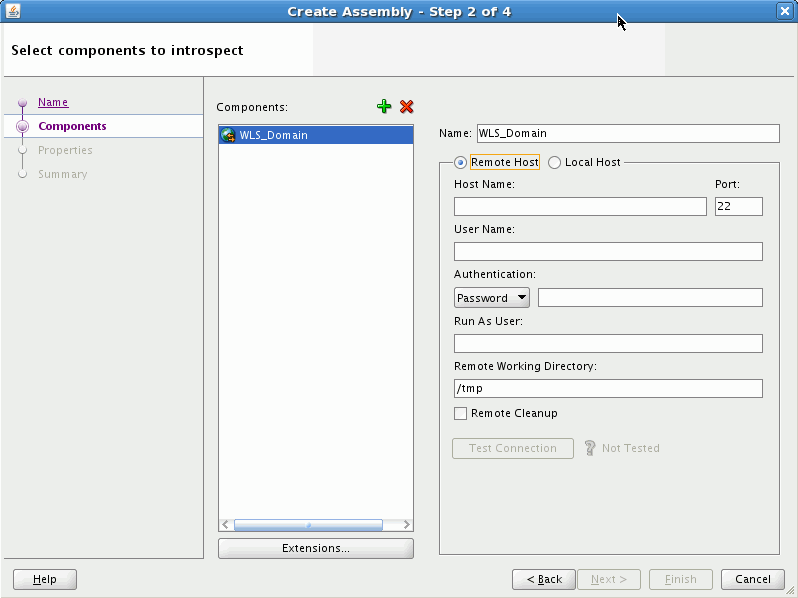
Description of "Figure 5-3 Create Assembly Wizard: Select Appliances"
Add appliances to the assembly by selecting the + icon (Figure 5-4):
Figure 5-4 Defining Appliances in the New Assembly

Description of "Figure 5-4 Defining Appliances in the New Assembly"
This displays the list of appliances that are supported for introspection:
-
Generic Product
-
Oracle Coherence*Web (Alias of WLS)
-
Oracle HTTP Server
-
Oracle Database
-
Oracle Forms*Web
-
Oracle RAC Database
-
Oracle Reports
-
Oracle SOA (Alias of WLS)
-
Oracle Web Cache
-
Oracle WebLogic Server
-
Oracle Traffic Director
-
Oracle Tuxedo
You can name the appliance, specify a local or remote host, and a working directory (this is a directory used during remote introspection to copy configuration files locally for caching purposes).
If you specified a remote host, you must define its connection and authentication parameters.
In the Run As User field you may enter the name of a user on the remote machine to sudo as before executing operations. For example, if you log in with 'User Name' bob and 'Run As User' jill, the introspection process will run as jill, not bob. In that case, bob must do a sudo operation to jill.
After defining parameters for the remote host, select Test Connection to verify that you can create an SSH connection using the supplied credentials to the remote host.
You can select Remote Cleanup to remove the artifacts copied over to the Remote Working Directory once the Introspection is complete.
Note:
You cannot perform remote introspection of a database if you cannot log into the database machine with the database installation owner's account. If remote introspection is required, you must enable the account for remote access.
5.3.1.4.1 Viewing Extensions
Click the Extensions button to see a list of included extensions for the selected type (that will automatically get executed).
Figure 5-5 Viewing Extensions for an Appliance
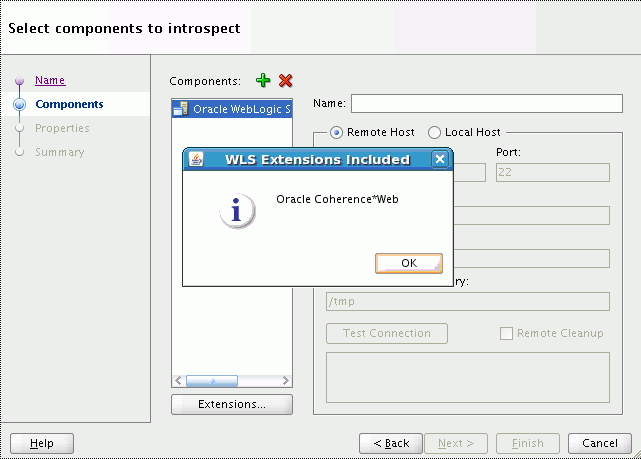
Description of "Figure 5-5 Viewing Extensions for an Appliance"
5.3.1.4.2 Authentication
Select Password and enter a password or select Private Key to reference the SSH key to use rather than providing a password. If selecting Private Key, select the browse button and navigate to the location of a private SSH key file on the local machine. The use of a private key file provides added security because no password handling is required by Oracle Virtual Assembly Builder.
5.3.1.4.3 Configuring Properties
In the Configure Properties window (Figure 5-6) you can set the introspection properties for the appliances you included for introspection in the previous window. Required properties are identified with an asterisk next to the property name.
Figure 5-6 Create Assembly Wizard: Configure Properties

Description of "Figure 5-6 Create Assembly Wizard: Configure Properties"
To edit a value for a property, select the appliance from the Appliances pane, and select the property from the Introspection Properties pane. Enter a value for the property. See Appendix B, "Oracle Virtual Assembly Builder Introspection Plug-ins", for information on introspection properties.
5.3.1.4.4 Capturing File Sets
The Capture File Set checkbox is selected by default. This option captures the files from the reference system specified by the file set definition created during introspection. The files are archived into one or more zip (or other raw) files which are stored in the shared area of the catalog. You should only unselect this checkbox if you do not want the file sets captured during introspection because you intend to customize your file sets.
5.3.1.4.5 Summary of Appliances for Introspection
Once you have set values for all required properties for all appliances, click Next (to see a summary) or Finish (to begin introspection without seeing a summary).
The Summary window (Figure 5-7) displays a logical tree view of the appliances you selected for introspection, their hosts, and the introspection properties entered.
Figure 5-7 Create Assembly Wizard: Summary
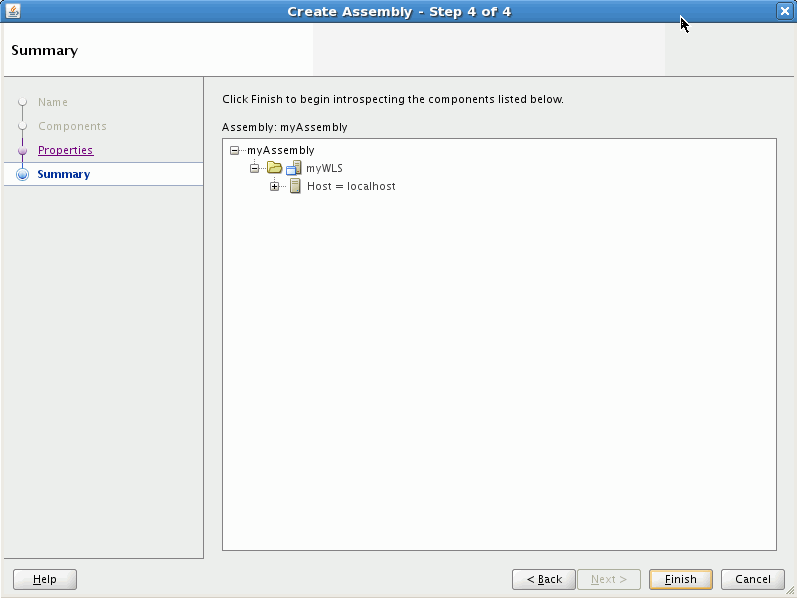
Description of "Figure 5-7 Create Assembly Wizard: Summary"
Click Finish to begin the introspection. A confirmation box appears informing you that the operation is time and resource intensive. Once you select OK to confirm, introspection starts.
You can see the progress of the introspection in the catalog navigator. Oracle Virtual Assembly Builder Studio displays a node for the appliance being introspected. If introspection fails, Oracle Virtual Assembly Builder Studio provides a link to a log for that appliance. See also Appendix D, "Troubleshooting".
5.3.1.5 Introspect Additional Appliances
The introspection wizard is a standalone interface to allow you to add a single appliance to a new or an existing assembly. To access it, select File > New > Appliance Introspection.
In the Name Appliance window, name your component and decide whether to create as a child of an existing parent assembly, or as a standalone component. Enter the following information:
-
Appliance Name: Name your appliance; any string is acceptable. The name can be 4 to 40 characters, may not start with a digit, and no spaces or special characters are allowed (underscores are allowed). Assembly and appliance names are not allowed to be localized.
-
Overwrite: If introspecting at the top level, you can check this box to overwrite any top-level assembly or appliance object, provided that it is not registered. If you are introspecting into an existing assembly, checking this box overwrites only assemblies and appliances inside that assembly.
-
Parent Assembly: (Optional) Choose a Parent Assembly from the drop-down list or select <no selection> to place the new appliance at the top of the catalog.
-
Description: Enter an optional description.
Click Next.
In the Identify Host window, you identify the host on which the appliance you want to introspect is running, by entering the following information:
-
Remote or Local Host: Select Remote Host or Local Host.
If you selected Remote Host, configure the following information:
-
Host Name: Enter the name of the host that you want to introspect.
-
Port: Enter the port number for SSH for this host. The default port number is 22.
-
User Name: Enter the username for the SSH user to log into the remote host. This user must have permissions to access the introspected configuration.
-
Authentication: Select Password and enter a password or select Private Key to reference the SSH key to use rather than providing a password. If selecting Private Key, select the browse button and navigate to the location of a private SSH key file on the local machine. The use of a private key file provides added security because no password handling is required by Oracle Virtual Assembly Builder.
-
Run As User: Enter the name of a user on the remote machine to sudo as before executing operations.
-
Remote Working Directory: Enter the path to a directory on the remote host in which Oracle Virtual Assembly Builder may stage files required for introspection. The files may be reused.
-
Remote Cleanup: Click this check box to remove the artifacts copied over to the Remote Working Directory once the Introspection is complete.
-
Note:
You cannot perform remote introspection of a database if you cannot log into the database machine with the database installation owner's account. If remote introspection is required, you must enable the account for remote access.
In the Select Appliance Type window, you identify the type of appliance you want to introspect, by entering the following information:
-
Type: Choose the appliance type you want to introspect from the Type drop-down menu.
Depending on the type of appliance chosen, different sets of properties are displayed. Set the properties for that appliance by selecting the cell for the property and entering a value for the property. Required properties are identified with an asterisk.
5.3.1.5.1 Viewing Extensions
Click the Extensions button to see a list of included extensions for the selected type (that will automatically get executed).
5.3.1.5.2 Capturing File Sets During Introspection
The Capture File Set checkbox is selected by default. This option captures the file set definitions generated from introspection, archives the file sets into one or more zip (or other raw) files, and stores the resulting files in the shared area of the catalog. You should only unselect this checkbox if you do not want the file sets captured during introspection because you intend to customize your file sets.
Click Finish.
5.3.1.6 Introspect Using abctl
abctl provides both local and remote introspection capability. For remote introspection, the Oracle Virtual Assembly Builder host must have SSH access to the subject machine.
The -name flag is optional.
Here are two examples:
Example 5-2 Introspect Oracle HTTP Server Remotely
$ ./abctl introspectOHS -oracleInstance /path/to/oi –componentName ohs1 –name myOHS -remoteHost myReferenceSystemHost –remoteUser abdemo
Example 5-3 Introspect Oracle WebLogic Server Locally
$ ./abctl introspectWLS -wlsHome /path/to/wls/wlserver_10.3 -domainRoot /path/to/user_projects/domains/basic_domain -adminUser weblogic -name myWLS
For more information see Appendix A, "Command Line Reference", which contains the details of the parameters that can be passed into the command.
5.3.2 Capture File Sets for an Appliance or an Assembly
Capturing file sets takes the file set definitions generated from introspection, archives these file sets into one or more zip (or other raw) files and stores the resulting files in the shared area of the catalog.
For the capture to succeed, some plug-ins have specific requirements for the reference system's running state. Table 5-2 lists the preconditions for the products supported by Oracle Virtual Assembly Builder.
Table 5-2 Capture Plug-in Requirements
| Introspected Product | Running State Pre-Condition |
|---|---|
|
Oracle WebLogic Server |
No requirement; Oracle WebLogic Server may be up or down. |
|
Oracle Coherence*Web |
No requirement; Oracle WebLogic Server may be up or down. |
|
Oracle HTTP Server (OHS) |
No requirement; Oracle HTTP Server may be up or down. |
|
Oracle Web Cache |
No requirement; Oracle Web Cache may be up or down. |
|
Oracle RDBMS (DB) |
For both Oracle Virtual Assembly Builder Studio and abctl, the database must be down when capturing file sets is done as part of introspection. For For Oracle Virtual Assembly Builder Studio, the database must be down in the creating template phase. |
|
Oracle Tuxedo |
No requirement; Oracle Tuxedo may be up or down. |
5.3.2.1 Capturing File Sets Using Oracle Virtual Assembly Builder Studio
The capturing file sets operation is available in the Template Creation Wizard, which is described in Section 5.3.3, "Create Templates for an Appliance or an Assembly".
Configuring Local and Shared File Sets
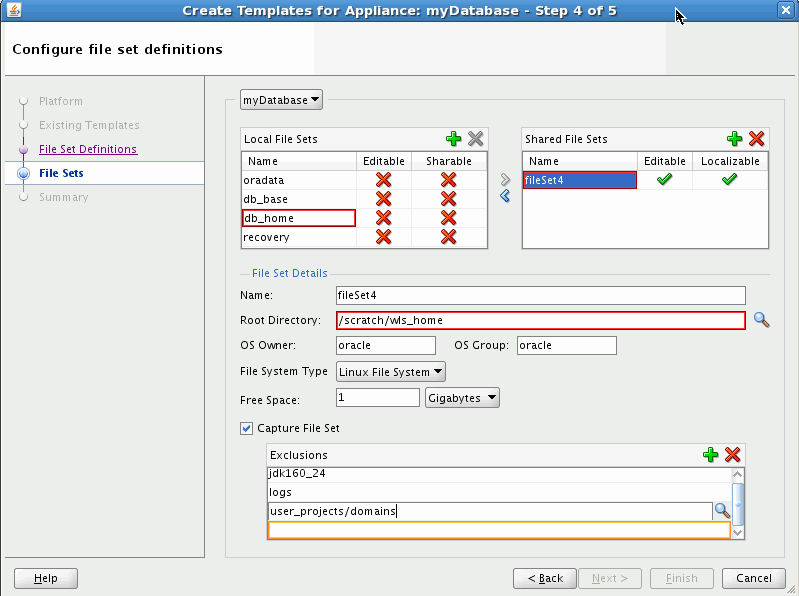
In the Configure File Set Definitions window, you configure local and shared file sets for appliances (Figure 5-8). The file sets that appear are configured by the introspector plug-in (at this point they are read-only).
You can add file sets. For example, in Oracle HTTP Server there is a DocumentRoot path, and you may want to capture this file set. The new file set is marked Editable and Sharable.
Configure these parameters for a file set:
-
Name: Enter a name for the file set.
-
Root Directory: Enter a root directory.
-
OS Owner and OS Group: For each file set, a you can specify an OS owner and group. The product makes no guarantees that the owner and/or group is defined in the base image. During deployment, the file set is expanded with the owner and group specified. The owner and groups defaults to "oracle."
-
Exclusions: For each file set you can specify multiple locations under the root directory that should not be captured. The locations are relative to the root directory. The following patterns are allowed in the exclusions:
-
a literal path, for example foo/bar
-
any * in a trailing file/directory name, for example:
-
foo/bar/*
-
foo/bar/*.log
-
foo/bar/tmp.*
The difference between foo/bar and foo/bar/* is that foo/bar removes bar, whereas foo/bar/* removes everything under foo/bar, but not foo/bar itself.
-
-
Note:
The base image must have the owners and groups defined.
Creates a directory where you can capture the file set definition in this file set. The file set definition is the set of instructions used to build a file set. Both local and remote file sets can be captured if the file system type allows it. See "File System Type".
Editable describes a file set where you can modify any of the File Set Details. Sharable describes a local file set that you can change to a shared file set, and Localizable describes a shared file set that you can change to a local file set.
You can configure each file set as either shared or local. You can use the shuttle buttons to migrate a file set in one direction or the other. If shared, users may or may not decide to capture the file set. In some cases a file set may not be allowed to migrate from local to shared or vice versa. This is defined by the introspector plug-in that created the initial file set and Oracle Assembly Builder Studio follows that setting.
You can also specify mount options for a shared file set. This occurs only in the property inspector view during deployment plan editing.
You can specify the free space size for a given file set (Figure 5-9). Each file set can have a defined free space. This value is set on a file set by file set basis. For local file sets, you can also elect to not capture the file set, and create an empty space on the VM.
Select the file system type. For local file sets, valid choices are:
-
Linux
-
Can capture a file set
-
Can define free space
-
For Shared File Sets, valid choices are:
-
NFS
-
Can capture a file set
-
Cannot define free space
-
-
RAW
-
Cannot capture a file set
-
Can define free space
-
-
Linux
-
Can capture a file set
-
Can define free space
-
Define Free Space for a File Set
Define a free space for the given file set. Select Megabyte, Gigabyte, or Percent for the free space unit, and enter a value.
The free space unit can only be defined as Percent if the file set is captured. A RAW file system type cannot use Percent because RAW can never capture a file set.
Figure 5-9 Defining Free Space for a File Set
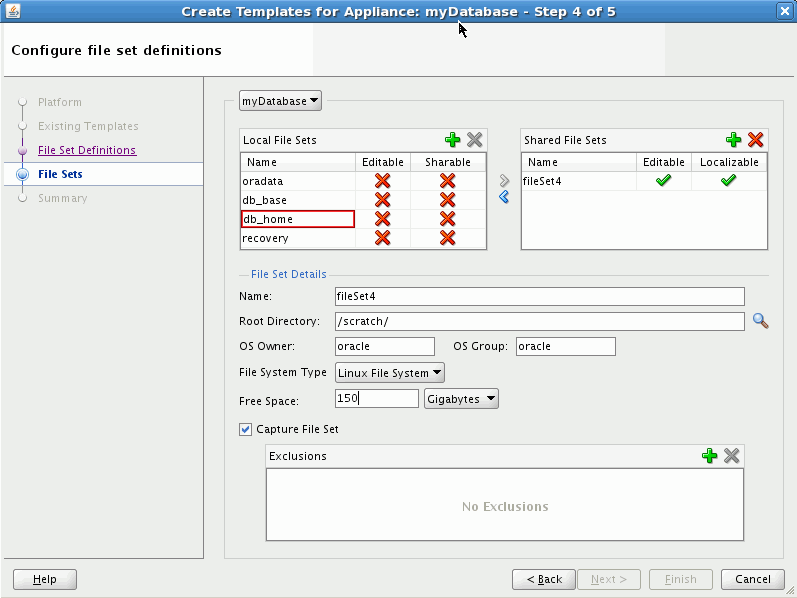
Description of "Figure 5-9 Defining Free Space for a File Set"
5.3.2.2 Review
In the Review window, you can review the capture file sets decisions you have made, then click Finish.
Progress messages are posted in the message log window. You can open and review the Assembly Status Overview by selecting the Template Creation tab to verify that progress is occurring.
5.3.2.3 Capture File Sets Using abctl
The introspect* commands in abctl currently capture file sets at the end of introspection by default. This can be overridden with a flag to allow separate capture of file sets via the captureFileSets command.
abctl provides both local and remote file set capture capability. For remote file set capture, the Oracle Virtual Assembly Builder host must have SSH access to the subject machine.
Here are two examples:
Example 5-4 Capture File Sets for Oracle HTTP Server Remotely
$ ./abctl captureFileSets –name myOHS -remoteHost myReferenceSystemHost –remoteUser abdemo
Example 5-5 Capture File Sets for Oracle WebLogic Server Locally
$ ./abctl captureFileSets -name myWLS -force
For more information see Appendix A, "Command Line Reference", which contains the details of the parameters that can be passed into the command along with a sample output of the command.
5.3.3 Create Templates for an Appliance or an Assembly
Template creation generates virtual machine templates that are ready to be deployed into virtualized platforms. In Oracle Virtual Assembly Builder, Oracle VM is the only supported platform. Oracle Virtual Assembly Builder supports Oracle Enterprise Linux guest OS for all appliances.
To create a template, you must provide a system base image that contains the operating system. You may create your own system base image if the sample system base image does not meet your needs.
Oracle Virtual Assembly Builder provides a sample system base image for Oracle Enterprise Linux templates. When creating Oracle Enterprise Linux templates, Oracle Virtual Assembly Builder transparently invokes Oracle VM's modifyjeos tool to create the virtual machine templates. The tool allows you to modify or customize the base image (for example, adding disk space to the base image, or specifying certain RPMs). Refer to "System Base Images" in Oracle Virtual Assembly Builder Installation Guide for details on how to create a custom system base image.
5.3.3.1 Storage of Templates
Templates are stored in the Oracle Virtual Assembly Builder instance's catalog directory. Template creation must be done on an Oracle Virtual Assembly Builder Host, where Oracle VM's modifyjeos is installed.
Note:
Base images are stored in either $AB_INSTANCE, or in $ORACLE_HOME. Here is the order of precedence for base image detection:
-
location specified by
-baseImageflag -
$AB_INSTANCE/templates/baseImage/OVM/OEL
-
$ORACLE_HOME/templates/baseImage/OVM/OEL
5.3.3.2 Selecting a Target Platform
You can select either an Oracle VM or Oracle Exalogic target platform. If you select Oracle Exalogic, you must choose a base image which is compatible (that is, has the proper RPMs installed) with the Oracle Exalogic platform. You can also use the wizard to validate a base image for Oracle Exalogic.
5.3.3.3 Create Templates Using Oracle Virtual Assembly Builder Studio
This operation allows you to create templates for an assembly by selecting Create Template from the Assembly Node Context Menu, or Catalog > Create Template.
In the Specify Image Location window (Figure 4-x), you select a target platform and configure the base images as follows:
-
Select either an Oracle VM or Oracle Exalogic target platform. If you select Exalogic, you must choose a base image which is compatible (that is, has the proper RPMs installed) with the Oracle Exalogic platform. This value is meaningful to both the individual appliance templates as well as the assembly archive. An appliance may have both Oracle Exalogic and Oracle VM templates at the same time. However only one assembly archive may exist at any given time.
-
Specify a location for the base images by selecting the browse icon, navigating, and selecting the base image. If you have placed your base image in one of the default locations you can leave this field as is.
-
Enter OS Root and VNC passwords.
If you selected an Oracle Exalogic target platform, click Validate Exalogic Image to verify whether the base image has the proper RPMs installed for the Oracle Exalogic platform.
Figure 5-10 Create Template Wizard: Specify Image Location
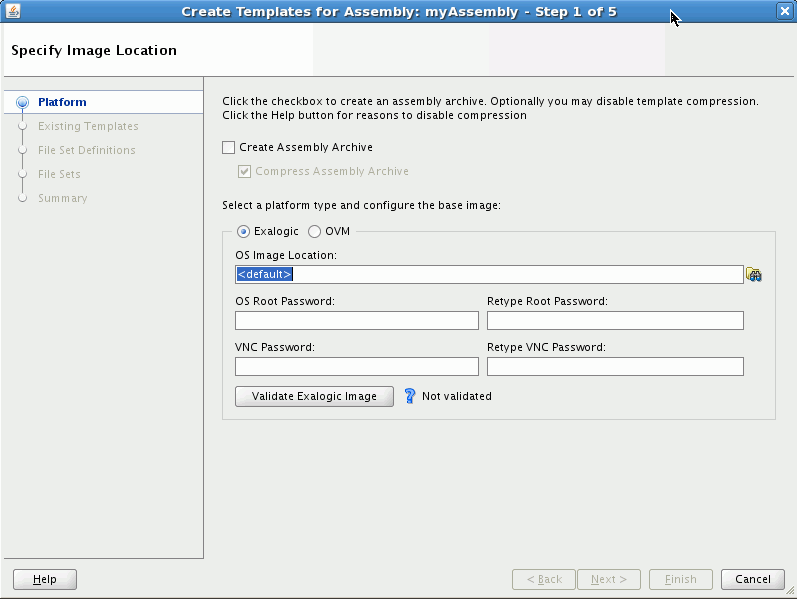
Description of "Figure 5-10 Create Template Wizard: Specify Image Location"
Click Next to continue.
Note:
Refer to Section 5.3.2, "Capture File Sets for an Appliance or an Assembly" for descriptions of capturing file sets in the Create Templates wizard.
The Summary window lists all the templates that will be created after you click Finish. It also shows a warning that creating templates can take some time.
5.3.3.3.1 Recreating a Template
If the assembly appliances have already had a template created, you can recreate the templates. The Confirm Component Template Recreation window identifies appliances that have an associated template that has been already created. You can select those that need to be recreated by placing a check in the Recreate box.
Figure 5-11 Recreating an Appliance Template
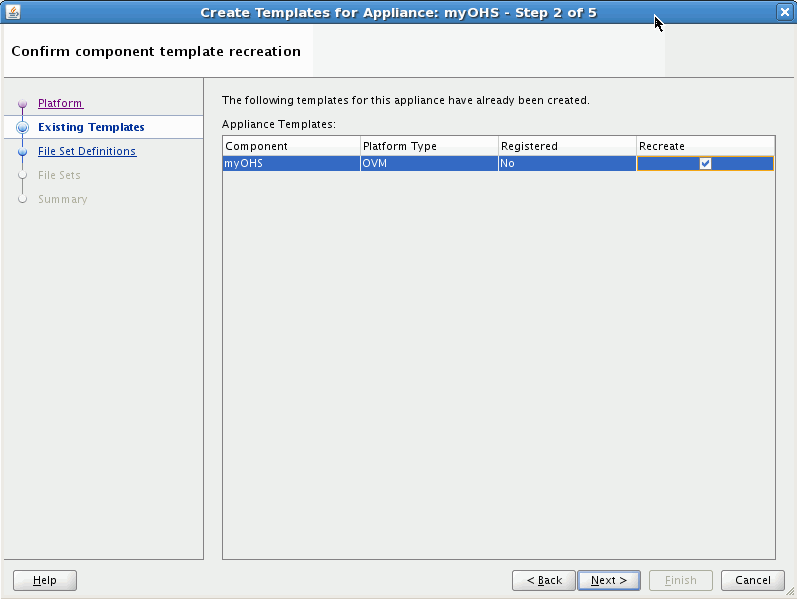
Description of "Figure 5-11 Recreating an Appliance Template"
Click Next.
In the Confirm Component File Set Definitions window, select whether to use a pre-existing file set if available, or specify a host where the files are located.
Figure 5-12 Confirming Appliance File Set Definitions
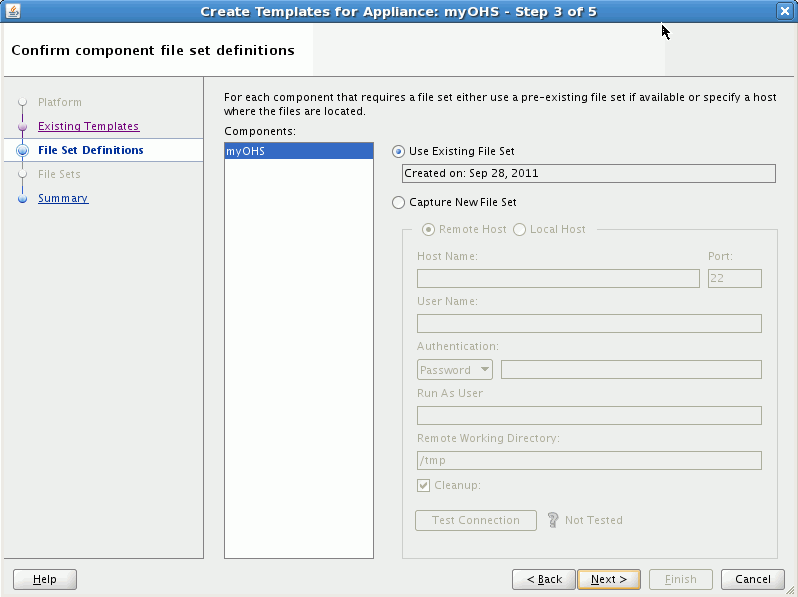
Description of "Figure 5-12 Confirming Appliance File Set Definitions"
Click Next, then click Finish to recreate the templates.
Progress messages are posted in the message log window. You can open and review the Assembly Status Overview by selecting the Template Creation tab to verify that progress is occurring.
5.3.3.4 Create Assembly Archives Using Oracle Virtual Assembly Builder Studio
You can create an assembly archive for a given assembly when you initiate the create template wizard in the context of a non-atomic assembly. Additionally you have the option of compressing the assembly archive.
When the assembly archive completes successfully, the assembly is locked. At this point you will not be able to make any changes to the assembly without explicitly deleting the assembly archive.
You can explicitly delete an assembly archive by selecting the assembly archive in the structure pane and hitting the delete key, or right-click and select Delete.
5.3.3.5 Create Templates Using abctl
Example 5-6 through Example 5-7 are createTemplate command examples:
Example 5-6 create Oracle VM Guest OS template for Oracle WLS
$ ./abctl createTemplate -name myWLS -platform OVM
Example 5-7 create Oracle VM Guest OS template for OHS
$ ./abctl createTemplate -name myOhs -platform OVM -baseImage /private/baseImage/OVM/OEL/System.img
For more information see Appendix A, "Command Line Reference", which contains the details of the parameters that can be passed into the command.
5.3.3.6 Create Assembly Archives Using abctl
You can use abctl to create an assembly archive for the named top-level assembly. This command can only be invoked on a top-level assembly. Additionally, you must have previously templated all the subappliances within the assembly using the createTemplate command.
Use the -platform option to specify the platform as Oracle VM or Oracle Exalogic.
Example 5-8 is a createAssemblyArchive command example:
Example 5-8 Create Assembly Archive
$ ./abctl createAssemblyArchive -name myWlsAssembly -platform OVM -nocompress
For more information see Appendix A, "Command Line Reference", which contains the details of the parameters that can be passed into the command.
5.3.4 Edit an Assembly Using Oracle Virtual Assembly Builder Studio
This section describes how to edit an assembly, using Oracle Virtual Assembly Builder Studio.
After creating an assembly, you may need to edit the assembly before it can be deployed to create connections, and optionally, to make other changes.
5.3.4.1 Creating Connections
Managing connection configuration includes the connecting of inputs to outputs, setting or changing the property values of inputs and outputs (such as JDBC connection strings), and creating external resource appliances for those outputs that connect to components not deployed as part of deployment of the assembly.
Defining a connection means generally to connect an output to an input and set/modify the properties of the input and output as necessary. The "connect output to input" step can be achieved by either connecting an output of an appliance to an input of another or connecting an output of an appliance to the input of an external resource appliance.
All input/output properties that require values must have values set. All other properties may also need to be set/modified according to the environment that will be in place at deployment time.
-
Configure Web server port forwarding: select an output on myohs and connect it to a managed server input on the mywls assembly by drawing an arrow between the two.
-
Specify JDBC connect strings for each JDBC connection: open the JDBC output of an Oracle WebLogic Server assembly by selecting it.
For JDBC connections, you either create external resources or introspect the database, then make the connection between the JDBC output of Oracle WebLogic Server to the external resource or the introspected database appliance.
Each of the JDBC connections has a different description. Use that description to figure out which JDBC database schema to connect each to. For each of the JDBC entries, you can look at the
original-url, and then copy thehostnameandglobal-db-name, into mydb.For example: in
jdbc:oracle:thin:@machine999.example.com:1521/orcl, thehostnameis machine999.example.com, theport1521, and theglobal-db-nameorcl.Also specify the
global-db-nameandportas properties of the external database resource input, and the host as a property of the database appliance itself.The port is a property of the external database resource input. The hostname is the only property that belongs to the database external resource itself.
Note:
Appliance-specific connection information is described in Appendix B, "Oracle Virtual Assembly Builder Introspection Plug-ins"
5.3.4.2 Property Inspector
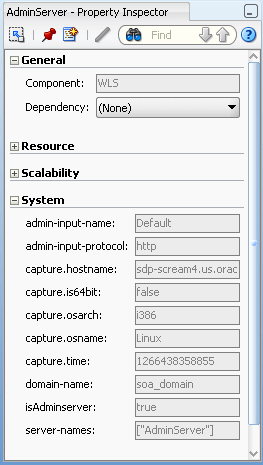
You may not need to make changes to properties if the values from the reference system are appropriate. If required, make changes using the property inspector.
The property inspector (Figure 5-13) displays the property values. Set the properties as required.
5.3.4.3 Structure Pane
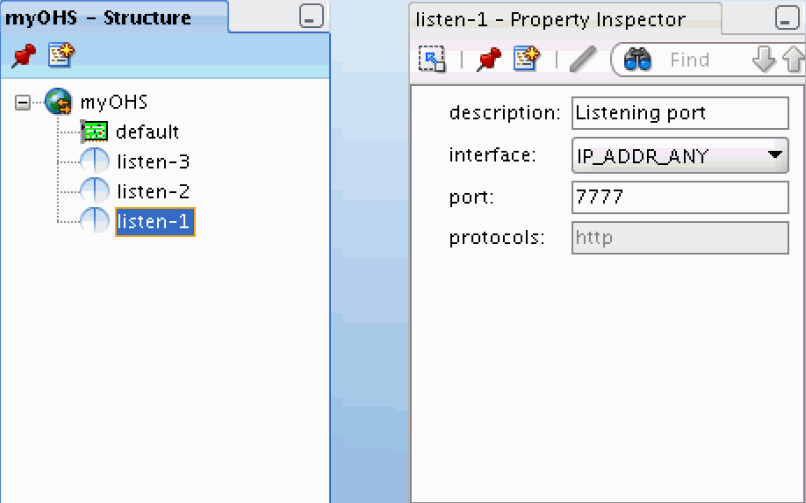
The Structure Pane is populated whenever you select a catalog node. When you select an assembly, the Structure Pane shows the structure of that assembly, including all appliances as well as those appliances' inputs, outputs and network interfaces. Selecting an item on the structure pane populates the property inspector with the properties scoped to that specific selection.
5.3.4.4 Editing Assemblies Containing Oracle HTTP Server/Oracle Web Cache and Oracle WebLogic Server
If you have an assembly that contains Oracle HTTP Server/Oracle Web Cache and Oracle WebLogic Server with Enterprise Manager deployed, as part of deployment of Oracle HTTP Server/Oracle Web Cache "opmnctl registerInstance" is called to register that appliance with an Enterprise Manager application hosted in Oracle WebLogic Server. To enable this operation to complete successfully, you must perform the following steps while editing the assembly:
-
Define connections between Oracle HTTP Server/Oracle Web Cache's EMRegistration and Oracle WebLogic Server.
-
Use the property inspector to set the Oracle HTTP Server/Oracle Web Cache dependency on Oracle WebLogic Server. You can do this by selecting the Dependency drop-down menu in the General section.
Without this configuration, Enterprise Manager registration will fail because the Admin Server has not been started.
-
Verify that the Oracle WebLogic Server Admin Server has not been configured to accept only SSL connections. The "opmnctl registerInstance" does not support SSL connection to Oracle WebLogic Server.
5.3.4.5 Application Routing between Oracle HTTP Server and Oracle WebLogic Server
If the Oracle HTTP Server configuration file mod_wl_ohs.conf defines application routing between Oracle HTTP Server and Oracle WebLogic Server, you need to connect Oracle HTTP Server to Oracle WebLogic Server in the editor.
5.3.4.6 Creating Vnets within an Assembly
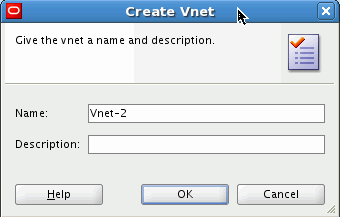
When an assembly is created, a default Vnet is created for the assembly. You can change the name and description of the default Vnet when you create the assembly. Once the assembly is created, you may also create additional Vnets other than the one created by default.
To create a new Vnet right-click the assembly and choose New > Vnet... or select the assembly and right-click the Vnets folder in the Structure Pane and choose New Vnet... from the context menu (Figure 5-15). Enter the name and description of the new Vnet.
5.3.4.7 Creating Network Interfaces within an Appliance
You can create physical or virtual network interfaces while editing an assembly. Physical interfaces are physical from the perspective of the vServer's OS stack, but since that OS is running in a vServer, that physical interface is actually a virtual network interface - thus this refers to a virtual network interface on top of another virtual network interface. To create interfaces:
-
Create a physical network interface by right clicking on an appliance in the assembly editor and selecting Add Network Interface, or by selecting the assembly in the Assembly navigator and right clicking on the appliance or the Network Interfaces folder under an appliance and selecting Add Network Interface.
-
Create virtual network interfaces by right-clicking on a physical network interface and choosing Add Network Interface. You are prompted for the name and description of the new interface. Set the other properties using the Property Inspector. The result is displayed in the Structure Pane as the child of the physical network interface. Virtual network interfaces exist to model the concept of VLAN.
5.3.4.8 Binding Appliance Inputs to Network Interfaces
When configuring an appliance Input you need to specify the network interface and port on which the Input will receive (or listen for) data. You can either select a specific network interface, in which case the Input will only listen for inputs coming from that network interface or you can specify INADDR_ANY in which case the Input will listen for inputs coming from any network interface configured for the appliance. INADDR_ANY is the default.
To set the default interface on an appliance: right-click the interface in the Structure Pane and choose Set as Default from the context menu. The default may be either a virtual or a physical interface. Note that virtual interfaces do not appear in the Assembly Editor. They may only be selected in the Structure Pane.
5.3.4.9 Binding Network Interfaces to Vnets
Assemblies and appliances have Vnets and network interfaces. Each network interface may be bound to one and only one Vnet. The deployment plan is used to associate Vnets and network interfaces with physical networks and IP addresses that exist in the deployment environment.
The binding can be changed to a different Vnet (if a different one exists) through the Property Inspector. Each logical network must be resolved at deploy time using the deployment plan (that is, each network will have properties in the deployment plan).
5.3.5 Edit an Assembly Using abctl
This section describes assembly editing operations you can perform using abctl.
Creating Empty Top-level Assemblies
Use the createAssembly command to create an empty top-level assembly. Example 5-9 shows the createAssembly command.
Example 5-9 createAssembly Command
$ ./abctl help –command createAssembly
$ ./abctl createAssembly -name myAssembly -defaultNetwork intranet
Adding Appliances (or WLS Assemblies) to Top-level Assemblies
Use the addToAssembly command to add appliances to a top-level assembly. Example 5-10 shows the addToAssembly command.
Example 5-10 addToAssembly Command
$ ./abctl help –command addToAssembly
$ ./abctl addToAssembly -name myAppliance -into myAssembly
Use the connectEndpoints command to creates a new connection between an output and an input. The protocols of the output and input must match, and the owners of the output and input must be part of the same assembly. Example 5-11 shows the connectEndpoints command.
5.4 Operations Related to Deployment
This section details how you will use Oracle Virtual Assembly Builder Studio or the abctl command line utility to perform operations related to deployment.
-
Section 5.4.4, "Registering an Assembly Archive to a Target"
-
Section 5.4.11, "Unregistering an Assembly Archive from a Target"
-
Section 5.4.12, "Uploading an Assembly Archive to the Deployer Repository"
-
Section 5.4.13, "Deleting an Assembly Archive from the Deployer Repository"
5.4.1 Configuring Targets
This section describes how to define the connection to the Oracle VM or Oracle Exalogic backend endpoints, to provide credentials if required, and add deployment targets in the backend.
5.4.1.1 Connection URL
Oracle recommends that you configure your target connections for Oracle VM 3 with TCP instead of HTTP protocol.
To configure with TCP, specify a URL of the form "tcp://their-ovm-host:54321".
5.4.1.2 Connection Credentials
To configure connection credentials:
-
For Oracle VM, create the target using the
createTargetcommand in abctl.This operation, which can only be performed by the Cloud Admin, defines the connection information, and, depending on the backend type, user credentials for the backend. For Oracle VM, credentials are supplied here.
For Oracle Exalogic, you do not perform the
createTargetcommand because a single target is preconfigured. Individual users will provide their own credentials in theaddTargetUserstep. -
Add users to the target using the
addTargetUserabctl command.Depending on the backend type, this may be a Cloud Admin call or an Application Admin, depending on differences in the security models of the backend systems:
-
For Oracle VM targets, this an operation that can only be performed by the Cloud Admin, and is used to control what users can access the pool. This is an Cloud Admin operation because the credentials supplied by the Cloud Admin must be protected from general users.
-
For Oracle Exalogic targets, this is an Application Admin operation and is used to specify Application Admin credentials (in this case, Cloud Admin does not have to give specific access because the backend will be checking the credentials). This is an Application Admin call because the user's credentials must be protected from others, including the Cloud Admin.
-
5.4.1.3 Examples
Example 5-12 shows how to create a target for Oracle VM:
Example 5-12 Create Target for Oracle VM
./abctl createTarget -name slcTarget_tcp -type ovm -properties ovm.poolName=ab_ovm_30_stand_alone_pool ovm.vmOperationTimeout=3600 ovm.vmmversion=3.0 ovm.user=admin ovm.pwd ovm.url=tcp://example.oracle.com:54321 -connectionName localDeployer
Example 5-13 shows how to add users to a target for Oracle VM:
Example 5-13 Add Users to a Target for Oracle VM
./abctl addTargetUser -user Username -target Targetname
Example 5-14 shows how to add users to a target for Oracle Exalogic, where the -properties option contains the user's credentials as a property=value pair:
5.4.2 Creating a Deployment Plan
A deployment plan allows you to override property values defined in the metadata of an assembly. The plan is applied when the assembly is deployed. Only top-level assemblies can have deployment plans.
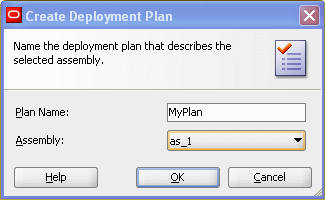
5.4.2.1 Creating a Deployment Plan Using Oracle Virtual Assembly Builder Studio
Create a deployment plan:
-
In the Deployment Plans navigator, right-click an assembly and select New Deployment Plan.
The Create Deployment Plan wizard appears (Figure 5-16).
-
Enter the name for the deployment plan.
-
Select the associated assembly from the Assembly drop-down menu.
-
Click OK. The Deployment Plan editor opens.
5.4.3 Editing a Deployment Plan
The Deployment Plan Editor displays a read-only view of the assembly. This view is useful as an overview and for selecting items so that their property values may be overridden.
5.4.3.1 Editing a New Deployment Plan
When you create a new deployment plan, the Deployment Plan editor opens automatically.
5.4.3.2 Editing an Existing Deployment Plan
Edit an existing deployment plan:
-
In the Deployment Plans navigator, right-click the plan and select Open.
Alternatively, in the Deployment Plans navigator you may double-click the plan icon.
5.4.3.3 Required Views
Deployment plan editing makes use of both the Structure Pane and the Property Inspector. You should ensure both views are visible.
-
Open the Structure Pane by selecting View > Structure.
-
Open the Property Inspector by selecting View > Property Inspector.
5.4.3.4 Selecting items in the Deployment Plan Editor
To override the properties of an appliance, input, output or other item, you must first select the item.
To select an item in the Deployment Plan editor, click on it.
5.4.3.5 Selecting items in the Structure Pane
When populated, the Structure Pane shows additional details of the plan.
Populate the Structure Pane:
-
In the Deployment Plans navigator, select the plan.
The Structure Pane populates with the assembly structure. To select an item in the populated Structure Pane, click on it.
Selecting any item in the Deployment Plan editor also populates the Structure Pane.
5.4.3.6 Overriding Property Values
The properties of the selected item are displayed in the Property Inspector.
To override a value:
-
In the property inspector, type a new value in the field.
A blue bullet is displayed next to overridden values.
5.4.3.7 Removing an Override Value
To remove an override:
-
In the Property Inspector, click the downward-pointing arrow (chevron) to the right of the property value.
-
From the pop-up menu, select Reset to...
The value shown in the Reset to... menu item is always the original value specified in the assembly metadata. The override is removed.
5.4.3.8 Synthetic Properties
You may override the scalability properties of an appliance. Doing so may change the number of potential appliance instances that can exist when the assembly is deployed. Each of these potential appliance instances may require its own network settings including hostname, IP address, MAC address, and netmask properties. The Property Inspector automatically displays the appropriate number of instance-specific network properties. When the scalability values are changed, the Property Inspector automatically adjusts the number of network properties to match the number of appliances instances that may potentially exist.
5.4.3.8.1 Appliance Properties
To display the network properties of an appliance:
-
In the Structure pane or Deployment Plan editor, click to select the appliance.
-
In the Property Inspector, click to open the Network category.
The default-gateway, dns-domains, and dns-servers property values are required unless all network interfaces of the appliance are configured to use DHCP. These values are shared by all instances of the appliance.
The hostname.0 property is required. If the appliance is scalable, the Property Inspector will display an appropriate number of properties (hostname.0, hostname.1, etc.) All values are required.
5.4.3.8.2 Network Interface Properties
To display the Deployment Plan properties of a network interface, click on the network interface in the Deployment Plan editor or expand the Network Interfaces folder in the Structure pane and click the network interface within the folder.
Setting the usedhcp property of the Interface to true asserts that these network properties will be automatically configured in the deployment target environment. When usedhcp is true, the Property Inspector displays previously-established values of the other network interface properties, but does not permit the values of these properties to be modified.
If usedhcp is false, the ip_address.0, mac_address.0, and netmask properties are required. If the appliance is scalable, the Property Inspector will display an appropriate number of address properties (ip_address.0, ip_address.1, ..., mac_address.0, mac_address.1, ...) and all values are required.
5.4.3.8.3 Vnet Properties
Vnets are not displayed in the Deployment Plan editor so cannot be selected there. To display the Deployment Plan properties of a Vnet, expand the Vnets folder in the Structure pane and select the Vnet.
The is_private property specifies that the network should be automatically configured as a high-performance network for internal use within the deployed Assembly. This value must be false if the deployment target environment does not provide the necessary platform support for high-performance private networks. Set this value to false when deploying directly to Oracle Virtual Machine version 3.0.
The network_name property specifies the name of the network defined in the deployment target environment. This property is required.
Some deployment target environments may not require that network names be unique. When network names are not unique, the optional network_id property can be used to uniquely specify the network defined in the deployment target environment. The value of this property is ignored when the is_private property is true.
5.4.3.9 Validating a Deployment Plan
To validate the deployment plan:
-
In the Deployment Plans navigator, right-click the plan and select Validate.
The validation results are displayed in a dialog box.
5.4.3.10 Saving a Deployment Plan
When the deployment plan has been modified, its name is displayed in italic font in both the Deployment Plan navigator and the tab of the Deployment Plan editor.
To save the deployment plan:
-
Select File > Save.
If the File > Save menu item is not enabled, the deployment plan may not be selected. In the Deployment Plan navigator, select the plan, then select File > Save.
You can create, edit and save multiple deployment plans for a single assembly. At deployment time, you select one plan for the deployment. In this way, a single assembly may serve as the basis of multiple deployments, each with their own specific network and other property settings.
5.4.4 Registering an Assembly Archive to a Target
Once you upload an assembly archive to Oracle Virtual Assembly Builder Deployer you can register the assembly archive to a particular target.
5.4.4.1 Registering Using Oracle Virtual Assembly Builder
Perform this in one of two ways:
-
In the Deployments navigator, under Available Assemblies, right-click on a specific assembly archive version and select Register.
-
Drag and drop a specific assembly archive version to the intended target. In the Deployments navigator, select the assembly archive under Available Assemblies, and drop it onto the target in Deployment Targets.
Both methods start the registration. The target node is updated with a new child representing the assembly archive version. The target node displays a throbber icon which will switch to the standard assembly archive icon once the registration is complete. You receive message feedback in the Message Log window as the registration progresses. If the registration fails, the node disappears and a pop-up menu appears explaining the failure.
To unregister, right-click on a registered node and select Unregister. The node will be removed once the unregistration is complete. Progress messages are printed in the Message Log and a dialog appears in the event of a failure.
5.4.4.2 Registering Using abctl
Use the registerAssemblyArchive command to unregister templates for an assembly. Example 5-15 shows the unregisterAssemblyArchive command:
Example 5-15 unregisterAssemblyArchive Command
$ ./abctl help –command registerAssemblyArchive
$ ./abctl registerAssemblyArchive -connectionName MyDeployerConnection -name TheAssembly -version 1
For more information see Appendix A, "Command Line Reference", which contains the details of the parameters that can be passed into the command.
5.4.5 Deploying an Assembly Instance
This section describes how to deploy an assembly instance, using Oracle Virtual Assembly Builder Studio, or abctl.
When an assembly instance is deployed, appliance instances for the assembly are created and started. Furthermore, applications within the appliance instances are also started. Deploying an assembly instance can be a long running operation that can take several minutes. The time taken to deploy an assembly instance will vary depending upon the number of VMs that need to be created and started.
5.4.5.1 Ability to Set Appliance 'target' Count to Zero (Zero-Count Appliances)
You can initially deploy an assembly with zero appliance instances. However, in subsequent scaling operations you could add appliance instances to those appliances that are part of the assembly configuration but were initially "deployed" with a zero instance count.
5.4.5.2 Deploying Using Oracle Virtual Assembly Builder Studio
Once an assembly archive is registered to a specific target, you can deploy that assembly archive one or more times.
-
Open the Deployments navigator by selecting View > Deployments.
In the Deployments navigator, under the Deployment Targets pane, you can expand the targets and see a list of assembly archives that you can deploy.
-
Right-click an assembly archive and select Deploy.
You can also initiate an assembly instance by dragging a deployment plan from the Deployment Plan navigator and dropping it on a registered assembly archive.
-
Enter the following information in the Deploy Assembly Archive window.
-
Deployment Plan: select a deployment plan. The dialog populates the drop-down list with deployment plans matching the name of the assembly being deployed. If no plans exist, you must create a plan before you can deploy.
-
Vnet Mappings: verify (and possibly correct) the Vnet mappings in the deployment plan. At the time the deployment plan is created Oracle Virtual Assembly Builder cannot determine where you intend to deploy the assembly so it cannot validate the name of the target Vnet.
You see one row for each Vnet defined in your assembly. The logical name of the Vnet (as defined in the assembly) is shown as the label and the corresponding drop-down contains the Vnets defined by the deployment target. The value from the deployment plan is included in the drop-down list, even though it may be invalid, for the purposes of displaying to you the value from the deployment plan. The value, or mapping, from the deployment plan has an asterisk (*) suffix.
If the current mapping is invalid, the value displays a red error border and the "Deploy" button becomes disabled. You cannot deploy an assembly if the deployment plan contains invalid mappings. Any changes made to the Vnet mapping are saved to the deployment plan before the assembly instance initiates.
-
-
Click Deploy to update the deployment plan with the new mappings and initiate the assembly instance.
Once you confirm the deployment options, the assembly instance is initiated. A new child node is created under the registered node to indicate the progress. The name of the new child node is the Deployment ID. A throbber icon is shown until the assembly instance reaches a final state.
When the network is initialized, you can expand an appliance to see the IP addresses of each virtual machine started for that appliance.
Success is indicated by a green icon. If the initiation of the assembly instance fails, a red icon indicates failure. Progress messages are shown in the Message Log window.
5.4.5.3 Deploying Using abctl
Create an assembly instance by using the createAssemblyInstance command, as shown in Example 5-16. The createAssemblyInstance command will return the assemblyInstanceId needed for the deployAssemblyInstance command.
Example 5-16 createAssemblyInstance Command
$ ./abctl help –command createAssemblyInstance
$ ./abctl createAssemblyInstance -deploymentPlan c:/zeroAppliancesSite_plan.xml -name SMALLOVA -version 1 -c cloudAdmin
Plan upload File Size: 700
Assembly Instance Id: gdc4_29x5_SMALLOVA_1
Assembly instance has been created.
Once you have created the assembly instance, you can deploy an assembly instance by using the deployAssemblyInstance command as shown in Example 5-17.
Example 5-17 deployAssemblyInstance Command (without Waiting for Completion)
$ ./abctl help –command deployAssemblyInstance
$ ./abctl deployAssemblyInstance -assemblyInstanceId gdc4_29x5_SMALLOVA_1 -c cloudAdminRequest ID: 1d1599a0-434b-426a-ab29-7c6230b5fa33Request to deploy assembly instance has been submitted to deployer.
The deployAssemblyInstance command is an asynchronous operation. It will initiate a deploy request and return a request ID. The status of the request can be queried using the describeRequests operation.If you want to wait until the completion of the operation, you may do so, optionally, by specifying additional parameters as follows:-waitForComplete -pollTime 30
Example 5-18 deployAssemblyInstance Command (Waiting for Completion)
$ ./abctl help –command deployAssemblyInstance
$ ./abctl deployAssemblyInstance -assemblyInstanceId gdc4_29x5_SMALLOVA_1 -c cloudAdmin -waitForComplete -pollTime 30Request ID: 1d1599a0-434b-426a-ab29-7c6230b5fa33Request to deploy assembly instance has been submitted to deployer.
You can list the current deployments with the describeAssemblyInstances command, as shown in Example 5-19:
Example 5-19 describeAssemblyInstances Command
$ ./abctl help –command describeAssemblyInstances
$ ./abctl describeAssemblyInstances -c cloudAdmin---------------------------------------------------------------------------------- Name     | Version | State      | Assembly Instance Id | Target  | Appliances---------------------------------------------------------------------------------- SMALLOVA | 3       | Undeployed | c1Lm-GyML_SMALLOVA_3 | LOCBOX1 | c1Lm-GyML_SMALLOVA_3:zeroAppliancesSite/myWls/Server_3Assembly Instances have been described.$
For more information see Appendix A, "Command Line Reference", which contains the details of the parameters that can be passed into the command.
5.4.6 Stopping an Assembly Instance
This section describes how to stop an assembly instance, using Oracle Virtual Assembly Builder Studio, or abctl.
When an assembly instance is stopped, the VMs and the applications that are running within the VMs are stopped. VMs that are in a stopped state retain their context. Stopped VMs can be restarted much more quickly than the original deployment because the VMs do not need to be created.
5.4.6.1 Stopping an Assembly Instance with Oracle Virtual Assembly Builder Studio
In the Deployment Targets pane of the Deployments navigator you can start, stop, deploy, or undeploy an assembly instance. To stop an assembly instance, select the assembly instance that needs to be stopped and click Stop.
5.4.6.2 Stopping an Assembly Instance with abctl
Use the stopAssemblyInstance command to stop an assembly instance. The assembly instance is referred to by its assemblyInstanceId. You can retrieve a list of assembly instances by using the describeAssemblyInstances command. Example 5-20 and Example 5-21 show the stopAssemblyInstance command:
Example 5-20 stopAssemblyInstance Command (without Waiting for Completion)
$ ./abctl help –command stopAssemblyInstance
$ ./abctl stopAssemblyInstance -assemblyInstanceId gdc4_29x5_SMALLOVA_1 -c cloudAdminRequest ID: 8486522b-8a5e-4348-bdf1-a7d55fccf848Request for stop has been submitted to deployer.
Example 5-21 stopAssemblyInstance Command (Waiting for Completion)
$ ./abctl help –command stopAssemblyInstance
$ ./abctl stopAssemblyInstance -assemblyInstanceId gdc4_29x5_SMALLOVA_1 -c cloudAdmin -waitForComplete -pollTime 30Request ID: 8486522b-8a5e-4348-bdf1-a7d55fccf848Request for stop has been submitted to deployer.
For more information see Appendix A, "Command Line Reference", which contains the details of the parameters that can be passed into the command.
5.4.7 Starting an Assembly Instance
This section describes how to start an assembly instance, using Oracle Virtual Assembly Builder Studio, or abctl.
5.4.7.1 Starting an Assembly Instance with Oracle Virtual Assembly Builder Studio
In the Deployment Targets pane of the Deployments navigator you can start, stop, deploy, or undeploy an assembly instance. To start an assembly instance, select the assembly instance and click Start.
5.4.7.2 Starting an Assembly Instance with abctl
The startAssemblyInstance command is used to start a deployment. The assembly instance is referred to by its assemblyInstanceId. You can retrieve the list of deployments by using the describeAssemblyInstances command. Example 5-22 and Example 5-23 show the startAssemblyInstance command:
Example 5-22 Start an Assembly Instance (without Waiting for Completion)
$ ./abctl help –command startAssemblyInstance
$ ./abctl startAssemblyInstance -assemblyInstanceId gdc4_29x5_SMALLOVA_1 -c cloudAdminRequest ID: 1936dff2-f8a7-4407-83f8-08521bb48fefRequest for start has been submitted to deployer.
Example 5-23 Start an Assembly Instance (Waiting for Completion)
$ ./abctl help –command startAssemblyInstance
$ ./abctl startAssemblyInstance -assemblyInstanceId gdc4_29x5_SMALLOVA_1 -c cloudAdmin -waitForComplete -pollTime 30Request ID: 1936dff2-f8a7-4407-83f8-08521bb48fefRequest for start has been submitted to deployer.
For more information see Appendix A, "Command Line Reference", which contains the details of the parameters that can be passed into the command.
5.4.8 Restarting an Assembly Instance
This section describes how to restart an assembly instance, using Oracle Virtual Assembly Builder Studio, or abctl.
An assembly instance that has been stopped can be restarted. Restarting an assembly instance starts up all the VMs that were stopped and also starts up the applications within the VMs. The assembly instance gets restored to the state it was in before it was stopped. This operation completes more quickly than a deployment operation.
5.4.8.1 Restarting an Assembly Instance with Oracle Virtual Assembly Builder Studio
In the Deployment Targets pane of the Deployments navigator you can start, stop, deploy, or undeploy an assembly instance. To restart an assembly instance, select the assembly instance and click Start.
5.4.8.2 Restarting an Assembly Instance with abctl
The restartAssemblyInstance command is used to restart an assembly instance. The assembly instance is referred to by its assemblyInstanceId. You can retrieve the list of assembly instances by using the describeAssemblyInstances command. Example 5-24 and Example 5-25 show the restartAssemblyInstance command:
Example 5-24 Restart an Assembly Instance (without Waiting for Completion)
$ ./abctl help –command restartAssemblyInstance
$ ./abctl restartAssemblyInstance -assemblyInstanceId gdc4_29x5_SMALLOVA_1 -c cloudAdminRequest ID: 126a97ef-89db-4b05-88d5-17b70e5cc3d2Request to restart assembly instance has been submitted to deployer.
Example 5-25 Restart an Assembly Instance (Waiting for Completion)
$ ./abctl help –command restartAssemblyInstance
$ ./abctl restartAssemblyInstance -assemblyInstanceId gdc4_29x5_SMALLOVA_1 -c cloudAdmin -waitForComplete -pollTime 30Request ID: 126a97ef-89db-4b05-88d5-17b70e5cc3d2Request to restart assembly instance has been submitted to deployer.
For more information see Appendix A, "Command Line Reference", which contains the details of the parameters that can be passed into the command.
5.4.9 Scale Appliance
This section describes how to scale the selected appliance instance after an initial deployment of an assembly, using Oracle Virtual Assembly Builder Studio, or abctl.
After you deploy an assembly, the target number of VM instances for each appliance is started. The initial target for each appliance instance is specified in the deployment plan. You can dynamically specify a new target after an assembly has been deployed. Oracle Virtual Assembly Builder dynamically starts or stops VM instances to reach the new target (thus scaling up or scaling down). A scale down operation will only stop the properly deployed instances.
5.4.9.1 Scale Appliance with Oracle Virtual Assembly Builder Studio
To scale the number of instances of an appliance:
-
Select an assembly instance in the Deployments navigator and expand the assembly structure in the Structure Pane.
-
Right-click on a scalable appliance and select Scale appliance.
In the Scale dialog, the minimum and maximum number of VM instances are displayed, as is the number of currently running VMs.
-
Set the target number of VM instances for the appliance from the Target drop-down list. Select a value between the between minimum and maximum.
-
Click OK.
5.4.9.2 Retrieve the scalingGroupId for Use in the Scale Command
Use the describeScalingGroups command to retrieve the scalingGroupId to pass in to the scale command. (Example 5-26):
Example 5-26 describeScalingGroup Command
$ ./abctl help -command describeScalingGroups
$ ./abctl describeScalingGroups
For more information see Appendix A, "Command Line Reference", which contains the details of the parameters that can be passed into the command.
5.4.9.3 Scale Appliance(s) in an Assembly Instance with abctl
Use the scale command to scale the appliance (Example 5-27 and Example 5-28):
Example 5-27 scale Command (without Waiting for Completion)
$ ./abctl help -command scale
$ ./abctl scale -scalingGroupId 1gWT-t0Np_SMALLOVA_1:zeroAppliancesSite/myWls/Server_3 -target 1 -c cloudAdminRequest ID: c1d2c742-d2fe-4698-bf61-99d619be4fcaRequest for scaling operation has been submitted to deployer.
Example 5-28 scale Command (Waiting for Completion)
$ ./abctl help -command scale
$ ./abctl scale -scalingGroupId 1gWT-t0Np_SMALLOVA_1:zeroAppliancesSite/myWls/Server_3 -target 1 -c cloudAdmin -waitForComplete -pollTime 30Request ID: c1d2c742-d2fe-4698-bf61-99d619be4fcaRequest for scaling operation has been submitted to deployer.
For more information see Appendix A, "Command Line Reference", which contains the details of the parameters that can be passed into the command.
5.4.10 Undeploying an Assembly Instance
This section describes how to undeploy an assembly instance, using Oracle Virtual Assembly Builder Studio, or abctl.
Undeploying an assembly instance stops all the running VMs. It also cleans up any failed VMs that may exist.
5.4.10.1 Undeploy a Deployment with Oracle Virtual Assembly Builder Studio
In the Deployments navigator, you can undeploy an assembly instance by right-clicking on a deployed assembly instance and selecting Undeploy. If successful, the node is removed. If the operation fails, a red icon appears. Progress messages are shown in the Message Log window.
5.4.10.2 Undeploy an Assembly Instance with abctl
You can use the undeployAssemblyInstance command to undeploy an assembly instance. The assembly instance is referred to by its assemblyInstanceId. You can retrieve a list of assembly instances by using the describeAssemblyInstances command. Example 5-29 shows the undeployAssemblyInstance command:
Example 5-29 undeployAssemblyInstance Command (without Waiting for Completion)
$ ./abctl help –command undeployAssemblyInstance
$ ./abctl undeployAssemblyInstance -assemblyInstanceId gdc4_29x5_SMALLOVA_1 -c cloudAdminRequest ID: 6b0f1b14-466e-4b23-bcc3-8b8506fd40acRequest to undeploy assembly instance has been submitted to deployer.
Example 5-30 undeployAssemblyInstance Command (Waiting for Completion)
$ ./abctl help –command undeployAssemblyInstance
$ ./abctl undeployAssemblyInstance -assemblyInstanceId gdc4_29x5_SMALLOVA_1 -c cloudAdmin -waitForComplete -pollTime 30Request ID: 6b0f1b14-466e-4b23-bcc3-8b8506fd40acRequest to undeploy assembly instance has been submitted to deployer.
For more information see Appendix A, "Command Line Reference", which contains the details of the parameters that can be passed into the command.
5.4.11 Unregistering an Assembly Archive from a Target
This section describes how to unregister an assembly archive from Oracle Virtual Assembly Builder Deployer using abctl. This operation unregisters the assembly archive, but does not delete the uploaded archive.
5.4.11.1 Unregistering Assembly Archives with Oracle Virtual Assembly Builder Studio
Unregister an assembly archive version (from a deployment target) by right-clicking on a registered version and selecting Unregister.
Confirm unregistering the assembly when prompted.
5.4.11.2 Unregistering Assembly Archives with abctl
Use the unregisterAssemblyArchive command to unregister templates for an assembly. Example 5-31 and Example 5-32 show the unregisterAssemblyArchive command:
Example 5-31 unregisterAssemblyArchive Command (without Waiting for Completion)
$ ./abctl help –command unregisterAssemblyArchive
$ ./abctl unregisterAssemblyArchive -name SMALLOVA -version 1 -target LOCBOX1 -c cloudAdminRequest ID: f9f9d0b7-e334-4020-a038-2b728e9a0a37Request to unregister assembly has been submitted to deployer.
Example 5-32 unregisterAssemblyArchive Command (Waiting for Completion)
$ ./abctl help –command unregisterAssemblyArchive
$ ./abctl unregisterAssemblyArchive -name SMALLOVA -version 1 -target LOCBOX1 -c cloudAdmin -waitForComplete -pollTime 30Request ID: f9f9d0b7-e334-4020-a038-2b728e9a0a37Request to unregister assembly has been submitted to deployer.
For more information see Appendix A, "Command Line Reference", which contains the details of the parameters that can be passed into the command.
5.4.11.3 redeployAssemblyInstance
Use the redeployAssemblyInstance command to redeploy an assembly instance. Example 5-33 and Example 5-33 show the redeployAssemblyInstance command:
Example 5-33 redeployAssemblyInstance Command (without Waiting for Completion)
$ ./abctl help –command redeployAssemblyInstance
$ ./abctl redeployAssemblyInstance -assemblyInstanceId gdc4_29x5_SMALLOVA_1 -c cloudAdminRequest ID: eff86a4c-d064-4794-b1ae-0624a972ab06Request to redeploy assembly instance has been submitted to deployer.
Example 5-34 redeployAssemblyInstance Command (Waiting for Completion)
$ ./abctl help –command redeployAssemblyInstance
$ ./abctl redeployAssemblyInstance -assemblyInstanceId gdc4_29x5_SMALLOVA_1 -c cloudAdmin -waitForComplete -pollTime 30Request ID: eff86a4c-d064-4794-b1ae-0624a972ab06Request to redeploy assembly instance has been submitted to deployer.
For more information see Appendix A, "Command Line Reference", which contains the details of the parameters that can be passed into the command.
5.4.11.4 deleteAssemblyInstance
Use the deleteAssemblyInstance command to delete an assembly instance once the assembly instance is in an undeployed state. Example 5-35 shows the deleteAssemblyInstance command:
Example 5-35 deleteAssemblyInstance Command
$ ./abctl help –command deleteAssemblyInstance
$ ./abctl deleteAssemblyInstance -assemblyInstanceId gdc4_29x5_SMALLOVA_1 -c cloudAdminAssembly instance gdc4_29x5_SMALLOVA_1 has been deleted.
For more information see Appendix A, "Command Line Reference", which contains the details of the parameters that can be passed into the command.
5.4.12 Uploading an Assembly Archive to the Deployer Repository
You can use the uploadAssemblyArchive command to upload an assembly archive to Oracle Virtual Assembly Builder Deployer.
Example 5-36 uploadAssemblyArchive Command
$ ./abctl help –command uploadAssemblyArchive
$ ./abctl uploadAssemblyArchive -fileName Path -name String [-description String] -connectionName String
For more information see Appendix A, "Command Line Reference", which contains the details of the parameters that can be passed into the command.
5.4.13 Deleting an Assembly Archive from the Deployer Repository
The OVAB Admin can use the deleteAssemblyArchive command in abctl to delete the assembly archive from the Deployer repository. This operation may only be performed if there are no registrations for the assembly archive.
Example 5-37 deleteAssemblyArchive Command (without Waiting for Completion)
$ ./abctl help –command deleteAssemblyArchive
$ ./abctl deleteAssemblyArchive -name TheAssembly -version 1 -connectionName myDeployerConnection
Example 5-38 deleteAssemblyArchive Command (Waiting for Completion)
$ ./abctl help –command deleteAssemblyArchive
$ ./abctl deleteAssemblyArchive -name TheAssembly -version 1 -connectionName myDeployerConnection -waitForComplete -pollTime 30
For more information see Appendix A, "Command Line Reference", which contains the details of the parameters that can be passed into the command.
5.4.14 Export Operations
The following sections describes the available export scenarios:
-
Export and import (of the artifacts created by the export) from the Oracle Virtual Assembly Builder Studio Catalog to another Oracle Virtual Assembly Builder Studio Catalog. See the following sections:
-
Assembly Archive copy. Publishing the assembly archive outside of Oracle Virtual Assembly Builder for someone else to consume. For example, you create an assembly archive and publish it within an enterprise for others to download and deploy.
-
Importing an assembly archive from the Deployer repository into the Oracle Virtual Assembly Builder Studio catalog (import command, or Import from Studio).
5.4.14.1 Export an Appliance or Assembly from a Catalog
This section describes how to export an appliance or assembly from a catalog, using Oracle Virtual Assembly Builder Studio, or abctl.
To copy an appliance or assembly from one catalog to another, you must use Oracle Virtual Assembly Builder's export and import functionality.
Note:
Manual copying of disk files from one catalog to another is not supported and will not work.
5.4.14.1.1 Exporting an Appliance or Assembly from a Catalog Using Oracle Virtual Assembly Builder Studio
Access the Export dialog box (Figure 5-17) to export an appliance or assembly from a catalog by selecting File > Export, or by right-clicking the assembly in the Assemblies navigator and select Export.
Enter the following information:
-
Name: this field pre-populates with the name of the appliance or assembly that you selected for export.
-
Directory: browse to and select or enter the name of the directory of the location of the export. This directory must be empty and will be created if it does not exist.
-
Metadata Only: check this checkbox to export only metadata (and not the associated templates or file sets).
Click OK.
Figure 5-17 Exporting an Appliance or Assembly from a Catalog
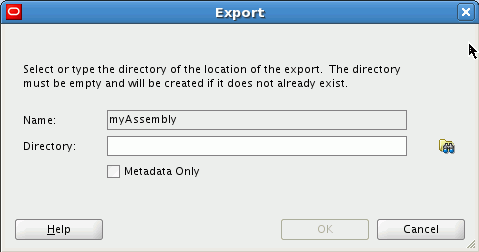
Description of "Figure 5-17 Exporting an Appliance or Assembly from a Catalog"
5.4.14.1.2 Exporting an Appliance or Assembly from a Catalog Using abctl
Use the export command to export an assembly, or assembly metadata. Example 5-39 shows the export command for exporting metadata, and associated templates and file sets. Example 5-40 shows exporting metadata only.
$ ./abctl help –command export
$ ./abctl export -name myOhs -toDir /tmp/myOhs.export/
(some progress messages)
Successfully exported to /tmp/myOhs.export/.
Example 5-40 export Command (Metadata Only)
$ ./abctl export -name myOhs -to /tmp/myOhs.export/ -metadataOnly
(some progress messages)
Successfully exported to /tmp/myOhs.export/.
For more information see Appendix A, "Command Line Reference", which contains the details of the parameters that can be passed into the command along with a sample output of the command.
5.4.14.2 Import an Appliance or Assembly to a Catalog
This section describes how to import an appliance, assembly, or assembly archive using Oracle Virtual Assembly Builder Studio, or abctl.
To copy an appliance or assembly from one catalog to another, you must use Oracle Virtual Assembly Builder's export and import functionality.
5.4.14.2.1 Importing Using Oracle Virtual Assembly Builder Studio
Access the Import dialog box (Figure 5-18) to import an appliance or assembly to a Catalog by selecting File > Import. Enter the following information:
-
Path: browse to and select or enter the name of the directory of the assembly or appliance which was exported. The path and associated assembly appear in the window.
-
Overwrite: check this checkbox to specify that any existing metadata and associated file sets and templates are overridden. This is to correct a case of name collision. Overriding an existing appliance can only be done if the existing appliance can be removed.
Click OK.
Figure 5-18 Importing an Assembly Archive
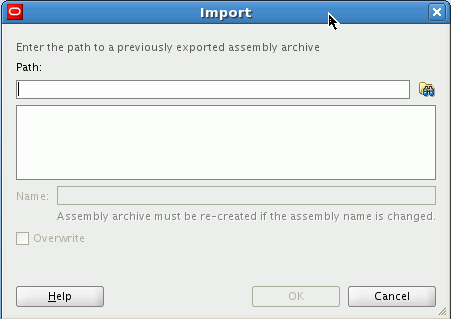
Description of "Figure 5-18 Importing an Assembly Archive"
5.4.14.2.2 Importing an Appliance or Assembly Using abctl
Use the import command to import (into the target catalog) the content of one or more files containing a sparse copy of exported metadata and associated file set and templates.
A new entry is created in the target catalog. If there is a name collision (for example, the import command attempts to create 'mySite', and the catalog already has 'mySite'), the operation will fail.
Example 5-41 shows the import command from a directory where you previously ran the export command:
Example 5-41 import Command from a Directory
$ ./abctl help –command import
$ ./abctl import -from /tmp/myOhs.export/
Successfully imported myOhs to /example/ab_home/catalog.
Example 5-42 shows the import command from an assembly archive:
Example 5-42 import Command from an Assembly Archive
$ ./abctl help –command import
$ ./abctl import -from /tmp/myOhs.ova
Successfully imported myOhs to /example/ab_home/catalog.
For more information see Appendix A, "Command Line Reference", which contains the details of the parameters that can be passed into the command.
5.4.14.2.3 Importing an External VM Template
You can import an external VM Template into a specified catalog, creating an external appliance that can later be added to any assembly for deployment.
This operation can only be performed using abctl.
Example 5-43 shows the import external VM template command:
Example 5-43 Import an External VM Template
$ ./abctl importExternalTemplate -fromDir /dir/containing/image/file -name myExternalAppliance
Executing importExternalTemplate command.
Set the root and vnc passwords that will be configured in the imported template.
Enter root password:
Retype root password:
Enter vnc password:
Retype vnc password:
  (some progress messages)
Successfully imported template.
5.4.14.3 Exporting (Copying) an Assembly Archive
Assembly archives in the Oracle Virtual Assembly Builder Studio catalog are stored in the $AB_INSTANCE/ova directory. You can copy or use FTP to transfer the assembly archives from this directory without the need for any export utility. Typically you will copy the assembly archives to the Deployments navigator managed by Deployer.
5.4.14.4 Importing an Assembly Archive to a Catalog
Importing an assembly archive allows you to import an assembly archive template file from a disk location into the local catalog to allow editing of the assembly appliances. Importing creates a metadata structure, with file set and template artifacts that are identical to the original catalog.
To import an assembly archive use the downloadAssemblyArchive command in abctl:
Example 5-44 downloadAssemblyArchive Command
$ ./abctl help –command downloadAssemblyArchive
$ ./abctl downloadAssemblyArchive -name MyAssembly -version 1 -fileName RenamedAssembly.ova
For more information see Appendix A, "Command Line Reference", which contains the details of the parameters that can be passed into the command.
5.4.15 Interacting with EM Software Library
Use these operations if you plan to use Enterprise Manager Grid Control Cloud Management Pack to perform deployment operations on assembly archives. In this scenario, you use Oracle Virtual Assembly Builder to create your assembly archive and upload it to the Enterprise Manager Software Library. You use Enterprise Manager Grid Control Cloud Management Pack to deploy the assembly instance.
5.4.15.1 Configuring a Connection to Enterprise Manager Software Library
You can configure a connection to the Enterprise Manager Software Library using the createEMConnection command in abctl. The connection to Enterprise Manager Software Library is persisted in a connections file.
You must specify the fully qualified hostname of the remote Enterprise Manager machine, for example myhost.example.com instead of myhost.
Example 5-45 createEMConnection
$ ./abctl createEmConnection -connectionURL emMachine:7791 -connectionUser admin -namedHostCredential hostCredential -remoteUser mySshUser -remoteWorkingDir /scratch/myovas [-sshPort 23] [-privateKeyFile ~/.ssh/id_rsa]
You are prompted for a connectionPassword.
For more information see Appendix A, "Command Line Reference", which contains the details of the parameters that can be passed into the command.
5.4.15.2 Uploading an Assembly
You can upload an assembly archive from Oracle Virtual Assembly Builder Studio Catalog to Enterprise Manager Software Library using the uploadEMAssemblyArchive command in abctl. The assembly archive must have been created with the assembly.
Example 5-46 Upload an Assembly to Enterprise Manager Software Library
$ ./abctl uploadEMAssemblyArchive -name archiveName -description "my assembly archive"
 Assembly archive upload started
  Assembly archive upload at 10%
  Assembly archive upload at 20%
  Assembly archive upload at 30%
  Assembly archive upload at 40%
  Assembly archive upload at 50%
  Assembly archive upload at 60%
  Assembly archive upload at 70%
  Assembly archive upload at 80%
  Assembly archive upload at 90%
  Assembly archive upload at 100%
  Assembly archive upload complete
  Assembly archive version 0.1 uploaded
  Successfully uploaded the assembly archive mySite to EM Software Library.  Check the status of the assembly archive with describeEMAssemblyArchives before using.
For more information see Appendix A, "Command Line Reference", which contains the details of the parameters that can be passed into the command.
5.4.15.3 Describe Assembly Archives in Enterprise Manager Software Library
You can list the assembly archives and their versions present in the Enterprise Manager Software Library using the describeEMAssemblyArchives command in abctl:
Example 5-47 Describing the Assembly Archives in EM Software Library
$ ./abctl describeEMAssemblyArchives [-name nameOfAssemblyArchive]

------------------------------------------------
Name   | Version | Description | Status
------------------------------------------------
mySite | 0.3     | mysite3     | READY
       | 0.2     | mysite3     | READY
       | 0.1     | mysite3     | READY
------------------------------------------------
For more information see Appendix A, "Command Line Reference", which contains the details of the parameters that can be passed into the command.
5.4.15.4 Deleting an Assembly Archive from Enterprise Manager Software Library
You can delete the specified version of an assembly archive from Enterprise Manager Software Library using the deleteEMAssemblyArchive command in abctl.
Note:
Do not attempt to delete an assembly archive until its status is READY from the describeEMAssemblyArchives command. See Example 5-47, "Describing the Assembly Archives in EM Software Library" for example output.
Example 5-48 Delete an Assembly Archive from Enterprise Manager Software Library
abctl deleteEMAssemblyArchive -name archiveName -version 1.2
For more information see Appendix A, "Command Line Reference", which contains the details of the parameters that can be passed into the command.
5.4.15.5 Downloading an Assembly to Oracle Virtual Assembly Builder Catalog
You can download an Assembly from the Enterprise Manager Software Library to the Oracle Virtual Assembly Builder Studio Catalog using the download command in abctl.
Note:
Do not attempt to download an assembly archive until its status is READY from the describeEMAssemblyArchives command. See Example 5-47, "Describing the Assembly Archives in EM Software Library" for example output.
The assembly archive is reverse engineered to have the Oracle Virtual Assembly Builder metadata, file sets and templates created and persisted in the Oracle Virtual Assembly Builder Studio catalog.
Example 5-49 Download an Assembly
abctl downloadEMAssemblyArchive -name archiveName -version 1.0 -force -downloadAs newName
For more information see Appendix A, "Command Line Reference", which contains the details of the parameters that can be passed into the command.
