27 Importing Data from Archives
This chapter provides information on retrieving Oracle WebCenter Content Server files and information from an exported Content Server archive by using the Import function of the Archiver application. Importing is typically used to obtain a copy of content from another Content Server instance or to restore data that has been in storage.
This chapter covers the following topics:
27.1 Understanding Importing Files
Using the Import function of Archiver, you can move archives into the Content Server repository according to specified rules and at specified times. The data in the files can be mapped to fields in the receiving Content Server instance, but care should be taken that the correct rules are applied during import.
The Content Server instance to which you are importing must have the same metadata fields, security groups, and accounts as the instance that the archive was exported from. Errors can result if there are mismatches.
Caution:
Do not use Archiver as your primary method of disaster recovery; instead use standard backup systems for the database and file system.
Note:
Imported revisions will not enter a workflow upon import, even if they meet the criteria for an active workflow.
Before beginning the import process, consider the following points:
-
Determine the method to be used, either manual or automatic.
-
Determine the rules to be used for updating.
-
Determine the mapping and import options.
-
Test your process by importing selected revisions.
This section covers these topics:
27.1.1 Import Uses
Typical uses for the Import function include:
-
Placing data archived from an intranet on an extranet for vendor or customer viewing.
-
Changing metadata for a large number of content items. For example, if an employee leaves the organization, you could export all of their content items and then import them with another user specified as the Author.
-
Restoring content that was inadvertently deleted or configuration information that was inadvertently changed.
-
Copying files, content types, and user attributes from a development Content Server archive to a production instance.
27.1.2 Import Methods
You can import archives in the following ways:
-
Manual: A one-time import initiated from Archiver by an administrator.
-
Automatic (Replication): Import from a local archive is initiated automatically, about once per minute.
For more information, see Section 27.3 and Chapter 29.
27.2 About Import Rules
An import rule defines how revisions are added, replaced, or deleted during import.
-
During import, Archiver compares each revision being imported with the existing revisions in the importing Content Server instance. The import rule specifies which action to take (add, replace, delete, or ignore), depending on comparison of the following information:
-
Content ID
-
Original Content Server
-
Revision number
-
Release date
-
-
Only one import rule can be selected for each import of an archive.
This section covers these topics:
27.2.1 Update Import Rule
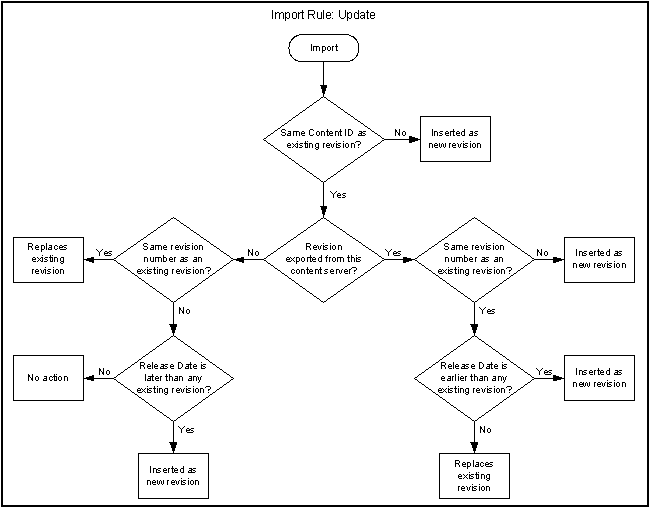
Use the Update import rule to replace existing revisions and insert new revisions.
Caution:
The Update import rule will replace existing revisions without saving the existing files. Be extremely careful when importing so you do not accidentally replace content you meant to keep.
-
If an imported revision has a different Content ID (dDocName) than any existing revision, the imported revision is inserted as a new revision.
-
If an imported revision has the same Content ID (dDocName) as an existing revision, the imported revision is inserted, ignored, or replaces the latest existing revision.
27.2.2 Insert Revision Import Rule
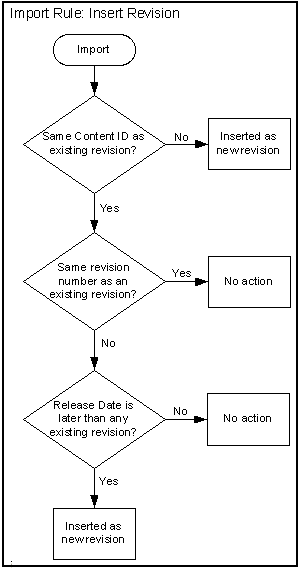
The Insert Revision import rule imports only revisions that have both the most recent revision number and the most recent release date.
-
If an imported revision has a different Content ID (dDocName) than any existing revision, the imported revision is inserted as a new revision.
-
If an imported revision has the same Content ID (dDocName) as an existing revision, but has a different Revision ID (dRevisionID) than any existing revision and a later release date (dInDate) than that of the latest existing revision, the imported revision is inserted as a new revision with a new revision label.
27.2.3 Insert Create Import Rule
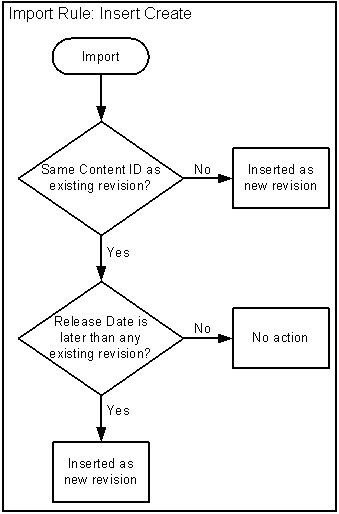
The Insert Create import rule imports only revisions that have the most recent release date, regardless of the revision number.
-
If an imported revision has a different Content ID (dDocName) than any existing revision, the imported revision is inserted as a new revision.
-
If an imported revision has the same Content ID (dDocName) as an existing revision, and the release date (dInDate) of the imported revision is later than that of the latest existing revision, the imported revision is inserted as a new revision with a new revision label.
Note:
When an Automatic Import occurs instead of a Manual Import, the Import rule is either update or deleteRev. The deleteRev option is considered in case of an auto-export delete. In all the other cases, the Import rule becomes update. If the import rule is set as Insert Create and Automatic Import is used, the rule is not considered.
27.2.4 Delete Revision Import Rule
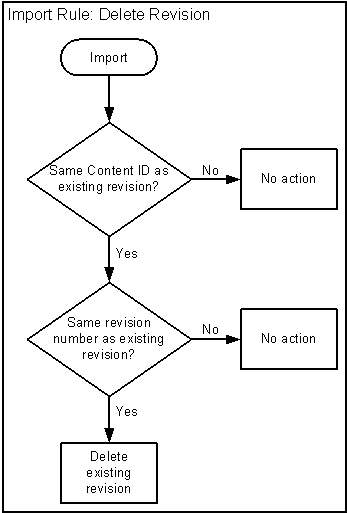
Use the Delete Revision import rule to delete individual revisions.
-
If an imported revision has the same Content ID (dDocName) and Revision ID (dRevisionID) as an existing revision, the existing revision is deleted.
27.2.5 Delete All Revisions Import Rule
Use the Delete All Revisions import rule to delete all revisions of a content item.
-
If an imported revision has the same Content ID (dDocName) as any existing revision, all existing revisions with that Content ID are deleted.
Figure 27-5 Import Rule: Delete All Revisions
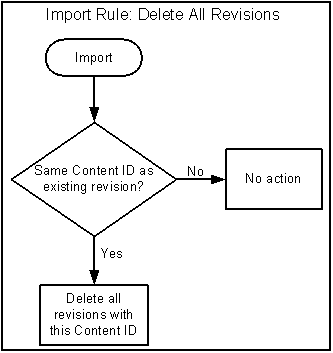
Description of "Figure 27-5 Import Rule: Delete All Revisions"
27.3 Importing Data
This section provides information about the import process and tasks.
Tip:
To determine which archive contains the data you want to retrieve, you can prepare an Archive History report using the Web Layout Editor.
You can also examine the files generated by the archive at the file system level, but preparing a report is more efficient if you frequently need to find archived data.
Important:
If you are using Sybase and you want to import an archive, you must perform the following tasks:
-
Make sure you are logged in to the Content Server instance as an administrator.
-
Choose Administration, then Admin Applets, then Repository Manager.
-
Select the Indexer tab.
-
In the Automatic Update Cycle section, click Configure.
-
Make sure Indexer Auto Updates is deselected.
-
Close Repository Manager.
-
Use Archiver to import the archive.
-
Open Repository Manager and select Indexer Auto Updates again.
This section covers these topics:
27.3.1 Importing Archived Data Manually
To manually import archived data:
-
Open the archive collection. See Section 25.3.1.
-
In the Current Archives list, select the archive from which to retrieve data.
-
Review the batch files in the archive. If necessary, remove revisions from the batch files. See Section 25.4.1.
-
If you want to change metadata fields or values during the import, set up the field and value mappings. See Section 27.3.2 and Section 27.3.3.
-
Set the general import options. See Section 27.3.4.
-
Test the import mappings and rules on a few individual revisions. See Section 27.3.5.
-
Initiate the import. See Section 27.3.6.
27.3.2 Setting Field Maps
Field maps specify how metadata values are copied from one metadata field to another during import. If you do not want to copy metadata values, do not specify any field maps.
To set up field maps:
-
Open the archive collection. See Section 25.3.1.
-
Select the archive in the Current Archives list.
-
Click the Import Maps main window.
-
Click Edit in the Field Maps section.
-
In the Edit Field/Value Maps window, click Browse For Fields.
-
In the Browse for Fields/Values window, select a source for the list of available metadata fields:
-
To retrieve the metadata fields from the local Content Server instance, select Local System.
-
To retrieve the metadata fields from a batch file, select Batch and then select a batch file from the list.
-
-
Click OK.
The Export Field list is populated with the metadata fields that are associated with the Content Server instance or the selected batch file.
-
In the Export Field list, select the metadata field from which you want to copy metadata.
The selected metadata field is displayed in the Export Field. (You can also edit this field directly; make sure to use the internal field name, such as
dDocAuthororxComments.) -
In the Target Field list, select the metadata field you want the Export metadata to be copied to.
-
The mapping expression is added to the Field Maps box.
-
To add to the mapping expression, repeat steps 8 through 10.
-
To update an existing mapping expression:
-
Select the line to be changed in the Field Maps box.
-
Edit the Export Field and Target Field as necessary.
-
Click Update.
The specified mapping expression replaces the selected line.
-
-
To delete a line from the mapping expression:
-
Select the line to be deleted in the Field Maps box.
-
Click Delete.
The selected line is deleted.
-
-
Click OK.
During import, the values from the Export field replace any existing values in the Target field.
-
To test the results of your field maps, import a few individual revisions from an archive. See Section 27.3.5.
27.3.3 Setting Value Maps
Value maps specify how specific metadata values are to be changed during import. If you do not want to change metadata values, do not specify any value maps.
To set up value maps:
-
Open the archive collection. See Section 25.3.1.
-
Select the archive in the Current Archives list.
-
Click the Import Maps main window.
-
Click Edit in the Value Maps section.
-
In the Edit Field/Value Maps window, to change all metadata values for a particular field, select All. Continue with step 11.
-
To change a specific metadata value, click Browse For Values.
-
-
In the Browse for Fields/Values window, select a batch file from the From Batch File list.
-
Select a metadata field from the From Field list.
-
Click OK.
The Input Value list is populated with the values that are associated with the selected metadata field in the selected batch file.
-
In the Input Value list, select the metadata value to be changed.
-
In the Field list, select the metadata field to be changed.
-
In the Output Value field, enter the new metadata value.
-
You can use Idoc Script in the output value. For example, to set the expiration date one week in the future for all imported revisions, you could use
<dateCurrent(7)$>. For more information, see Oracle Fusion Middleware Developing with Oracle WebCenter Content. -
To delete all values from the input metadata field, leave the output value blank.
-
-
The mapping expression is added to the Value Maps box.
-
To add to the mapping expression, repeat steps 5 through 11.
-
To update an existing mapping expression:
-
Select the line to be changed in the Value Maps box.
-
Edit the Input Value, Field, and Target Value as necessary.
-
Click Update.
The specified mapping expression replaces the selected line.
-
-
To delete a line from the mapping expression:
-
Select the line to be deleted in the Value Maps box.
-
Click Delete.
The selected line is deleted.
-
-
Click OK.
During import, the specified Input Values in the specified metadata Fields will be replaced with the Target Values.
-
To test the results of your value maps, import a few individual revisions from an archive. See Section 27.3.5.
27.3.4 Setting Import Options
To set general import options:
-
Open the archive collection. See Section 25.3.1.
-
Select the archive in the Current Archives list.
-
In the General tab of the Archiver window, click Edit in the Import Options section.
-
In the Edit Import Options (Select Rules) window, select an option in the Override Import Rules list to specify how existing revisions are added, replaced, or deleted during import. For detailed descriptions, see Section 27.2.
Caution:
The Update import rule will replace existing revisions without saving the existing files. Be extremely careful when importing so that you do not accidentally replace content you meant to keep.
-
Specify whether option list values are validated during import:
-
To import only revisions with valid option list values (validated option lists only), select Import only revisions with valid option list values.
-
To skip option list validation, deselect Import only revisions with valid option list values.
Tip:
The Import only revisions with valid option list values check box applies to all validated option lists. If you want to validate some option list fields but not all of them, you can change the Option List Type in the Configuration Manager. Use Select List Validated for option lists you want to validate; use Select List Not Validated for option lists you do not want to validate.
-
-
Specify whether to recalculate times in metadata date fields to reflect the time zone of the target Content Server instance:
-
To recalculate times, select Translate the dates to the current system time zone.
For example, if the time zone of the source (export) Content Server instance is Central Standard Time and the time zone of the target (import) Content Server instance is Eastern Standard Time, the release times, create times, expiration times, and any custom times will be changed to one hour later.
-
To leave times unchanged, deselect Translate the dates to the current system time zone.
-
-
Click OK.
-
To test the results of your import options, import a few individual revisions from an archive. See Section 27.3.5.
27.3.5 Importing an Individual Revision
To import a specific revision:
Tip:
Before importing an entire batch file, use this procedure to import a few individual revisions to test the results of your import maps and rules.
-
Open the archive collection. See Section 25.3.1.
-
Select the archive in the Current Archives list.
-
In the General tab of the Archiver window, click View Batch Files.
-
In the Removing Revisions from a Batch File window, select the batch file that contains the file you want to import.
-
Click Edit.
-
In the View Exported Content Items window, use the Filter feature and the navigation buttons to display the revision to be imported.
-
Select the revision.
-
Click Import.
If the revision was imported successfully, a confirmation message is displayed.
27.3.6 Initiating the Import
To initiate import of content and configuration information:
-
Open Archiver for the Content Server instance to which you want to import information.
-
Open the archive collection from which you want to import information. (This collection must be accessible through the file system.) See Section 25.3.1.
-
Select the archive in the Current Archives list.
-
From the Actions menu, choose Import.
-
In the Import Archiver window, specify the information to be imported:
-
To import content, select Import Batched Revisions.
-
To import content and tables, select Import Tables.
Note:
The User Configuration and Content Configuration options are available only if the selected archive includes this information (
users.hdaordoctypes.hdafile).
-
-
Click OK.
The import process is initiated, and the status bar at the bottom of the Archiver page displays progress messages.
