35 Re-configuring Gadget and Dashboard Settings
This chapter contains the following sections:
-
Section 35.2, "Reconfiguring and Deploying the Login Bar Widget"
-
Section 35.3, "Authorizing a Domain for Gadgets and the Dashboard"
-
Section 35.5, "Setting the Language of Deployed Gadgets and the Dashboard"
35.1 Configuring Dashboard Defaults
The dashboard is a gadget container. The dashboard can be configured to display selected gadgets in a preferred layout and/or color theme. The configurations you apply to the dashboard are considered to be defaults. Site visitors who access a deployed dashboard are given their own instance of the dashboard, which they can personalize by modifying its appearance.
Note:
When a gadget is registered to a site gadget catalog or shared from the global catalog to a site gadget catalog, its thumbnail is placed on the dashboard, on the gadget selection panel. If there are no gadgets registered to the site gadget catalog, you dashboard will be empty. For instructions on registering gadgets to a site gadget catalog, see the Oracle Fusion Middleware WebCenter Sites Administrator's Guide.
-
Log in to WebCenter Sites with designer credentials.
-
Access the desired site on which the Gadgets User interface is enabled, and select the Gadgets icon.
-
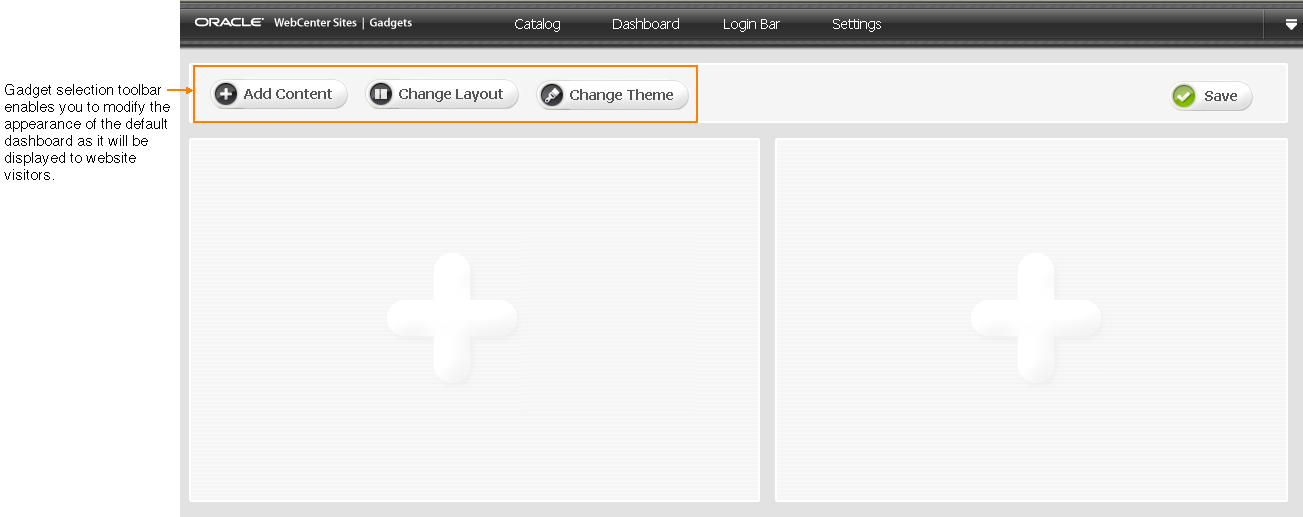
In the menu bar, select Dashboard, and then select Preview.
The preview of the dashboard opens (as shown in Figure 35-1).
The following configuration options are available to you:
35.1.1 Adding or Removing Default Dashboard Gadgets
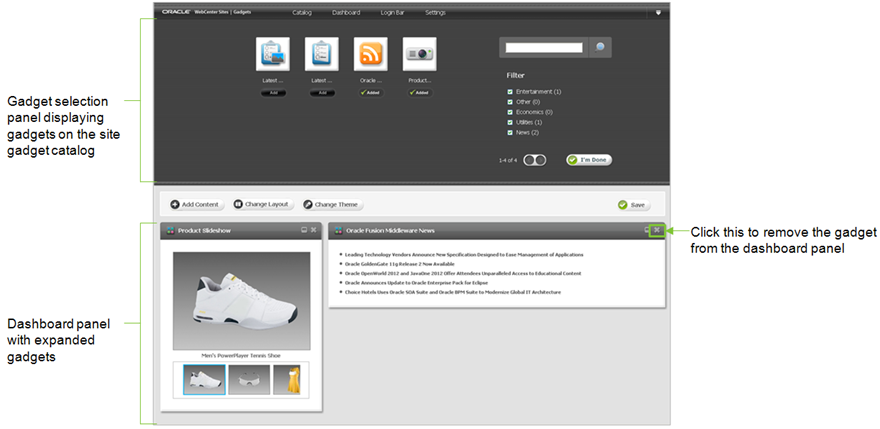
You can display gadgets at full size by adding them to the dashboard panel, from the gadget selection panel (shown in Figure 35-2). If you remove a gadget from the dashboard panel, its thumbnail remains on the gadget selection panel. When a dashboard is deployed, its set of gadgets is fixed for site visitors until you modify the set. Visitors can display the gadgets at full size or as thumbnails by adding them to or removing them from the dashboard panel.
Figure 35-2 Dashboard's Gadget Selection Panel
Description of "Figure 35-2 Dashboard's Gadget Selection Panel"
To add or remove default dashboard gadgets
-
Access the dashboard by accessing the Gadgets User interface, and selecting Dashboard, and then Preview (detailed steps in Section 35.1, "Configuring Dashboard Defaults").
-
Add gadgets to the dashboard panel:
-
Click the dashboard's Add Content button.
-
In the gadget selection panel, navigate to the gadget you wish to add to the dashboard panel:
-
(Optional) If you want to preview how the gadget's content will be displayed to website visitors before you add it, click the gadget's thumbnail image.
-
Click Add.
The gadget is displayed on the dashboard panel.
-
-
Click I'm Done.
The gadget selection panel closes.
-
(Optional) To move the gadget to another position on the dashboard panel, click its title bar and drag the gadget to the desired slot.
-
Click Save.
The configurations are picked up by the dashboard tag.
-
-
Remove a gadget from the dashboard panel:
-
In the dashboard panel, navigate to the gadget you wish to remove as a default, and click the X (located in the gadget's title bar) to remove the gadget.
The gadget is removed from the dashboard panel, but it is still accessible from the gadget selection panel, via its thumbnail.
-
Click Save to propagate your configurations to the dashboard widget tag.
-
35.1.2 Modifying the Default Layout of the Dashboard
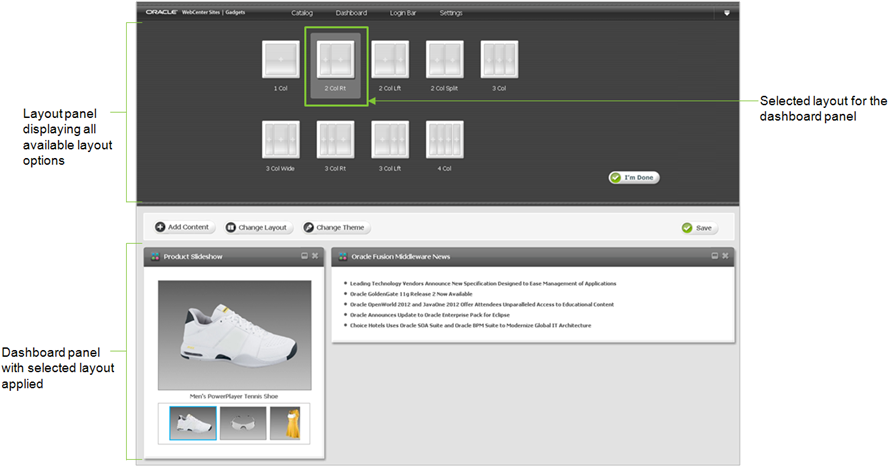
The dashboard's layout panel (shown in Figure 35-3) allows you to select the desired layout in which to arrange the gadgets on the dashboard panel.
To modify the default layout of the dashboard
-
Access the dashboard by accessing the Gadgets User interface, and selecting Dashboard, and then Preview (detailed steps in Section 35.1, "Configuring Dashboard Defaults").
-
Modify the default layout of the dashboard:
-
Click the dashboard's Change Layout button.
-
In the layout panel, select the desired default layout for the dashboard panel.
The selected layout is applied to the dashboard panel.
-
Click I'm Done.
The gadget selection panel closes.
-
Click Save to propagate your configurations to the dashboard widget tag.
-
35.1.3 Modifying the Default Color Theme of the Dashboard
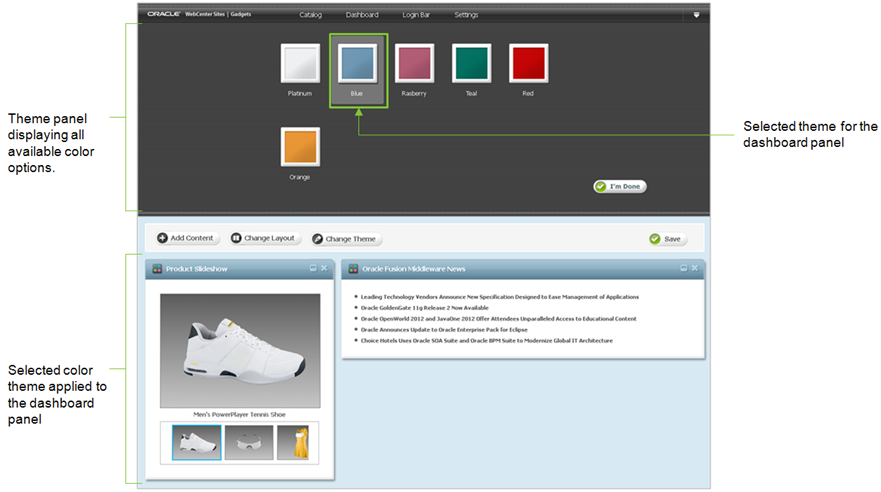
The dashboard's theme panel (shown in Figure 35-4) enables you to modify the dashboard's theme, which changes the dashboard's color scheme.
To modify the default color theme of the dashboard
-
Access the dashboard by accessing the Gadgets User interface, and selecting Dashboard, and then Preview (detailed steps in Section 35.1, "Configuring Dashboard Defaults").
-
Modify the color theme of the dashboard:
-
Click the dashboard's Change Theme button.
-
In the theme panel, select the desired color scheme for the dashboard panel.
The selected color is applied to the dashboard panel
-
Click I'm Done.
The theme panel closes.
-
Click Save to propagate your configurations to the dashboard widget tag.
-
35.2 Reconfiguring and Deploying the Login Bar Widget
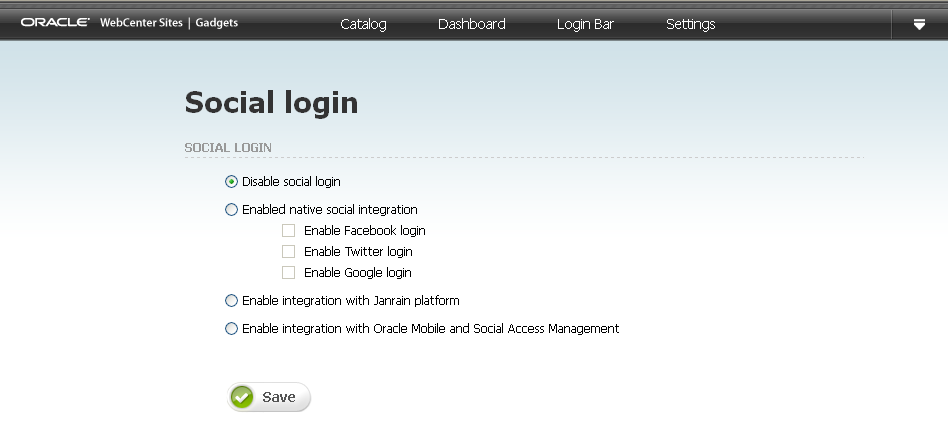
This section provides instructions for reconfiguring and deploying the Login Bar widget. The Login Bar menu is used to reconfigure the login bar site visitors use to log in to the gadgets and dashboard deployed on the pages of your company's site. Configuring login settings includes determining which credentials (for example, Facebook, Twitter, and Google+) visitors can use to log in to the gadgets and dashboard displayed on your website. Once you save these settings, the system dynamically updates all deployed Login Bar widgets on the website.
Note:
The Login Bar widget is common to the Gadgets application and the Community application. Any changes you make to the Login Bar widget in the Gadgets User interface are also applied to the Login Bar widget in the Community interface, and vice versa.
For more information about configuring the Login Bar, see Chapter 28, "Working with the Login Bar Widget."
This section contains the following:
35.2.1 Reconfiguring the Login Bar Widget's Default Settings
The Login Bar widget's default settings are its saved settings. These settings determine which credentials visitors can use to log in to the gadgets and dashboard deployed on the pages of your website.
Once default settings are saved, they dynamically modify all Login Bar widget tags deployed on the website (including standalone instances and instances that are embedded in and deployed with community widget tags and the dashboard).
To configure the Login Bar widget
-
Log in to WebCenter Sites with designer credentials.
-
Access the desired site on which the Gadgets User interface is enabled, and select the Gadgets icon.
-
In the menu bar, select Login Bar, and then select Configure.
-
Reconfigure the Login Bar widget. For instructions, see Table 28-1 in Section 28.2, "Reconfiguring the Login Bar Widget's Default Settings."
35.2.2 Deploying a Login Bar Widget Tag
The Login Bar widget tag can be deployed as a standalone widget on a web page or embedded in the tag of the dashboard and/or a community widget. This section provides instructions for deploying a standalone Login Bar widget tag.
To deploy the Login Bar widget tag
-
Log in to WebCenter Sites with designer credentials.
-
Access the desired site on which the Gadgets User interface is enabled, and select the Gadgets icon.
-
In the menu bar, select Login Bar, and then select Deploy.
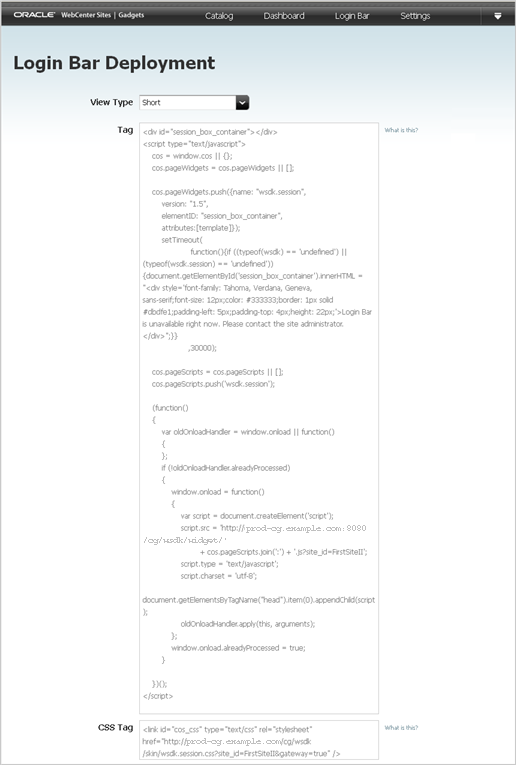
The "Login Bar Deployment" screen opens (as shown in Figure 35-6).
Figure 35-6 'Login Bar Deployment' Screen
Description of "Figure 35-6 'Login Bar Deployment' Screen"
-
Deploy the Login Bar widget tag with either default or custom settings. For instructions, see Section 28.3, "Deploying a Login Bar Widget Tag."
35.3 Authorizing a Domain for Gadgets and the Dashboard
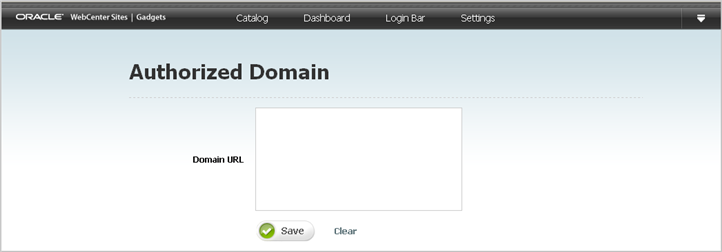
Authorizing a domain enables you to specify the domain on which gadget widget tags and the dashboard widget tag can be deployed. This restricts the usage of the tags to only the domain you authorize.
-
Log in to WebCenter Sites with designer credentials.
-
Access the desired site on which the Gadgets User interface is enabled, and select the Gadgets icon.
-
In the menu bar, select Settings, and then Authorized Domain.
The "Autorized Domain" screen opens (as shown in Figure 35-7).
-
In the Domain URL field, enter the domain name of the site(s) on which you wish to display gadgets and the dashboard. For example
www.examplecompany.com or www.myexample.example.com
To specify the domain name of multiple sites, separate each domain name with a comma. For example:
www.examplecompany.com, www.examplecompany2.com, www.examplecompany3.com, *.examplecompany.com
Gadgets and the dashboard can be rendered only on the specified domain(s). If a visitor views the source code of your company's site, and attempts to copy and deploy the gadget (or dashboard) on his own site, the deployment will fail.
Note:
The Domain URL field is optional. If you do not wish to specify a domain on which gadget and dashboard tags can be deployed, leave this field blank.
-
Click Save.
Gadget widget tags and the dashboard widget tag can be deployed only on the domain you specified.
35.4 Configuring Gadget Appearance Settings
Configuring gadget appearance settings enables you to control the appearance of the Gadgets User interface, the dashboard, and the single gadget widget tags.
To configure gadget appearance settings
-
Log in to WebCenter Sites with designer credentials.
-
Access the desired site on which the Gadgets User interface is enabled, and select the Gadgets icon.
-
In the menu bar, select Settings, and then select Appearance.
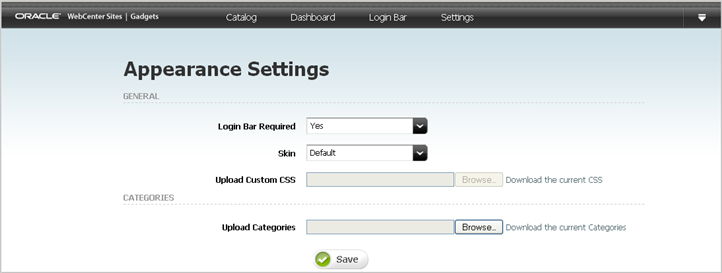
The "Appearance Settings" screen opens (shown in Figure 35-8).
-
Fill in the following fields:
-
Login Bar Required – Select either Yes or No to specify whether a Login Bar widget tag will be embedded in and deployed with the dashboard widget tag.
-
Skin – Select Default to use the default appearance of the Gadgets User interface. Select Custom to upload your own CSS file.
-
Upload Custom CSS – If you selected the Custom option in the "Skin" field, use the Browse button to select a cascading style sheet that will control the appearance of the Gadgets User interface (for example, the text fonts), the dashboard, and the single gadget widget tags (for example, the header, background images, and so on).
-
Upload Categories – Use the Browse button to upload the desired category file, which will dynamically modify the categories available in:
-
The "Filter" panel in the Gadgets User interface's "Catalog" screen and the dashboard's gadget selection panel.
-
The Category field in the "Register New Gadget" screen.
Note:
The category file must be in
.txtformat, the categories listed in the file must be in akey=valuestructure, only an English alphanumeric string is permitted for thekeyin thekey=valuepairs, each category listed in the file must be on its own line, and the size of the file can be no more than 100KB.You cannot remove the default categories (News, Entertainment, Utilities, Economics, and Others). These categories are automatically added to any category file you upload.
-
-
-
Click Save.
35.5 Setting the Language of Deployed Gadgets and the Dashboard
You can use the "Language" screen to specify the language in which deployed gadgets and the dashboard will be displayed.
Set the language of deployed gadgets and the dashboard
-
Log in to WebCenter Sites with designer credentials.
-
Access the desired site on which the Gadgets User interface is enabled, and select the Gadgets icon.
-
In the menu bar, select Settings, and then select Language.
The "Language" screen opens (shown in Figure 35-9).
-
In the "Language" field, click the down-arrow to display the Language drop-down menu. Select the language in which the dashboard and individually deployed gadgets will be displayed.
The available options are:
-
English
-
Brazilian Portuguese
-
Simplified Chinese
-
Traditional Chinese
-
French
-
German
-
Italian
-
Japanese
-
Korean
-
Spanish
Note:
If the desired language is not listed, contact your WebCenter Sites administrator or developers.
-
