10 Creating a Website's Navigation
This chapter provides information about creating the navigation for your website by using the Site Tree in the Contributor interface to place and unplace pages.
Note:
WebCenter Sites offers multiple ways to create a website's navigation. Your site design determines the way in which your website's navigation is created. In this section, we assume that your site design is configured to allow you to create your website's navigation using the Site Tree in the WebCenter Sites Contributor interface. For information about how the navigation for your website is created, see your site developers.
This chapter contains the following sections:
10.1 Overview of a Website's Navigation
A website's navigation allows visitors to access the different sections (pages, articles, and so on) of that site. The navigation of your website is determined by the placement of the "Page" assets under a site plan in the Site Tree of the Contributor interface (shown in Figure 10-1). A site plan reflects the website's navigation and enables you to create a hierarchy for the pages of your site. This means that the structure of your site's navigation starts off general and drills down to specific.
Note:
Since the content of a single CM site can be utilized by multiple websites, the Site Tree displays as many site plans as there are websites using the content of that one CM site.
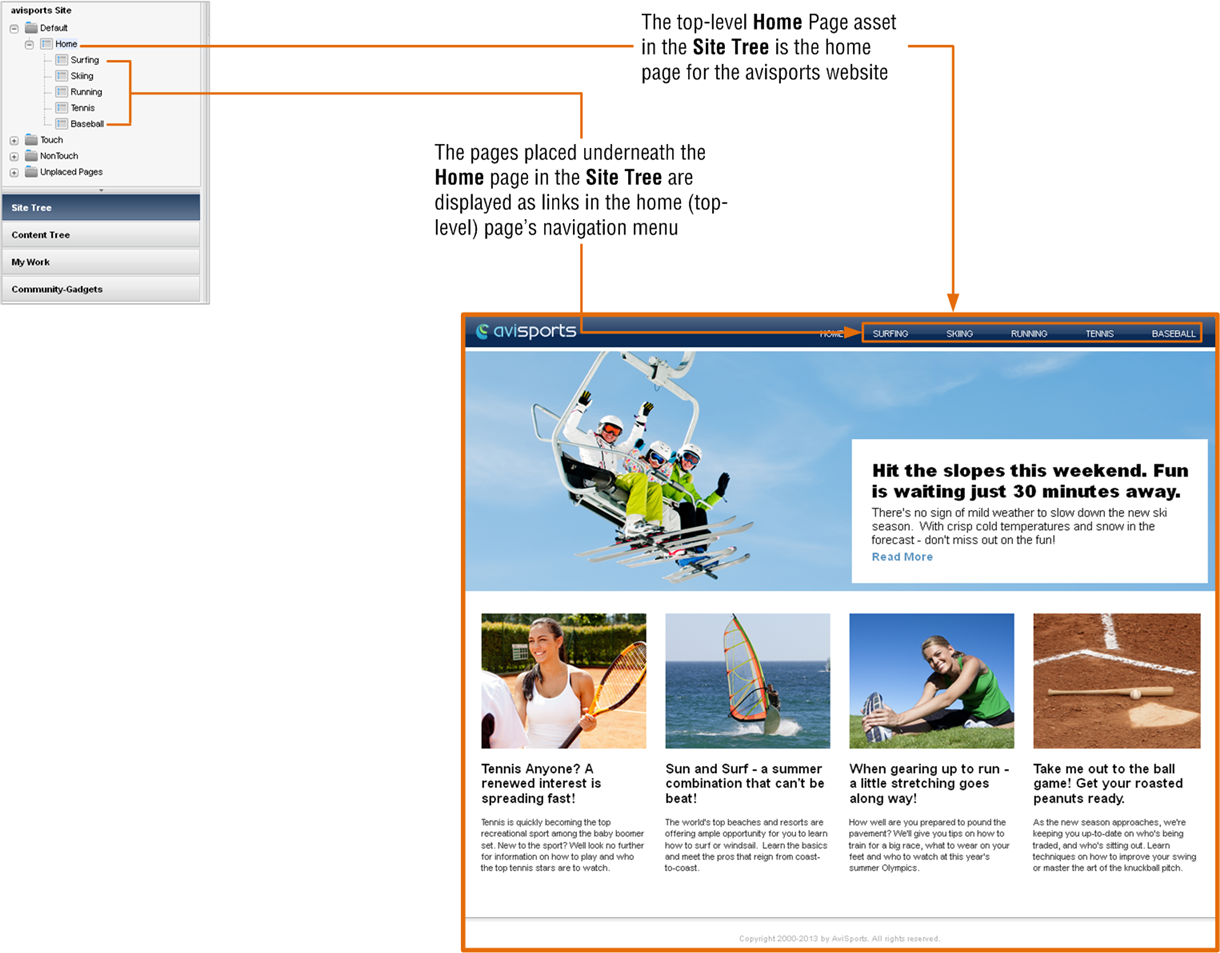
For example, if you place a page underneath an already placed page of a site plan in the Site Tree, the page you placed becomes a sub-level of the page under which you placed it. You can also copy the Pages placed under one site plan and paste them under another site plan. When the Pages are published to the website, the Page you placed as a sub-level is accessible from the top-level Page's navigation menu. Figure 10-1 shows the dynamic relationship between the placement of Pages under a site plan in the Site Tree and your website's navigation.
Figure 10-1 Relationship Between the Site Tree and Your Site's Navigation
Description of "Figure 10-1 Relationship Between the Site Tree and Your Site's Navigation"
10.2 Placing and Unplacing Pages
If you are assigned the appropriate role (configured by your administrator), you can use the Site Tree to place Pages under a site plan and unplace Pages (remove Pages from a site plan). Placing and unplacing Pages enables you to organize a website's navigation (as shown in Figure 10-1). The changes you make through the tree will be applied to the websites represented by the site plans during the next publishing session. For more information on Page assets, see the WebCenter Sites Developer's Guide or consult your developers.
Note:
The Site Tree requires you to place pages in an ordered hierarchy. Before you perform the procedures in this section, consult your developers to familiarize yourself with the structure of your website so that you know where each page belongs in the site hierarchy.
This section covers the following procedures:
10.2.1 Placing a Page
This section shows you how to place a Page asset under a site plan in the Site Tree. There are two supported methods for placing Pages under a site plan:
-
Directly under a top-level Page as the Page's highest-ordered sub-level.
-
At the same level in the hierarchy as another Page. The selected Page is placed before or after the other Page (depending on the location you choose).
After you place a Page, you must approve and publish it in order for it to be displayed on the website.
To place a Page under a site plan
-
Log in to WebCenter Sites, select the site you want to work with and select the icon for the WebCenter Sites Contributor interface.
-
In the navigation pane, click the Site Tree bar.
The pane displays the Site Tree.
-
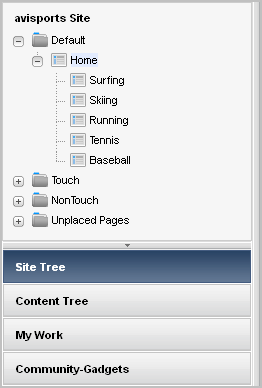
In the Site Tree, expand the desired site plan by clicking the plus sign displayed next to it. Figure 10-2 shows the Site Tree for the avisports sample site.
Figure 10-2 'Site Tree' for the avisports Sample Site
Description of "Figure 10-2 'Site Tree' for the avisports Sample Site"
-
Find the Page you want to place and determine its target position in the hierarchy:
-
Find the desired Page:
-
If you are placing an already placed Page, navigate to the site plan under which it is placed.
-
If you are placing an unplaced Page, navigate the Unplaced Pages hierarchy to find the desired Page.
-
-
Navigate to the desired site plan to determine the Page's target position in the hierarchy.
-
-
Place the Page in its target position in the hierarchy. Do one of the following:
-
To place the Page at the same level as another Page, drag the selected Page under or above the name of the other Page. The selected Page is placed in the list before or after the other Page.
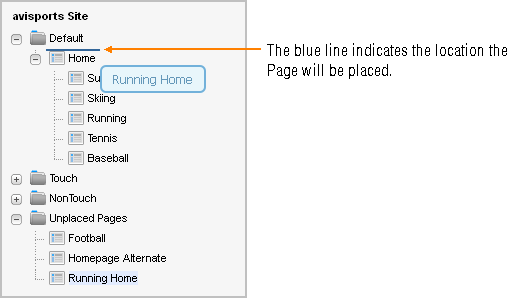
For example, to place the Running Home Page at the same level as (and before) the Home Page, drag the Running Home Page above the name of the Home Page, as shown in Figure 10-3:
Figure 10-3 Place a Page Asset at the Same Level as Another Page Asset
Description of "Figure 10-3 Place a Page Asset at the Same Level as Another Page Asset"
-
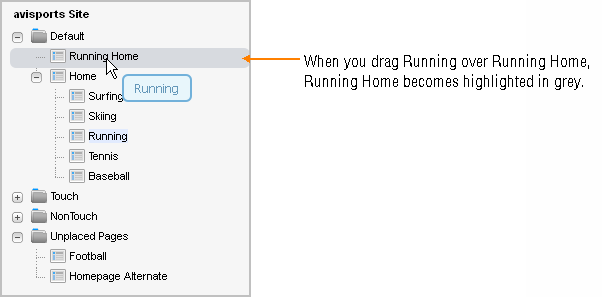
To place the Page as the highest-ordered sub-level of another Page, drag the selected Page over the name of the desired Page under which you wish to place it.
For example, to place the Running Page as the highest-ordered child of the Running Home Page, drag the Running Page over Running Home, as shown in Figure 10-4:
Figure 10-4 Place a Page Asset as the Highest-Ordered Child of Another Page Asset
Description of "Figure 10-4 Place a Page Asset as the Highest-Ordered Child of Another Page Asset"
You must approve the Page you placed in order for the website to be updated with your changes during the next publishing session.
-
10.2.2 Unplacing a Page
This section shows you how to unplace a Page asset — that is, mark it for removal from the website. After you unplace the Page, it will be removed from the website during the next publishing session.
-
Log in to WebCenter Sites, select the site you want to work with and select the icon for the WebCenter Sites Contributor interface.
-
In the navigation pane, click the Site Tree bar.
The pane displays the Site Tree.
-
In the Site Tree, expand the site plans and Unplaced Pages node by clicking the plus-sign next to each node.
-
Navigate the desired site plan to find the Page you want to unplace.
-
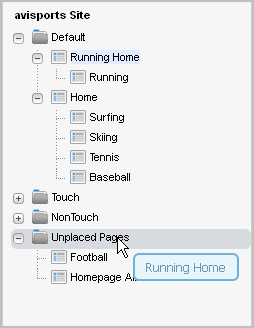
Unplace the Page by dragging it over the Unplaced Pages node. For example, to unplace the Running Home Page, drag it over the Unplaced Pages node, as shown in Figure 10-5:
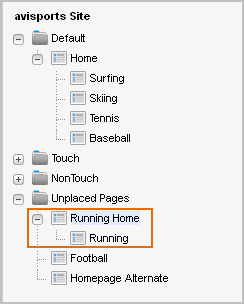
When you release the Page, it is displayed under the Unplaced Pages node. If the Page you unplaced contains sub-levels, its sub-level Pages are also unplaced, as shown in Figure 10-6.
Figure 10-6 Page Assets Displayed Under the 'Unplaced Pages' Node
Description of "Figure 10-6 Page Assets Displayed Under the 'Unplaced Pages' Node"
You must approve the unplaced Page in order for the website to be updated with your changes during the next publishing session.
10.3 Creating a Website's Navigation by Copying an Existing Navigation
If the Site Tree contains multiple site plans, instead of creating brand new content to place under a site plan, you can copy the navigation (placed Pages) under one site plan and paste the navigation under another site plan. You can either copy a site plan's entire navigation or a sub-set of its navigation. Once you paste the navigation under the desired site plan, both site plans will display the same placed Pages. However, each site plan's content is managed individually. When you make changes to the content of one site plan, those changes do not apply to any other site plan's content.
To create a website's navigation by copying an existing website's navigation
-
Log in to WebCenter Sites, select the site you want to work with, and then select the icon for the WebCenter Sites Contributor interface.
-
In the navigation pane, click the Site Tree bar.
The pane displays the Site Tree.
-
In the Site Tree, expand the site plan whose navigation (placed Pages) you wish to copy by clicking the plus sign displayed next to the site plan.
-
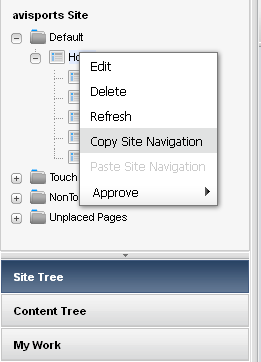
In the expanded site plan tree, right-click the highest-ordered Page in the hierarchy from which you wish to copy the navigation. In the context menu, select Copy Site Navigation.
Figure 10-7 Copy a Site Plan's Site Navigation (Placed Pages)
Description of "Figure 10-7 Copy a Site Plan's Site Navigation (Placed Pages)"
-
Paste the navigation under the desired site plan:
-
Navigate to the site plan under which you wish to paste the copied navigation and expand its hierarchy by clicking the plus sign next to it.
-
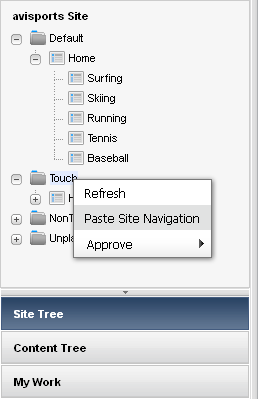
Right-click the site plan node (or a placed Page under the site plan node) and select Paste Site Navigation.
Figure 10-8 Paste a Site Plan's Site Navigation Under Another Site Plan Node
Description of "Figure 10-8 Paste a Site Plan's Site Navigation Under Another Site Plan Node"
-
In the confirmation dialog box, click Yes.
Figure 10-9 Paste Site Navigation – Confirmation Dialog Box

Description of "Figure 10-9 Paste Site Navigation – Confirmation Dialog Box"
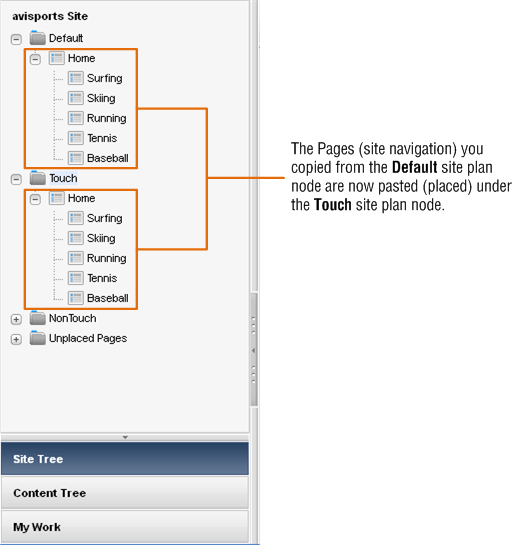
The Page and all of its sub-level Pages are placed under the site plan node (or under a placed Page in the site plan's tree). For example, if you copied the "Home" Page from the Default site plan node and pasted it directly under the Touch site plan node, the "Home" Page and all of its sub-level Pages are placed under the Touch site plan node (as shown in Figure 10-10).
Figure 10-10 Navigation from the Default Site Plan Pasted Under the Touch Site Plan
Description of "Figure 10-10 Navigation from the Default Site Plan Pasted Under the Touch Site Plan"
-
-
Edit the Pages you pasted under the site plan. For instructions, see Section 3.3, "Editing Assets in Form Mode" and Section 4.4, "Editing Assets in Web Mode." If you are editing the content for a mobile site plan, see Section 13.3, "Editing Assets in the Context of a Mobile Device."
-
Preview the changes you made to the content of the site plan. For instructions, see Chapter 7, "Previewing Assets." If you wish to preview the content in the context of a mobile device, see Section 13.4, "Previewing Assets in the Context of a Mobile Device."
-
Approve and publish the site plan. For instructions, see Section 14.2.2, "Approving a Site Plan for Publishing."
