4 Creating, Sharing, and Editing Assets in Web Mode
This chapter describes the basic procedures for creating and editing assets in Web Mode, illustrated with examples from the avisports sample site.
This chapter contains the following:
4.1 Overview
Working with assets is permissions based. If you have the right permissions, you can create and edit assets using the WebCenter Sites Contributor interface. If an asset type is configured such that all assets of that type open in Web Mode, when you create or edit an asset of that type, the asset's web page view will be displayed to you (as shown in Figure 4-1).
Note:
The Contributor interface provides two modes for creating new assets – Form Mode and Web Mode. This section only provides information about creating assets in Web Mode. For information about creating assets in Form Mode, see Section 3.1, "Creating Assets in Form Mode."
Depending on the configurations your developers made to your WebCenter Sites system, Web Mode might be disabled. In this section, we assume that Web Mode is enabled. For more information about whether Web Mode is enabled for your installation, see your developers.
Figure 4-1 ''Surfing' Page Asset's Inspect View (in Web Mode)
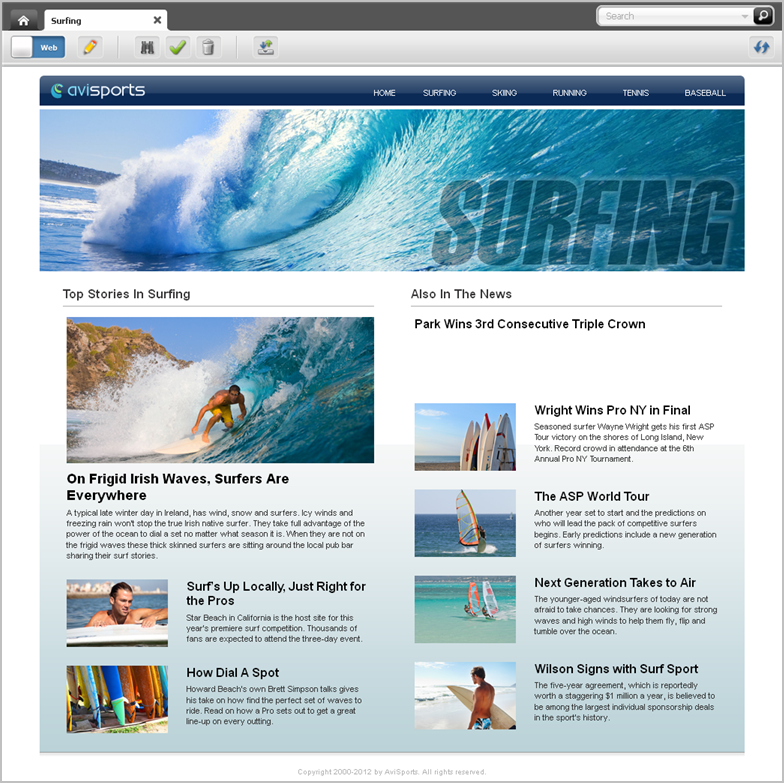
Description of "Figure 4-1 ''Surfing' Page Asset's Inspect View (in Web Mode)"
Web Mode offers in-context editing, which means you can work with assets directly in their published form (web page view). Instead of fields in a content entry form, it is the web page layout (template) assigned to the asset that determines the editable areas of an asset rendered in Web Mode. Editable areas can include simple text areas, WYSIWYG editor enabled text areas, and slots. Below shows an example Edit view of the Surfing page asset rendered in Web Mode displaying empty and occupied slots.
Figure 4-2 'Surfing' Page Asset's Edit View (in Web Mode)
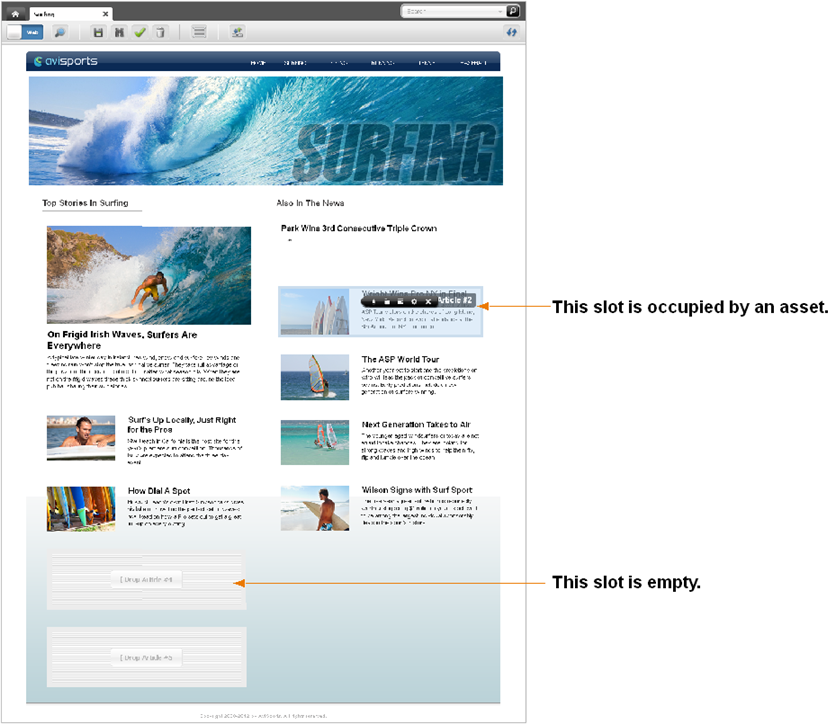
Description of "Figure 4-2 'Surfing' Page Asset's Edit View (in Web Mode)"
4.1.1 What is a Slot?
If the web page layout (template) assigned to the asset is configured to support slots, the asset's Create and Edit views will display empty and/or occupied slots (as shown in Figure 4-2 and Figure 4-3). Each slot accepts one piece of content – an asset (unless the slot is multi-valued, in which case the slot will accept more than one asset). If the slot supports drag and drop functionality, you can drag an asset from a tree or search results list and drop the asset into the desired slot. If the slot does not support drag and drop functionality, it will usually contain a predefined asset (such as a recommendation asset) which your developers or administrators have configured in the web page layout (template) assigned to the asset.
Figure 4-3 Empty and Occupied Slots ('Surfing' Page Asset)
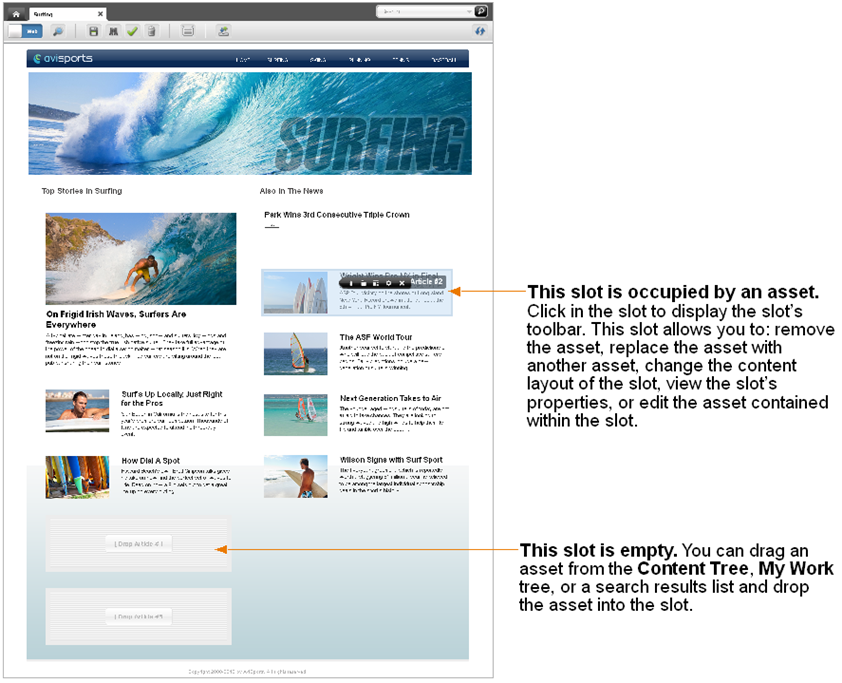
Description of "Figure 4-3 Empty and Occupied Slots ('Surfing' Page Asset)"
By adding an asset to a slot, you are creating an association between the asset with which you are working and the asset you placed in the slot. The type of asset each slot supports is determined by the configurations your developers made to the web page layout (template) assigned to the asset.
When you click in a slot, a toolbar with content management options you can perform on the slot is displayed (as shown in Figure 4-2). Using the toolbar you can edit the content of the asset contained within the slot, change the content layout of the slot (which changes the appearance of the asset in the slot), view the slot's properties, and/or remove the asset from the slot. If you are working with a multi-valued slot (which accepts multiple assets), you will see a Manage option that allows you to reposition the order in which the assets contained within that slot are displayed on the web page. The options available in a slot's toolbar are determined by the configurations your developers made to the web page layout (template) assigned to the asset with which you are working.
4.1.2 What is the Difference Between Web Page Layout and Content Layout?
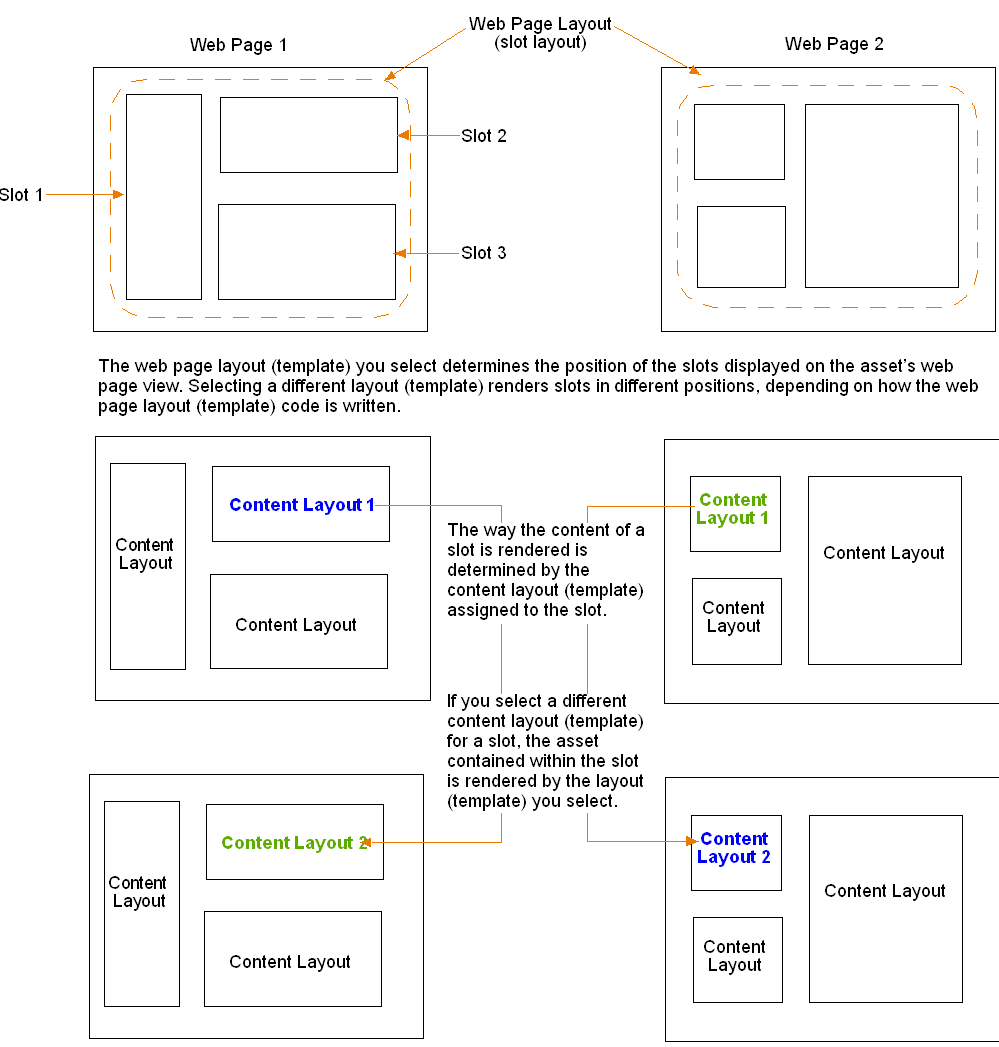
Web page layout is the layout (template) assigned to the asset with which you are working. When working with an asset in Web Mode, the web page layout assigned to the asset determines the arrangement of the slots in the asset's web page view (as shown in Figure 4-2 and Figure 4-3). Content layout is the layout (template) assigned to an individual slot. The content layout assigned to a slot determines the appearance of the asset contained within that slot.
A slot enables you to select a different content layout with which to render the content contained within it. When you change the content layout of a slot, the asset contained within the slot is rendered using the layout you selected. Figure 4-4 provides a diagram showing the difference between web page layout and content layout.
Figure 4-4 Web Page Layout vs. Content Layout
Description of "Figure 4-4 Web Page Layout vs. Content Layout"
4.2 Creating Assets in Web Mode
The types of assets you can create are determined by the asset types that are available in the Contributor interface and your assigned permissions. If you have the right permissions, you can create brand new assets "from scratch," using the WebCenter Sites Contributor interface. If the new asset that you want to create is similar to an existing one, you can copy the existing asset and make changes to the copy, which saves you a few steps. If an asset currently exists on one site and you need to create the same asset for a different site, you can share the asset so that you do not have to create it more than once.
4.2.1 How Many Ways Can You Create Assets?
For information about the different ways you can create assets in the Contributor interface, see Section 3.1.1, "How Many Ways Can You Create an Asset?"
4.2.2 If You Use Web Mode, Will You Need to Switch to Form Mode?
When you are working with an asset in Web Mode, the editable areas you see are determined by the configurations your developers made to the web page layout (template) assigned to the asset. The fields you see in an asset's content entry form (when working with the asset in Form Mode) are not necessarily the same fields that will be available to you when working with the asset in Web Mode. Therefore, certain fields such as date and Locale fields may not be available in Web Mode. In addition, certain attribute editors are only supported in Form Mode (for example, Clarkii Online Image Editor). In such cases, you will have to switch to Form Mode to fill in those fields. For instructions about switching to Form Mode, see step 8 in Section 4.2.3, "Creating a New Asset in Web Mode."
4.2.3 Creating a New Asset in Web Mode
If the administrator configured an asset type to be created in Web Mode and listed in your "New" menu (from the Content menu, select New), you can create assets of that type by entering information into the web page view of the asset.
To create a new asset in Web Mode
-
Log in to WebCenter Sites, select the site you want to work with and select the icon for the WebCenter Sites Contributor interface.
-
Select the type of asset you wish to create. In the menu bar, select Content, then select New, and then select the type of asset you wish to create. (To follow this example, select the Article asset type.)
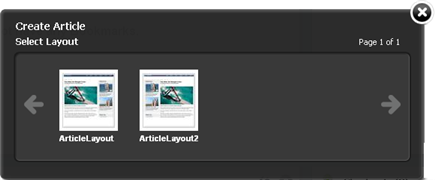
The "Create Asset" dialog box is displayed.
-
In the "Create Asset" dialog box, do the following:
-
In the "Select Layout" field, select the layout you want to assign to the asset.
The layout you select determines how the asset's Create view is displayed in Web Mode.
-
In the "Name" field, enter a name for the asset. Keep in mind the following:
-
The name must be between 1 and 64 alphanumeric characters.
-
The following characters are not allowed: single quote (;), double quote ("), semicolon (;), colon (:), question mark (?), percent sign (%), less-than sign (<), and greater-than sign (>).
-
The name can contain spaces, but cannot start with a space.
-
-
Click Continue.
-
-
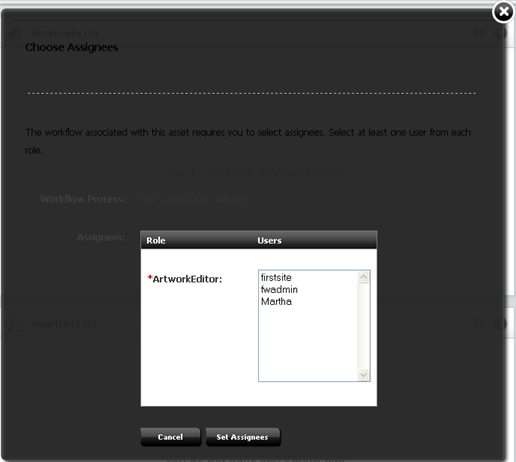
If the administrator configured the asset type such that all new assets of that type are placed into workflow upon creation, you will see the "Choose Assignees" dialog box:
Select at least one user for each required role and click Set Assignees. Any of these users can complete the next step in the workflow process. For more information, see Chapter 16, "Workflow."
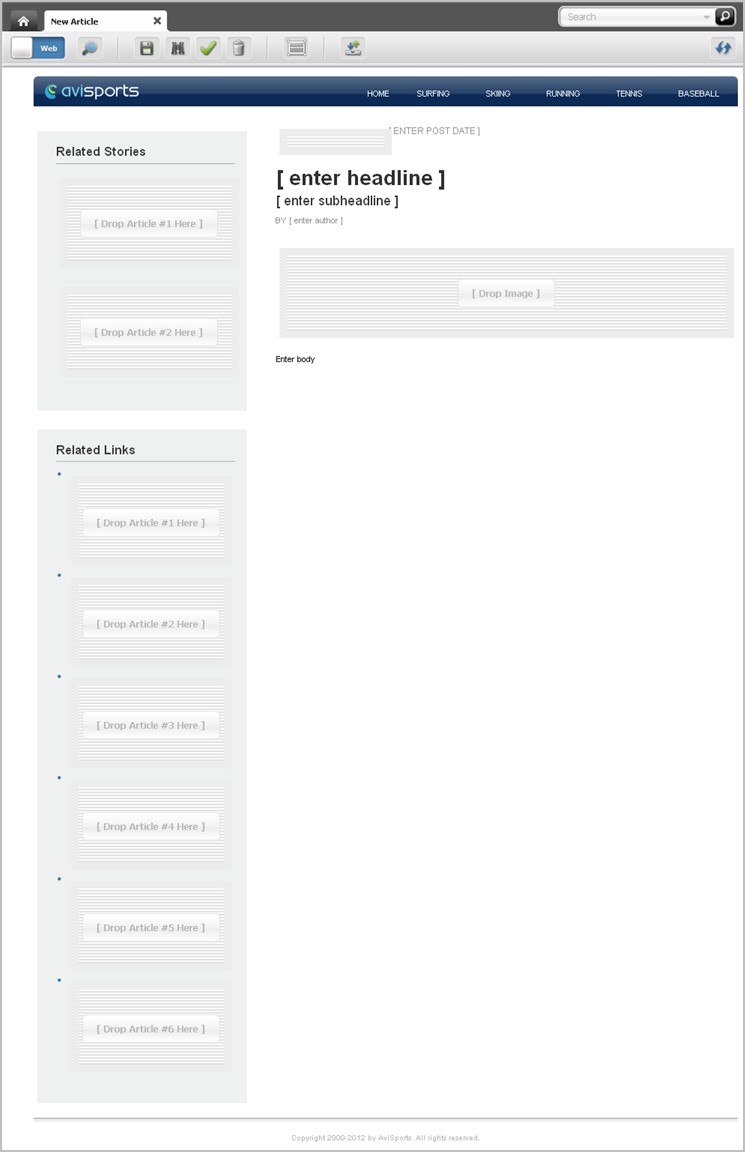
A new tab opens displaying the asset's Create view in Web Mode. ("Article" asset in this example.)
Figure 4-7 New Asset Displayed in Web Mode
Description of "Figure 4-7 New Asset Displayed in Web Mode"
The layout you assigned to the asset determines the editable areas you will see in the asset's Create view.
-
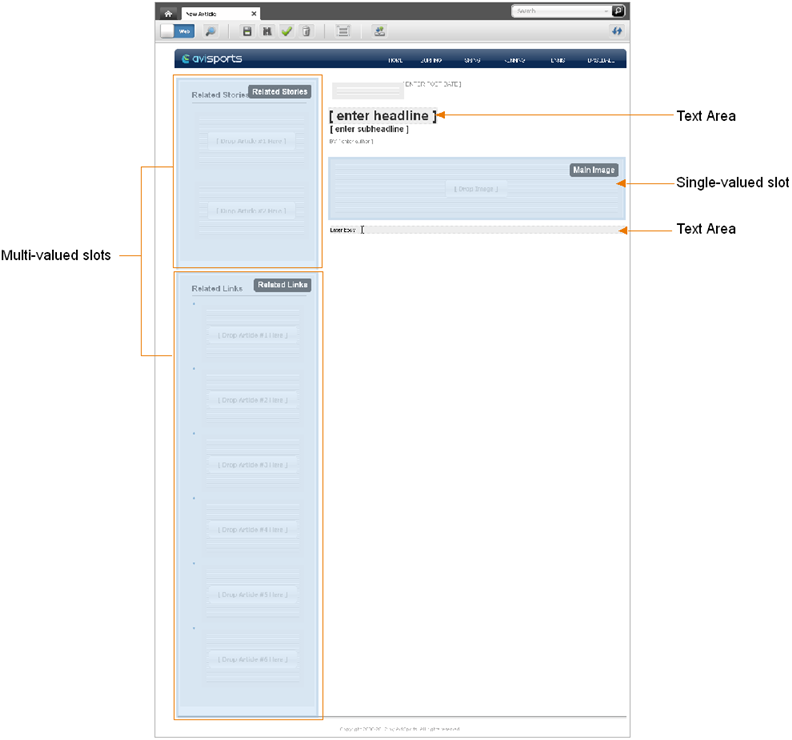
Point to the different areas of the asset's Create view to determine which areas accept content. Areas that support drag and drop functionality and other content management actions will be highlighted when you point to them (as shown in Figure 4-8):
Figure 4-8 Areas that Accept Content in Web Mode
Description of "Figure 4-8 Areas that Accept Content in Web Mode"
-
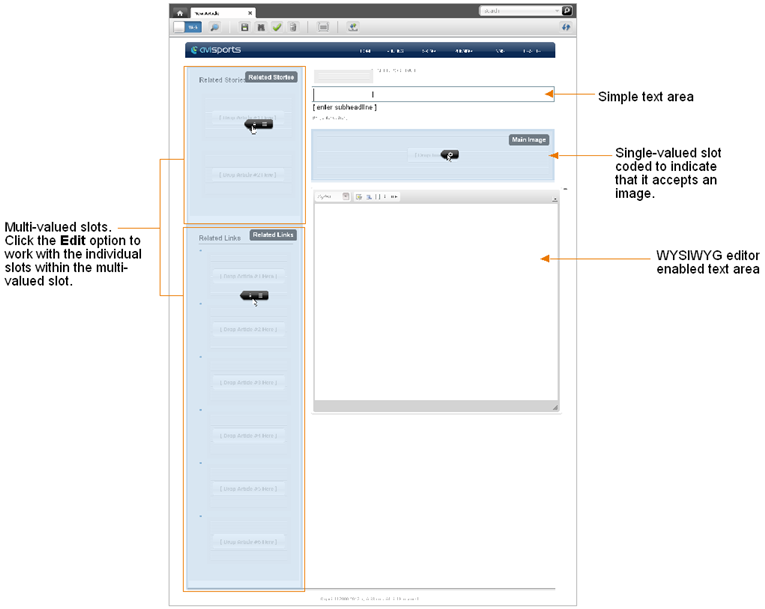
Click in the highlighted areas to determine the type of content each area supports. The types of editable areas you will see and how those areas are displayed in the asset's web page view are determined by how your developers have coded the asset's web page layout (template). Figure 4-9 is an example of the areas you may see when working with an asset in Web Mode:
Figure 4-9 Slots and Text Fields Displayed in Web Mode
Description of "Figure 4-9 Slots and Text Fields Displayed in Web Mode"
-
Populate the asset's Create view. Click in an editable area to determine the type of content the area accepts. The differences between the editable areas you may see when populating the asset are as follows:
-
Text Areas. You may see one or more areas that allow you to enter text. These areas may display predefined sample text describing the type of content that should be entered. When you point to a text area, it becomes highlighted in grey and your cursor appears as a text-selecting I-beam. For example:
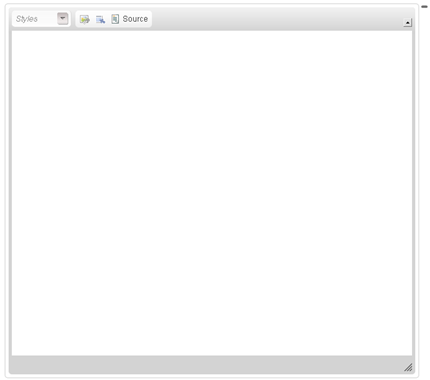
Click in the text area to enter the desired text. When you click in the text area, you will see one of the following:
-
Simple Text field. You can enter text into a simple text field, but you cannot format the appearance of that text.
-
WYSIWYG text field. If the text area supports an embedded WYSYWYG editor (such as CKEditor), the WYSYWYG editor is displayed. These text fields allow you to enter and format your content using controls similar to Microsoft Word.
-
-
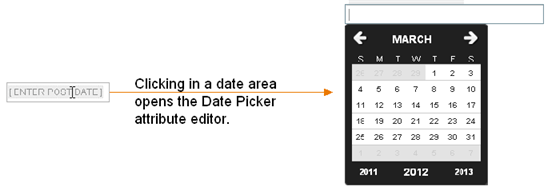
Date area. You may see one or more areas that allow you to select a date. For example:
Clicking in one of these areas invokes the Date Picker attribute editor. For more information, see Section 3.5.4, "Working with the Date Picker."
-
Slots. You may see one or more areas that display either predefined content or an empty slot. These areas are highlighted with a blue overlay when you point to them.
To work with a slot, do the following:
-
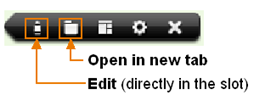
Click in the desired slot to display its toolbar. Depending on how the slot is coded in the web page layout (template) assigned to the asset, you may see one or more of the following content management options:
From left to right in the toolbar (displayed above), the options are the following:
Edit – Allows you to edit the content of the asset contained within the slot directly in the web page view of the asset you are creating. For more information, see Section 4.4.4.2, "Editing the Content of an Associated Asset."
Open in New Tab – Opens a tab displaying the Inspect view of the asset contained within the slot. For more information, see Section 4.4.1, "Editing the Content of an Asset in Web Mode."
Change content layout – Allows you to select a content layout (template) with which to render the slot's content. For more information, see Section 4.4.3, "Changing Content Layout."
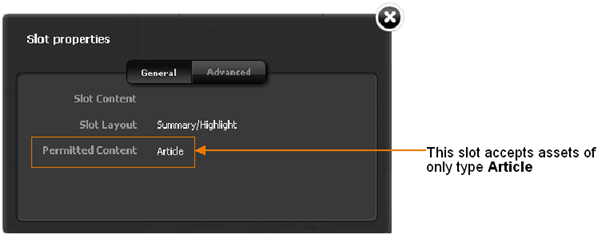
Slot properties – Provides you with a list of asset types the slot supports. For more information, see step c.
Clear slot – Removes the content from the slot. For more information, see Section 4.4.4.3, "Removing Associations."
The following option is only available in a multi-valued slot's toolbar:
Manage – Allows you to manage the position of the assets contained within a multi-valued slot. For more information about multi-valued slots, see Section 4.4.4.4, "Changing the Position of Content Displayed in a Multi-Valued Slot."
-
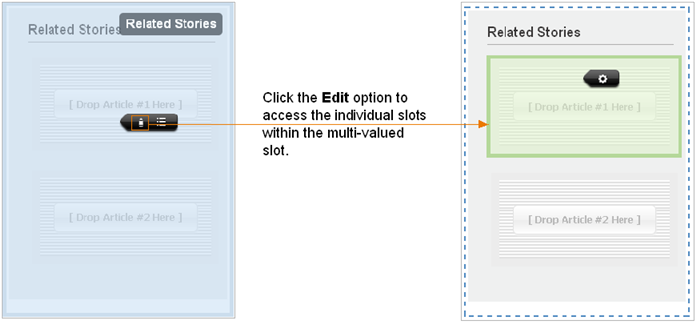
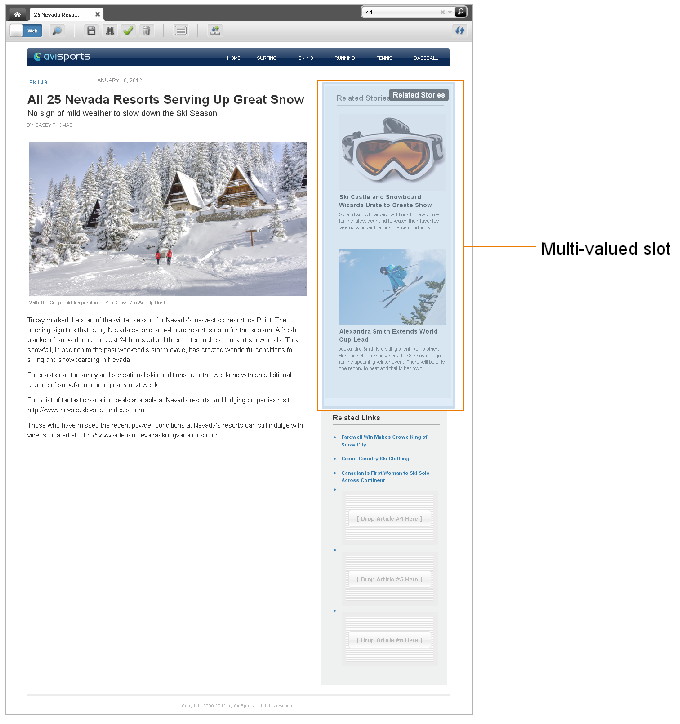
If the slot is multi-valued, when you click in the slot, its toolbar displays the Edit and Manage options. Click Edit to access the individual slots within the multi-valued slot, as shown below:
-
Determine the type of content a slot supports. Click in the slot and then click the Slot properties option in the slot's toolbar.
-
Determine if the slot supports drag and drop functionality by dragging an asset from the Content Tree, My Work tree, or a search results list to the desired slot.
If the slot's border turns green, then the slot accepts that type of asset. In this case, drop the asset into the slot. If the slot's border turns red, the slot either does not accept this type of asset or does not support drag and drop functionality.
For more information about adding content to a slot, see Section 4.4.4.1, "Adding or Replacing an Association."
-
-
-
If the web page layout (template) assigned to the asset you are creating is not coded to display certain fields in Web Mode, (for example, date and 'Locale' fields), then those fields will only be available in Form Mode. To populate these fields, you will have to switch to Form Mode:
-
In the asset's toolbar, click the Mode switch.
The tab re-displays the asset in Form Mode.
-
Fill in the required fields. For instructions, see step b in Section 3.1.2, "Creating a New Asset in Form Mode."
-
Switch back to Web Mode. In the asset's toolbar, click the Mode switch.
The tab re-displays the asset in Web Mode.
-
-
Save the asset. Do one of the following:
-
In the asset's toolbar, click the Save icon.
-
In the menu bar, select Content, then select Save.
WebCenter Sites saves the asset to the database, unless:
-
You have left out one or more required fields.
-
An entry or selection you have made in one or more of the fields is not permitted.
If either of the above is true, WebCenter Sites displays an error message indicating the offending fields. Correct the errors and save the asset.
-
-
Inspect the asset. Do one of the following:
-
In the asset's toolbar, click the Inspect icon.
-
In the menu bar, select Edit, then select Inspect.
The tab displays the asset's Inspect view in Web Mode. You cannot modify the asset's content when the asset is displayed in the Inspect view.
-
-
(Optional) If the asset is not preassigned to a workflow and you want to use the workflow feature, you can assign the asset to a workflow process as described in Section 16.4.1, "Assigning an Asset to a Workflow."
-
Preview the asset:
-
In the asset's toolbar, click the Preview icon.
The tab displays the preview of the asset. For detailed instructions about previewing an asset, see Chapter 7, "Previewing Assets."
-
If you wish to make additional changes to the asset, do the following:
-
In the asset's toolbar, click the Go Back icon.
The tab displays the Inspect view of the asset.
-
In the asset's toolbar, click the Edit icon.
The tab displays the Edit view of the asset. For more information about editing assets in Web Mode, see Section 4.4, "Editing Assets in Web Mode."
-
-
-
When you are finished working with the asset, save and close it. In the menu bar, select Content, then select Save & Close.
WebCenter Sites saves the asset and closes the tab displaying the asset.
4.2.4 Creating a New Asset by Copying an Existing Asset
The procedure for copying assets is the same for both Form Mode and Web Mode. For instructions about creating a new asset by copying an existing asset, see Section 3.1.3, "Creating Assets by Copying Existing Assets."
4.3 Sharing Assets With Other Sites
The procedure for sharing an asset with different sites is the same for both Form Mode and Web Mode. For instructions about sharing an asset with another site, see Section 3.2, "Sharing Assets with Other Sites."
4.4 Editing Assets in Web Mode
This section provides instructions on editing assets in Web Mode and contains the following:
4.4.1 Editing the Content of an Asset in Web Mode
Web Mode offers in-context editing, which means you can edit the content of an asset directly in its web page view. How the asset's web page layout (template) code is written determines the areas you will be able to edit in Web Mode. Certain fields (such as date and 'Locale' fields) may only be accessible when working with an asset in Form Mode. Therefore, to edit the content of these fields you will have to switch to Form Mode.
To edit the content of an asset in Web Mode
-
Log in to WebCenter Sites, select the site you want to work with and select the icon for the WebCenter Sites Contributor interface.
-
Find and open the asset. Do one of the following:
-
Search for and open the desired asset:
-
In the Search field, enter search criteria identifying the asset and then click the magnifying glass button.
-
In the search results list, click the name of the asset.
-
-
If you previously bookmarked the asset, open it from the Bookmarks node in the My Work tree:
-
In the My Work tree, expand the Bookmarks node. (If the My Work tree is collapsed, expand it by clicking the My Work bar in the navigation pane.)
-
In the list of bookmarked assets, double-click the name of the desired asset.
Note:
If you want to edit the asset without first inspecting it, in the list of assets, right-click the desired asset and select Edit from the context menu. Continue to step 4b. If the asset's Edit view is displayed in Form Mode, switch to Web Mode by clicking the Mode switch in the asset's toolbar.
For more information about finding assets, see Chapter 6, "Finding and Organizing Assets."
A tab opens displaying the Inspect view of the asset in either Form Mode or Web Mode. (In this example, we use the 25 Nevada Resorts Serving Snow "Article" asset.)
-
-
-
If the asset is displayed in Form Mode, switch to Web Mode.
-
In the asset's toolbar, click the Mode switch.
-
If the asset is not assigned to a template (web page layout), the "Select Layout" dialog box is displayed. Select the desired layout and then click Apply.
The tab re-displays the asset's Inspect view in Web Mode.
-
-
-
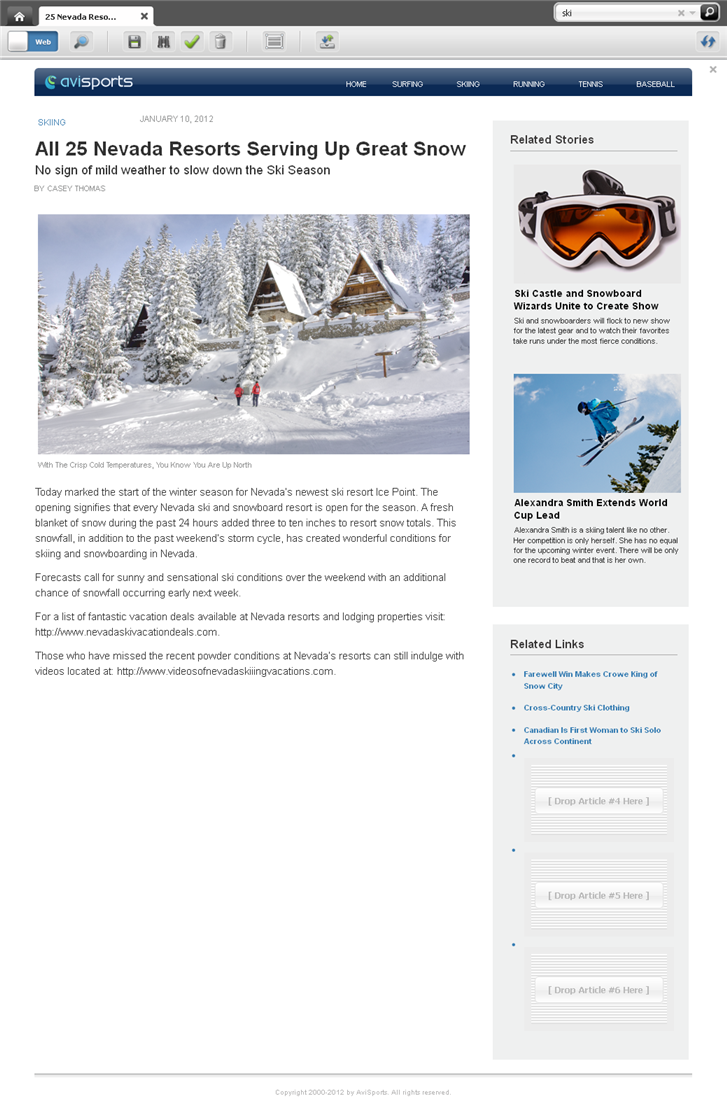
In the asset's toolbar, click the Edit icon.
The tab displays the Edit view of the asset in Web Mode.
Figure 4-18 Edit View of an Asset in Web Mode
Description of "Figure 4-18 Edit View of an Asset in Web Mode"
-
Make your changes to the asset. See steps 5 – 8 for details on the editable areas you may see when working with an asset in Web Mode.
-
-
Save the asset by doing one of the following:
-
In the asset's toolbar, click the Save icon.
-
In the menu bar, select Content, then select Save.
WebCenter Sites saves the asset to the database, unless:
-
You have left out one or more required field(s).
-
An entry or selection you have made in one or more field(s) is not permitted.
If either of the above is true, WebCenter Sites displays an error message indicating the offending fields. Correct the errors, then save the asset.
-
-
Inspect the asset by doing one of the following:
-
In the asset's toolbar, click the Inspect icon.
-
In the menu bar, select Edit, then select Inspect.
The tab displays the Inspect view of the asset in Web Mode. When you inspect an asset, you cannot modify its content.
-
-
If the asset is not preassigned to a workflow and you want to use the workflow feature, you can assign the asset to a workflow process as described in the section Section 16.4, "Using Workflow Functions."
-
Preview the asset:
-
In the asset's toolbar, click the Preview icon.
The tab displays the preview of the asset. For detailed instructions about previewing an asset, see Chapter 7, "Previewing Assets."
-
When you are done previewing the asset, click the Go Back icon.
The tab re-displays the asset in Web Mode.
-
4.4.2 Changing Web Page Layout
The web page layout (template) assigned to an asset determines the position of the slots displayed on the web page view of the asset. If you select a different layout (template) for the asset, the slots and other editable areas will be rendered in different positions, depending on how the web page layout (template) code is written. This section provides instruction on selecting a different web page layout (template) for an asset when working in Web Mode.
To change the web page layout of an asset
-
Log in to WebCenter Sites, select the site you want to work with and select the icon for the WebCenter Sites Contributor interface.
-
Find and open the asset. Do one of the following:
-
Search for and open the desired asset:
-
In the Search field, enter search criteria identifying the asset and then click the magnifying glass button.
-
In the search results list, click the name of the asset.
-
-
If you previously bookmarked the asset, open it from the Bookmarks node in the My Work tree:
-
In the My Work tree, expand the Bookmarks node. (If the My Work tree is collapsed, expand it by clicking the My Work bar in the navigation pane.)
-
In the list of bookmarked assets, double-click the name of the desired asset.
For more information about finding assets, see Chapter 6, "Finding and Organizing Assets."
A tab opens displaying the Inspect view of the asset in either Form Mode or Web Mode. (In this example, we use the Home Page asset.)
-
-
-
If the asset is displayed in Form Mode, switch to Web Mode.
-
In the asset's toolbar, click the Mode switch.
-
If the asset is not assigned to a template (web page layout), the "Select Layout" dialog box is displayed. Select the desired layout and then click Apply.
The tab re-displays the asset's Inspect view in Web Mode.
-
-
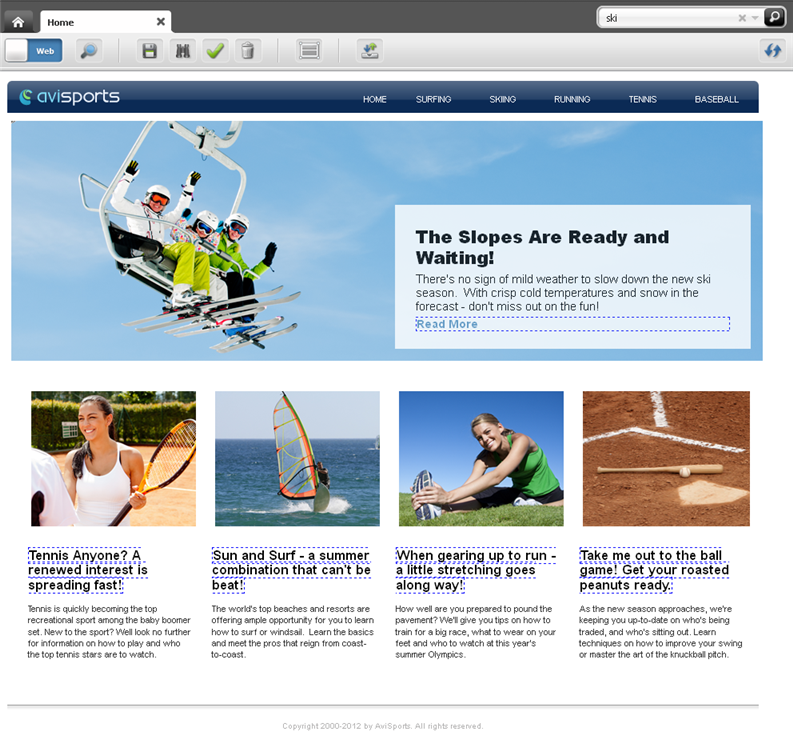
In the asset's toolbar, click the Edit icon.
The tab displays the Edit view of the asset in Web Mode.
Figure 4-19 Edit View of an Asset in Web Mode
Description of "Figure 4-19 Edit View of an Asset in Web Mode"
-
Change the web page layout (template) of the asset:
-
Do one of the following:
-
In the asset's toolbar, click the Change Page Layout icon.
-
In the menu bar, select Edit, then select Change Page Layout.
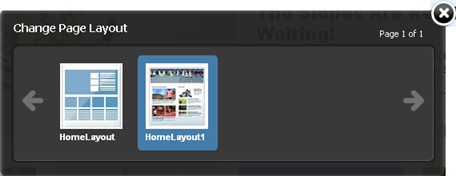
The "Change Page Layout" dialog opens.
Figure 4-20 'Change Page Layout' Dialog Box
Description of "Figure 4-20 'Change Page Layout' Dialog Box"
-
-
Select the web page layout (template) you wish to assign to the asset, then click Apply.
WebCenter Sites updates the asset's web page layout to the layout you selected. The web page layout (template) you select determines the position of the slots and other editable areas of the asset.
-
-
Save the asset by doing one of the following:
-
In the asset's toolbar, click the Save icon.
-
In the menu bar, select Content, then select Save.
WebCenter Sites saves the asset to the database, unless:
-
You have left out one or more required field(s).
-
An entry or selection you have made in one or more fields is not permitted.
If either of the above is true, WebCenter Sites displays an error message indicating the offending fields. Correct the errors, then save the asset.
-
-
Inspect the asset by doing one of the following:
-
In the asset's toolbar, click the Inspect icon.
-
In the menu bar, select Edit, then select Inspect.
The tab displays the Inspect view of the asset in Web Mode. When you inspect an asset, you cannot modify its content.
-
-
Preview the asset:
-
In the asset's toolbar, click the Preview icon.
The tab displays the preview of the asset. For detailed instructions about previewing an asset, see Chapter 7, "Previewing Assets."
-
When you are done previewing the asset, click the Go Back icon.
The tab re-displays the asset in Web Mode.
-
4.4.3 Changing Content Layout
Each slot is assigned a content layout (template). The content layout of a slot determines how the asset contained within the slot is displayed. When you change the content layout of a slot, a "Slot" asset is created and stored in the WebCenter Sites database. When you approve the asset, you must also approve the "Slot" assets associated with that asset. This section provides instructions for changing the content layout (template) of a slot.
To change the content layout of a slot
-
Log in to WebCenter Sites, select the site you want to work with and select the icon for the WebCenter Sites Contributor interface.
-
Find and open the asset. Do one of the following:
-
Search for and open the desired asset:
-
In the Search field, enter search criteria identifying the asset and click the magnifying glass button.
-
In the search results list, click the name of the asset.
-
-
If you previously bookmarked the asset, open it from the Bookmarks node in the My Work tree:
-
In the My Work tree, expand the Bookmarks node. (If the My Work tree is collapsed, expand it by clicking the My Work bar in the navigation pane.)
-
In the list of bookmarked assets, double-click the name of the desired asset.
For more information about finding assets, see Chapter 6, "Finding and Organizing Assets."
A tab opens displaying the Inspect view of the asset in either Form Mode or Web Mode. (In this example, we use the Tennis Page asset.)
-
-
-
If the asset is displayed in Form Mode, switch to Web Mode.
-
In the asset's toolbar, click the Mode switch.
-
If the asset is not assigned to a template (web page layout), the "Select Layout" dialog box is displayed. Select the desired layout and then click Apply.
The tab re-displays the asset's Inspect view in Web Mode.
-
-
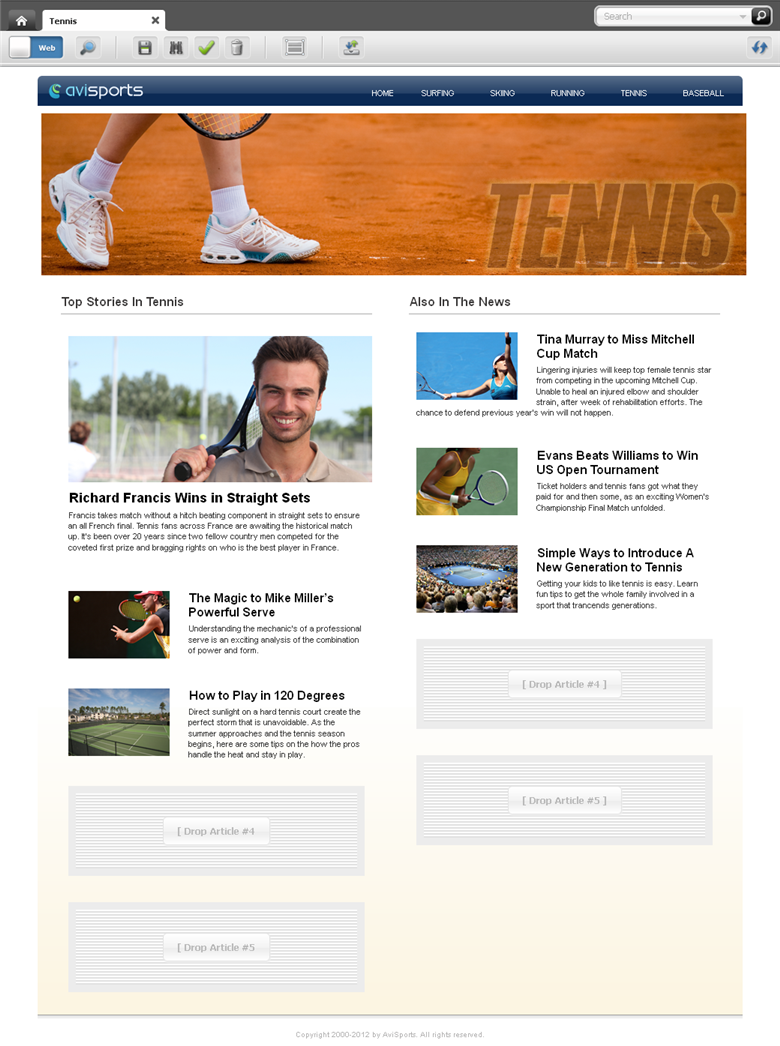
In the asset's toolbar, click the Edit icon.
The tab displays the Edit view of the asset in Web Mode.
Figure 4-21 Edit View of an Asset in Web Mode
Description of "Figure 4-21 Edit View of an Asset in Web Mode"
-
Change the content layout (template) of a slot containing an asset:
-
Click in the slot whose content layout (template) you wish to change. For example:
If the slot is multi-valued, when you click it, two or more slots will be highlighted along with the slot whose content layout you wish to change. In this case, the toolbar will display only the Edit and Manage options (shown below). Click the Edit option.
Now you can click the individual slots within the multi-valued slot. Click the desired slot to display its toolbar.
-
In the slot toolbar, click the Change content layout option.
Figure 4-24 Slot Toolbar – Change Content Layout

Description of "Figure 4-24 Slot Toolbar – Change Content Layout"
Note:
If you do not see the Change content layout option in the toolbar, stop here. The slot does not support this type of editing.
The "Change Content Layout" dialog opens.
Figure 4-25 'Change Content Layout' Dialog
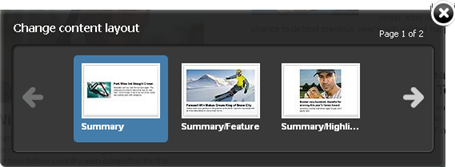
Description of "Figure 4-25 'Change Content Layout' Dialog"
-
Select the desired layout and then click Apply.
The content contained within the slot is rendered with the selected layout. For example:
-
-
Save the asset by doing one of the following:
-
In the asset's toolbar, click the Save icon.
-
In the menu bar, select Content, then select Save.
WebCenter Sites saves the asset to the database, unless:
-
You have left out one or more required field(s).
-
An entry or selection you have made in one or more field(s) is not permitted.
If either of the above is true, WebCenter Sites displays an error message indicating the offending fields. Correct the errors, then save the asset.
-
-
Inspect the asset by doing one of the following:
-
In the asset's toolbar, click the Inspect icon.
-
In the menu bar, select Edit, then select Inspect.
The tab displays the Inspect view of the asset in Web Mode. When you inspect an asset, you cannot modify its content.
-
-
Preview the asset:
-
In the asset's toolbar, click the Preview icon.
The tab displays the preview of the asset. For detailed instructions about previewing an asset, see Chapter 7, "Previewing Assets."
-
When you are done previewing the asset, click the Go Back icon.
The tab re-displays the asset in Web Mode.
-
4.4.4 Editing Associations
When working with an asset in Web Mode, you can edit its associations by adding an asset to an empty slot, replacing an asset currently displayed in a slot with a different asset, repositioning the assets displayed in a multi-valued slot, and removing an asset from a slot.
This section contains instructions on the following:
-
Section 4.4.4.2, "Editing the Content of an Associated Asset"
-
Section 4.4.4.4, "Changing the Position of Content Displayed in a Multi-Valued Slot"
4.4.4.1 Adding or Replacing an Association
This section shows you how to create or replace an association between two assets by dragging and dropping the asset you wish to associate into the desired slot space of the asset you are working with in Web Mode.
To add or replace an association
-
Log in to WebCenter Sites, select the site you want to work with and select the icon for the WebCenter Sites Contributor interface.
-
Find and open the asset. Do one of the following:
-
Search for and open the desired asset:
-
In the Search field, enter search criteria identifying the asset and click the magnifying glass button.
-
In the search results list, click the name of the asset.
-
-
If you previously bookmarked the asset, open it from the Bookmarks node in the My Work tree:
-
In the My Work tree, expand the Bookmarks node. (If the My Work tree is collapsed, expand it by clicking the My Work bar in the navigation pane.)
-
In the list of bookmarked assets, double-click the name of the desired asset.
For more information about finding assets, see Chapter 6, "Finding and Organizing Assets."
A tab opens displaying the Inspect view of the asset in either Form Mode or Web Mode. (In this example, we use the 25 Nevada Resorts Serving Snow "Article" asset.)
-
-
-
If the asset is displayed in Form Mode, switch to Web Mode.
-
In the asset's toolbar, click the Mode switch.
-
If the asset is not assigned to a template (web page layout), the "Select Layout" dialog box is displayed. Select the desired layout and then click Apply.
The tab re-displays the asset's Inspect view in Web Mode.
-
-
In the asset's toolbar, click the Edit icon.
The tab displays the Edit view of the asset in Web Mode.
-
Determine the slot into which you wish to place the asset. If the slots are already populated, determine which slot's content you wish to replace.
-
Associate an asset to the asset you are working with:
-
Find the asset you want to place in the slot. Do one of the following:
-
In the Search field, enter search criteria identifying the asset and click the magnifying glass button.
The search results list is displayed to the right of the asset you are working with.
-
If you previously bookmarked the asset, expand the Bookmarks node in the My Work tree. (If the My Work tree is collapsed, expand it by clicking the My Work bar in the navigation pane.)
For more information about finding assets, see Chapter 6, "Finding and Organizing Assets."
-
-
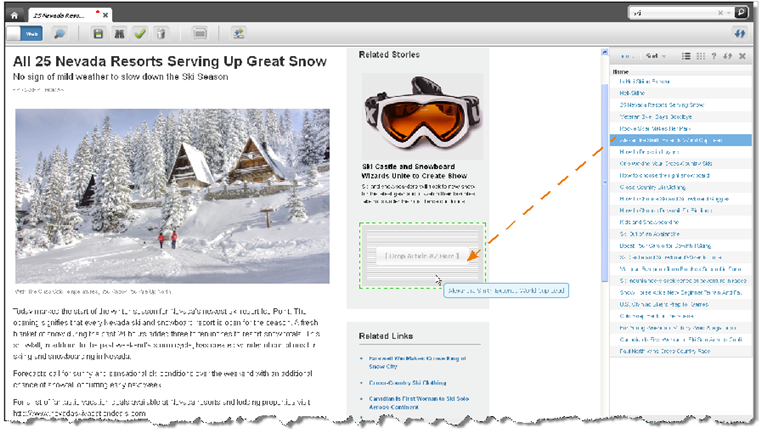
In the list of assets, click the name of the asset you want to add to the slot, hold down the button on the mouse and drag the asset to the desired slot, as shown in Figure 4-27.
As you drag the asset to the desired slot, the asset's name is displayed as a floating object. The slot into which you can drop the asset can either be empty or occupied. In Figure 4-28, the asset is being dragged over an empty slot.
Figure 4-28 Slot Surrounded by Green Border

Description of "Figure 4-28 Slot Surrounded by Green Border"
When you hover the asset over the slot, if the slot supports that type of asset, a green-dotted border is displayed around it (as shown above). If the slot does not support that type of asset, a red-dotted border is displayed around it.
-
Drop the asset into the slot.
The asset you dropped into the slot is now associated with the asset you are working with. If the slot into which you drop the asset is already populated, the asset that was replaced is removed from the slot and as an association of the asset with which you are working.
-
-
Save your changes by doing one of the following:
-
In the asset's toolbar, click the Save icon.
-
In the menu bar, select Content, then select Save.
WebCenter Sites saves the asset to the database, unless:
-
You have left out one or more required field(s).
-
An entry or selection you have made in one or more field(s) is not permitted.
If either of the above is true, WebCenter Sites displays an error message indicating the offending fields. Correct the errors, then save the asset.
-
-
Inspect the asset by doing one of the following:
-
In the asset's toolbar, click the Inspect icon.
-
In the menu bar, select Edit, then select Inspect.
The tab displays the Inspect view of the asset in Web Mode. When you inspect an asset, you cannot modify its content.
-
-
Preview the asset:
-
In the asset's toolbar, click the Preview icon.
The tab displays the preview of the asset. For detailed instructions about previewing an asset, see Chapter 7, "Previewing Assets."
-
When you are done previewing the asset, click the Go Back icon to display the asset in Web Mode.
-
4.4.4.2 Editing the Content of an Associated Asset
When working with an asset in Web Mode, you can edit the content of its associated asset(s) either directly in the slot which displays the associated asset or in a new tab. If you edit the content of an associated asset in a new tab, when you save that asset, the changes you made are reflected in the slot that displays the asset.
To edit the content of an associated asset
-
Log in to WebCenter Sites, select the site you want to work with and select the icon for the WebCenter Sites Contributor interface.
-
Find and open the asset. Do one of the following:
-
Search for and open the desired asset:
-
In the Search field, enter search criteria identifying the asset and click the magnifying glass button.
-
In the search results list, click the name of the asset.
-
-
If you previously bookmarked the asset, open it from the Bookmarks node in the My Work tree:
-
In the My Work tree, expand the Bookmarks node. (If the My Work tree is collapsed, expand it by clicking the My Work bar in the navigation pane.)
-
In the list of bookmarked assets, double-click the name of the desired asset.
For more information about finding assets, see Chapter 6, "Finding and Organizing Assets."
A tab opens displaying the Inspect view of the asset in either Form Mode or Web Mode. (In this example, we use the 25 Nevada Resorts Serving Snow "Article" asset.)
-
-
-
If the asset is displayed in Form Mode, switch to Web Mode.
-
In the asset's toolbar, click the Mode switch.
-
If the asset is not assigned to a template (web page layout), the "Select Layout" dialog box is displayed. Select the desired layout and then click Apply.
The tab re-displays the asset's Inspect view in Web Mode.
-
-
In the asset's toolbar, click the Edit icon.
The tab displays the Edit view of the asset in Web Mode.
Figure 4-30 Edit View of an Asset in Web Mode

Description of "Figure 4-30 Edit View of an Asset in Web Mode"
-
Click the slot containing the associated asset you wish to edit.
The slot toolbar is displayed. If the slot is configured to allow you to edit its content, you will see either the Edit option, the Open in new tab option, or both.
If the slot is multi-valued, when you click it, you will see only the Edit and Manage options. Click the Edit option to access the individual slots within the multi-valued slot. Click an individual slot to display its toolbar (shown in Figure 4-31).
-
Edit the associated asset displayed in the slot. Do one of the following:
-
If you wish to edit the associated asset directly in the slot:
-
In the slot's toolbar, click the Edit option.
-
Point to the areas of the asset. Any area that becomes highlighted is editable.
-
Make your changes to the associated asset.
-
-
If you wish to edit the associated asset in a new tab:
-
In the slot's toolbar, click the Open in new tab option.
A new tab opens displaying the Inspect view of the associated asset in either Form Mode or Web Mode.
-
In the associated asset's toolbar, click the Edit icon.
-
Make your changes to the associated asset.
If the asset is displayed in Web Mode, see steps 5 – 8 in Section 4.2.3, "Creating a New Asset in Web Mode" for details on the fields you may see.
If the asset is displayed in Form Mode, see step 6 in Section 3.1.2, "Creating a New Asset in Form Mode" for details on the fields you may see.
-
Save and close the asset. In the menu bar, select Content, then select Save & Close.
-
Switch back to the tab displaying the asset you are working with (which you opened in step 2 of this procedure.
-
Refresh the asset whose slot displays the associated asset you edited. In the asset's toolbar, click the Refresh icon.
The slot containing the associated asset you edited displays the asset with the changes you made.
-
-
-
Save your changes by doing one of the following:
-
In the asset's toolbar, click the Save icon.
-
In the menu bar, select Content, then select Save.
WebCenter Sites saves the asset to the database, unless:
-
You have left out one or more required field(s).
-
An entry or selection you have made in one or more fields is not permitted.
If either of the above is true, WebCenter Sites displays an error message indicating the offending fields. Correct the errors, then save the asset.
-
-
Inspect the asset by doing one of the following:
-
In the asset's toolbar, click the Inspect icon.
-
In the menu bar, select Edit, then select Inspect.
The tab displays the Inspect view of the asset in Web Mode. When you inspect an asset, you cannot modify its content.
-
-
Preview the asset:
-
In the asset's toolbar, click the Preview icon.
The tab displays the preview of the asset. For detailed instructions about previewing an asset, see Chapter 7, "Previewing Assets."
-
When you are done previewing the asset, click the Go Back icon to display the asset in Web Mode.
-
4.4.4.3 Removing Associations
When you are working with an asset in Web Mode and you remove an asset from a slot, you are also removing the association between the asset you are working with and the asset you removed from the slot.
-
Log in to WebCenter Sites, select the site you want to work with and select the icon for the WebCenter Sites Contributor interface.
-
Find and open the asset. Do one of the following:
-
Search for and open the desired asset:
-
In the Search field, enter search criteria identifying the asset and click the magnifying glass button.
-
In the search results list, click the name of the asset.
-
-
If you previously bookmarked the asset, open it from the Bookmarks node in the My Work tree:
-
In the My Work tree, expand the Bookmarks node. (If the My Work tree is collapsed, expand it by clicking the My Work bar in the navigation pane.)
-
In the list of bookmarked assets, double-click the name of the desired asset.
For more information about finding assets, see Chapter 6, "Finding and Organizing Assets."
A tab opens displaying the Inspect view of the asset in either Form Mode or Web Mode. (In this example, we use the 25 Nevada Resorts Serving Snow "Article" asset.)
-
-
-
If the asset is displayed in Form Mode, switch to Web Mode.
-
In the asset's toolbar, click the Mode switch.
-
If the asset is not assigned to a template (web page layout), the "Select Layout" dialog box is displayed. Select the desired layout and then click Apply.
The tab re-displays the asset's Inspect view in Web Mode.
-
-
In the asset's toolbar, click the Edit icon.
The tab displays the Edit view of the asset in Web Mode.
Figure 4-32 Edit View of an Asset in Web Mode

Description of "Figure 4-32 Edit View of an Asset in Web Mode"
-
Click the slot containing the asset you wish to remove.
The slot's toolbar is displayed.
-
Click the Clear Slot (X) option to remove the asset from the slot.
The asset is removed from the slot. The asset you removed is no longer associated with the asset you are working with.
-
Save your changes by doing one of the following:
-
In the asset's toolbar, click the Save icon.
-
In the menu bar, select Content, then select Save.
WebCenter Sites saves the asset to the database, unless:
-
You have left out one or more required field(s).
-
An entry or selection you have made in one or more fields is not permitted.
If either of the above is true, WebCenter Sites displays an error message indicating the offending fields. Correct the errors, then save the asset.
-
-
Inspect the asset by doing one of the following:
-
In the asset's toolbar, click the Inspect icon.
-
In the menu bar, select Edit, then select Inspect.
The tab displays the Inspect view of the asset in Web Mode. When you inspect an asset, you cannot modify its content.
-
-
Preview the asset:
-
In the asset's toolbar, click the Preview icon.
The tab displays the preview of the asset. For detailed instructions about previewing an asset, see Chapter 7, "Previewing Assets."
-
When you are done previewing the asset, click the Go Back icon to display the asset in Web Mode.
-
4.4.4.4 Changing the Position of Content Displayed in a Multi-Valued Slot
If the asset you are working with in Web Mode has a multi-valued slot, you can reposition the order in which its associated assets are displayed on the web page by moving an asset from one slot to another.
To change the order in which content is displayed in a multi-valued slot
-
Log in to WebCenter Sites, select the site you want to work with and select the icon for the WebCenter Sites Contributor interface.
-
Find and open the asset. Do one of the following:
-
Search for and open the desired asset:
-
In the Search field, enter search criteria identifying the asset and click the magnifying glass button.
-
In the search results list, click the name of the asset.
-
-
If you previously bookmarked the asset, open it from the Bookmarks node in the My Work tree:
-
In the My Work tree, expand the Bookmarks node. (If the My Work tree is collapsed, expand it by clicking the My Work bar in the navigation pane.)
-
In the list of bookmarked assets, double-click the name of the desired asset.
For more information about finding assets, see Chapter 6, "Finding and Organizing Assets."
A tab opens displaying the Inspect view of the asset in either Form Mode or Web Mode. (In this example, we use the 25 Nevada Resorts Serving Snow "Article" asset.)
-
-
-
If the asset is displayed in Form Mode, switch to Web Mode.
-
In the asset's toolbar, click the Mode switch.
-
If the asset is not assigned to a template (web page layout), the "Select Layout" dialog box is displayed. Select the desired layout and then click Apply.
The tab re-displays the asset's Inspect view in Web Mode.
-
-
In the asset's toolbar, click the Edit icon.
The tab displays the Edit view of the asset in Web Mode.
Figure 4-34 Edit View of an Asset in Web Mode

Description of "Figure 4-34 Edit View of an Asset in Web Mode"
-
Determine which slot is multi-valued. The configurations your developers made to the web page layout (template) assigned to the asset determines how multi-valued slots are displayed in an asset's Edit view. For information about which slots are multi-valued on your site, see your developers.
In our example (working with the 25 Nevada Resorts Serving Snow "Article" asset), when you point to a multi-valued slot, two or more slots associated with the multi-valued slot are highlighted with a blue overlay, as shown below:
-
Click in the desired multi-valued slot. A multi-valued slot's toolbar displays the Edit and Manage options. For example:
-
In the multi-valued slot's toolbar, click the Manage option.
The following dialog box opens:
Figure 4-37 Multi-Valued Slot's 'Manage Slot Content' Dialog
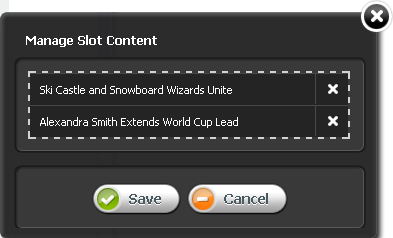
Description of "Figure 4-37 Multi-Valued Slot's 'Manage Slot Content' Dialog"
-
In the "Manage Slot Content" dialog box, reposition the assets displayed in the multi-valued slot. Click the name of the desired asset and then drag and drop it into the desired position.
Figure 4-38 Re-Ordering Assets in a Multi-Valued Slot
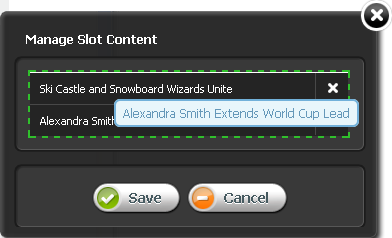
Description of "Figure 4-38 Re-Ordering Assets in a Multi-Valued Slot"
-
The assets are displayed in the desired order in the multi-valued slot.
Figure 4-39 Multi-Valued Slot – Assets Displayed in Desired Position
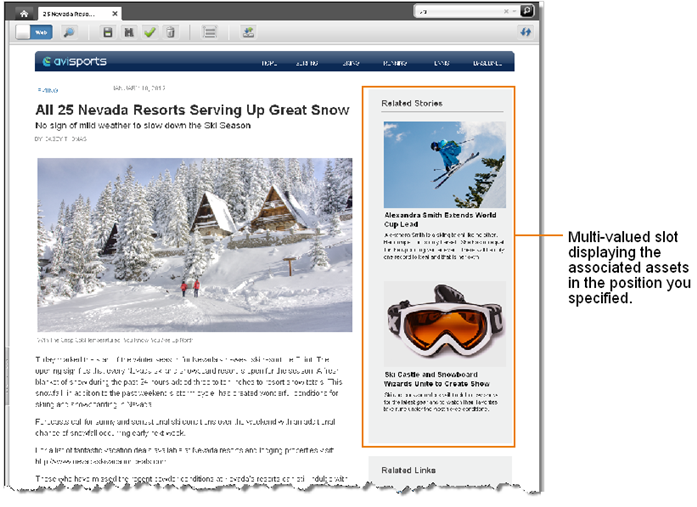
Description of "Figure 4-39 Multi-Valued Slot – Assets Displayed in Desired Position"
-
Save your changes by doing one of the following:
-
In the asset's toolbar, click the Save icon.
-
In the menu bar, select Content, then select Save.
WebCenter Sites saves the asset to the database, unless:
-
You have left out one or more required field(s).
-
An entry or selection you have made in one or more fields is not permitted.
If either of the above is true, WebCenter Sites displays an error message indicating the offending fields. Correct the errors, then save the asset.
-
-
Inspect the asset by doing one of the following:
-
In the asset's toolbar, click the Inspect icon.
-
In the menu bar, select Edit, then select Inspect.
The tab displays the Inspect view of the asset in Web Mode. When you inspect an asset, you cannot modify its content.
-
-
Preview the asset:
-
In the asset's toolbar, click the Preview icon.
The tab displays the preview of the asset. For detailed instructions about previewing an asset, see Chapter 7, "Previewing Assets."
-
When you are done previewing the asset, click the Go Back icon to display the asset in Web Mode.
-
