16 Completing Community-Gadgets Pre-Deployment Steps
This chapter describes the steps you must complete before you can deploy Community-Gadgets. It is assumed that you have successfully generated the Community-Gadgets deployment file.
This chapter contains the following sections:
-
Section 16.2, "Copying Installer-Generated Configuration Files"
-
Section 16.4, "Adding Community-Gadgets URLs to the WebCenter Sites customBeans.xml file"
-
Section 16.6, "If Your Management and/or Production WebCenter Sites Is Integrated with OAM"
16.1 Configuring inCache Invalidation
-
Run Sites Explorer and connect to the production WebCenter Sites server using the
ContentServeruser. (For instructions on logging in to Sites Explorer, see the Oracle Fusion Middleware WebCenter Sites Developer's Guide.) -
Open the
SystemSatellitetable in Sites Explorer:-
Copy the first row of the table.
-
Paste the row into the table, once for each management node of the Community-Gadgets application and once for each production node of the Community-Gadgets application.
-
In the new rows, change the values of the following fields to match the values for your installation:
-
description:
<node name> -
protocol:
<http or https> -
host:
<host name or IP address of the management or production Community-Gadgets application server> -
port:
<port number of the management or production Community-Gadgets application server> -
flushservletpath:
/cg/FlushServerNote:
If the standard Community-Gadgets application context root is not used, use:/<new context root>/FlushServer
-
username:
<of the production Satellite Server user>(the default isSatelliteServer) -
password:
<password of the above user>
-
-
-
Continue to Section 16.2, "Copying Installer-Generated Configuration Files."
16.2 Copying Installer-Generated Configuration Files
The Community-Gadgets installer created property files and other configuration files that will be read by the application server to start the deployed Community-Gadgets application correctly.
-
For easier management and scalability, we recommend copying the files such that each instance of the Community-Gadgets application has its own set of files:
-
In
<cg_install_dir>, create a directory called<cg-standalone-configs>. -
Within this newly created directory, create a subdirectory for each management node and each production node. The subdirectories will hold the configuration files for those nodes. These directories can be either on a shared file system or on an individual server, depending on you architecture.
-
For each subdirectory that you created in the step above, add its path to your application server's classpath.
For example, in Linux:
mkdir <cg_install_dir>/<cg-standalone-configs>
cd <cg_install_dir>/<cg-standalone-configs>
mkdir <cgA_M1> <cgA_M2> <cgB_P1> <cgB_P2> ...
-
-
Copy the installer-generated configuration and property files to the node subdirectories as follows:
For each Management Community-Gadgets application node:
-
Copy the configuration files from
<cg_install_dir>/deploy/management/management_node1to the subdirectories that you created in step 1.b for the management Community-Gadgets application.For example, in Linux:
cd <cg_install_dir>/deploy/management/management_node1
cp -p ./* <cg_install_dir>/<cg-standalone-configs>/<cgA_M1>
-
If needed, change the log file names by modifying
log4j-cos.propertiesandlog4j-shindig.propertiesfor each management Community-Gadgets application on a particular node.
For each Production Community-Gadgets application node:
-
Copy the configuration files from
<cg_install_dir>/deploy/production/production_node1to the subdirectories that you created in step 1.b for the production Community-Gadgets application.For example, in Linux:
cd <cg_install_dir>/deploy/production/production_node1
cp -p ./* <cg_install_dir>/<cg-standalone-configs>/<cgB_P1>
-
Edit
jbossTicketCacheReplicationConfig.xmlby going to the UDP tag and doing the following:-
For a non-clustered application, set the value of
mcast_portto a port number that is unique relative to the other CAS applications on the subnet. -
For a clustered application, set the value of
ip_ttlto8and change thebind_addrto the host IP address of the Visitors CAS cluster member. Ensure that all cluster members are listening on the same mcast address and port.
-
-
If needed, change the log file names by modifying
log4j-cos.properties,log4j-shindig.properties, andlog4j.propertiesfor each production Community-Gadgets application on a particular node.
-
-
Complete the rest of the steps in this chapter as necessary for your system. When you have finished, continue to Chapter 17, "Deploying Community-Gadgets."
16.3 Proxy Connection Settings
The Community-Gadgets application supports up to five proxy connection settings (disabled by default) as shown in Figure 16-1.
Figure 16-1 Proxy Connection Settings Supported by Community-Gadgets
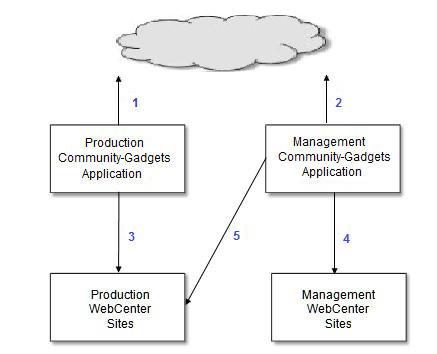
Description of ''Figure 16-1 Proxy Connection Settings Supported by Community-Gadgets ''
-
Proxy connection 1 is an Internet connection proxy that supports communication from the production Community-Gadgets application to the Internet. This proxy connection is used for external authentication via third-party services such as Facebook, Twitter, Google, and Janrain.
-
Proxy connection 2 is an Internet connection proxy that supports communication from the management Community-Gadgets application to the Internet. This proxy connection is used for access to external gadgets descriptors during gadgets registration.
-
Proxy connection 3 supports communication from the production Community-Gadgets application to the production WebCenter Sites application.
-
Proxy connection 4 supports communication from the management Community-Gadgets application to the management WebCenter Sites application.
-
Proxy connection 5 supports communication from the management Community-Gadgets application to the production WebCenter Sites application.
If you wish to configure proxy connections, do the following:
-
Proxy connections are configured in the
setup_proxy.propertiesfile located in thedeploy/production/production_node1anddeploy/management/management_node1folders, or inside the folders you created in Section 16.2, "Copying Installer-Generated Configuration Files." Thesetup_proxy.propertiesfile contains five sections with parameters for each proxy connection.-
If proxies are not used, all proxy sections by default have the
<proxy>.proxy.attrs.enabledparameter set tofalse. -
If a proxy is used, go to the relevant section and set the following parameters:
-
Set the
<proxy>.proxy.attrs.enabledparameter totrue. -
Set the
<proxy>.proxy.attrs.hostparameter to the host name or IP address of the proxy. -
Set the
<proxy>.proxy.attrs.portparameter to the port of the proxycos-production_www.proxy.attrs.auth.user
-
-
If a proxy requires authentication, set the
<proxy>.proxy.attrs.auth.requiredparameter totrueand specify the username and password in the<proxy>.proxy.attrs.auth.userand<proxy>.proxy.attrs.auth.passwordparameters.Note:
In the Internet proxies sections, it can be useful to add the host names of your management and production WebCenter Sites instances to the list of hosts for which a proxy should not be used in production and management. -
For reference, a sample configuration section is given below:
Sample configuration for a production Internet connection proxy (first section in the
setup_proxy.propertiesfile):# Use proxy server # Possible values: "true" or "false" cos-production_www.proxy.attrs.enabled=true # Proxy type # Possible values: "http" or "socks" cos-production_www.proxy.attrs.type=http # Proxy server host cos-production_www.proxy.attrs.host=www-proxy.example.com # Proxy server port. cos-production_www.proxy.attrs.port=80 # Is authentication required for proxy server configured above. cos-production_www.proxy.attrs.auth.required=true # User proxy account to log in to the proxy server cos-production_www.proxy.attrs.auth.user=user # Password of the above user. cos-production_www.proxy.attrs.auth.password=proxypassword # List of hosts for which proxy should not be used cos-production_www.proxy.attrs.non_proxy_hosts=
-
-
Complete the rest of the steps in this chapter as necessary for your system. When you have finished, continue to Chapter 17, "Deploying Community-Gadgets.".
16.4 Adding Community-Gadgets URLs to the WebCenter Sites customBeans.xml file
-
In your installation, navigate to
<sites_install_dir>/bin/customBeans.xml. -
Open the
customBeans.xmlfile. -
In the
RequestParamValidatorbean section, add the Community-Gadgets URLs insidevalidUrlslist as follows:-
On the WebCenter Sites management system, enter the following for each management Community-Gadgets instance:
<value>{protocol}://{cg_mgmt_node_host}:{cg_mgmt_node_port}/{cg_context}/*</value> -
On the WebCenter Sites production system, enter the following for each production Community-Gadgets instance:
<value>{protocol}://{cg_prod_node_host}:{cg_prod_node_port}/{cg_context}/*</value> -
In case of clustered installation, additional value is required for Community-Gadgets Load Balancer.
Example 16-1 shows a sample
customBeans.xmlfile.Example 16-1 Sample customBeans.xml File
<bean id="RequestParamValidator"class="com.fatwire.cas.web.RequestParamValidator"> <property name="validUrls"> <list> <!-- Sites URL --> <value>http://192.0.2.1:8080/cs/*</value> <!-- Community-Gadgets node 1 --> <value>http://192.0.2.2:8080/cg/*</value> <!-- Community-Gadgets node 2 --> <value>http://192.0.2.3:8080/cg/*</value> <!-- Community-Gadgets Load Balancer 1 --> <value>http://192.0.2.4:80/cg/*</value> </list> </property> </bean> -
16.5 Enabling Shindig Features
Gadgets that are either developed for iGoogle or use iGoogle features may require you to enable extra Shindig features in order for those gadgets to render properly. If you enable these Shindig features, the Community-Gadgets application downloads the third-party libraries necessary for rendering the gadgets that require them from the Internet.
Note:
To enable downloading of third-party libraries, you must have access to the Internet. If you use a proxy for Internet access, configure the proper connections settings for both management and production Internet access in thesetup_proxy.properties files. For more information, see Section 16.3, "Proxy Connection Settings."-
If you wish to enable additional Shindig features for the Community-Gadgets application, uncomment the following lines in the
gas_features.txtfile located in the<cg_install_dir>/deploy/management/management_node1and<cg_install_dir>/deploy/production/production_node1folders (or in the folders you created in Section 16.2, "Copying Installer-Generated Configuration Files"):# features/analytics/feature.xml # features/com.google.gadgets.analytics/feature.xml # features-extras/org.jquery.core-1.4.2/feature.xml
-
Complete the rest of the steps in this chapter as necessary for your system. When you have finished, continue to Chapter 17, "Deploying Community-Gadgets."
16.6 If Your Management and/or Production WebCenter Sites Is Integrated with OAM
-
If your management and/or production instance of WebCenter Sites is integrated with OAM, configure the Community-Gadgets instance to work with the same OAM. For instructions, see Oracle Fusion Middleware WebCenter Sites: Installing and Configuring Supporting Software.
-
Continue to Chapter 17, "Deploying Community-Gadgets."