5 Preparing to Install WebCenter Sites on IBM WebSphere Application Server
The chapter shows you how to configure WebSphere Application Server (WAS) for WebCenter Sites.
This chapter contains the following sections:
-
Section 5.1, "Quick Reference for Setting Up WebSphere Application Server"
-
Section 5.2, "Step 1: Configuring WebSphere Application Server"
-
Section 5.3, "Step 2: Integrating WebSphere Application Server with a Supported Web Server"
Note:
Before starting the procedures in this chapter, ensure you have completed pre-requisite steps described in Chapter 2, "Prerequisites for Installing WebCenter Sites."5.1 Quick Reference for Setting Up WebSphere Application Server
This section contains the following topics:
-
Section 5.1.2, "Paths and Directories Used in Configuring WebSphere Application Server"
-
Section 5.1.3, "Start/Stop Commands for WebSphere Application Server"
5.1.1 Summary of Steps
Complete the steps below for each development, content management, and delivery environment on which WebCenter Sites will be installed.
Step 1: Configuring WebSphere Application Server
-
Create the deployment manager and application server profiles as described in Section 5.2.1, "Create Required Profiles."
-
If you are configuring a cluster environment, create a cluster as described in Section 5.2.2, "Create a Cluster."
-
If you are configuring a non-cluster environment, create application servers as described in Section 5.2.3, "Create Servers."
-
Configure application servers as described in Section 5.2.4, "Configure Servers."
This step requires you to:
-
Configure web container properties for application servers as described in Section 5.2.4.1, "Configuring Web Container Properties."
-
Configure session management for application servers as described in Section 5.2.4.2, "Configuring Session Management."
-
Set the classpath and Java options as described in Section 5.2.4.3, "Setting the Classpath and Java Options."
-
-
Add host aliases to the virtual host for the new servers as described in Section 5.2.5, "Create Host Aliases for the Virtual Host."
-
Configure the WAS environment to connect to the WebCenter Sites database as described in Section 5.2.6, "Configuring a WAS Environment for Database Communications."
This step required you to:
-
Create J2C authentication data as described in Section 5.2.6.1, "Creating J2C Authentication Data."
-
Create a JDBC provider as described in Section 5.2.6.2, "Creating a JDBC Provider."
-
Create a data source as described in Section 5.2.6.3, "Creating a Data Source."
-
Step 2: Integrating WebSphere Application Server with a Supported Web Server
If your environment required a web server, you have the option to integrate WebSphere application servers with IBM HTTP Server or an Apache web server. For information, see Section 5.3, "Step 2: Integrating WebSphere Application Server with a Supported Web Server."
5.1.2 Paths and Directories Used in Configuring WebSphere Application Server
Table 5-1 lists paths and directories that are used in configuring WebSphere application server.
Table 5-1 Paths and Directories Used in Configuring WebSphere Application Server
| Name | Description |
|---|---|
|
|
Path to the directory where WebCenter Sites is installed. The path includes the name of the directory. |
|
|
Path to the WebCenter Sites shared file system directory. The path includes the name of the shared directory. |
|
|
Path to the directory where WebSphere Application Server is installed. The path includes the name of the directory. |
|
|
The host name or IP address of the Deployment Manager host. |
|
|
The port number on which the Deployment Manager console is listening for connections. |
|
|
The name of the Deployment Manager profile. |
|
|
The number of the Simple Object Access Protocol port of the Deployment Manager. |
|
|
The name of the WAS server. |
|
|
The name of the application server profile. |
|
|
The name of the application server node. |
|
|
Path to the directory where IBM HTTP Server is installed. The path includes the name of the directory. |
|
|
The path to the plug-in directory of the web server. The path includes the name of the directory. |
5.1.3 Start/Stop Commands for WebSphere Application Server
This section lists the commands for starting and stopping WAS components.
This section contains the following topics:
5.1.3.1 Deployment Manager
Note:
The default Deployment Manager profile name isDmgr01.Start and stop commands are the following:
-
To start:
-
On Windows:
<WAS_home>\bin\startManager.bat -profileName <dmgr_profile>
-
On UNIX:
<WAS_home>/bin/startManager.sh -profileName <dmgr_profile>
-
-
To stop:
-
On Windows:
<WAS_home>\bin\stopManager.bat -profileName <dmgr_profile>
-
On UNIX:
<WAS_home>/bin/stopManager.sh -profileName <dmgr_profile>
-
5.1.3.2 Node Agent
Note:
The default name of the first application server profile created isAppSrv01.Start and stop commands are the following:
-
To start:
-
On Windows
<WAS_home>\bin\startNode.bat –profileName <appsrv_profile>
-
On UNIX
<WAS_home>/bin/startNode.sh –profileName <appsrv_profile>
-
-
To stop:
-
On Windows:
<WAS_home>\bin\stopNode.bat –profileName <appsrv_profile>
-
On UNIX:
<WAS_home>/bin/stopNode.sh –profileName <appsrv_profile>
-
5.1.3.3 Application Server
Note:
The default server name isserver1.
The default name of the first application server profile created is AppSrv01.
Start and stop commands are the following:
-
To start:
-
On Windows:
<WAS_home>\bin\startServer.bat <server_name> -profileName <appsrv_profile>
-
On UNIX:
<WAS_home>/bin/startServer.sh <server_name> -profileName <appsrv_profile>
-
-
To stop:
-
On Windows:
<WAS_home>\bin\stopServer.bat <server_name> -profileName <appsrv_profile>
-
On UNIX:
<WAS_home>/bin/stopServer.sh <server_name> -profileName <appsrv_profile>
-
5.2 Step 1: Configuring WebSphere Application Server
This section shows you how to create a WAS instance using the command line.
Note:
On Windows, the names of the command-line tools used in this section end with.bat instead of .sh. Remember to make the necessary substitution when executing the commands on a Windows system.This section contains the following steps:
5.2.1 Create Required Profiles
Following the steps given in this section, you will be creating the deployment manager and application server profiles as required by your environment. In a multi-server non-clustered environment, you may use a single deployment manager to administer all local and remote servers from a single administration console, or use a deployment manager for each physical server. In a clustered environment, use a deployment manager on the primary cluster member only.
Note:
Make sure the host name is configured for the system so the nodes in each profile can be reached remotely.-
Delete unused profiles.
In case you want to cleanup profiles that are no longer in use, complete the following steps:
-
List existing profiles
From the
<WAS_home>/bindirectory of the WAS installation you want to check, run the following command:./manageprofiles.sh -listProfiles
By default, a deployment manager profile is prefixed with
Dmgr, while an application server profile is prefixed withAppSrv. -
Choose profiles from the list that you want to delete and proceed to step c.
-
Delete profiles
For each profile selected in step b, run the following command:
./manageprofiles.sh -delete -profileName <profile_name>
-
Delete the leftover profile directories,
<WAS_home>/profiles/<profile_name>.
-
-
Create a Deployment Manager profile:
If you are not using a deployment manager created by the installer, create one now. The command below will create a cell (
<dmgr_host>Cell#) or top-level organizational unit for the environment, and a node (<dmgr_host>CellManager#) or mid-level organizational unit for the deployment manager profile. From the<WAS_home>/bindirectory of the primary server, run the following command:./manageprofiles.sh -create -profileName <dmgr_profile> -profilePath <WAS_home>/profiles/<dmgr_profile> -templatePath <WAS_home>/profileTemplates/dmgr -isDefault -defaultPorts
Note:
If you want to enable admin security, append the following options:-enableAdminSecurity true -adminUserName <username> -adminPassword <password>
-
Start the deployment manager.
<WAS_home>/bin/startManager.sh -profileName <dmgr_profile>
-
Create Application Server profiles.
For each physical server, you will create either a managed or a standalone application server profile. If the application server profile will be local to the deployment manager, it will be managed, and if it is remote, it will be standalone. The commands in the following steps will create a node (
<appsrv_host>Node#) for each profile.-
Create a managed application server profile.
From the
<WAS_home>/bindirectory of the server in which the profile will exist, run the following command:./manageprofiles.sh -create -profileName <appsrv_profile> -profilePath <WAS_home>/profiles/<appsrv_profile> -templatePath <WAS_home>/profileTemplates/managed -isDefault
-
Create a standalone application server profile.
./manageprofiles.sh -create -profileName <appsrv_profile> -profilePath <WAS_home>/profiles/<appsrv_profile> -templatePath <WAS_home>/profileTemplates/default -isDefault
Note:
The ports used for these profiles will be the next available set of ports based on existing application server profiles on the server. -
-
Federate Application Server Profiles with the Deployment Manager.
The following command will associate the node of the application server profile with the cell that is managed by the deployment manager.For each application server profile created in step 3, run the following command from the
<WAS_home>/bindirectory of the server where the profile exists:./addNode.sh <dmgr_host> <dmgr_soap_port> -profileName <appsrv_profile>
Note:
The default value for<dmgr_soap_port>is8879. -
Start the Node Agents.
For each application server profile, run the following command from the server on which this profile is located:
<WAS_home>/bin/startNode.sh -profileName <appsrv_profile>
5.2.2 Create a Cluster
In a cluster environment, all WebSphere servers belong to a cluster, and communication between the servers is managed by the application server.
-
Log in to the WebSphere Integrated Solutions administration console:
http://<dmgr_host>:<dmgr_port>/admin
The default deployment manager port is
9060. -
In the tree on the left, expand Servers, expand Clusters, and click WebSphere application server clusters.
-
Create a Cluster:
-
Click New.
-
Enter a cluster name.
-
For an environment using session persistence, select Configure HTTP session memory-to-memory replication.
-
Click Next.
-
Create cluster member servers:
Repeat the following steps for each application server cluster member.
-
Enter a name for the cluster member.
-
Select the node where the cluster member will be located.
-
For the first cluster member, click Next, otherwise click Add Member.
-
Click Next.
-
-
Click Finish.
-
-
Save the changes.
5.2.3 Create Servers
In a non-cluster environment create servers using the following steps:
-
From the administration console, under Servers, expand Server Types, and click WebSphere application servers.
-
Create Servers.
Repeat the following steps for each application server in the environment:
-
Click New.
-
Select the node where the server will be located.
-
Enter a server name.
-
Click Next.
-
Select the default template and click Next.
-
Select Generate Unique Ports and click Next.
-
Click Finish.
-
Click on the newly created server.
-
Under Communications, expand Ports.
-
Note the following ports (They will be added later to the virtual host.):
-
WC_defaulthost -
WC_defaulthost_secure -
SIP_DEFAULTHOST -
SIP_DEFAULTHOST_SECURE
-
-
-
Save the changes.
5.2.4 Configure Servers
In this section, you will complete the following steps:
5.2.4.1 Configuring Web Container Properties
This section explains how to configure web container properties required for WebCenter Sites.
-
From the administration console, under Servers, expand Server Types, and click WebSphere application servers.
-
Add Web Container Properties.
For each application server, complete the following steps:
-
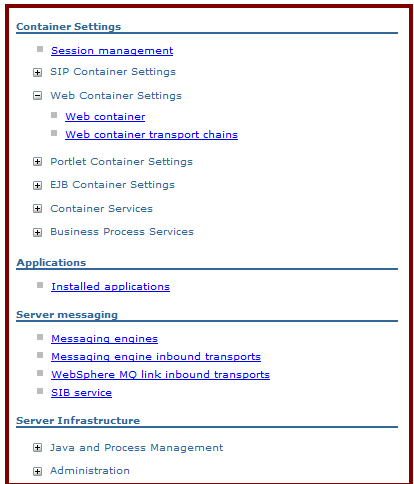
Select the server and expand the Web Container Settings node.
-
In the left-hand pane, expand Servers, then expand Server Types and click Application Servers.
A list of configured servers is displayed.
-
Select the application server instance you created for WebCenter Sites (for example, select server1), and expand the Web Container Settings node (Figure 5-1).
-
Below the Web Container Settings node, click Web container.
-
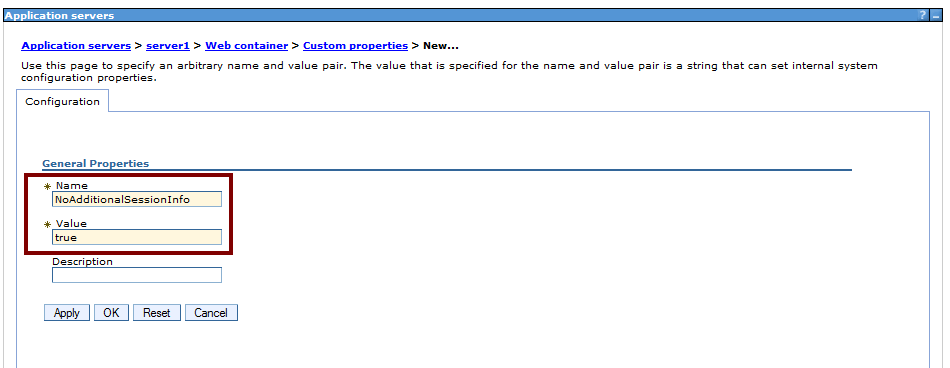
Below the Web container node, click Custom Properties and then click New (Figure 5-2).
-
In the Name field, enter
NoAdditionalSessionInfo. -
In the Value field, enter
true.
-
-
Click Save. The changes synchronize to all nodes (Figure 5-3).
-
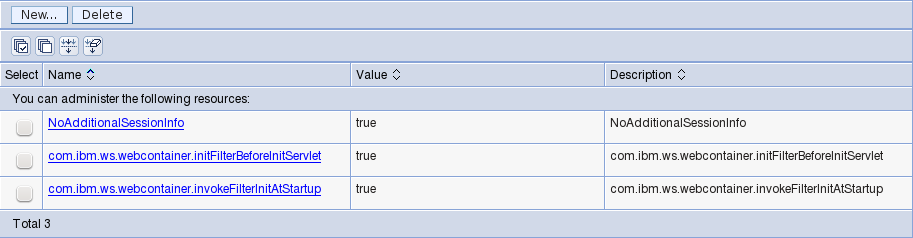
Add the following two properties by following steps e and f:
com.ibm.ws.webcontainer.initFilterBeforeInitServlet=true
com.ibm.ws.webcontainer.invokeFilterInitAtStartup=true
Web container properties should look something like Figure 5-3.
-
5.2.4.2 Configuring Session Management
This section explains how to configure session management properties required for WebCenter Sites.
-
From the administration console, under Servers, expand Server Types, and click WebSphere application servers.
-
Configure Session Management Properties.
For each application server, complete the following steps:
-
Click the server and under Container Settings, click Session management.
-
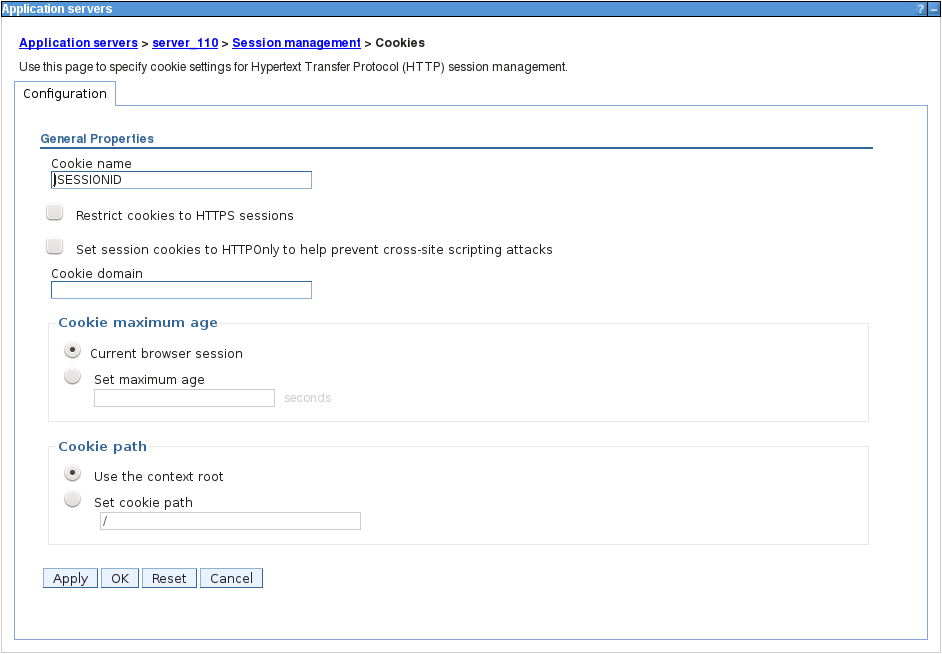
Under General Properties, click Enable cookies (Figure 5-4).
Figure 5-4 Session tracking mechanism: Enable cookies
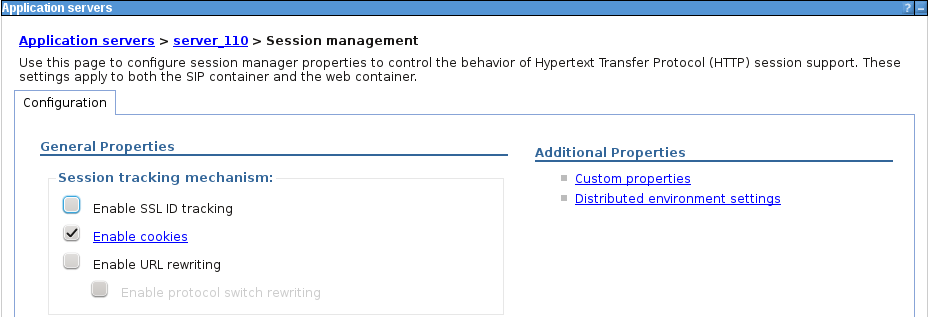
Description of ''Figure 5-4 Session tracking mechanism: Enable cookies''
-
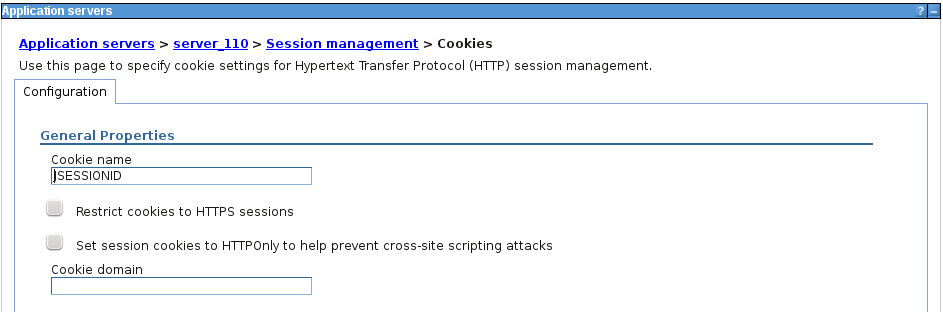
Deselect the Set session cookies to HTTPOnly to help prevent cross-sites scripting checkbox (Figure 5-5).
This is required to run the tree applet in the WebCenter Sites Admin interface.
-
For Cookie path, select Use the context root (Figure 5-6).
-
Click Apply and OK to save the changes.
-
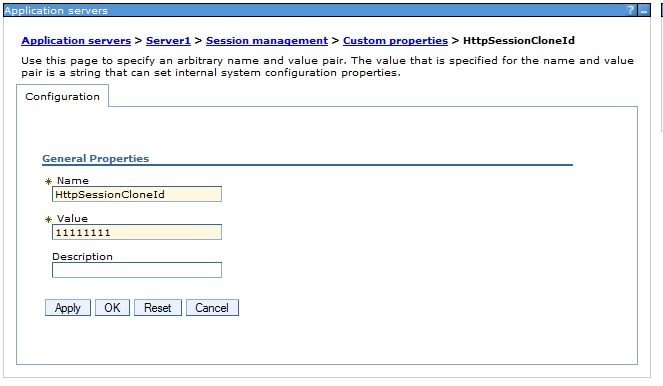
Under Additional Properties, click Custom properties.
-
Click New.
-
In the Name field, enter
HttpSessionCloneId. -
In the Value field, enter an 8 or 9 character alphanumeric Id (Figure 5-7). In a cluster environment, this Id is used to identify the cluster member in which a session is located. This Id must be unique for all cluster members.
-
Click OK and save the changes.
-
5.2.4.3 Setting the Classpath and Java Options
This section explains how to set memory arguments as well as add the required Java options for WebCenter Sites.
-
From the administration console, under Servers, expand Server Types, and click WebSphere application servers.
-
Set the Classpath and Java Options.
For each application server, complete the following steps:
-
Click the server and under Server Infrastructure, expand Java and Process Management and click Process definition (Figure 5-8).
Figure 5-8 Java and Process Management - Process Definition
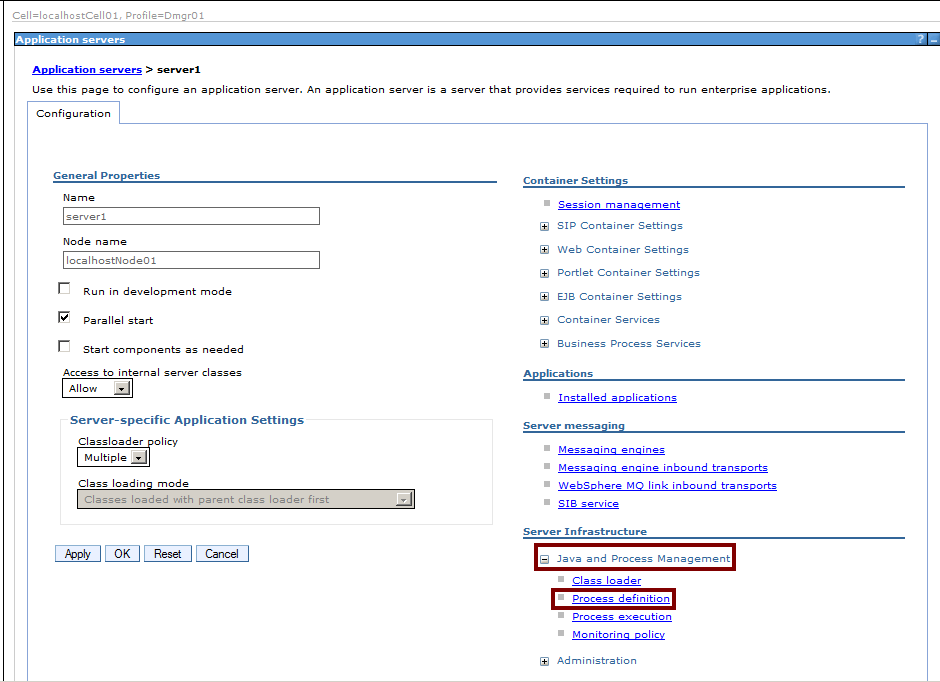
Description of ''Figure 5-8 Java and Process Management - Process Definition''
-
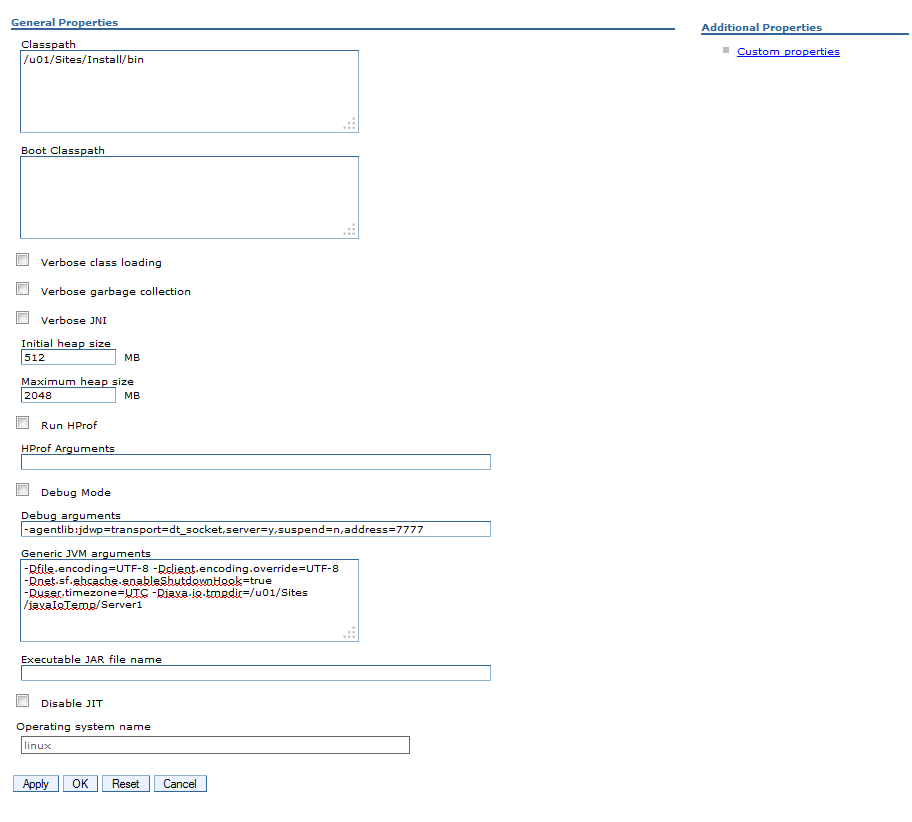
Under Additional Properties, click Java Virtual Machine.
-
Set the Classpath.
In the box under Classpath, enter the following path:
<sites_install_dir>/bin -
Set Memory Arguments.
-
Enter a value in the box under Initial heap size. The recommended value is
512. -
Enter a value in the box under Maximum heap size. The recommended value is
2048.
-
-
Set Java Options.
In the box under Generic JVM arguments, add the following Java options separated by a space:
-
-Dfile.encoding=UTF-8This option specifies UTF-8 file encoding.
-
-Dclient.encoding.override=UTF-8This option specifies UTF-8 URI encoding.
-
-Dnet.sf.ehcache.enableShutdownHook=trueThis option enables the Ehcache shutdown hook.
-
-Djava.net.preferIPv4Stack=trueThis option specifies the use of IPv4 addresses.
-
-Duser.timezone=UTCThis option is used to set the time zone for the JVM. It is recommended to set the value to
UTCacross all WebCenter Sites installations. However, any preferable time zone may be used as long as this value is the same for all WebCenter Sites installations. -
-Djava.io.tmpdir=<path_to_sites_tmpdir>This option specifies which temporary directory the JVM uses. The value (Figure 5-9) should be the path to the directory created in Section 2.1, "Before You Begin."
Note:
IfShift-JIScharacters will be used, add the following option:-Dcs.useJavaURLDecoder=false
-
-
Click OK and save the changes.
-
5.2.5 Create Host Aliases for the Virtual Host
This section explains how to add host aliases to the virtual host for the new servers that were created.
-
From the administration console, expand Environment, and click Virtual hosts.
-
Click default_host.
-
Under Additional Properties, click Host Aliases.
-
Compare the list of ports that were noted in step 2 of Section 5.2.3, "Create Servers" with the existing host aliases. For each unique port that does not have a host alias, do the following:
-
Click New.
-
For Host Name, enter
*. -
For Port, enter the port number.
-
Click OK.
-
-
Save the changes.
5.2.6 Configuring a WAS Environment for Database Communications
This section explains how to configure the WAS environment to communicate with the database for WebCenter Sites.
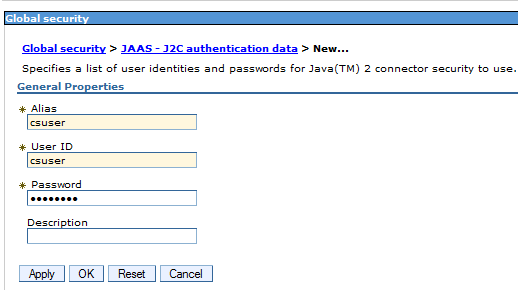
5.2.6.1 Creating J2C Authentication Data
The J2C authentication data is a list of identities and passwords that can be used for securing connections such as JDBC connections.
-
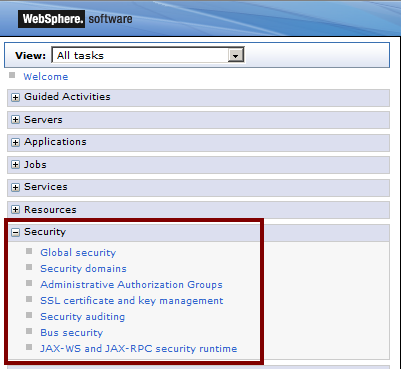
From the administration console, expand Security, and click Global Security (Figure 5-10).
-
Under Authentication, expand Java Authentication and Authorization, and click J2C authentication data.
-
Click New.
-
Create J2C Authentication Data (Figure 5-11).
-
For Alias, enter a unique alias for this user Id/password pair.
-
For User ID and Password, enter the information for the user that will be used to connect to the WebCenter Sites database.
Figure 5-11 JAAS – J2C Authentication Data
Description of ''Figure 5-11 JAAS – J2C Authentication Data''
-
Click OK and save the changes.
-
5.2.6.2 Creating a JDBC Provider
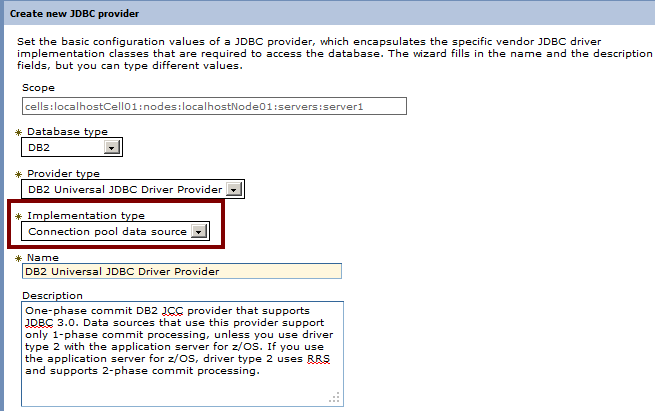
A JDBC provider encapsulates all data sources that use a specific JDBC driver implementation. In a cluster environment, all servers will share the same JDBC provider. In a non-cluster environment, a provider must be created for each server.
-
Copy the database driver JAR files corresponding with the database type to the
<WAS_home>/universalDriver/libdirectory:-
For DB2:
-
db2jcc.jar -
db2jcc_license_cu.jarNote:
db2jcc4.jaris not supported.
-
-
For Oracle:
ojdbc6.jar -
For MS SQL Server:
jtds-1.2.5.jar
-
-
From the administration console, expand Resources, expand JDBC, and click JDBC providers.
-
If the provider will be for a cluster environment, under Scope, select Cluster=<cluster_name> from the dropdown menu. If the provider will be for a non-cluster environment, under Scope, select Node=<appsrv_node>, Server=<server_name>.
-
Click New.
-
In the Create a new JDBC provider screen, complete the following (Figure 5-12):
-
For Database type, select DB2, Oracle, or if you are using MS SQL Server, User-defined.
-
For Provider type, select DB2 Universal JDBC Driver Provider for DB2, or Oracle JDBC Driver for Oracle. If you are using MS SQL Server, this dropdown is not displayed.
-
For Implementation type, if you are using Oracle or DB2, select Connection pool data source. If you are using MS SQL Server, enter
net.sourceforge.jtds.jdbcx.JtdsDataSource. -
For Name, enter a name for the JDBC provider.
-
Click Next.
-
-
On the Enter database class path information screen (Figure 5-13), do one of the following:
Oracle:
-
For the value of
${ORACLE_JDBC_DRIVER_PATH}, enter the location of theojdb6.jarfile copied in step 1. -
Click Next.
DB2:
-
Under Class path, replace
${UNIVERSAL_JDBC_DRIVER_PATH}with${DB2UNIVERSAL_JDBC_DRIVER_PATH}and remove the line containingdb2jcc_license_cisuz.jar. -
Click Apply.
-
For the value of
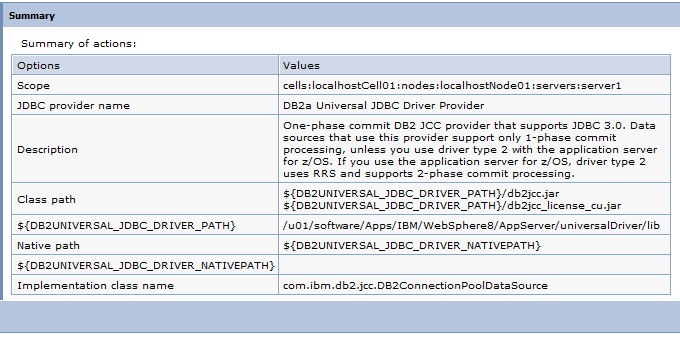
${DB2UNIVERSAL_JDBC_DRIVER_PATH}, enter the location of thedb2cc.jaranddb2jcc_license_cu.jarfiles copied in step 1.Figure 5-13 Database Class Path Information
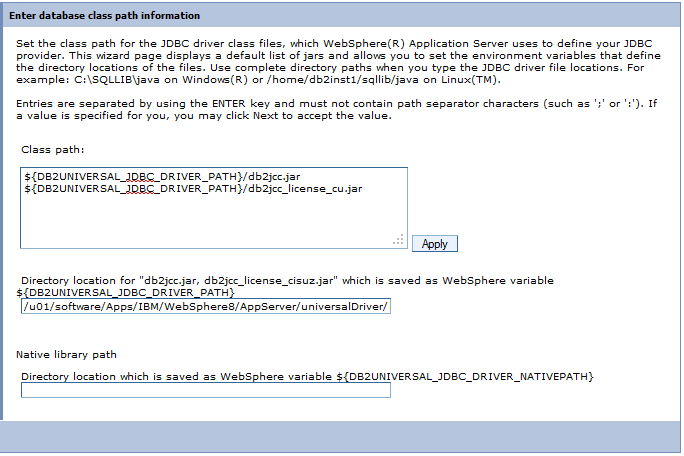
Description of ''Figure 5-13 Database Class Path Information''
-
Click Next.
MS SQL Server: Under Class path, delete the existing line and add the path to the
jtds-1.2.5.jarfile copied in step 1:<WAS_home>/universalDriver/lib/jtds-1.2.5.jar -
-
On the Summary screen (Figure 5-14), review the settings you have chosen and click Finish.
-
Save the changes.
5.2.6.3 Creating a Data Source
-
From the administration console, expand Resources, expand JDBC, and click Data sources.
-
If the data source is for a cluster environment, under Scope, select Cluster=<cluster_name> from the dropdown menu. If the data source is for a non-cluster environment, under Scope, select Node=<appsrv_node>, Server=<server_name>.
-
Click New.
-
In the Enter basic data source information screen (Figure 5-15), do the following:
-
In the Data source name field, enter a unique name for this data source.
-
In the JNDI name field, enter the JNDI name for this data source.
-
Click Next.
Figure 5-15 Basic Data Source Information
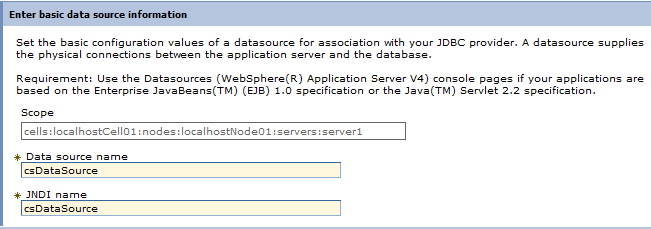
Description of ''Figure 5-15 Basic Data Source Information''
-
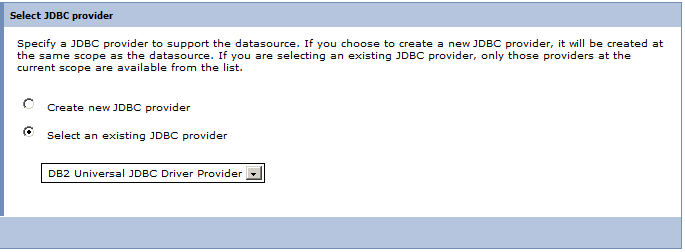
Select Select an existing JDBC provider (Figure 5-16).
-
In the drop-down list, select the JDBC provider you created in Section 5.2.6.2, "Creating a JDBC Provider."
-
Click Next.
-
-
In the Enter database-specific properties for the data source screen (Figure 5-17), do one of the following:
-
If you selected a DB2 JDBC provider in step e, do the following:
-
In the Database name field, enter the name of the database WebCenter Sites will be using.
-
In the Driver type drop-down list, select 4.
-
In the Server name field, enter the host name or IP address of the machine running the WebCenter Sites database.
-
In the Port number field, enter the port number on which the WebCenter Sites database is listening for connections.
-
Select the Use this data source in container managed persistence (CMP) check box.
-
Click Next.
Figure 5-17 Database-Specific Properties for the Data Source
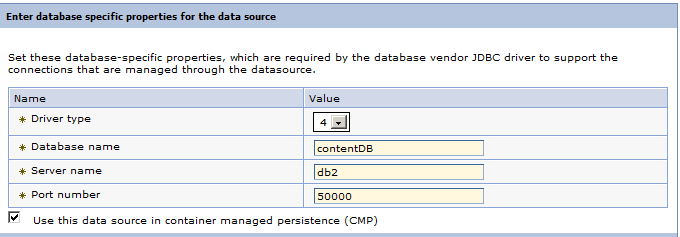
Description of ''Figure 5-17 Database-Specific Properties for the Data Source''
-
-
If you selected an Oracle JDBC provider in step e, do the following:
-
In the URL field, enter the URL of the database WebCenter Sites will be using. The URL you enter must be in the following format:
jdbc:oracle:thin:@//<db_host>:<db_port>/<db_name>
where:
-
<db_host>is the host name or IP address of the machine running the WebCenter Sites database.-
<db_port>is the port number on which the WebCenter Sites database is listening for connections.-
<db_name>is the name of the WebCenter Sites database. -
In the Data store helper class name drop-down list, select Oracle11g data store helper.
-
Select the Use this data source in container managed persistence (CMP) check box.
-
Click Next.
-
-
If you selected an SQL Server provider in step e, do the following:
-
In the Database name field, enter the name of the database WebCenter Sites will be using.
-
In the Server name field, enter the host name or IP address of the machine running the WebCenter Sites database.
-
In the Port number field, enter the port number on which the WebCenter Sites database is listening for connections.
-
Select the Use this data source in container managed persistence (CMP) check box.
-
Click Next.
-
-
-
In the Component-managed authentication alias drop-down list (Figure 5-18), select the J2C authentication you created in Section 5.2.6.1, "Creating J2C Authentication Data," then click Next.
Figure 5-18 Component-Managed Authentication Alias
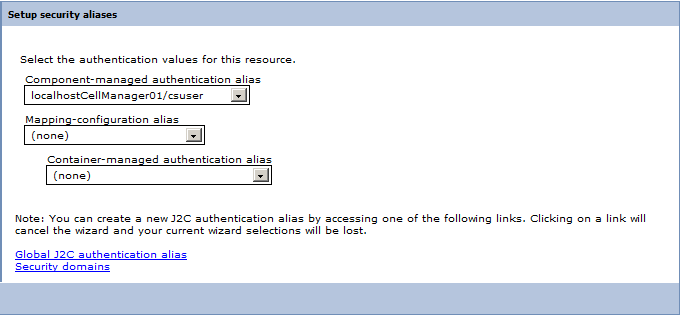
Description of ''Figure 5-18 Component-Managed Authentication Alias''
If you selected an SQL Server provider in step e, do the following:
-
For Data store helper class name, leave the default class.
-
Select the Use this data source in container managed persistence (CMP) check box.
-
Click Next.
-
-
Save the changes.
-
In the list of data sources, select the data source you just created.
-
In the Additional Properties area of the Data source screen, click Connection pool properties.
-
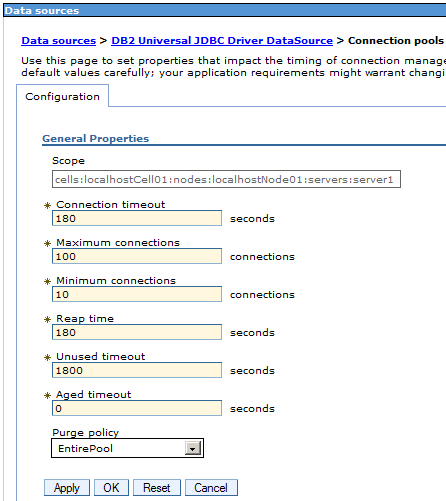
On the Connection pools screen (Figure 5-19), do the following:
-
In the Maximum connections field, enter
100(or a value appropriate to your configuration, if known). -
In the Minimum connections field, enter
10(or a value appropriate to your configuration, if known). -
Click OK.
-
-
Save the changes.
-
For installations running DB2 (Figure 5-20):
-
In the list of data sources, select the data source you just created.
-
In the Additional Properties area of the Data source screen, click Custom properties.
-
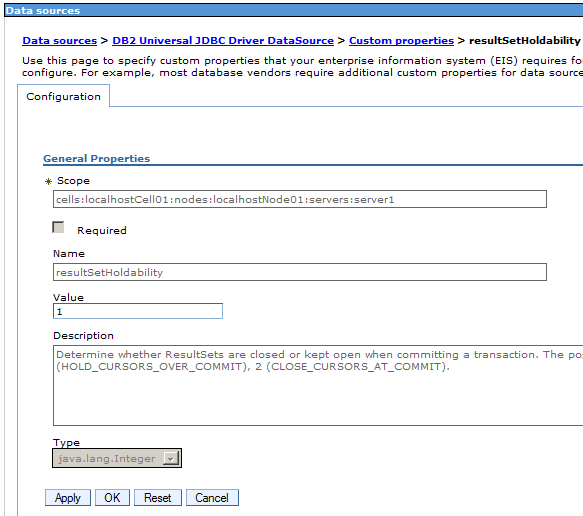
On the Custom properties screen click resultSetHoldability.
-
In the Value field, enter
1(Figure 5-21). Click OK. -
Click New.
-
For Name, enter
allowNextOnExhaustedResultSet, and for Value, enter1. Click OK. -
Click New.
-
For Name, enter
allowNullResultSetForExecuteQuery, and for Value, enter1. Click OK. -
In the Messages box, click Review.
-
On the Save screen, do the following:
-
Select the Synchronize changes with nodes check box.
-
Click Save.
-
-
-
Save the changes.
5.3 Step 2: Integrating WebSphere Application Server with a Supported Web Server
This section explains how to integrate WAS with an IBM HTTP Server or Apache 2.2.x web server using the Web Server Plug-ins for IBM WebSphere Application Server. After the web server and the web server plugin has been installed, perform the following steps:
-
Copy and run the Web Server Configuration script.
The Web Server Plug-ins installer will have created a configuration script
<plugin_home>/bin/configure<web_server_name>.sh, which is used to add the web server to the deployment manager so that it can be managed using the administration console.Copy this file to the
<WAS_home>/bindirectory of the primary server on which the deployment manager is running (start it if it is not already), then run the script. -
Generate and propagate a plug-in configuration.
From the administration console, a plug-in configuration file can be generated based off of the WAS environment.
-
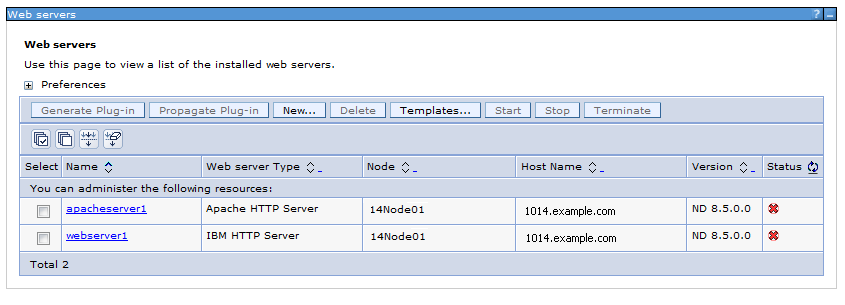
From the administration console, on the left, expand Server Types, and click Web servers.
You should be able to see the web server that was added using the script (Figure 5-22).
-
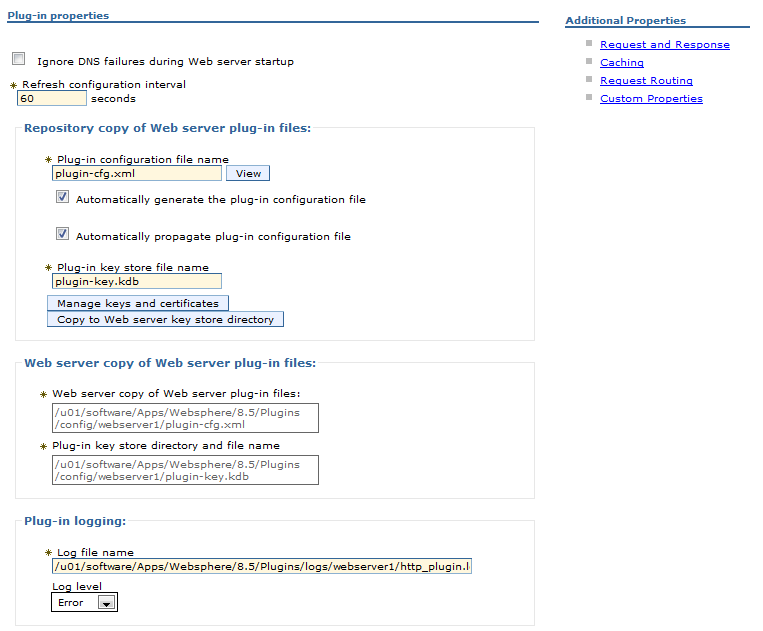
Click your web server, then click Plug-in properties.
The Plug-in properties screen is displayed (Figure 5-23).
-
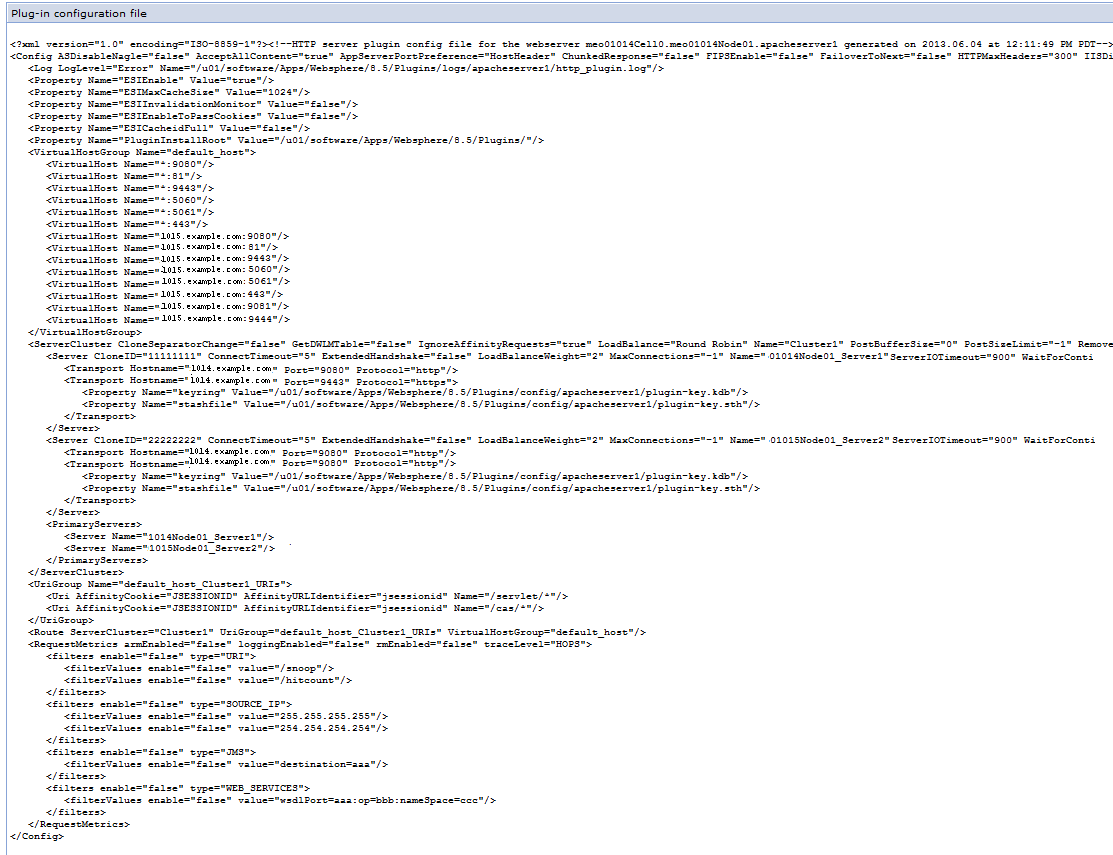
To view the plug-in configuration file, click View next to
plugin-cfg.xml(Figure 5-23). In a cluster environment, the file will look like Figure 5-24.In the Plug-in properties screen, you can disable automatic plugin-in configuration file generation and propagation, as well as modify the log file level.
After installing and deploying the WebCenter Sites and CAS web applications, you will re-generate and re-propagate the plug-in configuration file.
-
To manually generate and propagate a plug-in, go to the Web servers screen, select the web server you are configuring, and click Generate Plug-in.
-
After plug-in generation is successful, select the web server you are configuring, and click Propagate Plug-in.
-