87 Community-Gadgets: Deploying the CSS Tag
This chapter provides information about the CSS Tag and instructions for deploying this tag on web pages.
This chapter contains the following sections:
87.1 Overview
Each widget and gadget contains its own CSS which applies the desired look and feel to the widget and/or gadget deployed on a web page. A widget's or gadget's CSS is loaded when a request is made for the web page on which that widget or gadget is deployed. If multiple widgets and gadgets are deployed on the same page, the system loads each widget and gadget's CSS separately, which increases the load time of the web page.
To decrease the load time of a web page on which multiple widgets and gadgets are deployed, the Community and Gadgets applications provide the CSS tag. When the CSS tag is deployed, it combines all CSS files of the widgets and gadgets deployed on that page into one CSS. This means that each widget's and gadget's CSS is loaded at the same time, which reduces the amount of requests the system makes to load the page's content. Therefore, decreasing the time it would take the Community and Gadgets applications to load all CSS files for the widgets and gadgets deployed on the page.
87.2 Deploying the CSS Tag
The CSS Tag field is available in the deployment screen of any widget and gadget. This scenario uses the CSS tag in the Comments Deployment screen (Comments, Deploy, and then Comments).
For the CSS tag to load all CSS files for the widgets and gadgets deployed on a given web page, you will have to configure the CSS tag by specifying the widgets, gadgets, and the associated CSS files that will be loaded with the page. When the page is requested, the Community-Gadgets application scans the code of the CSS tag and makes a single request for all widget and gadget CSS files that are specified in the CSS tag.
Note:
If a widget or gadget that is deployed on the page is not specified inside the CSS tag, the page will not load that widget's or gadget's CSS.
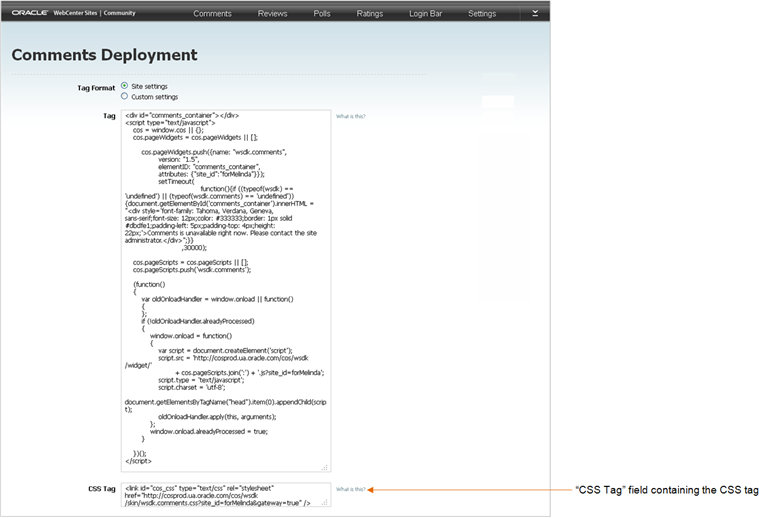
Below shows the CSS Tag field in the Comments Deployment screen (all other widget and gadget deployment screens contain a similar CSS Tag field).

Description of the illustration app_csttag1.png
To configure and deploy the CSS tag
-
Access the deployment screen of any widget tag or gadget. In this example, we access the Comments Deployment screen.
-
In the CSS Tag field, copy (Ctrl+C) the CSS tag.
-
Access the WebCenter Sites Admin interface, and insert the CSS tag into the template that renders the desired web page:
-
In the menu bar, point to the down-arrow icon, located at the extreme right of the screen, to render the applications bar.
-
In the applications bar, click the Admin icon to render the WebCenter Sites Admin interface.
-
Locate the template into which you wish to insert the CSS tag:
-
From the start menu options, click Search.
-
In the Search results list, select Find Template.
-
In the Search for Templates form, click Search.
-
In the List of Templates form, select the template into which you wish to insert the widget tag.
-
In the template's Inspect form, click Edit.
-
In the template's Element screen, insert (Ctrl+V) the widget tag into the Element Logic field between the
<head></head>tags. For example:<head> <link id="cos_css" type="text/css"rel="stylesheet" href="http://prod-cg.example.com:8080/cg/wsdk/skin/wsdk.comments.css?site_id=FirstSiteII&gateway=true" /> ... </head>
-
-
In the CSS tag, specify each widget, gadget, and CSS file that will be loaded with the page. For example:
If the CSS tag will load the CSS files for the Comments, Reviews, Polls, and Login Bar widgets, as well as a single gadget's CSS file, the CSS tag should be modified as follows:
<link id="cos_css" type="text/css" rel="stylesheet" href="http://prod-cg.example.com:8080/cg/wsdk/skin/wsdk.comments:wsdk.reviews:poll:wsdk.session:gadgets_dashboard.css?site_id=FirstSiteII&gateway=true" />
Where:
-
wsdk.comments: Name of the Comments widget. -
wsdk.reviews: Name of the Review Summary widget. -
poll: Name of both the Poll and Poll Results widgets. -
wsdk.session: Name of the Login Bar widget. -
gadgets_dashboard: Name of the single gadget.
The CSS
hreftag references the location of the CSS files that will be loaded for the widgets and gadgets deployed on the page. Notice that each widget's and gadget's name is separated by a colon.Each widget's name is located in its CSS tag in the widget's deployment screen. The widget names are as follows:
-
wsdk.comments: Name of the Comments widget. -
comments-summary: Name of the Comments Summary widget. -
comments-link: Name of the Links to Topics widget for comments and reviews. -
wsdk.topics: Name of the Most Commented, Recently Commented, Most Reviewed, Recently Reviewed, Top Ranked, Most Rated, and Recently Rated widgets. -
wsdk.reviews: Name of the Reviews widget. -
reviews-summary: Name of the Reviews Summary widget. -
wsdk.reviews_average: Name of the Reviews Average Rating widget. -
poll: Name of both the Poll and Poll Results widgets. -
wsdk.ratings: Name of the Stars, Thumbs Up/Down, Like It, and Recommend ratings widgets. -
wsdk.ratings_average: Name of the Ratings Average Rating widget. -
wsdk.session: Name of the Login Bar widget. -
gadgets_dashboard: Name of a gadget.
-
-
Click Save Changes.
-
-
Publish the template to the website. For instructions about publishing, see the Oracle Fusion Middleware WebCenter Sites Administrator's Guide.