52 Developer Tools: Installing and Configuring
This chapter provides instructions for setting up Developer Tools, updating Developer Tools to the latest version, and integrating a WebCenter Sites instance with Eclipse. This chapter also provides a brief overview for managing WebCenter Sites resources in Eclipse. The last section in this chapter provides instructions for uninstalling Developer Tools.
This chapter contains the following sections:
-
Section 52.4, "Managing WebCenter Sites Resources in Eclipse"
-
Section 52.5, "Uninstalling WebCenter Sites Developer Tools"
52.1 Prerequisites
Before setting up Developer Tools, keep in mind the following:
-
After you have integrated Eclipse with WebCenter Sites, you must log in to WebCenter Sites with general administrator credentials (for example,
fwadmin/xceladmin). This user must be a part of theRestAdmingroup. -
To use the command-line tool feature, you must have an advanced knowledge of Developer Tools. Information and instructions about running and using the command-line tool are provided in Chapter 58, "Developer Tools: Command-Line Tool."
52.2 Setting Up Developer Tools
-
Download the Eclipse package that suits your development needs. The Eclipse IDE for Java EE Developers is recommended for development on WebCenter Sites. You can download Eclipse from the following URL:
http://www.eclipse.org/downloads/ -
Unzip the
csdt.ziparchive, located in the WebCenter Sites distribution package. This archive contains the following folders:-
csdt-client: command-line client -
csdt-eclipse: Eclipse plug-in, which contains the archived Developer Tools plug-in (com.fatwire.EclipseCSDT_11.1.1.v8_0_rxxxxxx.zip).
-
-
In the
csdt-eclipsefolder, extract the Developer Tools plug-in (com.fatwire.EclipseCSDT_11.1.1.v8_0_rxxxxxx.zip) into a folder on your file system (for example,${USER_HOME}). -
Install the Developer Tools plug-in:
Note:
Eclipse installs plug-ins from local file system (or archive) locations and remote locations. The location of a plug-in is referred to as a "software site." For the Developer Tools plug-in, the "software site" is the path to the archived Developer Tools plug-in on the file system (which was extracted in step 3).
-
Start Eclipse (execute
eclipse.exe). -
In the Eclipse menu, select Help, then select Install New Software.
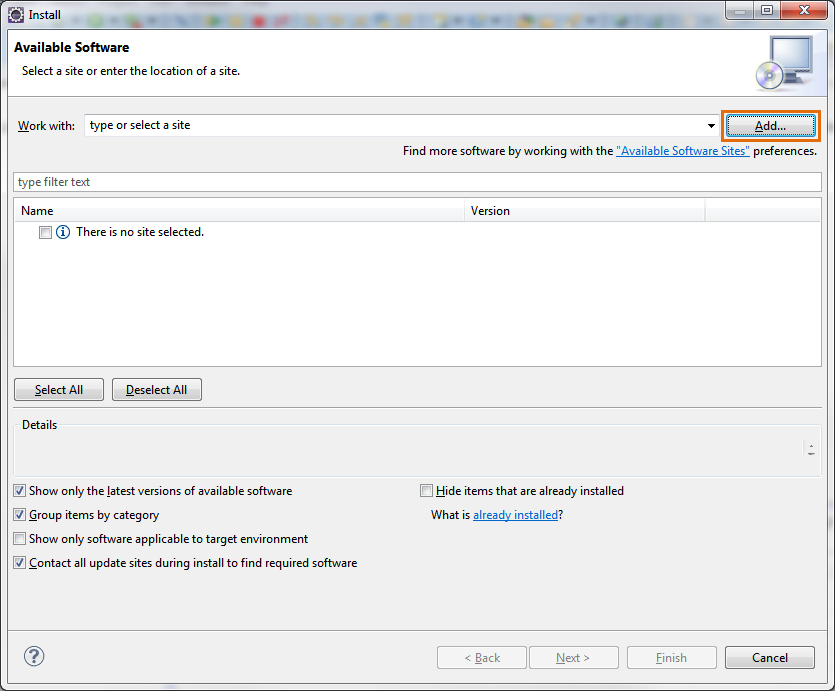
The installation wizard opens and displays the "Available Software" screen (shown in Figure 52-1).
Figure 52-1 Installation Wizard: 'Available Software' Screen
Description of "Figure 52-1 Installation Wizard: 'Available Software' Screen"
-
In the "Available Software" screen, click Add (located to the right of the "Work with" field).
-
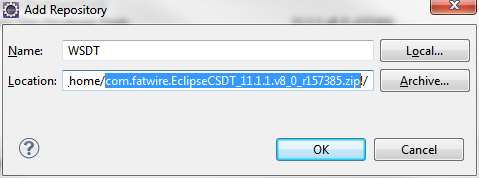
In the "Add Repository" dialog box (shown in Figure 52-2), fill in the following fields and then click OK.
-
In the Name field, enter a unique name for the Developer Tools plug-in.
-
In the Location field, click Archive... to specify the location (software site) of the Developer Tools plug-in archive (extracted in step 3).
The installation wizard picks up the Developer Tools plug-in from the specified location (software site), and lists the name of the plug-in in the "Available Software" screen.
-
-
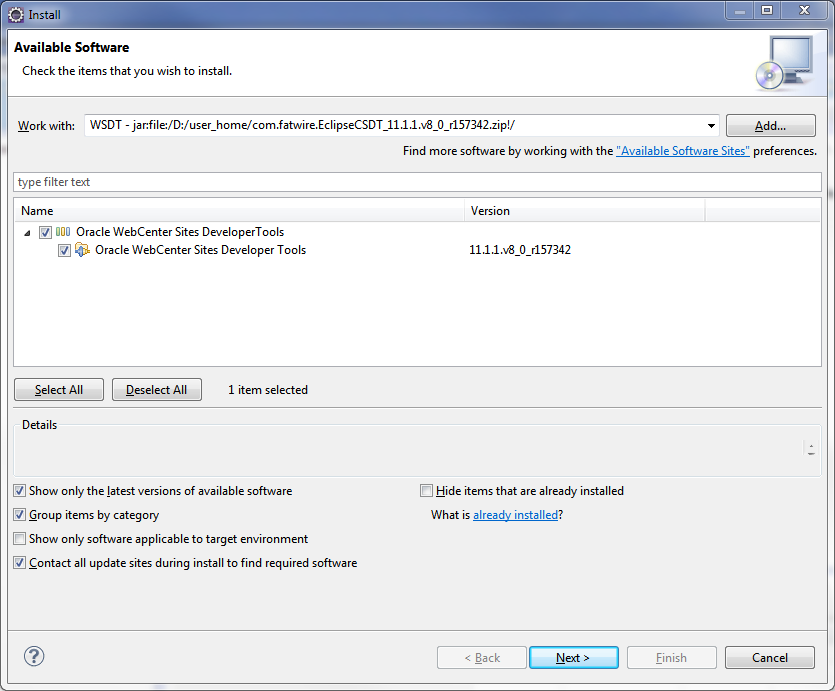
In the "Available Software" screen, select Oracle WebCenter Sites Developer Tools (as shown in Figure 52-3), then click Next.
Figure 52-3 Installation Wizard: 'Available Software' Screen Listing the Developer Tools Plug-In
Description of "Figure 52-3 Installation Wizard: 'Available Software' Screen Listing the Developer Tools Plug-In"
The "Install Details" screen opens.
-
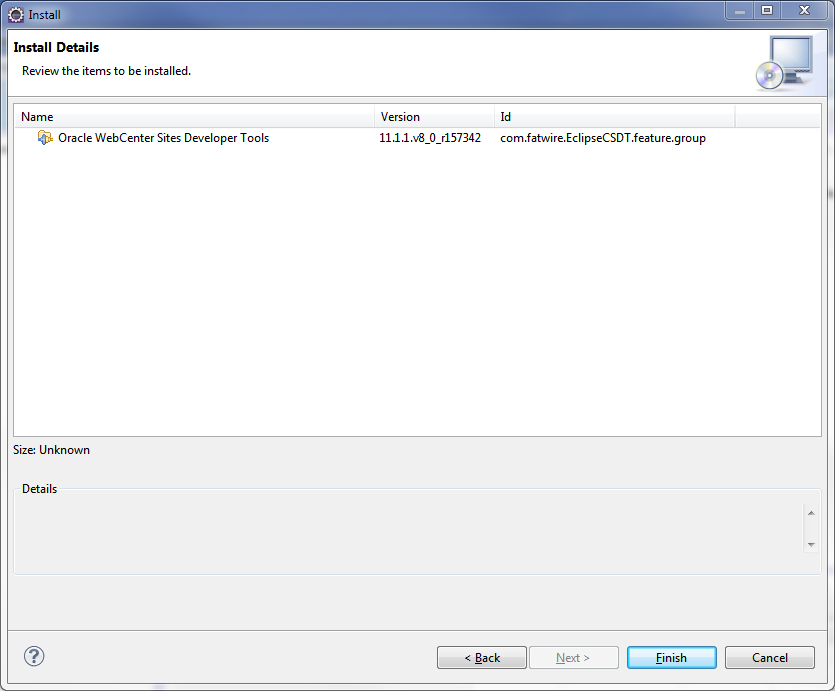
In the "Install Details" screen (shown in Figure 52-4), click Finish.
Figure 52-4 Installation Wizard: 'Install Details' Window
Description of "Figure 52-4 Installation Wizard: 'Install Details' Window"
-
During the installation process, a "Security Warning" dialog box opens (as shown in Figure 52-5). Click OK to continue with the installation.
Figure 52-5 'Security Warning' Dialog Box

Description of "Figure 52-5 'Security Warning' Dialog Box"
-
Once the installation completes successfully, the "Software Updates" dialog box opens, as shown in Figure 52-6. Do the following:
-
Start your local WebCenter Sites instance.
To ensure WebCenter Sites is running, access
${base_url}/HelloCS, where${base_url}is the base URL for your WebCenter Sites instance. For example, if your base URL ishttp://example:8080/cs, thenhttp://example:8080/cs/HelloCSis the verification URL for your WebCenter Sites instance. -
Restart Eclipse by clicking Yes in the "Software Updates" dialog box.
Restarting Eclipse refreshes the plug-in cache and makes the Developer Tools plug-in available in Eclipse.
Figure 52-6 'Software Updates' Dialog Box

Description of "Figure 52-6 'Software Updates' Dialog Box"
-
-
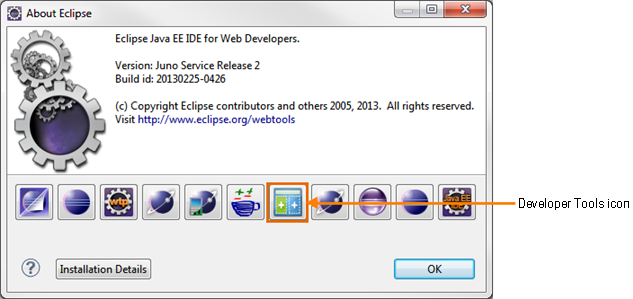
Once Eclipse restarts, verify that the Developer Tools plug-in is installed successfully. In the Eclipse menu, select Help, then select About Eclipse.
The "About Eclipse" dialog box opens and displays the Developer Tools icon in the list of installed plug-ins, as shown in Figure 52-7.
-
-
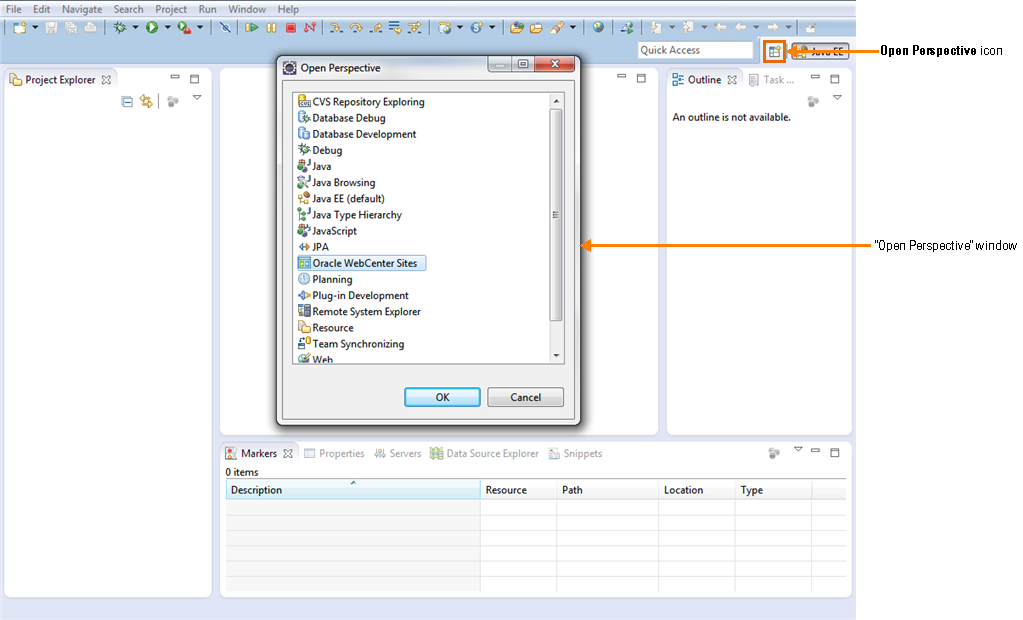
Open the "Oracle WebCenter Sites" perspective by clicking the Open Perspective icon, located on the top right of the Eclipse IDE. In the "Open Perspective" dialog, select Oracle WebCenter Sites (as shown in Figure 52-8), then click OK.
Figure 52-8 Open Perspective: Oracle WebCenter Sites
Description of "Figure 52-8 Open Perspective: Oracle WebCenter Sites"
-
Integrate WebCenter Sites with the Eclipse IDE:
-
If you are setting up Developer Tools for the first time, the configuration form is automatically displayed
-
If you have already connected to a WebCenter Sites instance and wish to connect to a different instance, navigate to the WebCenter Sites toolbar and click the Select Configuration wizard to open the configuration form.
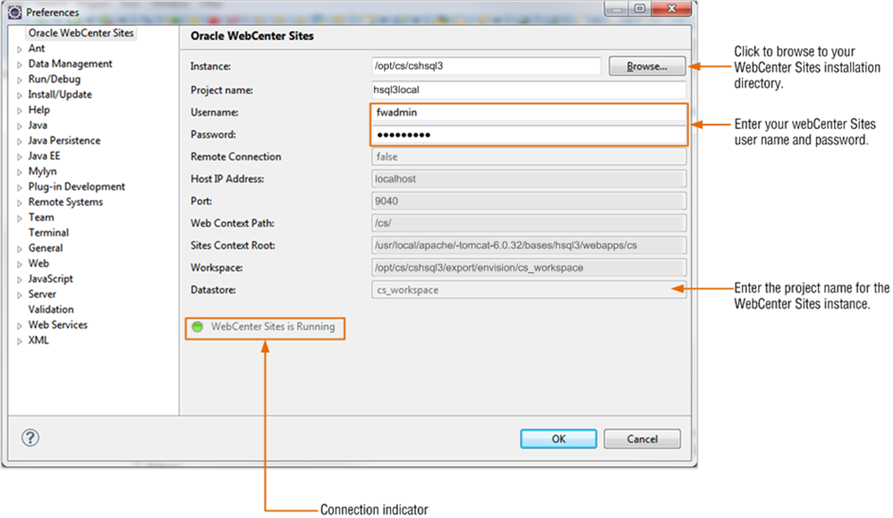
In the configuration form (shown in Figure 52-9), fill in the following fields with the information for the WebCenter Sites instance you wish to connect to:
-
In the "Instance" field, do one of the following, depending on whether you are connecting to a local or remote host:
Note:
A remote connection supports the creation of multiple projects on the same remote host. Local connections support only one project at a time.
-
If you are connecting to a local host, click Browse to select the directory containing the
futuretense.inifile for the WebCenter Sites instance. -
If you are connecting to a remote host (for example,
example:8080/cs), enter the path to the host in the format[host]:[port]/[path].
Once you enter a value in the "Instance" field, the following fields are automatically populated. The values of these fields are based on whether you specified a local or remote host in the "Instance" field:
-
Remote Connection: If you are connecting to a remote host, the value is set to
true. If you are connecting to a local host, the value is set tofalse. -
Host IP Address: Specifies the IP address of the host to which you are connecting.
-
Port: Specifies the port number of the host to which you are connecting.
-
Web Context Path: Specifies the context path to the host.
-
Workspace: Specifies the location of the Developer Tools workspace (Eclipse project).
-
Sites Context Root: If you are connecting to a local host, this field contains the path of the WebCenter Sites web application. If you are connecting to a remote host, this field is blank.
-
-
In the "Project name" field, enter a name for the project on which you will be working.
-
In the "Username" field, enter the user name of a general administrator. This user must be a member of the
RestAdmingroup. -
In the "Password" field, enter the password for the user name you entered in step c.
-
Click OK.
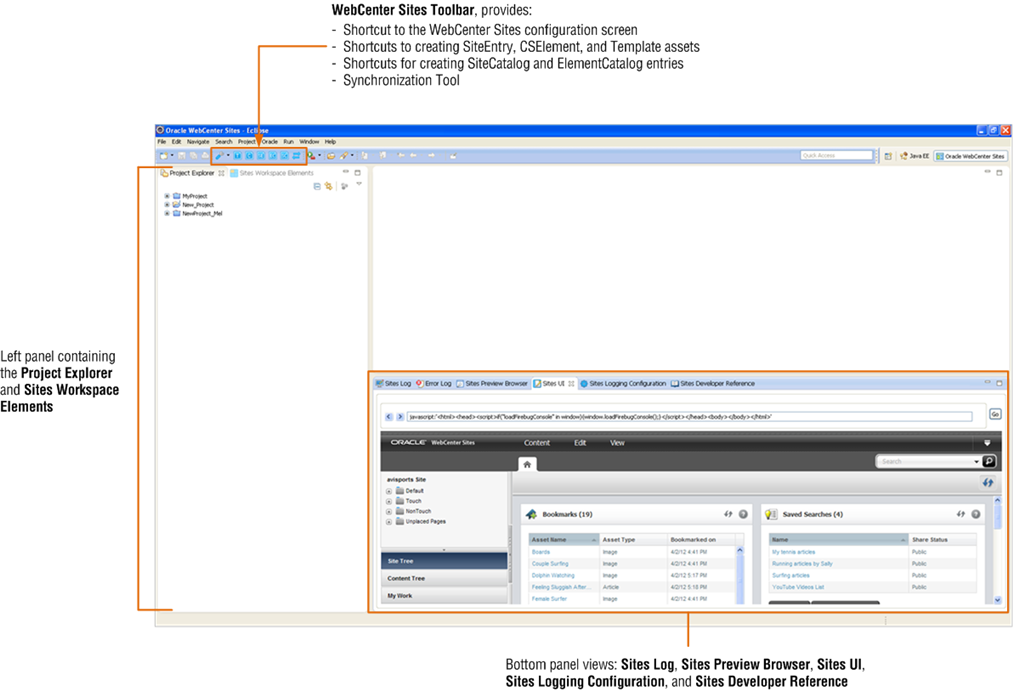
The "Oracle WebCenter Sites" perspective opens. If you are accessing the WebCenter Sites-integrated Eclipse for the first time, Figure 52-10 shows how the Oracle WebCenter Sites perspective will look.
Figure 52-10 Oracle WebCenter Sites Perspective
Description of "Figure 52-10 Oracle WebCenter Sites Perspective"
If the Oracle perspective is rendered as shown in Figure 52-10, then you have successfully set up Developer Tools.
Note:
The panels containing the Eclipse and Developer Tools views are interchangeable. To move a view to a different panel, click the view's tab and drag it to the desired panel.
-
-
(Optional) Associate the Oracle Fusion Middleware WebCenter Sites Tag Reference and Oracle Fusion Middleware WebCenter Sites Java API Reference with Eclipse:
For local hosts:
-
Download the
TagReference.zipandjavadoc.zip. -
Create a folder named
developerdocsunder your server's context path. For example, if your server is onmyhost:8080/cs, the path to the developerdocs folder should bemyhost:8080/cs/developerdocs. -
Extract the
TagReference.zipandjavadoc.zipinside thedeveloperdocsfolder. -
In Eclipse, open the "Sites Developer Reference" view. In both the "Tag Reference" and "Javadoc" tabs, click Home. The Oracle Fusion Middleware WebCenter Sites Tag Reference and Oracle Fusion Middleware WebCenter Sites Java API Reference are displayed in their respective tabs.
For remote hosts:
-
Download the
TagReference.zipandjavadoc.zip. -
Create a folder named
developerdocsunder your server's context path. For example, if your server is onexample:8080/cs, the path to thedeveloperdocsfolder should beexample:8080/cs/developerdocs. -
Extract the
TagReference.zipandjavadoc.zipinside thedeveloperdocsfolder. The "Tag Reference" and "Javadoc" are now accessible to all users who connect to this server. -
In Eclipse, open the "Sites Developer Reference" view. In both the "Tag Reference" and "Javadoc" tabs, click Home. The Oracle Fusion Middleware WebCenter Sites Tag Reference and Oracle Fusion Middleware WebCenter Sites Java API Reference are displayed in their respective tabs.
-
-
(For remote hosts) Enable code completion, copy the
WEB-INFdirectory from the remote computer into your Eclipse project. This enables Eclipse to perform tag completion and proper syntax highlighting. For more information, see Section 54.2, "Tag and Java API Completion."Note:
Code completion is enabled automatically for local instances.
-
If you upgraded your WebCenter Sites system, and wish to use Developer Tools to work with resources created prior to this release (existing resources), see Section 56.4.3, "Using Developer Tools with Pre-Existing Resources."
-
To quickly get started with managing WebCenter Sites resources in the Oracle WebCenter Sites perspective, continue to the next section. Start with step 4 in Section 52.4, "Managing WebCenter Sites Resources in Eclipse."
52.3 Updating Developer Tools
If you have upgraded your WebCenter Sites installation, follow the steps in this section to update your Developer Tools plug-in.
To update the Developer Tools plug-in
-
Extract the updated Developer Tools plug-in archive into a folder on your local file system.
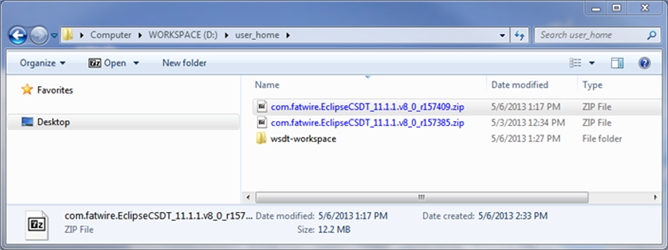
Figure 52-11, shows an example of the updated Developer Tools plug-in archive (
com.fatwire.EclipseCSDT_11.1.1.v8_0_r157409.zip) extracted into the same folder as the currently installed Developer Tools plug-in archive (com.fatwire.EclipseCSDT_11.1.1.v8_0_r157385.zip).Note:
To ensure you have the latest version of Developer Tools, note the version number (
rxxxxxx) appended to the archive's name.Figure 52-11 Updated Plug-In on File System
Description of "Figure 52-11 Updated Plug-In on File System"
-
Start Eclipse (execute
eclipse.exe). -
Update the location (software site) of the Developer Tools plug-in:
-
In the Eclipse menu, select Window, then select Preferences.
The "Preferences" window opens.
-
In the "Preferences" window, select Install/Update, then select Available Software Sites. In the "Available Software Sites" list, select the Developer Tools entry (WSDT entry in Figure 52-12), and then click Edit.
Figure 52-12 Preferences Window: Edit the Developer Tools (WSDT) Entry
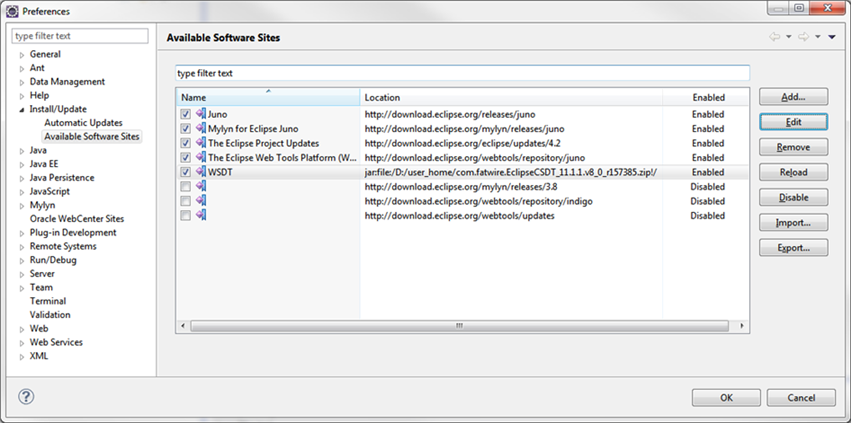
Description of "Figure 52-12 Preferences Window: Edit the Developer Tools (WSDT) Entry"
The "Add Repository" dialog box opens.
-
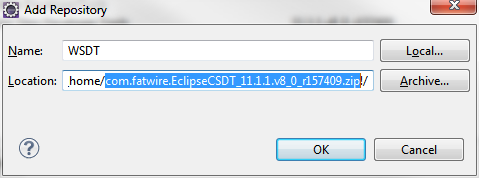
In the "Location" field, click Archive... to specify the location of the updated plug-in (extracted in step 1), then click OK (as shown in Figure 52-13).
The "Add Repository" window closes and the "Available Software Sites" list in the "Preferences" window displays the updated path to the Developer Tools entry.
-
In the "Preferences" window, click OK.
-
-
Check for updates to existing plug-ins.
-
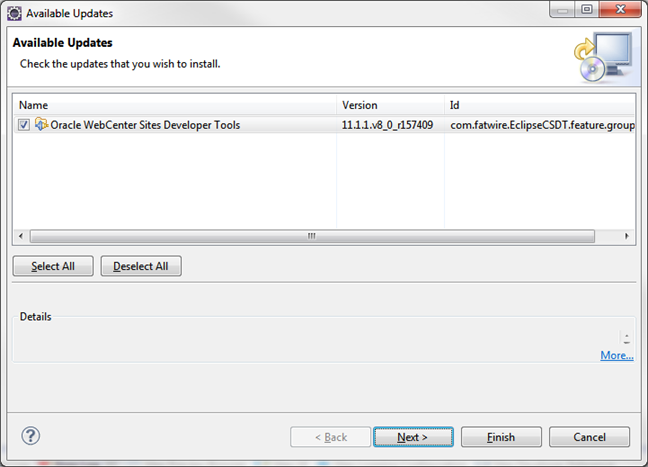
In the Eclipse menu, select Help, then select Check for Updates.
The "Available Updates" window opens, as shown in Figure 52-14.
-
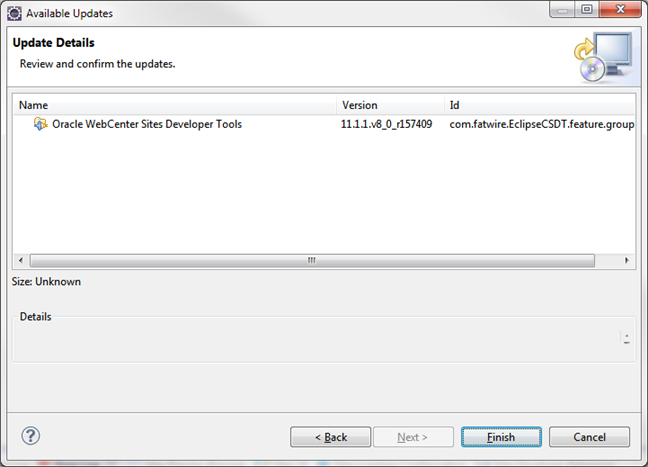
Select Oracle WebCenter Sites Developer Tools, then click Next.
The "Update Details" window opens, as shown in Figure 52-15.
-
To proceed with the update, click Finish.
-
During the update process, a "Security Warning" dialog box opens, as shown in Figure 52-16. Click OK to continue the update.
Figure 52-16 'Security Warning' Dialog Box Displayed During the Update Process

Description of "Figure 52-16 'Security Warning' Dialog Box Displayed During the Update Process"
-
Once the update completes successfully, the "Software Updates" dialog box opens. Do the following:
-
Start your local WebCenter Sites instance.
-
Restart Eclipse by clicking Yes in the "Software Updates" dialog box.
-
-
Once Eclipse restarts, verify that the Developer Tools plug-in has been successfully updated to the latest version:
-
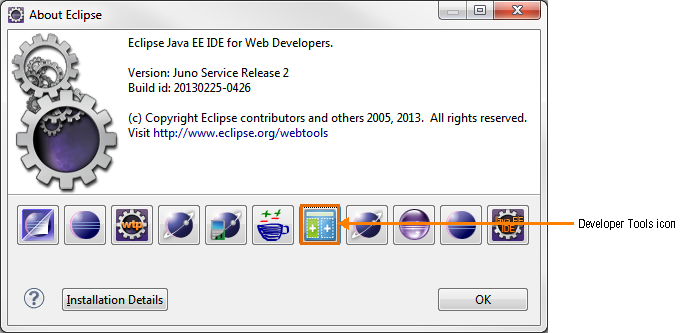
In the Eclipse menu, select Help, then select About Eclipse.
The "About Eclipse" dialog box opens and displays the Developer Tools icon in the list of installed plug-ins, as shown in Figure 52-17.
-
In the "About Eclipse" dialog box, click the Developer Tools icon.
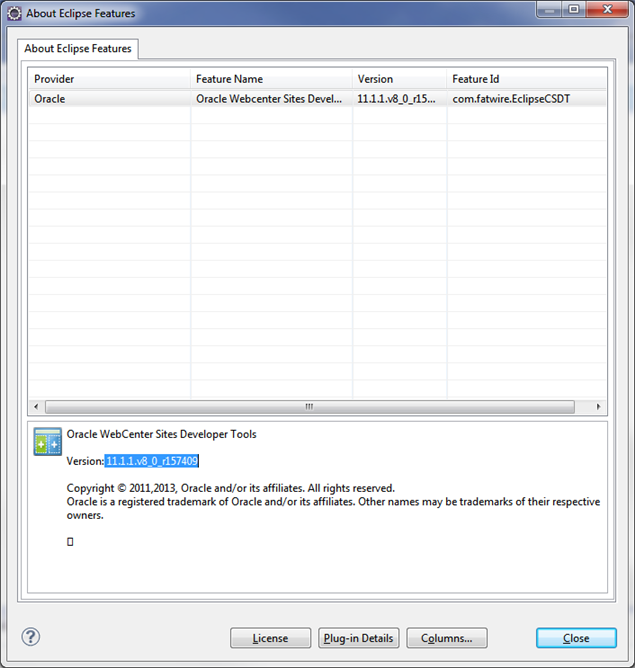
The "About Eclipse Features" window opens, and displays the version details of the Developer Tools plug-in, as shown in Figure 52-18.
Figure 52-18 'About Eclipse Features' Window
Description of "Figure 52-18 'About Eclipse Features' Window"
-
-
52.4 Managing WebCenter Sites Resources in Eclipse
This section takes you through the Eclipse Oracle WebCenter Sites perspective by summarizing the steps you would take to create, edit, and otherwise manage code-based WebCenter Sites resources:
-
SiteEntry assets
-
CSElement assets
-
Template assets
-
ElementCatalog Entries
-
SiteCatalog Entries
To manage WebCenter Sites resources in Eclipse
-
Start your local WebCenter Sites.
-
Start Eclipse.
-
Open the "Oracle WebCenter Sites" perspective:
In the Eclipse menu bar, select Window, then select Open Perspective, then Other, and then Oracle WebCenter Sites.
-
To create resources, do the following:
-
To create a SiteEntry asset, click the New Site Entry (SE) icon and fill in the forms.
-
To create a CSElement asset, click the New CSElement (C) icon and fill in the forms.
-
To create a Template asset, click the New Template (T) icon and fill in the forms.
-
To create an ElementCatalog entry, click the New ElementCatalog Entry (EC) icon and fill in the forms.
-
To create a SiteCatalog entry, click the New SiteCatalog Entry (SC) icon and fill in the forms.
For field definitions, see Chapter 23, "Creating Template, CSElement, and SiteEntry Assets."
-
-
To manage the resources you create, edit, delete, or share with other sites use the "Sites Workshops Elements" view. Right-click the resource and select the desired option. For information about the available options, see Section 53.4.1, "Sites Work."
-
To display Developer Tools views in panels, do the following:
-
Select Window, then Show View, and then Other.
-
In the "Show View" dialog box, select the desired view (located under the Oracle WebCenter Sites folder):
-
Sites UI displays the embedded WebCenter Sites Admin and Contributor interfaces.
-
Sites Log displays the log file for WebCenter Sites.
-
Sites Developer Reference displays the Oracle Fusion Middleware WebCenter Sites Tag Reference and Oracle Fusion Middleware WebCenter Sites Java API Reference, only if you have associated the Tag Reference and Javadoc with your current WebCenter Sites instance. For instructions, see step 7 in Section 52.2, "Setting Up Developer Tools."
-
Sites Workspace Elements provides access to code-related resources. This view displays the resources in a tree and groups each resource according to its site affiliation.
-
Sites Logging Configuration displays a dynamically updating view of the log4j configuration. In this view you can set the log levels of each WebCenter Sites logger.
-
Sites Preview Browser displays an embedded preview browser.
-
For more information about the Developer Tools views, see Section 53.4, "Developer Tools Views."
-
-
Synchronize WebCenter Sites resources by selecting the Synchronize Data icon. The synchronization tool enables you to either export data from WebCenter Sites to the Developer Tools workspace or import data to WebCenter Sites from your Developer Tools workspace.
-
For a quick overview of using the synchronization tool, see Section 53.5, "Data Synchronization (Export/Import) Tool."
-
For detailed information about synchronizing resources, see Chapter 56, "Developer Tools: Synchronization and Data Exchange."
-
52.5 Uninstalling WebCenter Sites Developer Tools
This section contains instructions for uninstalling Developer Tools.
-
Close the "Oracle WebCenter Sites Perspective" (along with any views associated with the "Oracle WebCenter Sites" perspective).
-
In the Eclipse menu, select Window, then select Preferences.
The "Preferences" window opens.
-
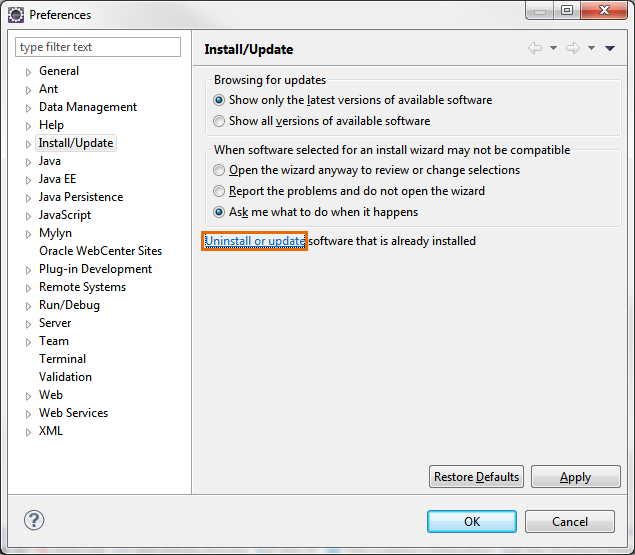
In the "Preferences" window, select Install/Update, then click the Uninstall or update link (as shown in Figure 52-19).
Figure 52-19 Preferences: 'Install/Update' Screen
Description of "Figure 52-19 Preferences: 'Install/Update' Screen"
-
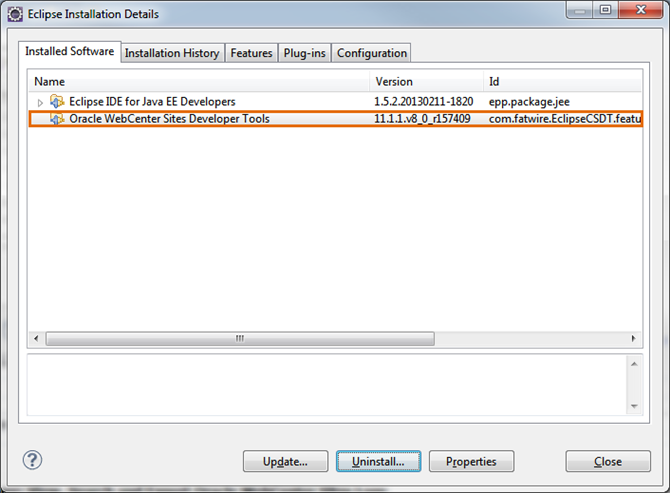
In the "Eclipse Installation Details" screen, select the Developer Tools plug-in and then click Uninstall... (as shown in Figure 52-20).
Figure 52-20 'Eclipse Installation Details' Screen
Description of "Figure 52-20 'Eclipse Installation Details' Screen"
-
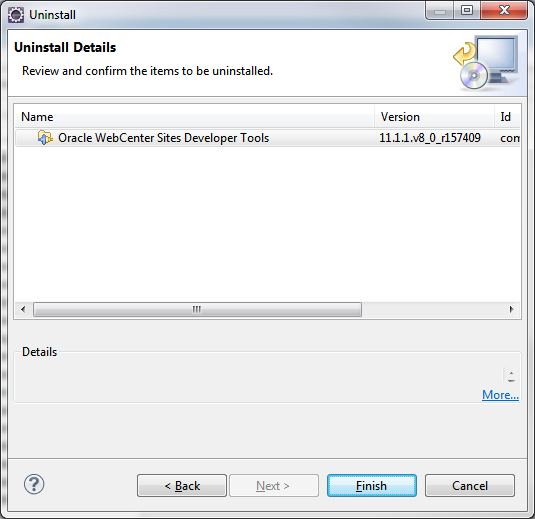
In the "Uninstall Details" screen (shown in Figure 52-21), click Finish to proceed with the process of uninstalling the Developer Tools plug-in.
-
Once the update completes successfully, the "Software Updates" dialog box opens, as shown in Figure 52-22. Click Yes to restart Eclipse.
Figure 52-22 'Software Updates' Dialog Box

Description of "Figure 52-22 'Software Updates' Dialog Box"
Restarting Eclipse refreshes the plug-in cache and completely removes the Developer Tools plug-in from Eclipse.
