56 Developer Tools: Synchronization and Data Exchange
This chapter provides information about the export/import features supported by Developer Tools. This chapter also provides information about exchanging resources between WebCenter Sites instances, and the Developer Tools mappings processes.
The Developer Tools kit uses ID and site mapping processes to enable developers to exchange resources between WebCenter Sites instances and is discussed in the sections on ID mapping and site mappings.
This chapter contains the following sections:
56.1 Synchronization Using Developer Tools
Synchronization is the bi-directional flow of resources between a WebCenter Sites instance and its associated workspace. Using Developer Tools, you can perform the following synchronization operations:
-
Export/import assets with built-in dependency resolution and ID mapping.
-
Export/import asset types, such as flex families and AssetMaker asset types.
-
Export/import site definitions, roles, start menu items, and tree tabs.
-
Export/import SiteCatalog and ElementCatalog entries.
-
(Command-line tool operation) Perform site re-mapping. For example, creating reusable modules which can be imported into any WebCenter Sites CM site.
Exporting or importing all resources of a given site enables you to track the entire site in a version control system. Advanced developers can use the command-line tool to re-map the resources of one site to another by creating reusable modules (custom workspaces).
56.2 Synchronization Scenarios
Depending on the scenario, resources are synchronized either automatically or manually.
If WebCenter Sites is running, resources between WebCenter Sites and Eclipse are automatically synchronized when the following actions are performed in Eclipse:
-
Code-based resources (Templates, CSElements, SiteEntries, ElementCatalog entries, and SiteCatalog entries) are created with the Developer Tools wizards in Eclipse.
-
Code-based resources (Templates, CSElements, and ElementCatalog entries) stored in the Developer Tools workspace are edited in Eclipse. This includes edits to JSP files, XML files, metadata, and other files associated with the resource.
For example, if you edit a resource's associated JSP file in the Eclipse editor, the Developer Tools kit automatically synchronizes the changes into the WebCenter Sites instance. Using the Eclipse editor, advanced developers can also edit metadata files (
.main.xml) of flex definitions and the Developer Tools kit will automatically synchronize the changes into WebCenter Sites. However, we recommend using the WebCenter Sites Admin interface to modify flex definitions.
In certain cases, resources must be manually synchronized using either the Synchronization tool in the Eclipse IDE or (for advanced developers) the command-line tool. Manual synchronization is required when:
-
The Eclipse editor is not used to edit resources stored in the Developer Tools workspace. For example, when resources are copied to the Developer Tools workspace from a shared network file system or a version control system.
-
WebCenter Sites resources are modified in the WebCenter Sites interfaces.
Note:
The Eclipse IDE provides an embedded WebCenter Sites Admin interface. However, Eclipse does not detect the changes that are made using this interface. Therefore, working in the embedded Admin interface is the same as working in a standalone browser running the Admin interface.
-
WebCenter Sites is not running while you are creating or editing resources in the Eclipse IDE. Once WebCenter Sites is restarted, you must manually synchronize the resources you created or edited.
Using the command-line tool to synchronize resources is mainly for deployment purposes, such as nightly builds that are deployed to test servers. For example, an advanced developer can embed a synchronization command into a script for an automated deployment procedure. For information about running and using the command-line tool, see Chapter 58, "Developer Tools: Command-Line Tool."
56.3 Dependency Resolution
WebCenter Sites resources often depend on other resources. For example, a flex asset requires an associated flex definition to exist before it can be created. In turn, the flex definition depends on a set of attributes and possibly other resources. Therefore, all flex constructs require that the flex family exist on the system. To import a flex asset into an empty WebCenter Sites system, you must first create a flex family to which the flex asset will be associated. Then, create the following:
-
Create the flex attributes. For example, name, address, age, and so on.
-
Create the desired flex parent definitions.
-
Create flex definitions.
-
Create the desired flex parents.
-
Create flex assets.
When you export a flex asset, the Developer Tools kit performs all dependency resolutions for that asset and automatically exports all of its dependencies. Therefore, you only need to select the desired resource (such as the desired flex asset) and the Developer Tools kit computes all of the asset's dependencies.
Note:
The Developer Tools kit does not resolve a resource's dependency on site definitions. This enables you to choose whether you want to export or import an entire site, a subset of sites, or completely ignore site definitions (for example, if you are using the command-line tool to create a reusable module that can be imported into any site). For a detailed example of creating a reusable module, see Chapter 61, "Developer Tools: Using the Command-line Tool to Create Reusable Modules."
56.4 ID Mapping
Each resource created in WebCenter Sites is assigned a unique local identifier. A resource's local identifier is unique only to the WebCenter Sites instance on which it was created. Since multiple WebCenter Sites instances will be used to create resources, it is possible for two different resources, on separate WebCenter Sites instances, to have the same local identifier.
This section contains the following topics:
56.4.1 ID Mapping Overview
To uniquely identify resources, the Developer Tools kit assigns each resource a globally unique identifier (fw_uid), which is unique across all WebCenter Sites instances. In addition, when you import a resource into a WebCenter Sites instance, the Developer Tools kit assigns a new local identifier to that resource on that instance. If the resource references other assets (such as associations, asset pointers, and flex definitions), a new local identifier is generated for each of those assets. On subsequent imports to that WebCenter Sites instance, the resources are assigned the same local identifier. The Developer Tools kit maintains the resources' fw_uid values across all WebCenter Sites instances. If the resource and its referenced assets are imported back into their original WebCenter Sites instance, the Developer Tools kit re-maps their local identifiers back to their original value.
Note:
Certain WebCenter Sites resources, such as Template assets, flex attributes, and tree tabs have unique name constraints. To avoid name conflicts, make sure each resource is uniquely named across all WebCenter Sites instances.
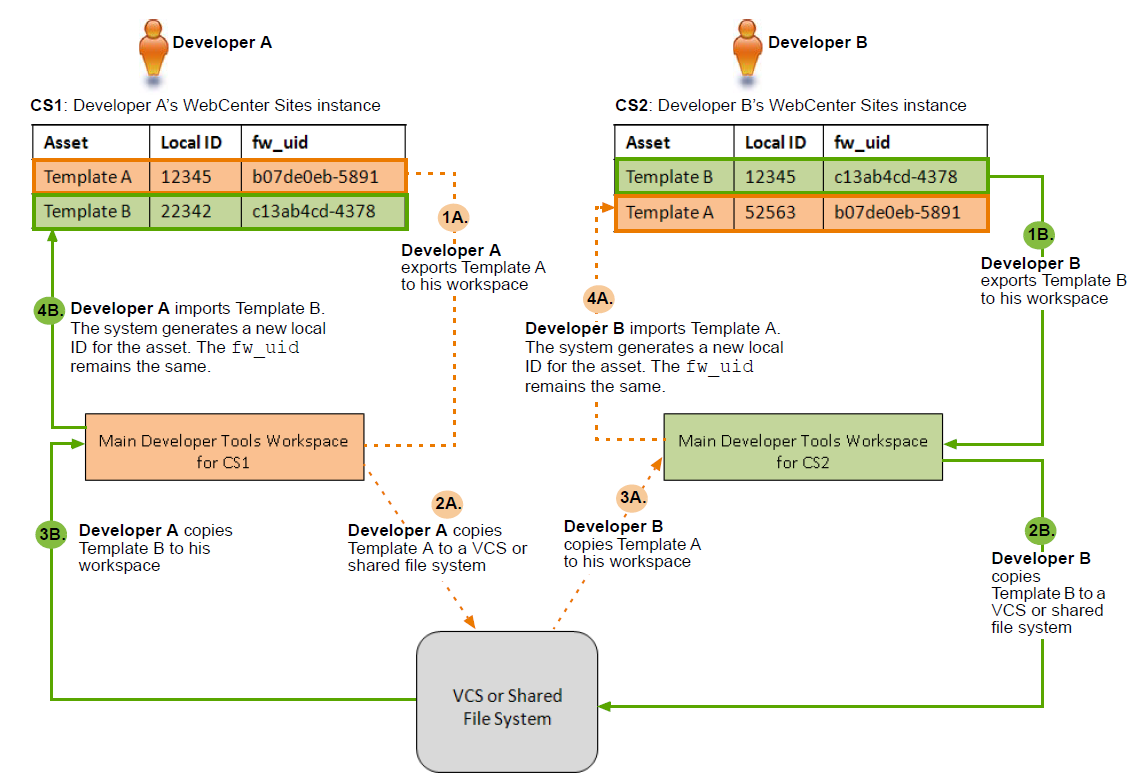
For example, (as shown in Figure 56-1) Developer A is working with a WebCenter Sites instance named CS1 and Developer B is working with a WebCenter Sites instance named CS2. Both developers created a completely different Template asset. Developer A created Template A and Developer B created Template B. The two Template assets have different fw_uid values and different names. However, since local identifiers are randomly assigned, both Template assets, by chance, have been assigned the same local identifier (12345). Developers A and B want to exchange Template assets between each other's WebCenter Sites instances. Developer A wants to import Template B into the CS1 instance, and Developer B wants to import Template A into the CS2 instance.
Figure 56-1 illustrates the steps both developers take to exchange Template assets between their WebCenter Sites instances. Both Template assets' local identifiers are re-mapped when imported into the other developer's WebCenter Sites instance. When Template A is imported into the CS2 instance, the system assigns it the local identifier 52563. When Template B is imported into the CS1 instance, the system assigns it the local identifier 22342. In each case, the fw_uid values for both Template assets remain the same.
Note:
To exchange resources between WebCenter Sites instances, the developers in our examples use a VCS or shared file system. For information about using a VCS, see Chapter 59, "Developer Tools: Integrating with Version Control Systems."
Figure 56-1 Exchanging two different assets with the same local identifier between two WebCenter Sites instances

Description of "Figure 56-1 Exchanging two different assets with the same local identifier between two WebCenter Sites instances"
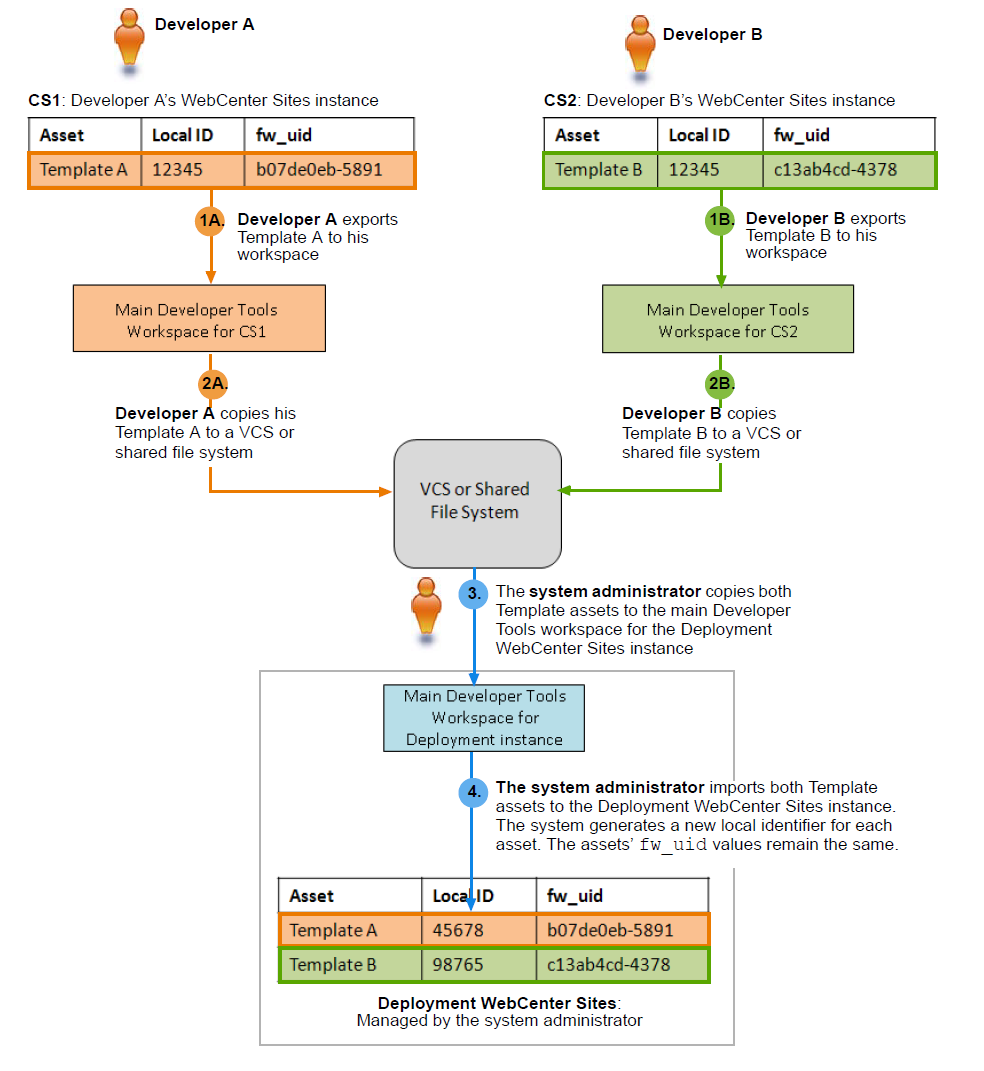
In Figure 56-2, Developer A wants to deploy Template A to the Deployment WebCenter Sites instance (managed by the system administrator) and Developer B wants to deploy Template B to the same instance. Both Template assets have the same local identifier (12345).
Developers A and B each export their Template to the main Developer Tools workspace for their WebCenter Sites instance. They then copy their Templates to a VCS or shared file system. From here, the system administrator copies both Template assets to the Deployment WebCenter Sites' main Developer Tools workspace. The system administrator then imports the two Template assets from the workspace to the Deployment WebCenter Sites. Upon import, the system assigns both Templates a new local identifier. Template A is assigned the local identifier of 45678 and Template B is assigned the local identifier of 98765. The assets' fw_uid values remain the same.
Figure 56-2 Deploying two different assets with the same local identifier to a third WebCenter Sites instance

Description of "Figure 56-2 Deploying two different assets with the same local identifier to a third WebCenter Sites instance"
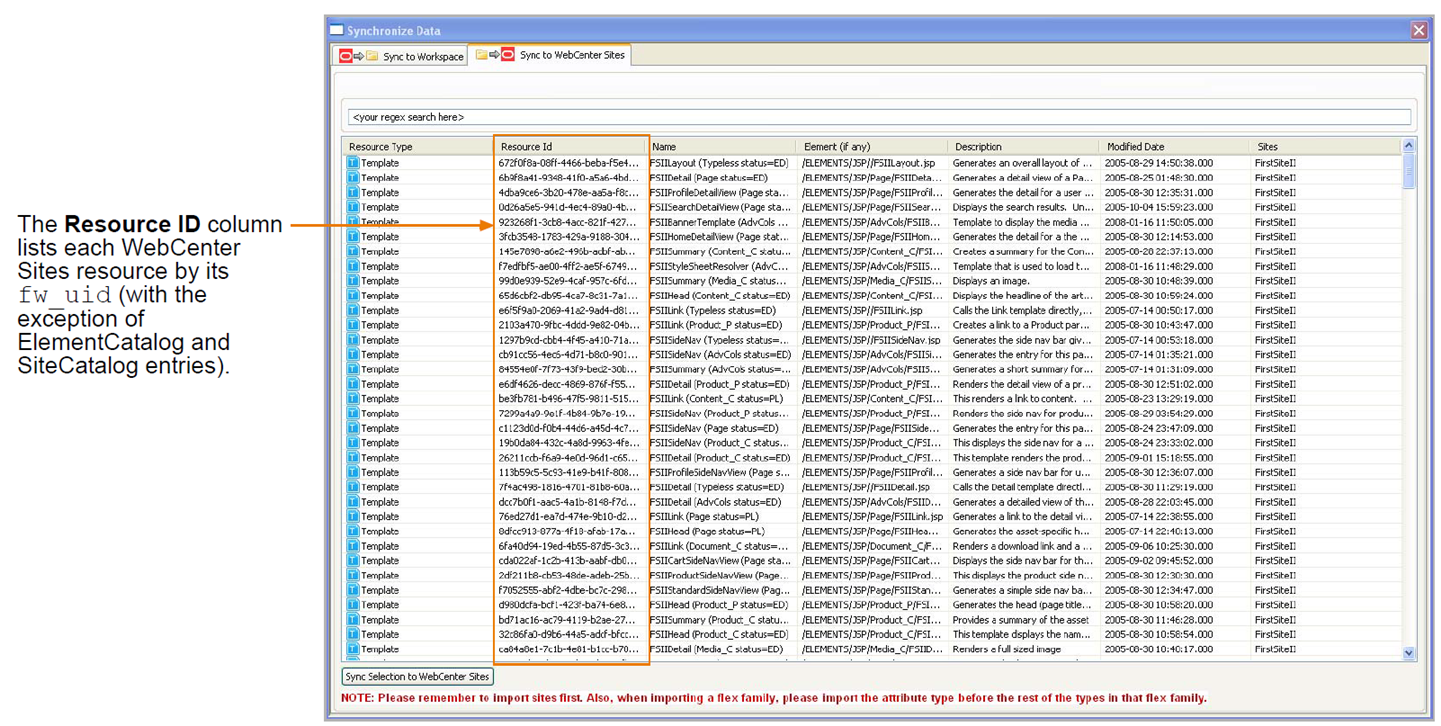
When a resource is exported to a workspace, it is identified only by its fw_uid. ElementCatalog and SiteCatalog entries are not assigned an fw_uid because these entries are uniquely identified by element name.

Description of the illustration syncscreen_resourceid.png
56.4.2 Overriding a Resource's fw_uid
When a resource is created, a UUID value is automatically generated as its globally unique identifier and stored in an asset attribute named fw_uid. Advanced developers can use the Asset API to override the default fw_uid scheme with their own by modifying the fw_uid attribute. For information about using the asset API, see the Oracle Fusion Middleware WebCenter Sites Java API Reference.
Note:
We recommend using the default WebCenter Sites fw_uid scheme. If you override a resource's default fw_uid value, you must make sure the value is unique across all WebCenter Sites instances. Once you set a resource's fw_uid attribute, do not change the value.
56.4.3 Using Developer Tools with Pre-Existing Resources
If your Oracle WebCenter Sites system is an upgrade from FatWire Content Server, some of its pre-existing resources may have their fw_uid values set to CSSystem:[type]:id. However, as of Content Server version 7.6, a resource's fw_uid is generated as a UUID value. Developer Tools can map resources with either type of fw_uid value, as long as the resource's fw_uid value is globally unique. Therefore, you can continue to use a pre-existing resource's current fw_uid value (in the format of CSSystem:[type]:id).
When using Developer Tools to work with pre-existing resources, do one of the following (or both):
-
We recommend continuing to use the pre-existing resource's
fw_uidvalue ofCSSystem:[type]:id. However, you must ensure that no other WebCenter Sites instance has generated the samefw_uidvalue for a different resource. For example, if you have a WebCenter Sites development instance and you published resources to a management instance, thefw_uidvalues of the published resources remain the same on both instances. Therefore, synchronizing resources between these two instances using Developer Tools will not result in ID conflicts. -
If you have pre-existing resources that were created on separate FatWire Content Server instances, but with identical
fw_uidvalues, each of those resources must be assigned a new, uniquefw_uidvalue. To avoid ID conflicts, you can either remove the currentfw_uidvalue and allow Developer Tools to generate a new UUID value when you export the resource from a WebCenter Sites instance, or you can assign your own unique identifier to the resource. For instructions, see Section 56.4.2, "Overriding a Resource's fw_uid."Note:
If you assign a resource a new
fw_uid, make sure to assign the newfw_uidvalue to every instance of that resource. For example, if you published the resource to another WebCenter Sites instance before modifying itsfw_uidvalue, make sure you assign the samefw_uidto both copies of that resource.
56.5 Site Mappings
Most WebCenter Sites resources, such as assets, are associated with at least one site. When a resource is exported from a WebCenter Sites instance to a workspace, it stores a complete (canonical) list of sites with which it is associated in its .main.xml file. The resource's canonical list remains the same on every WebCenter Sites instance, unless you add a new site affiliation, remove a current one, or (if you are an advanced developer) override the resource's natural site mapping using the command-line tool.
This section contains the following topics:
56.5.1 Natural Site Mappings
By default, Developer Tools maps resources to their associated sites by referencing the canonical list stored in a resource's .main.xml file. If any of the sites referenced in this list exist on the WebCenter Sites instance to which the resource is imported, Developer Tools maps the resource to those sites. If none of the sites referenced in the resource's canonical list exist on the WebCenter Sites instance, the import fails.
For example, Developer A installs two sites; News and Sports. On a separate WebCenter Sites instance, Developer B also installs two sites; News and Weather. Both developers import the same Template asset into their WebCenter Sites instances. This Template asset is associated with both the Sports and Weather sites (both sites are referenced in the asset's canonical list). Upon import, Developer Tools references the Template asset's canonical list and then maps the asset to the Sports site on Developer A's environment and the Weather site on Developer B's environment.
When Developers A and B share the changes they made to the Template asset with each other, Developer Tools maps the asset to the appropriate sites on both WebCenter Sites instances. The canonical list enables Developer Tools to recognize the sites with which the Template asset is associated, even when the asset is exported into an instance where some of those sites are not installed.
56.5.2 Overriding Natural Site Mappings With the Command-line Tool
Advanced developers can use the command-line tool to import a resource into sites that are not referenced in its canonical list. The command-line tool enables you to create reusable modules, which are workspaces containing resources that can be imported into any site.
For example, a developer creates a blogging solution within the FirstSiteII sample site. This solution includes resources such as a flex family, assets, and Templates. The developer wants the resources to be imported into various sites, including sites that do not exist yet. Since he is an advanced developer, he uses the command-line tool to export the desired resources to an empty workspace, and then archives the content of this workspace (using a .zip or .tar format). Using the command-line tool, other developers can then customize the site mappings of the resources contained in this module and manually specify the sites into which the module will be imported.
For more information about using the command-line tool, see Chapter 58, "Developer Tools: Command-Line Tool." For a detailed scenario of creating a reusable module, see Chapter 61, "Developer Tools: Using the Command-line Tool to Create Reusable Modules."