26 Revision Tracking
WebCenter Sites provides revision tracking functionality that prevents a row in a table from being edited by more than one user at a time. When you enable revision tracking for a table, WebCenter Sites maintains multiple versions of a row in that table.
WebCenter Sites applies this revision tracking functionality to your asset types. You decide which asset types should be tracked and determine how many revisions to store. The content providers then check their assets in and out and can compare versions, if necessary.
This chapter describes how to enable revision tracking and how to manage versions of assets.
This chapter contains the following sections:
26.1 Overview
WebCenter Sites provides revision tracking functionality through its revision tracking API. This API is used to provide additional revision tracking functionality for asset type tables.
When you enable revision tracking for an asset type, WebCenter Sites creates a new table, called a tracker table, for assets of that type. You specify how many versions you want to keep and you also specify a storage directory that the tracker table uses to store supporting files for the assets that it is tracking.
WebCenter Sites' implementation of revision tracking provides the following features:
-
Check out and check in.
Check out locks an asset so that only one user can edit it at a time.
Check in releases the lock on the asset, increments the version number, and determines whether the number of versions falls within the configured limit. If the new version exceeds the limit, the oldest version is deleted to make room for the next version.
-
Storage of multiple versions of an asset.
When you enable revision tracking for an asset type, WebCenter Sites stores versions in a tracker table; upload data is stored in a storage directory that you specify, as shown in Table 26-0, "The RTInfo Table". Because past versions are stored (that is, a history exists), a user can roll back an asset to a previous version or examine the differences between two versions of the asset.
-
Administrative or maintenance features.
An administrator can delete past versions of an asset or clear the checkout for an asset by overriding the check out on it and checking it back in.
When an asset type is being tracked, WebCenter Sites provides checkin, checkout, and other revision tracking features on the New and Edit forms for assets of those types.
This section contains the following topics:
-
Section 26.1.3, "Revision Tracking and the Two Asset Models"
-
Section 26.1.4, "Implicit vs. Explicit Checkin and Explicit Checkout"
26.1.1 Tracker Tables and Storage Directories
When you enable revision tracking for an asset type, WebCenter Sites creates a tracker table that stores revision information for the records in the source table. A tracker table has the same name as the main storage table for the asset type with _t appended to it. For example, the tracker table for the article asset type would be named Article_t. The tracker table for the attribute type asset type would be named AttrTypes_t.
For each record in a tracked asset type table, there are several rows in the corresponding tracker table that stores its version information. Tracker tables have two kinds of columns:
-
Columns that store the system information that the revision tracking system needs to keep track of all the versions
-
Columns that hold the IDs of text files that are stored in a storage directory
When a new version of an asset is checked in, WebCenter Sites creates a separate text file to hold the data in each of the asset type's upload (URL) fields and in any text fields that are configured to hold more than 64 characters. These files are stored in shared/rtStorage/AssetType. There is a set of these text files stored in the storage directory for each version of the asset.
Note:
Because tracker tables hold system information only, they are hidden in Sites Explorer. Do not attempt to modify the information in any of the tracker tables with a database tool.26.1.2 The RTInfo Table
While the tracker tables are kept hidden, the RTInfo table is visible through Sites Explorer. This table holds information about which tables are being revision tracked. It has the following columns:
| Column | Description |
|---|---|
|
|
The name of a table that is being revision tracked. For asset types, this is the name of the main asset type table. |
|
|
The number of versions to store for each asset of this type |
|
|
The path to the storage directory that holds the text files for each version of assets of this type. The path is in the shared folder, located in |
|
|
A timestamp of the last time a version was stored in the tracker table. |
|
|
The time at which revision tracking was enabled for the source table. |
26.1.3 Revision Tracking and the Two Asset Models
Because the data model for basic assets is different from the data model for flex assets, the revision tracking system works differently for the two asset models:
-
For basic assets, only the row in the main asset storage table is tracked.
-
For flex assets and the other multi-table asset types (template and CSElement), the information from the appropriate rows from all of their tables are serialized into an object and stored in the tracker table for that asset type.
For example, if you enable revision tracking for template assets, the appropriate rows from the Template, SiteCatalog, and ElementCatalog tables are serialized into an object and stored in the Template_t table.
26.1.4 Implicit vs. Explicit Checkin and Explicit Checkout
When revision tracking is on for an asset type, WebCenter Sites provides both implicit (or automatic) and explicit (or manual) checkout, and explicit checkin functionality. When users create or edit assets of a type that is being revision tracked, they do not have to manually check out the asset: it is automatically assigned to them. However, implicit checkin is not allowed; when they click Save, the asset is not checked back in. Users must manually check assets in.
This may or may not be the behavior that you want. For example, if an author is making extensive revisions to an asset that was checked out implicitly, the changes will not be available until the user also explicitly checks in the asset. This will help prevent the user from overwriting an older version that he or she really wanted to keep. An additional example is when an author implicitly checks out an asset to make edits, then navigates to a different area, then comes back to the asset. Once an implicitly checked out asset is navigated away from, it must be explicitly checked in when editing is complete.
Implicit checkouts are used for quick edits where the editing and saving would be done in one operation. These types of updates that are expected to be done with minimal clicks. Explicit checkouts are for changes to an asset over time.
When a content provider implicitly or explicitly checks out an asset, a version is not stored, no matter how many times he or she saves it, until it is manually checked back in.
26.1.5 Revision Tracking and Non-Asset Tables
In addition to using revision tracking for your asset types, you can implement revision tracking on your non-asset tables.
To do so, you use the User Access Management feature in the Admin tab to enable tracking for the table. WebCenter Sites then creates a corresponding tracker table to support the tracked table. It is named the same way as a tracker table for an asset type: nameOfTable_t. For example, if you enabled revision tracking for the Source table, the tracker table would be called Source_t.
When revision tracking is enabled for a non-asset table, you can use either the revision tracking features accessible from the menus in Sites Explorer or the User Access Management node on the Admin tab to lock (check out) a row and then unlock the row (check it back in) when you are finished with it.
If you need to provide additional support outside of the Sites Explorer tool for revision tracking of a non-asset table, your developers can code additional forms, using the WebCenter Sites revision tracking API and revision tracking XML or JSP tags. For information, see the Oracle Fusion Middleware WebCenter Sites: Tag Reference and the Oracle Fusion Middleware WebCenter Sites: Java API Reference.
Note:
If you need to delete a non-asset table from the WebCenter Sites database and that table is being revision tracked, be sure to untrack the table before deleting it.26.1.6 How Many Versions?
Each revision of an asset or a database row occupies disk space. Therefore, your decision about how many revisions to keep must be based on the following factors:
-
The amount of disk space that you have available
-
The typical data size of the asset (or row)
-
The likelihood that there could be a need for a rollback of several versions
For example, an asset that consists of a small amount of ASCII data occupies so little space that a large number of revisions would take little disk space. However, each version of an asset that holds a large amount of binary data could occupy a significant amount of disk space. In the second case, you must strike the appropriate balance, storing the fewest number of versions necessary for rollback purposes.
26.2 Enabling Revision Tracking
This section shows you how to enable revision tracking for assets and for non-asset tables.
Note:
If Revision Tracking is turned on at the publishing target destination for either ElementCatalog or SiteCatalog, then the publishing of template will fail and the template may become corrupted.It is not recommended to enable Revision Tracking on the target destination.
This section contains the following topics:
26.2.1 Enabling Revision Tracking for Assets
To enable revision tracking for assets
-
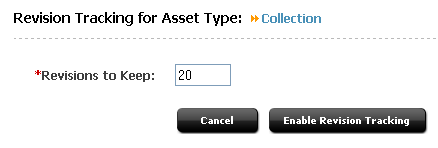
In the Admin tab, expand Asset Types, then expand the asset type for which you want to enable revision tracking.
-
Under the selected asset type, expand Revision Tracking and double-click Track.
The Track Asset Type form appears:
Figure 26-1 Revision Tracking for Asset Type Form
Description of ''Figure 26-1 Revision Tracking for Asset Type Form''
-
In the Revisions to Keep field, enter the number of revisions you want WebCenter Sites to store for each asset of the selected asset type. Once this many revisions are stored, the oldest revision is overwritten by the next revision.
If you are using revision tracking solely for its record-locking feature and you do not need the ability to roll back to previous versions, you can set this field to 1.
-
Click Enable Revision Tracking.
26.2.2 Enabling Revision Tracking for Non-Asset Tables
To enable revision tracking for database tables that do not hold assets, use the User Access Management node.
To enable revision tracking for non-asset tables
-
In the Admin tab, expand User Access Management and double-click Revision Tracking.
-
In the form that appears, select Track Tables and click OK.
-
In the Enter root storage directory field, enter the full path to the directory in which revisions of table rows will be stored. Do not add a slash (or backslash) character after the directory name.
-
In the Enter number of revisions to keep field, enter the number of revisions WebCenter Sites should store for rollback purposes.
-
Select the Track? check box next to each table for which you are enabling revision tracking.
-
Click Track Tables.
26.2.3 Editing Revision Tracking Settings
You must have the SiteGod, Xceladmin, Visitor Admin or Remote Client ACL to either inspect or edit revision tracking settings. If you attempt to examine the current revision tracking settings for a tracked asset type or non-asset table and you do not have one of those ACLs, the system does not display the name of the root storage directory or the number of revisions.
Because revision tracking settings directory affect the database, you must be careful when changing these settings.
This section contains the following topics:
26.2.3.1 Changing the Root Storage Directory
Caution:
If you change the root storage directory for an asset type or non-asset table, you will lose all the versions currently stored in it.If you must change the root storage directory, follow these steps:
-
Disable revision tracking for the asset type or table. When you do this, all the version data for the asset type is orphaned.
-
Enable revision tracking for the asset type or table, entering the new root storage directory.
26.2.3.2 Changing the Number of Revisions
The following sections provide information about increasing and decreasing the number of revisions to be stored for an asset type or table.
If you want to increase the number of revisions to be stored for an asset type, simply increase the value in the Revisions to Keep field.
To increase the value, in the Admin tab, expand Asset Types, expand the asset type you want to modify, Revision Tracking, and double-click Set Revisions. Use the form that appears to increase the value.
Although you might need to decrease the number of versions while you are testing configuration settings on a WebCenter Sites development system or while you are fine-tuning the Sites management system, it is best if you do not decrease the number of versions being stored by Revision Tracking on a fully functioning management system.
If you decrease the value in the Revisions to Keep field to a number that is less than the number of revisions currently being stored for that asset type or table, the following occurs:
-
The text files in the storage directory for the extra versions are orphaned.
-
The rows in the tracker table for the extra versions are orphaned.
You can avoid creating orphan rows in the tracker table by deleting the extra versions (the oldest ones) before you decrease the number of revisions. However, you cannot avoid creating orphan text files in the storage directory and you should not attempt to delete them because it is very difficult to determine which ones to delete.
If you must decrease the number of revisions, use the form associated with the asset type. In the Admin tab, expand Asset Types, the asset type you want to modify, Revision Tracking, and double-click Set Revisions. Use the form that appears to decrease the value.
26.3 Disabling Revision Tracking
When you disable revision tracking for an asset type or a non-asset table, the following occurs:
-
The tracker table is inactivated, but not deleted. This means that the versions stored in it are orphaned, but not deleted. And, after revision tracking is disabled for a table, you can no longer delete versions by using the WebCenter Sites revision tracking forms.
-
All links to the text files in the storage directory are broken, but the files themselves are not deleted. They, too, are orphaned.
If you later decide to enable revision tracking for that asset type, the old versions and text files are ignored. They remain orphaned.
Because these old versions could take up unwanted space, it may be necessary to delete them manually. Manually delete all the text files from the revision tracking directory located inside the storage directory for that asset type.
For example, if the storage directory for the asset type is /Storage/AssetType, then delete all the files from the /Storage/AssetType/AssetType revision tracking directory.
Note:
Do not delete any files from the asset type storage directory.To disable revision tracking for asset types
-
In the Admin tab, expand Asset Types, then the asset type for which you want to disable revision tracking.
-
Under the selected asset type, expand Revision Tracking and double-click Untrack.
WebCenter Sites displays a warning message:
Figure 26-2 Revision Tracking for Asset Type Warning MEssage
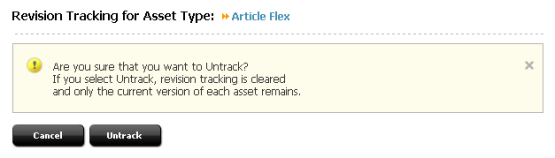
Description of ''Figure 26-2 Revision Tracking for Asset Type Warning MEssage''
-
Click Untrack.
26.4 Unlocking Revisions
Occasionally, user operations may leave an asset in an inappropriate locked state. Resolving these states is an administrative responsibility.
For asset types, use the Clear Checkouts function in the Admin tab.
Before you begin, find out the name of the user who has the asset locked. This information is listed on the Inspect form for the asset.
-
In the Admin tab, double-click Clear Checkouts.
WebCenter Sites displays the Search for Checkouts form:
-
Enter the name of the user who has left the asset locked and click Show Checkouts.
-
In the list of assets checked out to the selected user, select the Clear check box next to each asset for which you want to undo the checkout.
-
Click Clear Checkouts.
