23 Configuring the User Interfaces
There are several WebCenter Sites user interface features that must be configured before content providers can use them.
Some of these features are alternate interfaces to the WebCenter Sites interfaces: Sites Desktop, Sites DocLink, and the Web Mode of the Contributor interface. Others change the WebCenter Sites interfaces (locale settings) and the behavior of the preview function.
This chapter contains the following sections:
-
Section 23.1, "Setting the Locale for the WebCenter Sites Interfaces"
-
Section 23.5, "Maintaining Separate Browser Sessions for Preview"
Note:
The following features are deprecated in WebCenter Sites 11g Release 1 (11.1.1.8.0): Sites Desktop, Sites DocLink.23.1 Setting the Locale for the WebCenter Sites Interfaces
Once WebCenter Sites is installed, English is set as the default locale for the system. As the administrator, you can configure a default locale for WebCenter Sites.
There are several options and properties that you use to set the locale:
-
The Locale item in the Admin tab sets the default locale for the WebCenter Sites interfaces. Individual users can override the default and use a different locale (if one is present) by setting a preference.
-
The
cs.emailcharsetandcs.emailcontenttypeproperties in thefuturetense.inifile determine the character set that is used in the email messages that the workflow system sends. These properties—which must be set to a character set that can appropriately represent characters for all of the locales that your content providers can select—are usually set during installation. -
If your system is using the UTF-8 character set and you are using the Mirror to Server publishing delivery type, you must set the value for the
cs.mirrorrowsperpostproperty in thefuturetense.inifile to 4 or lower.
This section contains the following topics:
23.1.1 System Default Locale for the WebCenter Sites Users
When the language packs are installed, the installer writes the language and country code for the locale of the language pack to the LocaleMap database table. For example, Portuguese Brazilian is pt_BR. When there is more than one locale listed in the LocaleMap table the administrator should specify which should be the default locale. This can be done in the following ways:
-
Set a new global default language. You can use the WebCenter Sites Local Manager to replace the current default language for your WebCenter Sites system with a different language pack. This language will become the new default language globally on your WebCenter Sites system. You also have an option to set a different default language for individual users, but not from the Locale Manager.
-
Set a new default language on a per-user basis. This option allows you to select a default language for individual users that is different from the global default language that you select in the Locale Manager form. See Section 5.5, "Working with User Profiles and User Attributes" for information about how to set a user's locale preference.
WebCenter Sites determines which language to use for an individual user through its universal session variable locale. This variable contains the language and country code associated with the user who is logged in.
When a user logs in to WebCenter Sites, WebCenter Sites obtains the value for the locale variable as follows:
-
If the user profile has a value for the
localeuser attribute, WebCenter Sites obtains and uses it. -
If the user profile does not specify a preference, WebCenter Sites attempts to match the locale setting of that user's browser to a locale from the
LocaleMaptable. -
If the user profile does not set a preference and WebCenter Sites cannot match that user's browser locale, WebCenter Sites uses the default locale that is set for the system.
Note:
When you select a site and set a new system default language from that site, the language is automatically set as the global default language for all sites on your WebCenter Sites system.To set the system default locale
-
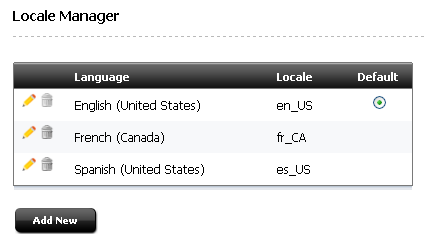
In the Admin tab, double-click Locale.
WebCenter Sites displays the Locale Manager form.
-
Click the Edit icon next to the desired locale.
A radio button will appear on the form in the Default column.
-
Select the Default radio button next to the desired locale.
-
Click Save.
The next time users log in to WebCenter Sites, the system will be displayed in the new default language.
Note:
An individual user's language preference (which is set from the User Profiles option) overrides the language preference set for the WebCenter Sites system (which is set from the Locale Manager). See Section 5.5, "Working with User Profiles and User Attributes" for information about how to set a user's locale preference.23.1.2 System Locale Properties
The properties in the following list should have been configured during the installation of the language pack on your Sites system. They are listed here for troubleshooting purposes. For example, if the workflow emails are displaying odd characters, perhaps the email properties were not set correctly.
For instructions on how to start and use the Property Editor to verify or modify property values, see the Oracle Fusion Middleware WebCenter Sites Property Files Reference.
Table 23-1 System Locale Properties
| Property | Property File | Description |
|---|---|---|
|
cs.contenttype |
futuretense.ini |
Determines the HTTP header character set for all WebCenter Sites pages, as well as other HTTP interaction (Sites Explorer, CatalogMover, and so on).This value is set to |
|
cs.emailcharset |
futuretense.ini |
Determines the character set used in the subject lines of email messages sent by WebCenter Sites. (Typically these are workflow emails.) |
|
cs.emailcontenttype |
futuretense.ini |
Determines the character set used in the body of email messages sent by WebCenter Sites. |
|
cs.mirrorrowsperpost |
futuretense.ini |
Specifies the number of table rows that can be mirrored during each HTTP POST while a mirror publish session is underway. If you are using UTF-8 and your database serves non-ASCII text, this value must be set to 4 or lower. |
|
xcelerate.charset |
futuretense_xcel.ini |
Determines the HTTP header character set used for all WebCenter Sites pages. This value must be set to UTF-8. |
23.1.3 Single-Language Restrictions
Although you can configure a multi-lingual management system, certain parts of the user interface can be displayed in one language only.
For example, the names of tables and columns in the WebCenter Sites database as well as individual items such as categories and source codes can have one name only. This means that although much of the text on an individual WebCenter Sites form can be displayed in any of the languages that you have installed on your Sites system, items such as field names and asset type names can be displayed in one language only.
Following is a list of items in WebCenter Sites that can have one name only, which means that they can be displayed in one language only:
-
Asset type names
-
Field names
-
Asset names
-
Categories
-
Source codes
-
Tree tab names
-
Site names
-
Names of workflow building blocks (actions, email objects, conditions, states, steps, processes)
-
Role names
-
Start menu items—both Search and New
On a system that provides two or more languages, you must determine which language is going to be used by the majority of content providers and then use that language to name your sites, tabs, asset types, and so on.
23.1.4 Locale and Asset Types
When your site developers create asset types (either basic or flex), they can specify the field names for those asset types in whatever language they have available on the Sites system. However, there are several core columns/fields that WebCenter Sites creates for all asset types by default:
-
id
-
name
-
description
-
status
-
createdby
-
createddate
-
updatedby
-
updateddate
-
startdate
-
enddate
-
subtype
-
filename
-
path
-
template
-
category
These column names are created in English, by default. When WebCenter Sites displays them as fields in its interfaces, it uses the language that is set as the system default language.
For descriptions of the default columns for asset types, see the Oracle Fusion Middleware WebCenter Sites Developer's Guide.
23.1.5 Locale and the Article Asset Type
If your site developers decided to use the sample site asset type named Article, you must also modify the value for the xcelerate.body.length property in the futuretense_xcel.ini file. This property determines how many characters are stored in the urlbody column of the Article table.
Because urlbody is a URL column, the data entered in it is actually stored as a file outside of the WebCenter Sites database. However, the first n number of characters, where n equals the value specified for the xcelerate.body.length property, is also stored in the urlbody column so that you can search for text in the body of an article asset with the search feature in the administrator's interface.
When this column holds non-ASCII text, the value for this property should be set to 500.
23.2 Sites Desktop
Sites Desktop enables Microsoft Word users to create, import, and edit Word documents as WebCenter Sites assets using the familiar Word user interface. They save these assets to, and open them from, the WebCenter Sites database.
Note:
Sites Desktop supports the use of standard Word documents and templates. In Microsoft Word 2000, web page templates that enable Word users to create HTML pages using Word were introduced.The Word web page templates are neither supported nor needed by Sites Desktop.
This section contains the following topics:
-
Section 23.2.2, "Configuring the Word Asset Types for Sites Desktop"
-
Section 23.2.4, "Installing the Sites Desktop Client Application"
-
Section 23.2.5, "Specifying Locale for the Client Application"
-
Section 23.2.7, "Configuring Word Templates for the Word Assets"
23.2.1 Overview
When Sites Desktop is configured for a system, users can log in to WebCenter Sites from a special toolbar in the Microsoft Word user interface.
You, the administrator, configure which asset types will be available in the Word interface. You enable the asset types for Sites Desktop and then determine which fields the Word users can enter data for. This information determines the appearance and the functionality of the WebCenter Sites toolbar when users create assets of those types in Word. Your content providers use the WebCenter Sites toolbar to insert field markers that mark the data for each field.
When someone saves the Word document as an asset, Sites Desktop sends that asset to WebCenter Sites. A temporary copy of the document is also saved locally on the user's hard drive.
The file conversion subsystem converts the binary form of the document into XML, which, in turn, is parsed into a form suitable for storing in the WebCenter Sites database. The asset is then managed as follows:
-
The Word document is also stored with the asset. That document is retrieved when a user opens the asset in Word.
-
When a visitor to your online site (on the delivery system) requests the asset, WebCenter Sites serves the asset, not the Word document.
Note:
If you use WebCenter Sites' interfaces to edit an asset that was created in Sites Desktop, the link between the asset and Sites Desktop will be irreversibly severed when you save the asset. You will no longer be able to edit the asset in Sites Desktop. WebCenter Sites warns you of this fact when you open the asset in the Edit form. A link to the Sites Desktop client installer is also provided at that time.
This section contains the following topics:
23.2.1.1 Sources of Data for a Word Asset
The Microsoft Word document is the complete source for a word asset. There are several ways to enter data for an asset's field in the Word interface:
-
A user enters text and then marks it with the appropriate field marker.
-
Certain required fields such as Name and Description are hidden in Word. For these fields, the user selects the field name from the WebCenter Sites toolbar and then enters the data in a dialog box.
This kind of data is considered to be Word metadata.
In Word, you can select File, then select Properties, and click the Custom tab to see these hidden fields and other metadata that results from storing the Word asset in the WebCenter Sites database. Do not modify this data.
-
Obtain information from Word template
.dotfiles. You can create Word templates for the Word assets that provide field/value pairs for specific fields. (You can also use Word templates to create a window for your content providers to use to enter information about their Word assets.)
23.2.1.2 Preserving the Formatting of the Word Data
The administrator determines how the data from an individual field is managed by using the Preserve formatting option when you configure asset types for Sites Desktop.
When you select Preserve formatting for a field, WebCenter Sites converts the Word format to the corresponding HTML format and stores the HTML in the column that represents the field in the WebCenter Sites database. Paragraph breaks are converted to <p> tags, bold text is marked with <b></b> pairs, tables are stored as HTML tables, and so on.
Therefore, it is best if you use the Preserve formatting option for fields that contain text only. Do not use the Preserve formatting option for fields that contain files (image or other types of files).
It is also best to keep text and images separate—that you do not allow the Sites Desktop users to save both text and images to the same blob attribute or upload field. For example, if you have an article asset type that contains an image with a caption, use one attribute or field for the caption and another attribute or field for the image file.
By keeping text and images in separate fields and controlling whether the formatting is preserved or not, your template writers can know what kind of data will be extracted from a particular field and can code their templates to display that data appropriately. If you decide to allow users to save both text and image to the same blob attribute, both you and your template developers should note the following:
Table 23-2 Format Preservation from Word Document Conversion
| Format Preserved | Word Content Marked to Be Saved in the Blob Attribute | How Word Content Is Stored in the Database |
|---|---|---|
|
Yes |
text and image |
The image is written to the directory identified by the |
|
Yes |
text only |
The text is stored as HTML in the URL column. |
|
Yes |
image only |
The image file is written to the URL column. |
|
No |
text and image |
The text is stripped out and the image file is written to the URL column. |
|
No |
text only |
The formatting of the text is stripped out and the text is written to the URL column. |
|
No |
image only |
The image file is written to the URL column. |
23.2.2 Configuring the Word Asset Types for Sites Desktop
The term "Word asset type" refers to any WebCenter Sites asset type that is configured to be created and edited in Microsoft Word. It is not a new asset type, but rather, an asset type already known to WebCenter Sites that you (or another administrator) have enabled for Word (Sites Desktop).
While there are no restrictions on which asset types might fall into this category, practical limits require that you restrict the qualifying asset types to those that have text content or are otherwise document-related. When configuring asset types for Sites Desktop ensure the following:
-
Enable the asset types that you want to make available through Sites Desktop.
-
For each subtype for the enabled basic asset types and for each definition for the enabled flex asset types, specify which fields will appear on the WebCenter Sites toolbar within the Microsoft Word interface.
-
For each field that you enable, determine whether WebCenter Sites should retain the formatting of the data that was entered in the Microsoft Word application. For fields that hold blobs, use the formatting option to determine how text and files are managed when they are written to that field.
-
Create Sites Desktop start menu items for each of the Word asset types.
This section contains the following topics:
23.2.2.1 Enabling Asset Types for Sites Desktop
You enable an asset type for Sites Desktop by adding it to those that are selected for Sites Desktop.
To enable asset types for Sites Desktop
-
In the tree, do one of the following:
-
In the Admin tab, expand Sites, then the site for which you are configuring Sites Desktop.
-
If you have logged in to the site that you are configuring and you have access to the SiteAdmin tab, select the SiteAdmin tab.
-
-
Expand Sites Desktop and double-click Enable Sites Desktop.
WebCenter Sites displays the Enable Asset Types for Sites Desktop form, showing asset types that have not yet been enabled for Sites Desktop in this site:
Figure 23-2 Enable Asset Types for Sites Desktop Showing Disabled Asset Types
Description of ''Figure 23-2 Enable Asset Types for Sites Desktop Showing Disabled Asset Types''
-
Select the asset types you want to enable for Sites Desktop in this site.
-
Click Enable Asset Types.
-
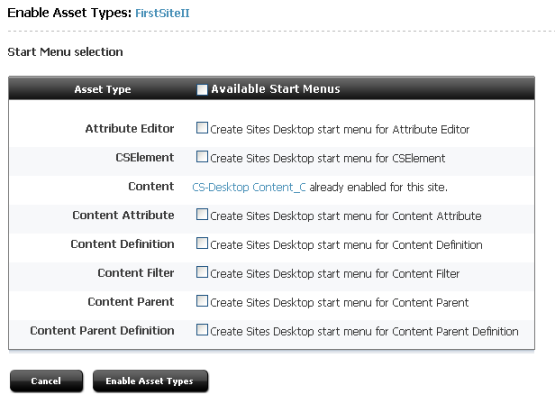
The Enable Asset Types Start Menu selection form displays.
-
Select the asset types to include in the Start Menu.
-
Click Enable Asset Types.
-
Continue to step 4 in Section 23.2.2.2, "Specifying Which Fields Are on the WebCenter Sites Toolbar."
23.2.2.2 Specifying Which Fields Are on the WebCenter Sites Toolbar
Before you begin this procedure, be sure that you have enabled the asset type(s) that you want to configure for Sites Desktop. If you have not yet enabled the asset type(s), see Section 23.2.2.1, "Enabling Asset Types for Sites Desktop."
To specify which fields of an asset type will be displayed on the WebCenter Sites toolbar in the Microsoft Word interface
-
In the tree, do one of the following:
-
In the Admin tab, expand Sites, then the site for which you are configuring Sites Desktop.
-
If you have logged in to the site that you are configuring and you have access to the SiteAdmin tab, select the SiteAdmin tab.
-
-
Expand Sites Desktop, then expand asset type you want to configure.
-
Double-click the desired subtype (basic asset types) or definition (flex and flex parent asset types).
The Configuration page for the asset opens.
-
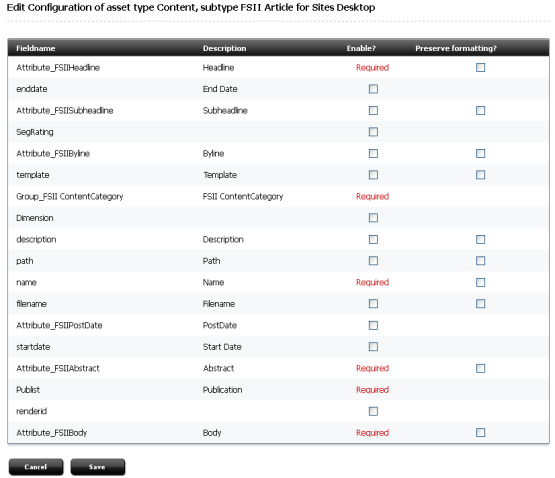
Click Edit Configuration.
WebCenter Sites displays a configuration form similar to this one:
Figure 23-4 Edit Configuration of Asset Type Form
Description of ''Figure 23-4 Edit Configuration of Asset Type Form''
-
In the Edit Configuration form, select the Enable check box for each field you want to appear in the Sites Desktop toolbar in Word. As a general rule, select only text-entry fields. Note that required fields are pre-elected and cannot be deselected.
-
(Optional) If you want the format of the text that is entered in a field through Word to be preserved when that data is stored in the WebCenter Sites database, select the Preserve formatting option for that field.
As a general rule, enable the Preserve formatting option only for fields that store text. Do not enable the Preserve formatting option for fields that hold uploaded files.
-
Click Save.
-
(Optional) Repeat steps 3 – 7 for each additional subtype or definition you want to configure.
-
(Optional) Repeat steps 2 – 8 for each additional asset type you want to configure.
23.2.2.3 Creating Sites Desktop Start Menu Items
The subtype configuration determines which fields are available on the WebCenter Sites toolbar in the Microsoft Word interface, but your Word asset types do not become available in Word until you create start menu items for them.
To create Sites Desktop start menu items
-
In the Admin tab, expand Asset Types, then the desired asset type.
-
Under the selected asset type, expand Start Menu and double-click Add New.
-
In the Name field, enter a short, descriptive name for the item. This is the name that is displayed in the list of asset types that are available from the Sites Desktop toolbar in Word.
-
In the Description field, enter a short, informative description for the start menu item.
-
In the Type field, select Sites Desktop.
Note:
You cannot set default field values for assets whose source is Word. Ignore the Default Values section when creating start menu items for Word asset types. -
In the Sites field, select which sites can use this start menu item. Use Ctrl-click to select more than one site.
-
In the Roles field, select all the roles that can have access to the start menu item. Use Ctrl-click to select more than one role.
-
(Optional) To configure workflow process details for the assets that are created with this start menu item, complete the following steps:
-
Click Select Workflow.
-
In the Select Workflow form, select the appropriate workflow process from the drop-down list and click Select Workflow.
-
In the Set Participants form, select at least one user for each role that appears and then click Set Participants.
-
Click Continue.
WebCenter Sites saves your changes and redisplays the Start Menu form.
-
-
In the Start Menu form, click Save.
-
Repeat steps 1–9 for each additional asset type you want to configure.
23.2.3 User Accounts and Sites Desktop
Like the content providers who use the WebCenter Sites interfaces, the content providers who use the Sites Desktop application must have WebCenter Sites user accounts as well. User accounts for the individuals who use Sites Desktop must have the following ACLs:
-
Browser
-
ElementReader
-
PageReader
-
RemoteClient
-
xceleditor
-
UserReader
-
Visitor
For information about creating user accounts, see Section 5.4.3, "Editing a User," and Section 31.4, "Required ACLs for Custom Users."
Give the Sites Desktop users the following information:
-
Their user name/password combination
-
The appropriate URL for logging in to your Sites management system
They need both pieces of information to log in to WebCenter Sites through Sites Desktop.
The WebCenter Sites URL uses the following convention:
http://<server>:<port>/<context>
where:
-
<server>is the host name or IP address of the machine running WebCenter Sites. -
<port>is the port on which WebCenter Sites is listening for connections. -
<context>refers to the application context root (URI) assigned to the WebCenter Sites application when it was installed.
23.2.4 Installing the Sites Desktop Client Application
In order to use the Sites Desktop feature, the Sites Desktop client must be installed on the client machine.
Note:
Before installing Sites Desktop, make sure that the client machine:-
Is running supported versions of Microsoft Windows and Word, and
-
Supports the entry and display of text using the UTF-8 character set.
To install the Sites Desktop client
-
In the shipped zip file, the Sites Desktop installer is located on the following path:
ContentServer/Xcelerate/cs_clientwhere there are
/32bitand/64bitfolders to choose depending on your system. -
Extract the downloaded archive to a temporary directory and open that directory.
-
Launch the Sites Desktop installer (
.msi) and follow the instructions it displays.Note:
If one or more language packs are installed on your Sites system, the page lists localized versions of the Sites Desktop client corresponding to the installed language packs. In such case, download the version appropriate to the user's language preference. (Language packs are available with patchset 1)
23.2.5 Specifying Locale for the Client Application
The Download page is generated dynamically based on the language packs that are installed on your Sites system. If your Sites system has a language pack installed, the Download page presents a Sites Desktop option in that language and the csdesktop.exe file installs a version of the help file in that language.
The first time a Sites Desktop user logs in to WebCenter Sites, the Log In dialog box is in English. The user clicks the Select Language link to select the language that matches the version of Sites Desktop help file that he or she installed.
After a user selects a language, Sites Desktop copies the appropriate XML language file from WebCenter Sites to that user's hard drive. Sites Desktop uses the information in that language file for menu names and dialog box text until the user selects a different language.
Additionally, whenever the language file on the WebCenter Sites server is updated, be sure to remind your Sites Desktop users to update their language file on their hard disks by using the Select Language link again the next time they log in to WebCenter Sites.
23.2.6 Testing the Sites Desktop Configuration
To determine whether your Sites Desktop application is configured correctly, you must create and save an asset from the Microsoft Word interface and then examine it through WebCenter Sites.
To determine if Sites Desktop is configured correctly
-
Open Microsoft Word.
-
On the button bar, select WebCenter Sites, then select Login.
-
In the Login dialog box, enter the following information:
-
The name and password of a user who has the RemoteClient ACL.
-
The server URL, as follows:
http://<server>:<port>/<context>
where:
-
<server>is the host name or IP address of the machine running WebCenter Sites. -
<port>is the number of the port on which WebCenter Sites is listening for connections. -
<context>refers to the application context root (URI) assigned to the WebCenter Sites application when it was installed.
-
-
-
Select the site, asset type, and subtype, as necessary, to set the field markers list.
-
Enter text in the Word document.
-
Select (highlight) the entire range of text.
-
Click the Field Markers button on the toolbar and select the marker for the field that you are entering text for.
-
Repeat steps 5 – 7 for all required asset fields that require you to enter text in the Word document.
-
Set values for the field markers containing ellipses (…). These field markers represent hidden fields; that is, their values do not appear in the Word document, but are part of the asset definition, and are thus stored in the WebCenter Sites database. When you click a field marker with an ellipsis, a dialog box opens. Enter the appropriate data.
-
In the button bar, select WebCenter Sites, then Save to WebCenter Sites.
-
Log in to the administrator's interface as a user who has access to the type of asset that you just created.
-
Select the site that you created the asset for and then click Search.
-
Find the asset that you entered through Sites Desktop.
-
Click Inspect. (Do not select Edit.)
-
Examine the data listed for the fields and verify that the data that you marked in Sites Desktop matches the data displayed in the Inspect form.
23.2.7 Configuring Word Templates for the Word Assets
The field markers on the WebCenter Sites toolbar are Word bookmarks. Therefore, you can create .dot files for your Word assets, marking the appropriate areas of those templates with either the WebCenter Sites field markers or your own Word bookmarks.
Create a new Word document and mark placeholder text with the appropriate field markers, just as you would for an asset of that type (that is, be sure that you do not mark text for the metadata fields such as Name and Description and so on). Then save the document as a template (a .dot file) rather than to WebCenter Sites.
23.3 Sites DocLink
Oracle WebCenter Sites DocLink (Sites DocLink) provides a drag-and-drop interface for uploading and downloading documents, graphics, or other files that are managed as flex assets by WebCenter Sites. This application presents the hierarchical data structure of the flex parents and flex assets in your WebCenter Sites database as folders and files in the Windows Explorer application.
This section contains the following topics:
23.3.1 Overview
Sites DocLink enables your content providers to use their third-party tools to create content for your online sites, and then save it to the WebCenter Sites database without having to log in to the WebCenter Sites interfaces.
Sites DocLink enables content providers to drag and drop Word files, Excel spreadsheets, graphic files, and so on—that is, single binary files—into the WebCenter Sites database by dropping each file onto the appropriate Microsoft Windows Explorer folder that represents the asset type or parent asset type that the document should be saved as.
After a content provider drops the file onto a folder, Sites DocLink displays a dialog box that prompts the user to enter any metadata that is required, depending on how you, the administrator, have configured your system. Examples of such metadata include name, description, and so on.
Sites DocLink differs from Sites Desktop for Word as follows:
-
With Sites Desktop, content providers produce the content and tag the data in that document that should be inserted into various fields from within the Word interface. The tagging process creates a structured asset when the document is stored in the database as an asset.
-
With Sites DocLink, content providers produce their content in their third-party applications but they do not use those applications to provide structure to the data.
They drop a binary file into the Windows Explorer interface, and then provide information about the file through the Sites DocLink dialog boxes that appear in response to the drop. The information required depends on the kind of asset type the file is going to be stored as, based on the place in the graphical representation of the database that the user dropped the file.
23.3.2 Configuring the Sites DocLink Asset Types
The term Sites DocLink asset type refers to a flex or flex parent asset type that is configured to be accepted by Sites DocLink. Sites DocLink asset types must be flex asset types that store an uploaded, binary file. That is, one (and only one) of the flex attributes that define the asset must be of type blob. When configuring the Sites Doclink asset types, complete the following:
-
Verify that the flex or flex parent asset type is enabled for the site. Be sure that the asset type has one flex attribute of type blob.
-
Enable the flex or flex parent asset type for Sites DocLink.
-
For each definition for those enabled asset types, specify which fields will be available in Sites DocLink and specify which field is the upload field.
-
Create Sites DocLink start menu items for each of the Sites DocLink asset types.
This section contains the following topics:
23.3.2.1 Enabling Asset Types for Sites DocLink
You enable an asset type for Sites DocLink by adding it to those that are selected for Sites DocLink.
To enable asset types for Sites DocLink
-
In the tree, do one of the following:
-
In the Admin tab, expand Sites, then the site for which you want to enable Sites DocLink.
-
If you have logged in to the site that you are configuring and you have access to the SiteAdmin tab, select the SiteAdmin tab.
-
-
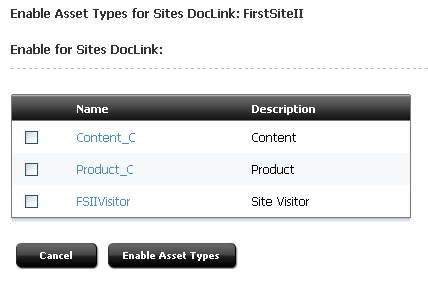
Under the selected asset type, expand Sites DocLink, then double-click Enable Sites DocLink.
WebCenter Sites displays the Enable Asset Types form, listing asset types that have not yet been enabled for Sites DocLink in the selected site.
Figure 23-5 Enable Asset Types for Sites DocLink Form
Description of ''Figure 23-5 Enable Asset Types for Sites DocLink Form''
-
Select the check boxes next to the asset types that you want to enable for Sites DocLink in the selected site.
-
Click Enable Asset Types.
-
The Start Menu Selection form appears. Select the items to include in the Start Menu.
The enabled asset types (the items selected on the Enable Asset Types form in step 2) appear in the Admin tab under the Sites DocLink node for the selected site.
-
Continue to step 3 in Section 23.2.2.2, "Specifying Which Fields Are on the WebCenter Sites Toolbar."
23.3.2.2 Specifying Which Fields Are Available in Sites DocLink
Before you begin this procedure, be sure that the following conditions are true:
-
You have enabled the asset type that you want to configure for Sites DocLink. If you have not yet enabled the asset type, see Section 23.3.2.1, "Enabling Asset Types for Sites DocLink."
-
The asset type that you want to configure has one attribute of type blob.
To specify which of an asset type's fields will be available to content providers who are using Sites DocLink to create or edit assets of that type
-
In the tree, do one of the following:
-
In the Admin tab, expand Sites, then the site for which you are configuring Sites DocLink.
-
If you have logged in to the site that you are configuring and you have access to the SiteAdmin tab, select the SiteAdmin tab.
-
-
Under the selected site, expand Sites DocLink, then expand the desired asset type and double-click the subtype.
The configuration form for the asset subtype is displayed.
-
Click Edit Configuration.
WebCenter Sites displays a form similar to this one:
Figure 23-6 Configuration of Asset Type for Sites DocLink Form
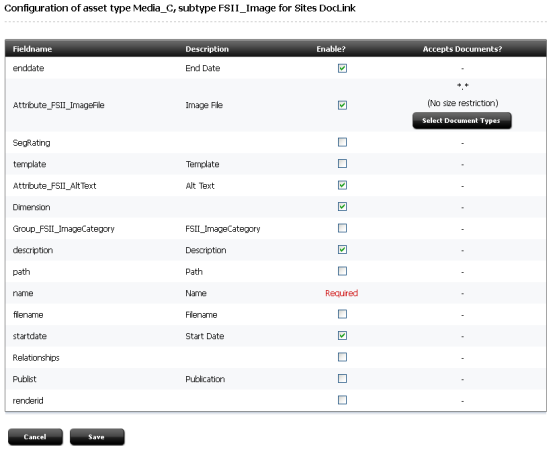
Description of ''Figure 23-6 Configuration of Asset Type for Sites DocLink Form''
-
In the Configuration of Asset Type form, select the Enable option for each field that you want to be displayed in the Sites DocLink interface. An enabled field means that users can view and edit the data in that field.
As a general rule, enable the following kinds of fields:
-
The blob attribute that will hold the file (just one)
-
Text entry fields (Description, for example)
Note:
-
Do not enable the Publist field—assets cannot be shared with other sites through the Sites DocLink interface.
-
If users are required to enter a value into a field, they will be prompted for the value when they create the asset—whether or not you have selected the Enable option for that field. If you wish to have a required field write-protected once the asset is saved, do not enable the field. When Sites DocLink users right-click the asset and select Properties, the required field will not be displayed to them.
-
-
-
Click Select Document Types next to the upload field (flex attribute) you want to specify as the field in which documents are to be stored.
Note:
If your developers have created a flex filter for assets of this type, the flex attribute that you specify as the upload field must match the field that is designated as the input attribute for the flex filter.For information about flex filters, see the Oracle Fusion Middleware WebCenter Sites Developer's Guide and talk to your developers.
WebCenter Sites displays a form similar to this one:
Figure 23-7 Configuration of Asset Type Form - Select Document Types
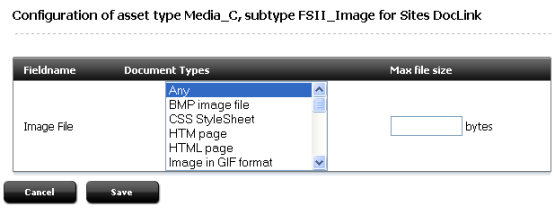
Description of ''Figure 23-7 Configuration of Asset Type Form - Select Document Types''
-
In the Document Types field, select the types of documents that this upload field can store. Use Ctrl-click to select more than one.
The values displayed in the Document Types field come from the
descriptioncolumn of the entries in theMimeTypetable. If the document type that you want to select does not appear in the list, use Sites Explorer to add it to theMimeTypetable.Note:
When you select the Any option, it means that Sites DocLink accepts any type of file for assets of this type, whether or not there is an entry for it in the MimeType table.However, when there is no entry for a file type in the MimeType table, a file of that type cannot be displayed correctly in the WebCenter Sites interfaces.
-
In the Max file size field, specify a size limit (if there is one) for the documents that can be stored in this upload field.
-
Click Save.
-
In the Configuration of Asset Type form, click Save again.
-
Repeat steps 2 – 8 for each additional subtype or definition you want to configure.
-
Repeat steps 2 – 10 for each additional asset type you want to configure.
23.3.2.3 Creating Sites DocLink Start Menu Items
The Sites DocLink configuration determines which fields are available in the Sites DocLink interface, but your content providers cannot create assets of this type in Sites DocLink until you create start menu items for those asset types.
To create Sites DocLink Start Menu items
-
In the Admin tab, expand Asset Types, then the desired asset type.
-
Under the selected asset type, expand Start Menu and double-click Add New.
-
In the Name field, enter a name for the item.
-
In the Description field, enter a short, informative description for the start menu item.
-
In the Type field, select Sites DocLink.
Note:
You cannot set default field values for assets whose source is Sites DocLink in this version. Ignore the Default Values section when creating Sites DocLink start menu items. -
In the Sites field, select which sites can use this start menu item. Use Ctrl+click to select more than one site.
-
In the Roles field, select all the roles that can have access to the start menu item. Use Ctrl+click to select more than one role.
-
(Optional) To configure workflow process details for the assets that are created with this start menu item, complete the following steps:
-
Click Select Workflow.
-
In the Select Workflow form, select the appropriate workflow process from the drop-down list and then click Select Workflow.
-
In the Set Participants form, select at least one user for each role that appears and then click Set Participants.
-
Click Continue.
WebCenter Sites saves the workflow information and redisplays the Start Menu form.
-
-
In the Start Menu form, click Save.
-
Repeat this procedure for each additional asset type you want to configure.
23.3.3 Users and Sites DocLink
Like the content providers who use the WebCenter Sites interfaces, the content providers who use the Sites DocLink application must have WebCenter Sites user accounts as well. Accounts for users who use Sites DocLink must have the following ACLs:
-
Browser
-
ElementReader
-
PageReader
-
RemoteClient
-
UserReader
-
xceleditor
For information about creating user accounts, see Section 5.4.1, "Creating a New User."
Give the Sites DocLink users the following information:
-
Their user name/password combination
-
The appropriate URL for logging in to WebCenter Sites
They need both pieces of information to log in to WebCenter Sites through Sites DocLink.
The WebCenter Sites URL uses the following convention:
http://<server>:<port>/<context>
where:
-
<server> is the host name or IP address of the machine running WebCenter Sites. -
<port>is the port on which WebCenter Sites is listening for connections. -
<context>refers to the application context root (URI) assigned to the WebCenter Sites application when it was installed.
23.3.4 Installing the Sites DocLink Client Application
In order to use the Sites DocLink feature, the Sites DocLink client must be installed on the client machine.
To install the Sites DocLink client
-
In the shipped zip file, the Sites DocLink installer is located on the following path:
ContentServer/Xcelerate/cs_clientwhere there are
/32bitand/64bitfolders to choose depending on your system. -
Extract the downloaded archive to a temporary directory and open that directory.
-
Launch the Sites DocLink installer (
.msi) and follow the instructions it displays.Note:
If one or more language packs are installed on your WebCenter Sites installation, the page lists localized versions of the Sites DocLink client corresponding to the installed language packs. In such case, download the version appropriate to the user's language preference. (Language packs are available with patchset 1)
23.3.5 Testing the Sites DocLink Configuration
To determine whether your Sites DocLink application is configured correctly, you must create and save an asset from the Sites DocLink interface and then examine it through WebCenter Sites.
To test the Sites DocLink configuration
-
Open WebCenter Sites Explorer.
-
Double-click Sites DocLink.
-
In the Login dialog box, enter the following information:
-
The Sites DocLink URL. See Section 23.3.3, "Users and Sites DocLink" for the appropriate URL for your system.
-
The user name and password of a user who has the necessary ACLs (listed in Section 23.3.3, "Users and Sites DocLink").
-
-
Drag a document from the file system to the file structure represented under the Sites DocLink node and drop it in the appropriate place.
-
If there are required fields that must be filled in, the Properties dialog box appears. Enter the required information and save the asset.
-
Open your browser and log in to the administrator's interface as a user who has access to the type of asset that you just created.
-
If prompted, select the site in which you created the asset.
-
Find the asset that you created through Sites DocLink and open it in the Inspect form.
-
Examine the data listed for the fields and verify that the data that you specified in Sites DocLink matches the data displayed in the Inspect form.
23.4 Web Mode
Web Mode is a WebCenter Sites feature that enables infrequent users or users who perform a limited role to find, edit, and submit content directly from the rendered (Preview) version of an asset.
Enabling this feature requires three general steps:
-
You, the administrator, set the
xcelerate.enableinsiteproperty in thefuturetense_xcel.inifile totrueon the Sites management system. -
Your developers code templates that invoke the Web Mode feature for the fields that you want content providers to be able to edit in this way. Note that these same templates do not display Web Mode on the WebCenter Sites delivery system because the
xcelerate.enableinsiteis set tofalseon that system. -
You determine the appropriate URL and then make it available to the WebCenter Sites users who need to use Web Mode.
-
Start the Property Editor and open the
futuretense_xcel.inifile. -
On the xcelerate tab, select
xcelerate.enableinsiteand set its value totrue. -
Save the property file and close the Property Editor.
To configure your servlet and host name used in Web Mode and Preview
-
Start the Property Editor and open the
futuretense_xcel.inifile. -
On the xcelerate tab, do one or both of the following:
-
Set the
xcelerate.previewhostproperty ashttp://<server>:<port>/servlet/
-
Change the value of the
xcelerate.previewservletproperty fromContentServertoSatellite
For Example:
-
If content providers are not required to include the port number in the URL that they use to log in to WebCenter Sites, include it in the value for the
xcelerate.previewhostproperty. -
If content providers are required to include the port number, specify a different port number for the property. Use either the web server port number or the port number of a redirect request to the web server.
-
Create an alias and use it only for the
xcelerate.previewhostproperty. -
Use the
xcelerate.previewservletproperty to specify the Satellite Server servlet rather than the WebCenter Sites servlet.
-
23.5 Maintaining Separate Browser Sessions for Preview
If the online site that you are serving from your WebCenter Sites delivery system requires visitors to log in, or it logs them in by default, your content providers need a separate browser session for preview if they must log in to the previewed site on the Sites management system with a user name that is different from the one they are using in WebCenter Sites.
Without a new, separate browser session for preview, the WebCenter Sites session ends when the preview session begins, which means that content providers can lose any unsaved work.
You can do the following to ensure that a preview session does not end the WebCenter Sites session:
-
Have your site designers configure the online site so that your content providers are logged in to the site that they are previewing with their WebCenter Sites user accounts.
-
Configure your Sites management system so that the web server opens a new browser session for the preview window without closing the current session in the WebCenter Sites window.
To configure your Sites management system so that the web server opens a new browser session for the previewed asset, you configure properties in the futuretense_xcel.ini file: xcelerate.previewhost and xcelerate.previewservlet.
You use these properties to point to the URL for the Sites management system, but the URL must be different in some way from the URL that your content providers use to log in to the management system. For example:
-
If content providers are not required to include the port number in the URL that they use to log in to WebCenter Sites, include it in the value for the
xcelerate.previewhostproperty. -
If content providers are required to include the port number, specify a different port number for the property—the web server port number or the port number of a redirect request to the web server.
-
Create an alias and use it only for the
xcelerate.previewhostproperty. -
Use the
xcelerate.previewservletproperty to specify the Satellite Server servlet rather than the WebCenter Sites servlet.
Start the Property Editor, open the futuretense_xcel.ini file, select the xcelerate tab, and do one or both of the following:
-
Set the
xcelerate.previewhostproperty as follows:For most application servers, including Sun JES Application Server:
http://<server>:<port>/servlet/
-
Change the value of the
xcelerate.previewservletproperty fromContentServertoSatellite