37 Configuring REST Security
This chapter provides information and instructions about configuring REST security, and contains the following sections:
37.1 REST Authorization
REST authorization is the process of granting privileges to perform REST operations on applications' resources, which map to objects in WebCenter Sites. REST authorization uses the "deny everything by default" model. If a privilege is not explicitly granted to a particular group, that privilege is denied. General administrators are responsible for authorizing users once the application is deployed and registered with the WEM Framework.
This section contains the following topics:
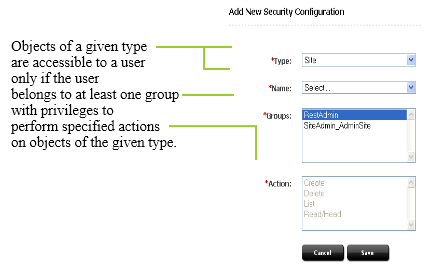
37.1.1 Security Model
The WEM security model is based on objects and groups, which are predefined in WebCenter Sites, and actions, which you create in WebCenter Sites (objects in WebCenter Sites map to REST resources in the WEM Framework). Security must be configured per object type in the WebCenter Sites Admin interface:
Figure 37-1 Add New Security Configuration Form
Description of ''Figure 37-1 Add New Security Configuration Form''
-
Object is a generic term that refers to any entity such as a site, a user, or an asset. Protected objects are of the following types:
-
Asset Type
-
Site
-
User Locale
-
Application
-
Asset
-
Role
-
ACL
-
Index
-
User
-
Group
-
-
Security groups are used to gather users for the purpose of managing their permissions (to operate on objects) simultaneously.
-
An action is a security privilege:
LIST,HEAD,READ,UPDATE,CREATE,DELETE. Groups are assigned privileges to operate on the objects allowed to the groups. Some objects, such as ACLs, are list-only (they can be created directly in WebCenter Sites, but not over REST).
A security configuration is an array, such as shown above, that specifies:
-
The protected object type and object(s)
-
Groups that are able to access the objects
-
Actions that groups (and their members) can perform on the objects
37.1.2 Configuring REST Security
Procedures for configuring REST security are available in Section 37.2, "Authorizing Users to Access Application Resources."
37.1.3 Privilege Resolution Algorithm
When configuring a security privilege, you can specify that the privilege applies to all objects of a certain type or a single object of a certain type. For example, granting the privilege to UPDATE (POST) any site allows users in the group to modify the details of all sites in the WEM Framework. Granting the privilege to UPDATE (POST) the FirstSiteII sample site allows users in the group to modify this site's details in WEM.
The Asset object type requires you to specify the site to which the security setting applies, as assets are always accessed from a particular site. The AssetType object type can be extended by specifying a subtype, which is used to make the security configuration more granular. For example, setting the DELETE privilege on asset type Content_C allows a DELETE request to be performed on the REST resource /types/Content_C (i.e., to delete the Content_C asset type from the system).
Because privileges can be granted only to groups, a user's total privileges are not obvious until they are computed across all of the user's group. The WEM Framework provides a privilege resolution algorithm. Its basic steps are listed below:
-
REST finds the groups in which the user has membership.
-
REST determines which groups can perform which REST operations on which REST resources. If site or subtype is specified, each is taken into account.
-
REST compares the results of steps 1 and 2. If at least one of the groups from step 1 is in the list of groups from step 2, then access is granted. Otherwise, access is denied.
37.2 Authorizing Users to Access Application Resources
Before continuing with this section, read "Section 37.1, "REST Authorization" for background information relating to the steps provided below.
-
Section 37.2.4, "Configuring Security for REST Resources".
Note:
Configure security for REST resources requires groups. You will be assigning privileges to the groups. To view the list of groups, continue with Section 37.2.1, "Viewing REST Security Configurations." To create groups, see Section 37.2.2, "Creating a Group."
37.2.1 Viewing REST Security Configurations
A security configuration identifies which groups have which permissions to which REST resources. WebCenter Sites defines security configurations for two default groups. They are RestAdmin and SiteAdmin_AdminSite.
To view REST security configurations
-
Log in to the WebCenter Sites Admin interface as a general administrator:
-
Select the Admin tab, expand the User Access Management node, expand the REST Security node, and double-click Configure Security.
The Security Configurations window is rendered in the main window.
-
Depending on your requirements, continue as follows:
-
To create a new group, see Section 37.2.2, "Creating a Group."
-
To add users to a group, see Section 37.2.3, "Adding Users to a Group."
-
To configure security privileges for REST resources, see Section 37.2.4, "Configuring Security for REST Resources."
Note:
To complete this step, ensure that the required groups exist. You will be assigning privileges to the groups.
-

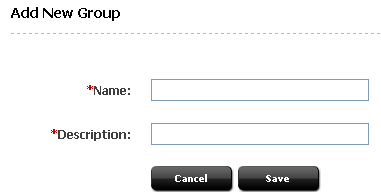
37.2.2 Creating a Group
-
Log in to the WebCenter Sites Admin interface as a general administrator:
-
In the WebCenter Sites tree, select the Admin tab. Expand the User Access Management node, expand the REST Security node, and then expand Groups. Double-click Add New.
-
In the Add New Group form, enter a name and brief description about the group you are creating.
-
Click Save.
The group you created is now listed under the Groups node.
-
Now that you have created a group, you can:
-
Add users to the group. For instructions, see Section 37.2.3, "Adding Users to a Group."
-
Configure REST security for the group. For instructions, see Section 37.2.4, "Configuring Security for REST Resources."
-
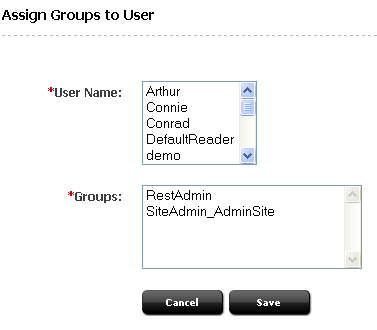
37.2.3 Adding Users to a Group
Adding users to a group determines their permissions to operate on REST resources used by the applications the users will access.
-
Log in to the WebCenter Sites Admin interface as a general administrator:
-
In the WebCenter Sites tree, select the Admin tab. Expand the User Access Management node, then expand the REST Security node, then expand Assign Users to Groups. Double-click Add New.
-
In the Assign Groups to User form, select users and assign them to any combination of the listed groups.
Note:
If the user you are looking to assign to the group is not listed, that user is already a member of a group. To assign the user to another group, see step 5. -
Click Save.
The user names you selected are listed under the Assign Users to Groups node. When you double-click a user's name you are able to view the groups to which that user is a member.
-
(Optional). If the name of the user you wish to assign to a given group is not displayed in the User Name field, then do the following:
-
In the WebCenter Sites tree, select the Admin tab. Expand the User Access Management node, expand the REST Security node then expand Assign Users to Groups, and double-click the name of the user you wish to assign to another group.
-
In the user's Inspect form, click Edit to render the Edit User Groups form.
-
In the Groups field, select the groups you wish to assign the user to, and then click Save.
-
-
Now that you have added users to a group, you can do the following:
-
Create a new group. For instructions see Section 37.2.2, "Creating a Group."
-
Configure security for a group. For instructions, see Section 37.2.4, "Configuring Security for REST Resources."
-
37.2.4 Configuring Security for REST Resources
When configuring security, you will specify which object types and objects must be accessible to groups, and which actions the groups can perform on the objects.
To configure security for REST resources
-
Log in to the WebCenter Sites Admin interface as a general administrator:
-
In the WebCenter Sites tree select the Admin tab, expand the User Access Management node, expand the REST Security , then expand Configure Security. Double-click Add New.
-
In the Add New Security Configuration form, you can set security for object types and objects.
Figure 37-5 Add New Security Configuration Form

Description of ''Figure 37-5 Add New Security Configuration Form''
See the following tables for a summary of possible security configurations.
Table 37-1 Available Actions (Security Privileges)
| Action | Description |
|---|---|
|
Create |
Create allows groups to create specified resources. |
|
Delete |
Allows groups to delete specified resources. |
|
List |
Allows groups to retrieve specified resources. |
|
Read/Head |
Allows groups to read specified resources. While Read returns the requested resources, Head returns metadata describing the requested resources. |
|
Update |
Update allows groups to modify specified resources. Note: Create and Update are each paired with the Read/Head privilege. Assigning one of these privileges to a group automatically assigns the Read/Head privilege to the group. |
Table 37-2 Summary of Possible Security Configuration Options
| Object Type | Name | Subtype | Site | Possible Actions | See Section ... |
|---|---|---|---|---|---|
|
ACLs |
Any |
N/A |
N/A |
List |
|
|
ApplicationFoot 1 |
Any |
N/A |
N/A |
Create, Update, Delete |
|
|
Application |
AppName |
N/A |
N/A |
Update, Delete |
|
|
Asset |
Any |
N/A |
Any |
List, Read/Head, Create, Update, Delete |
|
|
Asset |
Any |
N/A |
SiteName |
List, Read/Head, Create, Update, Delete |
|
|
Asset |
AssetType |
N/A |
SiteName |
List, Read/HeadFoot 2 , Create, Update, Delete |
|
|
Asset |
AssetType and AssetName |
N/A |
SiteName |
Read/Head, Update, Delete |
|
|
AssetType |
Any |
N/A |
N/A |
List, Read/Head, Create, Delete |
|
|
AssetType |
AssetType |
N/A |
N/A |
Read/Head, Delete |
|
|
AssetType |
AssetType |
Any |
N/A |
List |
|
|
AssetType |
AssetType |
Subtype |
N/A |
Read/Head |
|
|
Group |
Any |
N/A |
N/A |
List |
|
|
Group |
GroupName |
N/A |
N/A |
Read/Head |
|
|
Index |
Any |
N/A |
N/A |
List, Read/Head, Create, Update, Delete |
|
|
Index |
IndexName |
N/A |
N/A |
Read/Head, Update, Delete |
|
|
Role |
Any |
N/A |
N/A |
List, Read/Head, Create, Update, Delete |
|
|
Role |
Role |
N/A |
N/A |
Read/Head, Update, Delete |
|
|
Site |
Any |
N/A |
N/A |
List, Read/HeadFoot 3 , Create, Update, Delete |
|
|
Site |
SiteName |
N/A |
N/A |
Read/Head, Update, Delete |
|
|
User |
Any |
N/A |
N/A |
List, Read/Head, Create, Update, Delete |
|
|
User |
UserName |
N/A |
N/A |
Read/Head, Update, Delete |
|
|
UserDef |
Any |
N/A |
N/A |
List |
|
|
UserLocales |
Any |
N/A |
N/A |
List |
Footnote 1 For an example of setting security for applications, see step 3.
Footnote 2 READ allows reading associations on the named site.
Footnote 3 READ allows reading users and asset types on the named site.
37.3 REST Security Configuration Reference
This reference supportsTable 37-2, "Summary of Possible Security Configuration Options". It provides details of the tabulated security configurations.
This reference contains the following sections:
-
Section 37.3.1, "Configuring REST Security for ACL Resources"
-
Section 37.3.2, "Configuring REST Security for Application Resources"
-
Section 37.3.3, "Configuring REST Security for Asset Resources"
-
Section 37.3.4, "Configuring REST Security for Asset Type Resources"
-
Section 37.3.5, "Configuring REST Security for Engage Resources"
-
Section 37.3.6, "Configuring REST Security for Group Resources"
-
Section 37.3.7, "Configuring REST Security for Indexed Asset Type Resources"
-
Section 37.3.8, "Configuring REST Security for Role Resources"
-
Section 37.3.9, "Configuring REST Security for Site Resources"
-
Section 37.3.10, "Configuring REST Security for User Resources"
-
Section 37.3.11, "Configuring REST Security for UserDef Resources"
-
Section 37.3.12, "Configuring REST Security for UserLocale Resources"
-
Section 37.3.13, "Configuring REST Security for Visitor Resources"
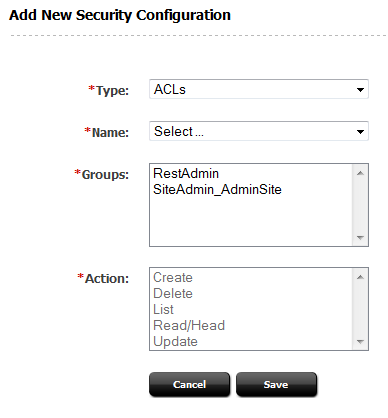
37.3.1 Configuring REST Security for ACL Resources
When assigning groups security privileges to ACLs, you determine which groups will be able to view the ACL resource list.
To configure group security for ACLs
-
In the WebCenter Sites tree select the Admin tab, expand the User Access Management node, expand the REST Security , then expand Configure Security. Double-click Add New.
The Add New Security Configuration screen appears.
-
In the Type field, select ACLs.
-
In the Name field, select Any.
Figure 37-6 Add New Security Configuration for ACLs
Description of ''Figure 37-6 Add New Security Configuration for ACLs''
-
Select the Groups and Actions as needed.
-
Click Save to save the configuration.
Table 37-3 Add New Security Configuration Form Field Names
| Field | Definition |
|---|---|
|
Name |
The only available option to make all ACLs available to the group(s). |
|
Groups |
Select the group(s) that will have access to the ACLs. |
|
Action |
The only available security privilege you can assign to the group(s) is to view the ACLs resource list. |
37.3.2 Configuring REST Security for Application Resources
When assigning groups security privileges to applications, you determine which groups can perform which operations on the specified applications.
To configure group security for applications
-
In the WebCenter Sites tree select the Admin tab, expand the User Access Management node, expand the REST Security , then expand Configure Security. Double-click Add New.
The Add New Security Configuration screen appears.
-
In the Type field, select Application.
-
In the Name field, select Any.
Figure 37-7 Add New Security Configuration
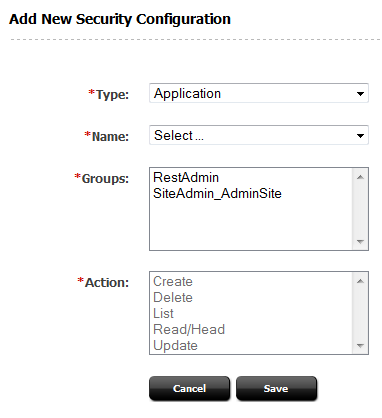
Description of ''Figure 37-7 Add New Security Configuration''
-
Select the Groups and Actions as needed.
-
Click Save to save the configuration.
Table 37-4 Add New Security Configuration Field Names
| Field | Definition |
|---|---|
|
Name |
Select the name of the application you wish to make available to the group(s), or select Any to make all applications available to the group(s). |
|
Groups |
Select the group(s) that will have privileges to operate on the application(s). |
|
Action |
Assign the security privilege(s) to the group(s). Your options depend on your selections in the previous fields. For example, if you selected Any and Create, members of your selected groups will be able to create the assets which make the applications accessible in WEM. |
37.3.3 Configuring REST Security for Asset Resources
When assigning groups security privileges to assets, you determine which groups can perform which operations on the specified assets.
To configure group security for Assets
-
In the WebCenter Sites tree select the Admin tab, expand the User Access Management node, expand the REST Security , then expand Configure Security. Double-click Add New.
The Add New Security Configuration screen appears.
-
In the Type field, select Asset.
-
In the Site field, select the appropriate site.
-
In the Name field, select Any.
Figure 37-8 Add New Security Configuration for Assets
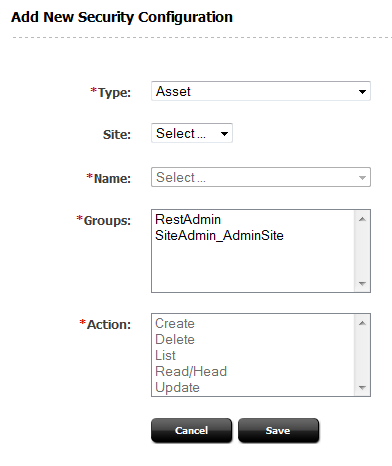
Description of ''Figure 37-8 Add New Security Configuration for Assets''
-
Select the Groups and Actions as needed.
-
Click Save to save the configuration.
Table 37-5 Add New Security Configuration Form Field Names
| Field | Definition |
|---|---|
|
Site |
Select the site associated with the asset you wish to make available to the group(s), or select Any to make all assets, system wide, available to the group(s). |
|
Name |
Select the asset type associated with the asset you wish to make available to the group(s), or select Any to make all assets available to the group(s). You can also make a specified asset of the selected asset type available to the group(s) by clicking the Browse button. |
|
Groups |
Select the group(s) that will have privileges to operate on the asset(s). |
|
Action |
Assign the security privilege(s) to the group(s). Your options depend on your selections in the previous fields. For example, if you selected a specific site, a specific asset type, and List, members of your selected groups will be able to perform searches in the specified site for assets of the specified asset type. |
37.3.4 Configuring REST Security for Asset Type Resources
When assigning groups security privileges to asset types, you determine which groups can perform which operations on the specified asset types.
To configure group security for asset types
-
In the WebCenter Sites tree select the Admin tab, expand the User Access Management node, expand the REST Security , then expand Configure Security. Double-click Add New.
The Add New Security Configuration screen appears.
-
In the Type field, select Asset Type.
-
In the Name field, select Any.
Figure 37-9 Add New Security Configuration Form for Field Names
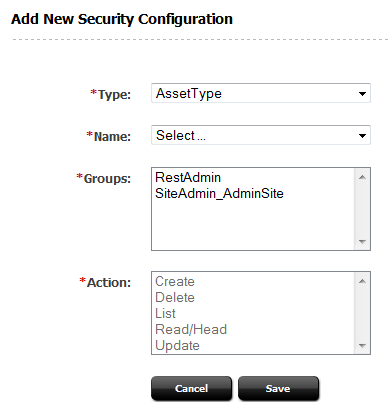
Description of ''Figure 37-9 Add New Security Configuration Form for Field Names''
-
Select the Groups and Actions as needed.
-
Click Save to save the configuration.
Table 37-6 Add New Security Configuration Field Names
| Field | Definition |
|---|---|
|
Name |
Select the asset type(s) you wish to make available to the group(s), or select Any to make all asset types available to the group(s). |
|
Subtype |
(Optional) Select the subtype of the asset type you wish to make available to the group(s). Note: If you selected the Any option in the Name field, then the Subtype field is not displayed. |
|
Groups |
Select the group(s) that will have privileges to operate on the asset type(s). |
|
Action |
Assign the security privilege(s) to the group(s). Your options depend on your selections in the previous fields. For example, if you selected Any and Create, members of your selected groups will be able to create asset types. |
37.3.5 Configuring REST Security for Engage Resources
When assigning groups security privileges to Engage resources, you determine which groups can perform which operations on Engage.
To configure group security for groups
-
In the WebCenter Sites tree select the Admin tab, expand the User Access Management node, expand the REST Security , then expand Configure Security. Double-click Add New.
The Add New Security Configuration screen appears.
-
In the Type field, select Engage.
-
In the Site field, select the appropriate site.
-
In the Name field, select Any.
Figure 37-10 Add New Security Definition Form for Engage
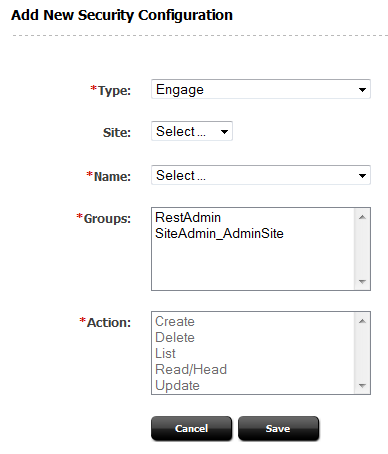
Description of ''Figure 37-10 Add New Security Definition Form for Engage''
-
Select the Groups and Actions as needed.
-
Click Save to save the configuration.
Table 37-7 Add New Security Configuration Form Field Names
| Field | Definition |
|---|---|
|
Site |
Select the site associated with the asset you wish to make available to the group(s), or select Any to make all assets, system wide, available to the group(s). |
|
Name |
Select the asset type associated with the asset you wish to make available to the group(s), or select Any to make all assets available to the group(s). You can also make a specified asset of the selected asset type available to the group(s) by clicking the Browse button. |
|
Groups |
Select the group(s) that will have privileges to operate on the asset(s). |
|
Action |
Assign the security privilege(s) to the group(s). Your options depend on your selections in the previous fields. For example, if you selected a specific site, a specific asset type, and List, members of your selected groups will be able to perform searches in the specified site for assets of the specified asset type. |
37.3.6 Configuring REST Security for Group Resources
When assigning groups security privileges to groups, determine which groups can perform which operations on the specified groups.
To configure group security for groups
-
In the WebCenter Sites tree select the Admin tab, expand the User Access Management node, expand the REST Security , then expand Configure Security. Double-click Add New.
The Add New Security Configuration screen appears.
-
In the Type field, select Group.
-
In the Name field, select Any.
Figure 37-11 Add New Security Definition Form for Groups
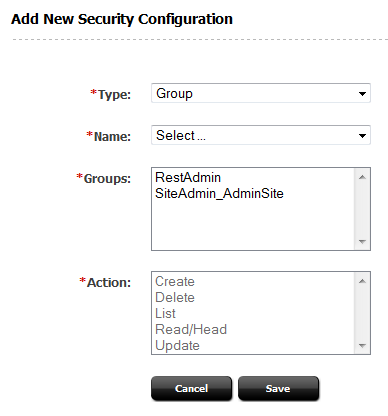
Description of ''Figure 37-11 Add New Security Definition Form for Groups''
-
Select the Groups and Actions as needed.
-
Click Save to save the configuration.
Table 37-8 Add New Security Configuration Field Names
| Field | Definition |
|---|---|
|
Name |
Select the group(s) you wish to make available to the groups, or select Any to make all groups available to the groups. |
|
Groups |
Select the group(s) that will have privileges to operate on the groups. |
|
Action |
Assign the security privilege(s) to the group(s). Your options depend on your selections in the previous fields. For example, if you selected Any and List, members of your selected groups will be able to view a listing of the system's groups. |
37.3.7 Configuring REST Security for Indexed Asset Type Resources
When assigning groups security privileges to indexed asset types, you determine which groups can perform which operations on the specified indexed asset types.
Note:
Before configuring security for indexed asset types, you must enable indexing for the WebCenter Sites "Global Search" and "Asset Type Search." If these search features are not enabled, then you will not be able to configure security for indexed asset types.When assigning groups security privileges to groups, determine which groups can perform which operations on the specified groups.
To configure group security for indexed asset types
-
In the WebCenter Sites tree select the Admin tab, expand the User Access Management node, expand the REST Security , then expand Configure Security. Double-click Add New.
The Add New Security Configuration screen appears.
-
In the Type field, select Group.
-
In the Name field, select Any.
Figure 37-12 Add New Security Configuration Form for Indexed Asset Types
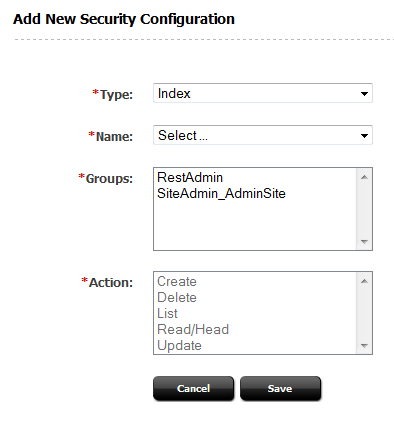
Description of ''Figure 37-12 Add New Security Configuration Form for Indexed Asset Types''
-
Select the Groups and Actions as needed.
-
Click Save to save the configuration.
Table 37-9 Add New Security Configuration Form Field Names
| Field | Definition |
|---|---|
|
Name |
Select the name of the indexed asset type you wish to make available to the group(s). Select Any to make all indexed asset types available to the group(s). Select Global to make all indexed asset types associated with the "Global Search" available to the group(s). |
|
Groups |
Select the group(s) that will have privileges to operate on the indexed asset type(s). |
|
Action |
Assign the security privilege(s) to the group(s). Your options depend on your selections in the previous fields. For example, if you selected Any and List, members of your selected groups will be able to search for assets of all types that are indexed on the system. |
37.3.8 Configuring REST Security for Role Resources
When assigning groups security privileges to roles, you determine which groups can perform which operations on the specified roles.
To configure group security for role resources
-
In the WebCenter Sites tree select the Admin tab, expand the User Access Management node, expand the REST Security , then expand Configure Security. Double-click Add New.
The Add New Security Configuration screen appears.
-
In the Type field, select Role.
-
In the Name field, select Any.
Figure 37-13 Add New Security Configuration Form for Role Resources

Description of ''Figure 37-13 Add New Security Configuration Form for Role Resources''
-
Select the Groups and Actions as needed.
-
Click Save to save the configuration.
Table 37-10 Add New Security Configuration Form Field Names
| Field | Definition |
|---|---|
|
Name |
Select the name of the role you wish to make available to the group(s), or select Any to make all roles available to the group(s). |
|
Groups |
Select the user group(s) that will have privileges to operate on the role(s). |
|
Action |
Assign the security privilege(s) to the group(s). Your options depend on your selections in the previous fields. For example, if you selected Any and Create, members of your selected groups will be able to create roles. |
37.3.9 Configuring REST Security for Site Resources
When assigning groups security privileges to sites, you determine which groups can perform which operations on the specified sites.
To configure group security for sites
-
In the WebCenter Sites tree select the Admin tab, expand the User Access Management node, expand the REST Security , then expand Configure Security. Double-click Add New.
The Add New Security Configuration screen appears.
-
In the Type field, select Site.
-
In the Name field, select Any.
Figure 37-14 Add New Security Confguration for Site
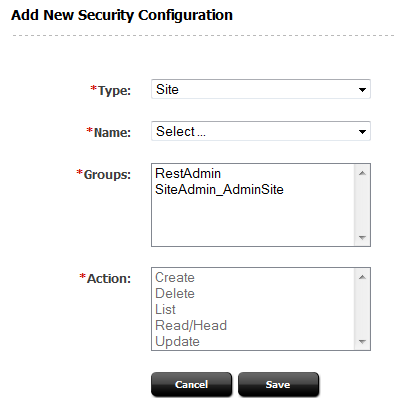
Description of ''Figure 37-14 Add New Security Confguration for Site''
-
Select the Groups and Actions as needed.
-
Click Save to save the configuration.
Table 37-11 Add New Security Configuration Form Field Names
| Field | Definition |
|---|---|
|
Name |
Select the name of the site you wish to make available to groups, or select Any to make all sites available to groups. |
|
Groups |
Select the user group(s) that will have privileges to operate on the sites. |
|
Action |
Assign the security privilege(s) to the group(s). Your menu options depend on your selections in the previous fields. For example, if you selected Any and Create, members of your selected groups will be able to create sites. |
37.3.10 Configuring REST Security for User Resources
When assigning groups security privileges to users, you determine which groups can perform which operations on the specified users.
To configure group security for user resources
-
In the WebCenter Sites tree select the Admin tab, expand the User Access Management node, expand the REST Security , then expand Configure Security. Double-click Add New.
The Add New Security Configuration screen appears.
-
In the Type field, select User.
-
In the Name field, select Any.
Figure 37-15 Add New Security Configuration for User Resources
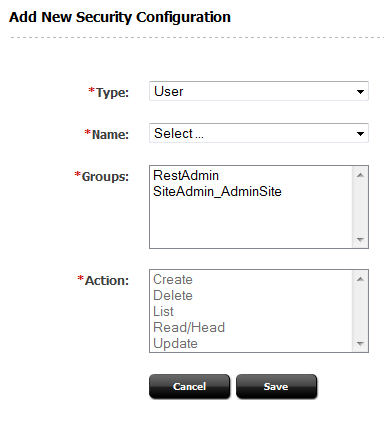
Description of ''Figure 37-15 Add New Security Configuration for User Resources''
-
Select the Groups and Actions as needed.
-
Click Save to save the configuration.
Table 37-12 Add New Security Definition Field Names
| Field | Definition |
|---|---|
|
Name |
Select the name of the user you wish to make available to groups, or select the Any option to make all users available to groups. |
|
Groups |
Select the group(s) that will have privileges to operate on the user(s). |
|
Action |
Assign the security privilege(s) to the group(s). Your menu options depend on your selections in the previous fields. For example, if you selected Any and Create, members of your selected groups will be able to create users. |
37.3.11 Configuring REST Security for UserDef Resources
When assigning groups security privileges to user definitions, you determine which groups can view the system's user definitions.
To configure group security for userdef resources
-
In the WebCenter Sites tree select the Admin tab, expand the User Access Management node, expand the REST Security , then expand Configure Security. Double-click Add New.
The Add New Security Configuration screen appears.
-
In the Type field, select UserDef.
-
In the Name field, select Any.
Figure 37-16 Add New Security Configuration Form for UserDef Resources
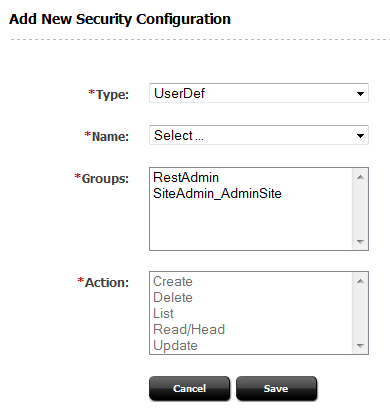
Description of ''Figure 37-16 Add New Security Configuration Form for UserDef Resources''
-
Select the Groups and Actions as needed.
-
Click Save to save the configuration.
Table 37-13 Add New Security Configuration Form Field Names
| Field | Definition |
|---|---|
|
Name |
The only available option is to make all user definitions available to groups. |
|
Groups |
Select the group(s) that will have privileges to view user definitions. |
|
Action |
The only available security privilege you can assign to the group(s) is Read/Head, which enables the members of your selected groups to view your system's user definitions. |
37.3.12 Configuring REST Security for UserLocale Resources
When assigning groups security privileges to user locales, you determine which groups can view the UserLocale resource list.
To configure group security for userlocale resources
-
In the WebCenter Sites tree select the Admin tab, expand the User Access Management node, expand the REST Security , then expand Configure Security. Double-click Add New.
The Add New Security Configuration screen appears.
-
In the Type field, select UserLocales.
-
In the Name field, select Any.
Figure 37-17 Add New Security Configuration Form for User Locale
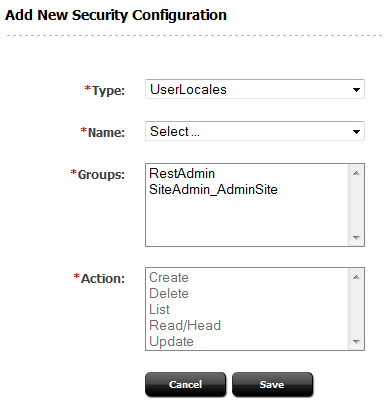
Description of ''Figure 37-17 Add New Security Configuration Form for User Locale''
-
Select the Groups and Actions as needed.
-
Click Save to save the configuration.
Table 37-14 Add New Security Configuration Field Names
| Field | Definition |
|---|---|
|
Name |
The only available option is to make all user locales available to groups. |
|
Groups |
Select the group(s) that will have privileges to view user locales. |
|
Action |
The only available security privilege you can assign to the group(s) is to view a listing of the system's user locales. |
37.3.13 Configuring REST Security for Visitor Resources
When assigning groups security privileges to visitors, you determine which groups can view the Visitor assets.
To configure group security for visitor resources
-
In the WebCenter Sites tree select the Admin tab, expand the User Access Management node, expand the REST Security , then expand Configure Security. Double-click Add New.
The Add New Security Configuration screen appears.
-
In the Type field, select Visitor.
-
In the Name field, select Any.
Figure 37-18 Add New Security Configuration Form for Visitors
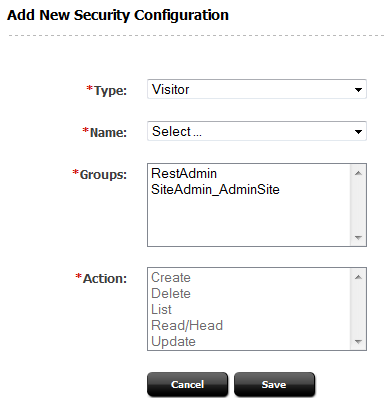
Description of ''Figure 37-18 Add New Security Configuration Form for Visitors''
-
Select the Groups and Actions as needed.
-
Click Save to save the configuration.s
Table 37-15 Add New Security Configuration Field Names
| Field | Definition |
|---|---|
|
Name |
The only available option is to make all visitors available to groups. |
|
Groups |
Select the group(s) that will have privileges to view user locales. |
|
Action |
The only available security privilege you can assign to the group(s) is to view a listing of the visitors. |