21 Integrating Oracle WebCenter Sites with Hierarchical Schema LDAP Servers
This chapter provides instructions for integrating WebCenter Sites with hierarchical schema LDAP servers.
This chapter contains the following section:
21.1 Integration Steps
To integrate with hierarchical schema LDAP, you will complete the following steps:
-
Section 21.1.1, "Step 1. Configure the WebCenter Sites LDAP Connection Properties"
-
Section 21.1.4, "Step 4. Create LDAP User Groups (WebCenter Sites ACLs)"
-
Section 21.1.5, "Step 5. Create Required Users and Assign Them to LDAP Groups"
-
Section 21.1.6, "Step 6. Create Sites and Roles in the LDAP Server"
-
Section 21.1.8, "Step 8. Post-Integration Steps When CM Sites Have Not Been Created"
Note:
In hierarchical schema LDAP, management of users and ACLs is required. Management of sites and roles is optional.21.1.1 Step 1. Configure the WebCenter Sites LDAP Connection Properties
In this step, you will configure several properties in the WebCenter Sites .ini files to establish communication with LDAP. The files are:
-
futuretense.ini -
dir.ini -
futuretense_xcel.ini(optional, if you wish to manage sites and roles directly in the LDAP server).
21.1.1.1 A. Start the Property Editor
Execute the following scripts at the MS DOS prompt or in a UNIX shell:
-
Windows:
propeditor.bat, which is usually located in <cs_install_dir/> -
Unix:
propeditor.sh, which is usually located in <$HOME/cs_install_dir>
If you need detailed instructions on starting the Property Editor or you would like more information on the properties to be modified, see the Oracle Fusion Middleware WebCenter Sites Property Files Reference.
21.1.1.2 B. Configure Properties in futuretense.ini
-
Open
futuretense.iniin the Property Editor. -
Select the Authentication tab.
-
Set the following properties as shown in the table below:
Property (In futuretense.ini) Value cs.managepropertydir.inics.manageUsercom.openmarket.directory.jndi.auth.JNDILogin -
Select File > Save to save the values.
-
Select File > Close.
21.1.1.3 C. Configure Properties in dir.ini
-
Open
dir.iniin the Property Editor. -
Select the Attribute Names tab and set the values for OpenLDAP properties as given in the following table:
Property (in dir.ini) Value cncnloginattributecnpassworduserPassworduniquememberuniquememberusernameuid -
Select the Global Data tab and set the values for OpenLDAP properties as given in the following table:
Property (in dir.ini) Value groupparentou=groups,dc=companyname,dc=compeopleparentcn=People,dc=companyname,dc=com -
Select the Interface Implementations tab and specify the following values for the following properties:
Property (in dir.ini) Value className.IDircom.openmarket.directory.jndi.JNDIDirclassName.INamecom.openmarket.directory.jndi.NameWrapperclassName.IUserDircom.openmarket.directory.jndi.LDAPUserDir -
Select the JNDI SPI Env tab and specify the following values for the following properties:
Property (in dir.ini) Value jndi.baseurlldap://<servername:port>jndi.connectAsUserIf WebCenter Sites can query the LDAP server for information as the user who is logged in to the WebCenter Sites interface and is making the query, set this property to true.(The same user must be defined in the LDAP server.)If WebCenter Sites must query the LDAP server as a specific user other than the user who is logged in to the WebCenter Sites interface, set this property to
false. Then specify a validuser name/passwordcombination with thejndi.loginandjndi.passwordproperties.OpenLDAP value:
falsejndi.custom(leave this value blank) jndi.loginIf the jndi.connectAsUserproperty is set tofalse, specify the fully qualified, fully distinguished name of the user account that WebCenter Sites will use to query the LDAP server. (The same user must be defined in the LDAP server.)OpenLDAP:
cn=Manager,dc=companyname,dc=comNote:
jndi.connectAsUserdetermines how a WebCenter Sites user is connected to the LDAP server, and therefore defines the LDAP user to be either administrative or non-administrative.-
If
jndi.connectAsUser=true, then WebCenter Sites defines the LDAP user to be the same one that is logged in to WebCenter Sites and connects that user to the LDAP server. For example,jndi.connectAsUser=trueconnects a WebCenter Sites administrator to LDAP as an administrator of the LDAP system. -
If
jndi.connectAsUser=false, then WebCenter Sites defines the LDAP user to be the one that is specified in the jndi.login property (indir.ini) and connects that user to the LDAP server.
jndi.passwordIf the jndi.connectAsUserproperty is set tofalse, specify the password for the user account that WebCenter Sites will use to query the LDAP server.This value is encrypted.
-
-
Select the Schema Defaults tab and specify the following values for OpenLDAP (beginning with "OpenLDAP" in the Value column) and other properties as given in the following table:
Property (in dir.ini) Value defaultGroupAttrsOpenLDAP: objectclass\=top&objectclass\=groupOfUniqueNamesdefaultPeopleAttrsOpenLDAP: objectclass\=top&objectclass\=Person&objectclass\=organizationalPersonobjectclassGroupOpenLDAP: groupOfUniqueNamesobjectclassPersonOpenLDAP: organizationalPersonrequiredGroupAttrs(leave this value blank) requiredPeopleAttrsSpecify all the required user attributes for this LDAP server. For example:
sn=Last Name&cn=Full Name -
Select File > Save.
-
Select File > Close.
21.1.1.4 D. Configure Properties in futuretense_xcel.ini
Note:
If you do not wish to manage sites or roles in the LDAP server, skip the steps in this section.-
Open
futuretense_xcel.iniin the Property Editor. -
Select the Xcelerate tab.
-
Set values for the following properties:
Property (in futuretense_xcel.ini) Value xcelerate.usermanagerclassThe value depends on the type of deployment you are using. Example value:
com.openmarket.xcelerate.user.UserManagerxcelerate.rolemanagerclassExample value: com.openmarket.xcelerate.roles.RoleManager -
Select the User Management tab.
-
Set values for the following properties:
Property (in futuretense_xcel.ini) Value xcelerate.sitesrootExample value: ou=sites.dc=<domainname>.dc=comxcelerate.sitenameattrExample value: ouxcelerate.displayablenameattrThe name of the user attribute describing the display name, if different from the login name. -
Select File > Save.
-
Select File > Close.
-
Stop and restart the application server for your changes to take effect.
21.1.2 Step 2. Configure the LDAP Server
-
Configure the LDAP server to recognize the user that is specified in the
jndi.connectAsUserandjndi.loginproperties (given in the table in step 5 of Section 21.1.1.3, "C. Configure Properties in dir.ini"). -
Assign the same user correct permissions to connect to LDAP, to look up groups, to look up user attributes, and so on.
Note:
Assign permissions judiciously. Once WebCenter Sites is LDAP-integrated, any WebCenter Sites administrator who connects to the LDAP server as a user with write permissions can still manage ACLs, users, sites, and roles from the WebCenter Sites interface. Some of the operations will propagate to the LDAP server, while other operations might result in errors.For information about management operations in the WebCenter Sites interface and their effect on the LDAP server, see the appendix "Managing Users, Sites, and Roles in LDAP-Integrated Sites Systems" in the Oracle Fusion Middleware WebCenter Sites Administrator's Guide.
21.1.3 Step 3. Check the mail Attribute
Each WebCenter Sites user must have a mail attribute (an attribute that stores an e-mail address). Before proceeding, check that the LDAP server's user entries have a mail attribute. For information about the WebCenter Sites mail attribute, see the Oracle Fusion Middleware WebCenter Sites Administrator's Guide.
21.1.4 Step 4. Create LDAP User Groups (WebCenter Sites ACLs)
Use the tools provided by your LDAP server to create groups that correspond to WebCenter Sites ACLs. The required ACLs are listed in this section.
Note:
Using ldif. You can create groups in the LDAP server by writing anldif file that contains the groups specified in this step, and the user and group memberships in Section 21.1.5, "Step 5. Create Required Users and Assign Them to LDAP Groups." You can then import the ldif file into your user directory.
The method for importing the ldif file varies for each directory, but the structure of the file is standardized among LDAP servers. For a sample ldif file, see Chapter 22, "Reference: Sample LDIF for Hierarchical Schema LDAP."
Naming conventions. In the steps that follow, you will be duplicating WebCenter Sites users and ACLs (optionally, sites and roles) in the LDAP server. All names must be duplicated exactly, including case, spaces, and special characters.
21.1.4.1 Default ACLs
The following list names the WebCenter Sites system default ACLs. You must create groups in the LDAP server whose names exactly match the ACL names below. For information about the access privileges that are granted by these ACLs, see the "System Defaults" appendix in the Oracle Fusion Middleware WebCenter Sites Administrator's Guide.
-
Browser -
ContentEditor -
ElementEditor -
ElementReader -
PageEditor -
PageReader -
RemoteClient -
SiteGod -
TableEditor -
UserEditor -
UserReader -
Visitor -
VisitorAdmin -
xceladmin -
xceleditor -
xcelpublish
21.1.4.2 Web Services ACLs
If you are using web services, create an LDAP group for each of the following ACLs. A group name must exactly match the ACL name:
-
WSAdmin
-
WSEditor
-
WSUser
For information about the access privileges granted by these ACLs (groups), see the "System Defaults" appendix in the Oracle Fusion Middleware WebCenter Sites Administrator's Guide.
21.1.4.3 Custom ACLs
If any custom ACLs have been created in WebCenter Sites since its installation, duplicate the ACLs as groups in the LDAP server. Group names must exactly match the names of the ACLs.
21.1.5 Step 5. Create Required Users and Assign Them to LDAP Groups
In this step, you will duplicate the following users and their group memberships in the LDAP server:
21.1.5.1 WebCenter Sites Default Users
-
Table 21-1 lists default users of the WebCenter Sites application. Duplicate the default users in the LDAP server, making sure to name them exactly as shown in Table 21-1.
-
Make the duplicated users members of the groups shown in Table 21-1.
Table 21-1 WebCenter Sites Default Users
Default User Group Memberships (ACLs) ContentServer
(user that is created in the database during the WebCenter Sites installation)
Browser, ContentEditor, ElementEditor, ElementReader, PageEditor, PageReader, SiteGod, TableEditor, UserEditor, UserReader
fwadmin
Browser, ElementEditor, PageEditor, RemoteClient, TableEditor, UserEditor, UserReader, Visitor, VisitorAdmin, xceladmin, xceleditor
DefaultReader
Browser, Visitor
21.1.5.2 Custom Users
-
Duplicate in the LDAP server all of the WebCenter Sites active custom users (all users who are assigned to active WebCenter Sites CM sites). Name the users exactly as they are named in WebCenter Sites.
-
Assign each custom user to the LDAP groups (created in Section 21.1.4.3, "Custom ACLs") that correspond to the user's ACLs in WebCenter Sites.
21.1.5.3 Sample Site Users
If you installed sample sites, create the associated sample users in the LDAP server. (Procedures are identical to those for custom users.) For information about sample users and sample sites, see the Oracle Fusion Middleware WebCenter Sites Administrator's Guide.
21.1.6 Step 6. Create Sites and Roles in the LDAP Server
Note:
If you are using a hybrid integration, theUserPublication table specifies which Roles are assigned to the user for each site. However, this table still contains all the pre-integrated data. To be able to log in, at least one user is required with the correct UserPublication table records for LDAP. For instance, for the fwadmin user, you must update the username to the LDAP dn.Originally the username in the UserPublication table is stored as something like userid=1230987654321,ou=People, where 1230987654321 is the Id of the user in the SystemUsers table. The following records are required:
-
Id={unique number} -
username="cn=fwadmin,ou=People,dc=fatwire,dc=com"(user'sdn) -
acl={the role to be assigned. For example, GeneralAdmin} -
pubid={the Id of the site for which this user is assigned this Role}
In the absence of the above records, the user can log in, but a message is displayed that the user does not have access to any sites.Once you have one user configured, you can use that user to assign roles to other users through the interface (as long as the user has the required Roles).
If you plan to use LDAP attribute mapping to manage sites and roles in your LDAP server, you will need to hierarchically order the sites and roles, as shown by the example in Figure 21-1 (system-defined roles are listed in Table 21-2). Continue with the steps in this section.
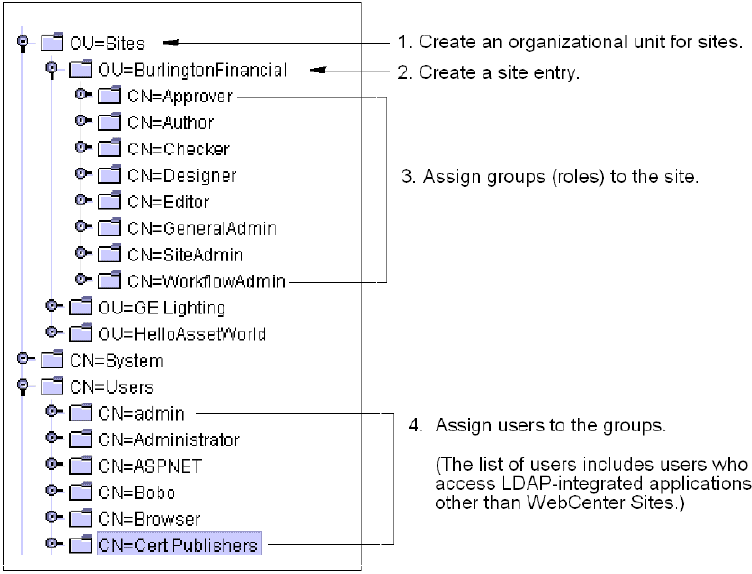
Table 21-2 System Defined Roles
| Role | Description |
|---|---|
|
GeneralAdmin |
Default system role for global WebCenter Sites administrators. Required for users who need access to the Admin tab (and all other possible functions) in the tree. Note: A user with the GeneralAdmin role must also have the |
|
SiteAdmin |
Default system role for site administrators. Required for users who are administrators of selected sites and therefore need access to the Site Admin tab (which displays a subset of the functions in the Admin tab). Assign the SiteAdmin role to users who will manage, but not create, other site users. Note: A site user with the SiteAdmin role must also have the |
|
WorkflowAdmin |
Default system role for workflow administrators. Required for users who need access to the Workflow tab in the tree. Note: A user with the WorkflowAdmin role must also have the |
|
AdvancedUser |
Grants WebCenter Sites users access to the WebCenter Sites Admin interface. |
|
SitesUser |
Grants WebCenter Sites users access to the WebCenter Sites Contributor interface. |
To create a hierarchical schema, complete the following steps in the LDAP server:
-
Create an organizational unit for sites. For an example, see step 1 in Figure 21-1.
-
Create a site entry under the site's organizational unit:
Complete this step by duplicating the names of active WebCenter Sites CM sites exactly as they are named in the WebCenter Sites interface (Admin tab). For an example, see step 2 in Figure 21-1.
Note:
If the sites you plan to use do not yet exist in WebCenter Sites, you can first create them in the LDAP server, then duplicate them (with identical names, including case) in WebCenter Sites. -
Assign groups to each site:
Complete this step for each site by exactly duplicating the names of the WebCenter Sites roles that are assigned to the site. For an example, see step 3 in Figure 21-1.
When creating a group for a system default role, name the group to exactly match the role names listed here:
-
GeneralAdmin(always assign this group to a site) -
SiteAdmin -
WorkFlowAdmin -
AdvancedUser -
SitesUserNote:
If the roles you plan to use do not yet exist in WebCenter Sites, you can first create them as groups in the LDAP server, then duplicate them as roles (with identical names, including case) in WebCenter Sites. For the list of system-defined roles, see Table 21-2.
-
-
Assign users to the groups. Name the users exactly as they are named in WebCenter Sites. For an example, see step 4 in Figure 21-1.
Note:
If you are completing the flat schema manual integration process (Chapter 20), reset WebCenter Sites users' passwords. For instructions, see step 3 in Section 20.3, "Completing the Integration."
21.1.7 Step 7. If You Completed Step 6
-
If in the previous step you created sites and roles in the LDAP server, but they do not exist in the WebCenter Sites database, create the same sites and roles in WebCenter Sites. Name them exactly as in the LDAP server. For instructions on creating sites and roles in the WebCenter Sites database, see the Oracle Fusion Middleware WebCenter Sites Administrator's Guide.
-
Assign the users to their relevant sites. For instructions, see "Granting Users Access to a Site" in the Oracle Fusion Middleware WebCenter Sites Administrator's Guide.
21.1.8 Step 8. Post-Integration Steps When CM Sites Have Not Been Created
If CM sites were not created on the given system, then after integrating WebCenter Sites with LDAP you will be unable to log in. The solution is to manually create the following new group entries in your LDAP server and assign fwadmin to each of these groups:
Management Site-SiteAdmin
Management Site-GeneralAdmin
Management Site-WorkflowAdmin
In addition, create the SitesUser group only for installations running in content management mode. This group enables the fwadmin user to access the WebCenter Sites Contributor interface:
Management Site-SitesUser
See Example 21-1.
dn: cn=Management Site-SiteAdmin,ou=Groups,dc=fatwire,dc=com
objectClass: top
objectClass: groupOfUniqueNames
uniqueMember: cn=fwadmin,ou=People,dc=fatwire,dc=com

dn: cn=Management Site-GeneralAdmin,ou=Groups,dc=fatwire,dc=com
objectClass: top
objectClass: groupOfUniqueNames
uniqueMember: cn=fwadmin,ou=People,dc=fatwire,dc=com

dn: cn=Management Site-WorkflowAdmin,ou=Groups,dc=fatwire,dc=com
objectClass: top
objectClass: groupOfUniqueNames
uniqueMember: cn=fwadmin,ou=People,dc=fatwire,dc=com

dn: cn=Management Site-SitesUser,ou=Groups,dc=fatwire,dc=com
objectClass: top
objectClass: groupOfUniqueNames
uniqueMember: cn=fwadmin,ou=People,dc=fatwire,dc=com
21.2 Testing the Integration
Test your LDAP-integrated system by opening a browser and entering the following URL:
http://<servername"://CatalogManager?ftcmd=login&username=ContentServer&password=" target="_blank"http://<servername>:<port>/<context>/CatalogManager?ftcmd=login&username=ContentServer&password=<password
where
<servername> is the name of the machine hosting the WebCenter Sites system
<port> is the port number of that server
<username> is user-defined (ContentServer, in this example)
<password> is user-defined (password, in this example)
-
If the browser displays a "
Login Successful" message, you have integrated your LDAP plug-in correctly. -
If you do not see the "
Login Successful" message, verify that you created theContentServeruser in the LDAP server, and that all properties are set to the correct values.