9 Use Case: Configuring Capture for Processing Expenses
This chapter describes how to configure an expense processing use case in which expense reports with bar codes are scanned or imported into Capture, indexed, and committed for storage and workflow processing.
|
Use Case |
The organization lacked an efficient method of receiving, capturing, and categorizing expense reports for sending on to approval workflow. Expenses were received in multiple ways, typically in paper form or emailed in various file formats. The substantial time processing staff spent manually processing expenses resulted in high costs and payment delays. |
|---|---|
|
Solution |
Configure a Capture workspace that provides automated and manual processing paths for scanning and importing expenses, reading their bar codes, and committing them for further processing. |
|
Components |
|
|
Required Documentation |
To complete this use case, see the following documentation resources: |
This chapter contains the following sections:
9.1 Introduction to the Use Case
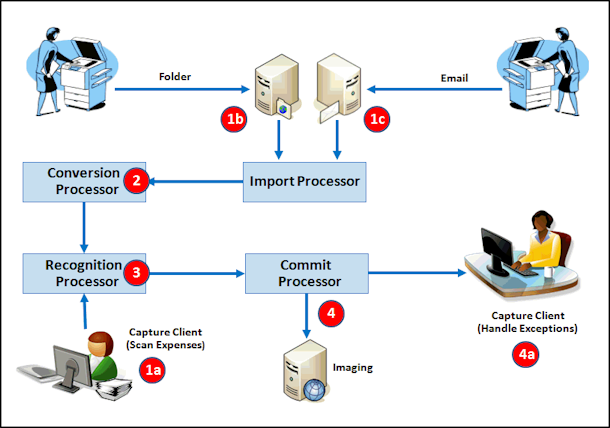
This use case illustrates configuring a Capture workspace for automated and manual capture, document conversion, bar code recognition, and commit of expense reports, as shown in Figure 9-1.
The use case makes several assumptions:
-
Employees initiate the process by creating an expense report, typically as part of a business application workflow. Creating a report automatically initiates the following processes:
-
Generates a cover sheet containing a bar code that identifies the expense report number.
-
Writes a database record that references the employee report number and links it to key employee values, such as name and employee ID.
-
-
Employees print the bar coded cover sheet, attach applicable expense receipts to it, and submit it.
-
For automated processing, employees scan their reports and either save them to a specified network folder or email them as attachments to a specified email account.
-
In cases where employees are unable to scan their reports, processors receive them in paper format, and manually scan and index them.
-
Expense Process in Capture Workspace
-
Expense reports enter a Capture workspace through one of several manual or automated paths (numbers below correspond to highlighted numbers in Figure 9-1):
-
Capture Client: Using a client profile, an employee scans or imports expense reports. Because scanning in the client always creates image documents and the client can convert imported ones, these batches go directly to recognition (bar code) processing.
-
Folder: Employees scan their expense reports on multi-function devices (MFDs), saving them to a network folder. A folder-type Import Processor job imports them, then sends the batch to the Document Conversion Processor. If the MFD created PDF files instead of TIFF files during scanning, the Document Conversion Processor job will convert the PDF files to image format, which is needed for recognition processing.
-
Email: Employees scan their expense reports on MFDs. The MFD creates a PDF document, attaches it to an email message and sends the email to an expenses inbox monitored by the Import Processor. An email-type Import Processor job imports the messages and attachments, then sends the batch to the Document Conversion Processor to convert the PDFs to image format for recognition processing.
-
-
A Document Conversion Processor job converts any non-image documents to image documents, merges them to a single document required for recognition processing, and sends the batch to the Recognition Processor.
-
A Recognition Processor job organizes the batch into individual expense documents based on expense cover sheets it detects. It then assigns the bar code's value (in this case, an expense report number) to a required Capture metadata field, and that value is used to look up and populate remaining metadata fields.
-
The Commit Processor commits the indexed expense reports to Imaging for approval and processing.
-
A client user handles any expense report exceptions that fail commit, such as those that encountered bar code recognition issues.
-
9.2 Implementing the Use Case
This section describes how to configure Capture for the expense processing use case.
Part I: Configuring Manual Expense Processing
Part II: Configuring Automated Expense Processing
9.2.1 Task 1: Use Case Prerequisites
To work with this use case, you need the following:
-
TIFF or PDF files.
-
TIFF image files, preferably multiple page, with a cover sheet containing a bar code. For example, you might use expense reports with a Code 128 bar code on each report's cover sheet.
-
PDF files, also multiple page, with a bar code on their cover sheets.
-
-
A JDBC database connection for configuring a database lookup, as described in Section 9.2.3. The lookup will search the database record for an expense report number and return employee information.
-
A location from which to import expense reports, as described in Section 9.2.9. For example, this might be a shared folder on your network, such as
C:\Expenses\Import. -
An email account from which to import expense report emails and attachments, as described in Section 9.2.10.
-
A WebCenter Content Imaging instance to which to commit processed expense documents, as described in Section 9.2.5.1. To test the configuration when no Imaging instance is available, you can configure a text file commit to a shared network folder such as
C:\Expenses\Commit, as described in Section 9.2.5.2.
9.2.2 Task 2: Create an Expenses Workspace and Elements
Begin by creating the structure and building blocks for the expenses use case. In the workspace you create, you will add the following elements:
-
Metadata fields to contain expense document values
-
A document profile that identifies the expense document metadata fields
-
A database lookup to populate metadata fields
-
A client profile for manually scanning or importing expense reports. This client profile also allows you to test your workspace settings. The importing option is useful when you do not have a scanner available.
To create a workspace and elements:
-
In the Capture workspaces pane, add a workspace (for example,
Expenses). Select the new workspace. -
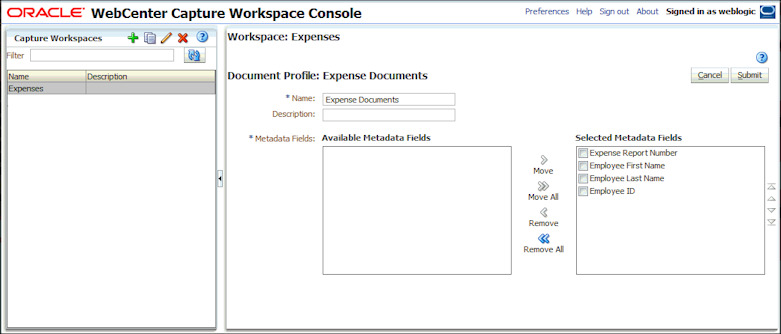
On the Metadata tab, add metadata fields such as the following:
-
Expense Report Number (Alpha Numeric, Required)
-
Employee First Name (Alpha Numeric)
-
Employee Last Name (Alpha Numeric)
-
Employee ID (Alpha Numeric)
Figure 9-2 Creating Metadata Fields in the New Workspace
Description of "Figure 9-2 Creating Metadata Fields in the New Workspace"
-
-
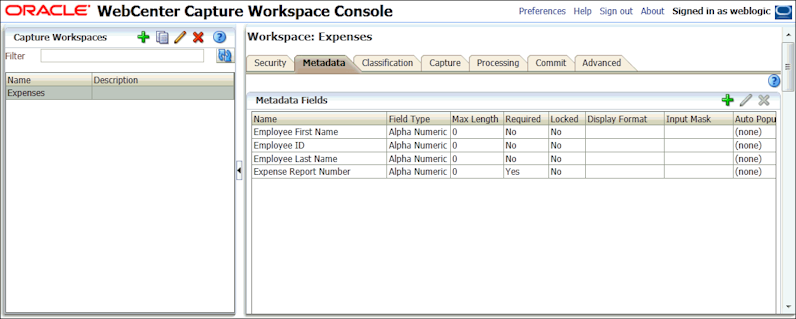
On the Classification tab, create a document profile (for example,
Expense Documents). Add the metadata fields and order them so they display in the client as follows:-
Expense Report Number
-
Employee First Name
-
Employee Last Name
-
Employee ID
-
9.2.3 Task 3: Configure a Database Lookup to Populate Capture Fields
In this section, configure a lookup that searches a database record for an expense report number and returns the associated employee's ID and full name from the record.
-
Scroll to the bottom of the Metadata tab. Click the Add button in the Database Lookup Profiles table.
-
Select settings on the General Settings train stop of the Database Lookup screen.
-
In the Database Lookup Name field, enter a name such as
Employee Lookup. -
In the JNDI Name field, enter a database connection (for example,
jdbc/lob). Click Connect. If successful, Status changes to Connected: connection name.
-
-
On the Search Fields train stop, configure the lookup to search on the expense report number field.
-
On the Return Fields train stop, configure the lookup to return database values based on the search results.
Notice that Expense Report Number is automatically selected in the Search Field option in the Return Field Definitions table's heading.
-
In the Return Field Settings window, select Employee ID as the Capture Field to be populated. Select the Database Field (from the previously selected schema and table) from which to return a value. Click OK.
-
Add another return field, selecting Employee First Name as the Capture Field to be populated and the database field whose value will populate the Capture field. Repeat to add a final return field for the Employee Last Name Capture field.
-
If needed, use the up/down arrow buttons to reorder the return fields as shown in Figure 9-4. The fields will be listed in this order left to right in client lookup results.
-
Figure 9-4 Configuring Database Lookup Return Fields for a Selected Search Field
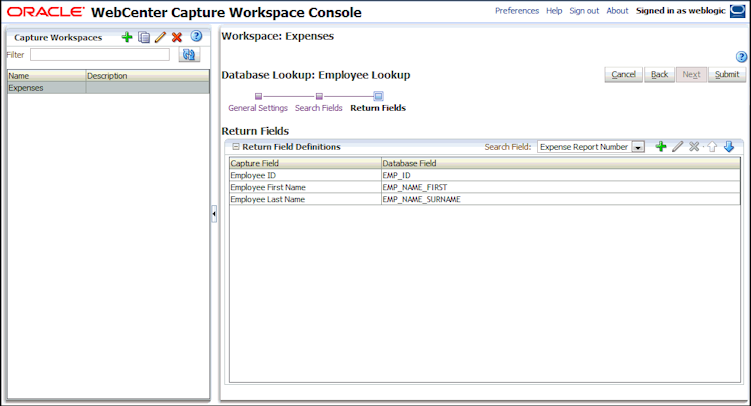
Description of "Figure 9-4 Configuring Database Lookup Return Fields for a Selected Search Field"
-
Click Submit to save the lookup.
9.2.4 Task 4: Configure Client Scanning of Expenses
Configure a client profile that client users can use to manually scan or import expense documents.
-
On the Capture tab, click the Add button in the Client Profiles table.
-
Configure settings on the General Settings train stop.
-
In the Profile Type field, choose 2 - Capture and Index.
-
In the Profile Name field, enter a name such as
Scan Expenses. -
In the Batch Prefix field, enter a prefix such as
SCANEXP.
-
-
Configure settings on the Image Settings train stop.
-
In the Default DPI field, select 300.
-
In the Non-Image File Import Action field, select Convert to Image Format. This will allow you to import PDF (non-image) files and Capture will convert them within the client without requiring the use of the Document Conversion Processor.
-
In the DPI field under Non-Image Conversion options, select 300.
-
-
Complete settings on the Document Indexing Settings train stop.
-
In the Document Creation Option field, select 3 - Variable Number of Pages.
-
In the Database Lookup Profile field, select the database lookup you created in Section 9.2.3 (for example, Employee Lookup).
-
In the Document Profiles field, select the profile you created (for example, Expense Documents).
Figure 9-5 Configuring a Client Profile for Capturing Expense Documents
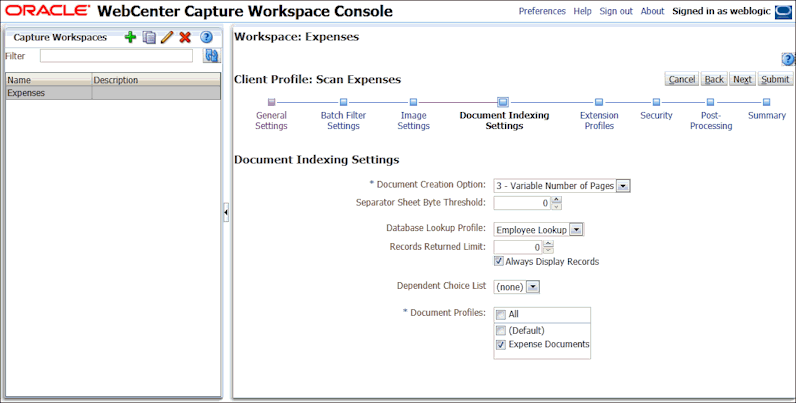
Description of "Figure 9-5 Configuring a Client Profile for Capturing Expense Documents"
-
-
On the Security train stop, assign yourself to the client profile.
-
On the Post Processing train stop, select Commit Processor in the Batch Processor field.
-
Click Submit to save the client profile.
9.2.5 Task 5: Configure Commit Processing
In this section, you configure commit processing. In a typical expenses scenario, expenses would be committed to Imaging for workflow processing. But for verification purposes or if you do not have an Imaging system available, you may want to configure a text file commit profile instead. You can configure one or both of the following profiles:
9.2.5.1 Configure Committing to Imaging
-
On the Commit tab, click the Add button in the Commit Profiles table.
-
Complete settings on the General Settings train stop.
-
In the Commit Profile Name field, enter a name (
Commit to Imaging). -
In the Commit Driver field, select WebCenter Content Imaging.
-
In the Document Output Format field, select PDF Searchable.
-
In the Restrict Commit to Document Profiles field, select the Expense Documents profile.
Figure 9-6 Configuring a Commit Profile for Committing to Imaging
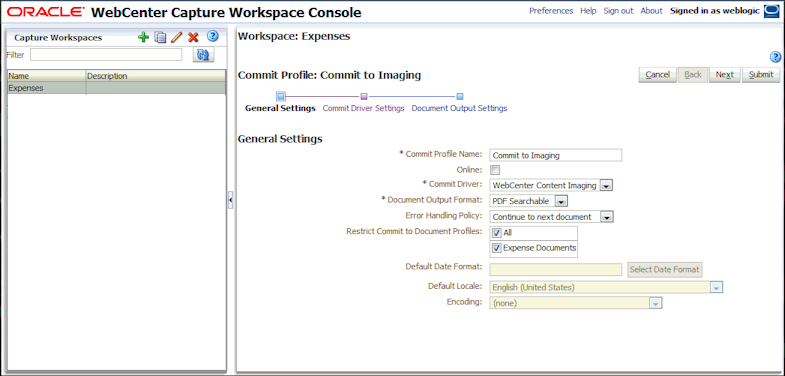
Description of "Figure 9-6 Configuring a Commit Profile for Committing to Imaging"
-
-
Complete settings on the Commit Driver Settings train stop. Note that these settings are specific to the Imaging commit driver you selected in step 2b.
-
On the Login tab, enter a User ID, Password, and Imaging WebService URL. Click Connect. The URL uses the following format:
http://host name:port/imaging/ws -
On the General tab, select Direct Commit.
-
On the Field Mappings tab, map Capture fields to fields in the selected Imaging application.
Select an Imaging application to which to write metadata values in the Imaging Application field. In the table, select an Imaging field to map and click the Edit button. Select a Capture field to map its value to the selected Imaging field.
Figure 9-7 Configuring How Capture Metadata Values are Committed to Imaging Application Fields
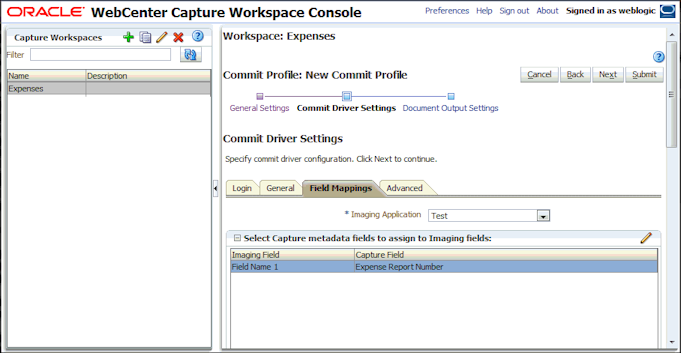
Description of "Figure 9-7 Configuring How Capture Metadata Values are Committed to Imaging Application Fields"
-
-
Click Submit to save the commit profile.
9.2.5.2 Configure Committing to a Folder (for Testing)
Follow these steps to commit expense reports to a document folder for testing purposes.
-
On the Commit tab, click the Add button in the Commit Profiles table.
-
Complete settings on the General Settings train stop.
-
In the Commit Profile Name field, enter a name (
Commit to Text). -
In the Document Output Format field, select TIFF Multi-Page.
-
In the Restrict Commit to Document Profiles field, select the Expense Documents profile.
Figure 9-8 Configuring a Commit Profile for Committing Documents to a Network Folder
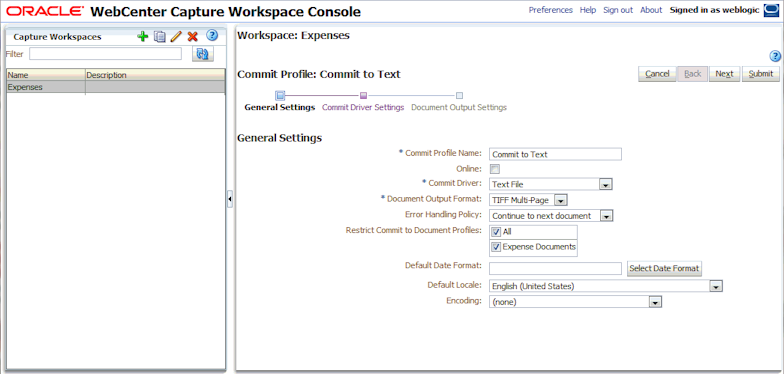
Description of "Figure 9-8 Configuring a Commit Profile for Committing Documents to a Network Folder"
-
-
Complete settings on the Commit Driver Settings train stop. Note that these settings are specific to the commit text driver you selected in step 2b.
-
In the Commit Text File Folder field, enter a location to write commit text files. This will enable you to view one or more text files after commit and verify the expense report number and the database lookup return fields written.
Either specify a folder on the Capture server or a network path accessible from the Capture server. For this example, you might specify a shared folder on your system. If the Capture server is running on Windows, you might specify a UNC path to a network share, such as
\\USER-SYSTEM\commit.In the File Prefix field, enter
TEXT_FILE.In the File Extension field, enter
txt. -
On the Document Folder tab, enter a location in the Document Folder field to write the expense files. For testing purposes, this might be a shared folder on your network, such as
C:\Expenses\Import.Select the Create a folder per committed batch field.
-
On the Document File Naming tab, complete settings.
Select the Name document file based on metadata field values field, then move Expense Report Number to the Selected Fields list.
-
-
Click Submit to save the commit profile.
9.2.6 Task 6: Verify Manual Processing
In this section, verify the settings and profiles you configured.
-
Start the Capture client.
Note that each time you make changes to a client profile in the workspace console, you need to sign out and back in to the Capture client to see the changes reflected.
-
Select the client profile you created (for example, Scan Expenses) in the Client Profile field in the upper left of the client window.
-
Capture one or more expense reports.
-
If scanning expenses, the client will create one document per batch, because you chose the Variable Number of Pages option but did not insert blank separator sheets between documents. (Document separation will occur later.)
-
If importing expenses, select the Create one document per import file option when prompted and select one file only. Note that you can import PDF files in addition to TIFF files, because you selected Convert to Image Format in the Non-Image File Import Action field in Section 9.2.4.
-
-
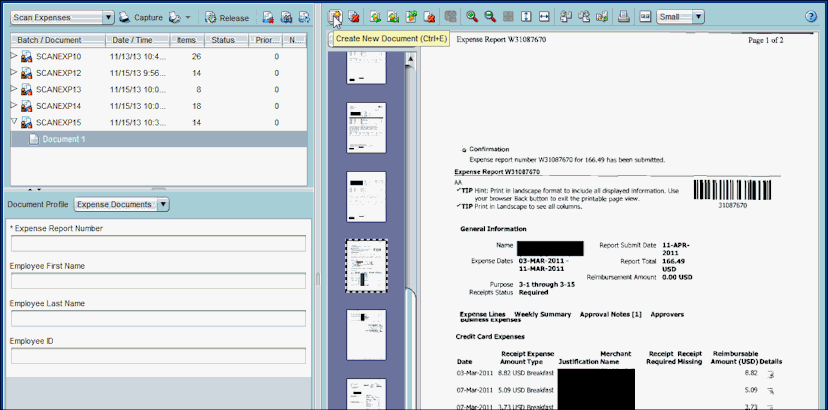
Expand the new batch. Select the document and organize it into separate expense documents.
If you scanned multiple expenses, you must manually organize the single document into multiple expense documents. (In a later section, you will configure the Recognition Processor to automatically organize documents based on bar-coded cover sheets.)
Use the down arrow key to proceed through the images until you reach the first page of a new expense document. Click the Create New Document button from the document toolbar. A new document separation appears in the thumbnail display.
Figure 9-9 As a Client User, Separating a Batch into Expense Documents
Description of "Figure 9-9 As a Client User, Separating a Batch into Expense Documents"
-
Use the database lookup to search by expense report number and return employee ID and name metadata values.
The metadata pane displays in the lower left pane. The Expense Report Number field name is prefaced with an asterisk to indicate that it is required. To successfully commit a document, all required fields must contain a value. (In a later section, the Recognition Processor will automatically read the bar code value and populate the fields.)
-
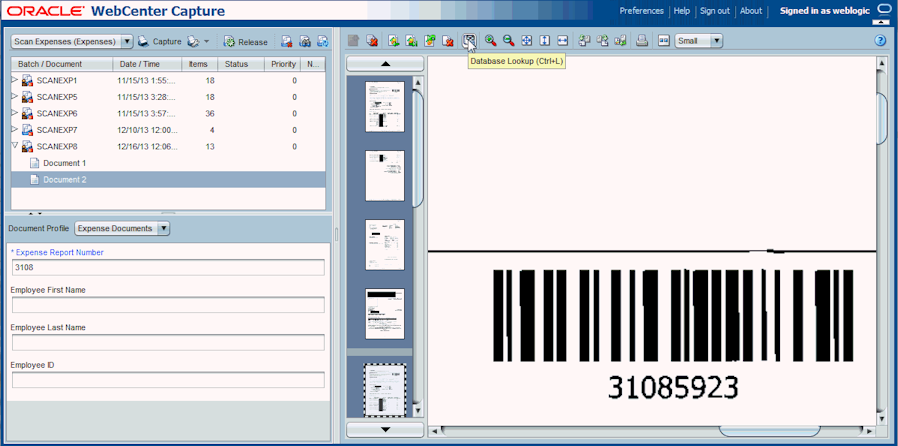
On a document's cover sheet, zoom in to view the expense report number.
Zoom in by left-clicking, dragging a rectangle around the area to zoom, and releasing.
Figure 9-10 As a Client User, Zooming In and Looking Up Values
Description of "Figure 9-10 As a Client User, Zooming In and Looking Up Values"
-
In the metadata pane, click the Expense Report Number field.
The name of the selected field displays in blue. Because you configured the lookup to search using this field, the Database Lookup button becomes available on the document pane's toolbar.
-
Enter a value to search for (optional), then click the Database Lookup button.
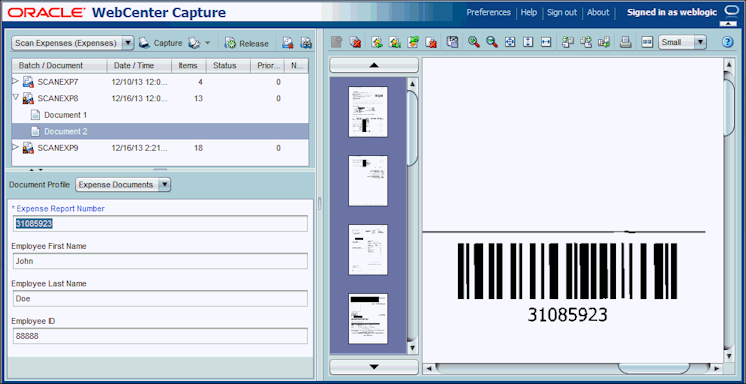
In a typical scenario, the user would enter the expense report number, the lookup would find a matching value and then populate Capture metadata fields with the employee ID, first name, and last name values returned from the selected database record.
If you are testing the configuration, you can leave the field blank to return all values found. In that case, the Database Lookup Results window displays. Select a record in the window and the Capture metadata fields are populated with the employee ID, first name, and last name values returned from the selected database record.
Figure 9-11 As a Client User, Populating Metadata Fields Using the Database Lookup
Description of "Figure 9-11 As a Client User, Populating Metadata Fields Using the Database Lookup"
-
-
Complete indexing the batch's documents.
-
Release the batch. Click the Refresh Batch List button multiple times if needed.
Notice that a progress bar indicates the release status as the batch is synchronized with the Capture server. The batch either disappears from the batch pane (indicating it was successfully committed) or remains with an error. For more information about errors, see Section 9.2.11.
-
Open the commit folder you specified in Section 9.2.5. View one or more text files and verify the expense report number and the database lookup return fields written.
9.2.7 Task 7: Configure Recognition Processing
Now that you can manually capture and index expense documents in the workspace, begin configuring automated processing by creating a Recognition Processor job in this section. The job will read expense report bar code values on the documents, organize the documents, and assign metadata values. To test the job, you will need documents with bar code values to capture.
-
On the Processing tab of Expenses workspace, click the Add button in the Recognition Processor Jobs table.
-
On the General Settings train stop, enter a name (for example,
Expense Reports) in the Recognition Job Name field. -
On the Bar Code Recognition train stop, select the symbology for the bar codes you will scan (for example, choose Code 128 or equivalent).
-
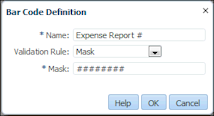
Create a definition on the Bar Code Definition train stop. For example, the steps below create a definition that uses a mask validation rule to look for an 8 digit bar code.
-
Click the Add button in the Bar Code Definitions table.
-
In the Bar Code Definition window, enter a name such as
Expense Report #in the Name field. -
In the Validation Rule field, specify how to validate the bar code. For example, select Mask to create a mask validation definition.
-
Complete the validation-specific field or fields that display, then click OK. For example, for a mask definition, enter a mask in the Mask field that displays. You might enter a mask of 8 # signs to identify 8 digits:
########Figure 9-12 Expense Report Bar Code Definition
Description of "Figure 9-12 Expense Report Bar Code Definition"
-
-
On the Document Organization train stop, leave the default Separator pages option selected.
In step 7, you will define the separator page. This will automate document organization for batches with bar coded separator sheets, as shown in Figure 9-1.
-
On the Document Profile train stop, select the Expense Documents profile you created in the Default Document Profile field.
Since all of the documents in a batch are expected to be expense reports and receipts, select the Expense Documents profile.
-
On the Document Processing train stop, configure an expense cover sheet separator page.
-
Click the Configure button.
-
On the Separator Page Definition screen, enter a name in the Name field (for example,
Expense Cover sheet). -
Click the Add button in the Rules table.
-
In the Separator Page Rule window, enter a name (for example,
Expense Separator Rule) in the Rule Name field. -
In the Bar Code field, select the bar code definition you created (Expense Report #). Click OK, then Submit to complete the separator page definition.
Figure 9-13 Configuring a Separator Page to Organize the Single Document Into Expense Documents
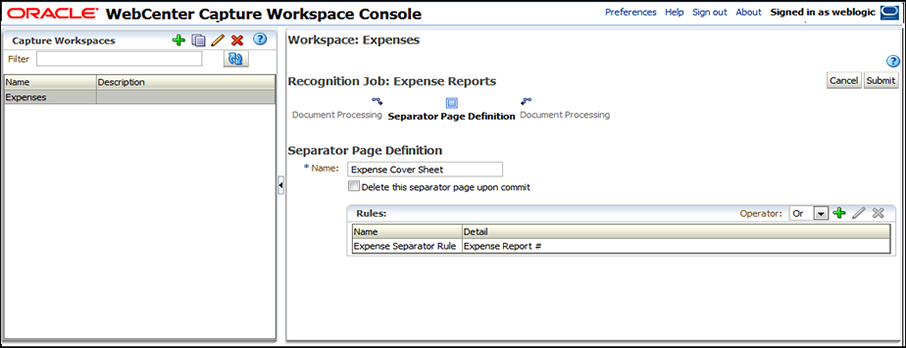
Description of "Figure 9-13 Configuring a Separator Page to Organize the Single Document Into Expense Documents"
-
-
On the Fields train stop, configure the bar code value to populate the Expense Report Number metadata field.
-
Select the Expense Report Number row in the Fields table and click the Edit button.
-
In the Edit Recognition Job Field window, select Bar Code in the Auto Populate With field, and select Expense Report # in the Bar Code field. Click OK.
Figure 9-14 Configuring the Bar Code Value to Populate a Capture Metadata Field
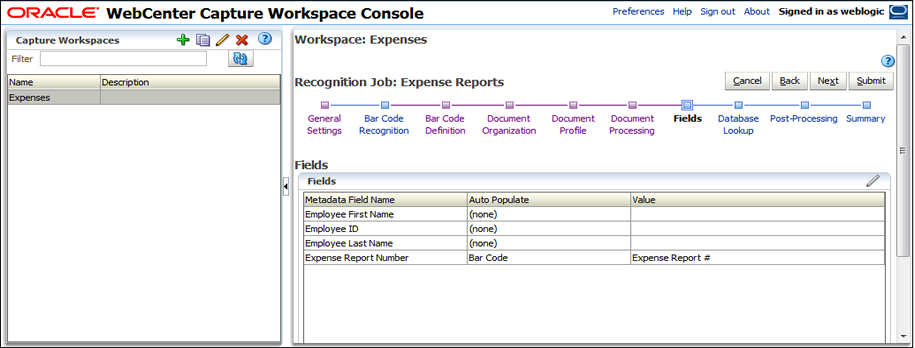
Description of "Figure 9-14 Configuring the Bar Code Value to Populate a Capture Metadata Field"
-
-
On the Database Lookup train stop, set a database lookup to populate the remaining metadata fields.
-
In the Using field, select Field Value.
-
In the Field Name field, select Expense Report Number.
-
In the Database Lookup Profile field, select Employee Lookup.
-
Select Expense Report Number as the Database Search Field.
Figure 9-15 Configuring the Database Lookup to Populate Capture Metadata Fields
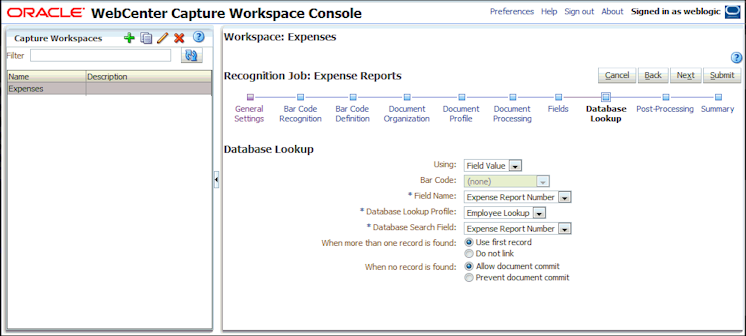
Description of "Figure 9-15 Configuring the Database Lookup to Populate Capture Metadata Fields"
-
-
On the Post-Processing train stop, select Commit Processor in the Batch Processor field under When there is no system error options. As shown in Figure 9-1, batches will flow from this Recognition Processor job to commit.
-
Click Submit to save the Recognition Processor job.
-
Configure batches to flow from the client to the Recognition Processor job.
-
On the Capture tab, select the Scan Expenses client profile, and click the Edit button.
-
On the client profile's Post-Processing train stop, choose Recognition Processor in the Batch Processor field and the Expense Reports job in the Batch Processor Job field. Click Submit.
-
-
Verify the Recognition Processor job.
-
Temporarily deactivate the commit profile, so that you can see the Recognition Processor job's results in the client. On the Commit tab, select the Imaging and/or folder commit profile and click the Toggle Online/Offline button.
-
Sign out of the client and back in.
-
Capture a batch of image documents (TIFFs) with bar codes. When importing, be sure to select the Create one document for all import files option, because the Recognition Processor requires a single document per batch to process.
Expand the batch and select the document. Notice how it contains no metadata values.
-
Click the Release button to release the batch. Notice how the batch icon changes to indicate processing (gear). Click the Refresh Batch List icon.
-
When the batch icon changes from processing to unlocked, expand the batch, then select a document.
The Recognition Processor job separated the single document into individual documents based on the page separator you configured in Section 9.2.7. In addition, the job populated the Expense Report Number metadata field with the bar code value it read, as configured. Lastly, the job looked up and populated remaining metadata fields using the database lookup (if configured).
Figure 9-16 As a Client User, Viewing Recognition Processor Results (Document Separation and Metadata Field Population)
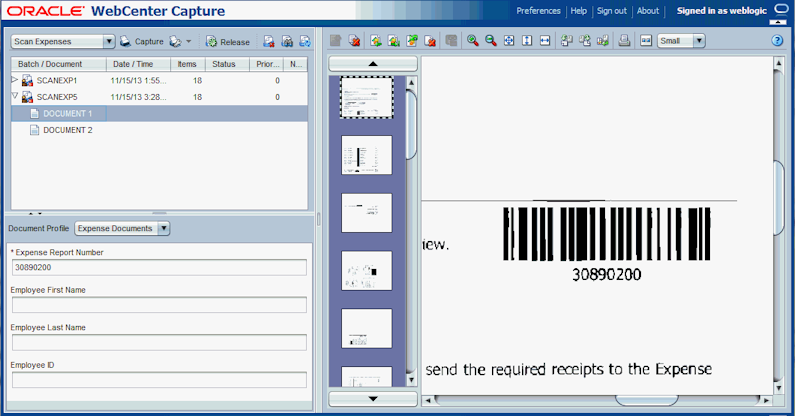
Description of "Figure 9-16 As a Client User, Viewing Recognition Processor Results (Document Separation and Metadata Field Population)"
When importing files manually, the client profile is set to convert non-image files to image format for recognition processing. In a fully automated processing path, non-image documents must also be converted. In the next section, you will configure a Document Conversion Processor job to automatically convert non-image documents to image format.
-
9.2.8 Task 8: Configure Document Conversion Processing
In this section, configure a Document Conversion Processor job to convert documents from PDF to TIFF format.
-
On the Processing tab, click the Add button in the Document Conversion Processor Jobs table.
-
Complete settings on the Document Selection train stop.
-
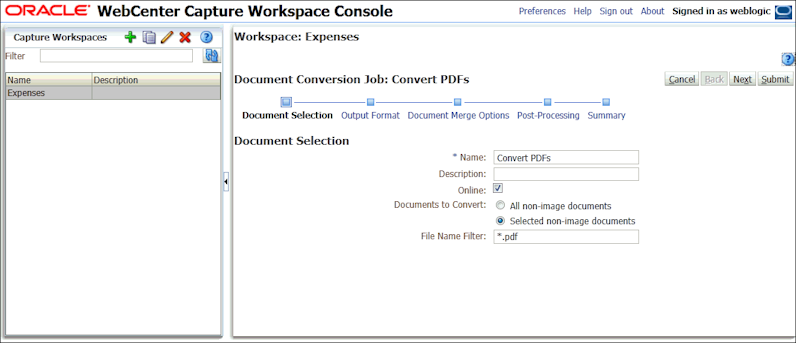
In the Name field, enter a name (for example,
Convert PDFs). -
In the Documents to Convert field, choose Selected non-image documents. Enter
*.pdfin the File Name Filter field.Figure 9-17 Configuring the Import Processor to Convert PDF Files to TIFF Format
Description of "Figure 9-17 Configuring the Import Processor to Convert PDF Files to TIFF Format"
-
-
On the Output Format train stop, select TIFF: black and white in the Output Image Format field and 300 in the DPI field.
-
On the Document Merge Options train stop, select Merge all documents in the Batch Merge Option field. This will ensure that the batch will contain one document only, which is required for the recognition processing that will follow conversion.
-
Under the When there is no system error options on the Post-Processing train stop, select Recognition Processor in the Batch Processor field and select the Expense Reports job in the Batch Processor Job field.
-
Click Submit to save the Document Conversion Processor job.
-
Configure batches to flow from the client to the Document Conversion Processor job, and then to the Recognition Processor job.
-
On the Capture tab, edit the Scan Expenses client profile you created in Section 9.2.4.
-
On its Post-Processing train stop, select Document Conversion Processor in the Batch Processor field, and select the Convert PDFs job in the Batch Processor Job field.
-
Click Submit to save the client profile. When you release from the client, the batch will go to document conversion processing, then automatically to recognition processing.
-
-
Verify the Document Conversion Processor job.
-
Sign out of the client and back in.
-
Import several PDF expense documents with bar codes, selecting the Create one document per import file. Expand the batch and see a single document.
-
Release the batch. The batch icon changes to indicate processing (gear). Click the Refresh Batch List icon, multiple times if needed. Performing document conversion and recognition processing will take longer.
-
When the batch icon changes from processing to unlocked, expand the batch and select a document. You can see that after document conversion, the Recognition Processor job separated the single document into individual documents and populated the Expense Report Number field.
The next step is to automate import processing as the initial processing step, as described in the next two sections: either from a network folder and from email.
-
9.2.9 Task 9: Configure Folder Import Processing
In this task, you configure an Import Processor job to import documents from a folder. In an expenses use case, employees scan expense reports on an MFD to a network folder, and the Import Processor job monitors and imports from the folder at a specified time interval. (Note that you can also configure email import, as described in Section 9.2.10.)
To configure and verify this job's configuration, you will need a shared folder that contains expense report files (PDF or TIFF).
-
On the Capture tab, click the Add button in the Import Processor Jobs table.
-
Complete settings on the General Settings train stop.
-
In the Import Job Name field, enter a name (
Import From Folder). -
Deselect the Online field. (When you are ready for import processing to begin, you will change the job to online.)
-
In the Batch Prefix field, enter a prefix (
IMPFLDR). -
In the Import Source field, select Folder Source.
-
In the Import Frequency field, select Every 1 minute.
-
-
On the Document Profile train stop, select the Expenses Documents profile in the Default Document Profile field.
-
Complete settings on the Import Source Settings train stop.
-
In the Import Folder Path field, enter a path to the shared folder from which to import (for example,
\\expenses). -
In the File Mask(s) field, enter the following to import PDF and TIFF files in the folder while bypassing all other files.
*.pdf; *.tif -
From the After Import options, select Delete file to prevent files from being reprocessed.
-
-
On the Post-Processing train stop, select Document Conversion Processor in the Batch Processor field and the Convert PDFs job in the Batch Processor Job field.
-
Click Submit. When ready, set the job's status to Online.
-
Verify the folder Import Processor job.
-
When ready to begin importing, ensure that there are PDF and/or TIFF files in the specified network folder. Select the job in the Import Processor Jobs table and click the Toggle Online/Offline button until the job's status changes to Online.
-
Start the client. Wait one minute for imported batches to display in the batch pane. If batches do not display, verify that Capture can access the shared folder you specified.
-
To stop importing, select the job in the Import Processor Jobs table and click the Toggle Online/Offline button until its status displays as Offline.
-
After batches are imported, they go to document conversion processing, then recognition processing. Click the Refresh Batch List icon, repeatedly if needed.
-
When the batch icon changes from processing to unlocked, expand the batch. You can see that the Recognition Processor job separated them into individual documents and populated the Expense Report Number field.
-
The final step in this use case is to activate the commit profile you set to offline earlier. On the Commit tab, select the profile and click the Toggle Online/Offline button until the profile's status changes to Online.
Based on the automated configuration, batches that do not encounter batch processor errors will enter Capture via the folder Import Processor job, undergo document conversion if applicable, then recognition processing, and finally commit processing. Batches that encounter errors will display in the client to exception specialists, who resolve and commit them.
-
9.2.10 Task 10: Configure Email Import Processing
In this task, configure how expenses attached to emails are imported and sent for processing. (Note that you can also configure folder import, as described in Section 9.2.9.)
To verify this job's configuration, you will need an email inbox folder that contains email messages with attached expense report files (PDF or TIFF).
-
On the Capture tab, click the Add button in the Import Processor Jobs table.
-
Complete settings on the General Settings train stop.
-
In the Import Job Name field, enter a name (for example,
Import From Email). -
Deselect the Online field. (When you are ready for import processing to begin, you will change the job to online.)
-
In the Batch Prefix field, enter a prefix (IMPEML).
-
In the Import Source field, select Email Source.
-
In the Import Frequency field, select Every 30 seconds.
-
-
Select the Import Source Settings train stop and complete settings on the Email Accounts tab.
-
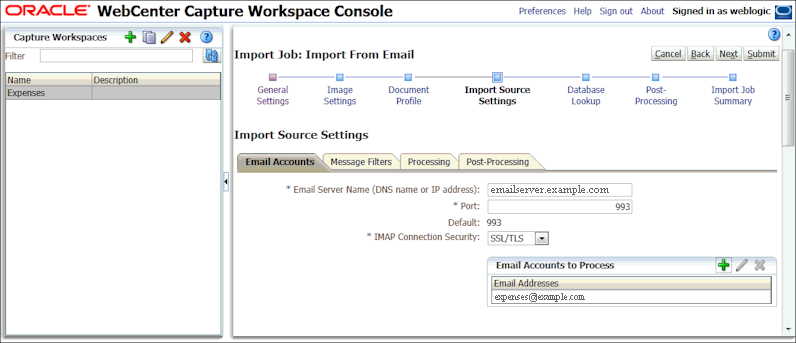
In the Email Server Name field, enter a DNS name or IP address (for example,
emailserver.example.com). -
Click the Add button in the Email Accounts to Process table.
-
In the Email Address and Password fields of the Add/Edit Email Account window, enter an email address and password.
-
Click Verify to verify the address/password entry, then click OK.
Figure 9-18 Configuring Email Accounts From Which the Import Processor Will Import Document Messages and Attachments
Description of "Figure 9-18 Configuring Email Accounts From Which the Import Processor Will Import Document Messages and Attachments"
-
-
On the Message Filters tab, specify the folder to process in the Folders to Process field.
For example, you might specify
inbox/expensesto import email messages stored in an expenses folder in the email inbox.Caution:
Be sure to specify a limited folder from which to import. Otherwise, Capture may attempt to process an entire inbox, which could result in unintended consequences.
-
On the Processing tab, optionally restrict the type of attachments to be imported.
By default, the Include attachments matching these mask(s) field is set to
*.*(all attachments are processed). To restrict import to certain file types, enter their extensions. For example, enter*.TIF;*.PDFto import all email attachments with a TIF or PDF extension. -
On the Post-Processing tab, select Document Conversion Processor in the Batch Processor field and the Convert PDFs job in the Batch Processor Job field
-
Click Submit to complete creating the email Import Processor job.
-
Verify the email Import Processor job.
-
When ready to begin importing, ensure there are email messages with attached TIFF or PDF documents in the specified inbox folder. Select the job in the Import Processor Jobs table and click the Toggle Online/Offline button until the job's status changes to Online.
-
Start the client. Wait at least a minute for imported batches to display in the batch pane. If they do not appear, check your email inbox folder settings.
-
To stop importing, select the job in the Import Processor Jobs table and click the Toggle Online/Offline button until its status displays as Offline.
-
After batches are imported, they go to document conversion processing, then recognition processing. Click the Refresh Batch List icon, repeatedly if needed.
-
When the batch icon changes from processing to unlocked, expand the batch. You can see that the Recognition Processor job separated them into individual documents and populated the Expense Report Number field.
-
-
The final step in this use case is to activate the commit profile you set to offline earlier. On the Commit tab, select the profile and click the Toggle Online/Offline button until the profile's status changes to Online.
Based on the automated configuration, batches that do not encounter batch processor errors will enter Capture via the email Import Processor job, undergo document conversion if applicable, then recognition processing, and finally commit processing. Batches that encounter errors will display in the client to exception specialists, who resolve and commit them.
9.2.11 Task 11: Configure Exception Handling
In the expenses scenario, errors can occur at several points.
-
Import Processor: The email or folder Import Processor job could fail. For example, Capture may encounter errors connecting to or reading from a specified email inbox or network folder.
-
Document Conversion Processor: The conversion processor could encounter a format that it does not recognize.
-
Recognition Processor: The processor might not be able to read a bar code due to a quality issue.
-
Commit Processor: Committing might fail if Capture encounters errors connecting to and writing to a shared network folder. Or, if a batch contains a document in which a required metadata value is blank, the batch does not commit and an error results.
To configure exception handling for an expenses scenario:
-
Optionally set a qualified user to be notified of document conversion processor errors.
-
On the Processing tab, edit the Document Conversion Processor job.
-
On the Post-Processing train stop, enter the qualified user's address in the email notification field under When there are system errors options. Click Submit to save the Document Conversion Processor job.
-
-
Optionally set a qualified user to be notified of Recognition Processor errors.
-
On the Processing tab, edit the Recognition Processor job.
-
On the Post-Processing train stop, enter the qualified user's address in the email notification field under When there are system errors options. Click Submit to save the Recognition Processor job.
-
-
On the Capture tab, click the Add button in the Client Profiles table to add a client profile.
An exceptions specialist can use this profile to quickly view, index, and commit batches that encountered errors in their batch processing.
-
Select settings on the General Settings train stop.
-
In the Profile Type field, select 3 - Index Only.
-
In the Profile Name field, enter
Handle Exceptions.
-
-
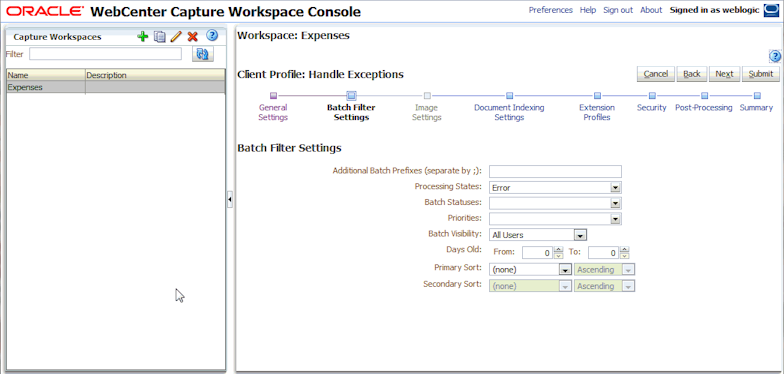
On the Batch Filter Settings train stop, select Error in the Processing States field.
-
Figure 9-19 Configuring an Exceptions Client Profile to Display Error Batches Only
Description of "Figure 9-19 Configuring an Exceptions Client Profile to Display Error Batches Only"
-
-
On the Document Indexing Settings train stop, select your Expense Documents profile in the Document Profiles field.
-
On the Security train stop, assign a qualified user access to this profile.
-
On the Post-Processing train stop, select Commit Processor in the Batch Processor field. This will allow the exception handler to manually complete batches and then commit them.
-
Click Submit to save the client profile.
-
Start up the client and log in as the user to whom you granted security access in step 7. Select the Handle Exceptions client profile. Select batches with errors to index and edit, then release them for committing.
