3 Configuration
This chapter provides information about different settings that you must configure to use the WebCenter Content Storage Connector for Microsoft SharePoint 2010.
This chapter covers the following topics:
3.1 Configuring Farm-level Settings
This section provides information on how you can configure connection settings, configure security settings at the farm level, and map WebCenter Content fields with SharePoint metadata at the farm level.
3.1.1 Configuring Connection Settings
To establish the connectivity between WebCenter Content and a SharePoint farm, you must configure the connection settings.
To configure the connection settings:
-
Log on to WebCenter Content as an administrator.
-
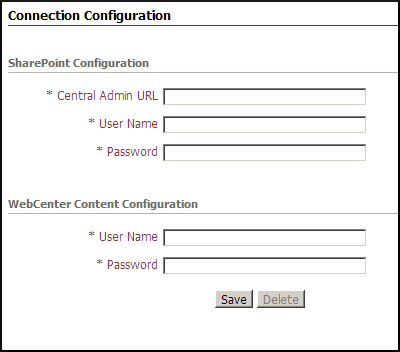
In the Content Server portal, open the SharePoint Connector tray, and then click Connection Configuration. The Connection Configuration page appears.
-
Enter the applicable information in each field.
The following table lists each field in the SharePoint Configuration region and the action associated with each field.
Field Description SharePoint Central Admin URL
Enter the URL of the Microsoft SharePoint farm that you want to connect to WebCenter Content.
User Name
Enter the user name that you use to access Microsoft SharePoint 2010. This user must be a part of the SharePoint Farm Administrators group on the SharePoint Central Administration site. For more information, see Section 2.2.2.2.
Password
Enter the password for the user name that you use to access Microsoft SharePoint 2010.
The following table lists each field in the WebCenter Content Configuration region and the action associated with each field.
Field Description User Name
Enter the administrator user name for WebCenter Content. This user must have administrative privileges, having permissions to all WebCenter Content security groups, accounts, and services. For more information, see Section 2.4.3.
Password
Enter the password for this user name.
-
Click Save. The connection between WebCenter Content and the SharePoint farm is established. If the connection is not established, an error message appears.
Note:
Before you change user name, password, or both for SharePoint or WebCenter Content, you must restart the UCM server.
3.1.2 Configuring Security Settings at the Farm Level
To enable the storage of files in WebCenter Content, you must configure security settings at the farm level. By default, all the elements under the hierarchy of a farm inherit the global security settings.
To configure the global security settings:
-
In the Content Server portal, open the SharePoint Connector tray, and then click Security Configuration. The Security Configuration page appears.
Figure 3-2 Farm Tab on the Security Configuration Page

Description of "Figure 3-2 Farm Tab on the Security Configuration Page"
-
Click the Farm tab.
-
From the Security Group drop-down list, select the security group that you want to configure for the farm. The Security Group drop-down list displays all security groups that are available in WebCenter Content.
Note:
The administrator must configure only those security groups to which the service account user has permissions.
-
(Optional) From the Select Account drop-down list, select the security account that you want to configure for the farm.
The security account that you select appears in the Account field. You can edit the account name in the Account field, if required.
-
Click Save. The security settings are applied at the farm level.
3.1.3 Mapping WebCenter Content Fields with SharePoint Metadata at the Farm Level
Metadata mapping allows you to map WebCenter Content fields with SharePoint metadata. After you map the metadata, when a SharePoint document is checked in or when the metadata is updated for a SharePoint document that is stored in WebCenter Content, the metadata is updated for the corresponding WebCenter Content fields.
After a file is stored on WebCenter Content, you can view the metadata for that file on the Content Information page. If the metadata mapping fails, SharePoint files do not get transferred to WebCenter Content.
You can map SharePoint metadata only at the farm level and document library level. Document library level metadata mapping takes precedence over the farm level metadata mapping. If you add a new document library to SharePoint, the document library inherits the default metadata mapping at the farm level.
You must map metadata for all required WebCenter Content fields. If you do not map metadata for any required WebCenter Content field, the connector does not transfer the SharePoint document to WebCenter Content.
You can map SharePoint metadata with WebCenter Content standard fields or custom fields. The following table displays the compatibility of the WebCenter Content supported field types with SharePoint supported metadata.
| WebCenter Content Field Data Type | SharePoint Metadata Type |
|---|---|
|
LongText (200 characters) |
Any type |
|
Memo (2000 characters) |
Any type |
|
Date |
DateTime |
|
Text (30 characters) |
Any type |
|
Integer |
Integer, Counter |
|
Decimal |
Number |
Note:
If the SharePoint metadata content is larger than the WebCenter Content Data Type limitation, the SharePoint metadata is trimmed.
To map SharePoint metadata with WebCenter Content fields at farm level:
Note:
If you add a new custom field in WebCenter Content and configure it as a required field, you must update the WebCenter Content database before mapping SharePoint metadata with WebCenter Content fields.
For more information, refer to "Customizing Repository Fields and Metadata" chapter in the Oracle Fusion Middleware Managing Oracle WebCenter Content guide.
-
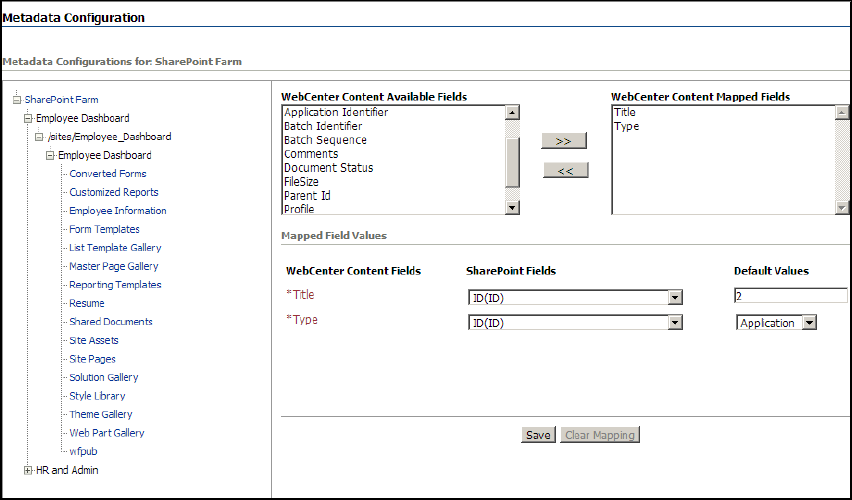
In the Content Server portal, choose the SharePoint Connector tray, then Metadata Configuration, then SharePoint farm. The metadata mapping for the farm appears in the right pane.
-
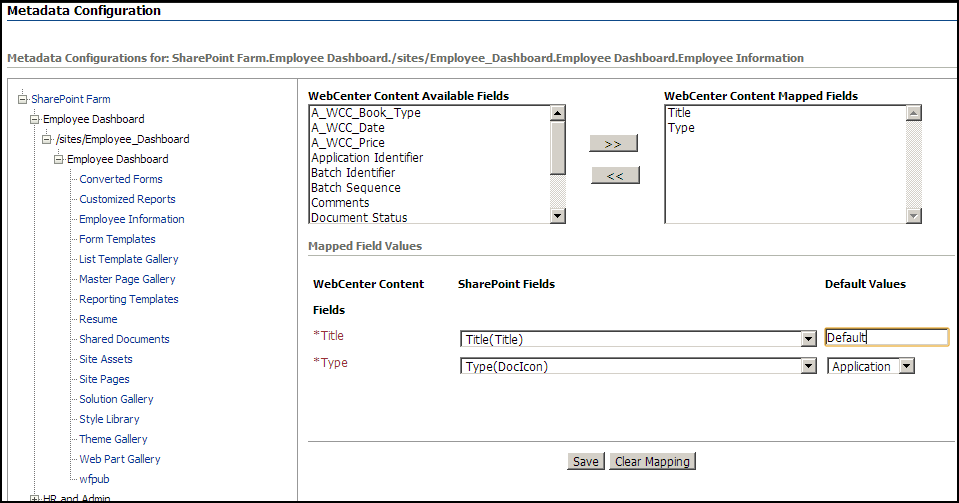
By default, the WebCenter Content Mapped Fields group and Mapped Field Values region display the fields for which you must map SharePoint metadata. The fields for which you must map metadata are highlighted in red and are marked with an asterisk (*).
Note:
Title and Type are mandatory fields.
(Optional) You can add additional fields with which you want to map SharePoint metadata. From the WebCenter Content Available Fields group, select the fields that you want to add, and then click the right arrow. The fields that you select appear in the Mapped Field Values region.
-
From the SharePoint Fields list, select the SharePoint metadata that you want to map with the WebCenter Content field.
-
In the Default Value field, enter a default value for the WebCenter Content mandatory field. When the SharePoint field does not contain any metadata, this default value is set as the value in the WebCenter Content field. If you do not enter a default value for a WebCenter Content mandatory field, an error message appears.
-
Click Ok. The SharePoint metadata is mapped with the WebCenter Content fields. The message Metadata mapping is successful for the selected SharePoint entity! appears.
3.2 Activating and Configuring the Connector
This section provides information on how you can activate the connector for a SharePoint content database, configure scope rules and conditions, configure security settings for locations, and map WebCenter Content fields with SharePoint metadata at the document library level.
3.2.1 Activating the Connector for a SharePoint Content Database
Before you activate a SharePoint content database, you must configure metadata and security mapping at farm level. For more information, see Section 3.1.3.
After you activate the connector for a SharePoint content database, the connector externalizes the documents created or updated in the site collections that belong to this SharePoint content database. When the connector externalizes a document from SharePoint, the connector verifies whether the document complies with the scope configuration rules. If the document complies with the scope configuration rules, it is stored in WebCenter Content. If the document does not comply with the scope configuration rules or if network connectivity issues occur, it is stored in the connector custom database. For more information, see Section 3.2.2.
To activate the connector for a SharePoint content database:
-
Log on to WebCenter Content as an administrator.
-
In the Content Server portal, open the SharePoint Connector tray, and then click Activation Configuration. The Activation Configuration page appears.
-
From the Web Application drop-down list, select the SharePoint application that you want to associate with WebCenter Content. The list of content databases that are associated with the application that you selected appears.
-
In the Action column, click Activate. The connector is activated on the applicable SharePoint content database. If the Activate button appears grayed, you must install and enable RBS for the content database. For more information, see Section 2.2.1.
Note:
After activating the connector on a SharePoint content database, you must not delete the user, which you configured during the connection configuration, from the user policy of the Web Application.
3.2.2 Configuring Scope Rules and Conditions
Documents are transferred to WebCenter Content only if they comply with the scope configuration rules and conditions. When the connector transfers a document from SharePoint, the connector verifies whether the document complies with the scope configuration rules and conditions. If the document complies with the scope configuration rules and conditions, the document is stored in WebCenter Content. If the document does not comply with the scope configuration rules and conditions or if network connectivity issues occur, the document is stored in the connector custom database. You can configure one scope configuration rule for each site collection, site, or document library. The child elements of a farm inherit the scope configuration rules of the parent elements.
You can configure scope configuration rules based on the following parameters:
-
Location where you want to apply this rule. You can configure the rule for site collections, sites, or document libraries.
-
File size
-
File type
Consider the following SharePoint site collection hierarchy:
-
Site collection 1
-
Site A
-
Document Library 1
-
Document Library 2
-
-
Consider the following scope configuration rules:
-
Scope Rule 1
-
Location: Site Collection 1
-
Condition 1:
-
Type = PDF
-
Size >=0
-
-
Condition 2:
-
Type = DOC
-
Size >=0
-
-
-
Scope Rule 2
-
Location: Document Library 1
-
Condition 1:
-
Type = DOC
-
Size >=1 MB
-
-
Condition 2:
-
Type = XLS
-
Size >=1 MB
-
-
-
There are no scope configuration rules for Site A and Document Library 2.
Given this SharePoint Site Collection hierarchy and scope configuration rules, consider the following scenarios and their results.
| Scenario | Result |
|---|---|
|
You upload a PDF file to Document Library 2. |
The connector transfers this document to WebCenter Content. This scenario complies with Rule 1, Condition 1 (file type=PDF, file size>=0), which was configured for Site Collection 1. Although there was no rule set for Document Library 2, it inherits scope rules from Site Collection 1. |
|
You upload a DOC file to Document Library 2. |
The connector transfers this document to WebCenter Content. This scenario complies with Rule 1, Condition 2 (file type=DOC, file size>=0), which was configured for Site Collection 1. Although there was no rule set for Document Library 2, it inherits scope rules from Site Collection 1. |
|
You upload an XLS file to Document Library 2. |
The connector does not transfer this document to WebCenter Content. There is no scope rule configured for XLS files on Document Library 2 or any of its parent elements. |
|
You upload a PDF file to Document Library 1. |
The connector transfers this document to WebCenter Content. This scenario complies with scope rule 1, Condition 1 (file type=PDF, file size>=0), which was configured for Site Collection 1. Although there was no scope rule configured for a PDF file type on Document Library 1, it inherits scope rules from Site Collection 1. |
|
You upload a 2 MB DOC file to Document Library 1. |
The connector transfers this document to WebCenter Content. This scenario complies with Rule 2, Condition 1 (file type=DOC, file size>=1 MB), which was configured for Document Library 1. |
|
You upload a 1 MB XLS file to Document Library 1. |
The connector transfers this document to WebCenter Content. This scenario complies with Rule 2, Condition 2 (file type=XLS, file size>=1 MB), which was configured for Document Library 1. |
|
You upload a .5 MB DOC file to Document Library 1. |
The connector transfers this document to WebCenter Content. Although this scenario does not comply with scope rule 2, condition 1 (file type DOC, file size >=1 MB) that was configured for Document Library 1, it complies with scope rule 1, Condition 1 (file type DOC, file size >=0), which was configured for Site Collection 1. Document Library 1 inherits scope rules from Site Collection 1. |
|
You upload a .5 MB XLS file to Document Library 1. |
The connector does not transfer this document to WebCenter Content. This scenario does not comply with any scope rules configured for Document Library 1. The file size of the XLS file that you uploaded is less than 1 MB whereas scope configuration rule 2 has a condition where the file size is set to greater than or equal to 1 MB. There are no other scope rules configured for XLS files on the parent elements of Document Library 1. |
3.2.2.1 Adding a Scope Configuration Rule
To add a scope configuration rule:
-
Log on to WebCenter Content as an administrator.
-
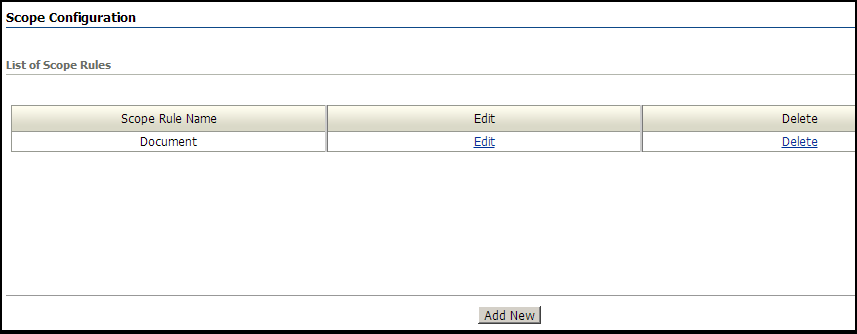
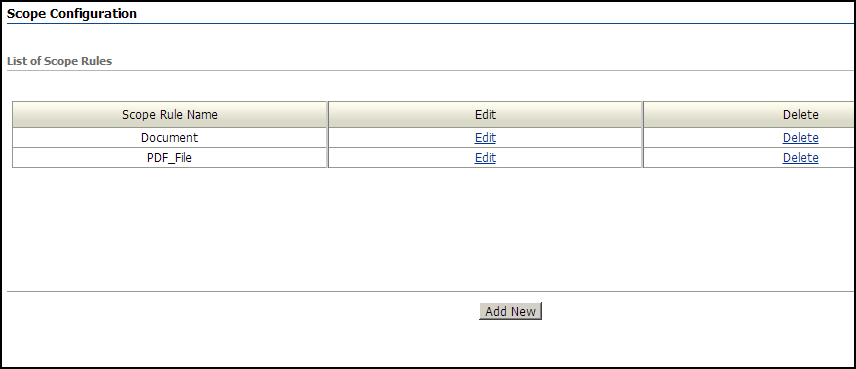
In the Content Server portal, open the SharePoint Connector tray, and then click Scope Configuration. The Scope Configuration page appears.
-
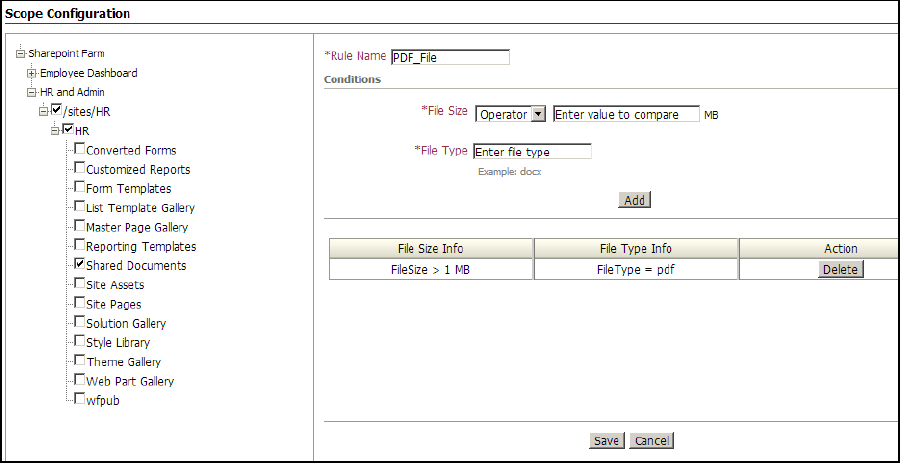
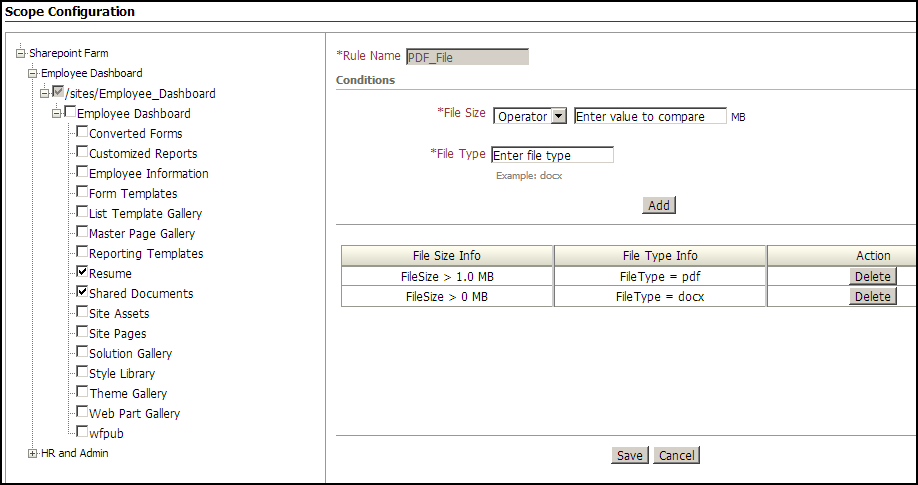
In the List of Scope Rules region, click Add New. The Scope Configuration page, where you can add a new scope configuration rule, appears.
-
In the left pane of the Scope Configuration page, select the site collection, site, or document library for which you want to configure the scope configuration rule.
-
In the Rule Name field, enter a name for the scope configuration rule.
Note:
This is a mandatory field.
-
Add a condition to a rule.
-
In the Conditions region, select an operator from the File Size drop-down list.
-
In the File Size field, select an operator and enter a file size value.
Note:
This is a mandatory field. You must enter an integer value. The value that you enter must comply with the SharePoint limitations on document upload size.
-
In the File Type field, enter the type of file that the connector must transfer from SharePoint to WebCenter Content. If you want to transfer all types of files from SharePoint to WebCenter Content, type all.
Note:
This is a mandatory field.
You must not add a dot before the file type. For example, you must use pdf instead of .pdf.
The file type is not case-sensitive. For example, you can use pdf or PDF to transfer PDF file types.
You can enter only one file type at a time. You must add a separate condition for each file type that you want to transfer to WebCenter Content in this rule. If you want to transfer all types of files from SharePoint to WebCenter Content, type all.
-
Click Add. The condition is added to this rule. To add another condition to this rule, repeat steps a to d.
-
-
Click Save. The scope configuration rule is added for the site collection, site, or document library that you selected.
3.2.2.2 Updating a Scope Configuration Rule
The List of Scope Rules table on the Scope Configuration home page displays the rules that you configured for site collections, sites, or document libraries. You can update a scope configuration rule by adding new conditions or deleting existing conditions.
To update a scope configuration rule:
-
Log on to WebCenter Content as an administrator.
-
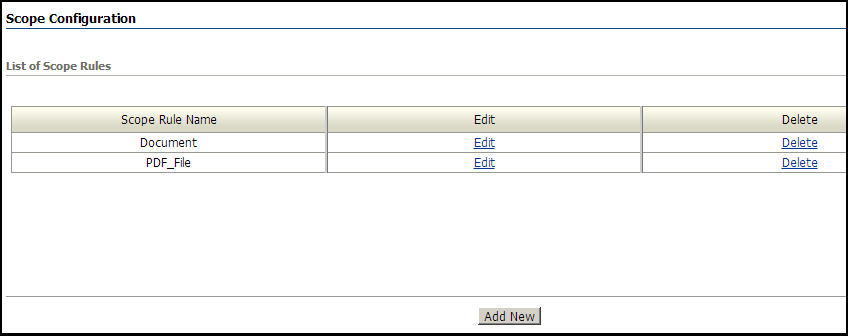
In the Content Server portal, open the SharePoint Connector tray, and then click Scope Configuration. The Scope Configuration page appears and displays the list of existing scope configuration rules.
-
In the List of Scope Rules region, click Edit in the row of the rule that you want to update. The Scope Rule Configuration page, where you can edit a rule, appears.
-
In the left pane of the Scope Configuration page, select the site collection, site, or document library for which you want to configure the scope configuration rule.
-
(Optional) Add a new condition to the scope configuration rule.
-
In the Conditions region, select an operator from the File Size drop-down list.
-
In the File Size field, select an operator and enter a file size value.
Note:
This is a mandatory field. You must enter an integer value. The value that you enter must comply with the SharePoint limitations on document upload size.
-
In the File Type field, enter the type of file that the connector must transfer from SharePoint to WebCenter Content. If you want to transfer all types of files from SharePoint to WebCenter Content, type all.
Note:
This is a mandatory field.
You must not add a dot before the file type. For example, you must use pdf instead of .pdf.
The file type is not case-sensitive. For example, you can use pdf or PDF to transfer PDF file types.
You can enter only one file type at a time. You must add a separate condition for each file type that you want to transfer to WebCenter Content in this rule. If you want to transfer all types of files from SharePoint to WebCenter Content, type all.
-
Click Add. The condition is added to this rule. To add another condition to this rule, repeat steps a to d.
-
-
(Optional) Delete a condition from the scope configuration rule. To delete a condition from a scope configuration rule, in the Conditions region, click Delete in the row of the condition that you want to delete.
-
Click Save. The scope configuration rule is updated.
3.2.2.3 Deleting a Scope Configuration Rule
You can delete a scope configuration rule that you configured for a site collection, site, or document library. After you delete a scope configuration rule, the documents that the connector transferred to WebCenter Content remain in WebCenter Content. If these documents are updated in SharePoint, the connector continues to update them in WebCenter Content. However, for new documents in SharePoint, even if they meet the scope configuration rule that you deleted, the connector does not transfer to WebCenter Content.
To delete a scope configuration rule:
-
Log on to WebCenter Content as an administrator.
-
In the Content Server portal, open the SharePoint Connector tray, and then click Scope Configuration. The Scope Configuration page appears and displays a list of existing scope configuration rules.
-
In the List of Scope Rules region, click Delete in the row of the rule that you want to delete. The scope configuration rule is deleted.
3.2.3 Configuring Security Settings for Locations (Optional)
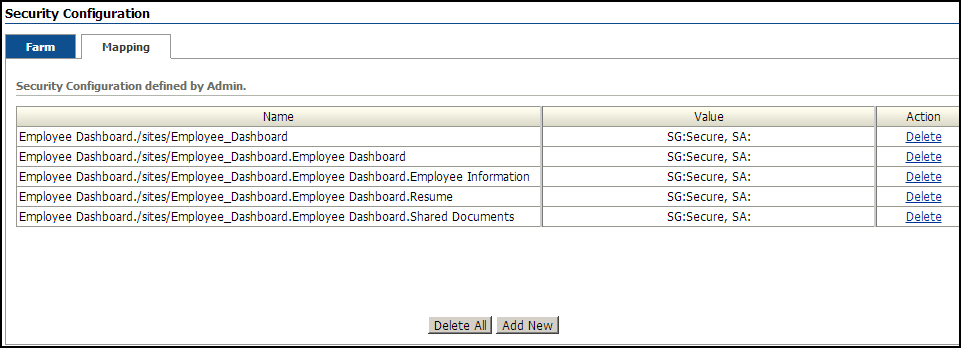
You can configure the security settings for locations, such as site collections, sites, and document libraries. The Mapped Security Configuration page lists each location for which security settings are configured.
Figure 3-10 Mapping Tab on the Security Configuration Page
Description of "Figure 3-10 Mapping Tab on the Security Configuration Page"
The following table describes the fields that appear on the Mapping tab.
| Element | Description |
|---|---|
|
Name |
Displays the site collection, site, or document library for which the security settings are configured. |
|
Value |
Displays the security group and security account that you configured for the site collection, site, or document library. |
|
Action |
Click Delete to delete the security settings that are configured for the site collection, site, or document library. For more information, see Section 3.2.3.2. |
|
Delete All |
Click Delete All to delete the security settings configured for all site collections, sites, and document libraries in the grid. For more information, see Section 3.2.3.2. |
|
Add Mappings |
Click Add Mappings to configure security settings for a site collection, site, or document library. For more information, see Section 3.2.3.1. |
3.2.3.1 Configuring Security Settings for a Site Collection, Site, or Document Library
To configure security settings:
-
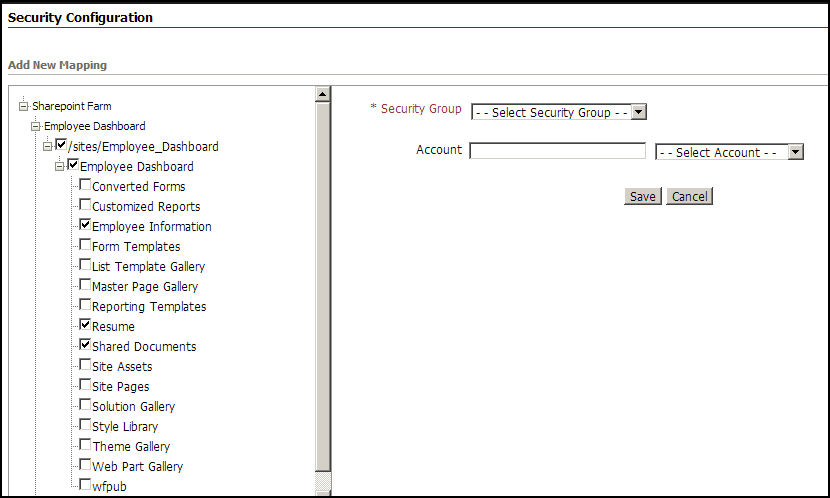
On the Mapping tab, click Add Mapping. The Add New Mapping page appears.
-
From Sharepoint Farm select the location, such as a site collection, site, or document library, for which you want to configure security settings.
Note:
You can configure security settings for multiple site collections, sites, and document libraries simultaneously.
-
From the Security Group drop-down list, select the security group that you want to configure for the locations that you selected.
Note:
The administrator must configure only those security groups to which the service account user has permissions.
-
(Optional) From the Select Account drop-down list, select the security account that you want to configure for the location that you selected. The security account that you select appears in the Account field. You can edit the account name in the Account field, if required.
-
Click Save. The grid displays the site collection, site, or document library for which the security settings are configured.
3.2.3.2 Deleting Security Settings for a Site Collection, Site, or Document Library
You can delete the security settings that you configured for a location, such as site collection, site, or document library. On the Mapping tab, click Delete in the row of the location for which you want to delete the security settings. After you delete the security settings for a location, this location automatically inherits the security settings that are configured for the immediate parent location.
You can also delete the security settings that you configured for all the site collections, sites, or document libraries that appear on the Mapped Security Configuration page. On the Mapping tab, click Delete All. After you delete all the security settings that you configured for all locations, these locations automatically inherit the security settings that are configured at the farm level.
3.2.4 Mapping WebCenter Content Fields with SharePoint Metadata at the Document Library Level (Optional)
You can also map WebCenter Content fields with SharePoint metadata at the document library level. Document library level metadata mapping takes precedence over the farm level metadata mapping. If you add a new document library to SharePoint, the document library inherits the default metadata mapping at the farm level.
To map SharePoint metadata with WebCenter Content fields at the document library level:
Note:
If you add a new custom field in WebCenter Content and configure it as a required field, you must update the WebCenter Content database before mapping SharePoint metadata with WebCenter Content fields. If you do not update the database, the system displays an error message.
-
In the Content Server portal, open the SharePoint Connector tray, and then click Metadata Configuration. The Metadata Configuration page appears.
-
On the navigation tree, expand the SharePoint farm, and then select the appropriate document library. The metadata mapping for the document library that you select appears in the right pane.
-
By default, the WebCenter Content Mapped Fields group and Mapped Field Values region display the fields for which you must map SharePoint metadata. The fields for which you must map metadata appear red in color and are marked with an asterisk (*). The fields that you select appear in the Mapped Field Values region.
Note:
Title and Type are mandatory fields.
(Optional) You can add additional fields with which you want to map SharePoint metadata. From the WebCenter Content Available Fields group, select the fields that you want to add, and then click the right arrow.
-
From the SharePoint Fields list, select the SharePoint metadata that you want to map with the WebCenter Content field.
-
In the Default Value field, enter a default value for the WebCenter Content mandatory field. When the SharePoint field does not contain any metadata, this default value is set as the value in the WebCenter Content field. If you do not enter a default value for a WebCenter Content mandatory field, an error message appears.
-
Click Ok. The SharePoint metadata is mapped with the WebCenter Content fields. The message Metadata mapping is successful for the selected SharePoint entity! appears.
Note:
Click Reset to clear fields. The page enables you to map SharePoint metadata with WebCenter Content fields again.
