7 Working with Packages
This chapter describes how to work with Packages in Oracle Data Integrator. The Load Sales Administration package is used as an example. An introduction to Packages and automating data integration between applications is provided.
This chapter includes the following sections:
7.1 Introduction
This section provides an introduction to automating data integration using packages in Oracle Data Integrator.
7.1.1 Automating Data Integration Flows
The automation of the data integration flows is achieved by sequencing the execution of the different steps (interfaces, procedures, and so forth) in a package and by producing a production scenario containing the ready-to-use code for each of these steps.
This chapter describes how to sequence the execution of the different steps. How to produce the production scenario is covered in Chapter 9, "Deploying Integrated Applications".
7.1.2 Packages
A Package is made up of a sequence of steps organized into an execution diagram. Packages are the main objects used to generate scenarios for production. They represent the data integration workflow and can perform, for example, the following jobs:
-
Start a reverse-engineering process on a datastore or a model
-
Send an email to an administrator
-
Download a file and unzip it
-
Define the order in which interfaces must be executed
-
Define loops to iterate over execution commands with changing parameters
In this Getting Started exercise, you will load your Sales Administration application using a sequence of interfaces. Since referential constraints exist between tables of this application, you must load target tables in a predefined order. For example, you cannot load the TRG_CUSTOMER table if the TRG_CITY table has not been loaded first.
In the Section 7.2, "Load Sales Administration Package Example", you will create and run a package that includes interfaces that are included in the Demo project and interfaces that you've created in Chapter 6, "Working with Integration Interfaces".
7.1.2.1 Scenarios
A scenario is designed to put a source component (interface, package, procedure, variable) into production. A scenario results from the generation of code (SQL, shell, and so forth) for this component.
Once generated, the code of the source component is frozen and the scenario is stored inside the Work repository. A scenario can be exported and then imported into different production environments.
Note:
Once generated, the scenario's code is frozen, and all subsequent modifications of the package and/or data models which contributed to its creation will not affect it. If you want to update a scenario - for example because one of its interfaces has been changed - then you must generate a new version of the scenario from the package.
See "Working with Scenarios" in the Oracle Fusion Middleware Developer's Guide for Oracle Data Integrator for more information.
In Chapter 9, "Deploying Integrated Applications", you will generate the LOAD_SALES_ADMINISTRATION scenario from a package and run this scenario from Oracle Data Integrator Studio.
7.2 Load Sales Administration Package Example
This section contains the following topics:
7.2.1 Purpose
The purpose of the Load Sales Administration package is to define the complete workflow for the loading of the Sales Administration application and to set the execution sequence.
7.2.2 Developments Provided with Oracle Data Integrator
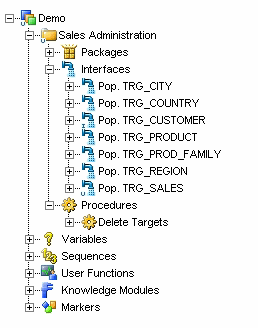
The demo repository is delivered with a number of developments. The Demo project now contains the following developments as shown in Figure 7-1:
-
Seven interfaces:
-
Pop. TRG_CITY: an interface that populates the TRG_CITY table. This interface is delivered with the demo repository.
-
Pop. TRG_COUNTRY: an interface that populates the TRG_COUNTRY table. This interface is delivered with the demo repository.
-
Pop. TRG_CUSTOMER: an interface that populates the TRG_CUSTOMER table. This interface is created in Section 6.1, "Pop. TRG_CUSTOMER Interface Example".
-
Pop. TRG_PRODUCT: an interface populates the TRG_PRODUCT table. This interface is delivered with the demo repository.
-
Pop. TRG_PROD_FAMILY: an interface that populates the TRG_PROD_FAMILY table. This interface is delivered with the demo repository.
-
Pop. TRG_REGION: an interface that populates the TRG_REGION table. This interface is delivered with the demo repository.
-
Pop. TRG_SALES: an interface that populates the TRG_SALES table. This interface is created in Section 6.2, "Pop. TRG_SALES Interface Example".
-
-
One procedure:
The Delete Targets procedure empties all of the tables in the Sales Administration application. This operation is performed by using a Delete statement on each table.
7.2.3 Problem Analysis
In order to load the Sales Administration application correctly (in accordance with the referential integrity constraints), the tasks must be executed in the following order:
-
Empty the Sales Administration tables with the Delete Targets procedure
-
Load the TRG_COUNTRY table with the Pop. TRG_COUNTRY interface
-
Load the TRG_REGION table with the Pop. TRG_REGION interface
-
Load the TRG_CITY table with the Pop. TRG_CITY interface
-
Load the TRG_PROD_FAMILY table with the Pop. TRG_PROD_FAMILY interface
-
Load the TRG_PRODUCT table with the Pop. TRG_PRODUCT interface
-
Load the TRG_CUSTOMER table with the Pop. TRG_CUSTOMER interface
-
Load the TRG_SALES table with the Pop. TRG_SALES interface
Such an integration process is built in Oracle Data Integrator in the form of a Package.
7.2.4 Creating the Package
This section describes how to create the Load Sales Administration Package. To create the Load Sales Administration Package perform the following procedure:
7.2.4.1 Create a New Package
To create a new Package:
-
In Designer Navigator, expand the Demo project node in the Projects accordion.
-
Expand the Sales Administration node.
-
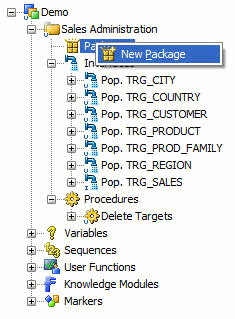
In the Sales Administration folder, right-click the Packages node and select New Package as shown in Figure 7-2.
The Package Editor is displayed.
-
On the Definition tab of the Package Editor, enter the name of your Package (Load Sales Administration) in the Name field.
-
From the File main menu, select Save.
7.2.4.2 Insert the Steps in the Package
To insert the steps in the Load Sales Administration Package:
-
In the Package Editor, go the Diagram tab.
-
In the Diagram tab, select the following components one by one from the Projects accordion and drag-and-drop them into the diagram:
-
Delete Targets (Procedure)
-
Pop. TRG_COUNTRY
-
Pop. TRG_REGION
-
Pop. TRG_CITY
-
Pop. TRG_CUSTOMER
-
Pop. TRG_PROD_FAMILY
-
Pop. TRG_PRODUCT
-
Pop. TRG_SALES
These components are inserted in the Package and appear as steps in the diagram. Note that the steps are not sequenced yet.
-
7.2.4.3 Define the Sequence of Steps in the Package
Once the steps are created, you must reorder them into a data processing chain. This chain has the following rules:
-
It starts with a unique step defined as the First Step.
-
Each step has two termination states: Success or Failure.
-
A step in failure or success can be followed by another step, or by the end of the Package.
-
In case of failure, it is possible to define a number of retries.
A Package has one entry point, the First Step, but several possible termination steps.
The Load Sales Administration Package contains only steps on Success.
To define the first step in the Load Sales Administration Package:
Note:
If you have dragged and dropped the Package components in the order defined in Section 7.2.4.2, "Insert the Steps in the Package", the Delete Target procedure is already identified as the first step and the first step symbol is displayed on the step's icon. If this is the case, define the next steps on success.
-
Select and right-click the Delete Target procedure step.
-
Select First Step from the contextual menu.
A small green arrow appears on this step.
Defining the Next Steps on Success
To define the next steps on success:
-
In the Package toolbar tab, select Next Step on Success.

-
Select the Delete Targets step.
-
Keep the mouse button pressed and move the cursor to the icon of the step that must follow in case of a success (here the Pop. TRG_COUNTRY step) and release the mouse button.
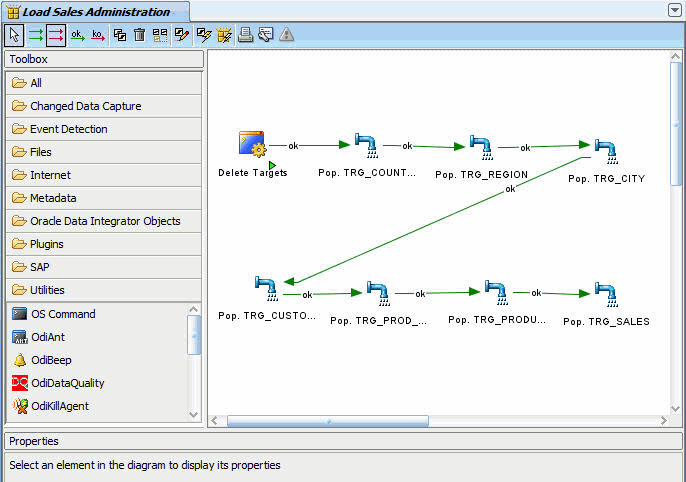
A green arrow representing the success path between the steps, with an ok label on it appears.
-
Repeat this operation to link all your steps in a success path sequence. This sequence should be:
-
Delete Targets (First Step)
-
Pop. TRG_COUNTRY
-
Pop. TRG_REGION
-
Pop. TRG_CITY
-
Pop. TRG_CUSTOMER
-
Pop. TRG_PROD_FAMILY
-
Pop. TRG_PRODUCT
-
Pop. TRG_SALES
The resulting sequence appears in the Package diagram as shown in Figure 7-3.
-
-
From the File main menu, select Save.
The package is now ready to be executed.


