8 Attaching Policies to Web Services
This chapter includes the following sections:
Viewing the Policies That are Attached to a Web Service
The following sections describe how to view the policies that are attached to a Web service using Fusion Middleware Control and the WebLogic Scripting Tool (WLST).
Using Fusion Middleware Control
To view the policies that are attached to a Web service:
-
Navigate to the home page for the Web service, as described in "Navigating to the Web Services Summary Page for an Application".
-
In the Web Service Details section of the page, click on the plus (+) for the Web service to display the Web service endpoints if they are not already displayed.
-
Click the name of a endpoint to navigate to the Web Service Endpoints page for a particular Web service.
-
Click the OWSM Policies tab.
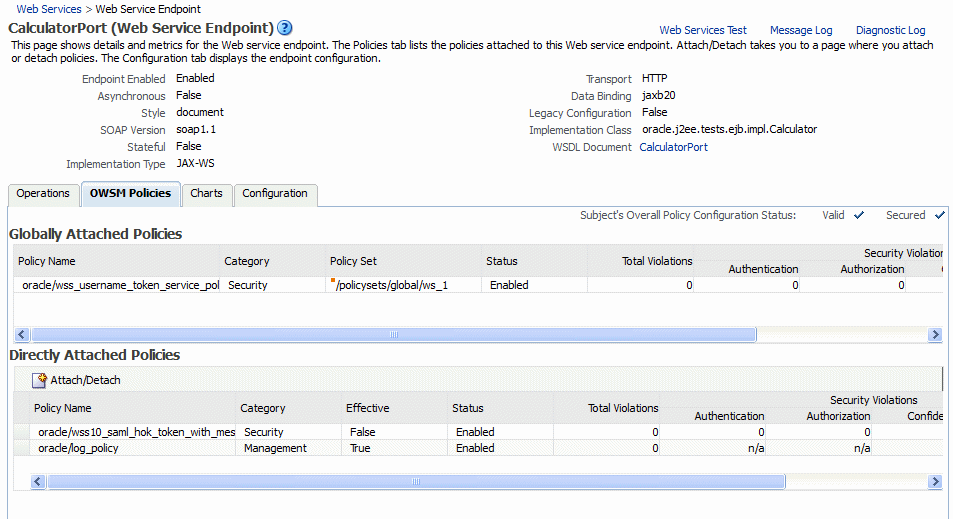
Figure 8-1 shows the screen display for an Oracle Infrastructure Web service endpoint that has both globally and directly attached policies. The output displays the globally attached policies that are in effect for the endpoint, all directly attached policies, and whether the endpoint has a valid configuration and is secure. You can view the run-time constraints, if any, configured for a policy set by placing your mouse over the policy set name, or clicking the red dot at the front of the policy set name. For more information about run-time constraints, see "Specifying Run-time Constraints in Policy Sets".
Because you can specify the priority of a globally or directly attached policy, as described in "Specifying the Priority of a Policy Attachment", the Effective field for a directly attached policy indicates if it is in effect for the endpoint. Note that to simplify endpoint management, all directly attached policies are shown in the output regardless of whether they are in effect. In contrast, only globally attached policies that are in effect for the endpoint are displayed. For details about effective policies for an endpoint, see "How the Effective Set of Policies is Calculated".
Figure 8-1 Policies Attached to an Oracle Infrastructure Web Service Endpoint
Description of "Figure 8-1 Policies Attached to an Oracle Infrastructure Web Service Endpoint"
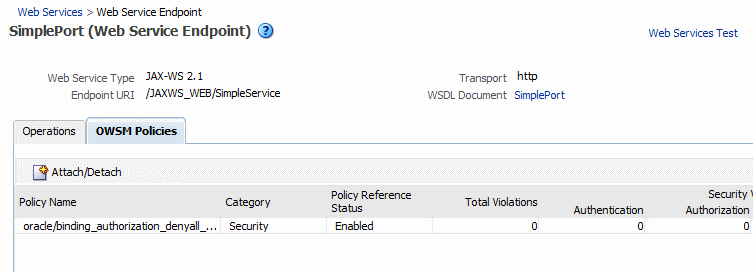
Figure 8-2 shows the screen display for a WebLogic Java EE endpoint. Only policies that are directly attached to an endpoint are displayed. Globally attached policies are not available.
Figure 8-2 Policies Attached to a WebLogic Java EE Web Service Endpoint
Description of "Figure 8-2 Policies Attached to a WebLogic Java EE Web Service Endpoint"
Using WLST
Use the following procedure to view the policies that are attached to a Web service:
-
Connect to the running instance of WebLogic Server to which the application is deployed as described in "Accessing the Web Services Custom WLST Commands".
-
Use the
listWebServicesWLST command to display a list of the Web services in your application as described in "Viewing the Web Services in Your Application". -
Use the
listWebServicePortscommand to display the port name and endpoint URL for a Web service.listWebServicePorts(application,moduleOrCompName,moduleType,serviceName)
For example, to display the port for the
WsdlConcreteService:wls:/wls-domain/serverConfig> listWebServicePorts("/wls-domain/AdminServer/jaxwsejb30ws", "jaxwsejb","web","WsdlConcreteService") WsdlConcretePort http://host.example.com:7001/jaxwsejb/WsdlAbstract
-
Use the
listWebServicePoliciescommand to view the policies that are attached to a Web service port.listWebServicePolicies(application,moduleOrCompName,moduleType,serviceName,subjectName)
For example, to view the policies attached to the
WsdlConcretePortport and any policy override settings:wls:/wls_domain/serverConfig> listWebServicePolicies("/wls_domain/AdminServer/jaxwsejb30ws", "jaxwsejb","web","WsdlConcreteService","WsdlConcretePort") WsdlConcretePort : addressing : oracle/wsaddr_policy , enabled=true management : oracle/log_policy , enabled=true security : oracle/wss_username_token_service_policy, enabled=true Attached policy or policies are valid; endpoint is secure.
Attaching Policies to Web Services
The following sections describe how to attach policies to a single subject, to multiple subjects (bulk attachment), and to validate the subject once policies are attached:
Note:
For WebLogic Java EE Web services policy attachment:
-
Only Oracle WSM security policies can be attached.
-
Oracle WSM policies and WebLogic Web Service policies cannot be attached to the same endpoint. If a WebLogic Java EE endpoint has WebLogic policies attached, you cannot attach Oracle WSM security policies. Note that WebLogic policies can be attached using the WebLogic Server Administration Console.
Attaching a Policy to a Single Subject
A subject is an entity to which a policy can be associated. You can attach one or more policies to a subject.
The order in which policies are attached to a subject or appear in the list of attached policies does not determine the order in which policies are executed. As a message is passed between the client and the Web service, the order of the interceptors in the policy interceptor chain determines the order in which the policies are executed.
See "How Policies are Executed" for more information.
Note:
Policy attachment is not synchronized automatically for SOA, ADF, and WebCenter services in a cluster. When using SOA, ADF, and WebCenter services in a cluster, you must attach and/or detach policies to each instance of the cluster. This issue does not apply to WebLogic Java EE Web services and SOA composite services.
Attaching a Policy to a Web Service Using Fusion Middleware Control
Follow this procedure to attach a policy to a single Web service endpoint. See "Attaching a Policy to Multiple Subjects (Bulk Attachment)" to attach a policy to multiple Web services at the same time.
To attach a policy to a Web service:
-
Navigate to the home page for the Web service, as described in "Navigating to the Web Services Summary Page for an Application".
-
In the Web Service Details section of the page, click on the plus (+) for the Web service to display the Web service endpoints, if they are not already displayed.
-
Click the name of a endpoint to navigate to the Web Service Endpoints page for a particular Web service.
-
Click the OWSM Policies tab.
The policies that are already globally and directly attached to the endpoint are displayed as shown in Figure 8-1.
-
Click Attach/Detach.
-
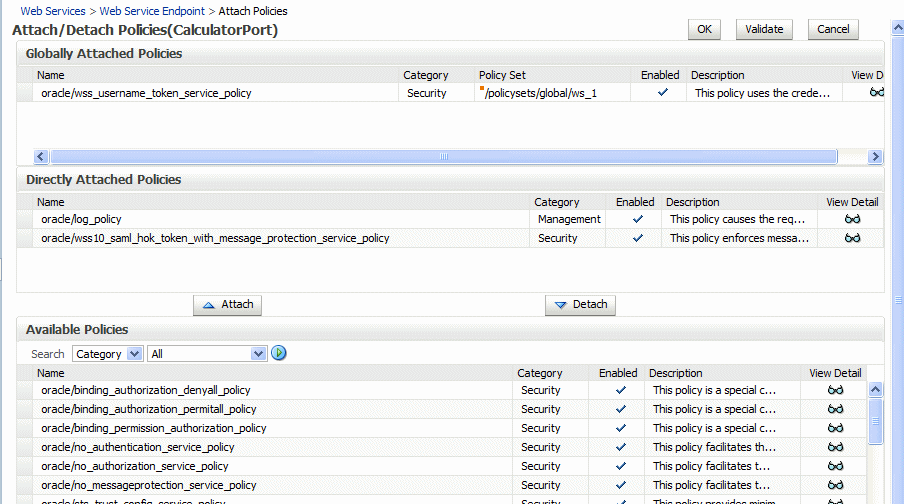
Select a policy from the Available Policies list, and click Attach. See Figure 8-3.
Figure 8-3 Attaching Policies to a Web Service
Description of "Figure 8-3 Attaching Policies to a Web Service "
-
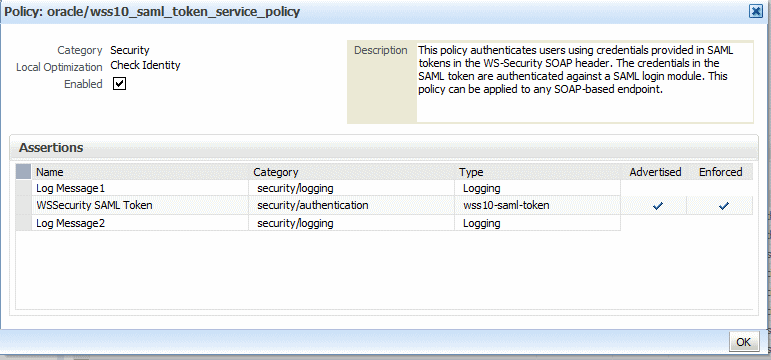
To view details about a policy, select the policy and click the View Detail icon. A pop-up window provides a full read-only description of the policy and lists the assertions that it contains. See Figure 8-4. Click OK when you are finished reviewing the details of the policy.
Figure 8-4 Viewing Details about a Policy
Description of "Figure 8-4 Viewing Details about a Policy"
-
Continue selecting and attaching policies. When you are finished, click Validate to verify that the combination of policies selected is valid.
-
Click OK.
-
The Web Service Endpoint page now displays the attached policy on the OWSM Policies tab as shown in Figure 8-1.
Note:
The output displays the globally attached policies that are in effect for the endpoint, all directly attached policies, and whether the endpoint has a valid configuration and is secure. Because you can specify the priority of a globally or directly attached policy, as described in "Specifying the Priority of a Policy Attachment", the Effective field for a directly attached policy indicates if it is in effect for the endpoint. Note that to simplify endpoint management, all directly attached policies are shown in the output regardless of whether they are in effect. In contrast, only globally attached policies that are in effect for the endpoint are displayed. For details about effective policies for an endpoint, see "How the Effective Set of Policies is Calculated".
-
For ADF and WebCenter applications, restart the Web service application. You do not need to restart a SOA composite or a WebLogic Java EE Web service application.
Note:
You need to wait approximately 30 seconds (or the equivalent of the configured Graceful Shutdown Timeout time) between stopping and restarting the application. During this time, the server is allowing all global transactions to complete before shutting down the application. If you do not wait the configured Graceful Shutdown Timeout time, then the application will not be restarted appropriately and you will not be able to access it. To avoid waiting the graceful shutdown timeout period, you can restart the application twice.
Attaching a Policy to a Web Service Using WLST
Use the following procedure to attach (or detach) a single policy, or multiple policies, to a single Web service port using WLST.
-
View the list of policies currently attached to the port as described in "Using WLST" in "Viewing the Policies That are Attached to a Web Service".
-
View the list of available policies as described in "Displaying a List of the Available Policies Using WLST".
-
To attach policies, do one of the following:
-
Use the
attachWebServicePolicycommand to attach a single policy to a Web service port. Specify the policy to be attached using thepolicyURIargument. If you specify a policy that is already attached or exists, then this command enables the policy if it is disabled.attachWebServicePolicy(application, moduleOrCompName, moduleType, serviceName, subjectName, policyURI, [subjectType=None]
For example, to attach the policy
oracle/wss_username_token_service_policyto theWsdlConcretePortof theWsdlConcreteService, use the following command:wls:/wls_domain/serverConfig> attachWebServicePolicy("/wls_domain/AdminServer/jaxwsejb30ws", "jaxwsejb","web","WsdlConcreteService","WsdlConcretePort", "oracle/wss_username_token_service_policy")
-
Use the
attachWebServicePoliciescommand to attach multiple policies to a Web service port. Specify the policies to be attached using thepolicyURIsargument. If any of the policies that you specify in this command are already attached, then this command enables the policies that are already attached (if they are disabled), and attaches the others.attachWebServicePolicies(application, moduleOrCompName, moduleType, serviceName, subjectName, policyURIs, [subjectType=None]
For example, to attach the policies
oracle/wss_username_token_service_policyandoracle/wsrm10_policyto theWsdlConcretePortof theWsdlConcreteService, use the following command:wls:/wls_domain/serverConfig> attachWebServicePolicies("/wls_domain/AdminServer/jaxwsejb30ws", "jaxwsejb","web","WsdlConcreteService","WsdlConcretePort", ["oracle/wss_username_token_service_policy","oracle/wsrm10_policy"]) Please restart application to uptake the policy changes.
Note:
The policyURIs are validated through the Oracle WSM Policy Manager APIs if the wsm-pm application is installed on WebLogic Server and is available. If the policy validation fails, a message is displayed and the command is not executed.
If the wsm-pm application is not installed or is not available, these commands are not executed.
For additional information about validating policies, see "Validating Policy Subjects".
-
-
To detach policies, do one of the following:
-
Use the
detachWebServicePolicycommand to detach a single policy from a Web service port. Specify the policy to be detached using thepolicyURIargument.detachWebServicePolicy(application, moduleOrCompName, moduleType, serviceName, subjectName, policyURI, [subjectType=None]
For example, to detach the policy
oracle/wss_username_token_service_policyfrom theWsdlConcretePortof theWsdlConcreteService, use the following command:wls:/wls_domain/serverConfig> detachWebServicePolicy("/wls_domain/AdminServer/jaxwsejb30ws", "jaxwsejb","web","WsdlConcreteService","WsdlConcretePort", "oracle/wss_username_token_service_policy")
-
Use the
detachWebServicePoliciescommand to detach multiple policies from a Web service port. Specify the policies to be detached using thepolicyURIsargument.detachWebServicePolicies(application, moduleOrCompName, moduleType, serviceName, subjectName, policyURIs, [subjectType=None]
For example, to detach the policies
oracle/wss_username_token_service_policyandoracle/wsrm10_policyto theWsdlConcretePortof theWsdlConcreteService, use the following command:wls:/wls_domain/serverConfig> detachWebServicePolicies("/wls_domain/AdminServer/jaxwsejb30ws", "jaxwsejb","web","WsdlConcreteService","WsdlConcretePort", ["oracle/wss_username_token_service_policy","oracle/wsrm10_policy"]) Please restart application to uptake the policy changes.
-
-
For ADF and WebCenter applications, restart the Web service application. You do not need to restart a SOA composite.
Note:
You need to wait approximately 30 seconds (or the equivalent of the configured Graceful Shutdown Timeout time) between stopping and restarting the application. During this time, the server is allowing all global transactions to complete before shutting down the application. If you do not wait the configured Graceful Shutdown Timeout time, then the application will not be restarted appropriately and you will not be able to access it. To avoid waiting the graceful shutdown timeout period, you can restart the application twice.
For more information about the WLST commands and their arguments, see "Web Services Custom WLST Commands" in WebLogic Scripting Tool Command Reference.
Attaching a Policy to Multiple Subjects (Bulk Attachment)
From the Application pages, you can attach one or more policies to one or more Web services.
Notes:
The bulk attachment mechanism does not perform validation on the policies that you attach.
The bulk attachment mechanism does not prevent you from creating an unsupported configuration such as having multiple authentication policies, or from attaching the same policy multiple times, and so forth.
Policy attachment is not synchronized automatically for SOA, ADF, and WebCenter services in a cluster. When using SOA, ADF, and WebCenter services in a cluster, you must attach and/or detach policies to each instance of the cluster. This issue does not apply to WebLogic Java EE Web services and SOA composite services.
To attach a policy to multiple Web services within an application:
-
In the navigator pane, expand WebLogic Domain to show the domain in which you want to attach the policy.
-
Select the domain, and then the instance of the server to which you want to attach the policy. The server can be an Administration Server or a Managed Server.
-
Using Fusion Middleware Control, click WebLogic Server and then Web Services.
-
From the Web Services Summary page, click Attach Policies.
-
From the Select Policy Subjects page, select one or more applications to which to attach a policy, as shown in Figure 8-5.
Use the Search control to search for a particular policy subject type, a particular application name, or the type of Web service to which you want to attach a policy. Valid policy subject types include: Web Service Endpoint, Web Service Client, Web Service Connection, SOA Component, SOA Service, SOA Reference, Asynchronous Callback Client, or WLS Web Service Endpoint. For more information about asynchronous callback clients, see "Developing Asynchronous Web Services" in Developer's Guide for Oracle Infrastructure Web Services.
For example, if you choose to search for a policy subject type of Web Service Client, only available Web service clients, if any, are displayed.
To select more than one application, press the Ctrl key and click the applications.
-
Click Next.
-
From the Select Policies page, select one or more policies that you want to attach to the selected applications, as shown in Figure 8-6. The Select Policies page shows only those policies that you can apply to all of the subjects selected in the previous step.
Note:
You can attach only security policies to WebLogic Java EE Web service endpoints using Fusion Middleware Control. If you attempt to attach a non-security policy to a WebLogic Web service endpoint, the action is ignored.
To select more than one policy, press the Ctrl key and click the policies you want to attach.
-
Click Next.
The Summary page displays the applications you selected and the policies that will be attached to those applications, as shown in Figure 8-7.
-
Click Back to make any changes, or click Attach to complete the bulk attachment.
-
For ADF and WebCenter applications, restart the Web service application. You do not need to restart a SOA composite or a WebLogic Java EE Web service application.
Note:
You need to wait approximately 30 seconds (or the equivalent of the configured Graceful Shutdown Timeout time) between stopping and restarting the application. During this time, the server is allowing all global transactions to complete before shutting down the application. If you do not wait the configured Graceful Shutdown Timeout time, then the application will not be restarted appropriately and you will not be able to access it. To avoid waiting the graceful shutdown timeout period, you can restart the application twice.
Validating Policy Subjects
The type and number of assertions within a policy may be valid and, therefore, a policy may be internally consistent and valid. However, when more than one policy is attached to a policy subject, the combination of policies must also be valid. Specifically, the following must be true:
Note:
When you view a policy, only the major category, such as security, is displayed. To see the subtype (such as authorization), see the Assertion Details section of the assertion template on which the policy is based.
-
Only one MTOM policy can be attached to a policy subject.
-
Only one Reliable Messaging policy can be attached to a policy subject.
-
Only one WS-Addressing policy can be attached to a policy subject.
-
Only one Security policy with subtype authentication can be attached to a subject.
-
Only one Security policy with subtype sts-config can be attached to a subject.
-
If an authentication policy and an authorization policy are both attached to a policy subject, the authentication policy must precede the authorization policy.
-
There may be one or more security policies attached to a policy subject. For example, a security policy can contain an assertion that belongs to the authentication or message protection subtype categories, or an assertion that belongs to both subtype categories. The second security policy contains an assertion that belongs to the authorization subtype.
-
If the policies attached to a subject are exact duplicates of each other, including any configuration overrides, the policy attachment is viewed as a duplicate and the configuration is valid.
-
If the policy requires a particular transport protocol (for example, HTTP or HTTPS), it checks to see that the Web service uses the expected transport protocol. (The check is done at run time.)
The run time automatically enforce STS-Trust configuration policies first and authorization policies last
You cannot use policy subject validation to check the validity of multiple policy subjects when you use the bulk attachment feature. After you attach the policies to your subjects with this feature, you must validate each subject individually.
Note:
The policy subject validation does not validate the XML schema of the policy. Therefore, if you manually edit the policy file, you must use another tool to check that the XML is valid.
To check for policy subject validation:
-
From the navigator pane, click the plus sign (+) for the Application Deployments folder to expose the applications in the farm, and select the application.
The Application Deployment home page is displayed.
-
Using Fusion Middleware Control, click Application Deployment, then click Web Services.
This takes you to the Web Services summary page for your application.
-
In the Web Service Details section of the page, click on the plus (+) for the Web service to display the Web service ports if they are not already displayed.
-
Click the name of the port to navigate to the Web Service Endpoints page.
-
Click the Policies tab.
-
Click Attach/Detach.
-
Click Validate.
If there is a validation error, a dialog box appears describing the error. Fix the error and do a policy subject validation again.
Attaching Policies to Web Service Clients
This section describes how to attach policies to SOA references, connection-based Web service clients (such as an ADF DC Web service client, ADF JAX-WS Indirection Proxy, or WebCenter client), asynchronous Web service Callback clients and Java EE Web service clients.
When using WLST to attach policies to a Web service client, the steps that you follow are the same for all Web service client types. The argument settings specify the type of client to which you are attaching the policy. For more information, see "Attaching Policies to Web Service Clients Using WLST".
Attaching Policies to Web Service Clients Using Fusion Middleware Control
In Fusion Middleware Control, the steps you follow to attach a policy to a Web service client are the same for all Web service client types. However, how you navigate to the Web service client varies based on the application type, as described in the following sections.
Attaching Policies to SOA References
The following procedures describe how to attach policies to SOA references. For more information about developing SOA references, see Oracle Fusion Middleware Developer's Guide for Oracle SOA Suite.
To attach policies to a SOA reference:
-
View the SOA reference, as described in "Viewing SOA References".
-
Select the Policies tab.
-
In the Directly Attached Policies section of the page, click Attach/Detach.
-
From the Available Policies section of the page, select one or more policies that you want to attach. Click Validate to validate the policy, or Check Services Compatibility to make sure that the client policies are compatible with the service policies.
-
Click Attach when you are sure that you want to attach the policy or policies.
-
Click OK.
Attaching Policies to Connection-Based Web Service Clients
The following procedure describes how to attach policies to a connection-based Web service client such as an ADF DC Web service client, ADF JAX-WS Indirection Proxy, or WebCenter client.
For more information about developing ADF DC Web service clients, see "Using ADF Model in a Fusion Web Application" in Oracle Fusion Middleware Fusion Developer's Guide for Oracle Application Development Framework.
To attach policies to a connection-based Web service client:
-
Use Fusion Middleware Control to expand Application Deployments.
-
Select the target application.
-
From the Application Deployment menu, select ADF, and then Configure ADF Connections.
-
On the ADF Connections Configuration page, select a row in the Web Service Connections list, and then use the Configure Web Service list to configure the Web Service client.
-
On the Web Service Client page, select the OWSM Policies tab.
-
In the Directly Attached Policies section of the page, click Attach/Detach.
-
On the Available Policies section of the page, select one or more policies that you want to attach. Click Validate to validate the policy, or Check Services Compatibility to make sure that the client policies are compatible with the service policies.
-
Click Attach when you are sure that you want to attach the policy or policies.
-
Click OK.
Attaching Policies to Asynchronous Web Service Callback Clients
The following procedure describes how to attach policies to an asynchronous Web service Callback client. For more information about developing asynchronous Web services and callback clients, see "Developing Asynchronous Web Services" in Developer's Guide for Oracle Infrastructure Web Services.
To attach policies to an asynchronous Callback client:
-
Navigate to the endpoint for the asynchronous Web service, as described in "Viewing the Details for a Web Service Endpoint".
-
Click Callback Client in the upper right portion of the endpoint page.
-
Click the Policy tab.
-
Click Attach/Detach.
-
On the Available Policies portion of the page, select one or more policies that you want to attach. Click Validate to validate the policy, or Check Services Compatibility to make sure that the client policies are compatible with the service policies.
-
Click Attach when you are sure that you want to attach the policy or policies.
-
Click OK.
Attaching Policies to Java EE Web Service Clients
This section describes how to attach a policy to a WebLogic Java EE Web service client.
Notes:
For WebLogic Java EE Web service client policy attachment:
-
Only Oracle WSM security policies can be attached.
-
Oracle WSM policies and WebLogic Web service policies cannot be attached to the same endpoint. If a WebLogic Java EE endpoint has WebLogic policies attached, you cannot attach Oracle WSM security policies. Note that WebLogic policies can be attached using the WebLogic Server Administration Console or programmatically.
-
Oracle recommends that you use Fusion Middleware Control or WLST to attach Oracle WSM policies to a Web service client post-deployment. If you attach Oracle WSM policies programmatically at development time, you will not be able to modify or delete the policies after the client application is deployed.
To attach a policy to a Java EE Web service client:
-
Navigate to the home page for the Java EE Web service, as described in "Navigating to the Web Services Summary Page for an Application".
-
Select the Java EE Web Service Clients tab to view the clients in the application.
-
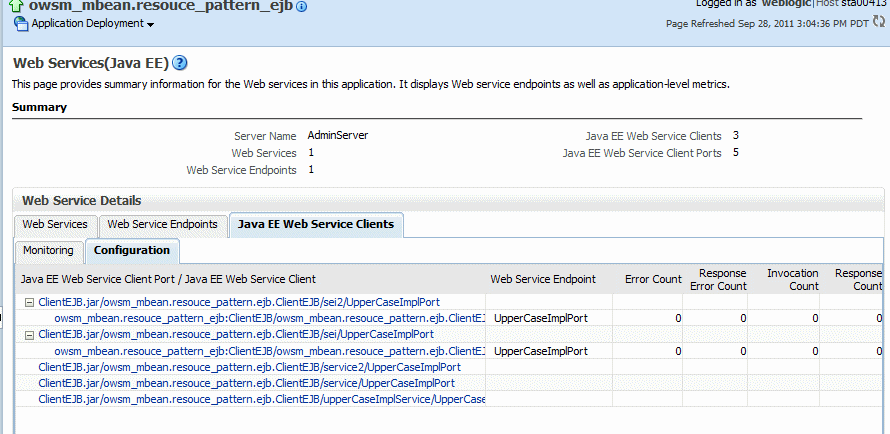
Select the Configuration tab to view the available client ports to which you can attach policies, as shown in Figure 8-8.
Notes:
If a port is associated with a run-time client instance, click the + node to expand the port name to view the instance with which it is associated. You can also attach policies to ports that are defined in the client application but are not currently associated with a run-time client instance.
To ensure that the latest policies are always enforced, it is important to follow Oracle's recommended best practices when developing your WebLogic Java EE Web service client. That is, you should explicitly close client instances when processing is complete. If the client instances are not closed, any policy changes in the repository are not enforced on the client. For more information about the best practices, see "Roadmaps for Developing Web Service Clients" in Programming Advanced Features of JAX-WS Web Services for Oracle WebLogic Server.
-
Click the name of the client port to navigate to the Java EE Web Service Client Port page.
-
Click Attach/Detach.
-
In the Available Policies section of the page, select one or more policies that you want to attach. Click Validate to verify that the combination of policies selected is valid, then click OK.
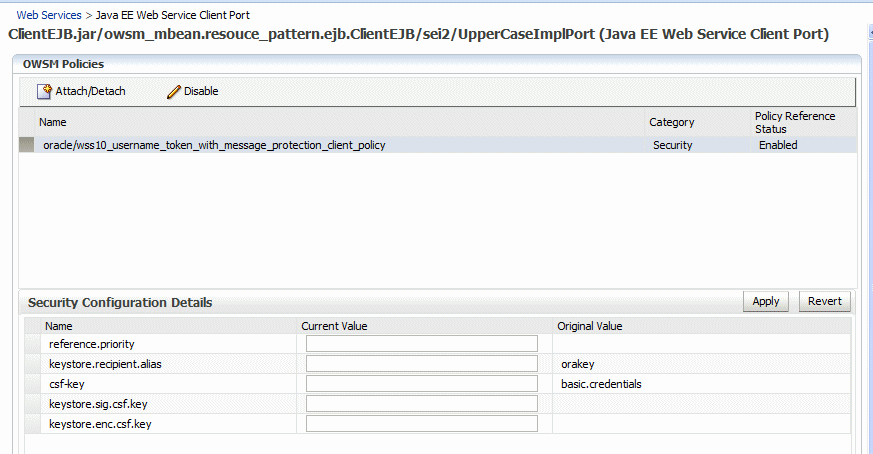
The attached policy is shown on the Java EE Web Service Client Port page, as shown in
Figure 8-9 Attaching Policies to WebLogic Java EE Web Service Client Ports
Description of "Figure 8-9 Attaching Policies to WebLogic Java EE Web Service Client Ports"
-
Optionally, specify configuration overrides for an attached policy. To do so:
-
Select the policy for which you want to configure the overrides in the OWSM Policies section of the page.
The properties that you can override are displayed in the Security Configuration Details section of the page.
-
Enter the override value in the Current Value field for the property and click Apply.
For more information about configuring overrides, see "Attaching Client Policies Permitting Overrides".
-
Attaching Policies to Web Service Clients Using WLST
The following procedure describes how to attach policies to SOA references, connection-based Web service clients (such as an ADF DC Web service client, ADF JAX-WS Indirection Proxy, or WebCenter client), Java EE Web Service Clients, and asynchronous Web service callback clients. The steps that you follow are the same for each type of client. However, the argument settings will vary depending on the type of client to which you are attaching or detaching policies.
-
View the Web service clients as described in Using WLST in "Viewing Web Service Clients".
-
Use the
listWebServiceClientPortscommand to display the port name and endpoint URL for a Web service client.listWebServiceClientPorts(application,moduleOrCompName,moduleType,serviceRefName)
For example, to display the port for the service reference
client:wls:/wls-domain/serverConfig> listWebServiceClientPorts('/base_domain/AdminServer/application1#V2.0', 'test1','wsconn','client') HelloWorld_pt
-
View the list of available policies as described in "Displaying a List of the Available Policies Using WLST".
To view only available client policies, set the
subjectargument toclient. For example:listAvailableWebServicePolicies("","client") -
To attach policies, do one of the following:
-
Use the
attachWebServiceClientPolicycommand to attach a single policy to a Web service client port.attachWebServiceClientPolicy(application, moduleOrCompName, moduleType, serviceRefName, portInfoName, policyURI, [subjectType=None]
Set the arguments as follows:
-
For a SOA reference, specify the name of the SOA composite using the
moduleOrCompNameargument, specifysoafor themoduleTypeargument, and the name of the SOA reference using theserviceRefNameargument. -
For a connection-based Web service client such as an ADF DC Web service client, ADF JAX-WS Indirection Proxy, or WebCenter client, specify the name of the client application using the
applicationargument, specifywsconnfor themoduleTypeargument, and the service reference name using theserviceRefNameargument. -
For an asynchronous Web service callback client, specify
webfor themoduleTypeargument. Specify the name of the client application or SOA composite using theapplicationandmoduleOrCompNamearguments, respectively. -
For all client types, specify the name of the port using the
portInfoNameargument. -
Specify the policy to be attached using the
policyURIargument. If you specify a policy that is already attached or exists, then this command enables the policy if it is disabled.
For example, to attach the client policy
oracle/wss_username_token_client_policyto theHelloWorld_ptof theclientservice, use the following command:wls:/wls_domain/serverConfig> attachWebServiceClientPolicy("/wls_domain/AdminServer/application1#2.0", "test1","wsconn","client","HelloWorld_pt","oracle/wss_username_token_client_policy")
-
-
Use the
attachWebServiceClientPoliciescommand to attach multiple policies to a Web service client port. Set the arguments as described for attaching a single client policy above, however you specify multiple policies to be attached using thepolicyURIsargument. If any of the policies that you specify in this command are already attached, then this command enables the policies that are already attached (if they are disabled), and attaches the others.attachWebServiceClientPolicies(application, moduleOrCompName, moduleType, serviceRefName, portInfoName, policyURIs, [subjectType=None]
For example, to attach the policies
oracle/wss_username_token_client_policyandoracle/wsrm10_policyto theHelloWorld_ptof theclientservice, use the following command:wls:/wls_domain/serverConfig> attachWebServiceClientPolicies("/wls_domain/AdminServer/application1#2.0", "test1","wsconn","client","HelloWorld_pt", ["oracle/wss_username_token_client_policy","oracle/wsrm10_policy"]) Please restart application to uptake the policy changes.
Note:
The policyURIs are validated through the Oracle WSM Policy Manager APIs if the wsm-pm application is installed on WebLogic Server and is available. If the policy validation fails, a message is displayed and the command is not executed.
If the wsm-pm application is not installed or is not available, these commands are not executed.
For additional information about validating policies, see "Validating Policy Subjects".
-
-
To detach policies, do one of the following:
-
Use the
detachWebServiceClientPolicycommand to detach a single policy from a Web service client port.detachWebServiceClientPolicy(application, moduleOrCompName, moduleType, serviceRefName, portInfoName, policyURI, [subjectType=None]
Set the arguments as described in step 4 above.
For example, to detach the client policy
oracle/wss_username_token_client_policyfrom theHelloWorld_ptof theclientservice, use the following command:wls:/wls_domain/serverConfig> detachWebServiceClientPolicy("/wls_domain/AdminServer/application1#2.0", "test1","wsconn","client","HelloWorld_pt","oracle/wss_username_token_client_policy")
-
Use the
detachWebServiceClientPoliciescommand to detach multiple policies from a Web service client port. Set the arguments as described for detaching a single client policy above, however you specify multiple policies to be detached using thepolicyURIsargument.detachWebServiceClientPolicies(application, moduleOrCompName, moduleType, serviceRefName, portInfoName, policyURIs, [subjectType=None]]
For example, to detach the policies
oracle/wss_username_token_client_policyandoracle/wsrm10_policyfrom theHelloWorld_ptof theclientservice, use the following command:wls:/wls_domain/serverConfig> detachWebServiceClientPolicies("/wls_domain/AdminServer/application1#2.0", "test1","wsconn","client","HelloWorld_pt", ["oracle/wss_username_token_client_policy","oracle/wsrm10_policy"]) Please restart application to uptake the policy changes.
Note:
When you detach a client-side security policy, you must manually remove any configuration overrides because client configuration overrides are applied at the port level. Otherwise, the override remains in effect for all future policy attachments to this port, both globally and directly.
-
-
For ADF DC and WebCenter client applications, restart the Web service client application. You do not need to restart a SOA composite.
For more information about these WLST commands and their arguments, see "Web Services Custom WLST Commands" in WebLogic Scripting Tool Command Reference.
Enabling and Disabling Web Service Client Policies Using WLST
Use the following procedure to enable or disable policies to a Web Service client:
-
View the Web service clients as described in Using WLST in "Viewing Web Service Clients".
-
Use the
listWebServiceClientPortscommand to display the port name and endpoint URL for a Web service client, as described in "Attaching Policies to Web Service Clients Using WLST". -
Use the
enableWebServiceClientPolicycommand to enable or disable a policy that is already attached to a Web Service client. Setting the command totrueenables the policy. Setting it tofalse, disables the policy.enableWebServiceClientPolicy(application,moduleOrCompName,moduleType, serviceRefName,portInfoName,policyURI,[enable],[subjectType=None] )
The following example enables the client policy
oracle/wss_username_token_client_policyof the portJRFWssUsernamePortof the Web moduleWssUsernameClient. The Web service is part of the applicationjwsclient_1#1.1.0for the serversoa1in the domainsoainfra.wls:/wls-domain/serverConfig>enableWebServiceClientPolicy ('/soainfra/soa1/jwsclient_1#1.1.0','WssUsernameClient','wsconn', 'WssUsernameClient','JRFWssUsernamePort', "oracle/wss_username_token_client_policy",true)
Attaching Policies to Servlet Applications
To secure servlet applications, such as ADF business components exposed as RESTful servlets, you can attach one or more of the predefined security policies listed in Table 8-1. For more information about these policies and how to manually configure them, see Appendix B, "Predefined Policies."
Note:
You can also attach a SPNEGO token policy that you create using the oracle/http_spnego_token_service_template assertion template. For more information, see "Configuring Kerberos With SPNEGO Negotiation".
There is no client-side policy support for servlet applications in this release.
Table 8-1 Predefined Policies Supported for Servlet Applications
| Predefined Policy | More Information |
|---|---|
|
|
|
|
|
|
|
|
|
|
|
|
|
|
|
|
|
|
|
|
|
|
|
|
|
|
|
|
|
|
|
|
|
|
|
|
For servlet applications, the Oracle WSM servlet filter is used to intercept and process the incoming request.
You can attach policies to a policy subject (servlet, in this case), either by directly attaching an individual policy to a subject, or globally attaching policies to a set of subjects by type using policy sets, as described in the following sections:
Attaching Policies Directly to Servlet Applications
Note:
For ease of manageability, Oracle recommends that you attach the policies globally using policy sets as described in "Attaching Policies Globally to Servlet Applications".
To attach policies directly to servlet applications, you must modify the web.xml deployment descriptor file to define the Oracle WSM servlet filter, associate it with a servlet to be secured, and define the policy attachment metadata. You can map an Oracle WSM servlet filter to a single servlet only. If you need to secure multiple servlets, you must define multiple servlet filters, maintaining a one-to-one correspondence.
For more information about the web.xml deployment descriptor, see "web.xml Deployment Descriptor Elements" in Developing Web Applications, Servlets, and JSPs for Oracle WebLogic Server.
To attach policies directly to servlet applications:
-
Define the Oracle WSM security filter by adding a
<filter>element, and defining the following subelements:-
Specify a meaningful name for the Oracle WSM servlet filter using the
<filter-name>element.For example:
<filter-name>OWSM Security Filter</filter-name>
-
Define the Oracle WSM servlet filter class using the
<filter-class>element.This element must be defined as follows:
<filter-class>
   oracle.wsm.agent.handler.servlet.SecurityFilter
</filter-class>
-
To pass the servlet name as a parameter to the
init()method of the Oracle WSM servlet filter class, add an<init-param>element to the<filter>definition.For example:
<init-param>
   <param-name>servlet-name</param-name>
   <param-value>TestServlet</param-value>
</init-param>
Note: If you omit this parameter, then the servlet application will not be protected, even if you define the
<policySet>element in the next step. -
Define the security policy attachments by adding an
<init-param>that defines a<policySet>element with one or more<PolicyReference>or<OverrideProperty>elements. For more information about the<policySet>element, see Appendix E, "Schema Reference for Policy Sets."Note: In this context, the
<policySet>element does not support theconstraintorstatusattributes. These attributes are supported for global policy attachment only.For example, in the following code excerpt the
<policySet>is configured in the form ofCDATA.<init-param> <param-name>oracle.wsm.metadata.policySet</param-name> <param-value><![CDATA[<sca11:policySet name="policySet" appliesTo="REST-Resource()" attachTo="Service('*')" xmlns:sca11="http://docs.oasis-open.org/ns/opencsa/sca/200903" xmlns:orawsp="http://schemas.oracle.com/ws/2006/01/policy" xmlns:wsp15="http://www.w3.org/ns/ws-policy"> <wsp15:PolicyReference URI="oracle/multi_token_rest_service_policy" orawsp:category="security" orawsp:status="enabled"> </wsp15:PolicyReference> <wsp15:PolicyReference URI="oracle/binding_authorization_permitall_policy" orawsp:category="security" orawsp:status="enabled"> </wsp15:PolicyReference> </sca11:policySet>]]> </param-value> </init-param>
-
-
Associate the Oracle WSM security filter with the servlet using the
<filter-mapping>element.For example:
<filter-mapping> <filter-name>OWSM Security Filter</filter-name> <servlet-name>TestServlet</servlet-name> </filter-mapping>
-
Define the servlet and servlet mapping using the
<servlet>and<servlet-mapping>elements.For example:
<servlet> <servlet-name>TestServlet</servlet-name> <servlet-class>webproj.TestServlet</servlet-class> </servlet> <servlet-mapping> <servlet-name>TestServlet</servlet-name> <url-pattern>/testservlet</url-pattern> </servlet-mapping>
-
Repeat steps 1 through 3 for each servlet you wish to secure.
Example 8-1 provides an example of how to update the web.xml file to attach policies to a servlet application.
Example 8-1 Example of web.xml File to Attach Policies to a Servlet Applications
<?xml version = '1.0' encoding = 'windows-1252'?>
<web-app xmlns:xsi="http://www.w3.org/2001/XMLSchema-instance"
xsi:schemaLocation="http://java.sun.com/xml/ns/javaee
http://java.sun.com/xml/ns/javaee/web-app_2_5.xsd"
version="2.5" xmlns="http://java.sun.com/xml/ns/javaee">
<filter>
<filter-name>OWSM Security Filter</filter-name>
<filter-class>oracle.wsm.agent.handler.servlet.SecurityFilter</filter-class>
<init-param>
<param-name>servlet-name</param-name>
<param-value>TestServlet</param-value>
</init-param>
<init-param>
   <param-name>oracle.wsm.metadata.policySet</param-name>
   <param-value><![CDATA[<sca11:policySet name="policySet"
     appliesTo="REST-Resource()"
     attachTo="Service('*')"
     xmlns:sca11="http://docs.oasis-open.org/ns/opencsa/sca/200903"
     xmlns:orawsp="http://schemas.oracle.com/ws/2006/01/policy"
     xmlns:wsp15="http://www.w3.org/ns/ws-policy">
        <wsp15:PolicyReference
           URI="oracle/multi_token_rest_service_policy"
           orawsp:category="security" orawsp:status="enabled">
        </wsp15:PolicyReference>
        <wsp15:PolicyReference
           URI="oracle/binding_authorization_permitall_policy"
           orawsp:category="security" orawsp:status="enabled">
        </wsp15:PolicyReference>
     </sca11:policySet>]]>
   </param-value>
</init-param>
</filter>
<filter-mapping>
   <filter-name>OWSM Security Filter</filter-name>
   <servlet-name>TestServlet</servlet-name>
</filter-mapping>
<servlet>
   <servlet-name>TestServlet</servlet-name>
   <servlet-class>webproj.TestServlet</servlet-class>
</servlet>
<servlet-mapping>
   <servlet-name>TestServlet</servlet-name>
   <url-pattern>/testservlet</url-pattern>
</servlet-mapping>
</web-app>
Attaching Policies Globally to Servlet Applications
To attach policies globally to servlet applications, you create a policy set using WLST, as described "Creating a Policy Set".
When creating the policy set, ensure that the type argument is set to REST-resource. It is recommended that you define the resource scope as a Domain expression so that the global policies apply to all RESTful services in the domain.
Example 8-2 provides an example of attaching policies globally to servlet applications using WLST.
Example 8-2 Attaching Policies Globally to Servlet Applications Using WLST
C:\Oracle\Middleware\oracle_common\common\bin> wlst.cmd
...
wls:/offline> connect("weblogic","password","t3://myAdminServer.example.com:7001")
Connecting to t3://myAdminServer.example.com:7001" with userid weblogic ...
Successfully connected to Admin Server "AdminServer" that belongs to domain "my_domain".

Warning: An insecure protocol was used to connect to the
server. To ensure on-the-wire security, the SSL port or
Admin port should be used instead.

wls:/my_domain/serverConfig> beginRepositorySession()

Session started for modification.

wls:/my_domain/serverConfig> createPolicySet('myPolicySet','REST-Resource', 'Domain("*")')

Description defaulted to "Global policy attachments for REST Resource resources."
The policy set was created successfully in the session.

wls:/my_domain/serverConfig> attachPolicySetPolicy('oracle/http_basic_auth_over_ssl_service_policy')

Policy reference "oracle/http_basic_auth_over_ssl_service_policy" added.

wls:/my_domain/serverConfig> commitRepositorySession()

The policy set myPolicySet is valid.
Creating policy set myPolicySet in repository.

Session committed successfully.

wls:/my_domain/serverConfig> displayPolicySet('myPolicySet')

Policy Set Details:
-------------------
Display Name : mypolicyset
Type of Resources:   REST Resource
Scope of Resources:  Domain("*")
Description:         Global policy attachments for REST Resource resources.
Enabled:             true
Policy Reference:    URI=oracle/http_basic_auth_over_ssl_service_policy, category=security, enabled=true
wls:/my_domain/serverConfig>
Attaching Web Service Policies Permitting Overrides
Note:
The procedures described in this section apply to Oracle Infrastructure Web services only.
You can specify a value for server-side configuration properties in a predefined or custom Web service policy, and then either use that value each time you attach the policy to a Web service or override it on a per-attachment basis.
Note:
Oracle recommends that you do not edit the predefined policies so that you will always have a known set of valid policies. You can, however, create new policies using the predefined policies as a base. For additional information about creating a new policy, see "Creating a Web Service Policy from an Existing Policy". Once you have created the new policy, you can edit the policy and set the configuration properties as desired.
For example, you might specify an IP address as a configuration property, and then validate the IP address from your Web service.
The scope for the server-side configuration property value is limited to the specific policy. That is, you could have two policies with the same server-side configuration property name, say P1, attached to the same Web service endpoint, and the two P1 properties can have different values.
Server-side properties that you can override are of two types:
-
Predefined policy configuration properties—The server-side configuration properties included with the predefined policies allow you to override certain domain-wide configuration settings from a policy, such as the CSF key used for storing the signature-key password.
-
User-defined policy configuration properties—For a user-defined property, you can add a property that has meaning in your environment. You can add a user-defined server-side property to the predefined policies, or to a custom policy. For more information about creating and configuring user-defined policy configuration properties, see "Configuring User-Defined Client- or Server-Side Override Properties".
The following sections describe how to attach Web service policies permitting overrides in more detail:
-
"Configuring Server-Side Override Properties for Message Protection Policies"
-
"Configuring Server-Side Override Properties for Authorization Policies"
-
"Overriding Configuration Properties When Attaching a Policy Using WLST"
Configuring Server-Side Override Properties for Message Protection Policies
The predefined Oracle WSM message protection policies define the set of server-side override properties shown in Table 8-2.
If you set (or then override) these properties, the new values are used in the attached Web service instead of the keystore passwords you configure as part of setting up the keystore for message protection, as described in "Configuring Keystores for Message Protection".
If you do not set these properties and leave the default blank values, the values you configure as part of setting up the keystore for message protection are used instead, as described in "Configuring Keystores for Message Protection".
Table 8-2 Server-Side Configuration Properties for Message Protection Policies
| Property Name | Default Value | Description |
|---|---|---|
|
|
Blank |
The alias and password used for storing the signature key password in the keystore. This property allows you to specify the signature key on a per-attachment level instead of at the domain level. (Applicable only to WSS10 message protection policies) When used with KSS, the |
|
|
Blank |
The alias and password used for storing the decryption key password in the keystore. This property allows you to specify the decryption key on a per-attachment level instead of at the domain level. (Applicable to WSS10 and WSS11 message protection synchronous policies) When used with KSS, the |
|
|
True |
Set to false (in both client and service policy) to have the bearer token be unsigned. By default (true), the bearer token is signed using the domain signature key. You can override this by using the |
|
|
Blank |
Use to set the priority of a policy attachment in the effective policy calculation. For more information, see "Specifying the Priority of a Policy Attachment". |
|
|
Blank (equivalent to False) |
Set to true (in both client and service policy) to propagate the identity context from the Web service client to the Web service, and then make it available ("publish it") to other components for authentication and authorization purposes. |
Setting Default Values for the Keystore Configuration Properties
By default, the keystore.sig.csf.key and keystore.enc.csf.key properties have a blank value. You can choose to set a value such that any Web service that attaches the policy can use these values, or override the values when you attach the policy.
Note:
Oracle recommends that you do not edit the predefined policies so that you will always have a known set of valid policies. You can, however, create a new policy from a predefined policy and configure the properties as desired.
To set a value of a configuration property for a policy:
-
Navigate to the Web Services Policies page, as described in "Navigating to the Web Services Policies Page in Fusion Middleware Control".
-
From the Web Services Policies page, select the message protection policy from the Policies table and click Edit.
-
On the Edit Policy page, click the Configurations tab.
-
Select the configuration property and click Edit to change to the
keystore.sig.csf.keyandkeystore.enc.csf.keyproperties based on the keys in your keystore. See Figure 8-10 for a partial screen.Figure 8-10 Server-Side Configuration Properties

Description of "Figure 8-10 Server-Side Configuration Properties"
-
Validate your changes.
-
Click Save.
Configuring Server-Side Override Properties for Authorization Policies
For the predefined oracle/binding_permission_authorization_policy policy defines the set of server-side override properties shown in Table 8-3. You can use these properties to set a different action and resource.
If you set (or then override) these properties, the new values are used in the attached Web service instead of the action and resource you configure as described in "How Authorization Permissions Are Determined".
Table 8-3 Server-Side Configuration Property for Authorization Policies
| Property Name | Default Value | Description |
|---|---|---|
|
action |
* |
Specify the operations for which this policy should be enforced. |
|
resource |
* |
Specify the Web service name (Namespace of Web service plus ServiceName) |
Setting Default Values for the Configuration Properties
By default, the action and resource properties have a value of *. You can choose to set a different value such that any Web service that attaches the policy can use that value, or override the value when you attach the policy.
To set a value for the configuration property:
-
Navigate to the Web Services Policy page, as described in "Navigating to the Web Services Policies Page in Fusion Middleware Control".
-
From the Web Services Policies page, select the
oracle/binding_permission_authorization_policypolicy from the Policies table and click Edit. -
On the Edit Policy page, click the Configurations tab.
-
Select the configuration property and click Edit to make the change to the
actionorresourceproperty based on your environment. -
Validate your changes.
-
Click Save.
Overriding Configuration Properties When Attaching a Service Policy Using Fusion Middleware Control
After you attach a policy that includes a server-side overridable configuration property, you can then override the existing value. In WLST, you do so using the setWebServicePolicyOverride command as described in "Overriding Configuration Properties When Attaching a Policy Using WLST".
To override a configuration property using Fusion Middleware Control:
-
Select the attached policy with the overridable configuration property.
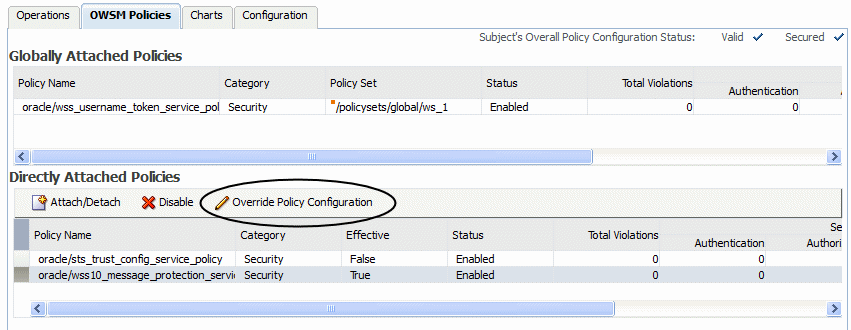
The Override Policy Configuration button is displayed as shown in Figure 8-11.
Note:
The Override Policy Configuration button is displayed only when the selected policy contains configuration properties that can be overridden.
Figure 8-11 Override Policy Configuration Button
Description of "Figure 8-11 Override Policy Configuration Button"
-
Select Override Policy Configuration.
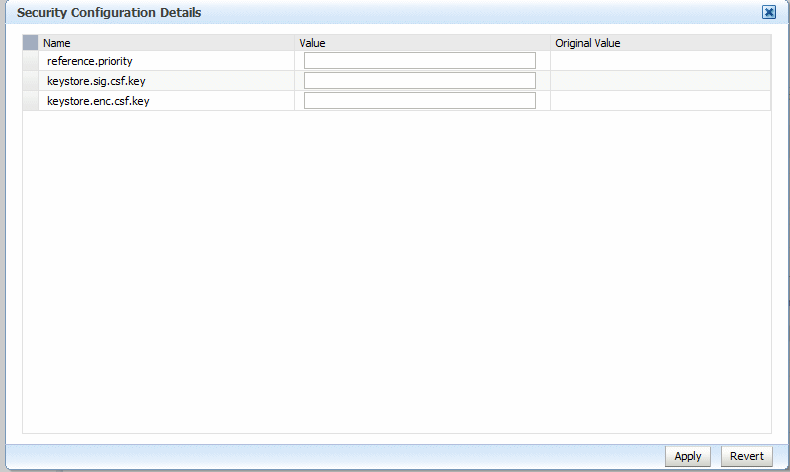
The Security Configuration Details window is displayed, as shown in Figure 8-12. This figure shows the overridable properties for the
oracle/wss10_message_protection_service_policy.Figure 8-12 Overriding a Policy Configuration Property
Description of "Figure 8-12 Overriding a Policy Configuration Property"
-
Enter the override value in the Value field for the property and click Apply.
The property is overridden on a per-attachment basis.
For example, assume that you have not changed the value of the keystore.sig.csf.key property for the oracle/wss10_message_protection_service_policy and that it is still blank. If Web service A attaches the oracle/wss10_message_protection_service_policy and overrides the keystore.sig.csf.key property to be "sigkey," the keystore.sig.csf.key property has a value of "sigkey" only for the oracle/wss10_message_protection_service_policy attached to Web service A.
For all other policies, keystore.sig.csf.key uses the value you configure as part of setting up the keystore for message protection, as described in "Configuring Keystores for Message Protection".
Overriding Configuration Properties When Attaching a Policy Using WLST
When you attach a policy that has an overridable property, you can override the existing value using the setWebServicePolicyOverride command. To do so, use the following procedure.
-
Attach the policy to the service as described in "Attaching a Policy to a Web Service Using WLST".
-
Use the
setWebServicePolicyOverridecommand to override policy properties.setWebServicePolicyOverride(application,moduleOrCompName,moduleType, serviceName,portName,policyURI,properties)
You can override the properties listed in Table 8-2 and Table 8-3, and user-defined properties as described in "Configuring User-Defined Client- or Server-Side Override Properties".
For example, to override the
keystore.sig.csf.keyproperty in theoracle/wss10_message_protection_service_policypolicy, use the following command:wls:/wls-domain/serverConfig>setWebServicePolicyOverride ('/wls_domain/AdminServer/Jaxwsejb30ws','jaxwsejb', 'web','WsdlConcreteService','WsdlConcretePort', "oracle/wss10_message_protection_service_policy",[("keystore.sig.csf.key","sigkey")])
Notes:
If the policy that you specify is not attached to the port, an error message is displayed and/or an exception is thrown.
If you set the
propertiesargument toNone, then all policy overrides are removed. -
For ADF and WebCenter applications, restart the Web service application. You do not need to restart a SOA composite.
Note:
You need to wait approximately 30 seconds (or the equivalent of the configured Graceful Shutdown Timeout time) between stopping and restarting the application. During this time, the server is allowing all global transactions to complete before shutting down the application. If you do not wait the configured Graceful Shutdown Timeout time, then the application will not be restarted appropriately and you will not be able to access it. To avoid waiting the graceful shutdown timeout period, you can restart the application twice.
For more information about this WLST command and its arguments, see "Web Services Custom WLST Commands" in WebLogic Scripting Tool Command Reference.
Attaching Client Policies Permitting Overrides
The policy configuration override feature allows you to specify certain Web service client configuration information on a per-client basis, in addition to, or in lieu of setting it globally for any attachment of the policy. This targeting of configuration information limits the number of distinct policies you need to maintain.
You can define a single policy, and specify a default value for a configuration value. Rather than creating multiple policies with slightly varied configurations, you could use the same generic policy and override specific values to meet your requirements.
For example, the oracle/wss_http_token_client_policy policy is one example of a policy that includes the csf-key property, which has a default value of basic.credentials. The value signifies a key that maps to a username/password. It might happen that you will always use the same key value any time you attach this policy to any number of Web service clients. In this case, you can specify the key value on the oracle/wss_http_token_client_policy policy Configurations tab and have it apply to every instance.
However, you also have the option to override this key value on a per-client basis.
In Web service client policies, you may be able to override one or more of the properties defined in Table 8-4, depending on the policy that you attach.
If you need to clear an overridden configuration property, set it to an empty string. Before you clear it, remember that other policies could be using the same property. The properties are client-specific and there could be multiple policies that are attached to the same client that use the same property.
Note:
When you detach a client-side security policy, you must manually remove any configuration overrides because client configuration overrides are applied at the port level. Otherwise, the override remains in effect for all future policy attachments to this port, both globally and directly.
Table 8-4 Overridable Properties in Web Service Client Policies
| Property | Notes |
|---|---|
|
|
Audience restriction. Optional, does not have to be set. |
|
|
Optional, does not have to be set. |
|
|
Client's principal name as generated using the Note: |
|
|
Must be set on policy Configuration page or overridden. |
|
|
Optional, does not have to be set. |
|
|
Optional, does not have to be set. |
|
|
Optional, does not have to be set. Note: The For WSS11 policies, |
|
|
Can be set on policy Configuration page or overridden. Superseded by the Service Identity Certification Extension feature, as described in "Using Service Identity Certification Extension". If the certificate is published in the WSDL, then the client override property value is ignored. |
|
|
Optional, does not have to be set. |
|
|
Location of the client's keytab file. Note: |
|
|
Optional, does not have to be set. Used only when |
|
|
Set to true (in both client and service policy) to propagate the identity context from the Web service client to the Web service, and then make it available ("publish it") to other components for authentication and authorization purposes. |
|
|
Optional, does not have to be set. Used to specify the priority of the policy attachment in the effective policy calculation. For more information, see "Specifying the Priority of a Policy Attachment". |
|
|
Optional, does not have to be set. |
|
|
Optional, does not have to be set. |
|
|
Optional, does not have to be set. Default value is true. |
|
|
Optional, does not have to be set. |
|
|
Must be set on policy Configuration page or overridden. Principal name for the Web service that needs to be protected, using the format |
|
|
Optional, does not have to be set. Note: For the Applications from which Oracle WSM accepts the externally-supplied identity must have the See "Configuring SAML Web Service Clients for Identity Switching" for information about how to use For all other SAML and JWT policies, If |
|
|
Optional, does not have to be set. Used only when |
|
|
One or both of |
|
|
One or both of |
|
|
Must be set on policy Configuration page or overridden. Used only when |
|
|
Optional, does not have to be set. |
|
|
Optional, does not have to be set. |
Overriding Configuration Properties When Attaching Client Policies Using Fusion Middleware Control
To override a client configuration property using Fusion Middleware Control:
-
Attach a policy to a Web service client, as described in "Attaching Policies to Web Service Clients".
-
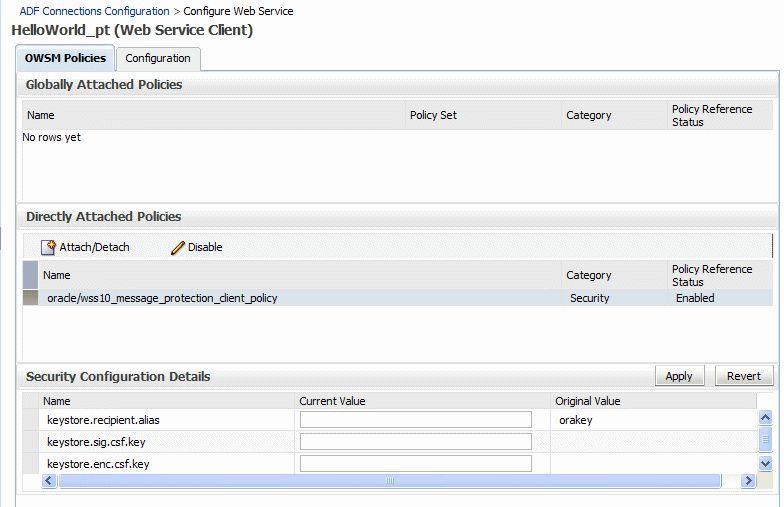
After you attach a client policy that includes a property that you can override, select the policy, then supply a value for the property in the Security Configuration Details section of the OWSM Policies page, as shown in Figure 8-13.
Figure 8-13 Overriding a Client Configuration Property
Description of "Figure 8-13 Overriding a Client Configuration Property"
Attaching Client Policies Permitting Overrides Using WLST
Note:
This procedure applies to Oracle Infrastructure Web service clients only.
When you attach a client policy that has an overridable property, you can override the existing value using the setWebServiceClientStubProperties command.
To override a client configuration property using WLST:
-
Attach the policy to the Web service client, as described in "Attaching Policies to Web Service Clients Using WLST".
-
Use the
setWebServiceClientStubPropertiescommand to override policy properties.setWebServiceClientStubProperties(application, moduleOrCompName, moduleType, serviceRefName, portInfoName, properties)
For example:
wls:soainfra/serverConfig>
setWebServiceClientStubProperties('/soa_domain/soa_server1/adf_dc_to_bc',
 'ADF_BC', 'wsconn', 'AppModuleService', 'AppModuleServiceSoapHttpPort',
[("csf-key","HCM_APPID")])
-
For ADF DC and WebCenter client applications, restart the Web service client application. You do not need to restart a SOA composite.
Note:
You need to wait approximately 30 seconds (or the equivalent of the configured Graceful Shutdown Timeout time) between stopping and restarting the application. During this time, the server is allowing all global transactions to complete before shutting down the application. If you do not wait the configured Graceful Shutdown Timeout time, then the application will not be restarted appropriately and you will not be able to access it. To avoid waiting the graceful shutdown timeout period, you can restart the application twice.
For more information about this WLST command and its arguments, see "Web Services Custom WLST Commands" in WebLogic Scripting Tool Command Reference.
Configuring User-Defined Client- or Server-Side Override Properties
Note:
The procedures described in this section apply to Oracle Infrastructure Web services only.
You can use the Add New Configure Property feature to add one or more configuration properties that have meaning in your environment. Specifically, you can add one or more user-defined server- or client-side properties to the predefined policies, or to a custom policy. Then, you can either use the user-defined property as-is, or override it when you attach the policy.
In both cases, the property must already exist in the policy before you can override it when attaching the policy to a Web service or client. That is, you can override only those properties that are already present in the policy.
Therefore, you would typically add a user-supplied property with some default value to the predefined or custom policy, and then override it on a per-attachment basis.
You can add a user-defined property of type required, optional, or constant, but you cannot override a property of type constant.
The following sections describe how to configure user-defined override properties:
Scope of User-Defined Configuration Properties
As with the predefined configuration properties, the scope for user-defined configuration properties in a policy differs for clients and Web services. Consider the following:
-
The scope for a client-side configuration property value is the client. There could be multiple policies that are attached to the same client that use the same property.
-
The scope for a server-side configuration property value is limited to the specific policy. That is, you could have two policies with the same server-side configuration property name, say P1, attached to the same Web service endpoint, and the two P1 properties can have different values.
Adding a User-Defined Configuration Property
You edit the predefined or custom policy to add a user-defined configuration property.
To add a user-defined configuration property:
-
Navigate to the Web Services Policy page, as described in "Navigating to the Web Services Policies Page in Fusion Middleware Control".
-
From the Web Services Policies page, select the policy for which you want to add a property from the Policies table and click Edit.
-
On the Edit Policy page, click the Configurations tab.
-
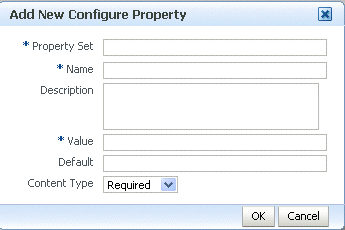
Click Add. The Add New Configure Property dialog box shown in Figure 8-14 appears.
Figure 8-14 Adding a New Configuration Property
Description of "Figure 8-14 Adding a New Configuration Property"
-
Enter the following information and click OK.
-
Property Set is your name for the group (set) to which you want this property to belong. This is a required field.
-
Name is your name for the property. The name must be unique for this policy. This is a required field.
-
Description is your description for the property.
-
Value is the current String value for the property. This is a required field.
-
Default is the default String value for the property if it is not otherwise set.
-
Content Type can be one of Constant, Optional, or Required. You can subsequently override only properties of type Optional and Required.
-
-
Validate the policy.
-
Click Save.
Editing a User-Defined Configuration Property
You can edit a user-defined configuration property if you need to change it.
To edit a user-defined configuration property:
-
Navigate to the Web Services Policy page, as described in "Navigating to the Web Services Policies Page in Fusion Middleware Control".
-
From the Web Services Policies page, select the policy for which you want to edit a property from the Policies table and click Edit.
-
On the Edit Policy page, click the Configurations tab.
-
Select the user-defined configuration property you want to edit and click Edit.
-
Make any needed changes.
-
Validate the policy.
-
Click Save.
Deleting a User-Defined Configuration Property
You can delete a user-defined configuration property if you no longer need it.
To delete a user-defined configuration property:
-
Navigate to the Web Services Policy page, as described in "Navigating to the Web Services Policies Page in Fusion Middleware Control".
-
From the Web Services Policies page, select the policy for which you want to delete a property from the Policies table and click Edit.
-
On the Edit Policy page, click the Configurations tab.
-
Select the user-defined configuration property you want to delete and click Delete.
-
Validate the policy.
-
Click Save.
Overriding the Configuration Properties When Attaching a User-Defined Policy
Attach the user-defined policy as described in "Attaching a Policy to a Single Subject", "Attaching a Policy to Multiple Subjects (Bulk Attachment)", or "Attaching Policies to Web Service Clients" as appropriate.
When you attach a policy that has a user-defined configuration property, you can override the existing value as follows:
-
To override a user-defined configuration property for a Web service policy:
-
Using Fusion Middleware Control, see "Overriding Configuration Properties When Attaching a Service Policy Using Fusion Middleware Control".
-
Using WLST, use the
setWebServicePolicyOverridecommand, as described in "Overriding Configuration Properties When Attaching a Policy Using WLST".
-
-
To override a user-defined configuration property for a Web service client policy:
-
Using Fusion Middleware Control, see "Attaching Client Policies Permitting Overrides".]
-
Using WLST, use the
setWebServiceClientStubPropertiescommand, as described in "Attaching Client Policies Permitting Overrides Using WLST".
-


