14 Developing Resource Catalogs
This chapter describes how to use Oracle JDeveloper to create and manage resource catalogs for your WebCenter Portal Framework applications.
This chapter includes the following topics:
14.1 Introduction to Resource Catalogs
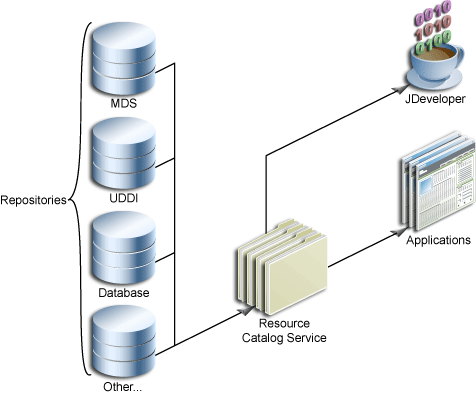
Resource catalogs provide a consolidated view of the contents of one or more otherwise unrelated repositories in a unified search and browse user interface. They provide a mechanism for defining and organizing all the resources available for inclusion in a page, page template, or task flow. Resources originate in their source repository and are then exposed through the resource catalog as shown in Figure 14-1.
When using JDeveloper, you see two types of resource catalogs—design time resource catalogs and runtime resource catalogs.
Design time resource catalogs are available in the Resource Palette and are like favorites lists for developers. The WebCenter Portal - Services Catalog is a design time catalog that is available out-of-the-box when you install the WebCenter Portal extension bundle. You can add task flows and data controls from this catalog to a Portal Framework application. In addition to the WebCenter Portal - Services Catalog, you can define connections and create catalogs to organize resources exposed by those connections. Such resources can be re-used in any application that you are developing.
See Also:
-
Section 2.2.2, "Installing the WebCenter Portal Extension for JDeveloper"
-
Oracle JDeveloper online Help for more information about the Resource Palette and catalogs.
To locate this information in JDeveloper, from the Help menu, select Table of Contents. In Help Center, expand JDeveloper Basics and select Working with the Resource Palette.
In WebCenter Portal and deployed Portal Framework applications, runtime resource catalogs determine the resources available when using Composer to populate pages, task flows, and page templates.
See Also:
Seeded Resource Catalog Configuration
When you add a Page Customizable component to a page in your application, a seeded resource catalog with the catalog definition file, default-catalog.xml, is configured in the application. Depending on the type of application you created, the catalog definition file is created in one of the following folders:
-
In a Portal Framework application, the
default-catalog.xmlfile is located in theApplication_Root/Portal/public_html/oracle/webcenter/portalapp/catalogsdirectory. The resource catalog in this case contains the folders shown in Figure 14-2. -
In a non-Portal Framework application, the
default-catalog.xmlfile is located in theAPPLICATION_ROOT/Portal/src/portaldirectory. The resource catalog in this case contains the ADF Faces Components folder, which contains ADF Faces components that a user can add to the page.
If you have registered a portlet producer with your application, then that producer's portlets are displayed in a Portlets folder in the resource catalog. If you have not registered any producers, the Portlets folder is hidden.
You can create your own resource catalogs or modify the seeded catalog and include components relevant to your business.
Portal Framework applications support the runtime administration of resource catalogs to help users continue developing a portal even after it has been deployed. With runtime administration, authorized users can create and manage resource catalogs in a browser-based environment, with no requirement to install or understand JDeveloper. For more information, see Section 9.5, "Working with Portal Resources at Runtime."
You can bring runtime-created or modified resource catalogs back into JDeveloper, to ensure that any changes are not lost when the portal is redeployed. You can also edit these resource catalogs to further enhance them if necessary, and upload them back into the deployed portal. For more information, see Section 9.6, "Working with Round-Trip Development."
14.2 Creating a Resource Catalog
If the seeded resource catalog created for your application does not meet your requirements, or if you want to configure multiple resource catalogs, you can create your own resource catalogs with all the required resources.
Note:
To correctly implement resource catalogs, you must know where the application looks for the definitions and the XML schema upon which the definitions are based. See Appendix B, "Composer Component Properties and Files" for further information.To create a resource catalog:
-
In the Application Navigator, right-click the node where you want to create the resource catalog (typically,
/oracle/webcenter/portalapp/catalogs) and choose New. -
In the New Gallery, expand Web Tier, select Portal Framework and then Resource Catalog, and click OK.
-
In Create Application Resource Catalog dialog, in the File Name field, enter a name for the XML file that represents the resource catalog, for example,
users-catalog.xml.Figure 14-3 The Create Application Resource Catalog Dialog
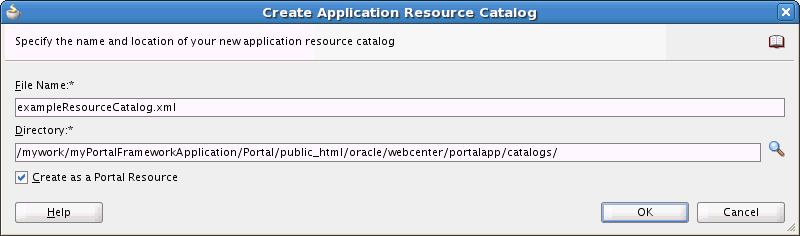
Description of "Figure 14-3 The Create Application Resource Catalog Dialog"
-
In the Directory field, enter the full directory path of the location under which to create the resource catalog definition XML file.
Note:
In a Portal Framework application, to expose the new resource catalog in the Assets page of the runtime administration console, you must create the resource catalog under theApplication_Root/Portal/public_html/oracle/webcenter/portalappdirectory. By default, Portal Framework applications include a separatecatalogsdirectory.In a non-Portal Framework application, create the resource catalog in the
Application_Root/Portal/src/portal directory.Tip:
If you do not select this option now, you can add the resource catalog to the runtime administration console later by right clicking it and choosing Create Portal Resource. -
Select Create as Portal Resource to enable users with the appropriate permissions to manage the resource catalog at runtime in the Assets page of the runtime administration console.
Note:
This option is available in a Portal Framework application only if the directory you entered is theApplication_Root/Portal/public_html/oracle/webcenter/portalappdirectory or one of its subdirectories. -
Click OK.
When you create a resource catalog in a Portal Framework application, a catalog definition file (an XML file) is created for the resource catalog in the specified directory. The catalog definition file opens in Design view.
Figure 14-4 A Resource Catalog in Design View
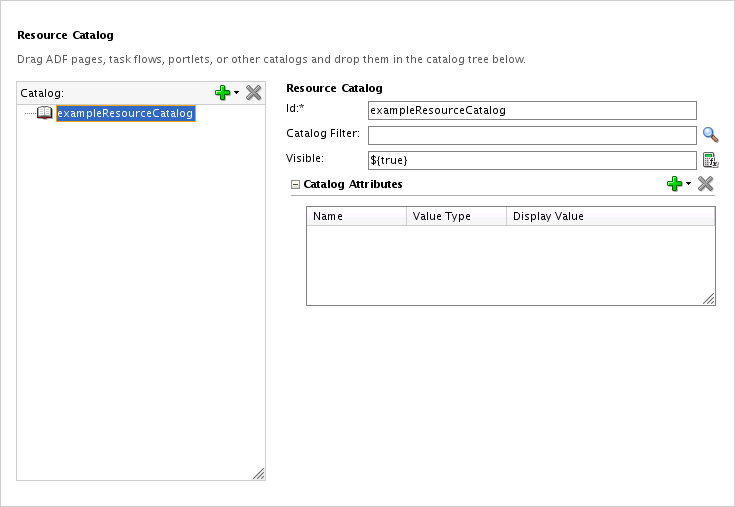
Description of "Figure 14-4 A Resource Catalog in Design View"
The catalog definition file is initially empty, so you must edit it to design the structure and content of your resource catalog. For more information, see Section 14.3, "Editing a Resource Catalog."
Tip:
If you do not want to add resources from scratch, as a starting point, you could copy the source code of thedefault-catalog.xmlfile into the Source view of your new catalog definition.If you created the resource catalog under the appropriate directory and selected the Create as a Portal Resource option, the resource catalog is automatically available for runtime management. For more information, see Section 9.5, "Working with Portal Resources at Runtime."
14.3 Editing a Resource Catalog
To define the content of your resource catalog you can edit the seeded resource catalog, default-catalog.xml, to add the resources that you want users to be able to add to the pages and task flows in your application. The seeded resource catalog is created automatically when you create an application using the WebCenter Portal Framework Application template.
You can also create your own resource catalog and edit that. For more information, see Section 14.2, "Creating a Resource Catalog."
You can add resources to a resource catalog in two ways:
-
Drag and drop resources from different areas in JDeveloper onto the resource catalog in Design view.
-
Use the options on the Add new node menu in the Design view for the resource catalog (Figure 14-5).
Figure 14-5 The Resource Catalog Add New Node Menu
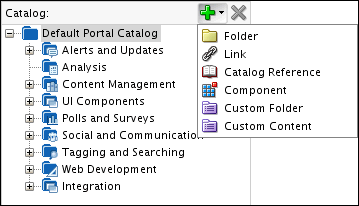
Description of "Figure 14-5 The Resource Catalog Add New Node Menu"
In the Design view for a resource catalog you can also rearrange, modify, and delete existing resources.
The left half of the XML editor contains the Catalog section, which displays the hierarchical structure of components in the catalog. The right half of the page provides fields to define attributes and parameters on a selected resource.
Tip:
If you are creating a resource catalog from scratch, you can refer to the default catalog definition file to get an idea of how resources are included in the catalog.Note:
If you are using a standalone version of Composer (that is, Composer without WebCenter Portal Framework), you can add a resource to the catalog by directly adding a<resource> element to the source of the catalog definition file. For more information, see Section C.3.12, "resource."See Also:
For details about the catalog definition file and its attributes:This section includes the following topics:
-
Section 14.3.2, "How to Drag and Drop a Resource into a Resource Catalog"
-
Section 14.3.5, "How to Add a Custom Component to a Resource Catalog"
-
Section 14.3.6, "How to Add a Custom Folder to a Resource Catalog"
-
Section 14.3.7, "How to Add a Custom Content Provider to a Resource Catalog"
-
Section 14.3.8, "How to Add a Resource Catalog to Another Resource Catalog"
-
Section 14.3.9, "How to Set Display Options for a Resource Catalog or Resource"
-
Section 14.3.11, "How to Show or Hide a Resource Catalog or Resource"
-
Section 14.3.12, "How to Edit a Resource in a Resource Catalog"
-
Section 14.3.13, "How to Delete a Resource from a Resource Catalog"
-
Section 14.3.14, "How to Expose Data Controls Created at Design Time in a Resource Catalog"
-
Section 14.3.15, "How to Expose Data Controls Created at Runtime in a Resource Catalog"
-
Section 14.3.16, "How to Control Visibility of Portlets in a Resource Catalog"
14.3.1 How to Define Connections to Resources
Many resources, such as WebCenter Portal tools and services and portlets, are accessed through connections defined in your application's connections.xml file. Therefore, you must create connections before adding such resources to the resource catalog.
You can create connections to resources in different ways. This section describes how to create a connection from the Resource Palette. For information about additional ways to create connections, see Section 4.2, "Preparing Your Framework Application for Tools and Services."
To create a connection from the Resource Palette:
-
From the Resource Palette, click the New icon in the upper left corner.
-
Choose New Connection and then the type of connection you want to create.
The wizard for your connection type appears.
-
Step through the wizard filling in the necessary information about the connection.
When you click Finish, the connection should appear in the Resource Palette under Connections.
-
Right click the connection in the Resource Palette and choose Add to Application from the context menu.
Alternatively, you can drag and drop the connection from the Resource Palette to the Application Resources panel of the Application Navigator.
14.3.2 How to Drag and Drop a Resource into a Resource Catalog
You can add the following resources to a catalog by dragging and dropping them onto the desired location in the Design view of the catalog definition file:
-
Portlets, from the Application Resources pane or the Resource Palette.
-
Content, from a Content Server connection in the Application Resources pane or Resource Palette.
-
Task flows, from the Application Resources pane or the Resource Palette.
Note:
If you add an ADF task flow to the catalog and want to export the catalog to an already deployed application, then you must deploy the task flow as a shared library to the deployed application.For more information, see Section 15.4, "Adding Custom Task Flows to a Page."
-
Resource catalogs, from the Application Navigator. This embeds one resource catalog inside another.
14.3.3 How to Add a Link to a Resource Catalog
You can add links to the following resources to a catalog:
-
Task Flow: Link to a WebCenter Portal tools and services task flow (in the Resource Palette) or a custom task flow created in JDeveloper (in the Application Navigator).
-
Portlet: Link to any registered portlet producer. See Chapter 63, "Consuming Portlets" for detailed information about registering portlet producers and adding portlets to a page.
-
Content: Link to a file or directory from an existing Content Server connection.
-
Other: Link to a custom component that you create by providing the XML code for that component.
To add a link:
-
In the Application Navigator, right-click the resource catalog to which you want to add the link, and choose Open.
-
In the Design view for the resource catalog, in the Catalog section on the left side, select the node in the resource catalog under which you want to add the link.
-
Click the Add new node icon and choose Link.
A
urlelement is added to the catalog. The right side of the page displays fields to define the new link's attributes and parameters. -
The Id field is automatically populated with generated ID. You can keep this ID, but you will probably want to change it to something more descriptive. The ID must be unique within the catalog definition file.
-
From the Type list, select the type of resource that you want to create. You can choose Taskflow, Portlet, Content, or Other.
Notes:
If you add an ADF task flow to the catalog and want to export the catalog to an already deployed application, then you must deploy the task flow as a shared library to the deployed application.For more information, see Section 15.4, "Adding Custom Task Flows to a Page."
-
If you are adding a link to a custom resource (that is, you selected Other from the Type list), then specify the factory class of the component. For all other resource types, the Factory Class value is automatically populated with the appropriate value for the selected link type.
The factory classes for the available resource types are as follows:
-
Task flow:
oracle.webcenter.portalframework.sitestructure.rc.TaskFlowResourceFactory -
Portlet:
oracle.webcenter.portalframework.sitestructure.rc.PortletResourceFactory -
Content:
oracle.webcenter.content.model.rc.ContentUrlResourceFactory
For more information, see Section C.4, "Factory Classes Available for Adding Dynamic Resources to the Catalog."
-
-
In the URL field, enter the URL to access the resource. If you do not know the location, click the Browse Files icon to browse for available resources. Table 14-1 provides the URL format to used for each resource type.
Table 14-1 URL Format for the Different Resource Types
Resource Type Location in the Application URL Format Task Flow from an ADF Library
Resource Palette
taskflow://pathToTaskFlow/taskFlowDefinitionFilName#taskFlowId
Task Flow Within the Application
Application Navigator
taskflow://pathToTaskFlow/taskFlowDefinitionFileName#taskFlowId
Portlet
Portlet producer connection in the Application Resources pane or in the Resource Palette
portlet://producerId/portletId
Content
Content Repository connection in the Application Resources pane
content://contentConnectionId/documentId
Note:
If you enter the URL for a portlet or content type resource manually, and if the connection for that resource is available only in the Resource Palette, then ensure that you first add the connection to the application. -
In the Visible field, specify whether the link is listed in the resource catalog at runtime. The default value is the EL expression
#{true}, which means the link is listed for all users at all times. Enterfalseor#{false}to hide the link from all users at all times, or enter an EL expression to specify the conditions under which the link is listed. If the field is empty, the value defaults totrue. -
Optionally, in the URL Attributes section, specify any desired display options for the link. For more information, see Section 14.3.9, "How to Set Display Options for a Resource Catalog or Resource."
-
In the URL Parameters section, enter values, as desired, for any parameters supported by the resource. You can bind these parameters to other artifacts in the application.
Click the Add icon to create a row in the Parameters table.
-
Save the catalog definition file.
14.3.4 How to Add a Folder to a Resource Catalog
You can create folders to group similar resources, thereby organizing the catalog better.
To add a folder:
-
In the Application Navigator, right-click the resource catalog to which you want to add the folder, and choose Open.
-
In the Design view for the resource catalog, in the Catalog section on the left side, select the node in the resource catalog under which you want to add the folder.
-
Click the Add new node icon and choose Folder.
A
folderelement is added to the catalog. The right side of the page displays fields to define the new folder's attributes and parameters. -
The Id field is automatically populated with a generated ID. You can keep this ID, but you will probably want to change it to something more descriptive. The ID must be unique within the resource catalog.
-
In the Visible field, specify whether the folder is listed in the resource catalog at runtime. The default value is the EL expression
#{true}, which means the folder is listed for all users at all times. Enterfalseor#{false}to hide the folder from all users at all times, or enter an EL expression to specify the conditions under which the folder is listed. If the field is empty, the value defaults totrue. -
Optionally, in the Folder Attributes section, specify any desired display options for the folder. For more information, see Section 14.3.9, "How to Set Display Options for a Resource Catalog or Resource."
-
In the Folder Parameters section, enter values, as desired, for any parameters supported by the folder. You can bind these parameters to other artifacts in the application.
Click the Add icon to create a row in the Parameters table.
-
Save the catalog definition file.
14.3.5 How to Add a Custom Component to a Resource Catalog
You can add custom component to a resource catalog, such as simple ADF Faces components, compound objects containing two or more components, and JSF Verbatim tags that let you add arbitrary HTML content inside them. An example for arbitrary HTML that you can add to your catalog is a YouTube video.
To add a custom component:
-
In the Application Navigator, right-click the resource catalog to which you want to add the custom component, and choose Open.
-
In the Design view for the resource catalog, in the Catalog section on the left side, select the node in the resource catalog under which you want to add the custom component.
-
Click the Add new node icon and choose Component.
A
componentelement is added to the catalog. The right side of the page displays fields to define the new component's attributes and parameters. -
The Id field is automatically populated with a generated ID. You can keep this ID, but you will probably want to change it to something more descriptive. The ID must be unique within the resource catalog.
-
In the Component Factory field, enter the name of a Java class that implements the
oracle.adf.rc.component.ComponentFactoryinterface and creates an instance of the component based on a set of parameters, for example,oracle.adf.rc.component.XmlComponentFactory.As you type the name, the field auto-completes with valid factory classes from the classpath. You can also use the Browse icon to select a class.
For more information, see Section C.4, "Factory Classes Available for Adding Dynamic Resources to the Catalog."
-
In the Visible field, specify whether the component is listed in the resource catalog at runtime. The default value is the EL expression
#{true}, which means the component is listed for all users at all times. Enterfalseor#{false}to hide the component from all users at all times, or enter an EL expression to specify the conditions under which the component is listed. If the field is empty, the value defaults totrue. -
Optionally, in the Component Attributes section, specify any desired display options for the custom component. For more information, see Section 14.3.9, "How to Set Display Options for a Resource Catalog or Resource."
-
Use the Component Parameters section to add parameters that were defined when implementing the factory class.
For example, if you are adding an XML component, click the Add icon in the Parameters section and select xml. In the new row that is displayed, specify the XML code for the component in the value field.
Note:
The xml option is displayed only if you selectedoracle.adf.rc.component.XmlComponentFactoryas the component factory.To ensure that the component works properly, you must specify the custom component ID to be
#, and provide the namespace, as shown in the following example:<cust:panelCustomizable id="#" xmlns:cust="http://xmlns.oracle.com/adf/faces/customizable"/>
The
#value ensures that a unique ID is generated dynamically for the component. -
Save the catalog definition file.
14.3.6 How to Add a Custom Folder to a Resource Catalog
You can add a folder using a resource catalog adapter so that the folder is populated dynamically. A custom folder is not added as a folder with resources to the catalog; it contains only a reference to the factory class, which displays the resources dynamically.
To add a custom folder:
-
In the Application Navigator, right-click the resource catalog to which you want to add the custom folder, and choose Open.
-
In the Design view for the resource catalog, in the Catalog section on the left side, select the node in the resource catalog under which you want to add the custom folder.
-
Click the Add new node icon and choose Custom Folder.
A
customFolderelement is added to the catalog. The right side of the page displays fields to define the new folder's attributes and parameters. -
The Id field is automatically populated with a generated ID. You can keep this ID, but you will probably want to change it to something more descriptive. The ID must be unique within the resource catalog.
-
In the Initial Context Factory field, enter the name of a Java class that implements the
javax.naming.InitialContextFactoryinterface and generates the folder based on a set of parameters.For more information, see Section C.4, "Factory Classes Available for Adding Dynamic Resources to the Catalog."
-
In the Visible field, specify whether the folder is listed in the resource catalog at runtime. The default value is the EL expression
#{true}, which means the folder is listed for all users at all times. Enterfalseor#{false}to hide the folder from all users at all times, or enter an EL expression to specify the conditions under which the folder is listed. If the field is empty, the value defaults totrue. -
Select Insert Folder Contents to display the contents of the custom folder directly in the catalog rather than displaying them under the folder.
-
Optionally, in the Custom Folder Attributes section, specify any desired display options for the folder. For more information, see Section 14.3.9, "How to Set Display Options for a Resource Catalog or Resource."
-
Use the Custom Folder Parameters section to add parameters that were defined while implementing the factory class. You can bind these parameters to other artifacts in the application.
Click the Add icon in the Parameters section to create a new row in the Parameters table.
You may see a drop-down menu on the Add icon if the factory class exposes parameters, for example, Content Presenter-specific factory classes provide a
templateViewparameter. -
Save the catalog definition file.
14.3.7 How to Add a Custom Content Provider to a Resource Catalog
A custom content provider dynamically generates zero or more catalog entries at runtime. Catalog entries include folders, links, custom folders, components, and so on. When you add a custom folder, a folder is created in the catalog and is displayed at runtime even if it is empty. However, when you add a custom content element, a folder is created in the catalog, but is displayed at runtime only if it has components inside it. Except for this difference, a custom content provider is similar to a custom folder.
To add a custom content provider:
-
In the Application Navigator, right-click the resource catalog to which you want to add the custom content provider, and choose Open.
-
In the Design view for the resource catalog, in the Catalog section on the left side, select the node in the resource catalog under which you want to add the custom content provider.
-
Click the Add new node icon and choose Custom Content.
A
customContentelement is added to the catalog. The right side of the page displays fields to define the new folder's attributes and parameters. -
The Id field is automatically populated with a generated ID. You can keep this ID, but you will probably want to change it to something more descriptive. The ID must be unique within the resource catalog.
-
In the Content Provider field, enter the fully qualified name of a class that implements the interface
oracle.adf.rc.spi.plugin.catalog.CustomContentProviderV2.You can use the Browse icon to see a list of classes that implement this interface. Also, see Section C.4, "Factory Classes Available for Adding Dynamic Resources to the Catalog."
-
In the Visible field, specify whether the folder is listed in the resource catalog at runtime. The default value is the EL expression
#{true}, which means the folder is listed for all users at all times. Enterfalseor#{false}to hide the folder from all users at all times, or enter an EL expression to specify the conditions under which the folder is listed. If the field is empty, the value defaults totrue. -
Optionally, in the Custom Content Attributes section, specify any desired display options for the folder. For more information, see Section 14.3.9, "How to Set Display Options for a Resource Catalog or Resource."
-
Use the Custom Content Parameters section to define parameters on the folder. The parameters you define here are passed to and interpreted by the
CustomContentProviderV2implementation.Click the Add icon in the Parameters section to create a new row in the Parameters table.
-
Save the catalog definition file.
14.3.8 How to Add a Resource Catalog to Another Resource Catalog
You can include another resource catalog inside the selected catalog. When you add another catalog, only a pointer to this catalog is included in the catalog definition file. The actual catalog contents are inserted only at runtime.
To add a resource catalog to another resource catalog:
-
In the Application Navigator, right-click the resource catalog to which you want to add the resource catalog, and choose Open.
-
In the Design view for the resource catalog, in the Catalog section on the left side, select the node in the resource catalog under which you want to add the resource catalog.
-
Click the Add new node icon and choose Catalog Reference.
A
catalogelement is added to the catalog. The right side of the page displays fields to define the resource catalog's attributes and parameters. -
The Id field is automatically populated with a generated ID. You can keep this ID, but you will probably want to change it to something more descriptive. The ID must be unique within the resource catalog.
-
In the Path field, enter the MDS path to the catalog definition file, for example,
\oracle\webcenter\portalapp\catalogs\custom-catalog.xml.You can use the Browse icon to browse application folders and select the catalog definition file.
-
In the Visible field, specify whether the folder is listed in the resource catalog at runtime. The default value is the EL expression
#{true}, which means the folder is listed for all users at all times. Enterfalseor#{false}to hide the folder from all users at all times, or enter an EL expression to specify the conditions under which the folder is listed. If the field is empty, the value defaults totrue. -
Optionally, in the Catalog Attributes section, specify any desired display options for the resource catalog. For more information, see Section 14.3.9, "How to Set Display Options for a Resource Catalog or Resource."
-
Save the catalog definition file.
14.3.9 How to Set Display Options for a Resource Catalog or Resource
You can specify various display options for a resource catalog or any of its resources to determine their appearance and behavior. The display options available depend on the type of the resource.
-
Title: A label to be used for the resource in the catalog. This attribute is defined by default. You can change its value, if required.
-
Description: A description of this resource.
-
Subject: Keywords to facilitate keyword searching of the resource catalog.
-
ToolTip: The tool tip to be displayed when you move the mouse over this resource name in the catalog.
-
IconURI: The location of the icon to display next to the resource name in the catalog.
To set display options for a resource catalog or resource:
-
In the Application Navigator, right-click the resource catalog and choose Open.
-
In the Design view for the resource catalog, in the Catalog column on the left side, select the resource for which you want to set display options.
To set display options for the resource catalog, select the root node.
-
In the resource's Attributes panel, click the Add icon and choose the attribute that you want to set. Table 14-2
Table 14-2 Resource Catalog Display Options
Attribute Description Title
The title displayed for the resource in the resource catalog.
Description
A description of the resource.
Subject
Keywords to facilitate searching of the node.
ToolTip
Text that displays to provide additional information about the resource when users hover the mouse over the Title.
IconURI
An icon to visually represent the resource. This is displayed next to the Title in the resource catalog.
-
From the Value Type drop-down list, choose:
-
Literal String—to specify a string as the value for the attribute.
-
Resource Bundle—to use a resource bundle to provide localized values for the attribute.
-
-
In the Display Value field, enter the value for the attribute. If you are using a resource bundle, click the Browse icon to select the resource bundle to search for the localized value.
-
Save the catalog definition file.
14.3.10 How to Rearrange Resources in a Catalog
You can move resources to different folders within a resource catalog after you have added them. You can rearrange resources in the following ways:
-
Drag and drop a resource from one folder into another.
-
Use the Change Parent context menu option to move a resource to a different folder.
To rearrange a resource using the Change Parent option:
-
In the Application Navigator, right-click the resource catalog and choose Open.
-
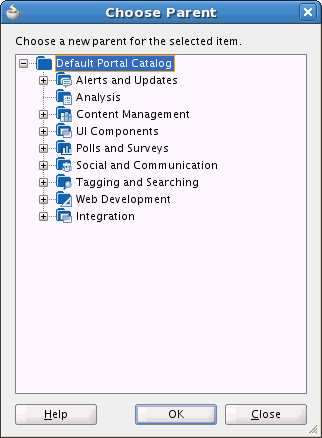
In the Design view for the resource catalog, in the Catalog column on the left side, right-click the resource and choose Change Parent from the context menu.
-
In the Choose Parent dialog (Figure 14-6), select the folder in which to include the resource and click OK.
Note:
The OK button is enabled only when you select a valid location for the resource. -
Save the navigation model definition file.
14.3.11 How to Show or Hide a Resource Catalog or Resource
You can specify whether or not a resource catalog or one of its resources is visible at runtime.
Tip:
As well as specifying an absolute true or false value, you can also dynamically determine whether or not the resource catalog or resource is available by using an EL expression to specify the conditions under which it is visible.To show or hide a resource catalog or resource:
-
In the Application Navigator, right-click the resource catalog and choose Open.
-
In the Design view for the resource catalog, in the Catalog column on the left side, select the resource for which you want to set the visibility.
To set the visibility of the navigation model resource catalog, select the root node.
-
In the Visible field, specify whether the resource catalog or resource is available for use in the application. This field takes an EL value. The default is
#{true}, which means the resource catalog or resource is visible. Enterfalseor#{false}to hide the resource catalog or resource, or enter an EL expression to specify the conditions under which it is available. If the field is empty, the value defaults totrue. -
Save the navigation model definition file.
14.3.12 How to Edit a Resource in a Resource Catalog
To edit a resource, select it in the Catalog section of the catalog definition file. The resource's attributes and parameters are displayed in the right half of the page. You can edit values for these attributes and parameters and save the catalog definition file. For details about a resource's attributes and parameters, see the appropriate section earlier in this chapter.
14.3.13 How to Delete a Resource from a Resource Catalog
To delete a resource, select it in the Catalog section of the catalog definition file and click the Remove selected node icon (Figure 14-7).
Figure 14-7 Delete Option in the Resource Catalog Design View
Description of "Figure 14-7 Delete Option in the Resource Catalog Design View"
14.3.14 How to Expose Data Controls Created at Design Time in a Resource Catalog
Oracle WebCenter Portal exposes a large number of service data controls that can be added to application pages and task flows. In addition, you may have created your own SQL or Web Services data controls in JDeveloper. To enable users to add these data controls to pages and task flows, you must expose the data controls in the resource catalog. For this, you must add a customFolder entry in your catalog definition file, as shown in Example 14-1 and Figure 14-8:
Example 14-1 Custom Folder for Design Time Created Data Controls
<customFolder id="dtDataControls"
               factoryClass="oracle.webcenter.datacomposer.internal.adapter.datacontrol.DTDataControlContextFactory">
  <attributes>
    <attribute value="Design Time Data Controls" attributeId="Title"/>
    <attribute value="Data controls created at design time" attributeId="Description"/>
    <attribute value="design time data controls,DT, data controls" attributeId="Subject"/>
    <attribute value="/adf/webcenter/folderlists_qualifier.png" attributeId="IconURI"/>
  </attributes>
</customFolder>
Figure 14-8 Design Time Data Controls Folder
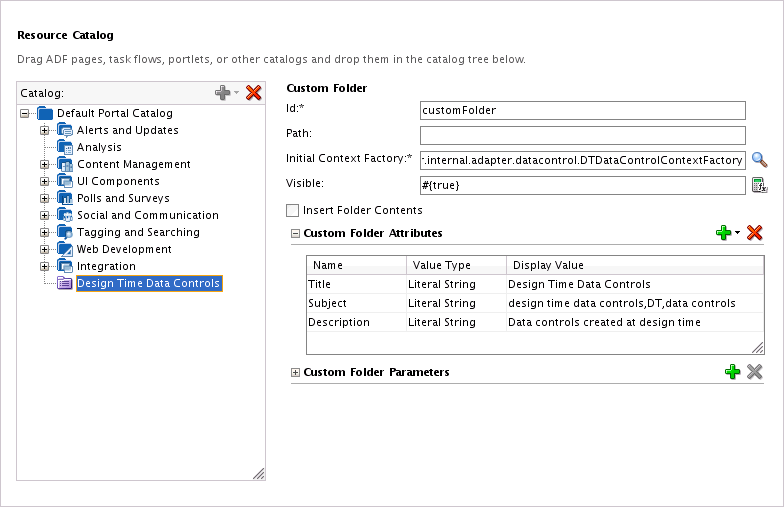
Description of "Figure 14-8 Design Time Data Controls Folder"
To expose the customFolder as a translatable resource in the catalog, the folder's string attributes must be stored as resource strings in a resource bundle. For this, the catalog definition file must have a resourceBundle attribute and each translatable attribute must have an isKey attribute. Then the attribute value is saved in a resource bundle, as shown in the following example:
The resourceBundle attribute on the catalog definition:
<catalogDefinition id="DefaultCatalog" visible="#{true}"
                    resourceBundle="oracle.webcenter.portalapp.catalogs.DefaultCatalogBundle"
                   definitionFilter="portal.catalog.DefaultCatalogFilter"
                   xmlns="http://xmlns.oracle.com/adf/rcs/catalog">
The isKey attribute defined on the attributes of a translatable resource:
<customFolder id="dtDataControls"
               factoryClass="oracle.webcenter.datacomposer.internal.adapter.datacontrol.DTDataControlContextFactory">
  <attributes>
    <attribute value="DATACONTROL_FOLDER.TITLE" isKey="true" attributeId="Title"/>
    <attribute value="DATACONTROL_FOLDER.DESCRIPTION" attributeId="Description" isKey="true"/>
    <attribute value="DATACONTROL_FOLDER.KEYWORDS" attributeId="Subject" isKey="true"/>
    <attribute value="/adf/webcenter/folderlists_qualifier.png" isKey="false" attributeId="IconURI"/>
  </attributes>
</customFolder>
For more information about using resource bundles, see Section 20.12, "Configuring Runtime Resource String Editing."
At runtime, the resource catalog displays a folder titled Design Time Data Controls irrespective of whether the application has any design-time data controls.
In a deployed application, the Assets page of the runtime administration console allows you to add design-time data controls individually to custom catalogs. Out-of-the-box catalogs cannot be edited at runtime. For more information, see the "Adding a Resource to a Resource Catalog" section in Oracle Fusion Middleware Building Portals with Oracle WebCenter Portal.
Exposing Custom Data Controls in an Already Deployed Application
If you created a SQL or web service data control in your application, and want to expose them in an already deployed application, you must perform the following steps:
-
Package the application into an ADF shared library.
-
Deploy the application to the WebLogic Server instance. For more information, see Section 55.2.5, "Deploying Extensions to the WebCenter Portal Shared Library (extend.spaces.webapp.war)."
When you perform this configuration, the deployed data controls are available in the Design Time Data Controls folder in the runtime Resource Registry. Users can add the data controls from the registry to any custom resource catalog, from where they can be consumed in pages and task flows.
14.3.15 How to Expose Data Controls Created at Runtime in a Resource Catalog
Users can create data controls at runtime in the Assets page of the runtime administration console. If you want your resource catalog to dynamically display data controls created at runtime, add a customFolder entry in your catalog definition file, as shown in Example 14-2.
Example 14-2 Custom Folder for Runtime Created Data Controls
<customFolder id="rtDataControls"
               factoryClass="oracle.webcenter.datacomposer.internal.adapter.datacontrol.DataControlContextFactory">
  <attributes>
    <attribute value="Runtime Data Controls" attributeId="Title"/>
    <attribute value="Data controls created at runtime" attributeId="Description"/>
    <attribute value="runtime data controls,RT,data controls" attributeId="Subject"/>
    <attribute value="/adf/webcenter/folderlists_qualifier.png" attributeId="IconURI"/>
  </attributes>
</customFolder>
To expose this folder as a translatable resource, the folder's string attributes must be stored as resource strings in a resource bundle. See Section 14.3.14, "How to Expose Data Controls Created at Design Time in a Resource Catalog" for an example of how to create translatable resources.
At runtime, the catalog displays a folder titled Runtime Data Controls irrespective of whether the folder has any data controls.
14.3.16 How to Control Visibility of Portlets in a Resource Catalog
Out-of-the-box, a resource catalog displays portlets from all the available producers irrespective of whether the portlets are secured or not. As a result, users are allowed to consume even secured portlets to which they do not have access. When a user adds such a portlet to a page, the portlet component is added, but it does not display any content. To ensure that users view and consume only those portlets that they can access, you can control the visibility of portlets in the resource catalog. Implement the PortletItemSecurityHelper interface to display portlets conditionally in the resource catalog, based on the user's permissions.
To control visibility of portlets in a resource catalog:
-
Implement the
PortletItemSecurityHelperinterface in your own item security helper class, for example,CustomPortletSecurityHelper.java.Example 14-3 shows a sample implementation of the
PortletItemSecurityHelperinterface. The following assumptions are made for the purpose of this example:-
Grants are defined for each portlet to control who can see it.
-
A permission class,
PortletVisibilityPermission, is defined to check a user's permissions on the portlet.
Example 14-3 Sample Implementation of PortletItemSecurityHelper
public class CustomPortletSecurityHelper extends PortletItemSecurityHelper { public boolean canView(String producerId, String portletId) { String permissionPath = producerId + '/' + portletId; PortletVisibilityPermission permission = new PortletVisibilityPermission (permissionPath, VIEW_ACTION); try { // throws AccessControlException if the permission is not granted JpsAuth.checkPermission(permission); canView = true; sLogger.logp(Level.FINE, SOURCE_CLASS, method, "PortletVisibilityPermission check passed. Producer={0}, Portlet={1} Action=view", new Object[]{producerId, portletId}); } catch(AccessControlException ace) { canView = false; sLogger.logp(Level.FINE, SOURCE_CLASS, method, "PortletVisibilityPermission check passed. Producer={0}, Portlet={1} Action=view", new Object[]{producerId, portletId}); } return canView; } } -
-
Create an
rc_ext.xmlfile in the application'sMETA-INFdirectory, and add the following code to register the implementation with the resource catalog:<extension xmlns:="http://xmlns.oracle.com/adf/rc/extension" id="your.extension.id" name="Your Extension Name" version="11.1.1.4.0"> <item-security-helper class="your.implementation.class.name"/> </extension>
At runtime, when a user clicks Add Content in Composer, the resource catalog displays only those portlets on which the user has permissions.
14.4 Selecting the Default Resource Catalog
You can configure the default catalog at the application and page levels. You can also use different resource catalogs depending on different criteria.
This section includes the following subsections:
-
Section 14.4.1, "How to Select the Default Resource Catalog for an Application"
-
Section 14.4.2, "How to Configure Multiple Resource Catalogs"
-
Section 14.4.3, "How to Select the Default Resource Catalog for a Page"
14.4.1 How to Select the Default Resource Catalog for an Application
Every Portal Framework application defines a default resource catalog that is used when users add content to a page, task flow, or page template.
When you first create a Portal Framework application, the seeded resource catalog, default-catalog.xml, is set as the application's default resource catalog. If you subsequently create your own resource catalog, you can set that as the default.
You can set the default resource catalog for a Portal Framework application in the application's adf-config.xml file. For more
To select the default resource catalog for an application:
-
Open the application's
adf-config.xmlfile. -
Change the
catalog-nameattribute value in the<rcv:rcv-config>element and specify the custom catalog name, as shown in the following example:<rcv:rcv-config> <rcv:default-catalog catalog-name="/oracle/webcenter/portalapp/catalogs/myCustomCatalog.xml"/> </rcv:rcv-config>
The
catalog-nameattribute identifies the catalog to be used as the default one.The path you specify is relative to the resource catalog root directory, for example, if you saved your new catalog definition as
C:\JDeveloper\mywork\RCSampleApp\Portal\Public_Html\oracle\webcenter\portalapp\catalogs\myCustomCatalog.xml, then thecatalog-namevalue would be/oracle/webcenter/portalapp/catalogs/myCustomCatalog.xml. The name uses the/separator because it represents a part of an MDS path.Note:
For information about the resource catalog-specific configurations you can make inadf-config.xml, see Section B.2.2, "adf-config.xml." -
Save the
adf-config.xmlfile.
14.4.2 How to Configure Multiple Resource Catalogs
Most businesses require that users and groups have access to only those resources that they can add to a page. To address this need, you can configure multiple resource catalogs in your application. You can expose different catalogs to different users based on specific criteria, such as the page being edited, the user, or the user role. This section describes how to associate multiple resource catalogs with your application. It contains the following subsections:
To use multiple catalogs, you must implement the ResourceCatalogSelector API to select the appropriate catalog for the user and the page being edited. You must include the catalog-selector entry in your application's adf-config.xml file to specify the name of your ResourceCatalogSelector class. If you do not specify a catalog-selector, the default catalog is used for all editable pages and all users see the same content. If you specify a catalog-selector, the default catalog is used only when the specified selector returns null.
To configure multiple resource catalogs:
-
Create your custom catalogs by performing the steps outlined in Section 14.2, "Creating a Resource Catalog" and Section 14.3, "Editing a Resource Catalog."
-
Implement the
oracle.adf.rc.model.config.ResourceCatalogSelectorinterface in your own resource catalog selector class, for example,CatalogSelector.java.Example 14-4 shows a catalog selector implementation where a custom resource catalog,
admin-catalog.xml, is shown toahunoldwho has administrator privileges, andusers-catalog.xmlis shown to usersskingandjdoe. If there is a problem with rendering either of these catalogs, then the default catalog is shown to users.Example 14-4 Sample ResourceCatalogSelector Showing Entries for Multiple Resource Catalogs
package webcenter; import javax.faces.context.FacesContext; import java.util.Map; import javax.faces.component.UIViewRoot; import javax.faces.context.FacesContext; import javax.faces.context.ExternalContext; import oracle.adf.rc.model.config.ResourceCatalogSelector; import oracle.adf.rc.model.dc.RCVContext; import oracle.adf.rc.model.config.ResourceCatalogSelector; /** * CatalogSelector is a sample implementation of the ResourceCatalogSelector * interface. * * This implementation is based on the authenticated user */ public class CatalogSelector implements ResourceCatalogSelector { public CatalogSelector() { } /** * Returns the Id of the catalog that must be used for the current * user. * * @param context a Map cont * @return id of the catalog to be used for the current user or * null if the default catalog must be used. */ public String getCatalogName(Map context) { // if no catalog is selected, return null & ensure that the Composer uses the // default catalog defined in the rcv-config String retval = null; // get information about the current user. FacesContext fctx = FacesContext.getCurrentInstance(); ExternalContext ectx = fctx.getExternalContext(); String user = ectx.getRemoteUser(); if (user == null || user.length() == 0) { // user name is not available so use the default catalog retval = null; } else if (user.equals("jdoe") || user.equals("sking") ) { // return users-catalog for users jdoe and sking retval = "users-catalog"; } else if (user.equals("ahunold")) { // return admin-catalog for user ahunold retval = "admin-catalog"; } return retval; } } -
In your
adf-config.xmlfile, enter the name of the class you created for selecting a resource catalog with the<rcv:catalog-selector>tag as show in the following example:<rcv:rcv-config> <rcv:default-catalog catalog-name="/oracle/webcenter/portalapp/catalogs/default-catalog.xml"/> <rcv:catalog-selector class-name="webcenter.CatalogSelector"/> </rcv:rcv-config>
The value for
catalog-namecorresponds to the default catalog definition file with the MDS path.Note:
For information about the resource catalog-specific configurations you can make inadf-config.xml, see Section B.2.2, "adf-config.xml."
14.4.3 How to Select the Default Resource Catalog for a Page
If your application page contains Composer components, then you can specify the catalog name in the catalog attribute on the Page Customizable component. You can specify a static or EL value. For more information, see Section B.1.1, "Page Customizable Component."
14.5 Filtering Items in a Resource Catalog
If you want to arrange catalog content so that it is essentially the same for all users, but displays different subsets of the content to different users, then you can configure your resource catalog to filter out selected items based on specific criteria.
For example, if two users A and B have different privileges on a page, you can configure your application to display the entire catalog to user A and only a subset of items in the catalog to user B.
To apply a filter on the catalog, you must implement the oracle.adf.rc.spi.plugin.catalog.CatalogDefinitionFilter interface. Additionally, you must associate this filter with the resource catalog.
Tip:
You can conditionally hide individual resources in a catalog by specifying an EL expression in the Visible field for the resource. For more information, see Section 14.3.11, "How to Show or Hide a Resource Catalog or Resource."To filter items in a resource catalog:
-
From the File menu, choose New.
-
In the New Gallery dialog, expand General, select Java, and then Java Class, and click OK.
-
In the Create Java Class dialog, enter a name for the class, for example,
CatalogFilter. -
Under the Optional Attributes section, add the
oracle.adf.rc.spi.plugin.catalog.CatalogDefinitionFilterinterface. -
Click OK.
-
Specify the logic for filtering items.
Note:
When implementing the filter logic it is common to want information about the current user and current page. This information can be obtained from theFacesContext.Example 14-5 shows a sample
CatalogDefinitionFilterimplementation. It is configured to hide theDiscussionsfolder (forumsFolder) for userjdoefrom the custom catalog,users-catalog.xml. The entire catalog, with theADF Faces ComponentsandDiscussionsfolders, is shown to all other users.Example 14-5 Sample Showing CatalogDefinitionFilter Implementation
package webcenter; import oracle.adf.rc.catalog.CatalogElement; import oracle.adf.rc.spi.plugin.catalog.CatalogDefinitionFilter; import java.util.Hashtable; import javax.faces.context.ExternalContext; import javax.faces.context.FacesContext; public class CatalogFilter implements CatalogDefinitionFilter { public boolean includeInCatalog(CatalogElement element, Hashtable env) { ExternalContext ectx =FacesContext.getCurrentInstance().getExternalContext(); if ("jdoe".equals(ectx.getRemoteUser()) && "forumsFolder".equals(element.getId())) return false; else return true; } } -
In the Application Navigator, right-click the resource catalog and choose Open.
-
In the Design view for the resource catalog, in the Catalog panel on the left side, select the root node of the resource catalog
-
In the Catalog Filter field, enter the name of the Java class you created, for example,
webcenter.CatalogFilter.This adds a
definitionFilterattribute in Source view of the file. -
Save the catalog definition file.
14.6 Deleting a Resource Catalog
If a resource catalog is no longer required within your application, you can delete it.
To delete a resource catalog, right-click the catalog in the Application Navigator and choose Delete from the context menu. For more information, see Section 9.4, "Deleting Portal Resources."
14.7 Defining Task Flow Parameters and Attributes of the Enclosing Show Detail Frames for Task Flows
At runtime, when you add a task flow from the resource catalog to your application page in Composer, the task flow is automatically enclosed in a Show Detail Frame component. You can initialize attributes, such as the title, height, or width, associated with the enclosing Show Detail Frame by defining those attributes in the catalog definition file that contains the task flow. To differentiate the task flow's properties from the enclosing Show Detail Frame's properties, you must use attr. as a prefix for Show Detail Frame properties.
For example, if a user adds a task flow to a page with a dark background setting, the task flow continues to use the background setting of the enclosing Show Detail Frame component. This may not be the look the user wants. To enable the user to change the Show Detail Frame's background property, you must initialize and expose the background attribute in the resource catalog. At runtime, while editing the task flow's properties, a user can also change the Show Detail Frame's background attribute.
Similarly, you can also initialize task flow parameters. You can define such parameters in the catalog definition file using an EL expression. At runtime, while editing the task flow's properties, a user can also change values for the exposed parameters. To differentiate the task flow's properties from the initialized parameters, you must use parameter. as a prefix for such parameters.
To initialize task flow parameters and Show Detail Frame properties:
-
Open the catalog definition file that contains the task flow.
-
Within the task flow's
<url>or<resource>element, add an<attribute>entry for each parameter andShow Detail Frameattribute you want to define.The
attributeIdfor a parameter must contain the parameter name along with a prefix ofparameter.; theattributeIdfor aShow Detail Frameattribute must contain the attribute name along with a prefix ofattr.as shown in the following example:<url visible="#{true}" factoryClass="oracle.webcenter.portalframework.sitestructure.rc.TaskFlowResourceFactory" id="wallMiniView" url="taskflow://oracle/webcenter/peopleconnections/wall/controller/taskflows/WallViewer.xml#WallViewer"> <attributes> <attribute value="WALL_MINIVIEW.TITLE" attributeId="Title" isKey="true"/> <attribute value="WALL_MINIVIEW.DESCRIPTION" attributeId="Description" isKey="true"/> <attribute value="#{securityContext.userName}" attributeId="parameter.userName"/> <attribute value="false" attributeId="attr.stretchContent"/> <attribute value="never" attributeId="attr.showResizer"/> </attributes> <contents/> </url>Note:
Include theisKeyattribute and set it totrueonly if the value is coming from a resource bundle. If not included, theisKeyvalue defaults tofalse. -
Save the catalog definition file.
14.8 Troubleshooting Problems with Resource Catalogs
This section provides information to assist you in troubleshooting problems you may encounter while using resource catalogs.
For information about configuring logging, see "Configuring ADF Logging for Composer".
Resource catalog is empty.
The default catalog is not available to MDS. Ensure that the deployment profile contains the necessary entries to copy the default catalog file. Also, ensure that in the MDS section of adf-config.xml, a namespace entry points to the default catalog file.
A project task flow does not appear in the resource catalog.
The task flow must be packaged as an ADF Library (JAR file) and added to the project. You must also ensure that the task flow ID is given in the following format:
taskflow://Path_to_Task_Flow/Task_Flow_Definition_File_Name#Task_Flow_ID
For example:
taskflow://oracle/webcenter/peopleconnections/wall/controller/taskflows/WallViewer.xml#WallViewer