10 Developing a Navigation Model
This chapter describes how to use Oracle JDeveloper to create and manage the navigation for your WebCenter Portal Framework applications.
This chapter includes the following topics:
10.1 Introduction to Navigation Models
Typically, a portal is made up of many pages that provide information from various different sources. Users need a way to easily move through all these pages to quickly access the specific information that they need. You provide this path through your portal's pages with your portal navigation.
You can also use your portal navigation to provide access to other resources, such as external pages, content repositories, portlets, and task flows.
A navigation model defines the content, structure, and metadata of the navigation. When you create the navigation model, you specify the items to include and the hierarchy of those items. Navigation models can include the following resources:
-
Pages (individual pages and page hierarchies)
-
External links
-
Content (individual content items or the results of a content query)
-
Other navigation models
-
Portlets, task flows, and external applications
For more information, see Section 10.3, "Editing a Navigation Model."
You can also add resources that are dynamically generated:
-
Custom Resources
-
Components
-
Custom Folders
-
Custom Content
For more information, see Section 10.3.6, "How to Add Dynamically Generated Resources to a Navigation Model."
When you create a new Portal Framework application, a navigation model is created for you (default-navigation-model.xml). You can build on this seeded navigation model or create your own. You might even want to create different navigation models for different user types.
Note:
If you create your own navigation model, rather than extend the seeded navigation model, we recommend that you set your navigation model as the default navigation model. For more information, see Section 10.4, "Selecting the Default Navigation Model."After you have created your navigation model, you can expose it on any page or page template in your portal. For more information, see Section 10.12, "Visualizing Portal Navigation."
Portal Framework applications support the runtime administration of navigation models to help users continue developing a portal even after it has been deployed. With runtime administration, authorized users can manage an application's navigation models, and create new ones, in a browser-based environment, with no requirement to install or understand JDeveloper. For more information, see Section 9.5, "Working with Portal Resources at Runtime."
You can bring navigation models that have been created or modified at runtime back into JDeveloper to ensure that any changes are not lost if the portal is redeployed. You can also edit these navigation models to further enhance them if necessary, and upload them back into the deployed portal. For more information, see Section 9.6, "Working with Round-Trip Development."
10.2 Creating a Navigation Model
If the seeded navigation model created for your application does not meet your requirements, you can create your own navigation model.
To create a navigation model:
-
In the Application Navigator, right-click the node where you want to create the navigation model (typically,
/oracle/webcenter/portalapp/navigations) and choose New. -
In the New Gallery, expand Web Tier, select Portal Framework and then Navigation, and click OK.
-
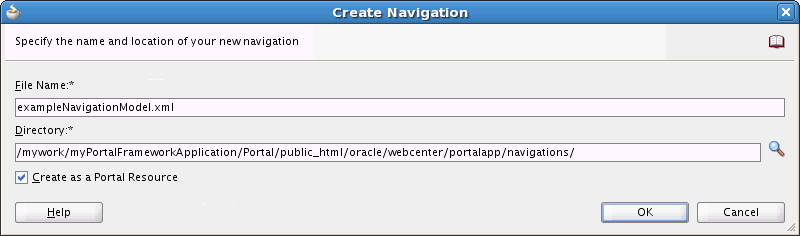
In the Create Navigation dialog (Figure 10-1), in the File Name field, enter a name for the XML file that represents the navigation model, for example
mainNavigation.xml. -
In the Directory field, enter the full directory path of the location under which to create the navigation model definition XML file.
Note:
In a Portal Framework application, to expose the new navigation model in the Assets page of the runtime administration console, you must create the navigation model under theApplication_Root/Portal/public_html/oracle/webcenter/portalappdirectory. By default Portal Framework application includes a separatenavigationsdirectory. -
Select Create as a Portal Resource to enable users with the appropriate permissions to manage the navigation model at runtime in the Assets page of the runtime administration console.
Note:
This option is available only if the directory you entered is theApplication_Root/Portal/public_html/oracle/webcenter/portalappdirectory or one of its subdirectories.Tip:
If you do not select this option now, you can add the navigation model to the runtime administration console later by right clicking it and choosing Create Portal Resource. -
Click OK.
When you create a navigation model in a Portal Framework application, a navigation model definition file (an XML file) is created for the navigation model in the specified directory. The navigation model definition file opens in Design view (Figure 10-2).
Figure 10-2 A Navigation Model in Design View
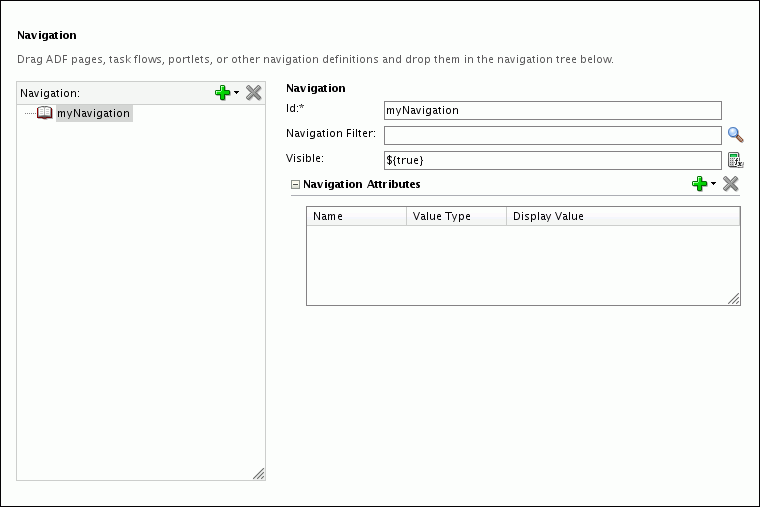
Description of "Figure 10-2 A Navigation Model in Design View"
The navigation model definition file is initially empty, so you must edit it to design the structure and content of your navigation model. For information, see Section 10.3, "Editing a Navigation Model."
Tip:
If you do not want to add resources from scratch, as a starting point, you could copy the source code of thedefault-navigation-model.xmlfile into the Source view of your new navigation model definition.If you created the navigation model under the appropriate directory and selected the Create as a Portal Resource option, the navigation model is automatically available for runtime administration. For more information, see Section 9.5, "Working with Portal Resources at Runtime."
If you create your own navigation model in a Portal Framework application, rather than extend the seeded navigation model, it is recommended that you set your navigation model as the default navigation model for the application. This makes it much easier to consume the navigation model in your pages and page templates. For more information, see Section 10.4, "Selecting the Default Navigation Model."
10.3 Editing a Navigation Model
To define the content of your navigation model you can edit the seeded navigation model, default-navigation-model.xml, to add nodes for the resources that you want users to be able to access within your application. The seeded navigation model is created automatically when you create an application using the WebCenter Portal Framework Application template.
You can also create your own navigation model and edit that. For more information, see Section 10.2, "Creating a Navigation Model."
You can add nodes to a navigation model in two ways:
-
Drag and drop resources from different areas in JDeveloper onto the navigation model in Design view.
-
Use the options on the Add new node menu in the Design view for the navigation model (Figure 10-3).
Figure 10-3 The Navigation Model Add New Node Menu
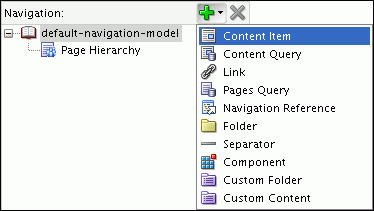
Description of "Figure 10-3 The Navigation Model Add New Node Menu"
In the Design view for the navigation model you can also modify and remove existing navigation model nodes.
This section includes the following topics:
-
Section 10.3.1, "How to Drag and Drop a Resource onto a Navigation Model"
-
Section 10.3.4, "How to Add a Separator to a Navigation Model"
-
Section 10.3.5, "How to Add Other Resources to a Navigation Model"
-
Section 10.3.6, "How to Add Dynamically Generated Resources to a Navigation Model"
-
Section 10.3.7, "How to Set Display Options for a Navigation Model or Navigation Model Node"
-
Section 10.3.8, "How to Rearrange Nodes in a Navigation Model"
-
Section 10.3.9, "How to Show or Hide a Navigation Model or Navigation Model Node"
10.3.1 How to Drag and Drop a Resource onto a Navigation Model
You can add the following resources to a navigation model by dragging and dropping them onto the desired location in the Design view of the navigation model definition file:
-
Pages, from the Application Navigator. You are prompted to choose whether to add just the page itself or to add a page query that includes the page and its subpages.
-
URL connections, from the Application Resources pane or Resource Palette.
-
Content items, from a Content Server connection in the Application Resources pane or Resource Palette.
-
Portlets, from the Application Resources pane or Resource Palette.
-
Task flows, from the Application Resources pane or Resource Palette.
-
External applications, from the Application Resources pane or Resource Palette.
-
Navigation models, from the Application Navigator. This embeds one navigation model inside another.
10.3.2 How to Add a Page to a Navigation Model
A navigation model is mostly made up of links to the various pages within the application. You can add links to any JSPX page in the application.
To add a page to a navigation model:
-
In the Application Navigator, right-click the navigation model to which you want to add the page, and choose Open.
-
In the Design view for the navigation model, in the Navigation column on the left side, select the node in the navigation model under which you want to add the page.
-
Click the Add new node icon and choose Link.
-
The Id field is automatically populated with a generated ID. You can keep this ID, but you will probably want to change it to something more descriptive. The ID must be unique within the navigation model.
The ID is used to provide direct access to a node in the navigation model. For example, if you have a top level node with the ID
home, and a child node below it with the IDsales, then the child node can be accessed using the following URL:http://host:port/application-context-root/servlet/home/sales
Note:
If the node is at the top level of the navigation model, the ID must not be one of the navigation URL reserved keywords. For more information, see Section 10.10, "Navigation URL Reserved Keywords."Tip:
If the ID is not unique, or you enter any invalid characters, the border of the field becomes red. -
From the Type drop-down list, select Page.
-
The Factory Class field is automatically populated with the appropriate value for pages and cannot be edited.
-
In the URL field, enter or browse for the URL to access the page. The URL should use the following format:
page://pathToPage/pageName
For example:
page://oracle/webcenter/portalapp/pages/myPage.jspx
Tip:
If you are not sure of the path to the page, click Browse Files to locate the page in the application. -
Select Render URL in Page Template, to render the page in the content area of the application using the specified page template.
Select Redirect to URL, to cause the page to issue a client-side redirect to the defined URL.
-
In the Visible field, specify whether the page is listed in the navigation model when it is rendered at runtime. The default value is the EL expression
#{true}, which means the page is listed for all users at all times. Enterfalseor#{false}to hide the page from all users at all times, or enter an EL expression to specify the conditions under which the page is listed. If the field is empty, the value defaults totrue.Note:
Nodes in a navigation model are automatically filtered based on security. If a user does not have access to a page, it is not displayed in the rendered navigation model. -
In the URL Attributes section, specify any desired display options for the page. For more information, see Section 10.3.7, "How to Set Display Options for a Navigation Model or Navigation Model Node."
-
In the URL Parameters section, enter values, as desired, for any parameters supported by the selected page.
Click the Add icon to create a row in the Parameters table.
For example, you can specify the size of the inline frame used to display the page by adding the
url_renderer_widthandurl_renderer_heightparameters and specifying a value in pixels. -
Save the navigation model definition file.
10.3.3 How to Add a Folder to a Navigation Model
Navigation models can be organized hierarchically to create subsets of nodes in your navigation model or to group similar nodes together. This hierarchy can be collapsed at runtime to save space if you have a lot of nodes in your navigation model.
You can place a node under any other node in a navigation model to create this hierarchy. If you have a collection of nodes that do not have a node that can act as their parent, you can create a folder. A folder does not point to an underlying resource; it serves only to contain other navigation model nodes.
To add a folder to a navigation model:
-
In the Application Navigator, right-click the navigation model to which you want to add the folder, and choose Open.
-
In the Design view for the navigation model, in the Navigation column on the left side, select the node in the navigation model under which you want to add the folder.
-
Click the Add new node icon and choose Folder.
-
The Id field is automatically populated with a generated ID. You can keep this ID, but you will probably want to change it to something more descriptive. The ID must be unique within the navigation model.
The ID is used to provide direct access to a node in the navigation model. For example, if you have a top level node with the ID
home, and a child node below it with the IDsales, then the child node can be accessed using the following URL:http://host:port/application-context-root/servlet/home/sales
Note:
If the node is at the top level of the navigation model, the ID must not be one of the navigation URL reserved keywords. For more information, see Section 10.10, "Navigation URL Reserved Keywords."Tip:
If the ID is not unique, or you enter any invalid characters in the ID, the border of the field becomes red. -
In the Visible field, specify whether the folder is displayed when the navigation model is rendered at runtime. The default value is the EL expression
#{true}, which means the folder is displayed to all users at all times. Enterfalseor#{false}to hide the folder from all users at all times, or enter an EL expression to specify the conditions under which the folder is displayed. If the field is empty, the value defaults totrue. -
In the Folder Attributes section, specify any desired display options for the folder. For more information, see Section 10.3.7, "How to Set Display Options for a Navigation Model or Navigation Model Node."
-
In the Folder Parameters section, enter values, as desired, for any parameters supported by the folder.
Click the Add icon to create a row in the Parameters table.
-
Save the navigation model definition file.
10.3.4 How to Add a Separator to a Navigation Model
Separators visually divide a navigation model into distinct groupings of nodes. Separators enable you to visually break up the nodes in the navigation model when it is rendered at runtime, making it easier to locate nodes.
To add a separator to a navigation model:
-
In the Application Navigator, right-click the navigation model to which you want to add the separator, and choose Open.
-
In the Design view for the navigation model, in the Navigation column on the left side, select the node in the navigation model under which you want to add the separator.
-
Click the Add new node icon and choose Separator.
-
The Id field is automatically populated with a generated ID. You can keep this ID, but you will probably want to change it to something more descriptive. The ID must be unique within the navigation model.
The ID is used to provide direct access to a node in the navigation model. For example, if you have a top level node with the ID
home, and a child node below it with the IDsales, then the child node can be accessed using the following URL:http://host:port/application-context-root/servlet/home/sales
Note:
If the node is at the top level of the navigation model, the ID must not be one of the navigation URL reserved keywords. For more information, see Section 10.10, "Navigation URL Reserved Keywords."Tip:
If the ID is not unique, or you enter any invalid characters in the ID, the border of the field becomes red. -
In the Visible field, specify whether the separator is displayed when the navigation model is rendered at runtime. The default value is the EL expression
#{true}, which means the separator is displayed to all users at all times. Enterfalseor#{false}to hide the separator from all users at all times, or enter an EL expression to specify the conditions under which the separator is displayed. If the field is empty, the value defaults totrue. -
Save the navigation model definition file.
10.3.5 How to Add Other Resources to a Navigation Model
You can add other resources to your navigation model, including documents, external web pages, portlets, and task flows.
To add other resources to a navigation model:
-
In the Application Navigator, right-click the navigation model to which you want to add the resource, and choose Open.
-
In the Design view for the navigation model, in the Navigation column on the left side, select the node in the navigation model under which you want to add the resource.
-
Click the Add new node icon, then choose the type of resource that you want to add:
-
Content Item to add a document
-
Content Query to add a collection of documents that meet specific query criteria
-
Link to add a portlet, task flow, external application, or web page
-
Pages Query to add a list of pages
-
Navigation Reference to embed another navigation model
-
-
The Id field is automatically populated with a generated ID. You can keep this ID, but you will probably want to change it to something more descriptive. The ID must be unique within the navigation model.
The ID is used to provide direct access to a node in the navigation model. For example, if you have a top level node with the ID
home, and a child node below it with the IDsales, then the child node can be accessed using the following URL:http://host:port/application-context-root/servlet/home/sales
Note:
If the node is at the top level of the navigation model, the ID must not be one of the navigation URL reserved keywords. For more information, see Section 10.10, "Navigation URL Reserved Keywords."Tip:
If the ID is not unique, or you enter any invalid characters in the ID, the border of the field becomes red. -
In the Visible field, specify whether the node is displayed when the navigation model is rendered at runtime. The default value is the EL expression
#{true}, which means the node is displayed to all users at all times. Enterfalseor#{false}to hide the node from all users at all times, or enter an EL expression to specify the conditions under which the node is displayed. If the field is empty, the value defaults totrue. -
The remaining fields are specific to the resource type. See Table 10-1 for details.
Table 10-1 Fields for Navigation Model Resources
Field Applies to Description Factory Class
Link
Content Item
This field is automatically populated with the appropriate factory class for the resource type and cannot be edited.
Insert Folder Contents
Content Query
Page Query
Select to display the results of the query directly in the rendered navigation model rather than displaying them under a folder.
Page Style
Page Query
Select the style of page to include in the navigation model.
Page Template
Page Query
Select the page template to use to display the resource when it is selected.
Page Visibility
Page Query
Select whether to include pages even if they have been flagged as hidden.
Path
Page Query
Navigation Reference
Enter the path and file name of the XML file that corresponds to the page that you want to use as the starting point of the page query. For example:
/oracle/webcenter/portalapp/pagehierarchy/pages/pages.xml
/oracle/webcenter/portalapp/pagehierarchy/pages/productsPages.xml
Query
Content Query
Enter the query criteria to identify the content to include in the navigation model, for example:
SELECT * FROM cmis:document WHERE cmis:name LIKE 'Foo%'
For more information about how to format the query and for more examples, see the Oracle Fusion Middleware Content Management REST Service Developer's Guide.
Redirect to URL
Link
Content Item
Select to issue a client-side redirect to the defined URL.
Render URL in Page Template
Link
Content Item
Select to render the resource in the current page, using the specified page template.
Repository
Content Query
Enter or browse for the content repository whose content you want to search.
Note: If you enter the repository name manually (that is, without using drag and drop or the Choose a Resource dialog), and if the connection for the repository is available only in the Resource Palette, then ensure that you first add the connection to the application (in the Application Resources pane).
Scope
Page Query
This field is not applicable to Portal Framework applications (the scope is always the current application).
Type
Link
Content Item
Select the type of link that you want to add to the navigation model: External Link, External Application, Page, Taskflow, Portlet, Content.
URL
Link
Content Item
Enter the location of the resource. If you do not know the location, click the Browse Files icon to browse for available resources.
Table 10-2 provides the URL format to use for the different resource types.
Note: If you enter the URL for a Portlet, External Application, or Content resource manually (that is, without using drag and drop or the Choose a Resource dialog), and if the connection for the resource is available only in the Resource Palette, then ensure that you first add the connection to the application (in the Application Resources pane.
Table 10-2 provides the URL format to use for the different resource types.
Table 10-2 Format for URL for Different Resource Types
Resource Type Location in Application URL Formats External Link
None
Absolute or relative path to the web page to which you want to link.
Note: If you use the External Link option to include a
mailto:link in your navigation, your navigation UI must explicitly handle this type of link. For information, see Section 10.12, "Visualizing Portal Navigation."External Application
External application connection in the Application Resources pane
extapp://externalApplicationIdPage
Application Navigator
page://pathToPage/pageName
For example:
page://oracle/webcenter/portalapp/pages/myPage.jspx
Task Flow from an ADF Library
Resource Palette
taskflow://pathToTaskFlow/taskFlowDefinitionFileName#taskFlowId
Note: Navigating directly to a task flow in this way enables you to set the parameters of the task flow. If you need additional control over the task flow, add it to a page and then add the page to the navigation model.
Task Flow Within the Application
Application Navigator
taskflow://PathToTaskFlow/taskFlowDefinitionFileName#taskFlowId
Note: Navigating directly to a task flow in this way enables you to set the parameters of the task flow. If you need additional control over the task flow, add it to a page and then add the page to the navigation model.
Portlet
Portlet producer connection in the Application Resources pane or Resource Palette
portlet://producerId/portletId
Note: If you provide navigation directly to a portlet in this way, then when users navigate to the portlet they will not be able to customize it. If you want users to be able to customize the portlet, then add it to a page to create a portlet instance, which can be customized, and then add that page to the navigation model.
Content
Content repository connection in the Application Resources pane or Resource Palette
content://contentConnectionId/documentId
-
In the resource's Attributes section, specify any desired display options for the resource. For more information, see Section 10.3.7, "How to Set Display Options for a Navigation Model or Navigation Model Node."
-
In the resource's Parameters section, enter values, as desired, for any parameters supported by the resource.
Click the Add icon to create a row in the Parameters table.
For links you can specify the size of the inline frame used to display the target of the link by adding the
url_renderer_widthandurl_renderer_heightparameters and specifying a value in pixels.If you want to use a Content Presenter display template to display a content item or the results of a content query, in the Parameters section, click the Add icon, and choose templateView.
In the Value field for the templateView parameter, enter the display template view ID to use for rendering the content, for example:
-
For a single content item:
oracle.webcenter.content.templates.default.detail -
For a content query:
oracle.webcenter.content.templates.default.list.simple
Note:
If you display a wiki page using a Content Presenter display template, by default any links within that wiki page are displayed in the Document Viewer. If you want to display wiki page links using Content Presenter, you must edit theadf-config.xmlfile. For more information, see Section 30.3.5, "Displaying Wiki Page Links Within Content Presenter." -
10.3.6 How to Add Dynamically Generated Resources to a Navigation Model
As well as adding known resources to your navigation model, you can also add resources that are dynamically generated at runtime.
-
Custom resources are links to third party resources.
-
Custom components are resources, such as simple ADF Faces components, compound objects containing two or more components, or JSF Verbatim tags that let you add arbitrary HTML content inside them.
-
Custom folders are configured to display their content dynamically at runtime. A custom folder is not added as a folder with resources; it contains only a reference to the factory class, which displays the resources dynamically.
-
Custom content providers dynamically generate zero or more resources at runtime. They are very similar to custom folders, except that, when you add a custom folder, the folder is always displayed when the navigation model is rendered at runtime, even if it is empty. With custom content providers however, the folder is displayed at runtime only if it has content inside it.
To add dynamically generated resources to a navigation model:
-
In the Application Navigator, right-click the navigation model to which you want to add the resource, and choose Open.
-
In the Design view for the navigation model, in the Navigation column on the left side, select the node in the navigation model under which you want to add the resource.
-
Click the Add new node icon, then choose the type of resource that you want to add:
-
Link to add a custom resource. You must also select Other from the Type drop-down list.
-
Component to add a custom component
-
Custom Folder to add a custom folder
-
Custom Content to add a custom content provider
-
-
The Id field is automatically populated with a generated ID. You can keep this ID, but you will probably want to change it to something more descriptive. The ID must be unique within the navigation model.
The ID is used to provide direct access to a node in the navigation model. For example, if you have a top level node with the ID
home, and a child node below it with the IDsales, then the child node can be accessed using the following URL:http://host:port/application-context-root/servlet/home/sales
Note:
If the node is at the top level of the navigation model, the ID must not be one of the navigation URL reserved keywords. For more information, see Section 10.10, "Navigation URL Reserved Keywords."Tip:
If the ID is not unique, or you enter any invalid characters in the ID, the border of the field becomes red. -
In the Visible field, specify whether the node is displayed when the navigation model is rendered at runtime. The default value is the EL expression
#{true}, which means the node is displayed to all users at all times. Enterfalseor#{false}to hide the node from all users at all times, or enter an EL expression to specify the conditions under which the node is displayed. If the field is empty, the value defaults totrue. -
The remaining fields are specific to the resource type. See Table 10-3 for details.
Table 10-3 Fields for Custom Navigation Model Resources
Field Applies to Description Component Factory
Custom Component
Enter or browse for the Java class that implements the
oracle.adf.rc.component.ComponentFactoryinterface and creates an instance of the component based on a set of parameters, for example,oracle.adf.rc.component.XmlComponentFactory.As you type the name, the field autocompletes with valid factory classes from the classpath.
For more information, see Section C.4, "Factory Classes Available for Adding Dynamic Resources to the Catalog."
Content Provider
Custom Content
Enter or browse for the Java class that implements the
oracle.adf.rc.spi.plugin.catalog.CustomContentProviderV2 interface.For more information, see Section C.4, "Factory Classes Available for Adding Dynamic Resources to the Catalog."
Factory Class
Custom Resource
Enter or browse for the
URLResourceFactoryimplementation class that can resolve the URL for the custom resource.Initial Context Factory
Custom Folder
Enter or browse for the Java class that implements the
javax.naming.spi.InitialContextFactoryinterface and generates the folder based on a set of parameters.For more information, see Section C.4, "Factory Classes Available for Adding Dynamic Resources to the Catalog."
Insert Folder Contents
Custom Folder
Select to display the contents of the custom folder directly in the rendered navigation model rather than displaying them under the folder.
Path
Custom Folder
Enter the MDS path for the custom folder.
Redirect to URL
Custom Resource
Select to cause the page to issue a client-side redirect to the defined URL.
Render URL in Page Template
Custom Resource
Select to render the resource in the current page, using the specified page template.
Type
Custom Resource
Select Other.
URL
Custom Resource
Enter the URL to access the resource.
-
In the resource's Attributes section, specify any desired display options for the resource. For more information, see Section 10.3.7, "How to Set Display Options for a Navigation Model or Navigation Model Node."
Note:
Typically for custom content providers, you will not need to specify any attributes, because the attributes for the resources generated by the content provider will be specified by the content provider. -
In the resource's Parameters section:
-
For custom resources, enter values, as desired, for any parameters supported by the custom resource.
-
For custom folders, add the parameters that were defined while implementing the factory class. You can bind these parameters to other artifacts in the application.
-
For custom content providers, define the parameters on the custom content provider. The parameters you define here are passed to and interpreted by the
CustomContentProviderV2implementation.
Click the Add icon to create a row in the Parameters table.
-
-
Save the navigation model definition file.
10.3.7 How to Set Display Options for a Navigation Model or Navigation Model Node
You can specify various display options for a navigation model or any of its nodes to determine their appearance and behavior when the navigation model is rendered at runtime. The display options available depend on the type of the resource.
To set display options for a navigation model node:
-
In the Application Navigator, right-click the navigation model and choose Open.
-
In the Design view for the navigation model, in the Navigation column on the left side, select the node for which you want to set display options.
To set display options for the navigation model, select the root node.
-
In the resource's Attributes panel, click the Add icon and choose the attribute that you want to set. Table 10-4 lists the available attributes.
Table 10-4 Navigation Model Display Options
Attribute Description Title
The title displayed for the node when the navigation model is rendered at runtime.
AccessKey
A key mnemonic (single character) that users can enter to access the node without using the mouse.
Description
A description of the node.
IconURI
An icon to visually represent the node. This is displayed next to the Title when the navigation model is rendered at runtime.
Subject
Keywords to facilitate searching of the node.
Target
The location on the container page where the node is displayed when it is selected, either in the same browser window (
_self), a new window (_blank), or a popup (_popup), or any other location supported by the navigation UI.Note: Popups are not supported for pages.
ToolTip
Text that displays to provide additional information about the node when users hover the mouse over the Title.
Modified
The date of the last modification of the node. This attribute is used for site map creation.
ChangeFrequency
How frequently the node is likely to change:
always,hourly,daily,weekly,monthly,yearly,never. This attribute is used for site map creation.Significance
The priority of this node relative to other nodes in the navigation model, within the range
0.0to1.0. This attribute is used for site map creation.ExternalId
An ID to enable a direct reference to a node in the navigation model from a static link in the page.
For more information, see Section 10.10, "Navigation URL Reserved Keywords."
-
From the Value Type drop-down list, choose:
-
Literal String—to specify a string as the value for the attribute.
-
Resource Bundle—to use a resource bundle to provide localized values for the attribute.
-
-
In the Display Value field, enter the value for the attribute. If you are using a resource bundle, click the Browse icon to select the resource bundle to search for the localized value.
-
Save the navigation model definition file.
10.3.8 How to Rearrange Nodes in a Navigation Model
You can move nodes around within a navigation model after you have added them. You can rearrange nodes in the following ways:
-
Drag and drop a node from one location to another.
To move a node within the navigation model, select the node and drag it to the desired position. To indent a node (child) under another (parent), select the child node and drag it over the top of the parent node.
-
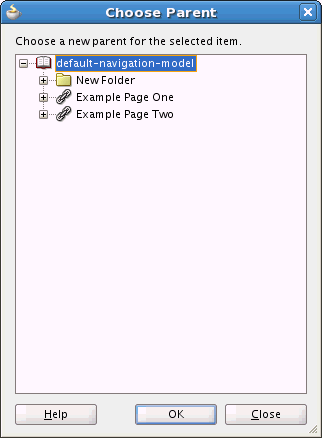
Use the Change Parent context menu option to move a node to a different location.
To rearrange a node using the Change Parent option:
-
In the Application Navigator, right-click the navigation model and choose Open.
-
In the Design view for the navigation model, in the Navigation column on the left side, right-click the node and choose Change Parent from the context menu.
-
In the Choose Parent dialog (Figure 10-4), select the parent node in which to include the node and click OK.
Note:
Any node within a navigation model can be the parent of another node. -
Save the navigation model definition file.
10.3.9 How to Show or Hide a Navigation Model or Navigation Model Node
You can specify whether or not a navigation model or one of its nodes is visible at runtime.
Tip:
As well as specifying an absolute true or false value, you can also dynamically determine whether or not the navigation model or node is available by using an EL expression to specify the conditions under which it is visible.To show or hide a navigation model or navigation model node:
-
In the Application Navigator, right-click the navigation model and choose Open.
-
In the Design view for the navigation model, in the Navigation column on the left side, select the node for which you want to set the visibility.
To set the visibility of the navigation model, select the root node.
-
In the Visible field, specify whether the navigation model or node is available for use in the application. This field takes an EL value. The default is
#{true}, which means the navigation model or node is visible. Enterfalseor#{false}to hide the navigation model or node, or enter an EL expression to specify the conditions under which the navigation model or node is available. If the field is empty, the value defaults totrue. -
Save the navigation model definition file.
10.3.10 How to Edit a Navigation Model Node
To edit a navigation model node, select it in the Navigation section of the navigation model definition file. The resource's attributes and parameters are displayed in the right half of the page. You can edit values for these attributes and parameters and save the navigation model definition file. For details about a resource's attributes and parameters, see the appropriate section earlier in this chapter.
10.3.11 How to Delete a Navigation Model Node
To delete a resource, select it in the Navigation section of the navigation model definition file and click the Remove selected node icon ().
Figure 10-5 Delete Option in the Navigation Model Design View
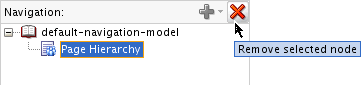
Description of "Figure 10-5 Delete Option in the Navigation Model Design View"
10.4 Selecting the Default Navigation Model
Every Portal Framework application defines a default navigation model that provides a convenient way to identify the navigation model that should be used by default by the application. You can then reference this default navigation model without having to specify its actual name. For example, in navigation EL expressions, the default navigation model is often referenced, such as in #{navigationContext.defaultNavigationModel}.
When you first create a Portal Framework application, the seeded navigation model, default-navigation-model.xml, is set as the application's default navigation model. If you subsequently create your own navigation model to use for the main navigation path through your application, rather than having to explicitly reference this navigation model whenever you want to use it, you can set it as the default. This greatly simplifies the process of using the navigation model in your application.
You can set the default navigation model for a Portal Framework application by editing the oracle.webcenter.portalapp.navigation.model preference in the adf-config.xml file.
To select the default navigation model:
-
In the Application Resources pane of the Application Navigator, right-click the adf-config.xml file, and choose Open.
Tip:
To locate theadf-config.xmlfile, expand the Descriptors node, and then the ADF META-INF node. -
Click the Source tab.
-
Locate the ADF preference with the following
id:oracle.webcenter.portalapp.navigation.model
-
Set the
valueattribute to the path of the navigation model that you want to use as the default for the application, for example:value="/oracle/webcenter/portalapp/navigations/myNavigationModel.xml"
Example 10-1 shows an example of the complete preference element.
-
Save the
adf-config.xmlfile.
10.5 Filtering the Contents of a Navigation Model
You can use a filter to determine which nodes to include in the navigation model, based on specific criteria, when it is rendered at runtime.
Tip:
You can conditionally hide individual nodes in the navigation model by specifying an EL expression in the Visible field for the node. For more information, see Section 10.3.9, "How to Show or Hide a Navigation Model or Navigation Model Node."To filter the contents of a navigation model:
-
In the Application Navigator, right-click the navigation model and choose Open.
-
In the Design view for the navigation model, in the Navigation panel on the left side, select the node that represents the navigation model (the root node).
-
In the Navigation Filter field, enter the name of a Java class to use to filter out selected nodes in the navigation model based on specific criteria.
The Java class should implement the
oracle.adf.rc.spi.plugin.catalog.CatalogDefinitionFilterinterface.Nodes are automatically filtered based on security. If a user does not have access to a particular resource, the node for that resource is not displayed when the navigation model is rendered at runtime.
-
Save your changes.
10.6 Deleting a Navigation Model
If a navigation model is no longer required within your application, you can delete it.
Note:
If you delete an application's default navigation model, you must make sure to change the default navigation model to a valid navigation model. For more information, see Section 10.4, "Selecting the Default Navigation Model."To delete a navigation model, right-click the navigation model in the Application Navigator and choose Delete from the context menu. For more information, see Section 9.4, "Deleting Portal Resources."
10.7 Editing the Navigation Registry File
The navigation registry is a resource catalog specifically for registering which resources users can add to navigation models at runtime. Each Portal Framework application contains one navigation registry file, navigation-registry.xml, which is created when you create the application. You can edit this file, for example, to remove the Navigation Reference resources so that users cannot embed other navigation models at runtime.
To edit the navigation registry:
-
In the Application Navigator, right-click the
navigation-registry.xmlfile.Tip:
You can find this file underApplication_Root/oracle/webcenter/portalapp/navigations. -
Edit the file the same way as any other resource catalog. For more information, see Section 14.3, "Editing a Resource Catalog."
You can add the following resources to the navigation registry:
-
Folder
-
Link
-
Task Flow
-
Portlet
-
Content
-
Other
-
-
Resource Catalog
-
Component
-
Custom Folder
-
Custom Content
You can also modify and remove existing resources in the navigation registry, and rearrange resources in the registry.
-
-
When you are finished, save the
navigation-registry.xmlfile.
10.8 Editing the Navigation Renderer
The navigation renderer is a JSPX page that renders non-page resources when accessed through a navigation model, including:
-
Portlets
-
Content
-
External links
-
External applications
-
Task flows
You can edit the navigation renderer page to change how these types of resources are rendered. For example, you may also want to add an image before or after the navigation renderer task flow or change from a flow to a stretch layout.
Note:
In the vast majority of cases, you should be able to edit the existing navigation renderer to meet your requirements. However, if required, you can create your own navigation renderer page. For example, the navigation renderer expects acontent facet. If you want to use a different facet, you can create your own page and place the navigation renderer task flow in the appropriate location for your template.
If you choose to create your own navigation renderer page, it must include a navigation renderer region that contains the navigation renderer task flow.
To set your page as the navigation renderer for the application, edit the navigation renderer ADF preference (oracle.webcenter.portalapp.navigation.renderer) to point to the appropriate file. For detailed instructions for how to edit an ADF preference, see Section 10.4, "Selecting the Default Navigation Model."
The navigation renderer page is hidden by default, so you must first show it in your application before you can edit it.
To edit the navigation renderer:
-
In the Application Navigator, right-click the application project and choose Project Properties.
-
In the Project Properties dialog, expand the Project Source Paths node and select Web Application.
-
Select the Excluded tab.
-
Select the navigation renderer file (
navigation-renderer.jspx) and click Remove to remove it from the list of excluded files. -
Click OK.
The navigation renderer JSPX file is now listed in the Application Navigator under the following node:
/oracle/webcenter/portalapp/pages/
-
In the Application Navigator, right-click navigation-renderer.jspx and choose Open.
-
Click the Source tab and edit the file as required.
-
When you are finished, save the
navigation-renderer.jspxfile.
10.9 Setting the REDIRECT_OPTIONS Context Parameter
If your application does not use partial page refresh (PPR), the URL in the browser changes whenever a user navigates to a node in the navigation model. However, the URL shown by the browser does not reflect the current page; it shows the URL of the last page shown.
To enable the browser to display the URL of the current page, you can set the oracle.webcenter.navigationframework.REDIRECT_OPTIONS context parameter in the web.xml file.
Note:
Setting theoracle.webcenter.navigationframework.REDIRECT_OPTIONS context parameter affects performance by adding an extra request/response for every navigation.To set the REDIRECT_OPTIONS context parameter:
-
In the Application Navigator, right-click the web.xml file and choose Open.
-
In the Overview Editor, expand the Context Initialization Parameters section.
-
Click the Create Context Initialization Parameter icon.
-
In the Name field, enter
oracle.webcenter.navigationframework.REDIRECT_OPTIONS. -
In the Value field, enter
toPrettyURL.This adds the following to the
web.xmlfile:<context-param> <param-name>oracle.webcenter.navigationframework.REDIRECT_OPTIONS</param-name> <param-value>toPrettyURL</param-value> </context-param>
-
Save the
web.xmlfile.
10.10 Navigation URL Reserved Keywords
You can use specific reserved keywords to provide direct access to nodes within a navigation model. These reserved keywords are:
-
wcnav_defaultSelection—Use to access the first navigable node of a navigation model -
wcnav_currentSelection—Use to access the currently selected node of a navigation model -
wcnav_externalId—Use to access the node within a navigation model with the specified external ID -
wcnav_title—Use to access the node within a navigation model with the specified title
You can use these keywords in an af:goLink component in a page or page template (Example 10-2) or in the URL of an External Link navigation item in a navigation model (Example 10-3).
Example 10-2 Providing Direct Access to a Navigation Model Node from a goLink Component
<af:goLink id="pt_glink1" text="Navigation Item"
           destination="/faces/wcnav_defaultSelection"/>
Example 10-3 Providing Direct Access to Navigation Model Node from an External Link Navigation Item
<url visible="#{true}"
     factoryClass="oracle.webcenter.portalframework.sitestructure.rc.UrlResourceFactory"
     id="externalLink"
     url="/faces/wcnav_externalId/myNavigationItem">
</url>
By default these URLs provide access to nodes within the default navigation model. To directly access a node in a non-default navigation model, you must specify the path of the navigation model by setting the wcnav.modelPath URL parameter, for example:
/faces/wcnav_externalId/myNavigationItem?wcnav .modelPath=/oracle/webcenter/siteresources/scopedMD/
s7f446cab_f622_4b68_a83e_b7eaf28b52ec/navigation/gsr0271c712_721a_4565_9f0e_755784a7093b/
myProjectNavigationModel
Depending on where you are using the link, you may need to encode the URL parameters, for example, if the external ID contains spaces or special characters you would specify the URL as /faces/wcnav_externalId/my%2Fnav%2Fitem.
10.11 Tips for Developing Navigation Models
When creating a navigation model for your Portal Framework application, consider the following:
-
Try to use only one main navigation model. Using multiple navigation models limits the control of friendly URLs.
-
Ensure that each section of your Portal Framework application has a friendly subroot name. For example, place all footer links under a Footer folder.
-
Include all links that take users to another part of the Portal Framework application, including header and footer links, in the navigation model.
-
Use external IDs to surface persistent links in the application so that external applications can reference them without breaking when navigation model nodes are moved.
-
If a page defines parameters, you can set these parameters in the navigation model node to dynamically control how the page is rendered.
-
Use page links as often as possible. For example, if you want to include a contact link, create a page to display the link and then include that page in the navigation model.
For more information, see the "Oracle WebCenter & ADF Architecture Team" blog.
10.12 Visualizing Portal Navigation
The navigation visualization determines how the navigation appears in the application. For example, navigation can be provided as a set of tabs along the top of each page, or perhaps as a tree structure along the side of the page. Another common navigation visualization is to provide a "master-detail" navigation, for example, tabs along the top of the page, with each tab having additional navigation provided as a tree structure along the side of the page.
Typically, you add navigation visualization to page templates, so that it can be defined in one place and propagated consistently across the whole portal. However, you can also add navigation visualization to individual pages.
Oracle WebCenter Portal provides several built-in navigation task flows in the WebCenter Portal - Services Catalog of the resource catalog that you can add to pages or page templates to visualize the navigation. These built-in navigation task flows provide a quick way to test your navigation model, but they provide a fairly simple navigation visualization. For more information about these built-in navigation task flows, see the "Adding Navigation to a Page Template" section in Oracle Fusion Middleware Building Portals with Oracle WebCenter Portal.
It is more likely that you will require a more advanced visualization. To do this, you must create your own navigation UI using ADF navigation components and the Oracle WebCenter Portal navigation APIs.
Note:
If the navigation model referenced by the page or page template includes External Link navigation items that usemailto: links, you must explicitly handle these. The example below uses JSTL to inspect the navigation item's externalURL to see if it starts with the string mailto:. If it does, an ADF Faces goLink component is used to render the link.
<c:choose>
  <c:when test="${fn:startsWith(node.externalURL, 'mailto:')}">
    <af:goLink id="pt_gl_mail" text="#{node.title}"
               destination="#{node.externalURL}"/>
  </c:when>
  <c:otherwise>
    ...
  </c:otherwise>
</c:choose>
Oracle WebCenter Portal provides two sets of APIs for adding navigation to your portal:
-
Expression Language (EL) APIs—Use EL expressions to obtain the navigation model and navigation nodes.
-
REST APIs—Use standard HTTP methods to point to the navigation model and navigation nodes, returning a standard representation of any retrieved object. REST APIs can be used when using client-side programming languages, for example JavaScript + HTML, or environments, for example an iPhone.
Note:
Any task flow that uses the navigation model to trigger navigation within an application must include aparent-action activity, named wcnav_parentAction, in the task flow definition that propagates the wcnav_outcome to the root level, as follows:
<parent-action id="wcnav_parentAction">
  <root-outcome>wcnav_outcome</root-outcome>
</parent-action>
This section includes the following topics:
10.12.1 Using the Navigation Expression Language APIs
Oracle WebCenter Portal provides a set of expression language (EL) APIs that you can use to obtain the navigation model and represent that navigation model as a runtime model. The runtime models can be bound directly to ADF Faces navigation components.
The available navigation EL expressions are listed in full in Section F.7, "ELs Related to Navigation."
This section includes the following topics:
-
Section 10.12.1.2, "Introduction to the Navigation Runtime Model"
-
Section 10.12.1.3, "Introduction to the Navigation Resource"
-
Section 10.12.1.4, "How to Render the Navigation Model as a List of Links"
-
Section 10.12.1.5, "How to Render the Navigation Model as a Tree"
-
Section 10.12.1.6, "How to Render the Navigation Model as a Three-Level Menu"
-
Section 10.12.1.7, "How to Render the Navigation Model as Breadcrumbs"
Note:
This section includes some examples of how to use the navigation EL APIs. For a full working example, see the default page templates (pageTemplate_globe.jspx and pageTemplate_swooshy.jspx) created when you create a Portal Framework application.10.12.1.1 Introduction to the Navigation Context
The Navigation Context is the entry point to access all navigation elements within your system. Specifically, it enables you to access navigation models via preference, state, and direct reference, as well as providing the hooks to create custom UI to actually navigate to the nodes.
-
Default navigation model (preference)—This is the model specified by the ADF preference
oracle.webcenter.portalapp.navigation.modelin theadf-config.xmlfile. This enables you to define the general model to be used throughout your application and enables you to change the value in one place rather than having to go to each page and page template to set the value. The EL expression to retrieve the default navigation model is:#{navigationContext.defaultNavigationModel}Note:
For more information about how to set theoracle.webcenter.portalapp.navigation.modelpreference, see Section 10.4, "Selecting the Default Navigation Model." -
Current navigation model (state)—This model is the one used to navigate to the current view and, if it is not set, returns the default navigation model. Your application may contain multiple navigation models. The EL expression to retrieve the current navigation model is:
#{navigationContext.currentNavigationModel}Using this expression enables you to have a single value within a page or page template (for example, for displaying breadcrumbs) and have it display the correct value without having to select a specific navigation model.
-
Direct navigation model access (direct reference)—You can also select a specific navigation model by passing in the path to the XML definition of the model. The EL expression to retrieve a specific navigation model is:
#{navigationContext.navigationModel['modelPath=path']where
pathis the path to the navigation model definition file, for example:#{navigationContext.navigationModel['modelPath=/oracle/webcenter/portalapp/navigations/myNavigation']}Note:
You do not need to include the.xmlfile name extension.
Use these ELs for core bean operations for binding the navigation model to the UI component's actionListener attribute. For example:
#{navigationContext.processAction}
Example 10-4 creates a simple tree UI using the Navigation Context to access the current navigation model and render the tree using <af:outputText/>.
Example 10-4 Simple Tree Navigation UI
<af:tree var="node"
    value="#{navigationContext.currentNavigationModel.treeModel['startNode=/,
    includeStartNode=true,
    depth=1']}"
    id="t1">
  <f:facet name="nodeStamp">
    <af:outputText value="#{node.title}" id="ot1"/>
  </f:facet>
</af:tree>
Example 10-5 uses the Navigation Context's processAction listener to handle navigation for an ADF commandImageLink component, passing in the current node as the parameter called node as an attribute to the actionListener.
Example 10-5 Binding the Navigation Model to the UI Component
<af:tree var="node"
    value="#{navigationContext.currentNavigationModel.treeModel['startNode=/,
           includeStartNode=true,
           depth=1']}"
    id="t1">
  <f:facet name="nodeStamp">
    <af:commandImageLink text="#{node.title}"
        id="sm_c1b"
        actionListener="#{navigationContext.processAction}"
        inlineStyle="#{node.selected ? 'font-weight:bold;' : ''}">
      <f:attribute name="node" value="#{node}"/>
    </af:commandImageLink>
  </f:facet>
</af:tree>
10.12.1.2 Introduction to the Navigation Runtime Model
The Navigation Runtime Model exposes the underlying XML definition as runtime models, as well as providing direct access to individual nodes. The runtime models take into account such factors as security and visibility to produce a session-specific representation that can be bound to UI objects.
Note:
Note the difference between the navigation model that you create to define the content, structure, and metadata of the navigation and the navigation runtime model that determines how the navigation model behaves at runtime.You can access the whole model by using the default runtime model (defaultTreeModel, defaultListModel, defaultMenuModel, and defaultSiteMap), or access a specific sub-tree using the various parameters when creating the runtime model. For example:
#{navigationContext.defaultNavigationModel.menuModel['startNode=home,
    includeStartNode=false, depth=2']}
For more information about the underlying ADF Faces MenuModel, TreeModel, and ListModel, see the Oracle Fusion Middleware Web User Interface Developer's Guide for Oracle Application Development Framework.
You can create the following runtime models based on the underlying navigation model:
-
UI Models
-
Tree model
#{navigationContext.defaultNavigationModel.defaultTreeModel} #{navigationContext.defaultNavigationModel.treeModel['parameters']} -
Menu model
#{navigationContext.defaultNavigationModel.defaultMenuModel} #{navigationContext.defaultNavigationModel.menuModel['parameters']} -
List model
#{navigationContext.defaultNavigationModel.defaultListModel}
#{navigationContext.defaultNavigationModel.listModel['parameters']}
-
-
Search Engine Model
-
Sitemap
#{navigationContext.defaultNavigationModel.defaultSiteMap}
#{navigationContext.defaultNavigationModel.siteMap['parameters']}
-
You can access specific nodes within the navigation model using the follow EL expressions:
-
#{navigationContext.defaultNavigationModel.currentSelection} -
#{navigationContext.defaultNavigationModel.rootNode} -
#{navigationContext.defaultNavigationModel.node['path']}
Example 10-6 renders the current navigation model's menu model as a breadcrumb.
Example 10-6 Rendering the Navigation Model as a Menu Model
<af:breadCrumbs id="bc1"
    var="node"
    value="#{navigationContext.currentNavigationModel.defaultMenuModel}">
  <f:facet name="nodeStamp">
    <af:commandNavigationItem id="cni1"
        text="#{node.title}"
        actionListener="#{navigationContext.processAction}"
        partialSubmit="true">
      <f:attribute name="node" value="#{node}"/>
    </af:commandNavigationItem>
  </f:facet>
</af:breadCrumbs>
Example 10-7 produces a Sitemap for the application based on the default navigation model.
Example 10-7 Producing a Sitemap
<jsp:root xmlns:jsp="http://java.sun.com/JSP/Page"  version="2.1"
    xmlns:f="http://java.sun.com/jsf/core">
  <jsp:directive.page contentType="text/xml;charset=UTF-8" />
  <f:view>
    ${navigationContext.defaultNavigationModel.defaultSiteMap}
  </f:view>
</jsp:root>
For more information about Sitemaps, see Section 10.13, "Using a Navigation Model to Create a Sitemap."
10.12.1.3 Introduction to the Navigation Resource
The Navigation Resource provides access to individual properties against each node within the navigation model. These fall into the following categories:
-
Attributes—Common properties that the user can specify against any navigation element and are used for rendering the node on the page, including:
-
Title—The title displayed for the node when the navigation model is rendered at runtime.
-
AccessKey—A key mnemonic (single character) that users can enter to access the node without using the mouse.
-
Description—A description of the node.
-
IconURI—An icon to visually represent the node. This is displayed next to the Title when the navigation model is rendered at runtime.
-
Subject—Keywords to facilitate searching of the node.
-
Target—The location on the container page where the node is displayed when it is selected, either in the same browser window (
_self), a new window (_blank), or a popup (_popup), or any other location supported by the navigation UI. -
ToolTip—Text that displays to provide additional information about the node when users hover the mouse over the Title.
-
Modified—The date of the last modification of the node. This attribute is used for Sitemap creation.
-
ChangeFrequency—How frequently the node is likely to change: always, hourly, daily, weekly, monthly, yearly, never. This attribute is used for Sitemap creation.
-
Significance—The priority of this node relative to other nodes in the navigation model, within the range 0.0 to 1.0. This attribute is used for Sitemap creation.
-
ExternalId—An ID to enable a direct reference to any node in the navigation model from a static link in the page.
-
-
Parameters—User-defined properties that are specific to each node. These are name/value pairs and can contain any value.
-
State—Built-in properties that you can query and use to navigate to the node. For example:
-
Type of node, for example, folder or separator
-
Whether the node is navigable
-
The path to the node
-
Parent, child, or sibling node access
-
Whether the node is the currently selected node within the navigation model or on the selected node's path
For a complete list, see Section F.7, "ELs Related to Navigation."
-
Example 10-8 renders an ADF commandImageLink component with various attributes.
Example 10-8 Rendering a commandImageLink with Attributes
<af:commandImageLink text="#{node.title}"
    id="cil1"
    actionListener="#{navigationContext.processAction}"
    shortDesc="#{node.attributes['ToolTip']}"
    accessKey="#{node.attributes['AccessKey']}"
    inlineStyle="#{node.selected ? 'font-weight:bold;' : ''}">
  <f:attribute name="node" value="#{node}"/>
</af:commandImageLink>
Example 10-9 accesses values passed from a node to the corresponding page through parameters.
Example 10-9 Passing Node Values to Page Parameters
homePageDef.xml

<pageDefinition xmlns="http://xmlns.oracle.com/adfm/uimodel"
    version="11.1.1.55.96" id="homePageDef"
    Package="oracle.webcenter.portalapp.pages">
  <parameters>
    <parameter id="NavigationParameter"
        value="#{navigationContext.currentNavigationModel.currentSelection.parameters
            ['MyNavParam']}"/>
  </parameters>
Example 10-10 conditionally displays breadcrumb links based on whether you can navigate to the node. It also bases the UI component on the type of the node.
Example 10-10 Conditionally Displaying Navigation Nodes
<af:breadCrumbs id="bc1"
                var="node"
                value="#{navigationContext.currentNavigationModel.defaultMenuModel}">
  <f:facet name="nodeStamp">
    <af:switcher facetName="#{node.navigable}" id="swn1">
      <f:facet name="true">
        <af:commandNavigationItem id="cni1" text="#{node.title}"
                                  actionListener="#{navigationContext.processAction}"
                                  partialSubmit="true">
          <f:attribute name="node" value="#{node}"/>
        </af:commandNavigationItem>
      </f:facet>
      <f:facet name="false">
        <af:outputText value="#{node.title}" rendered="#{!node.separator}" id="ot3"/>
      </f:facet>
    </af:switcher>
  </f:facet>
</af:breadCrumbs>
10.12.1.4 How to Render the Navigation Model as a List of Links
One common way to visualize a portal's navigation is as a list of links. Clicking a link navigates to the resource associated with it.
Example 10-11 retrieves the list model for the current navigation model and renders it vertically on the page. The code iterates through the navigation model, binding each node in turn to an ADF commandImageLink component. If a node contains children, a second iterator renders those children on the page. If a node is not navigable, it is not rendered as a link. The currently selected node is displayed in bold.
Example 10-11 Navigation as a List of Links
<af:panelGroupLayout id="pgl1" layout="vertical">
  <af:spacer id="sp1" height="20px"/>
  <af:iterator id="i1"
               value="#{navigationContext.currentNavigationModel.listModel['startNode=/,
                     includeStartNode=false']}"
               var="node">
    <af:panelGroupLayout layout="vertical">
      <af:commandImageLink id="cil2" text="#{node.title}"
                           actionListener="#{navigationContext.processAction}"
                           action="pprnav"
                           icon="#{node.attributes[pageFlowScope.tnBean.iconKey]}"
                           disabled="#{not node.navigable}"
                           inlineStyle="#{node.onSelectedPath ? 'font-weight:bold;' : ''}">
        <f:attribute name="node" value="#{node}"/>
      </af:commandImageLink>
      <af:iterator id="i2" value="#{node.children}" var="node2">
        <af:panelList id="pl1">
          <af:commandImageLink id="cil3" text="#{node2.title}"
                               actionListener="#{navigationContext.processAction}"
                               action="pprnav"
                               icon="#{node2.attributes[pageFlowScope.tnBean.iconKey]}"
                               disabled="#{not node2.navigable}"
                               inlineStyle="#{node2.onSelectedPath ? 'font-weight:bold;' : ''}">
            <f:attribute name="node" value="#{node2}"/>
          </af:commandImageLink>
        </af:panelList>
      </af:iterator>
    </af:panelGroupLayout>
  </af:iterator>
  <af:spacer id="sp3" height="20px"/>
</af:panelGroupLayout>
10.12.1.5 How to Render the Navigation Model as a Tree
Another common way to visualize portal navigation is as a tree structure. A navigation tree is typically listed down the side of the page, so it is a useful way of displaying the entire navigation hierarchy. Users can navigate immediately to any node in the navigation. The advantage of using a tree structure over a simple list of links, is that users can expand and collapse the different nodes of the navigation model.
To include a tree structure in your page or page template, you can bind the ADF Faces tree navigation component to your navigation model. Example 10-12 shows how to do this. In the example, the second level of the navigation hierarchy is collapsed by default, but an icon enables users to expand a node to show its children.
Example 10-12 Navigation as a Tree
<af:panelGroupLayout id="pgl1" layout="vertical">
  <af:spacer id="sp2" height="20px"/>
  <af:tree id="tree1" var="node" initiallyExpanded="true"
           value="#{navigationContext.currentNavigationModel.treeModel['includeStartNode=false']}">
    <f:facet name="nodeStamp">
      <af:commandImageLink id="cil2" text="#{node.title}"
                           actionListener="#{navigationContext.processAction}"
                           action="pprnav"
                           icon="#{node.attributes[pageFlowScope.tnBean.iconKey]}"
                           disabled="#{not node.navigable}"
                           inlineStyle="#{node.onSelectedPath ? 'font-weight:bold;' : ''}">
        <f:attribute name="node" value="#{node}"/>
      </af:commandImageLink>
    </f:facet>
  </af:tree>
  <af:spacer id="sp3" height="20px"/>
</af:panelGroupLayout>
10.12.1.6 How to Render the Navigation Model as a Three-Level Menu
You can also render your navigation as a menu. In a menu, the top level of navigation is displayed. When the user hovers the mouse over a particular node, if that node has children, they are displayed as a popup menu.
Figure 10-5 retrieves the list model for the current navigation model and renders it vertically on the page. The code iterates through the navigation model. If a node contains children, then a second iterator iterates through those children. Nodes without children are rendered as menu items. In the second level of the navigation model, if any of the nodes have children, then a third iterator is executed. Again, nodes without children are rendered as menu items. At the third level of the navigation mode, nodes are rendered as menu items. Non-navigable nodes are not rendered as links. The currently selected node is displayed in bold.
Example 10-13 Navigation as a Menu
<af:panelGroupLayout id="pgl1" layout="vertical">
  <af:spacer id="sp1" height="20px"/>
  <af:menuBar id="mb1">
    <af:iterator id="i1"
                 value="#{navigationContext.currentNavigationModel.listModel['startNode=/,
                       includeStartNode=false']}"
                 var="node">
      <af:switcher id="s1"
                   facetName="#{empty node.children ? 'leafNode' : 'parentNode'}">
        <f:facet name="parentNode">
          <af:menu id="m1" text="#{node.title}"
                   inlineStyle="#{node.onSelectedPath ? 'font-weight:bold;' : ''}">
            <af:iterator id="i2" value="#{node.children}"
                         var="node2">
              <af:switcher id="s2"
                           facetName="#{empty node2.children ? 'leafNode' : 'parentNode'}">
                <f:facet name="parentNode">
                  <af:menu id="m2" text="#{node2.title}"
                           inlineStyle="#{node2.onSelectedPath ? 'font-weight:bold;' : ''}">
                    <af:iterator id="i3" value="#{node2.children}"
                                 var="node3">
                      <af:commandMenuItem id="cml3"
                                          text="#{node3.title}"
                                          actionListener="#{navigationContext.processAction}"
                                          action="pprnav"
                                          icon="#{node3.attributes[pageFlowScope.tnBean.iconKey]}"
                                          disabled="#{not node3.navigable}"
                                          inlineStyle="#{node3.onSelectedPath ?
                                                      'font-weight:bold;' : ''}">
                        <f:attribute name="node" value="#{node3}"/>
                      </af:commandMenuItem>
                    </af:iterator>
                  </af:menu>
                </f:facet>
                <f:facet name="leafNode">
                  <af:commandMenuItem id="cml1"
                                      text="#{node2.title}"
                                      actionListener="#{navigationContext.processAction}"
                                      action="pprnav"
                                      icon="#{node2.attributes[pageFlowScope.tnBean.iconKey]}"
                                      disabled="#{not node2.navigable}"
                                      inlineStyle="#{node2.onSelectedPath ?
                                                  'font-weight:bold;' : ''}">
                    <f:attribute name="node" value="#{node2}"/>
                  </af:commandMenuItem>
                </f:facet>
              </af:switcher>
            </af:iterator>
          </af:menu>
        </f:facet>
        <f:facet name="leafNode">
          <af:commandMenuItem id="cml2" text="#{node.title}"
                              actionListener="#{navigationContext.processAction}"
                              action="pprnav"
                              icon="#{node.attributes[pageFlowScope.tnBean.iconKey]}"
                              disabled="#{not node.navigable}"
                              inlineStyle="#{node.onSelectedPath ? 'font-weight:bold;' : ''}">
            <f:attribute name="node" value="#{node}"/>
          </af:commandMenuItem>
        </f:facet>
      </af:switcher>
    </af:iterator>
  </af:menuBar>
  <af:spacer id="sp3" height="20px"/>
</af:panelGroupLayout>
10.12.1.7 How to Render the Navigation Model as Breadcrumbs
To provide users with a quick way of orientating themselves within the portal navigation, you can provide a trail of breadcrumbs on the page. Breadcrumbs show the current location in the portal and the path taken through the navigation to get there. Users can then quickly return to any point along that path. Breadcrumbs are typically used on a page in addition to other forms of navigation.
To include breadcrumbs in your page or page template, you can bind the ADF Faces breadCrumbs navigation component to your navigation model. Example 10-14 shows how to do this.
Example 10-14 Navigation as Breadcrumbs
<af:panelGroupLayout id="pgl1" layout="vertical">
  <af:spacer id="sp1" height="20px"/>
  <af:breadCrumbs id="bc1" var="node"
                  value="#{navigationContext.currentNavigationModel.menuModel[
                        'includeStartNode=false']}">
    <f:facet name="nodeStamp">
      <af:commandNavigationItem id="cil1" text="#{node.title}"
                                actionListener="#{navigationContext.processAction}"
                                action="pprnav"
                                icon="#{node.attributes[pageFlowScope.tnBean.iconKey]}"
                                disabled="#{not node.navigable}">
        <f:attribute name="node" value="#{node}"/>
      </af:commandNavigationItem>
    </f:facet>
  </af:breadCrumbs>
  <af:spacer id="sp2" height="20px"/>
</af:panelGroupLayout>
10.12.1.8 How to Render Master-Detail Navigation
Often portals provide a "master-detail" navigation visualization, for example, as tabs along the top of the page, with each tab having additional navigation provided as a tree structure along the side of the page.
The master-detail navigation in Example 10-15 uses the same navigation model for the master and detail navigation. The master navigation renders the top level of the navigation model as a list of links along the top of the page. The detail navigation renders the children of the currently selected top level node as a tree.
Tip:
For thec:set tag to work correctly in the following examples, you must include the JSTL library by adding the following to the jsp:root tag:
xmlns:c="http://java.sun.com/jsp/jstl/core"
Example 10-15 Master-Detail Navigation Using a Single Navigation Model
<af:panelGroupLayout id="pgl1" layout="vertical">
  <af:spacer id="sp1" height="20px"/>
  <!-- Master -->
  <af:navigationPane id="np1" var="node" hint="bar" level="1"
                     value="#{navigationContext.navigationModel[
                           'modelPath=/oracle/webcenter/portalapp/navigations/master-detail']
                           .defaultMenuModel}">
    <f:facet name="nodeStamp">
      <af:commandNavigationItem id="cil1" text="#{node.title}"
                                actionListener="#{navigationContext.processAction}"
                                action="pprnav"
                                icon="#{node.attributes[pageFlowScope.tnBean.iconKey]}"
                                disabled="#{not node.navigable}"
                                inlineStyle="#{node.onSelectedPath ? 'font-weight:bold;' : ''}">

        <f:attribute name="node" value="#{node}"/>
      </af:commandNavigationItem>
    </f:facet>
  </af:navigationPane>
  <af:spacer id="sp2" height="20px"/>
  <!-- Setup the parameters for detail query -->
  <c:set value="startNode=/${navigationContext.navigationModel[
               'modelPath=/oracle/webcenter/portalapp/navigations/master-detail']
               .currentSelection.prettyUrlPath[1]}, includeStartNode=false"
         var="currSel" scope="session"/>
  <!-- Detail -->
  <af:tree id="tree1" var="node2" initiallyExpanded="true"
           value="#{navigationContext.navigationModel[
                 'modelPath=/oracle/webcenter/portalapp/navigations/master-detail']
                 .treeModel[currSel]}">
    <f:facet name="nodeStamp">
      <af:commandImageLink id="cil2" text="#{node2.title}"
                           actionListener="#{navigationContext.processAction}"
                           action="pprnav"
                           icon="#{node2.attributes[pageFlowScope.tnBean.iconKey]}"
                           disabled="#{not node2.navigable}"
                           inlineStyle="#{node2.onSelectedPath ? 'font-weight:bold;' : ''}">
        <f:attribute name="node" value="#{node2}"/>
      </af:commandImageLink>
    </f:facet>
  </af:tree>
  <af:spacer id="sp3" height="20px"/>
</af:panelGroupLayout>
The example above can also be written to use two different navigation models, one for the master navigation, and one for the detail navigation. Example 10-16 shows how.
Example 10-16 Master-Detail Navigation Using Multiple Navigation Models
<af:panelGroupLayout id="pgl1" layout="vertical">
  <af:spacer id="sp1" height="20px"/>
  <!-- Master -->
  <af:navigationPane id="np1" var="node" hint="bar" level="1"
                     value="#{navigationContext.navigationModel[
                           'modelPath=/oracle/webcenter/portalapp/navigations/master']
                           .defaultMenuModel}">
    <f:facet name="nodeStamp">
      <af:commandNavigationItem id="cil1" text="#{node.title}"
                                actionListener="#{navigationContext.processAction}"
                                action="pprnav"
                                icon="#{node.attributes[pageFlowScope.tnBean.iconKey]}"
                                disabled="#{not node.navigable}"
                                inlineStyle="#{node.onSelectedPath ? 'font-weight:bold;' : ''}">
        <f:attribute name="node" value="#{node}"/>
      </af:commandNavigationItem>
    </f:facet>
  </af:navigationPane>
  <af:spacer id="sp2" height="20px"/>
  <!-- Setup the parameters for detail query -->
  <c:set value="startNode=/${navigationContext.navigationModel[
               'modelPath=/oracle/webcenter/portalapp/navigations/master']
               .currentSelection.prettyUrlPath[1]}, includeStartNode=false"
         var="currSel" scope="session"/>
  <!-- Detail -->
  <af:tree id="tree1" var="node2" initiallyExpanded="true"
                      value="#{navigationContext.navigationModel[
                            'modelPath=/oracle/webcenter/portalapp/navigations/master']
                            .treeModel[currSel]}">
    <f:facet name="nodeStamp">
      <af:commandImageLink id="cil2" text="#{node2.title}"
                           actionListener="#{navigationContext.processAction}"
                           action="pprnav"
                           icon="#{node2.attributes[pageFlowScope.tnBean.iconKey]}"
                           disabled="#{not node2.navigable}"
                           inlineStyle="#{node2.onSelectedPath ? 'font-weight:bold;' : ''}">
        <f:attribute name="node" value="#{node2}"/>
      </af:commandImageLink>
    </f:facet>
  </af:tree>
  <af:spacer id="sp3" height="20px"/>
</af:panelGroupLayout>
10.12.2 Using the Navigation REST APIs
Oracle WebCenter Portal provides REST APIs to access the navigation model of your application. Use the navigation REST APIs to access the interface used to visualize the navigation model. You would typically use REST when creating Rich Internet Applications that are client-side scripted and require the ability to interact with data from a server-side application. For example, the Oracle WebCenter Portal iPhone App uses REST APIs to interact with a Portal Framework application.
For an introduction to the REST APIs, see Chapter 53, "Using Oracle WebCenter Portal REST APIs."
To access the navigation REST APIs, construct a URL as follows:
http://host:port/<ApplicationContextRoot>/api/navigations/default-navigation-model
where host and port are the hostname and port number for the server where the portal is running, and <ApplicationContextRoot> is the context root for the portal application. For example:
http://localhost:7101/MyPortalApplication-Portal-context-root/api/navigations/default-navigation-model
The response to this request provides the entry point URI (href) for the navigation REST APIs, identified by the link element with the following resourceType:
urn:oracle:webcenter:navigations
Sending a GET request to this entry point URI returns a list of navigation models within the application, for example:
<sitestructure>
  ...
  <navigation-list>
    oracle/webcenter/siteresources/scopedMD/s8bba98ff_4cbb_40b8_beee_296c916a23ed/
    navigations/default-navigation
  </navigation-list>
  <navigation-list>
    oracle/webcenter/siteresources/scopedMD/s8bba98ff_4cbb_40b8_beee_296c916a23ed/
    navigations/admin-navigation
  </navigation-list>
  <navigation-list>
    oracle/webcenter/siteresources/scopedMD/s8bba98ff_4cbb_40b8_beee_296c916a23ed/
    navigations/myNavigation
  </navigation-list>
  ...
</sitestructure>
Using this information, you can start to retrieve information about specific navigation models and the nodes within them, using the URIs listed in Table 10-5. The URIs shown in Table 10-5 can be appended to the http://host:port/<ApplicationContextRoot> part of the URL to access the desired REST endpoint.
Table 10-5 REST URI Model for Navigation
| REST URI | Returns |
|---|---|
.../api/navigations |
All navigation models in the application. |
.../api/navigations/default-navigation-model |
The properties of the default navigation model. |
.../api/navigations/pathToModel/modelId |
The properties of the specified navigation model ( |
.../api/navigations/pathToModel/modelId/resources |
All root resources under the specified navigation model ( |
.../api/navigations/pathToModel/modelId/resources/pathToResource/resourceId |
The specified resource ( |
...api/navigations/pathToModel/modelId/resources/pathToResource/resourceId/children |
A navigation tree listing all the children of the specified resource ( |
.../api/navigations/pathToModel/modelId/resources/pathToResource/resourceId/children?depth=dep |
A navigation tree listing the children of the specified resource ( |
Each navigable node has a prettyURL element that you can use to drill down further in the navigation model hierarchy.
10.12.3 Tips for Visualizing Portal Navigation
When visualizing portal navigation model, consider the following:
-
Use ADF Faces layout components to organize your page or page template, rather than HTML
divandspantags. For more information, see the "Organizing Content on Web Pages" chapter in the Oracle Fusion Middleware Web User Interface Developer's Guide for Oracle Application Development Framework. -
If your Portal Framework application is public facing, or you want to enable search engine optimization, add navigation visualization using the
af:goLinkcomponent in conjunction with thegoLinkPrettyUrlmethod. -
Manage styling, decorative images, and geometry using skins.
-
Select the page template using the default page template setting in
adf-config.xmlor using the Render URL in Page Template option for individual navigation links.
For more information, see the "Oracle WebCenter & ADF Architecture Team" blog.
10.13 Using a Navigation Model to Create a Sitemap
When a search engine crawls a web site, it parses the HTML for standard links (for example, <a href="url">text</a>). However, ADF-based web sites generate links as JavaScript, which when executed in a browser, cause the page change or navigation. These JavaScript links cannot be interpreted by search engines.
Some popular search engines, such as Google and Bing, support Sitemaps. A Sitemap is an XML file that lists URLs for a site along with additional metadata about each URL (for example, when it was last updated, how often it usually changes, and how important it is relative to other URLs in the site), so that search engines can more intelligently crawl the site. By submitting a Sitemap to a search engine, or by referencing the Sitemap in your robots.txt file, you can feed a list of pages into the search engine for indexing.
For more information about Sitemaps, go to:
Portal Framework applications can provide a Sitemap URL that you can register with search engines to get them to index your set of pages. If the user-agent of the search engine matches one supported by ADF, the HTML is returned for the request instead of the JavaScript.
Note:
Currently, the only user-agent registered with ADF is Google's googlebot.You can create a Sitemap for your application based on a navigation model, as shown in Example 10-17.