| Oracle® Fusion Middleware Oracle Authorization Policy Manager Administrator's Guide (Oracle Fusion Applications Edition) 11g Release 6 (11.1.6) Part Number E20839-04 |
|
|
PDF · Mobi · ePub |
| Oracle® Fusion Middleware Oracle Authorization Policy Manager Administrator's Guide (Oracle Fusion Applications Edition) 11g Release 6 (11.1.6) Part Number E20839-04 |
|
|
PDF · Mobi · ePub |
The information in this chapter is specific to Oracle Fusion Applications only.
This chapter describes the procedures an administrator follows to manage security policies on database resources, and it is divided into the following sections:
Data security policies determine who can do what on which set of data. A data security policy defines the enterprise or application roles that provides members of those roles access rights to specific data.
The Oracle Fusion security reference implementation provides enterprise roles and access to data through a comprehensive set of predefined data security policies applicable to application roles that are members of those enterprise roles.
Data security consists of privileges conditionally granted to a role, and these grants are used to control access to instance sets of a business object. A privilege is a single action corresponding to an operation on a single business object. Instance sets are rows of a database resource returned by a user-defined SQL WHERE clause; instance sets may be a single row of data, multiple rows of a single table, or all rows of a single table. A data security policy is, therefore, a set of privileges to a principal on a business object for a given instance set.
The security administrator uses Oracle Authorization Policy Manager to create and administer data security policies. A data security policy involves the following security artifacts:
A database resource that references a primary key corresponding to the database table or view of the business object to be secured
A role that has been provisioned with the users who can perform the granted actions
A rule (also known as a condition) to define the available row instances in the form of an SQL predicate or simple filter (stored as XML) defined on the rows of the database resource
One or more actions (such as view, edit, or delete) performed on database records that correspond to the operations supported by the business object, and which may include custom operations
By default, when a business object is registered as a database resource in Authorization Policy Manager, users are denied access to all data of that business object. A data security policy makes data available to users based on the roles they are members of according to the actions and conditions specified in the policy:
Actions determine whether the user has the right to perform a given operation.
Condition evaluation for actions (and their corresponding operations) specify the set of rows on which those operations can be applied.
Data security policies secure the database resources of an enterprise. The Oracle Fusion security reference implementation provides a comprehensive set of predefined data security policies for database resources that involve database tables and views that correspond to business objects; it is recommended that these database resources not be changed.
In cases where custom database resources must be secured, the security administrator can manage the predefined database resources or create new data security policies. Before modifying any data security policy, it is important to understand the predefined data security policies provided by the security reference implementation. As a general guideline, security policies assigned to duty roles of the reference implementation should not be changed, only their participation in role hierarchies. Details about the Oracle Fusion security reference implementation can be found in the Oracle Fusion Security Reference Manual and are also available for review Authorization Policy Manager.
Important:
Review but do not modify data security policies from the Oracle Fusion security reference implementation in Authorization Policy Manager except as a custom implementation to create data security policies.
For example, in the security reference implementation, the IT Security Manager job role hierarchy includes the Application Data Security Administration Duty duty role, which is entitled to manage data security policies (the entitlement is Manage Data Security Policy). This entitlement provides necessary privileges to perform the Manage Data Security Policies task in Authorization Policy Manager.
Before creating a data security policy with Authorization Policy Manager, the security administrator should collect the following information for custom security policies:
The actions corresponding to the operations that the business object to be secured defines; these actions can be obtained from the developer who implemented the business function.
The primary key of the database table or view that the business object represents; this key can be obtained from the developer who implemented the business function.
The application roles for which the policy is created; these roles can be obtained from an Oracle Identity Manager administrator, or they can be queried with Authorization Policy Manager.
To define an Oracle Fusion Data Security policy, proceed as follows:
Identify the business object that you want to secure and register its backend database table or view as a database resource.
A table or view is registered by its primary key columns.
Identify and define all of the conditions that you want to make available on the registered database resource.
Conditions define an instance set of rows specified either by simple filters (XML defined) or complex SQL queries whose values can be parameterized. No condition definition is needed in the case of a single row instance or all row instances.
Identify and register the actions that you want to secure for this database resource.
Action names should match the names of the operations the business object supports (for example, view_US_ONLY, edit_US_ONLY, delete_US_ONLY for custom operations).
Identify the Oracle Platform Security Services (OPSS) role for which you want to create the policy.
OPSS roles and the role inheritance hierarchy are managed by Oracle Identity Manager.
Define a rule to specify the values (data) that you want to make available on the registered database resource for a particular role.
A rule can be a row instance of the database resource (when a single value is desired), the entire resource (when all values are desired), or a condition that had been defined for the resource (when multiple values are needed).
Grant one or more actions on the database resource to the role for the specified rule.
Available actions will be limited to the actions that had been defined for the database resource.
Data security policies are displayed in Authorization Policy Manager by the database resource they secure, as explained in the following sections:
Database resources can be queried with a simple or an advanced search.
To specify a simple search, proceed as follows:
Select Global from the pull-down list at the top of the navigation panel.
Select Database Resources from the pull-down list second from the top.
Enter a string to match in the text box, possibly using the wildcard characters % or * (the wild character matches any character in the pattern).
The search returns all names and display names of database resources that match the specified string; leave this box empty to obtain the list of all objects of the specified type.
Click the Go button to trigger the search and to display the results in the tab Search Results, which is automatically brought to the foreground when the search is completed. Positioning the cursor on the blue information button next to an item displays the item details. The Search Results tab shows at most the first 200 matches found by the search.
Once an item is selected in the Search Results, it can be opened or edited by clicking Open or Edit at the top of the table.
To specify a database resource advanced search, proceed as follows:
Expand the hierarchy it to expose all nodes in the hierarchy.
Double-click Database Resources under the Global node to display the Manage Database Resources and Policies tab.
In the Search area of that tab, enter the query parameters as follows:
In the Object Name box, enter the string to match the database resource name, possibly including the wildcard characters % or * (the wild character matches any character in the pattern). To match all strings, leave the box empty.
In the Display Name box, enter the string to match the database resource display name, possibly including the wildcard characters % or * (the wild character matches any character in the pattern). To match all strings, leave the box empty.
In the User Module Name pull-down box, select a module where to look for database resources. To locate a module, optionally select the Search item (at the bottom of the pull-down list) to bring up the Search and Select: User Module Name dialog, illustrated in Figure 11-1. In User Module Name box in that dialog, enter the string to match module and select one from the result list returned and then click OK.
Optionally, click Reset to set the parameter values to the values they had before you entered the current values.
Optionally, click Save... to save the current query parameters. The name of the saved collection then appears in the pull-down list Saved Search. Selecting a saved search from this pull-down list fills in the query parameters automatically with the saved values.
Click Search to trigger the search. All database resources matching the entered specifications are displayed in the table Search Results.
The actions at the top of this table allow:
Creating a database resource
Editing a database resource
Deleting a database resource
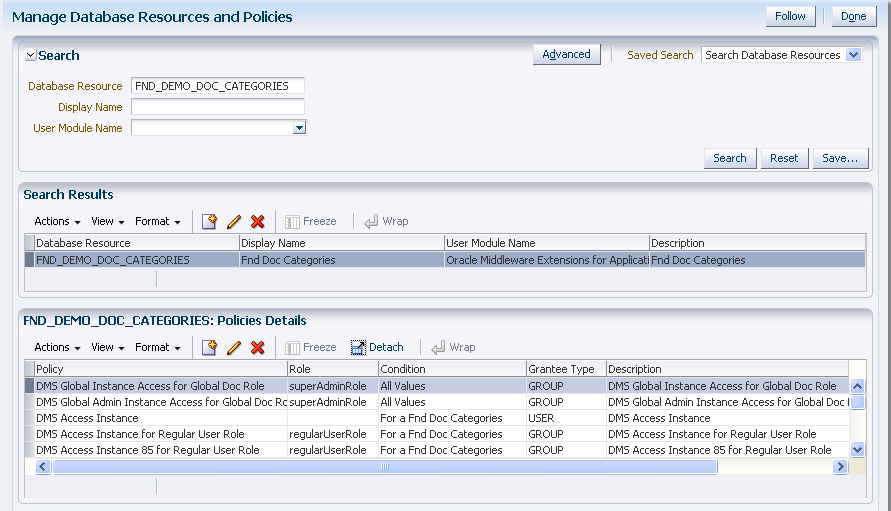
In addition, the table below the Search Results area, displays the list of policies associated with a database resource selected in the Search Results table.
Figure 11-2 illustrates the results of an advanced search on database resources and the policies associated with a database resource selected from the Search Results table.
The button Follow is used send out notifications about the activity stream. For details about Activity Stream, see Oracle Fusion Applications Developer's Guide.
Figure 11-2 Manage Database Resources and Policies Tab
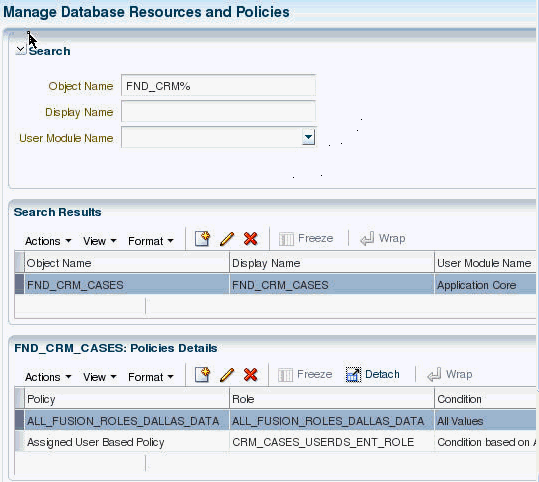
To locate a policy (global or associated with an application) associated with a database resource, first identify the database resource with a search as described in section Searching Database Resources, and then inspect the list of policies associated with the database resource in the Policies Details table. Figure 11-2 illustrates the policies associated with a database resource FND_CRM_CASES.
For alternative ways to locate policies, see Chapter 4, "Searching for Security Objects."
The following sections describe how to specify what portion of the database resource is secured by a data security policy:
The following sections describe how to manage the available columns of a database resource for which security policies may be defined:
Figure 11-3 illustrates the General Information tab in the Edit Data Security page after the FND_DOC_CATEGORIES table has been registered as a database resource with the primary key CATEGORY_ID and no columns filtered.
Figure 11-3 Creating a Database Resource - Specifying the Primary Key Columns
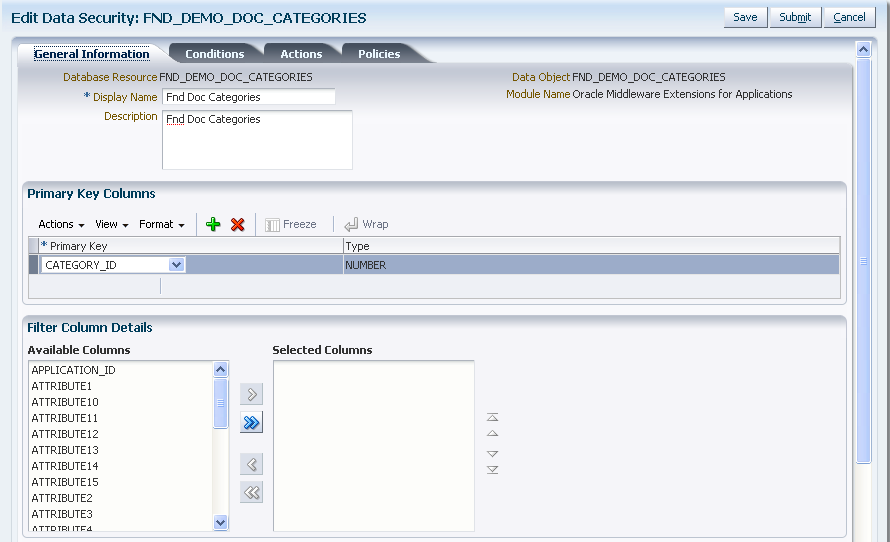
The database resource is a database table or view. You use the table or view's primary key column(s) to register it as a database resource.
To specify the primary key of the database resource, proceed as follows:
Identify the database resource by matching the name of the database resource that the policy will secure. For details, see Section 11.2.1, "Searching Database Resources."
In the General Information tab, click Add and choose the database resource's primary key from the dropdown list. You can add additional key columns when more than one key column is defined by the resource.
Click Save to complete the specification of the primary key.
You can filter columns at the level of the database resource when you want to exclude columns from the row instance sets defined by data security policies. Additionally, the data from filtered columns will not be accessible by the user.
To filter the list of columns that the database resource defines, proceed as follows:
Identify the database resource by matching the name of the database resource that the policy will secure. For details, see Section 11.2.1, "Searching Database Resources."
In the General Information tab, move available columns to the Selected Column list when you want to exclude that column from the database resource.
Excluded columns will not be available when defining database resource conditions and the data of these columns will not be accessible to any user.
Click Save to complete the filtering the list of columns.
You define conditions on the database resource to specify what portions of the database resource may be secured by data security policies. A condition is a group of row instances that are determined by a simple XML filter or an SQL predicate (WHERE clause) that queries the attributes of the resource itself. Conditions are always defined on a single table or view.
You can define a condition to specify multiple row instance sets using a parameterized SQL WHERE clause. For example, the condition may be defined by the predicate REGION=&PARAM where the parameter PARAM is associated with different regions. When an action is granted for a condition, it may be done for a particular value of the parameter, such as a "sales manager" in the West region may have an action granted for a Region condition with the parameter value West.
You do not need to define a condition for single row instance condition (single value) or for all row instances conditions (all values). Both the single-value case and the all-values case may be easily defined when you create the data security policy. Internally, Oracle Authorization Policy Manager will save these as conditions with the appropriate SQL query clause.
Figure 11-4 illustrates the Conditions tab in the Edit Data Security page after several row instance sets have been defined as conditions of the database resource. You can perform these operations using the Conditions tab:
Click New to define a new condition.
Select an existing condition and click Edit to edit the condition details.
Select an existing condition and click Delete to delete the condition.
Figure 11-4 Creating a Database Resource - Adding to the Available Conditions List

To define a new database resource condition, proceed as follows:
Identify the database resource to secure by matching the name of the database resource that the policy secures. For details, see Section 11.2.1, "Searching Database Resources."
In the Conditions tab, click New and define what portions of the database resource may be secured by data security policies. For details, see Section 11.3.2, "Managing Database Resource Conditions."
In the Create Database Resource Condition dialog, enter the following information:
A name (required)
A display name (required)
A description (optional)
A condition type (required)
When you what to use the attribute tree picker user interface to define a simple condition, choose Filter.
When you know the attributes names of your condition and you want to define an SQL WHERE clause, for example to specify a dynamic condition, using a parameterized SQL predicate, choose SQL Predicate.
If you chose a Filter condition type, then define the condition as follows:
Click Add and choose the column name from the dropdown list that you want to define the filter on.
Choose the tree operator for the selected column.
Enter a value as the test for the operator.
Add additional columns as needed.
Select Match All or Match Any depending on whether you want the filter conditions to be ANDed (match all) or ORed (match any).
Figure 11-5 illustrates the Create Database Resources Condition dialog in the Edit Data Security page when creating an XML filter condition.
Figure 11-5 Creating a Database Resource Condition - Defining an XML Filter Condition
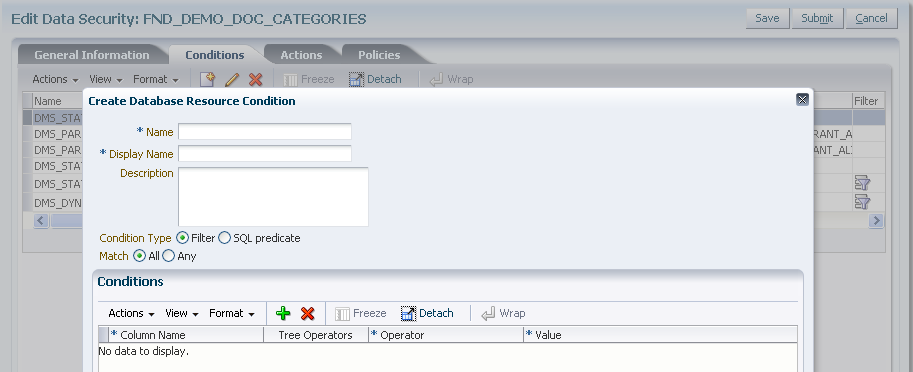
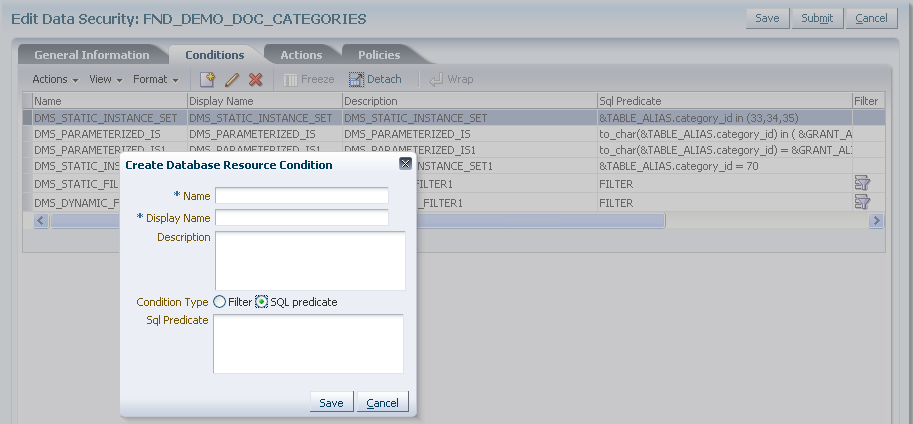
If you chose a SQL Predicate condition type, then enter the SQL predicate consisting of a query on the table or view named by the database resource.
Figure 11-6 illustrates the Create Database Resources Condition dialog in the Edit Data Security page where you enter an SQL predicate condition.
Figure 11-6 Creating a Database Resource Condition
Click Save to complete the creation of a database source condition.
You define actions on the database resource to specify what kind of access data security policies will secure on a business object. For example, you can specify whether a user might have read, update, or delete access by naming actions for each of these and granting them in a data security policy to a particular role.
An action corresponds one to one with an operation that the business object implements. Action names must match the corresponding business object operation names established by the business object developer. Actions may correspond to either standard operations or custom operations. For example, a business object might define custom read operations based on the regions West and East, which allows you to create the corresponding actions read_WEST and read_EAST. Alternatively, actions that you define, such as read and update, may correspond to the standard read and update operations of the same business object, when no region is specified.
Actions act on the row instance sets of the database resource conditions that you define in a data security policy. When the user invokes an operation on the business object, the system will act on the row set instances defined by the condition and the corresponding action of the security policy in effect for that business object. The system will perform the operation only if the policy grants the user a privilege for the corresponding action.
Figure 11-7 illustrates the Actions tab in the Edit Data Security page after several actions have been defined on the database resource. You can perform these operations using the Actions tab:
Click Add to define a new action.
Click in any field of an existing action and edit the details; do not change the name of an action unless the name of the corresponding business object operation should be changed too.
Select an existing action and click Delete to delete the action.
Figure 11-7 Creating a Database Resource - Adding to the Available Actions List

To define a new database resource action, proceed as follows:
Identify the database resource to secure by matching the name of the database resource that the policy secures. For details, see Section 11.2.1, "Searching Database Resources."
In the Actions tab, click New and enter the following information in the list of actions table:
An action name (required) - the name must match the corresponding operation of the business object. When defining actions for custom operations, consult the developer for the names of the operations.
A display name (required)
A description (optional)
Click Save.
The following sections describe how to determine the roles that can access a database resource and the type of actions that those roles may perform on the data:
When you register a new business object as a database resource, users will initially be prevented from invoking the operations of the business object. They will also be prevented from accessing the data of the resource. You define data security policies to make data of a custom business object available to the users of the application.
Figure 11-8 illustrates the Policies Details tab in the Manage Database Resources and Polices page after several data security policies have been created for the database resource. You can perform these operations using the Policies tab:
Click New to define a new policy.
Select an existing policy and click Edit to edit the details in the Details tab.
Select an existing policy and click Delete to delete the policy.
Important: Duty roles in security policies in the Oracle Fusion reference implementation should not be edited or deleted; only their role hierarchies should be modified.
Figure 11-8 Creating a Data Security Policy - Adding to the Policy List
Before you begin
Before you create a data security policy, perform the following tasks:
Register the business object as a database resource, as described in Section 11.3, "Managing Database Resources."
Define the conditions that you want to apply for specific actions of the policy, as described in Section 11.3.2, "Managing Database Resource Conditions." Conditions determine the row instance set available to a user for a given operation.
Define the actions to grant to the role, as described in Section 11.3.3, "Managing Database Resource Actions." Actions correspond to the operations of the business object that the user may invoke.
Obtain the name of the application role or enterprise role for which you want to create the policy.
To create a new data security policy, proceed as follows:
Identify the database resource to secure by matching the name of the database resource that the policy secures. For details, see Section 11.2.1, "Searching Database Resources."
In the Policies tab, click New.
In the General Information tab of the Details section, enter the following information for the data security policy being created:
A name (required)
A module (required)
A start date for the policy to become effective (required)
An end date for the policy to cease to be effective (optional)
A description (optional)
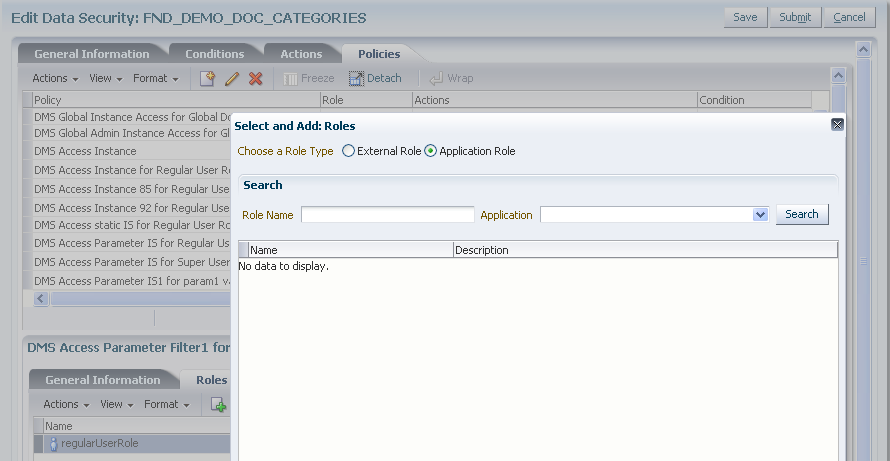
In the Roles tab of the Details section, select the role to which the policy grants access. The roles you add entitle all users assigned to those roles with access to the data.
Figure 11-9 illustrates the Select and Add: Roles dialog in the Edit Data Security page.
Figure 11-9 Creating a Data Security Policy, Selecting a Role
In the Rule tab of the Details section, specify the rows of the database resource on which the policy applies in the following ways:
When you want to secure a specific row, select Single Value.
When you want to secure all rows, select All Values.
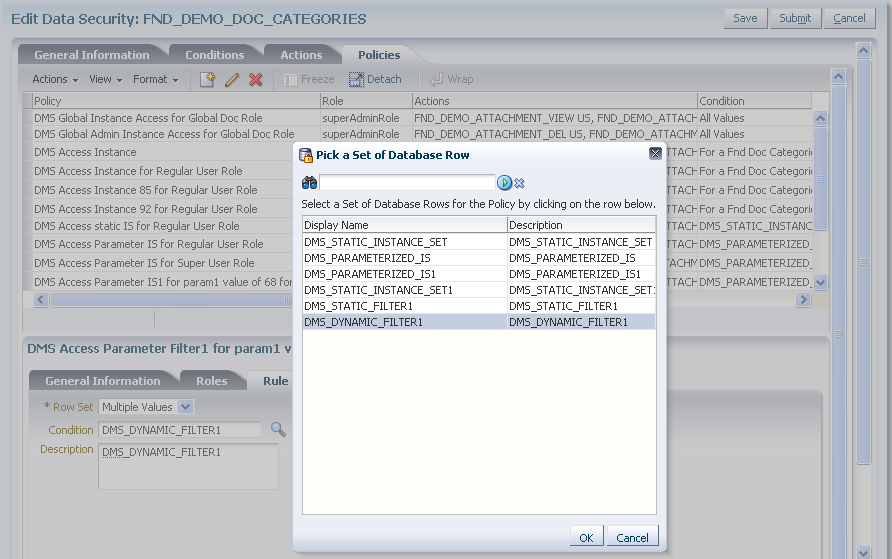
When you want to change the condition in order to change the secured rows of the database resource, select Multiple Values and click the Search icon and choose the desired condition. To create a new condition, see Section 11.3.2, "Managing Database Resource Conditions."
Figure 11-10 illustrates the Pick a Set of Database Row dialog in the Edit Data Security page after several conditions have been selected from the list of available conditions.
Figure 11-10 Creating a Data Security Policy, Selecting Database Row
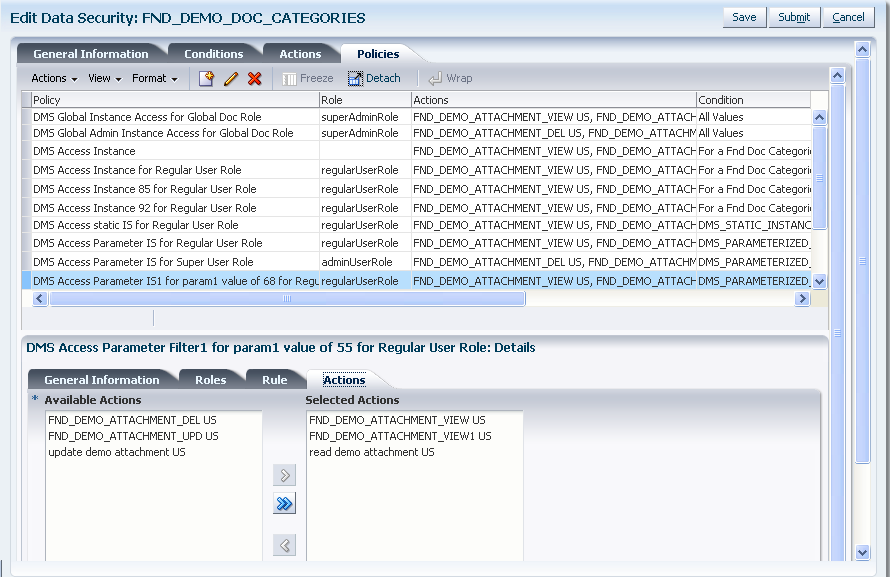
In the Action tab of the Details section, click New and specify what kind of access data security policies will secure on the database resource. For details, see Section 11.3.3, "Managing Database Resource Actions."
Figure 11-11 illustrates the Actions tab in the Edit Data Security page after several actions have been selected.
Figure 11-11 Creating a Data Security Policy, Selecting Actions
Click Save to compete the creation of the data security policy.
Data security policies provided in the Oracle Fusion security reference implementation can be viewed but it is recommended that they not be modified; other data security policies, that is, those created with Oracle Authorization Policy Manager, can be modified.
To modify a data security policy, proceed as follows:
Identify the data security policy to modify or view in either of the following ways:
By matching the name of the policy. For details, see Section 11.2.2, "Locating Policies Associated with a Database Resource."
By matching the name of the database resource that the policy secures. For details, see Section 11.2.1, "Searching Database Resources."
In the Policies tab, select the policy to modify from the Policy list and modify the following details for the data security policy:
In the General Information tab, you can modify the policy start and end dates, as well as change the name of the policy and its description.
In the Roles tab, you can change the roles to which the policy grants access. You can add a new role to the policy when you want to entitle all users who belong to that role with access to the data. You can also remove an existing role from the policy.
In the Rule tab, you can change the rows of the database resource on which the policy applies in the following ways:
When you want to secure a specific row, select Single Value.
When you want to secure all rows, select All Values.
When you want to change the condition in order to change the secured rows of the database resource, select Multiple Values and click the Search icon and choose the desired condition. To create a new condition, see Section 11.3.2, "Managing Database Resource Conditions."
In the Actions tab, you can change the actions on the database resource's records secured by the policy. To create a new action, see Section 11.3.3, "Managing Database Resource Actions."
Click Save to complete the modification of the data security policy.