| Oracle® Communications IP Service Activator QoS User’s Guide Release 7.2 E47716-01 |
|
|
PDF · Mobi · ePub |
| Oracle® Communications IP Service Activator QoS User’s Guide Release 7.2 E47716-01 |
|
|
PDF · Mobi · ePub |
This chapter describes the rule types that feature in Oracle Communications IP Service Activator. The chapter:
Provides an overview of each rule type and its function
Describes where rules can be applied
Gives detailed information for creating classification, policing and access rules
Describes how to implement rules
Explains how to check the status of implemented rules
Describes how to manage and disable rules
Rules are one of the building blocks you use to create a QoS or security policy. You can use rules to:
Mark traffic and optionally manage bandwidth – classification rules
Police the bandwidth used by a particular traffic type or classification and specify the treatment for traffic that conforms to or exceeds the bandwidth requirements – policing rules
Implement security by permitting or denying network traffic – access rules
You can apply rules to any policy target – that is, any network component, a customer, site or VPN – and you can apply any type of rule at any point in the network. For example, you can apply a classification rule to a device at the network edge or in the core. However, some general guidelines for deployment are:
Use classification rules at the outbound interface of devices at the network edge – that is, CE (access) devices.
Use policing rules at the outbound interface of devices at the network edge or inbound interfaces at the core edge – that is, CE (access) or PE (gateway) devices. Policing at CE devices is preferable as it reduces traffic at the earliest possible point. However, if the CE device is not managed by the service provider, this may not be possible.
Use access rules at the network edge – that is, CE (access) devices. Access rules can also be used within the core network to protect specific servers.
Note:
The ability to install a rule is dependent on an interface's capabilities. For example, an access rule can only be installed on an interface whose capabilities show support for Access. For more information, see IP Service Activator User's Guide.You can specify whether a rule applies to an interface's inbound or outbound traffic, or traffic in both directions.
The type of traffic a rule applies to can be defined within the rule itself, based on source and destination address and traffic type. Alternatively, if you have created standalone traffic classifications, you can associate any number of classifications or classification groups with a rule. See "Setting Up a Classification" for information on defining classifications.
Policy rules can be created at almost any point in the network hierarchy, including domain level, or associated with a VPN, customer or site.
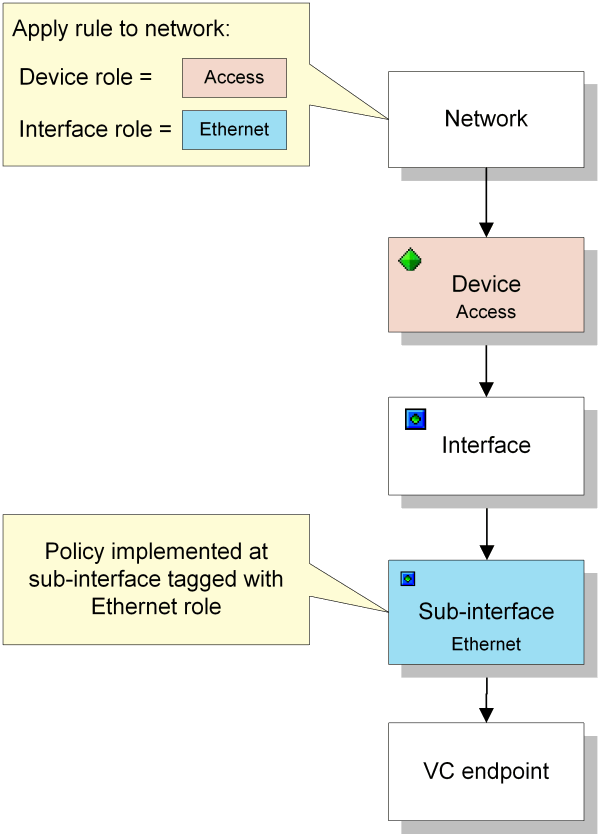
Rules are automatically inherited so that they are applied to all relevant interfaces and/or sub-interfaces on appropriate devices. You specify relevant interfaces or sub-interfaces by associating a device and interface role with the rule. The rule is only applied where the device and interface role match the roles specified in the rule. Figure 3-1 shows an example.
If you wish, you can use roles to apply policy at very specific points in the network. For example, you can apply a role to a sub-interface independent of its parent interface. By associating a rule with the sub-interface role, the rule's policy is applied only at the sub-interface. See Figure 3-2 for more details.
Note:
When you create a rule, there are no policy roles associated with it by default. You must associate both a device and an interface role for the rule's configuration to be applied at the appropriate points in the network. If either the device or interface role are not specified, no configuration will be applied.Each implementation of a rule at a specific point in the network results in a concrete rule. A concrete rule is an implementation of a classification rule, policing rule or access rule that applies to a specific point in the network, i.e. at a particular interface or sub-interface. There may be several concrete rules for each parent or abstract rule. See "Checking Implemented Rules" for more information.
See "Policy Inheritance" for information on how policy is inherited in IP Service Activator.
The ability to install a particular type of policy rule is dependent on an interface's capabilities. These capabilities indicate:
Whether the interface supports a particular rule type
What traffic types the interface can classify on – effectively, which traffic classification types can be associated with a rule
For classification and policing rules, the interface's packet marking capabilities – for example, whether the interface can mark on all DiffServ codepoints or IP Precedence bits only
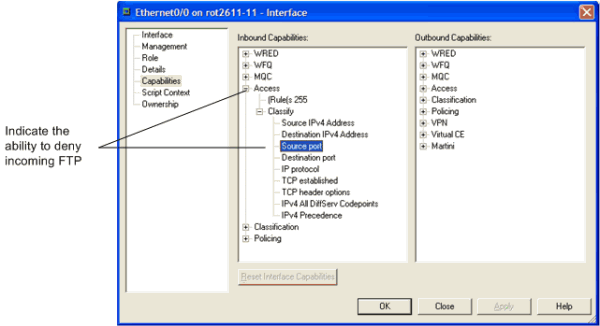
For example, an access rule that denies incoming FTP traffic can only be installed on an interface whose inbound capabilities show support for Access, with the classification subcategory Source port. See Figure 3-3.
In order for a rule to be applied to a policy target, it must have both a device and an interface role associated with it. This role combination specifies where the rule will be applied. See "Using Roles in Policy Elements" for information on using roles in policy elements.
Classification rules specify how devices identify categories of network traffic and define how they are to be treated. For example, you can use a classification rule to re-mark packets of a particular traffic classification.
For information on device-specific support for classification rules, see the appropriate cartridge or device driver guide.
Packet marking can also be implemented using an MQC PHB group. See "Setting Up Class-Based Marking" for more information.
Note:
If a classification rule is configured on an interface using policy maps, you cannot configure an MQC PHB group on the same interface.Create one classification rule for each classification and marking strategy you need to implement. The number of rules required will depend on the number of traffic classifications and classification groups defined. For example, if you have four different categories of traffic to be managed using two classification strategies, you should:
Create classification groups for traffic in each of the classification strategies
Define two classification rules, one for each classification group
Each classification rule specifies:
The traffic to be managed and the action to be taken
The device and interface role combination to which the rule applies
Note:
You must specify a device and interface role within a rule definition. The system-defined role Any Role can be used where the rule applies to all roles.The actions taken can include any (or all) of the following:
Mark IP packets with a DiffServ codepoint value
Mark IP packets with an IP Precedence value
Mark MPLS packets with an MPLS Experimental bit value
Various other packet markings
Note:
Note that classification rules cannot use packet markings specifying settings for the Frame Relay Discard Eligible bit or ATM Cell Loss Priority bit.Traffic can be identified by a combination of source and destination IP address or account – for example, source or destination port. The traffic affected by the rule can be defined within the rule itself or based on one or several pre-defined traffic classifications or classification groups.
Traffic Type Port Definitions support identifying traffic from TCP flags found in TCP packets.
The following TCP flags can be specified:
Established
ACK
RST
URG
PSH
SYN
FIN
Further classifications based on ICMP protocol can be done using the Messages drop-down menu. This menu is enabled only when ICMP is selected as IP protocol on the Port Traffic property page.
These are the available ICMP protocol options:
EchoRequest
EchoReply
TTLExceeded
Unreachable
Redirect
TimeExceeded
PacketTooBig
SourceQuench
AdministrativelyProhibited
ICMP protocol options are enabled only if ICMP is selected as IP protocol on Port Traffic property page.
Optionally, classification rules can be made conditional on a date or time.
You can copy an existing classification rule to other policy targets and update values for multiple roles. See "Copying Rules" and "Updating Multiple Rules" for more information.
To set up a classification rule:
Select the object to which the rule applies.
You can apply a classification rule to any policy target.
Right-click and select Add Classification Rule from the pop-up menu.
On the Classification Rule property page, enter values including Name, Quality of Service, Direction, and Rule Status.
Under Classification either specify that the rule applies to traffic defined within the rule or to one or several pre-defined classifications or classification groups.
To set a guaranteed bandwidth level to be assigned to the traffic, select the Guarantee check box and enter a value (in Kbits/s).
If the traffic classification to which the rule applies is defined within the rule, select the Classification property page and specify the source and destination points between which the rule is applied.
If the rule applies to one or more pre-defined traffic classifications or classification groups, select the Classification property page and select the relevant classifications or classification groups.
Note:
The Local Classification check box indicates if classification is defined within the rule or by a classification or classification group. Select IPv4 or IPv6 from the list provided next to Local Classification. If selected, details of the source/destination and traffic type are set up on the rule's Classification page. If cleared, one or more predefined classifications or classification groups can be selected on the Classification page.Select the Role property page and select the device and interface roles to which the rule applies.
You must specify both a device and an interface role. The system-defined Any Role can be used to apply the rule to any device or interface tagged with a role.
On the Marking property page, specify how the rule is to mark packets by selecting the Packet Marking with which identified packets are to be marked.
If you want the classification rule to apply at a particular date or time, select the Date and Time property page.
You can select from any previously set up date and time template (for devices supported by device driver technology only) listed in the Name combo box. Alternatively, you can select Local from the combo box and enter details directly of the date and time that the policy is to apply.
The Address Type field accommodates both IPv4 and IPv6 addresses. Local or global classifications must be set for Ipv4 or IPv6 based on requirement.
Click OK to close the dialog box, and save the rule.
For complete dialog box and property page descriptions, refer to IP Service Activator online Help. See "Checking Implemented Rules" for details of how to check the implemented rules.
For details on vendor support for PHB group properties, refer to the vendor-specific cartridge guide.
Policing rules specify one or more traffic classes to be policed, their bandwidth allocation and the action to take for traffic that conforms to or exceeds the specified bandwidth. For example, traffic that exceeds the bandwidth requirements can be dropped or re-marked with a lower DiffServ codepoint.
Policing rules can be associated with any policy target.
Policing can also be implemented using an MQC PHB group. See "Setting Up Class-Based Policing" for more information.
Depending on how your system is configured, you may need to create one or a number of policing rules for each traffic class to be managed. By grouping traffic classes into traffic classification groups, you may be able to minimize the number of rules required. See "Setting Up a Classification" for information on defining traffic classifications and classification groups.
Each policing rule specifies the traffic to be policed and the action to be taken.
Traffic to be policed can be identified by a combination of source and destination IP address or account and traffic type – for example, source or destination port. The traffic class to be policed can be defined within the rule itself or based on one or more pre-defined traffic classifications or classification groups.
The following bandwidth requirements can be set:
Committed rate permitted
Normal burst size permitted
Excess burst size permitted
The committed rate can be specified on its own or in combination with normal burst size and excess burst size.
For Cisco devices there are certain behaviors where parameters (such as CAR) are rounded off by IP Service Activator. For details refer to the appropriate device driver or cartridge guide.
IP Service Activator configures an ACL to identify the traffic policed by the rule. By default, IP Service Activator generates the ACL name/number but you can override this and specify a name/number.
Optionally, policing rules can be made conditional on a date or time.
To set up a policing rule:
Select the object to which the rule applies.
You can apply a policing rule to any policy target.
Right-click and select Add Policing Rule from the pop-up menu.
On the Policing Rule property page, enter details including Name, Bandwidth Requirements, and Direction for the rule.
Under Classification select the Local Classification check box to specify source/destination and traffic type within the rule or clear it to associate the rule with one or several pre-defined classifications or classification groups.
If you wish to specify the name/number of the ACL generated for the policing rule, select Value under Access Control List and specify a value.
If the traffic class to which the rule applies is defined within the rule, select the Classification property page and specify Source, Destination, and Traffic Type.
If the rule applies to one or more pre-defined traffic classifications or classification groups, select the Classification property page and select the relevant classifications or classification groups.
Select the Role property page and select the device and interface roles to which the rule applies.
You must specify both a device and an interface role. The system-defined Any Role can be used to apply the rule to any device or interface tagged with a role.
On the Action property page, define the action to be taken for conforming and non-conforming traffic choosing from Drop, Transmit, Continue and Re-Mark as in the Conform Action and Exceed Action panels.
Re-marked packets may be treated differently at subsequent routers.
Note:
Policing rules cannot use packet markings specifying settings for the Frame Relay Discard Eligible bit or ATM Cell Loss Priority bit. For Re-Mark and Continue to work correctly, you need to set up several policing rules in a logical sequence.If you want the rule to apply at a particular date or time, select the Date and Time property page.
You can select from any previously set up date and time template (for devices supported by device driver technology only) listed in the Name combo box. Alternatively, you can select Local from the combo box and enter details directly of the date and time that the policy is to apply.
Click OK to close the dialog box, and save the rule.
See "Checking Implemented Rules" for details of how to check the implemented rules.
Access rules (or filters) are used to provide network security by explicitly denying or permitting access by identified traffic.
Traffic can be identified by a combination of source and destination IP address or account and traffic type – for example, source or destination port. The traffic affected by the rule can be defined within the rule itself, or based on one or more pre-defined traffic classifications.
Depending on how your system is configured, you may need to create one or several access rules for each traffic class to be managed. By grouping traffic classes into traffic classification groups, you may be able to minimize the number of rules required. See "Setting Up a Classification" for information on defining traffic classifications and classification groups.
The identified traffic can be denied or permitted access. Each rule can apply to inbound traffic only, outbound traffic only or both.
Optionally, access rules can be made conditional on the date or time.
To set up an access rule:
Select the object to which the rule applies.
You can apply an access rule to any policy target.
Right-click and select Add Access Rule from the pop-up menu.
The Access Rule dialog box opens.
Enter an identifying name for the rule.
Under ACL type, specify whether Named or Numbered ACls are to be generated. Enter a value in the appropriate field or select Generate to use a system generated name or number.
Select or clear the Management rule override check box to avoid automatic creation of ACL rules. ACL rules are automatically generated to assure SNMP and Telnet access from IP Service Activator to the CE.
On the Access Rule property page of the Access Rule dialog box, select from the following options:
Permit or Deny the identified traffic.
Log (All) Enables / Disables Cisco ACL logging
Under Direction, specify one or both of the following:
In: Apply to inbound traffic
Out: Apply to outbound traffic
Under Rule Status, specify one of the following:
Disable: Select to switch off the rule
Conflict: When selected, indicates that the rule is in conflict with another rule. This is a read-only field.
ID: Internal ID number of this object; allocated automatically by IP Service Activator.
Enter values including Name, Action (Deny, Permit), Direction (In, Out), and Classification.
If Classification was set to Local Classification, select the Classification property page and specify the source and destination points between which the rule is applied. Otherwise, select the Classification property page and select the relevant classifications or classification groups. There is a check box to indicate if classification is defined within the rule or by a classification or classification group. Select IPv4 or IPv6 from the list provided next to Local Classification. If selected, details of the source/destination and traffic type are set up on the rule's Classification page. If cleared, one or more predefined classifications or classification groups can be selected on the Classification page.
Select the Role property page and select the device and interface roles to which the rule applies.
You must specify both a device and an interface role. The system-defined Any Role can be used to apply the rule to any device or interface tagged with any role.
If you want the access rule to apply at a particular date or time, select the Date and Time property page.
In the Name field, you can choose from any previously set up date and time template (for devices supported by device driver technology only) listed in the pull-down menu. Alternatively, you can select Local from the combo box and enter details directly of the date and time that the policy is to apply.
The Address Type field accommodates both IPv4 and IPv6 addresses.
Click OK to close the dialog box.
It is possible to quickly copy and paste Classification, Policing, and Access rules between objects in the same domain. This makes it simple to re-create the settings for a rule on another object, without having to access a lot of property pages.
To copy Classification, Policing, and Access rules:
Double-click on the item which has the source rule already applied to it.
Select the appropriate tab — either Classification Rules, Policing Rules, or Access Rules — in the Details pane to show the rule to be copied.
Select the source rule and click the copy icon in the toolbar.
Double-click the target item to which you want copy the rule.
Ensure the appropriate tab in the Details window is still selected, and click inside the Details pane. The enables the Paste button in the toolbar.
Click the Paste button in the toolbar.
The rule is copied to the destination object. Modify the roles and values of the newly copied rule as you wish.
On Cisco devices, IP Service Activator supports the ability to process or block/ignore traffic by means of exclusion. In other words, Classification objects (classifiers) can be created which match traffic to be excluded from further processing. For example, you can define a set of criteria so that all traffic that does not match the criteria will have QoS applied and traffic that does match the criteria will not.
The exclusion capability corresponds to the creation of Cisco ACLs employing the deny keyword. When Cisco ACLs are evaluated, processing of classification statements stops when the first match is found. Therefore, the ordering of entries in IP Service Activator Classification objects is of high importance. Capabilities in the IP Service Activator user interface support the specification of entry order in these objects.
Below is an example ACL using the Deny keyword:
access-list 180 deny ip any any
The deny keyword is an instruction to block all traffic that matches the criteria in the ACL statement. In this example, the device blocks all IP-type traffic to which access-list 180 is applied.
Note:
If no conditions match, the software drops the packet. This is because each access list ends with an unwritten or implicit deny statement. That is, if the packet has not been permitted by the time it was tested against each statement, it is denied.The access list must contain at least one permit statement or else all packets are denied.
The IP Service Activator user interface supports the deny action in Classification objects.
The Classification dialog box, Details property page, contains two radio buttons and two check boxes:
Include - the traffic that matches the specified criteria in the classifier is explicitly included in the processing applied to the classifier. This selection corresponds to the permit keyword in Cisco ACLs.
Exclude - the traffic that matches the specified criteria in the classifier is explicitly excluded in the processing applied to the classifier. This selection corresponds to the deny keyword in Cisco ACLs.
Log - Enables or disables Cisco ACL logging. Headers of packets affected by the access rule are stored in the routing engine and can be displayed using the show log command.
Note:
Enabling ACL logging may negatively affect router performance. Processor power may be used to perform the logging and log files may impact available disk space.Fragments - When selected, non-initial packet fragments are included for matching. This selection corresponds to the Fragments parameter in Cisco ACLs.
You can update several rules simultaneously. The rules must be defined at the same point in the network – that is, you must be able to list and select them in the Details pane for a given policy target.
You can apply a new date and time template to any rule (for devices supported by device driver technology only.) For classification rules, you can also re-specify the packet marking to be applied.
To update multiple rules:
Double-click on the relevant object – any policy target – from the hierarchy tree or the topology map.
The configuration that applies at the selected level is listed in the Details pane - select the relevant tab.
Select several abstract rules whose values you want to set.
Abstract rules are displayed on a white background. If a rule has a gray background, it has been inherited from a higher point in the hierarchy indicated by the Level column.
From the pop-up menu select Properties.
The Classification Rule dialog box opens. It contains a subset of the property pages that are available for a single rule.
Note:
If you have included a concrete rule in the selection, no property pages are displayed on the Classification Rule dialog box. Deselect the concrete rule to display the dialog box correctly.Select the relevant tabs and specify the values you wish to apply.
Note:
Only user-defined templates are available for selection on the Date and Time property page when updating multiple rules. You can only apply the default Local setting to individual rules.Click OK.
The values are applied and the new values displayed in the rule list.
You can copy one or more rules from one policy target to another. Rules may already be applied to the target object. To prevent naming conflicts, the copied rule is named as follows:
If there is no naming conflict between the copied and the existing rules, the rule is copied to the target object with the same name.
If the copied rule conflicts with an existing rule name, the rule is copied with the text Copy of preceding the rule name. If subsequent copies are made, the copy number is incremented – that is, Copy (n) of where n is the copy number.
Some of the values associated with the rule may need to be edited after copying. For example, a different date and time template may need to be selected (for devices supported by device driver technology only.)
You cannot copy classification rules from one domain to another.
Note:
Editing the values associated with a copied rule may result in two rules of the same name that have different values.To copy rules using menu commands:
List an object's rules in the details pane and select one or more rules to be copied.
From the Edit menu, select Copy.
Select the target object, and from the Edit menu select Paste.
To copy rules using drag and drop:
List an object's rules in the details pane.
Open a new window for the target object and from the Window menu select Tile.
List the relevant rules for the target object in the details pane. Ensure that there is space at the end of the rule list.
Select one or more rules to be copied from the source object and drag them to the target object's details pane.
You must drag the rules on to white space in the target window.
As you create rules through the user interface they are queued in the current transaction. Depending on your user access level, you may be able to commit the transaction immediately, or save it in a pending state for checking and committing by a supervisor. The policy defined by a rule is not implemented until the transaction it forms part of is committed.
For information on transactions, see IP Service Activator Concepts Guide.
Once you have propagated rules to devices throughout the network, you can check how and where the rules have been implemented.
At any one time, a number of rules may be listed for a policy target – particularly as rules can be applied to various levels of both the logical and the physical hierarchy and applied via a process of inheritance. See "Policy Inheritance" for information on inheritance.
The listed rules may have originated at a higher point in the hierarchy. IP Service Activator uses color to indicate whether the rule is abstract or concrete.
Note that you can also view summary information for rules (see "Viewing System Statistics and Statistic Summary Information") as well as searching for concrete rules by type and status.
For information on locating concrete policy elements and what to do if concrete rules are not created, see IP Service Activator User's Guide.
To view the rules that apply to an object:
Double-click on the relevant object – any policy target – from the hierarchy tree or the topology map.
The configuration that applies at the selected level is listed in the Details pane.
Select the relevant tab depending on the policy element type to view the rules that apply.
Each abstract (parent) rule is followed by a list of the concrete rules that have been created at appropriate interfaces.
If there are one or more concrete rules associated with an abstract rule, a plus-sign icon is displayed next to the rule. Click on the icon to expand or collapse the list of associated concrete rules.
For information on classification rules, access rules and policing rules, see IP Service Activator IP Service Activator online Help.
For information on how to view system statistics and statistics summary information, refer to the IP Service Activator Administrator's Guide or IP Service Activator online Help.
For information on locating concrete policy elements and what to do if concrete rules are not created, see IP Service Activator User's Guide.
This section discusses changing the sequence order of rules, avoiding rule conflicts, and disabling rules.
At any one time, a number of rules of a specific type (classification, access or policing rules) may apply to a particular interface – particularly as rules can be applied to various different levels and applied via a process of inheritance.
The abstract and inherited rules that apply to a policy target are listed in the following order:
Abstract rules – rules created at the object
Inherited rules – rules that have been inherited from an object higher in the hierarchy
Inherited rules are further subdivided according to where the corresponding abstract rule was applied.
The order in which rules are listed in the details pane is important as this defines the order in which rules are checked against packets on that interface. The first rule that matches the packet is applied. Therefore you must ensure that rules appear in the correct order – for example, you need to ensure that a more general rule does not appear before a specific rule that would therefore never be checked.
The initial order reflects the order in which the rules were created, but you can change the order if required, by dragging and dropping rules to a new position in the list.
Note:
You cannot move inherited rules above abstract rules – this means that abstract rules always override inherited rules.It is potentially possible for two rules of the same type to be in conflict if there is any overlap in the defined traffic. Inadvertent conflicts may occur where rules are created at various levels (domain, customer, VPN, site, device, interface or VC endpoints). For example, an access rule defined at a high-level object might apply to all port-based traffic types, while an access rule defined at a lower-level object applies to a specific port.
Potential rule conflicts are dealt with automatically by IP Service Activator by a process of rule ordering. At each interface, IP Service Activator checks the rules in a strict sequence and rules are not applied if they would result in a conflict. Rules created at a lower level override those created at a higher level - for example, a classification rule created at a specific interface overrides one created for the whole domain. Where multiple rules apply at any one level, they are checked in their defined sequence order, which can be changed.
The priority levels are shown in Table 3-1. Lower numbers indicate higher priority.
Table 3-1 Rule Conflict Priorities
| Object | Priority |
|---|---|
|
Root network |
15 |
|
Network |
14 |
|
Domain |
12 |
|
Customer |
10 |
|
VPN |
8 |
|
Site |
6 |
|
Device |
4 |
|
Interface |
3 |
|
Sub-interface |
2 |
|
VC endpoint |
1 |
For example, a rule that applies to a device takes precedence over a rule applied at the domain level. In the case of PHB groups, only one PHB group can be applied to any one interface, so the highest priority PHB group in the list is applied, and others that may apply are ignored.
|
Copyright © 2012, 2013, Oracle and/or its affiliates. All rights reserved. Legal Notices |
|