| Oracle® Communications IP Service Activator VPN User's Guide Release 7.2 E47719-01 |
|
|
PDF · Mobi · ePub |
| Oracle® Communications IP Service Activator VPN User's Guide Release 7.2 E47719-01 |
|
|
PDF · Mobi · ePub |
This appendix outlines the high-level steps you need to follow in order to set up management and customer VPNs on Oracle Communications IP Service Activator.
In the following example, three VPNs are created:
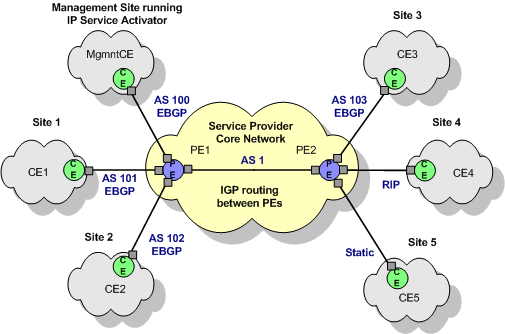
A management VPN is set up comprising the Management site and all other sites in all VPNs managed by IP Service Activator. With IP Service Activator running at the management site, all CE routers can be managed. The management site is a hub site; all other sites are spoke sites.
Customer VPN 1 comprises sites 1, 2 and 4.
Customer VPN 2 comprises sites 1, 3 and 5.
VPN 1 and 2 are both fully-meshed. The network layout and routing protocols are shown in Figure A-1.
Figure A-1 Network and Routing Protocols for Management and Customer VPNs

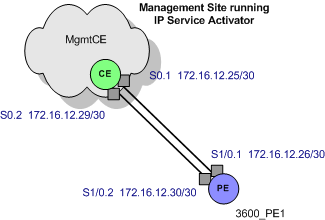
Between the management site and the core network, two links are required, one to provide VPN connectivity and one to provide routes to the Service Provider backbone IGP. These links are illustrated in Figure A-2.
Figure A-2 Links Between Management Site and Core Network

The following steps explain the sequence of operations required to set up a management VPN, enabling access to the CE routers, followed by customer VPNs. For full details, see the detailed explanation in "Setting Up MPLS VPNs".
Configuring VPNs involves:
To set up the domain:
On the Domain page of the Domain dialog box:
Set the Type to MPLS VPN.
Select the PE to CE Addresses option.
Set the required parameters on the VPN BGP page and the VPN MPLS page.
See "Setting Up Domain Parameters" for more details.
To set up the core network ASN:
On the ASN page of the Domain dialog box, set the internal BGP ASN to 1.
See "Setting Up the Provider Core ASN for the Domain" for more details.
To discover the network and assign roles to devices and interfaces:
Run a device discovery to discover the PE devices (PE1 and PE2) and the CE device at the management site (MgmtCE).
Devices can be discovered using their IP addresses or DNS names.
Assign the correct system-defined roles to devices. Routers must be assigned the Gateway role and the CE router must be assigned the Access role.
Appropriate interfaces on the devices also need to be assigned Local or Access roles.
Assign roles manually for each device.
For more information, see IP Service Activator User's Guide.
To prevent interfaces on a CE-PE link from being configured into a VPN, disable them.
To disable interfaces:
Assign the role of Disabled to the interfaces at both ends of the Serial 0.1 link between PE1 and MgmtCE (the link that is not to be used for the VPN connection).
Note:
The Access Point (interface or sub-interface) that is in the Management VPN and thus provides routes to the CE must be passive. This is so that routes from the customer networks are not leaked into the Service Provider backbone, and vice versaSet all discovered devices to Managed so that IP Service Activator can configure them.
To set up customers and sites:
On the Service tab, set up the appropriate customers:
Create a dummy customer, such as Management for the management VPN
Create dummy customers, Customer 1 and Customer 2, for the customer VPNs
Create site objects for the management site and each of the customers sites and give them identifying names.
For each site, link the appropriate access interface on the PE router to the site by dragging and dropping.
To set up VPN routing parameters for each site:
On the Site property page, set the appropriate routing type and relevant parameters (EBGP, RIP, OSPF, EIGRP, EBGP & OSPF, EBGP & RIP, EBGP & EIGRP and/or static routing).
On the Addressing page of the Site dialog box, set up private addresses (used with the VPN) and public addresses (used outside the VPN).
Note:
In this example, it is assumed that the settings on the Advanced VPN page are left as defaults.To create the management VPN:
Under the Management customer object, create a VPN object to represent the management VPN.
Link all the sites (Management site, Site 1, Site 2, Site 3, Site 4, and Site 5) to the VPN by dragging and dropping.
On the Connectivity page of the VPN properties, set the Connectivity to Management.
Ensure that the management site is selected as the hub site.
To implement the management VPN:
Save the changes to the database.
Commit the transaction.
To set up the CE devices:
Discover the CE devices using their defined loopback addresses.
Link the CE devices to the appropriate sites by dragging and dropping.
An error is flagged if the devices are not linked.
To set up the customer VPNs:
On the Service tab, create to VPN objects to represent the two customer VPNs.
Link the customer sites to the appropriate VPN objects by dragging and dropping:
Link Customer VPN 1 to Site 1, Site 2, and Site 4.
Link Customer VPN 2 to Site 1, Site 3, and Site 5.
To implement the customer VPNs:
Save the changes to the database.
Commit the transaction.
Note:
For example VPN configurations, see the Device Driver guide appropriate for your installation.