| Oracle® Enterprise Data Quality for Product Data Application Studio Reference Guide Release 11g R1 (11.1.1.6) Part Number E29128-03 |
|
|
PDF · Mobi · ePub |
| Oracle® Enterprise Data Quality for Product Data Application Studio Reference Guide Release 11g R1 (11.1.1.6) Part Number E29128-03 |
|
|
PDF · Mobi · ePub |
This chapter explains how to implement advanced concepts that you can use to enrich your DSAs, Transformation Maps, and Decision Maps.
You can define an Item Definition transformation to classify your input data automatically. You may output classifications for as many classification schemas as you have defined in your data lenses.
The use of Item Definition transformations, including the Classification tab, is described in Defining Item Definition Transforms on page 89.
Use the following steps to create a multi-classification Transformation Map:
Open the DSA and Transformation Map that you want to be processed with multiple classification schemas.
Open an existing Item Definition transformation or create a new one.
Select the Classification tab.
Ensure that the Output Classification check box is selected, which activates the list of classification schemas.
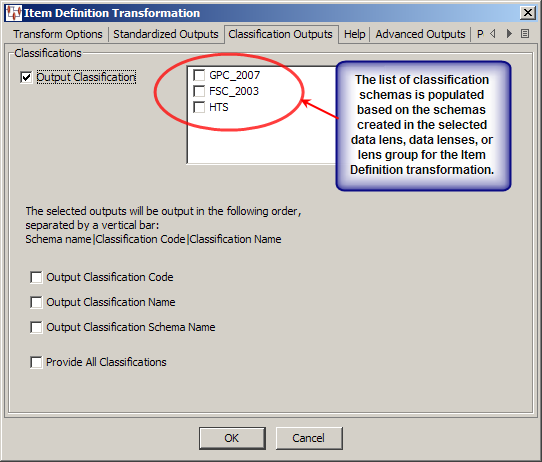
Select all classification schemas that you want to apply to your input data from the list of check boxes.
Select the items of classification data that you want to output or Provide All Classifications for all classification data.
Click OK to save these changes in the Item Definition transformation.
Save and close the map.
Select the next step in the DSA and open the associated map.
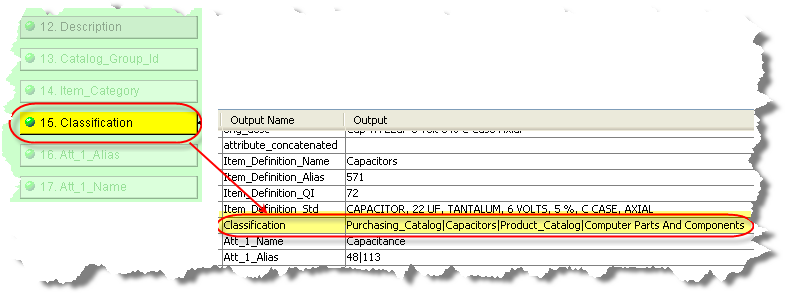
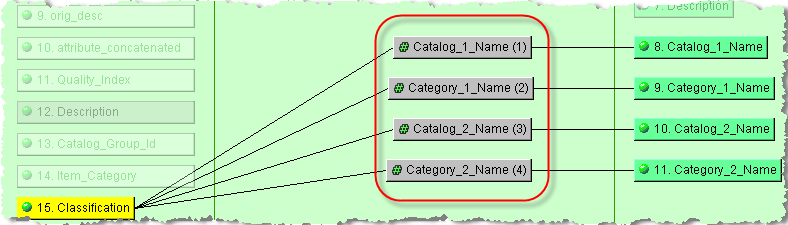
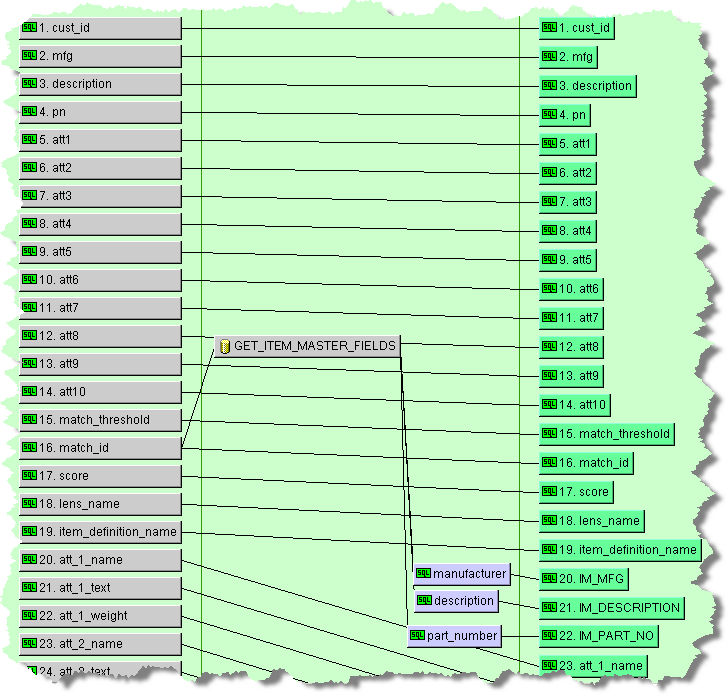
The step that follows the multiple classifications Transformation Map must use the Extract widget to obtain the information from each of the selected classification schemas. The output from the Item Definition transformation is an overloaded field named Classification by default. It contains the results of the multiple classification request and the values are delimited by a vertical bar (|) as in the following figure:
Add an Extract widget for each item of classification data, as described in "Strings Widgets". Ensure that you use the vertical bar as the field separator.
Connect each of the Extract widgets to the Classification input node and individual output nodes as follows:
Note:
If you edit the Classification tab in the Item Definition transformation, you must ensure that you edit the extraction Transformation Map accordingly.Save and close the map.
The de-duplicate functionality enables you to quickly and easily sort through your input data to find duplicate records of data to prevent them from being included in the output results. It is based on the selection of the Match Results (Multiple) output type, for use in Governance Studio projects, in the DSA output step.
Note:
The matching capability, including de-duplicate, is an additional Enterprise DQ for Product component that is purchased and licensed. If this widget is not activated (an error occurs with attempted use), this functionality may not be activated. See Oracle Enterprise Data Quality for Product Data Oracle DataLens Server Administration Guide. To purchase this additional component, contact Oracle Sales.The following DSA example illustrates the use of this feature:
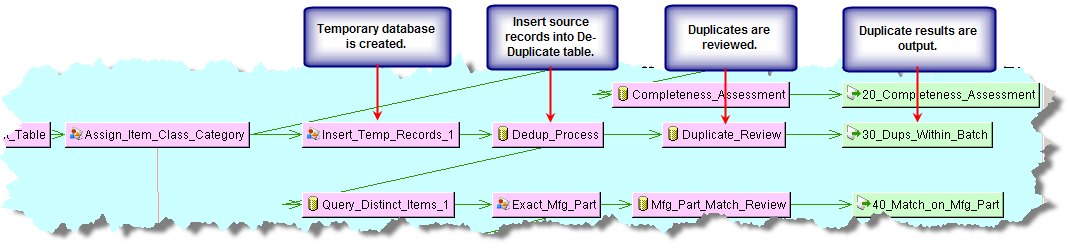
The de-duplicate function is created using a processing step that calls a Transformation Map that contains only the DeDup widget.
To create de-duplicate processing in your DSA, follow this process:
Open your DSA.
Ensure that you have a processing step that is supplying the data records that you want searched for duplicates in a data table.
Create or edit the next processing step so that it contains a database Transformation Map. See "Core Processing Steps" and "Creating Transformation Maps".
From the Map Component Tree pane, drag and drop the Dedup widget to the output column.
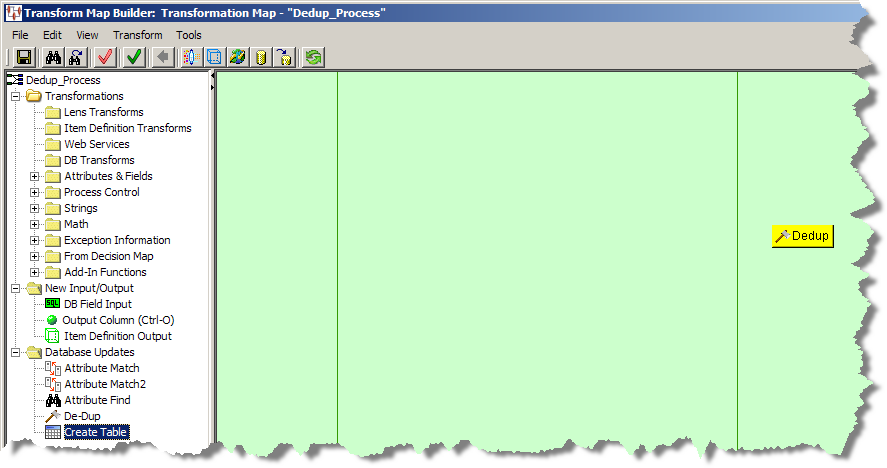
Enter a name for the widget.
Select the type of database connection.
Select the number of attributes to be received.
Modify the example SQL statements to match the number of attributes, the name of your data table, etc. Ensure that the number of attributes matches the number of attribute statements to avoid errors. The following example SQL statements generate a dup_id and score to create the duplicate groups based on the item_definition_name, semantic_key, and match_divisor attributes.
select interface_table_unique_id, item_definition_name, semantic_key, match_divisor,
att_1_text, att_1_weight,
att_2_text, att_2_weight,
att_3_text, att_3_weight,
att_4_text, att_4_weight,
att_5_text, att_5_weight,
att_6_text, att_6_weight,
att_7_text, att_7_weight,
att_8_text, att_8_weight,
att_9_text, att_9_weight,
att_10_text, att_10_weight,
att_11_text, att_11_weight,
att_12_text, att_12_weight,
att_13_text, att_13_weight,
att_14_text, att_14_weight,
att_15_text, att_15_weight,
att_16_text, att_16_weight,
att_17_text, att_17_weight,
att_18_text, att_18_weight,
att_19_text, att_19_weight,
att_20_text, att_20_weight
from temp_records&JOBID&
where semantic_key is not null
and source_system_name <> 'Product Information Management Data Hub'
order by item_definition_name, semantic_key
Select the database connection in the Update section.
Modify the example SQL statements in the Update section with the name of the table you are going to update with the results, the correct attribute names, and ensure that the number of question marks exactly matches the number of attributes you entered in the list in parentheses.
You can use the Test button to make sure that your SQL query and database connection operate correctly.
Click OK.
Save and close the map.
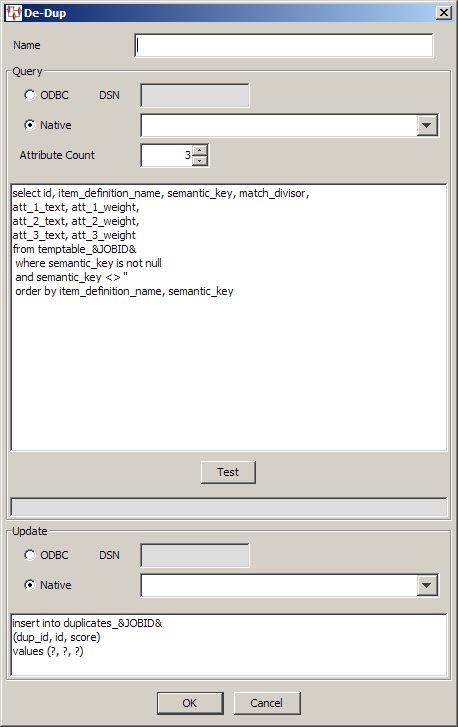
Create or edit the next DSA processing step so that it receives all of the duplicate attribute data that resulted from the de-duplicate processing in the previous DSA step as in the following example:
Note:
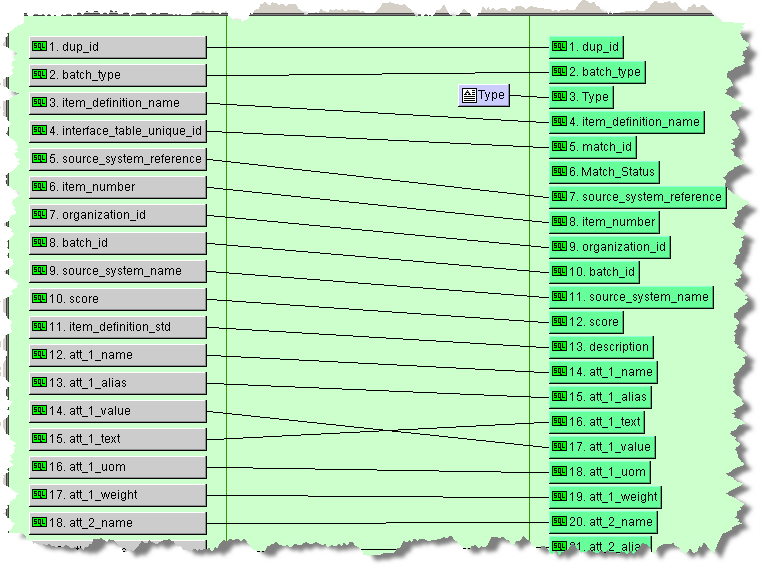
You must make sure thatmatch_id is listed in the correct output order because all output nodes above match_id appear in the top pane in the Governance Studio while output nodes below match_id appear in the lower paneCreate or edit the text output step to forward the results to the Governance Studio project for review. See "Text Output Nodes".
Ensure that the Match Results (Multiple Selection Review, Approve, and Route) Output Type is selected on the Governance Studio tab.
Connect the de-duplicate DSA processing steps.
Save the DSA and check it in so that it can be used by the Governance Studio project.
A matching application is a set of two Data Service Applications (DSAs) that you use to find appropriate data records that match criteria specified in your data lenses. A matching process is built upon a data lens (or set of data lenses), used to recognize items by their attributes and to rank attributes in order of importance. This type of matching functionality is flexible and can assemble exact matches or close matches, depending on pre-specified Match Type criteria configured in your data lens. Since you control the Match Types in your data lenses, you can make a change or add a new match type in the data lens and use the changed or added match type in the DSA.
Matching data using a data lens enables you to process your data rapidly in real-time. A matching application can easily handle input data containing thousands or millions records.
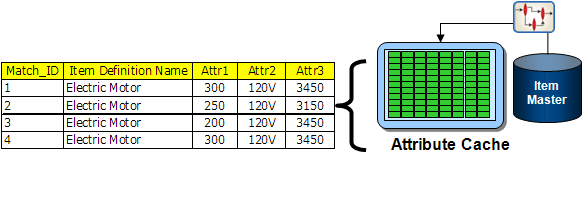
Further, that your customers submit frequent purchase requests that you need to process to determine whether you can fulfill those requests from the products contained in your input data. To meet this need, you can construct a matching application that will process (match) the incoming requests against an existing set of records in the source input data known as an Item Master.
At a high level, the following shows an example of a matching application, this has the following elements:
Creates an attribute cache that includes a Semantic Key to enable matching
Passes the original data through one or more data lenses to produce a set of attributes and a Semantic Key per record.
Outputs standardized attributes of the data along with the Semantic Key into a database attribute cache, which can be stand-alone or connected to the Item Master.
Processes a set of records against the attribute cache to determine if there is a match
Passes the new, incoming source data through the data lenses.
Creates a set of standardized attributes and Semantic Key
Checks for matches, using the Semantic Key between the new data and previously created Item Master data held in the attribute cache. A row is considered a match when the Semantic Keys match exactly.
Presents the matches in the format required for the downstream application.
Attributes serve as the foundation of the matching application so it is important to distinguish between the function and configuration of attributes for data recognition and those attributes used in a matching application. You define the attributes in the data lens, and for a matching application, attributes are also weighted.
For matching the attributes of incoming source records against the attributes contained in an Item Master, you must have the following components:
an Item Master that holds uniquely identified product descriptions,
a data lens or lenses that recognize descriptions and output standardized attributes,
a database that holds the attribute output from the attribute cache,
all records in the Item Master (and thus attribute cache) are identified by a match_id, and
the incoming source records are uniquely identified by a request_id to match against the Item Master using the attribute cache.
For example, suppose electric motors data is being matched based on the following criteria:
120 Volts
3100-3150 RPMs
The matching process includes two steps. The following figure illustrates the first step in the matching process where you create a match type using a set of attributes:
In this example, Attr2 (volts) and Attr3 (rpm) are a part of the match type.
The second step evaluates the incoming record attribute values against the existing records. Any incoming record that has the same attribute values will be considered a match.
There are two types of matching functions and both match data using a Semantic Key cache. A Semantic Key is an obfuscated string of text that is created for each data record based on the required matching attributes set in your data lens using a semantic matching algorithm. The Item Definition Transform generates the Semantic Key cache. The Semantic Key cache (or index) is container of data that contains the Semantic Key, id, Item Definition, attributes, attribute weight, and text for each data record. The two matching functions are as follows:
This matching function uses a static Semantic Key cache, consisting of a fixed set of matching attributes and weights. This Semantic Key 1 cache can be used for matching until the required matching attributes or weights are changed. When this occurs, the Semantic Key must be rebuilt. Each data lens Match Type requires an individual Semantic Key.
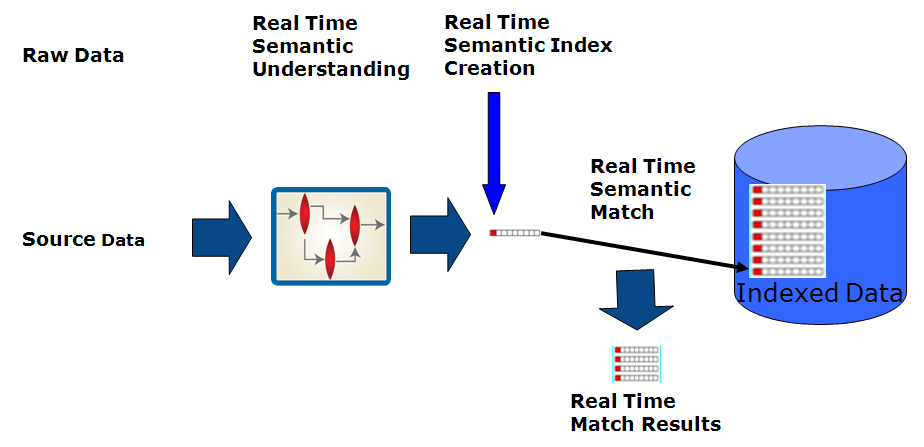
This matching function uses a Semantic Key2 cache that is built independently of the match weights, allowing you to use the same Semantic Key2 cache for multiple match types without the need either to have multiple caches for each match type or to rebuild the cache if the match weights change as is the case for Semantic Key1. The Semantic Key2 operates with multiple Match Types that provide the match weights to the match algorithm in real time. In addition, Semantic Key2 is created based on the Unit Conversion and Standardization Types selections in the Lens Transformation. The cache only needs to rebuilt if new attributes are added to the set.
The Semantic Key2 also uses a memory cache to improve performance. The memory cache is synchronized with a Semantic Key2 table that dynamically ensures that the Semantic Key cache is current.
For more information about configuring Match Types and match attributes, see Oracle Enterprise Data Quality for Product Data Knowledge Studio Reference Guide.
Note:
The matching capability is an additional Enterprise DQ for Product component that is purchased and licensed. If the Attribute Match and Attribute Match2 widgets are not activated (an error occurs with attempted use), this functionality may not be activated. See Oracle Enterprise Data Quality for Product Data Oracle DataLens Server Administration Guide. To purchase this additional component, contact Oracle Sales.Note:
Both Attribute Match Widget types (Attribute Match - Semantic Key1 and Attribute Match2 - Semantic Key2) requires at least two data inputs: id and an Item Definition Transformation Output. Furthermore, it must be the output of a Decision Map if you want to use multiple lenses.Attributes for recognition in the data lens can be one of the following three types:
Necessary to define an item. Without Required attributes, you cannot categorize the designated item.
Form/fit/function attributes that increase the likelihood that the description describes the designated item.
For example, for the following data record:
MTR, 3/4HP, 1725RPM, 115/208-230V, 56
You might use the following Required, Scoring and Optional attributes in your data lens:
| Attribute Type | Function | Example |
|---|---|---|
| Required | Necessary to define item | Motor
Voltage |
| Scoring | Horsepower
RPM Mounting Type |
3/4 HP
1725 RPMs |
| Optional | Brand, Model # | Harley-Davidson
MN-1528-FX2 |
Only the Required and Scoring attributes participate in the Item definition quality index, which is the scoring mechanism within the data lens.
For matching, all types of attributes can participate numerically in the matching process, this makes the matching application extremely flexible and effective while leveraging the power of the data lens to correctly identify items and standardize text.
In a matching application, you must provide some additional information about the attributes to the data lens. This additional information specifies how important each attribute is in determining whether another data record is a suitable match for downstream processes, such as suggesting alternative products to a purchaser. You can do this by creating one or more standardization types in the data lens that specify which attributes should participate in the match and the weight to be given each attribute. You can specify and weight attributes of any type (required, scoring, or optional) as a match type.
You can construct a matching application that processes the incoming requests and presents the records in the Item Master that match the requests. The recommended best practice is to design a DSA that creates an attribute cache from the Item Master, and then a DSA that processes the matching in this order as in the following two sections.
For more information about creating DSAs, see "Creating or Opening a DSA".
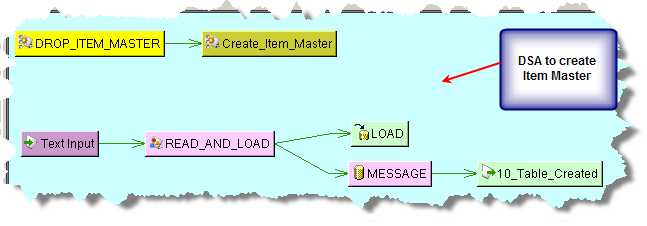
Create your Item Master DSA and ensure that you include all attributes, even those that are not required. You must have the Match Type, attribute name, attribute text, match_threshold, match_divisor, and match_weight values. This is the data that you will match your input data against. Ensure that you create pre-processing steps to create the actual Item Master table. In this example, the LOAD database output step creates the attribute cache.
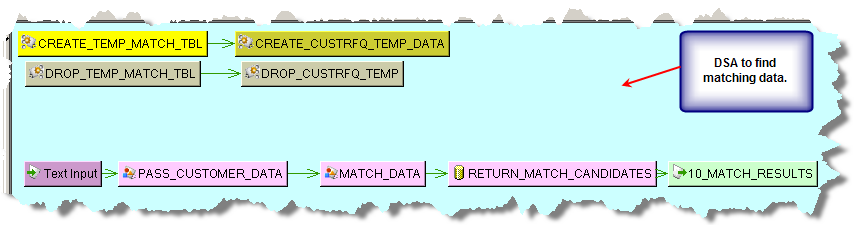
Create the DSA to process your input data to look for matches. You should create a table that contains your input data and a table to contain the matches found during processing. The Transformation Maps created for the PASS_CUSTOMER_DATA processing step that passes the source input data is as follows:
The MATCH_DATA processing step includes a Decision Map that includes a Lens Transformation and a decision output node to pass all of the attribute data.
Note:
The match relies on the same lenses and match types for both the cache creation and match.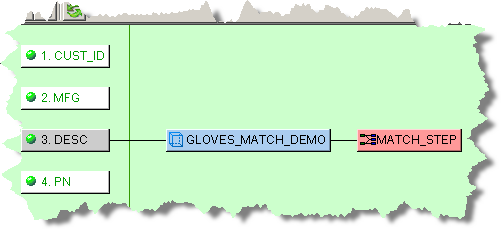
The Lens Transformation is configured with the appropriate Lens Group and attributes as follows.
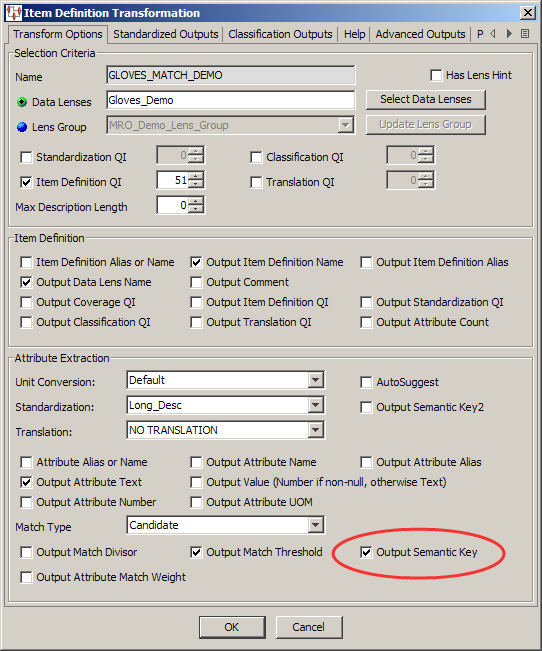
The MATCH_STEP Decision Map that actually processes the data searching for matches contains the required attributes, the Attribute Match widget, SKEY_1_MATCH Output column node, Item Definition processing decision, and table Output node to pass the data is as follows:

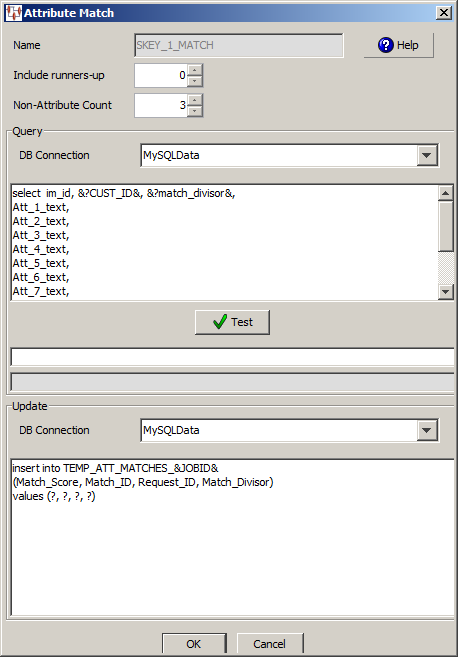
When you add an Attribute Match widget to the output column of a Transformation Map, you must provide the attribute matching counts, SQL statements that you want to use to search for matches, and the SQL statements to update the table that contains the matching data. The SKEY_1_MATCH Attribute Match query consists of the following information:
This example does not search for any runners-up matching data so those records that were a close match are not included in the output because the Include runner-up score list is zero (0). The Non-Attribute Count list must match how many non-attributes are in the SQL select clause.
In the Query section, the SQL statements must adhere to the following rules:
The first variable in the select clause must be the Match ID. The Match ID is the unique id for the match.
The second and third variables must be the Request ID and Match Divisor.
All non-attributes must come before the attributes listed in the select clause so that the attributes are looped through to add the match weights preset in the data lenses for the matched attributes.
The keywords that can be used to get data from the Item Definition are as follows. Remember that to use them you need to wrap them with &? and &. For example, &?Att_3_Value&.
Non-attribute values
Item_Name
Item_QI
Attribute_Count
Match_Divisor
Match_Threshold
Semantic_Key
Attribute values
Using attribute 3 as an example:
Att_3_Value
Att_3_Text
Att_3_Number
Att_3_Units
Att_3_Name
The following SQL statements are used in the example Attribute Match widget:
select im_id, &?CUST_ID&, &?match_divisor&,
Att_1_text,
Att_2_text,
Att_3_text,
Att_4_text,
Att_5_text,
Att_6_text,
Att_7_text,
Att_8_text,
Att_9_text,
Att_10_text
from GLOVES_ATTR_CACHE
where semantic_key=&?semantic_key&
The Match ID is im_id, the Request ID is CUST_ID, and the Match Divisor is match_divisor. You must modify the sample statements so that it matches your input nodes, table names, etc. Since there are three non-attribute values in the select clause, the Non-Attribute Count is set to 3.
It is a good practice to include the same number of attribute placeholders in your SQL statements for all of your attributes even if you do not use them in matching to avoid errors. This also allows you to use any attribute in a subsequent processing step.
You can review the help topics using either of the help buttons. Your matching SQL statements can be tested by supplying a value for each parameter using a vertical bar as a delimiter in the active field, and then clicking Test. The database connections, as well as the entered statements are tested and the results appear in the field below the values you enter.
The Update section of the Attribute Match dialog box is used to update the table you created to contain your match output data.
The Match Score (computed by the Application Studio) must be the first variable in the insert or update SQL statement. The insert or update clause is automatically populated with the values retrieved in the select clause and is in the order specified by in the select clause.
Tip:
To avoid errors, ensure that yourvalues clause has one question mark (?) for every node (column) in the insert or update statement.In this example, the table update statements are as follows:
insert into TEMP_ATT_MATCHES_&JOBID&
(Match_Score, Match_ID, Request_ID, Match_Divisor)
values (?, ?, ?, ?)
The Match Score, match ID, Request ID, and Match Divisor values will be inserted into the matching table.
The Attribute Match widget, SKEY_1_MATCH is connected to the CUST_ID and Decision Item Definition input nodes as is necessary.
The Transformation Map Output node, INSERT_CUST_RFQ_DATA contains the data from the matching table to pass from the MATCH_STEP Decision Map to the RETURN_MATCH_CANDIDATES processing step Transformation Map in the DSA as follows:
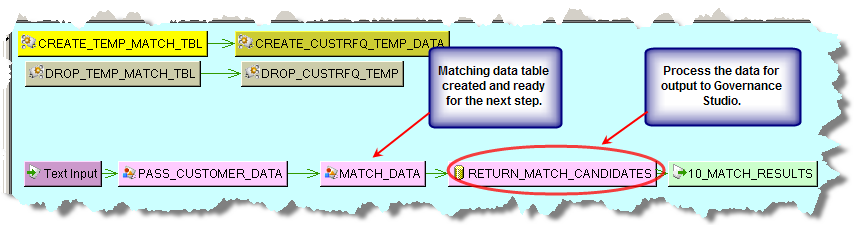
The RETURN_MATCH_CANDIDATES Transformation Map is configured as follows:
This map inserts the match data, with all of the attributes, into the appropriate output nodes in preparation for the DSA output step.
The output step of the matching DSA is configured based on how you want view the matching data in the Governance and Knowledge Studios. You must select one of the Match Results output types on the Oracle DataLens Governance Studio tab. For more information about configuring output steps, see "Text Output Nodes".
Designing a matching application using Semantic Key2 operates in a very similar manner to Semantic Key1 and its implementation is essentially the same. See "Using Semantic Key1 for Matching".
The difference is that the Attribute Match2 Widget query relies on the Item Definition name and the Item Definition output must include the Semantic Key2 as in the following:
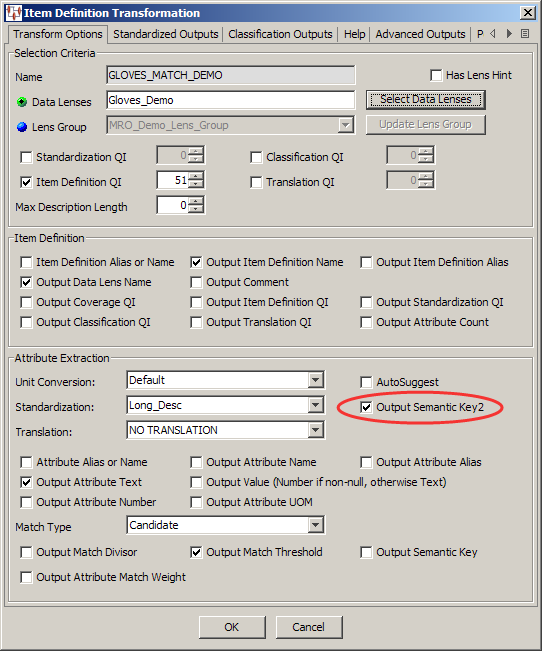
The MATCH_STEP Decision Map that actually processes the data searching for matches contains the required attributes, the Attribute Match2 widget, EXPONENTIAL_SKEY2 output column node, Item Definition processing decision, and table Output node to pass the data is as follows:
When you add an Attribute Match2 widget to the output column of a Transformation Map, you must provide the attribute matching counts, SQL statements that you want to use to search for matches, and the SQL statements to update the table that contains the matching data. The EXPONENTIAL_SKEY2 Attribute Match2 query contains the following information:
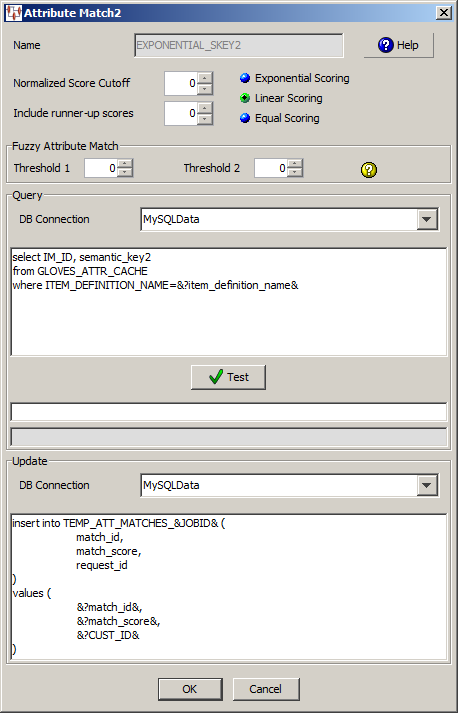
This example does not search for any runners-up matching data so those records that were a close match are not included in the output because the Include runner-up scores list is zero (0).
In this example, linear scoring is selected though additional scoring is not used as indicated by the zero in the Normalized Score Cutoff check box.
Scoring is computed with the required attributes and any scoring attributes you have selected for the Item Definition in Knowledge Studio. The following example illustrates how match scoring is computed:
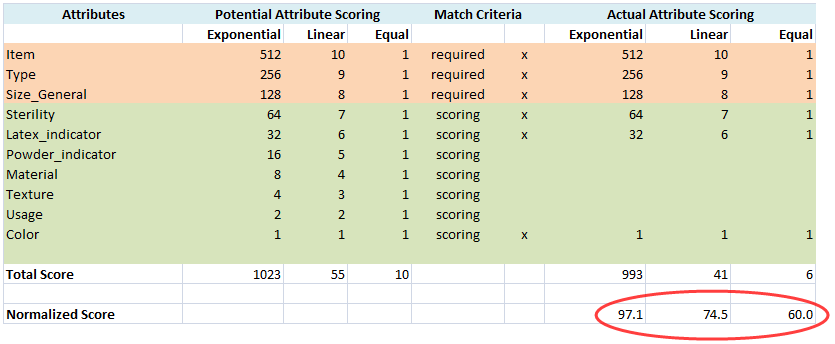
The potential attribute match scoring reflects the use of all attributes in the computation while the actual attribute match scoring uses only the required and selected scoring attributes. The actual score is then normalized for use in the Knowledge Studio with the following computation:
(Sum of actual attribute scores/Sum of all potential attribute scores) * 100 = Normalized Score that is used in Knowledge Studio
Each of the three scoring methods are reflected in the example computation and are as follows:
Scoring is computed as an exponential power of two; the match score begins with the lowest attribute scoring of 2 or 1 and increases each remaining attribute by a power of two for the total set of attributes.
Scoring is computed in a linear manner; the match score begins at the total number of available enhancement attributes and descends in value by one for each selected attribute.
Scoring is weighted equally for all selected match attributes.
In the Fuzzy Attribute Match section, you can set a threshold for fuzzy matching, which are matches that represent variants or errors in the data set. When the default threshold are set to zero, attributes that are not equal matches are compared using fuzzy matching logic. Data containing numbers are not compared using fuzzy matching. When either threshold is set to a number other than zero, the fuzzy match weighting computation is as follows:
Attribute weight * the lower computed percentage of participating matches = Fuzzy Match score.
For example, if you set Threshold1 to 70 and Threshold2 to 80, and the fuzzy matching results are 90 and 75 respectively then there is no score because the second threshold did not exceed 80. If you set Threshold1 to 70 and Threshold2 to 80, and the fuzzy matches are 90 and 85 respectively then the score is 85% of the normalized attribute score because 85 is the lower of the two match percentages.
In the Query section, the SQL statements must adhere to the following rules:
The first variable in the select clause must be the Match ID. The Match ID is the unique id for the match.
The second variable in the select clause must be the Semantic Key2.
The where clause must select matches based on the Item Definition and may select on data that is passed into the transformation.
Note:
No other data from the matching table is required or used by the matching application.The following SQL statements are used in the example Attribute Match2 widget:
select IM_ID, semantic_key2
from GLOVES_ATTR_CACHE
where ITEM_DEFINITION_NAME=&?item_definition_name&
The Match ID is IM_ID and the Semantic Key2 variable is semantic_key2. You must modify the sample statements so that it matches your input nodes, table names, etc.
You can review the help topics using either of the help buttons. Your matching SQL statements can be tested by supplying a value for each parameter using a vertical bar as a delimiter in the active field, and then clicking Test. The database connections, as well as the entered statements are tested and the results appear in the field below the values you enter.
The Update section of the Attribute Match2 dialog box is used to update the table you created to contain your match output data. The rules for the insert clause are extremely flexible. You can insert various pieces of data, using the &?name& mechanism. The order is irrelevant as long as the field names and data names correspond correctly. The available data is the following:
&?match_id&
&?match_score&
&?match_score&
&?att_1_value&
&?item_definition_name&
&?item_definition_qi&
&?attribute_count&
&?match_divisor&
&?match_threshold&
&?semantic_key2&
&?att_1_text&
&?att_1_name&
&?att_1_alias&
&?att_1_uom&
&?att_1_weight&
Any node that is connected to the Attribute Match2 transformation, such as a Request ID node, can be named. For example, the data from a node named request_id would be specified as &?request_id&.
In this example, the table update statements are as follows:
insert into TEMP_ATT_MATCHES_&JOBID& (
match_id,
match_score,
request_id
)
values (
&?match_id&,
&?match_score&,
&?CUST_ID&
)
The Match ID and Semantic Key2 values will be inserted into the matching table.
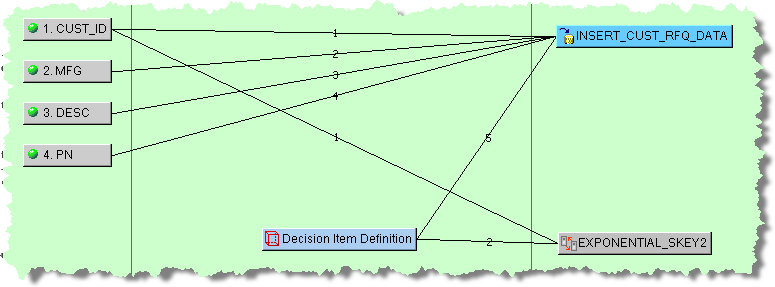
The Attribute Match widget, EXPONENTIAL_SKEY2 is then connected to the CUST_ID and Decision Item Definition input nodes as is necessary.
Completing the matching application process is identical to the Semantic Key1 process as described in "Using Semantic Key1 for Matching".
Finding unparsed, unknown, and unattributed text to convert to attributes, which enriches your data, is a powerful tool.
Similar to the matching functionality, to use the Attribute Find function, you must have two data inputs, one of which must be a Lens Transformation, as in this example. Further, it must be the output of a Decision Map as in the following example:
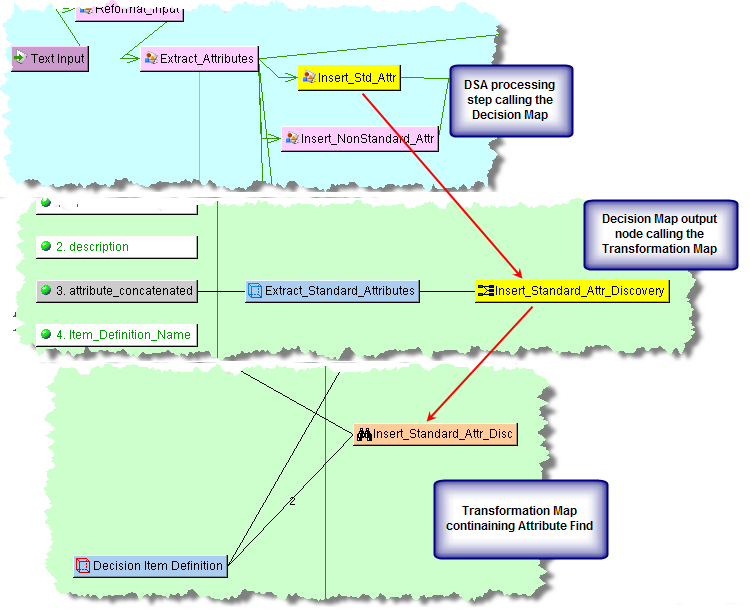
The following example illustrates the use of the Attribute Find functionality as it takes input data, finds standard attributes that are processed by an Item Definition Decision, and then provides the output data in an Item Definition node for use in the next step of a DSA:
The Attribute Find widget is used in the output column and the Attribute Find dialog box is used in the same manner as described in "Database Query Data Input".
The requirements for the fields in the insert clause are as follows:
There is a minimum of two nodes connected to the Attribute Find widget, an ID input node and an Item Definition transformation node. You can connect multiple input nodes.
The ID field is required and is obtained from the first connected node.
In addition to this field, you can include additional fields that get their data from the corresponding connected nodes. There must be exactly the same number of connected non-Item Definition nodes as there are non-Item Definition values in the insert clause and these nodes must be in the same order as the fields in the insert clause.
For example, if you want to pass in the Organization ID and the Department ID, you would have four nodes connected to the Attribute Find widget. The non-Item Definition nodes must be in the same order as the fields in the insert clause.
A sample insert clause is as follows:
insert into TABLE_&JOBID&
     ( id, organization_id, department_id, lens_name, item_name, att_name,
       phrase_name, att_text )
     values ( ?, ?, ?, ?, ?, ?, ?, ? )
The lens_name, item_name, att_name, phrase_name, att_text fields are all obtained from the connected Item Definition node and have the following requirements:
They must appear in the following order:
id, lens_name, item_name, att_name, phrase_name, att_text
The spelling must match the corresponding fields in the database table.
They must be the last five fields of the insert clause.
There can be no intervening fields
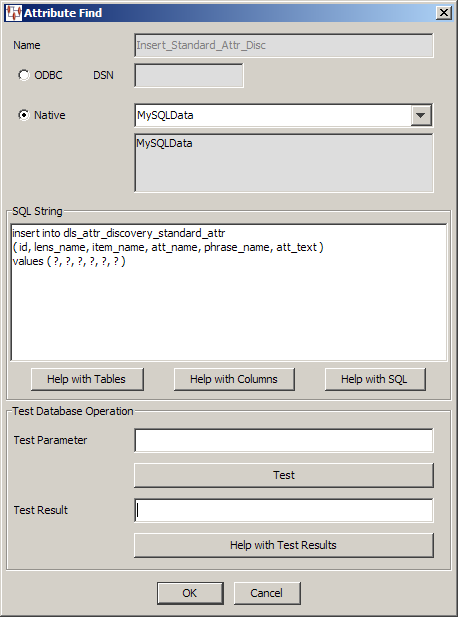
The example SQL statements for the Attribute Find widget, Insert_Standard_Attr_Dsc, insert the following standard attributes into a table: the ID, lens name, Item Definition name, attribute name, associated phrase name, and the attribute text.
Note:
You must ensure that the number of values matches the number of question marks in thevalues ( ?, ?, ?, ?, ?, ? ) clause to avoid errors.The table created, named dls_attr_discovery_standard_attr is then passed to the next DSA processing step via the std_attr Item Definition output node.
An Ngram can be a single word (Unigram), two words (Bigram), or three words (Trigram). An Ngram matching application is similar in concept to an attribute matching application and consists of a set of two DSAs that you use to find appropriate data records that match a set of Ngrams from an input record. An Ngram matching process uses an Ngram Cache, which is similar to an attribute cache (as described in the previous section). The Ngram Create and Ngram Match widgets use id and description as input then automatically generates Unigrams, Bigrams, and Trigrams from the description along with a set of key values to insert them into a table (Ngram Cache).
For example, you can assess a set of descriptions to see if there are matches against an existing set of descriptions or a classification. Another example is to conduct a data assessment to determine the number of variants that exist for a given gold form of a word or phrase (Ngram). The word PACK might be found as a variant in the data as PAKC or PAC. The data assessment has the ability to find fuzzy matches that represent variants or errors in the data set.
To meet this need, you can construct an Ngram matching application that will process (match) the incoming requests against an existing set of records in the Ngram Cache.
The Ngram computation process creates and uses a set of keyword values. The process takes the input record and creates the set of Ngrams dynamically. If you chose to use Unigram, Bigram, and Trigram as part of your data assessment, each type of Ngram (NTYPE) is processed by comparing the selected Ngrams types of the input record to those found in the Ngram Cache by type. As a result, if you only select Unigrams then the process only compares Unigrams (NTYPE = 1).
The following sections illustrate a high-level example of an Ngram matching application.
Passes the original descriptions through the Ngram Create widget to produce a set of Ngrams per record.
Outputs a set of Ngrams and key values.
Create your Ngram cache DSA using the Ngram Create widget.
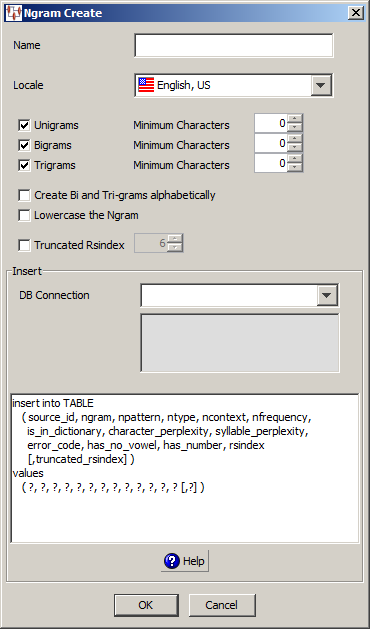
Use the Ngram Create dialog box as follows.
Enter a name for your Ngram Create widget. This name is displayed in the Map Component Tree pane and in the Graphical Map Builder pane.
Select the type of Ngrams you want to create and a minimum number of characters that will be created if desired.
Creates a unigram and optionally a minimum number of characters if the value is greater than zero.
Creates a bigram and optionally a minimum number of characters if the value is greater than zero.
Creates a trigram and optionally a minimum number of characters if the value is greater than zero.
Select this check box to alphabetize the bigrams and trigrams created. Selecting this option allows matches to succeed when words are not in same order though are in fact the same phrase. For example, "Blood Test" will not match against "Test Blood" without this option selected.
Select this check box to lowercase all Ngrams created. This ensures that matches are consistently found because certain databases or database selections enforce case. The result is that "Pack" does not match "pack".
By default, the rsindex value is created with a Soundex algorithm to set a sounds like value that can be used for data matching.
Select this check box to truncate the rsindex value to a specific number of characters. A lower number yields more matching results though the default, six, or more may yield closer matching results depending on your data.
You must change the SQL statements to reflect the additional output field and one more question mark for the 14th value. The following insert statement is an example with the additional field, rs6index.
insert into ngram_cache
   ( source_id, ngram, npattern, ntype, ncontext, nfrequency,
     is_in_dictionary, character_perplexity, syllable_perplexity,
     error_code, has_no_vowel, has_number, rsindex, rs6index )
values
   ( ?, ?, ?, ?, ?, ?, ?, ?, ?, ?, ?, ?, ?, ? )
Use this section as follows:
You must select the type of database connection that you want to use. The list of database connections is populated based on those that you are configured in the Oracle DataLens Server. If the type of database connection is not listed, you must configure it in the Oracle DataLens Server so that it is available for selection when creating Transformation Maps.
Use the field to construct your database query with standard SQL query statements and syntax. For example, you could use the following SQL statements:
insert into DLS_SEARCH_NGRAMS&DATASETNAME&
( source_id, ngram, npattern, ntype, ncontext, nfrequency,
is_in_dictionary, character_perplexity, syllable_perplexity,
error_code, has_no_vowel, has_number, rsindex )
values
( ?, ?, ?, ?, ?, ?, ?, ?, ?, ?, ?, ?, ? )
Note:
All 13 variables must be inserted into the table, which must include 13 question marks in thevalues clause.In this example, the query is inserting the following information into the table:
| Variable | Description | Output Value |
|---|---|---|
source_id |
A unique id for the input line. | 1302346 |
ngram |
Unigram, Bigram, or Trigram value. | REV |
pattern |
'A' for alpha or '9' for number and blanks between words. | AAA |
ntype |
1 - Unigram
2 - Bigram 3 - Trigram |
1 |
ncontext |
0 - Ngram found at beginning
1 - Ngram found at end 2 - Ngram found in both |
1 |
nfrequency |
The number of times that the Ngram appears in the line. | 1 |
is_in_dictionary |
0 - Ngram not in dictionary
1 - Ngram in dictionary The dictionary is locale dependent; for example, |
0 |
character_perplexity |
Internal field; used for diagnostics. | N/A |
syllable_perplexity |
Internal field; used for diagnostics. | N/A |
error_code |
Internal field; used for diagnostics. | N/A |
no_vowel |
0 - Ngram has no vowels
1 - Ngram has vowels |
0 |
has_number |
0 - Ngram has no numbers
1 - Ngram has numbers |
0 |
rsindex |
Soundex pattern with first character being the first letter of the Ngram. | R902 |
This insert clause must be compatible with your database. At run-time, the question mark character is replaced with the transformation input data. This allows you to create a database transformation that varies with the content of the record being processed. Additionally, when database transforms are used to aggregate data fields from several different data sources, common access key information can be used across all data sources.
Note:
Duplicate Ngrams are not saved. For example, if the Unigram "Large" appears three times in a description, the Unigram is only saved once, but thenfrequency value will be 3 for the three times that the Ngram appears in the line.Passes the new, incoming source data through the Ngram Match Widget
Creates a set of Ngrams from the input source
Checks for matches, using either an exact Ngram match and/or a Fuzzy Ngram match between the new data and previously created Ngram Cache. An Ngram is considered a match either when the Ngrams match exactly or if Fuzzy logic is used to create a fuzzy match.
Presents the matches in the format required for the downstream application.
Create a DSA to process your input data to look for Ngram matches. The Ngram Match widget requires at least two inputs. These are an ID (also known as the request ID) and the text (description) for the Ngram Match, which are provided in this order. You may provide additional inputs. If you do so, refer to the input values using the name of the input node.
For example, if you have an input node called 'source', refer to it in your SQL statements as &?source&. If you want to refer to the standard inputs, a node called 'description', is referred to as &?description&.
The second parameter, the text, is analyzed for Ngrams, and matches made against the database using the Query SQL. Based on your Ngrams selections, the Application Studio matches unigrams, bigrams, and trigrams.
Then the matches are used with the Update SQL statements to insert the matched data into the update table.
The following table describes the keywords that are used and returned by the Ngram computation:
| Keywords | Description |
|---|---|
NGRAM |
Ngram created from the input text. |
DB_NGRAM |
Ngram from the Ngram database cache that matched to the input Ngram. This could be a unigram, bigram or trigram. |
NTYPE |
1 - Unigram
2 - Bigram 3 - Trigram |
MATCH_ID |
ID value associated with the matching record. |
MATCH_SCORE |
Score of the matching record based on the Ngram weights selected in the Exact Query and/or the Fuzzy Query tabs of the Ngram Match widget. |
RSINDEX |
Soundex pattern with first character being the first letter of the Ngram. |
MAX_SCORE |
Max score of an individual record in the set of matching records; used with the Match (Details) type. |
PCT_MAX_SCORE |
Percent of an individual matching record score to the Max Score of the best scoring record within the set of matching records for a given input record; used with the Match (Details) type. |
BEST_POSSIBLE |
Best possible score for input record; used with the Match (Consolidate) type. |
PCT_BEST_POSSIBLE |
Percent of a matching record score to the Best Possible Score of Input Record; used with the Match (Consolidate) type. |
COUNT |
Count of Ngram variants; used with the Variant Search type. |
The following sections describe how to use the Ngram Match dialog box.

You must select the type of database connection that you want to use. The list of database connections is populated based on those that you are configured in the Oracle DataLens Server. If the type of database connection is not listed, you must configure it in the Oracle DataLens Server so that it is available for selection when creating Transformation Maps.
Select the type of Ngram matching process from the following:
For a given input (Request ID), the output is the set of both exact and fuzzy Ngrams matches and the score for a matching record (Match ID) where NGRAM is the input and DB_NGRAM is the output match. The Percent_Best_Possible keyword is not populated.
For a given input (Request ID), the output is a single consolidated score for a matching Ngrams associated with the output record (Match ID) and NGRAM. The NGRAM and DB_NGRAM keywords are not output because it does not have any meaning in the context of a consolidated result. The Percent_Best_Possible keyword is populated.
The Query from the Fuzzy Query processes is expected to produce a count for a given variant from the Ngram Cache. The Ngram process inserts the variant count into the update table using the special keyword &?COUNT&. This greatly reduces the number of inserts into the update table.
Use this section to select Match ID record threshold to limit the number of records that are returned that are matched against the input record (Request ID).
Allows you to specify a threshold percent that represents a cumulative score that the Ngram result must equal or exceed. This selection applies to any selection in the Type section.
Scores the input record then compares the consolidated score of all the matching records to determine if that matching record equals or exceeds the threshold value. For example, if the input record scores 100 and a matching record scores a 90 (90%) with a threshold of 85% then the matching record exceeds the threshold value and it appears in the results.
Scores all matching records and determines the highest scoring record. Only those matching records that equal or exceed the threshold value are included in the results. For example, if the highest scoring matching record scores 100 and the threshold is 85% then all matching records that equal or exceed the threshold value appear in the results.
Use this section to select the following additional options:
Creates a bigrams and trigrams in alphabetical order.
Creates Ngrams in lowercase.
Rejects Ngrams when the first letter does not match the incoming word. It does not apply to Threshold 1.
Click the Exact Query tab.

Use this section to select the type of Ngram(s) and how you want them to be numerically weighted. The weights are used in the scoring process when one of Ngram of that type matches:
Creates a unigram with the selected weight.
Creates a bigram with the selected weight.
Creates a trigram with the selected weight.
Use this section to set up your database query.
Use the field to construct your database query with standard SQL query statements and syntax.
The default SQL Query is similar to the following:
select source_id as match_id, ngram from dls_search_ngrams_&DATASETNAME&where ngram = &?NGRAM& and ntype = &?NTYPE&
Use the following SQL when you are matching a data set against itself and you want to exclude matching a row to itself:
select source_id as match_id, ngram from dls_search_ngrams_&DATASETNAME&where ngram = &?NGRAM& and ntype = &?NTYPE&and source_id <> &?ID&
The select clause only returns the Match ID and the Ngram. It is irrelevant what the fields are named; the Match ID must be the first field in the select clause and Ngram the second field (anything else is ignored).
Use this button to test your database connection.
Click the Fuzzy Query tab.
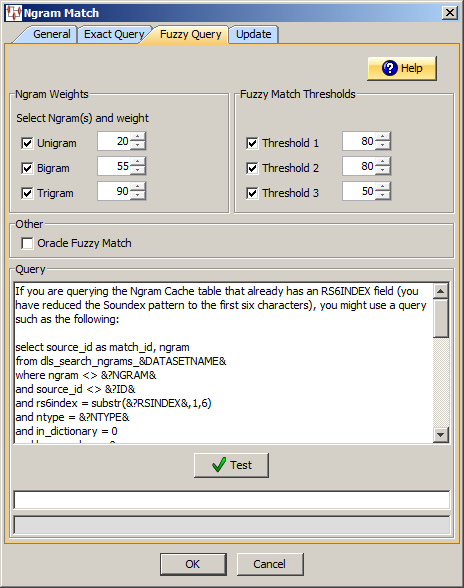
Use this section to select the type of Ngram(s) and how you want them to be numerically weighted. The weights are used in the scoring process when one Ngram of that type matches:
Creates a unigram with the selected weight.
Creates a bigram with the selected weight.
Creates a trigram with the selected weight.
Use this section to select the level of fuzzy match thresholds, 1 through 3, and how you want them to be weighted:
If you are using fuzzy matching, you may want to filter the results from the database based on various different threshold values. The value computed for the Ngram (between 0 and 100) must be greater than or equal to every active threshold value. These settings are data dependent and must be tuned for maximum performance.
Note:
Fuzzy matching is not used with Trigrams because it is not effective.Note:
Several of these threshold values are only computable if the selected Locale is English-based. Non-English locales default to a value of 100 and thus pass through the filter.Use this section to select this additional option:
Allows you to use fuzzy matching when connecting to an Oracle database. It automatically quotes each word in the Ngram with the appropriate backslash characters so that it is in an acceptable format for the Oracle database. The SQL statements that you provide in the Query section must configure the Oracle fuzzy matching functionality.
Note:
The use of this option cannot be used in conjunction with the fuzzy matching threshold functionality of the Application Studio. The two fuzzy matching functions are mutually exclusive.Note:
To use Oracle Fuzzy, you must turn on the Oracle Text feature and create Fuzzy Indexes for each locale you want to search on. Consult with your Database Administrator for details.Enter your query as follows:
Use the field to construct your database query with standard SQL query statements and syntax. For example, you could use the following SQL statements:
select source_id as match_id, ngram
from dls_search_ngrams_&DATASETNAME&
where ngram <> &?NGRAM&
and source_id <> &?ID&
and rs6index = substr(&?RSINDEX&,1,6)
and ntype = &?NTYPE&
and in_dictionary = 0
and has_number = 0
Ensure that the Match ID is the first variable in the select clause and the Ngram is the second variable; anything else is ignored. This select clause must be compatible with your database.
The following SQL statements are an example of a Variant Search match type:
select ngram, count(*) frequency from dls_search_ngrams_&DATASETNAME&
where ngram <> &?NGRAM&
and source_id <> &?ID&
and rs6index = substr(&?RSINDEX&,1,6)
and ntype = &?NTYPE&
and in_dictionary = 0
and has_number = 0
group by ngram
The following is an example of the preceding query that incorporates Oracle fuzzy matching:
select match_id from TABLE where CONTAINS(ngram, 'fuzzy(('||&?NGRAM&||'), 65, 20, weight)', 1) > 0 and &?NTYPE& = ntype
It is important to recognize the following:
The second parameter to CONTAINS is a string, and the || concatenates are being used to concatenate the first part of the fuzzy function with the Ngram and the last part of the fuzzy function. The and surrounding the Ngram are needed so that the fuzzy function is able to handle Bigrams and Trigrams. For example, if there is a phrase rather than a single word.
Each word in the Ngram phrase must be escaped since it is possible that the word is an Oracle keyword. If you use Oracle fuzzy matching, the Application Studio escapes each word appropriately.
Use this button to test your database connection.
Click the Update tab. This tab allows you to capture the results of the Ngram Match process by inserting those results into a database table.

Use this field to construct your database query with standard SQL query statements and syntax.
You can insert data from either an input node or the results from an Ngram computation. For data from an input node, you specify the value with the name of the node surrounded by &? and &. For example if your input node is called id, you refer to it as &?id& in the values clause. The input node data must appear before the computed keyword values as in the following example:
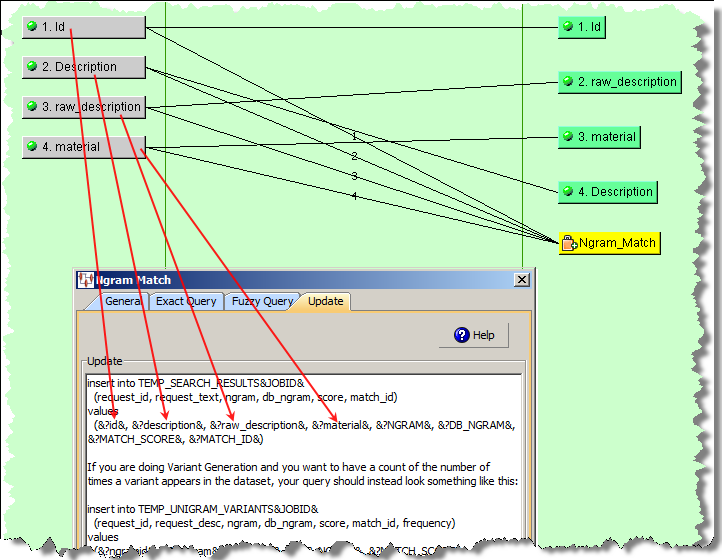
For example, you could use the following SQL statements:
insert into TEMP_SEARCH_RESULTS&JOBID&
(request_id, request_desc, raw_desc, ngram, db_ngram, score, match_id)
values
(&?id&, &?description&, &?raw_description&, &?material&, &?NGRAM&, &?DB_NGRAM&, &?MATCH_SCORE&, &?MATCH_ID&)
The following SQL statements are an example of a Variant Search match type:
insert into TEMP_UNIGRAM_VARIANTS&JOBID&
(request_id, request_desc, ngram, db_ngram, score, match_id, frequency)
values
(&?ngramid&, &?unigram&, &?NGRAM&, &?DB_NGRAM&, &?MATCH_SCORE&, &?MATCH_ID&, &?COUNT&)
You can insert whatever data you want into the update table as long as the data is data from either an Input node, or results from the Ngram computation. For data from an Input node, you specify the value with the name of the node surrounded by &? and &. For example, if your input node is called request_id, you refer to it as &?request_id& in the value clause.
Note:
The database field names do not have to match the input node names.If your Ngram processing DSA is of the variant search matching type, you must configure it as a Quick Lookup DSA for the associated Output step of the main DSA as in the following example:
The Oracle DataLens Server repository contains statistical information regarding each job run for each DSA or attribute information related to the DSA. It may be advantageous to retrieve this type of information for reporting purposes. The Create Table widget can be used to retrieve this information and insert it into an existing table. You must create a temporary or permanent table using a Pre-Processing step in your DSA.
This widget is only active in Transformation Maps that use database inputs.
Enter a name for the Create Table widget.
Select the type of data you want to retrieve job statistics or attribute information.
Use the Update section to select the information you want to retrieve. Select Create Attribute Table for DSA attribute information or Create Job Table for DSA job history information.
You must select the type of database connection that you want to use. The list of database connections is populated based on those that you are configured in the Oracle DataLens Server. If the type of database connection is not listed, you must configure it in the Oracle DataLens Server so that it is available for selection when creating Transformation Maps.
Enter the name of the table into which you want to insert data. The insert clause in the SQL field is automatically updated with this table name to avoid errors.
Use this field to construct your database query with standard SQL query statements and syntax to insert the information into an existing table that is either a permanent or temporary table that you created during the pre-processing step.
Your SQL statements are different depending on what you selected in the Update section.
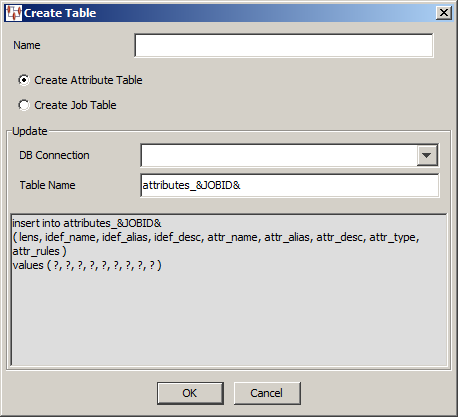
If you selected Create Attribute Table, you could use the following SQL statements to insert the DSA attribute information retrieved into an existing table, attributes_&JOBID&:
insert into attributes_&JOBID&
( lens, idef_name, idef_alias, idef_desc, attr_name, attr_alias, attr_desc, attr_
type, attr_rules )
values ( ?, ?, ?, ?, ?, ?, ?, ?, ? )
Alternatively, if you selected Create Job Table, you could use the following SQL statements to insert the DSA job history information retrieved into an existing table, jobs_&JOBID&:
insert into jobs_&JOBID&
( job_id, priority, workflow, description, status, start_time, end_time, input_
line_count, output_line_count_good, output_line_count_bad )
values ( ?, ?, ?, ?, ?, ?, ?, ?, ?, ? )
This insert clause must be compatible with your database. Optionally, you can use a question mark (?) in the insert clause. At run-time, the question mark character is replaced with the transformation input data. This allows you to create a database transformation that varies with the content of the record being processed. Additionally, when database transforms are used to aggregate data fields from several different data sources, common access key information can be used across all data sources.
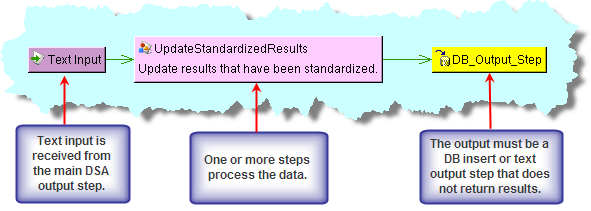
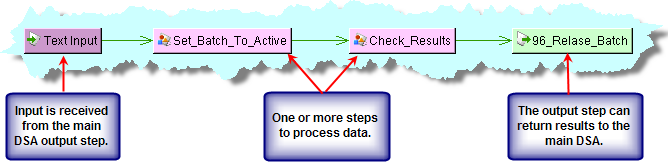
DSA output steps can be associated with specific secondary DSAs to further process output data within the Governance Studio. The secondary DSA allows you to interact with the data in an environment that operates like an application. There are three types of dedicated secondary DSAs that all receive text output from a Governance Studio output step as follows:
Results have been reviewed and approved by a user to continue downstream processing. The results could be inserted into a database table or delivered using optional methods like email, file, etc.
Results require continued processing within the application. The results are returned to the calling Governance Studio project and merged into existing steps. Since the results of the Re-Run DSA are expected back in the calling Governance Studio project, the output steps from the calling application must coincide (name and structure) with the Re-Run DSA.
These DSAs are specialized and used in the Ngram process to distinguish a variant in the context of the original description. They are considered to be Re-Run DSAs. See "Matching Ngrams".
Completes the current Governance Studio job, saves the state of the data, and then makes the Governance Studio project read only.
You can use one or all of the secondary DSA processing types and change output steps at any time.
The following sections describe how to implement the use of secondary DSAs from a main DSA.
Create the DSA that you want to apply as a secondary DSA.
Open the main DSA.
Edit the output step to add secondary DSA processing. For more information about editing output nodes, see "Editing a Text Output Step".
Ensure that the input columns of the Apply DSA correspond to the output columns of the main DSA as in the following example:
Note:
If your output step is text, ensure that the Do NOT return results to caller check box is selected so that results are not returned to the DSA erroneously.Select the Oracle DataLens Governance Studio tab.
Select one of the review or match options from the Output Type section.
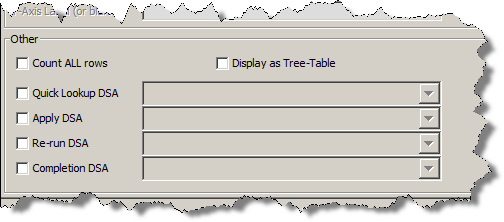
The Other section is activated. The Count ALL rows and Display as Tree-Table options are active only when match options are selected.
Select the Apply DSA check box to activate the list of deployed DSAs that have an equal or greater number of columns as the selected output step.
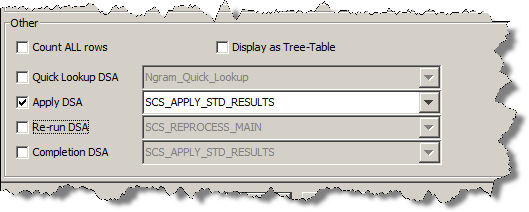
Select the DSA that you want applied when the Apply DSA function is used in the Governance Studio project.
Note:
If the DSA you want to use is not listed, you must exit this dialog, check the DSA in, and then return to this section. Only DSAs that are checked-in to the Oracle DataLens Server will appear in this list.Optional - By default, the total number of matching rows in the top pane of all Governance Studio match output tabs, created with match output types, is displayed on the Graph Summary tab in the tooltip for each match output tab as in the following example:
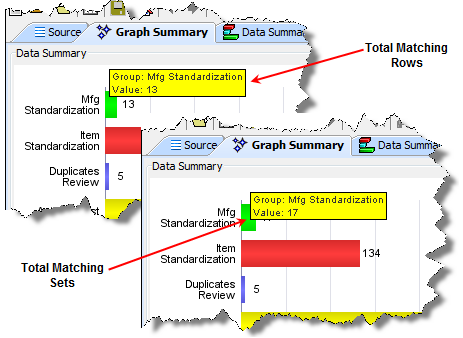
To count the number of matched sets (duplicates) in the bottom pane of the match output tab rather than the top pane, select Count ALL rows.
Optional - By default, the data on each output tab is displayed in a tabular format and using this option displays the data in an expandable tree format. The following is an example of both views:
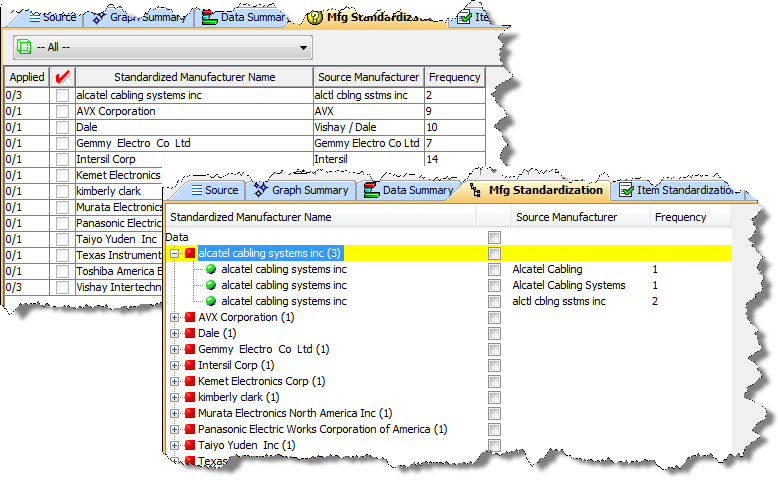
To display the matching rows in an expandable tree format, select Display as Tree-Table.
Click OK to complete the configuration of the Apply secondary DSA.
Check-In the DSA so that the changes are available in the Governance Studio project.
An important feature of using Re-run DSAs is that the results are automatically returned to the main (or calling) DSA. The outputs from the Re-run DSA are distributed amongst all the outputs of the main DSA whose names match. The results of the Re-run are merged with the existing results of the calling DSA.
Additionally, the rows selected for processing by the Re-Run DSA are automatically deleted from the main DSA output step.
Note:
All data selected for re-run is included in a re-run operation so all of the source data output nodes from the calling DSA is sent to the secondary DSA for processing. The secondary DSA must have at least the same number of input nodes to receive the data. On a matching output tab, both the upper and lower task pane columns are output.Note:
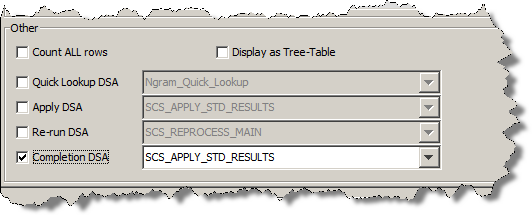
If you are using a long running temporary table, the row(s) must be deleted from that table in the Re-run DSA to avoid double counting.Create the DSA that you want re-run as a secondary DSA.
Open the main DSA.
Edit the output step to add secondary DSA processing. For more information about editing output nodes, see "Editing a Text Output Step".
Ensure that one or more output columns of the Re-run DSA correspond to the output columns of the main DSA as in the following example:
Select the Oracle DataLens Governance Studio tab.
Select one of the review or match options from the Output Type section.
The Other section is activated. The Count ALL rows and Display as Tree-Table options are active only when match options are selected.
Select the Re-run DSA check box to activate the list of deployed DSAs that have an equal or greater number of columns as the selected output step.
Select the DSA that you want applied when the Re-run DSA function is used in the Governance Studio project.
Note:
If the DSA you want to use is not listed, you must exit this dialog, check the DSA in, and then return to this section. Only DSAs that are checked-in to the Oracle DataLens Server will appear in this list.Optional - To count the number of matching rows in the bottom pane of the tab, select Count ALL rows. See "Using the Apply DSA Option".
Optional - To display the matching rows in an expandable tree format, select Display as Tree-Table. See "Using the Apply DSA Option".
Click OK to complete the configuration of the Re-run secondary DSA.
Check-In the DSA so that the changes are available in the Governance Studio project.
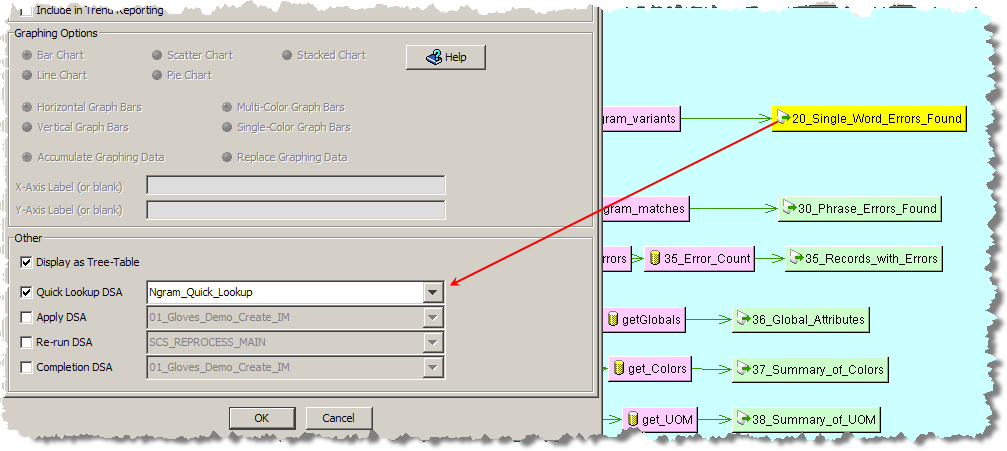
A Quick Lookup DSA is used in the output step of an Ngram matching DSA to show the variants that exist in the data for a given Ngram. The results from a Quick Lookup DSA are displayed in the Governance Studio on the Output tab for the Ngram output step.
Create an Ngram matching DSA that you want use as a quick lookup DSA.
See "Matching Ngrams".
Open the main DSA.
Edit the output step to add Quick Lookup DSA processing. For more information about editing output nodes, see "Editing a Text Output Step".
Select the Oracle DataLens Governance Studio tab.
Select one of the review or match options from the Output Type section.
The Other section is activated. The Count ALL rows and Display as Tree-Table options are active only when match options are selected.
Select the Quick Lookup DSA check box to activate the list of deployed DSAs that have an equal or greater number of columns as the selected output step.
Select the DSA that you want applied when the Quick Lookup DSA function is used in the Governance Studio project.
Note:
If the DSA you want to use is not listed, you must exit this dialog, check the DSA in, and then return to this section. Only DSAs that are checked-in to the Oracle DataLens Server will appear in this list.Optional - To count the number of matching rows in the bottom pane of the tab, select Count ALL rows. See "Using the Apply DSA Option".
Optional - To display the matching rows in an expandable tree format, select Display as Tree-Table. See "Using the Apply DSA Option".
Click OK to complete the configuration of the Quick Lookup secondary DSA.
Check-In the DSA so that the changes are available in the Governance Studio project.
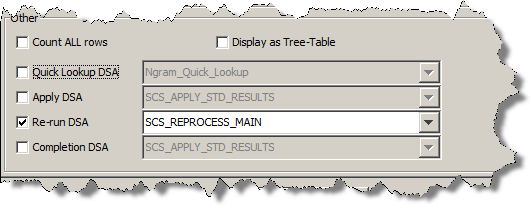
Create the DSA that you want re-run as a secondary DSA.
Open the main DSA.
Edit the output step to add secondary DSA processing. For more information about editing output nodes, see "Editing a Text Output Step".
Ensure that the input columns of the completion DSA coincide with the output columns of the main DSA as in the following example:
Select the Oracle DataLens Governance Studio tab.
Select one of the review or match options from the Output Type section.
The Other section is activated. The Count ALL rows and Display as Tree-Table options are active only when match options are selected.
Select the Completion DSA check box to activate the list of deployed DSAs that have an equal or greater number of columns as the selected output step.
Select the DSA that you want applied when the Completion DSA function is used in the Governance Studio project.
Optional - To count the number of matching rows in the bottom pane of the tab, select Count ALL rows. See "Using the Apply DSA Option".
Optional - To display the matching rows in an expandable tree format, select Display as Tree-Table. See "Using the Apply DSA Option".
Click OK to complete the configuration of the Completion secondary DSA.
Check-In the DSA so that the changes are available in the Governance Studio project.
Stored procedures and functions are blocks of code, stored and executed on a database, which extend the SQL language with procedural functionality and can be shared across the database. A DSA using stored database procedures and functions can benefit from the added functionality and increased performance. In addition, the use of stored procedures and functions can aggregate common functionality into a single code block that can be shared across DSAs ensuring standard database practices.
DSAs support stored database procedures and functions in the, Pre-Processing and Post-Processing steps. For information about how to use these steps, see "Pre-Post Processing Folder".
Additionally, this functionality is supported in the DB Transform and DB Update transformations in Transformation Maps. For information about how to use these transformations, see "Defining DB Transforms".
For more information about the support provided for database subprograms, see the vendor documentation supplied with you database software.
Note:
The JDBC array interface does not support calling database stored procedures o functions in a batch; all stored procedures and functions are executed serially.The support for this functionality, by database vendor, is as follows:
| Database Vendor | Stored Functions Supported | Stored Procedures Supported |
|---|---|---|
| Oracle 9i and later | Y | Y |
| SQL Server 2005 | N | Y |
| MySQL (Version >= 5) | Y | Y |
Stored functions are only supported by the DB Transformation node. The function return type must be a string or automatically converted to a string by your database vendor. When you create or edit either of the supported transformations, you must use the following stored function calling syntax:
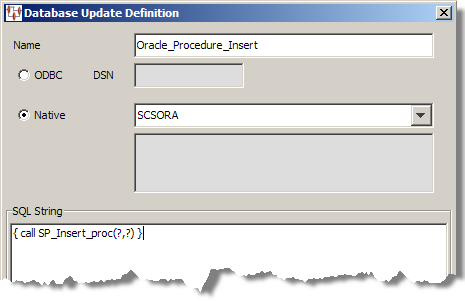
{ ? = call function_name(parameters) }
This function call is entered into the SQL String field of the Database Lookup Transformation or Database Update Definition dialog box as in the following example.
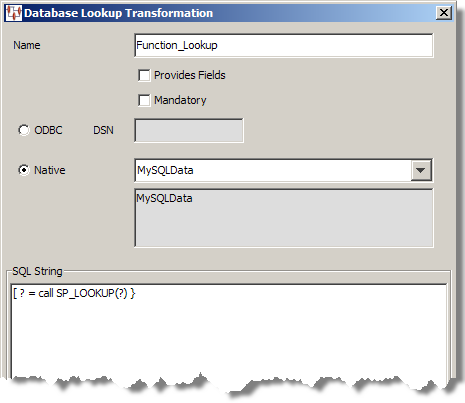
The Provide Fields check box cannot be used with stored functions. Selecting the Mandatory check box ensures that an exception is raised if a null value is returned.
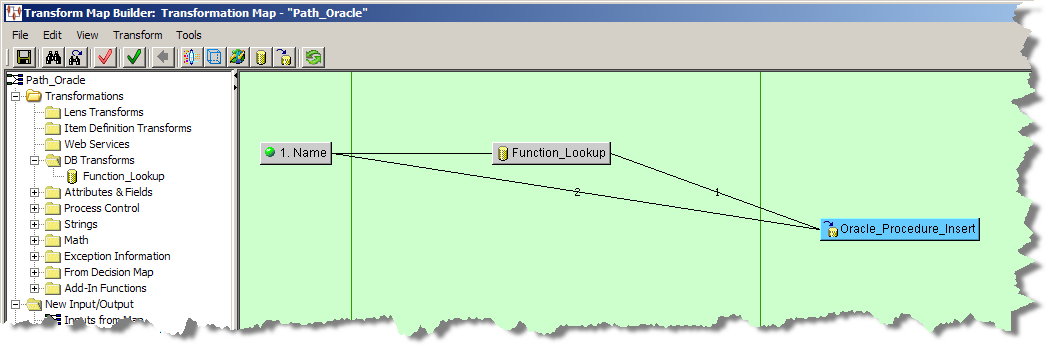
You use the returned value by connecting the DB node to the next node or widget in the map as in the following example Transformation Map.
Stored procedures are only supported by the DB Update Transformation Map node and the Pre-Processing and Post-Processing DSA steps. When you create or edit any of the supported steps or transformations, you must use the following stored procedure calling syntax:
{ call procedure_name(parameters) }
You use the returned value by connecting the DSA step to the next step or the DB node to the next node or widget in the map as in the following example Transformation Map.
Note:
The Enterprise DQ for Product version 5.5 and greater release does not support stored procedure out parameters and ignores any values returned from the procedure.For performance and concurrence reasons, a stored subprogram must not issue a commit or rollback unless your database vendor supports and the stored subprogram is coded to use true nested transactions. For example, the Oracle autonomous transaction. A true nested transaction operates outside of the parent transaction; commit or rollback operations of the nested transaction do not affect the parent transaction.
Global Transform Maps allow you to create transforms at the DSA level and then reuse them in multiple Transform Maps in the DSA they are defined. The type of transformations are algorithms.
Creating Global Algorithm Transform Maps
You create a global algorithm Transform Map from an open DSA by:
In the DSA Component Tree pane, right-click anywhere that is blank then select Add Global Algorithm Transform.
Enter a name for the algorithm; this is also the name of the global Transform Map.
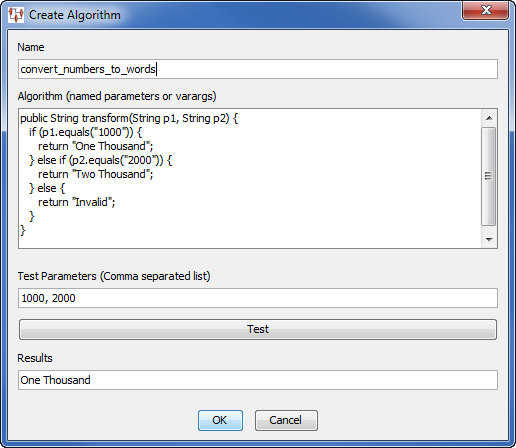
In this example, the map name is 'convert_numbers_to_words' and the algorithm converts numbers to words.
(Optional) You can test the validity of your algorithm by entering testing parameters and clicking Test; the results appear in the Results field as in the previous example.
Click OK to create the map.
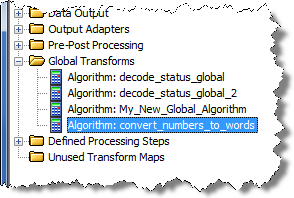
The Global Algorithm Transform Map appears in the Global Transforms folder in the DSA Component Tree pane on every existing or new Transform Map throughout the DSA.
The new Global Transform can be used one or more times in multiple Transform Maps in the DSA.
Using Global Algorithm Transform Maps
To use a Global Algorithm Transform Map in an open DSA:
Open a Transform Map.
Expand the Global Transforms folder in the Map Component Tree Task pane.
Select the algorithm you want to use in your map, then drag and drop it into the Transformation Column.
Connect the algorithm to input and output nodes and complete your map.
Editing Global Algorithm Transform Maps
Global Algorithms can not be edited in the Transform Maps, they must be edited in the DSA.
To delete Global Algorithm Transform Map in an open DSA:
In the DSA Component Tree pane, expand the Global Transforms folder.
Select the algorithm you want to edit, then right-click anywhere and select Edit Global Transform.
The Edit Algorithm dialog box appears, which operates identically to the Create Algorithm dialog box, see "Creating Global Algorithm Transform Maps".
Modify your algorithm and click OK.
Your changes automatically effect all Transform Maps that are using the Global Algorithm. In other words, you only make the change once and all Transform Maps using the algorithm benefit from the single change. This is the key reason to use Global Algorithm since it allows for central maintenance of a single instance, while giving the ability to use it multiple times throughout a DSA.
The Statistical Similarity (StatSim) matching application is used to quickly identify similar records in your data. StatSim is generally used when attempting to match a set of query records against an index of thousands or millions of records. Data lenses are not necessary for StatSim matching. Statsim is an implementation of a similarity metric that considers both the amount of shared and unshared content between two records. The relative frequencies of the character strings involved in the records being compared are also considered. Using this information, a similarity score is generated for each record used in the index, indicating the similarity between the query and index records.
Use of StatSim is a two-step process that requires that you create two DSAs that are run from your Oracle DataLens Server. Prior to creating these two DSAs, you must have the following:
query records
a set of data records to process
a database
a corresponding database connection already created and tested on your Oracle DataLens Server
The first DSA creates an index from a the input data set. The index that is used by the match or classification DSA to identify the matches or classifications. A large data set tends to give better results by providing more examples and features for the subsequent matching process.
The second DSA uses your query along with the index created by the first DSA to identify and return record matches or classifications depending on the type of DSA being run. For matching applications, the records in the index that are similar to records in the query are returned as matches; the similarity scores for the match results are also returned. For classification applications, each query record is compared against all matching records in the index, and the distinct classification codes associated with the highest scoring matches are returned as classifications for the query record. The matching or classification jobs can be run from the Governance Studio, which gives you the option to modify the StatSim runtime options and easily review and summarize your results, or it can be run as a batch process using the default runtime options defined in the DSA.
A basic StatSim index DSA has one core step that takes database input to create a index table in your database.
To create your StatSim index DSA:
Create a new DSA.
Create a new database input Transform Map. For example, 'getData'. See "Creating Transformation Maps".
Create at least two database input nodes with the first node being a numeric ID. You can include up to eight additional input nodes.
Expand the Database Updates folder, and the drag and drop the Stat Create widget to the output column.
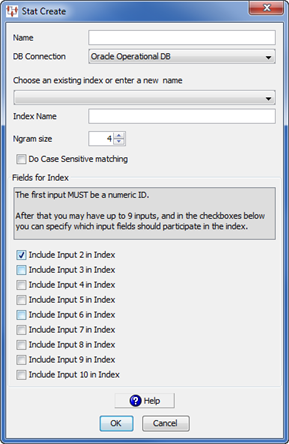
Complete the Stat Create dialog box as follows:
Enter a name into the Name field for this StatSim index.
Select the database connection that corresponds to your database from the DB Connection list box. The only database connections that appear in this list are operational database connections. Operational database connections must first be set up on your Oracle DataLens Server. See Oracle Enterprise Data Quality for Product Data Oracle DataLens Server Administration Guide.
Select the name of an existing StatSim index or enter a new name in the Index Name field. You can select a name then modify it. Your index name should include a reference to the data source and the ngram size; this will help you differentiate it from other indexes you create. For example, if you are creating an index from a data source called 'ACME_Supply' with an ngram setting of 4 (the default), it is recommended you name the index 'ACME_Supply_N4'.
Select the ngram size you want from the Ngram size list box. The default and recommended size is 4, which means that the matches are based on the complete set of four consecutive characters found in the dataset used to create the index. This default works well with most datasets. For large datasets (> 5 million rows) containing long lines of data (> 1500 characters) an ngram size or five or six may be preferred because a larger ngram size results in faster match times. Selecting an ngram size lower than 4 increases the amount of time required to match; however, it may improve the match results for data that is highly abbreviated.
A larger Ngram size typically yields more precise results though may be more prone to missing desired matches while a smaller Ngram size yields less precise results though may find more matches.
(Optional) Select Do Case Sensitive matching if you want the matching to be case sensitive.
Use the Include Input 3 - 10 in Index check boxes to indicate the number of description fields (up to nine) to use to create your index. The Include Input 2 in Index check box is selected by default because at least one description field is required. Any inputs that are attached to the match create widget above and beyond the checked inputs to include in the index will be stored for later retrieval during the match process.
Classification Index—If you are creating an index for classification purposes, you must include the classification code and optionally the classification descriptions after the descriptive text to be indexed and attach them to the StatCreate node. These codes are retrieved later by the classification DSA for classification applications.
Click OK.
Save and close the Transform Map.
Save the DSA.
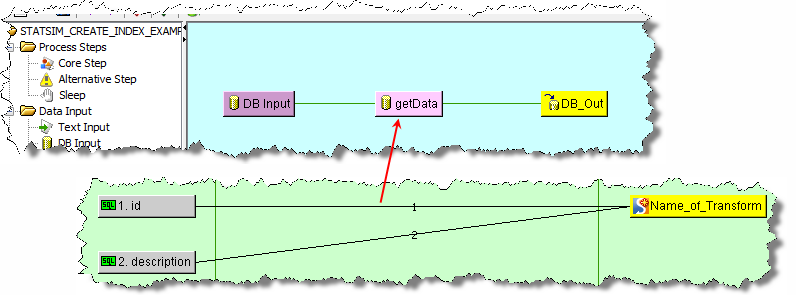
The following example is a basic StatSim create index DSA and Transform Map using the defaults:
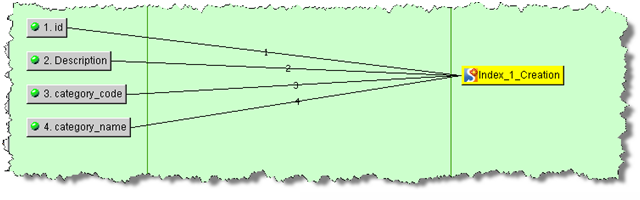
The following example is a StatSim create index Transform Map for Classification Purposes:
From the DSA menu, select Check-In... to check the DSA into your Oracle DataLens Server.
Next, you have to run the index creation job from your new StatSim Creation Index DSA.
To run the index creation job, you can log into the Administration server and click on job run. The job will create the index. However, it is recommended that the job be setup as a automated or manually scheduled job so that the index creation process can be rerun to refresh the index with new rows without having to setup the job again. Use the remaining steps to create the scheduled jobs, which requires administrator user access.
Log into Oracle DataLens Server Administration Web page and click on the Administration tab. See Oracle Enterprise Data Quality for Product Data Oracle DataLens Server Administration Guide.
Click Schedule a Job from the Jobs panel.
Select the server group you want to use from the Server Group list box.
Select your StatSim create index DSA from the Select a DSA list box.
Enter a description for the scheduled job in the Description text box.
(Optional) The remaining options can be modified so that the job is run the way you want it. You can either schedule the recurrence to be manual to allow you to run the job on demand, or you can schedule a recurrence of your choice so that the index will be refreshed periodically.
Click Schedule This Job to complete the scheduled job creation.
If you created a manual reoccurrence, click Scheduled Jobs from the Jobs panel.
Locate your StatSim job in the list and click the run button in the Actions column to run the job immediately.
The StatSim job is run and you are advanced to the Job Status page. When the job completes it is listed in the StatSim Indexes panel.
To view or delete your StatSim indexes, from the Server panel, select Statsim Index.
You can recreate your StatSim index at any time by rerunning it from the Scheduled Jobs panel, which reruns your StatSim create index DSA.
A basic StatSim matching DSA contains two core processing steps. In the first step the matches are created in accordance with the StatSim Match widget settings. The second step returns the match results for management in the Governance Studio, which is the easiest way to review your results.
To create your StatSim matching DSA:
Create a new DSA.
Create a new text input Transform Map which is the first core processing step. For example, you could name it 'text_input'. See "Creating Transformation Maps".
Create at least two input nodes with the first node being a numeric ID. You can include up to eight additional input nodes.
Expand the Database Updates folder, and the drag and drop the Stat Match widget to the output column.
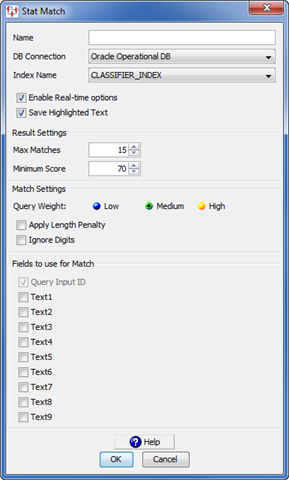
Complete the Stat Match dialog box as follows:
Enter a name into the Name field for this StatSim match process.
Select the database connection that corresponds to where your StatSim index is stored from the DB Connection list box.
Select the name of the StatSim index you want to use from the Index Name list box. This list is populated based on the database connection you select.
Select Enable Real-time options to enable the Governance Studio user to override the values at run at time within the Governance Studio.
Select Save Highlighted Text to enable highlighting of the match results in the Governance Studio. The highlighting shows the difference between the query text and the match text.
Select the Max Matches and Minimum Score values or use the recommended defaults from the respective list boxes to return match results that allow you to view a reasonable set of match results with the best matches at the top of the list Increasing the Max Matches value and/or decreasing the Minimum Score returns a greater number of match returns while selections in the reverse return fewer and closer matches.
Select one of the Query Weight options. Medium is the recommended for most datasets and applications because it considers both the shared and unshared content between the query and index records.
If the records used for your index are short (10-60 characters) and your query records are longer, then select Low.
If you wish to search for records (find the records in the index that contain the exact terms appearing in query records), then select High. This increases the number of match returns though the returned items will likely have additional words in the description.
Note:
Match performance (match speed) may suffer if the query weight option "low" is selected. Conversely, match performance may improve if the query weight "high" is chosen.(Optional) Select the Apply Length Penalty check box to penalize very short matches.
(Optional) Select the Ignore Digits check box to apply a rescoring of the original match results so that the digits in the query and index lines are ignored and similarity scores are calculated based on the remaining text.
If you select Ignore Digits, the following pair of records will have a match score of 100:
Pencil, Automatic, .4mm, Blue Cap
Pencil, Automatic, .5mm, Blue Cap
Notice that these two lines differ only in their digits. When Ignore Digits is selected, the digits are ignored and the match score is calculated based on the remaining text.
Use the Text1 - 9 check boxes to indicate the number of input node description fields (up to nine) to use for the query text. The Query Input ID check box is selected by default because the numerical ID input is required.
Click OK.
Connect the two or more input nodes to the Stat Match widget.
Save and close the Transform Map.
For matching applications, complete the following steps:
Create a database input Transform Map, which is the second core processing step and takes the StatSim match step as its input. For example, you could name it 'match_results'. See "Creating Transformation Maps".
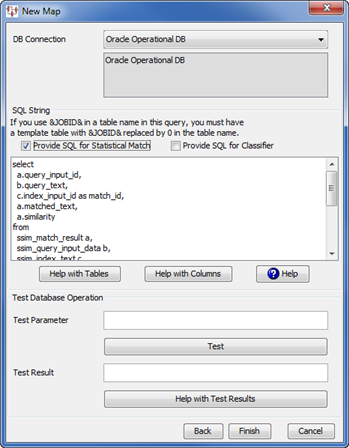
Ensure that you select the database connection associated with your StatSim index from the DB Connection list box.
Select Provide SQL for Statistical Match to automatically populate the necessary SQL statements.
Click Finish.
The database input Transform Map is displayed.
From the New Input/Output folder, drag and drop a DB Field Input widget to the input column.
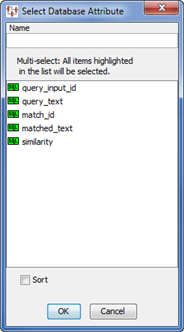
This list of database attributes is populated with all of the match attributes that are necessary to the StatSim match.
Select all of the attributes in the order in which they appear. Do not sort the list.
Click OK.
Create output nodes for all of the input nodes.
Save and close the map.
Connect the first processing step ('match_step') to the second processing step ('match_results').
Create a text output node and enter a name in the Name field. For example, 'match_results_output'.
Click the Governance Studio tab.
In the Output Type section, select one of the Match Results options so that your matches can be reviewed in the Governance Studio and click OK.
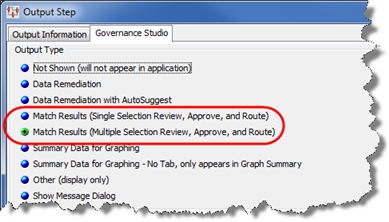
Connect the second processing step to the output step.
Save the DSA.
The following example is a basic StatSim match index DSA with two inputs (id and description) and two Transform Maps using the defaults:
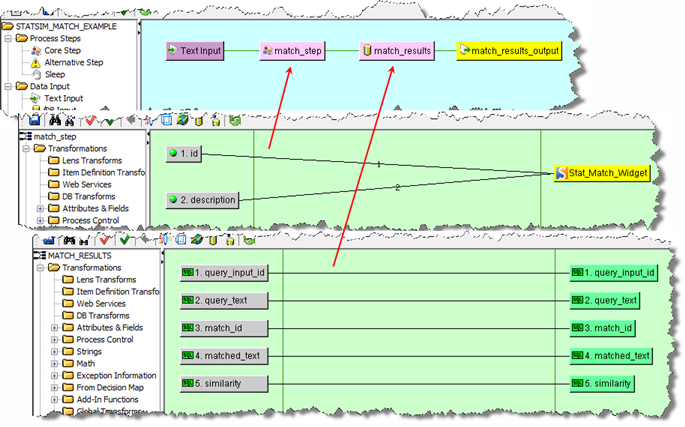
From the DSA menu, select Check-In... to check the DSA into your Oracle DataLens Server.
Start the Governance Studio
Create a new project ensuring that you select your StatSim match DSA and identify your input data. See Oracle Enterprise Data Quality for Product Data Governance Studio Reference Guide.
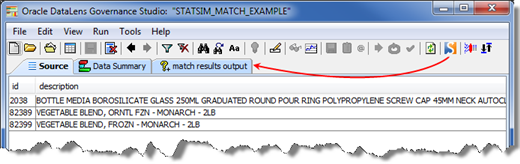
(Optional) Click the Stat Match Options button on the toolbar to set the runtime options. In order to use the runtime options, you need to enable it in the DSA Stat Match widget by selecting the Enable Real-time options check box. The StatSim runtime options are a subset of the options in the Stat Match Runtime Options dialog box and allow you to dynamically modify the result and match settings, as well as the fields to use in the match process. Using the StatSim runtime options can save you time; it allows you to quickly make changes to your StatSim application without modifying your DSA in the Application Studio.
Set the options as described in step "Step 1: Creating the StatSim Index Creation DSA" then click OK.
Click the transform data button on the toolbar to obtain your match results.
Click on your match results tab to view your results.
Click on a line of data to view the match results for it.
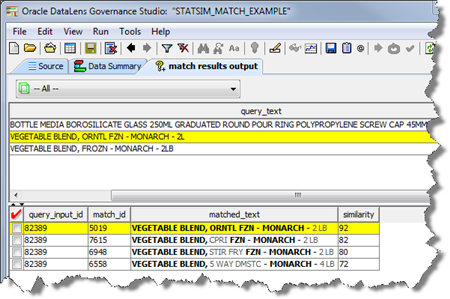
The first line in the lower pane is the closest match to query text.If the Save Highlighted Text option was selected in the Stat Match DSA, then the query text that matches the index text will be shown in bold.
For Classification Applications
Create a database input Transform Map, which is the second core processing step and takes the StatSim match step as its input. For example, 'match_results'.
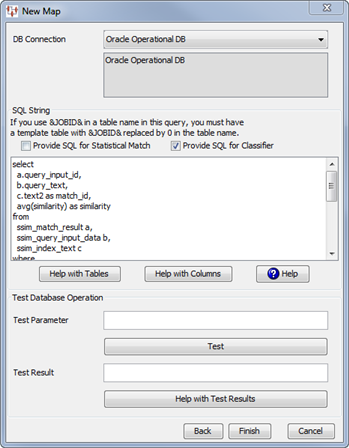
Select Oracle Operational DB from the DB Connection list box.
Select the Provide SQL for Classifier check box to automatically populate the text box with the necessary classifier SQL statements.
Click Finish to complete the map.
The database input Transform Map is displayed.
From the New Input/Output folder, drag and drop a DB Field Input widget to the input column.

This list of database attributes is populated with all of the match attributes that are necessary to the StatSim match for classification purposes.
Select all of the attributes in the order in which they appear. Do not sort the list.
Click OK.
Create output nodes for all of the input nodes.
Save and close the map.
Connect the first processing step ('match_step') to the second processing step ('match_results').
Create a text output node and enter a name in the Name field. For example, 'match_results_output'.
Click the Governance Studio tab.
In the Output Type section, select one of the Match Results options so that your matches can be reviewed in the Governance Studio and click OK.
Connect the second processing step to the output step.
Save the DSA.
The following example is a basic StatSim match index DSA with two inputs (id and description) and two Transform Maps using the defaults:
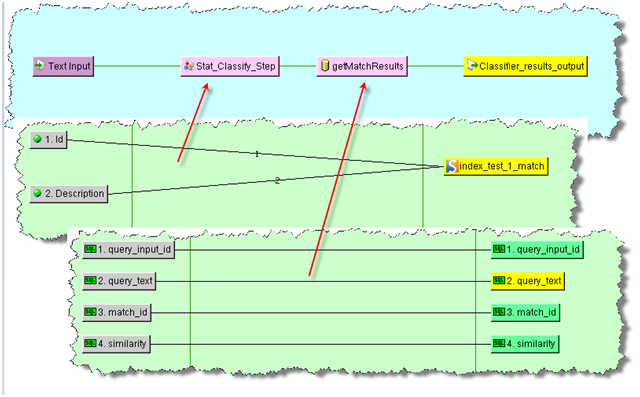
From the DSA menu, select Check-In... to check the DSA into your Oracle DataLens Server.
Start the Governance Studio
Create a new project ensuring that you select your StatSim match DSA and identify your input data. See Oracle Enterprise Data Quality for Product Data Governance Studio Reference Guide.
(Optional) Click the Stat Match Options button on the toolbar to set the runtime options. In order to use the runtime options, you need to enable it in the DSA Stat Match widget by selecting the Enable Real-time options check box. The StatSim runtime options are a subset of the options in the Stat Match Runtime Options dialog box and allow you to dynamically modify the result and match settings, as well as the fields to use in the match process. Using the StatSim runtime options can save you time; it allows you to quickly make changes to your StatSim application without modifying your DSA in the Application Studio.
Set the options as described in step "Step 1: Creating the StatSim Index Creation DSA" then click OK.
Click the transform data button on the toolbar to obtain your match results.
Click on your match results tab to view your results.
Click on a line of data to view the match results for it.
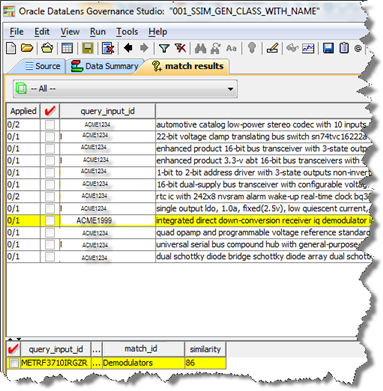
The first line in the lower pane is the suggested classification for the corresponding input line. The match id corresponds to the suggested category, the similarity is the average similarity of the input lines across all of the lines in the index that were classified to the Demodulators category and because it is above the threshold put in the match application, the category was returned as a potential good category for this item.
|
Copyright © 2001, 2013, Oracle and/or its affiliates. All rights reserved. Legal Notices |
|