| Oracle® Enterprise Data Quality for Product Data Knowledge Studio Reference Guide Release 11g R1 (11.1.1.6) Part Number E29134-02 |
|
|
PDF · Mobi · ePub |
| Oracle® Enterprise Data Quality for Product Data Knowledge Studio Reference Guide Release 11g R1 (11.1.1.6) Part Number E29134-02 |
|
|
PDF · Mobi · ePub |
This chapter explains techniques and information related to defining context and Item Definitions further using the Knowledge Studio.
You can view and modify all of the phrases and terms attributes in your data lens from one dialog box. From the Edit menu, click Edit Phrase and Term Attributes.
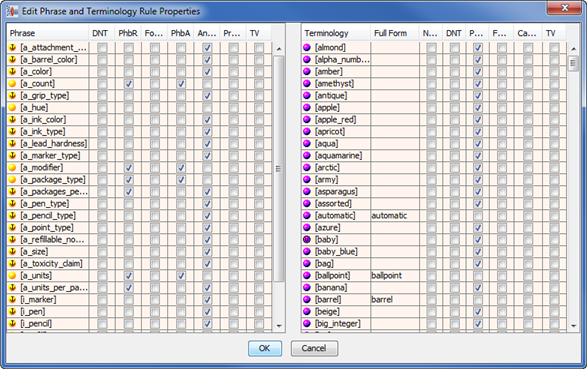
Edit the phrase and term attributes using the check boxes and field in the following columns:
Sets/clears the 'Do Not Translate' attribute for phrase or term rules.
Sets/clears the 'Prohibit Rename' functionality for the selected rule. If the selected rule has this check box selected, then you will not be able to rename it.
Sets/clears the 'Format to Locale' attribute for phrase or term rules.
Sets/clears the 'Anchor' attribute for the select phrase rule. If the selected rule has this check box selected, then this rule cannot be at the top of the phrase structure. For this rule to be invoked, it must have a parent.
Sets/clears the 'Anchor' attribute for the selected phrase rule. If this check box is selected, then the selected phrase rule may sit at the top of a phrase structure and does not require a parent node.
Sets/clears the 'Promote Children' attribute for phrase rules. This allows the ability to promote lower level phrases separately.
Sets/clears the 'Translate Variable' attribute for phrase and terminology rules. This will allow this phrase and/or term to be translated once regardless of where in context it is used.
Displays any full form term variants that have been generated for the term. You can click in this field to add or edit the full form of each term.
Sets/clears the 'Needs Review' attribute for terminology rules.
Sets/clears the 'Case Sensitive' attribute for terminology rules.
An attribute can be set or cleared for a range of rows by clicking on the attribute for the first rule, holding down the shift key, and then clicking the attribute for the last rule. This only works within a single attribute column.
If you double-click the rule name, you can open the Review Productions dialog for that rule.
When you define a terminology rule, Knowledge Studio can automatically generate abbreviated forms for that term. For example, if you have a [resistor] terminology rule, Knowledge Studio can automatically generate a variety of possible alternatives, such as rsstr. In many circumstances, this eliminates the need for you to manually drag-and-drop to create additional associations.
The generation of term variants feature is a data lens option that you set. Once you set the data lens option to create automatically generate variants, generation is applied as you create terminology rules. For more information about data lens options, see "Setting Data Lens Options".
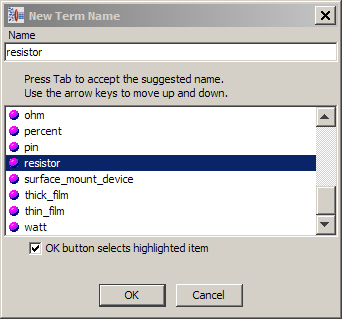
For this feature to be effective, you must label the terminology rule with the full name. Using the rsstr example, you must label the terminology rule [resistor] so that Knowledge Studio can create as many variations as possible.
After you finishing building the phrase structure, a blue icon with a check is now displayed next to the term indicating that variants have been defined and that the term requires your review.
You can review automatically generated variants by double-click the term.
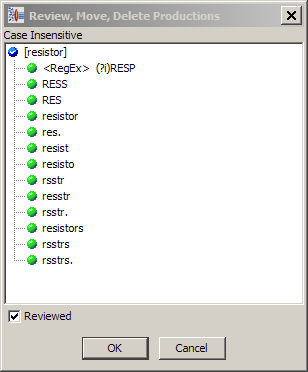
Review the variants and delete the variants that you do not want. You can sort the productions in the list by right-clicking on any of them and selection Sort Productions. After you have completed your review of the term variants, you indicate this to the data lens with the Reviewed check box.
Alternatively, you can use the Edit Attributes function to review terminology rules though you cannot mark the term as 'Reviewed' using this feature.
This section describes in detail the syntax of the data lens phrase and term rules. You can see a rules detailed structure using the Edit Rule feature.
The Edit Rule menu item is only available from the Define Phrases sub-tab on the Phrases tab and is accessed by right-clicking on a term.
Using the Edit Rule dialog allows you to change the rules that are currently being recognized by the data lens. It is recommended that you fully understand the implications of using this functionality prior to making changes.
The following sections use the Edit Rule dialog to describe rule syntax.
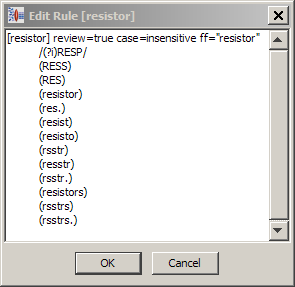
A terminology rule starts with the rule name inside of square brackets. The name cannot have spaces and must start with a letter. When you create rules using Knowledge Studio the proper syntax is created for you. In the following example, the terminology rule [resistor] contains variants of the resistor term. In other words, [resistor], is satisfied by RESS, RESP, RESISTOR, etc. The text within the parenthesis represents literal text from the content. For each literal, a leading tab (not spaces) and surrounding parenthesis are required. Each row of a rule is called a production. Each production represents a unique text variation that can be recognized by the rule.
Once a terminology rule has been defined then additional variations can be entered immediately by using the edit rule functionality. See "Generating Term Variants".
The items immediately to the right of the preceding rule name are the rule attributes. In the preceding example, the [resistor] rule has its case attribute set to case insensitive.
String matches may be made case sensitive or case insensitive. Case sensitivity can be defined at the data lens level or at the individual terminology rule level.
Case sensitivity for regular expression matching, however, cannot be set as a rule attribute. They must be set in terms of the matching context. See the regular expression definitions and examples in the following section.
A regular expression is a way to capture various text forms in a simple representation. For example, all integers can be represented by the regular expression pattern /\d+/. For a complete discussion of regular expression syntax, see Appendix A, "Regular Expressions." This section describes the use of regular expression in the standardization process.
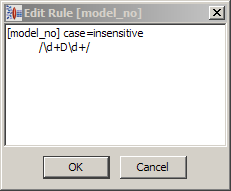
Rules containing strings of text must be matched exactly to the strings. These strings are identifiable by the fact that they are directly enclosed by parentheses. The following example shows a term rule that contains three different model numbers.

Rather than writing each entry as it appears in the content, you can use the following shortcut that defines a model number as an integer, followed by D, followed by another integer. The integers are of unspecified length. This pattern will match every occurrence of model number of this form (for example, one or more integers followed by a capital 'D' followed by one or more integers) in our data without further action. Regular expressions can be entered into a terminology rule through the edit rule functionality of the Knowledge Studio.
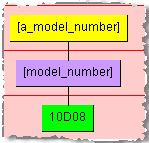
If you enter the text '10D08' you would see that it is recognized by the [model_number] rule as in the following example:
There are two forms for regular expression rules within a term rule:
Regular expressions that are not sensitive to white space. These are defined in terminology rules using the forward slash (/) match characters. You can use this regular expression format if you want to recognize terms that are embedded in other terms, i.e. terms that are not surrounded by white space.
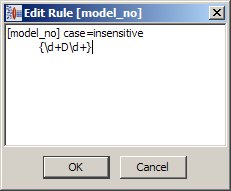
Regular expressions are sensitive to white space. You can also define regular expressions bounded by white space. You typically use this technique for names and addresses, especially when embedded white space is important to identifying your text items. To do this you use curly brackets ({}) to define your regular expression. Alternatively, you could use the source formatting feature to add white space to regular expressions as described "Source Format".
The following example matches model numbers, but only when the model number is surrounded by white space.
Note:
The use of curly brackets to delineate white space separated terminology is not a Perl standard for regular expressions. The use of curly brackets within the Perl standard and SCS-defined curly brackets are not in conflict. For example, the following terminology regular expression matches model numbers that have from one to three of the capital letter 'D' surrounded by two integers, and the model number as a whole is both preceded and followed by white space:{\d{2}D{1,3}\d{2}}
Phrase structures are composed of phrase rules and term rules. Phrase rules contain productions which are composed of term and other phrases.
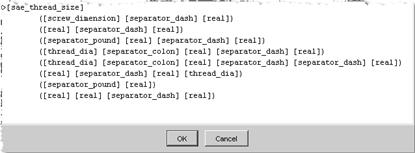
The top most phrase structure rule must start with a greater than symbol, '>'=. In the following example, each line of the rule represents a different form of [sae_thread_size]. The first form, for example, consists of a [screw_dimension] (which is itself a phrase structure), a [separator_dash], and a [real]. Each line is in parenthesis with a space between each phrase structure rule. Each phrase structure will eventually reference one or more terminology rules. Other formatting is the same as for terminology rules.
[sae_thread_size] references [screw_dimension] as follows'
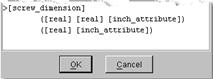
[screw_dimension] in turn references [inch_attribute] as follows:
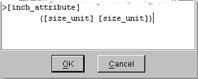
[inch_attribute] in turn references [size_unit] as follows:
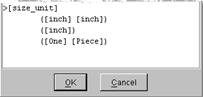
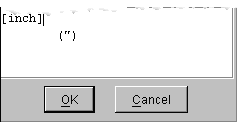
[size_unit] finally references the terminology rule [inch], which defines double-quote to be inch as follows:
Phrase structure rules can include a special character called a start symbol, >. Start symbols indicate the root of a phrase structure.
Phrase structure rule names that include the start symbol appear as tags in the tagged content file.
Rule names must be unique. It is recommended that you use a rule naming convention that represents the product and attributes of your content. Additional points to consider:
A phrase structure rule can only contain the names of term rules.
A terminology rule can only contain literal text or regular expressions.
A rule name can only contain alphabetic, numeric, and underscore characters.
White space in literal text is meaningful. (J L) and (JL) are not equivalent.
Rule names cannot start with numbers.
The ability to rename a phrase rule and apply this change in knowledge throughout your data lens can be a powerful way to ensure consistency and consolidate rules. The Rename Rules functionality available from the Edit menu provides more search functionality than the context-sensitive option of the same name.
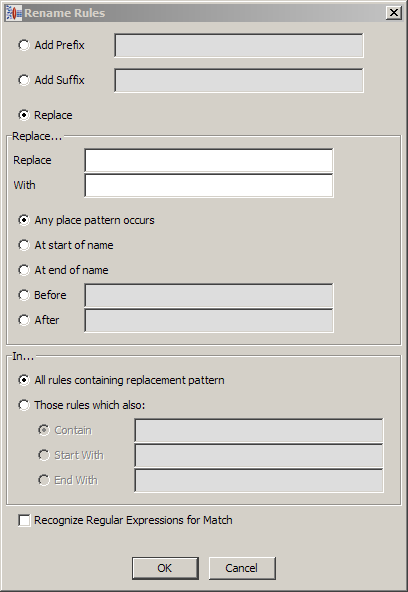
This renaming operates similar to a typical search and replace. You can choose to add a prefix, suffix, or to replace information for the selected rule; only one of these renaming functions can be selected.
If you choose to add a prefix or suffix to the rule, you simply enter the text in the field and click OK.
Replacing information in the rules provides several self-explanatory choices for searching and replacing the data. You cannot leave both the Replace and With fields blank though if either is left blank it operates as a deletion based on the other selected options.
For example, if you could use the At start/end of name, Before, and After options to specify where in a rule you want to make changes. Using the options as follows:
| Replace | res_ |
| With | resistor_ |
| After | a_ |
The previous example will change 'a_res_ohms' to 'a_resistor_ohms' and will not change 'a_resolution_pixels'.
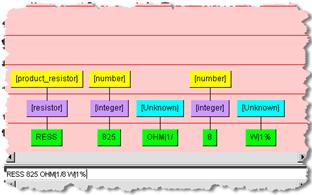
Source Format allows the content to be reformatted prior to the creation of knowledge. The purpose of the formatting is to reduce the number of special rules for content standardization. Source formatting is only needed prior to the application of the data lens rules.
For example, the following figure shows the text 'Res10Ohm|1\8W|' entered into the Selected Content field, directly below the Graphical Rule Building pane. In this case the data contains pipe (|) field separators. The Knowledge Studio is not able to separate the '|' from the terms. If a problem like this is found repeatedly in the sample data, then you should apply Source Formatting.
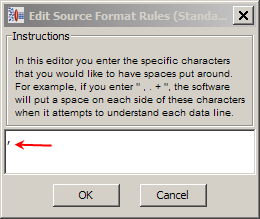
From the Data Lens menu, click Source Format, and select Standard Mode.
Enter a comma in the entry field of the Edit Source Format Rules dialog and click OK.
For example, if you needed to add spaces around all of the commas in your data, you would enter ’,' (a comma).
Click OK.
To apply the new source formatting to your line of text, click in the Sample Data pane and press Enter.
Click Refresh to refresh your source formatting changes across your entire sample data file.
The phrase structure display is updated in the Graphical Rule Builder pane as follows:

From this point forward all ',' characters are surrounded with spaces, allowing you to build the phrase structure that you need. If you want to turn off source formatting for a particular character, simply reverse the process.
Note:
If the comma is followed by another character, that character is formatted too. In addition, multiple characters next to one another operate as a list.The Expert Mode option of the Source Format feature can be used for removing, substituting, and adding characters to your source input. An example of a regular expression used in Expert Mode is as follows:
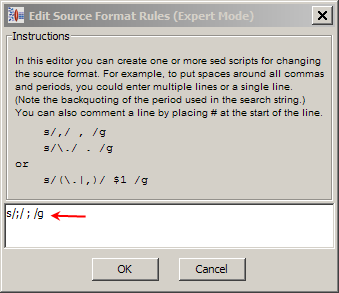
This regular expression substitutes all instances of the character ';' with the same character with spaces on either side of it, '; '.
You can remove any grammar rules (terms and phrases) that are required by the data file against which the compaction is run.
From the Data Lens menu, click Compact Grammar.
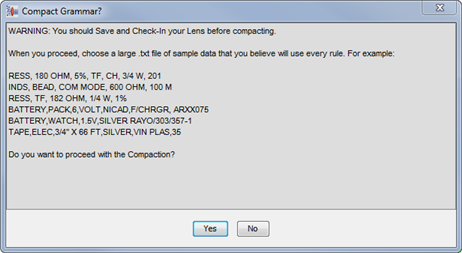
Review the messages and ensure that you have the sample data you want to use to compact the grammar.
Click Yes.
Select the sample data file and click Open.
Your data lens grammar is then compacted and the results are displayed for you to review.
Click OK.
|
Copyright © 2001, 2013, Oracle and/or its affiliates. All rights reserved. Legal Notices |
|