| Oracle® Enterprise Data Quality for Product Data Knowledge Studio Reference Guide Release 11g R1 (11.1.1.6) Part Number E29134-02 |
|
|
PDF · Mobi · ePub |
| Oracle® Enterprise Data Quality for Product Data Knowledge Studio Reference Guide Release 11g R1 (11.1.1.6) Part Number E29134-02 |
|
|
PDF · Mobi · ePub |
This chapter explains how to create Terminology Rules (Term Rules) and phrase structures.
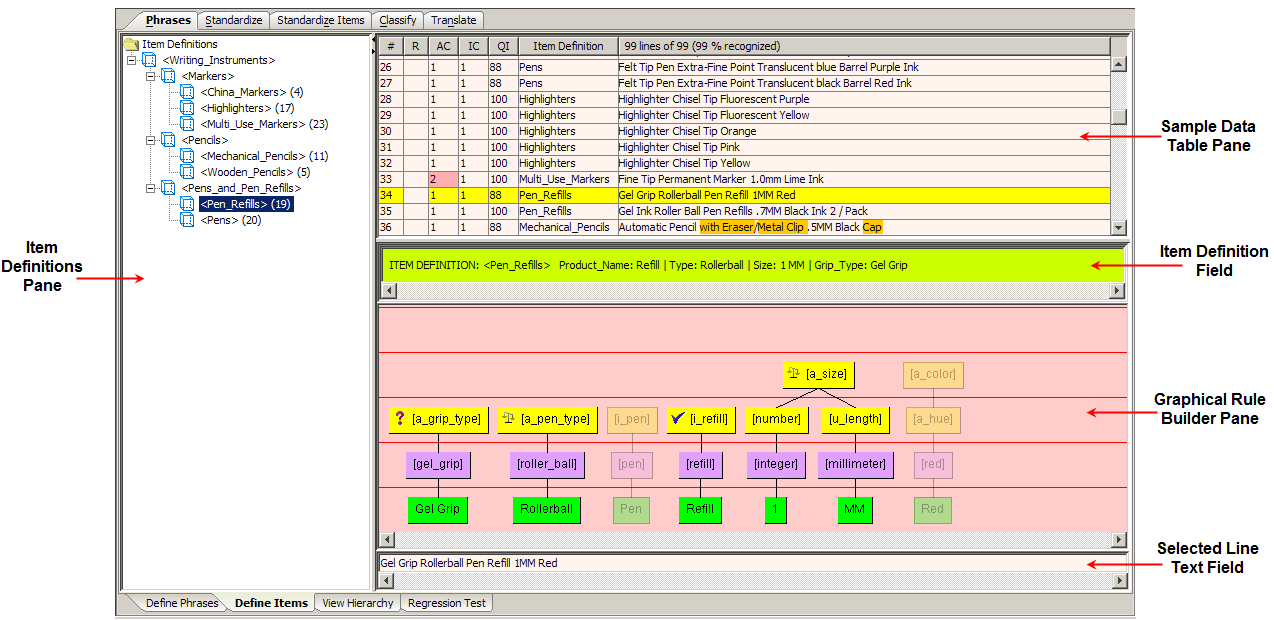
The Phrases tab and associated sub-tabs are used to build the phrase structures that describe your sample data in a data lens. The Define Phrases sub-tab is the default and is the initial sub-tab used to begin building your data lens.
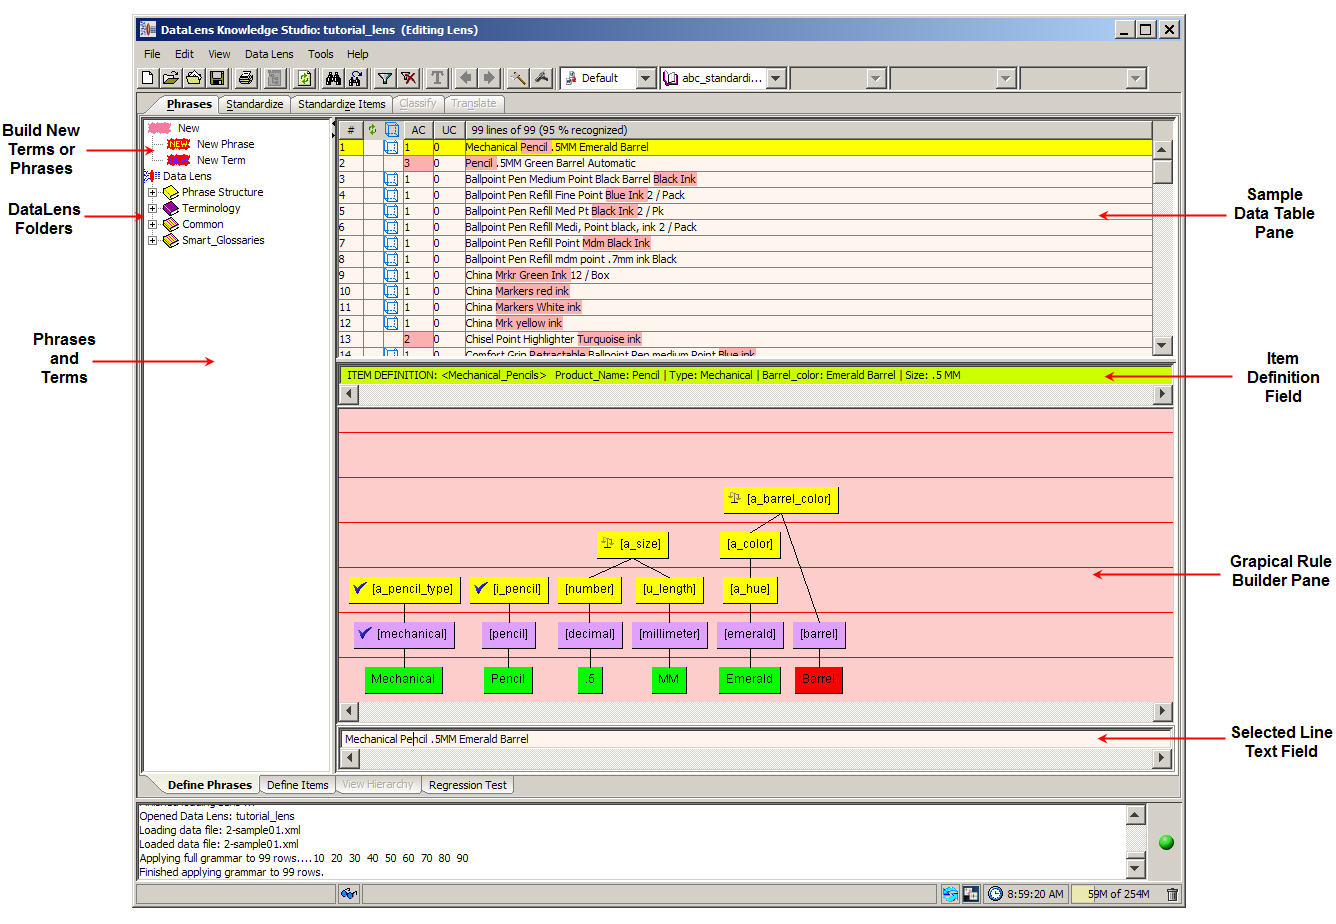
The Knowledge Studio separates your sample data automatically. The selected line of sample data is colored yellow; in the selected line, the unrecognized text is gold, and the ambiguous text is pink.
The Phrases and Terms pane contains all the components necessary for creating phrase structures in your data lens as follows:
These two icons can be dragged into the Graphical Rule Builder pane to create a new phrase or terminology node respectively.
This folder is the parent folder for your entire data lens and contains all structures associated with the data lens. The nodes contained in these folders can be dragged into the Graphical Rule Builder pane to construct phrase structures.
Contains phrase rules in use.
Contains terminology rules in use.
Contains commonly used phrase structures and terminology nodes.
Contains sample structures previously delivered in early versions of Enterprise DQ for Product. This is an older version of the Smart Glossaries Folder that may still exist if an importable lens uses this domain name. It does not exist when a Foundation data lens is not present.
Contains all Smart Glossaries imported into the data lens; does not exist when Smart Glossaries have not been imported.
The following context-sensitive menu operates in both the Phrases and Terms pane and the Graphical Rule Builder pane:
| Referenced By…
Displays information about the rule (phrase or terminology) including the Item Definitions, rules, and classifications that reference the selected rule. Jump to Standardization Activates the Standardize Phrases or Standardize Terms sub-tab on the Standardize tab with your selection so that you can edit the Item Definition. Review Productions Displays a dialog that allows you to review, move, or delete the productions that are associated with the selected rule or term. See "Modifying Phrase Productions". |
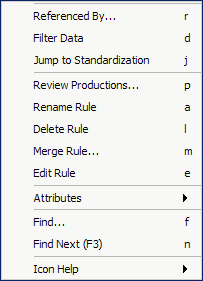 |
| Filter Data on rule name
Filters the sample data based on the selected rule and updates the Sample Data Table pane. The Unfilter button can be used to return the data to an unfiltered state. |
|
| Merge Rule…
Displays a dialog that allows you to merge the selected rule with another rule. See "Merging Two Phrase Rules". |
|
| Rename Rule
Displays a dialog that allows you to rename the selected phrase or term rule. See "Renaming Phrase Rules". |
|
| Delete Rule
Displays a verification message prompting you to review the consequences of the selected rule deletion including all the associated rules and productions that will also be deleted. |
|
| Edit Rule
Displays a dialog that allows you to edit the selected rule. See "Editing Phrase Rules". |
|
| Create New Parent
Creates a new parent term. See "Creating, Inserting, or Disconnecting a Parent Node". |
|
| Disconnect from Parent
Deletes the connection between a lower level node and a parent node. |
|
| Insert New Parent
Inserts a new parent term for the selected node. See "Creating, Inserting, or Disconnecting a Parent Node". |
|
| Attributes
See the following context-sensitive menu description. |
|
The following Attribute Rule context-sensitive menu is slightly different for phrase structures and terminology nodes though the menu options work the same. Setting the various attribute options results in these changes to data lens processing:
| Do Not Translate
The rule will not appear on the Translation tab and is not available for translation selection. See "Translating Data". Format to Locale The selection is automatically formatted based on target language requirements. |
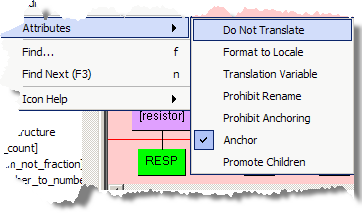 |
| Translation Variable
Indicates that the rule will only be translated once and thereafter used as a variable that is reused during translation. |
|
| Prohibit Rename
Ensures that the rule cannot be renamed. |
|
| Prohibit Anchoring
Does not allow the rule to be anchored to any phrase. |
|
| Anchor
Anchors the rule to a phrase; this is the default. |
|
| Promote Children
Promotes all children of the rule to use the same value of the parent attribute. |
|
The Sample Data Table pane contains the lines of sample data for the selected sample data file. The columns of the table, left to right, indicate the following:
The unique number assigned to that line of data.
This column contains a refresh icon if the line of data must be refreshed; the Phrases tab is also marked with the refresh icon. Refresh applies the modification to all lines in the loaded sample data file. If there are rules in the grammar which have not been applied to a particular line of data, this column will contain a refresh icon. Lines are refreshed one at a time by clicking on the line or refresh all of your sample data by clicking the Refresh button.
Indicates the ambiguity count for the line of data and corresponds to the pink colorized text so that you can resolve them. See "Resolving Phrase Ambiguity".
Indicates the unparsed terms in the line and corresponds to the gold colorized text. This allows you to easily identify the term and phrase rules that you must create so that your data is parsed completely.
The column heading indicates the number of lines and percentage of data that is recognized by the data lens. It is updated when the data is refreshed and as rules are created or edited.
Each of the columns that contain data can be used to sort the table, both ascending and descending, by clicking on the column title. Clicking a column heading once sorts the table by the items in the selected column, in ascending alphabetically order. Clicking the same column heading a second time sorts the table again in descending alphabetical order.
The following context-sensitive menu operates in the Sample Data Table pane and the options result in the following actions:
| Mark Lines for Delete
Changes the # column to red for all of the selected lines though the lines are not deleted. Un-Delete Lines Changes the lines that are marked for deletion back to a normal state. |
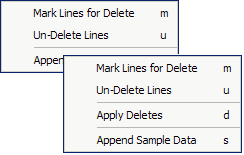 |
| Apply Deletes
Deletes all lines of data that are marked for deletion permanently. This option is active only when there are lines marked for deletion. Deleted lines cannot be retrieved so this option should be used carefully. Append Sample Data Appends additional sample data from the data entry line to the current data source file. |
|
This field displays the Item Definition for the line selected in the Sample Data Table pane; it is for review only.
This pane is used to create visual representations of phrase and terminology structures that identify the text components in a line of data. To create or modify a rule for the selected line of data, you drag and drop the phrase or term rules from the Phrases and Terms pane into the Graphical Rule Builder pane.
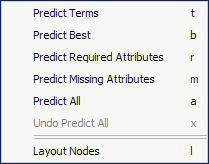
The following context-sensitive menu operates in the Graphical Rule Builder pane:
| Predict Terms
All possible rules that could apply to the input data for an individual sample row, based on confidence ratings and meeting the Prediction Threshold, are displayed for you to choose from or a message that advises you why no predictions are available. Predict Terms only works in the context of Item Definition where the sample row has an associated Item Definition. You can select the appropriate |
 |
| rule or reject the predictions. Rejecting predictions is only applicable to the current data lens editing session and is reset when you close the data lens. This option is also on the Edit menu. See "Using Rule Predictions".
Predict Best Displays the closest matching phrase rules for the unparsed text in the selected record, which are automatically selected, based on confidence ratings and meeting the Prediction Threshold, for you to choose from or a message that advises you why no predictions are available. Predict Best only works in the context of Item Definition where the sample row has an associated Item Definition. See "Using Rule Predictions". |
|
| Predict Required Attributes
Displays only the matching phrase rules for the unparsed text in the selected record that match Item Definition Required Attributes. See "Using Rule Predictions". |
|
| Predict Missing Attributes
Displays only the matching phrase rules for the unparsed text in the selected record based on the attribute order specified in the Item Definition. See "Using Rule Predictions". |
|
| Predict All
You can select this option to examine all unparsed data in all records and automatically accept all predictions See "Using Rule Predictions". |
|
| Undo Predict All
Reverses changes effected using the Predict All option; only available after Predict All has been selected. See "Using Rule Predictions". |
|
| Layout Nodes
Realigns and redisplays the nodes in the Graphical Rule Builder pane. This can be very useful when you made several modifications to a rule. |
|
| New Term
Adds a new term. See "Creating Terminology Rules for Unknown Items". |
|
| Change to Regex
Changes the selected node (term rule production) to a regular expression. This is most useful for numbers and symbols, or when there is text within a string that does not contain spaces. See Appendix A, "Regular Expressions." |
|
The Selected Line field allows you to edit the selected line of data and add those changes to your sample data. The data in this field is the same data that is displayed in the Graphical Rule Builder pane. You can further separate the selected lined of sample data, to produce more granular phrase rules, in this field.
The following context-sensitive menu operates in the Selected Line field:
| Add to Sample Data
Adds all of the edits that you have made in the Selected Line field to your sample data. |
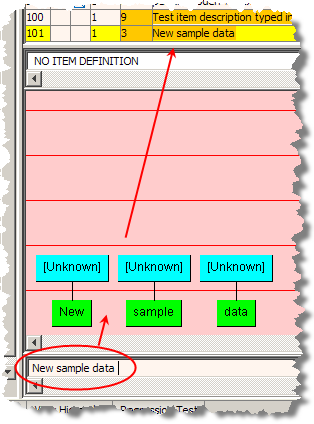
You can also use the Selected Line field to enter in trial content, or content not contained in your sample data file. For example, you could enter "New sample data" into this field, and then use the Add to Sample Data option. This adds the entered text as a new term as in the following figure:
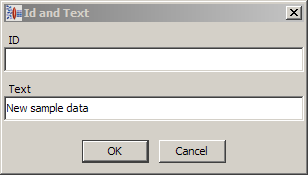
Enter an ID or you can leave the field blank, and then click OK.
The new line appears as the last line of your sample data file.
The following sections explain how to use these tools.
There are three ways to create terminology rules for unknown items as follows:
Use the context-sensitive menu, by right-clicking on the green text node, then clicking New Term.
Right-click on a blue [Unknown] node and click New Term. You will be prompted for the term name. Create a terminology rule for the text 'mechanical'.
Double-click the green text node to create a terminology rule with the same name.
You should only use the double-click method when the text is an exact match for the name you want to use for the name of the terminology node because this also provides a default value for the full form for this term rule.
All of these methods result in appearance of the New Term Name dialog.
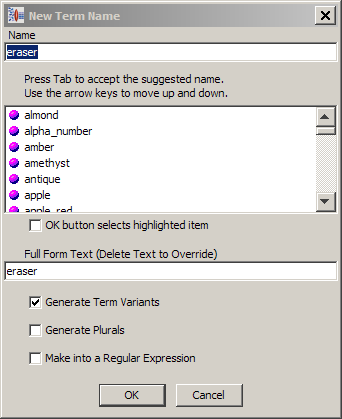
Enter a descriptive name for the new term rule.
Select the check boxes as appropriate:
Generate Term Variants
Automatically generates the term variants for the rule as you create terminology rules. For example, rsstr is an variant for RESISTOR.
Generate Plurals
Automatically generates the plurals of the rule as you create terminology rules to aid in recognizing variants of the full form term.
Make into a Regular Expression
Converts the productions of the term rule into a regular expression in the full form of the term. Typically, this is only useful for numbers or symbols.
Click OK to add the new term. The new terminology node appears in the Phrases and Terms pane.
As a best practice, you should have a full form included when you build term rules. This will enhance predictions. For more information about predictions, see "Using Rule Predictions"
This section describes how to create the higher level phrase rules that contain the term rules. A well-formed phrase structure has at least one term node and at least one phrase node.
You can create a new phrase structure by dragging the New Phrase icon at the top of the Phrases and Terms pane onto an existing phrase or terminology node, by right-clicking on a terminology node and clicking Create New Parent, or by double-clicking a terminology node. Build your new rule as previously described.
Combining two nodes together allows you to join them together as one semantic concept and consolidates the phrase knowledge in your data lens.
To combine text nodes to form one production, use the following steps:
Create a new phrase as a parent for a term node.
Since this is a generic measurement, it is a good idea to assign it a name that can be used for other parsing rules.
Select the term [millimeter], right-click and click Create New Parent.
Select [number] and create a phrase [a_size].
To connect the [a_size] phrase node to the [u_length] phrase node, click the lower level node [u_length] (it turns red).
Click in the center [a_size], and then click to drag yellow phrase ball to [u_length].
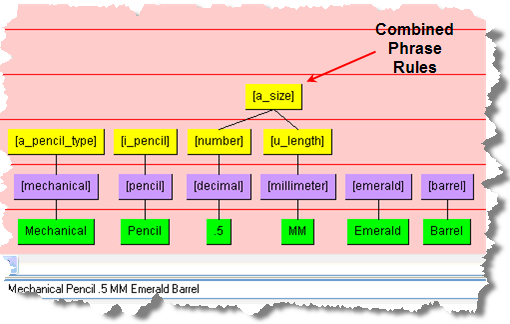
Lines defining a phrase structure now join the two nodes into a combined phrase structure.
Merging rules is useful when you want to combine the productions of two rules into one rule.
To merge rules, use the following steps:
Right-click the term or phrase to be merged, and click Merge Rule….
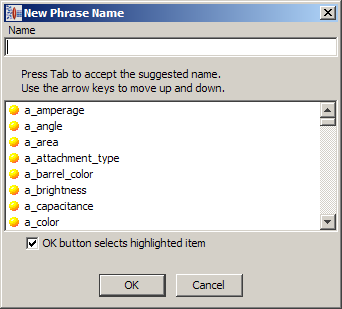
Locate the term or phrase you want the selection to be merged into and press the Tab key to select that term or phrase.
Use the scroll bar to search for the term or phrase you want to merge into or to search for it, enter the then name in the Name field.
Click OK to merge the rules.
You can view the results of the merge rule operation by right-clicking the term or phrase; and clicking Review Productions.
You can easily change the name of a phrase rule by right-clicking the phrase in the Graphical Rule pane, and then select Rename Rule. Use the New Term Name dialog to rename this phrase rule. See "Creating Terminology Rules for Unknown Items".
Right-click the rule you want to edit and select Edit Rule.
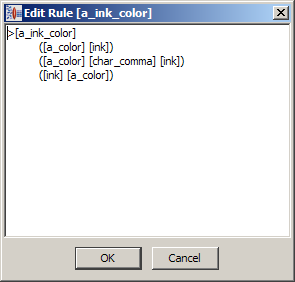
The Edit Rule dialog allows you to directly edit the selected rule and operates like a text editor. You use this dialog to examine the existing production for the correct syntax, edit as necessary, and then click OK.
The most robust phrase and terminology rules include the variations that could be associated with a term node to ensure that sample data is parsed quickly and in a standard way.
For example, the term [medium] could be further defined to include occurrences of the term 'med' as a term variant.
To ensure variations of the term are generated, edit the term as previously described and select Generate Term Variants.
All the phrase productions that have been created for a rule are displayed.
Select a rule, right-click on it, and select Review Productions. The following shows three different ways that [a_point_type] will be recognized in the data.
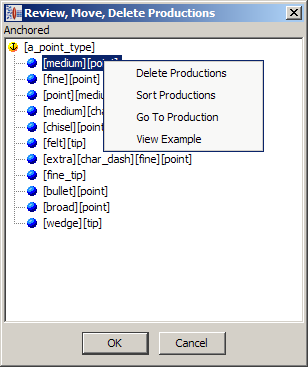
You can delete a production by selecting it, right-clicking, and then clicking Delete Productions. The other context-sensitive options result in the following actions:
Sorts the listed productions in ascending alphabetical order.
Activates the selection in the Standardize Phrases sub-tab of the Standardize tab.
Activates the example text for the selection in an editable field for you to edit.
An expedient method for adding phrases and terms to existing rules is to use the Knowledge Studio Prediction feature. The Prediction options examine the unparsed source text, in the selected record or all records, to determine the rule that the text is most closely matches based on confidence ratings.
The Prediction options are activated based on the Item Definitions within the data lens and are described as follows:
All possible rules that could apply to the input data for an individual sample row, based on confidence ratings and meeting the Prediction Threshold, are displayed for you to choose from or a message that advises you why no predictions are available. Predict Terms only works in the context of Item Definition where the sample row has an associated Item Definition. You can select the appropriate rule or reject the predictions. Rejecting predictions is only applicable to the current data lens editing session and is reset when you close the data lens
Tip:
This option is also on the Edit menuThe closest matching phrase rules for the unparsed text in the selected record, which are automatically selected, based on confidence ratings and meeting the Prediction Threshold, are displayed for you to choose from or a message that advises you why no predictions are available. Predict Best only works in the context of Item Definition where the sample row has an associated Item Definition
Only the phrase rules for the unparsed text, in the selected record, that match Item Definition Required Attributes are displayed. Changes only affect the Required Attributes of the displayed Item Definition.
Only the phrase rules for the unparsed text, in the selected record, that match based on the Order Attribute rule specified in the Item Definition are displayed. If the Item Definition does not have an Order Attribute rule specified, then all attributes are examined.
All unparsed data in all records are examined then all predictions are automatically accepted and effected in the data lens immediately. The results are displayed in the Status Field.
Note:
No confirmation of this action occurs so if you want to reverse the effects on your data lens, you must use the Undo Predict All option.You can select this option to reverse all changes effected by the Predict All option. Similar to Predict All, selecting Undo Predict All immediately executes a reversal of the changes and clears the prediction cache without a confirmation prompt. The results are displayed in the Status Field.
Note:
The prediction results are based on meeting the Prediction Threshold, which is set in the Prediction tab of the DataLens Options. Setting to 0% will yield the full set of available of predictions, but there may be false positives that result from such a low setting. If you use a very low setting in conjunction with Predict All, you may inadvertently add incorrect associations. You should review Predict All results carefully. For more information about configuring prediction options, see "Setting Data Lens Options".These options are available only on the Define Phrases sub-tab only by selecting a record in the Sample Data pane, and then right-clicking in the Graphical Rule Builder pane.
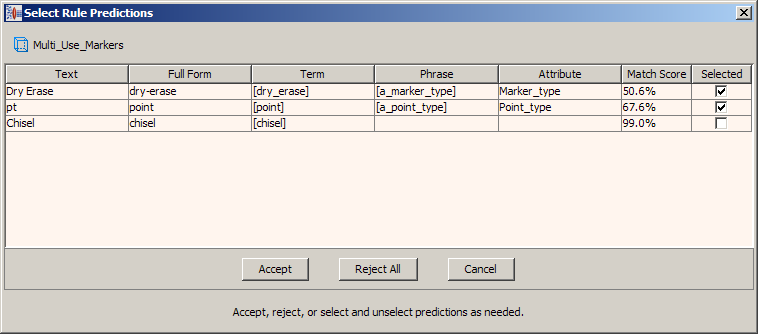
The Select Rule Predictions dialog is displayed for all options when predictions are found with the exception of Predict All and Undo Predict All. The columns of data displayed are the original unparsed text, full form term variant that might match the text, matching term, matching phrase, matching attribute, and the overall confidence matching score by percentage.
When possible, the predictions with the highest match scores are selected for you to accept them quickly. You can select rule predictions to accept or reject them. Rejecting predictions is only applicable to the current data lens editing session and is reset when you close the data lens.
Once you have accepted a prediction, the terminology rule is updated to add the prediction, which is appended with %ati% %review%. When reviewing the term production, the prediction is displayed with a pink as in the following example.
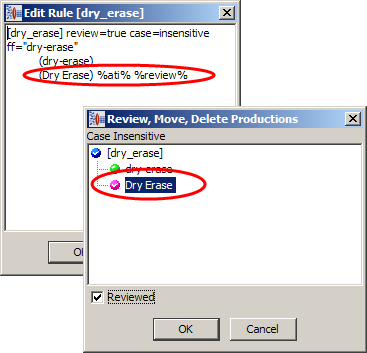
Indicating that you have reviewed rule prediction, using the Reviewed check box, removes the %review% appended to the rule and changes the production from a pink ball to a green ball.
It is possible to create more than one phrase structure that recognizes a string of text (one or more text nodes) within your line of data. The competing phrase structures result in ambiguities.
The output order of parse results can not be guaranteed when ambiguities exist.
An Ambiguity Count greater than 1 means that there is more than one set of rules that recognize the line of data. When the Ambiguity Count is greater than 1, this column displays in pink and the terminology and the term and phrase rules will be white.
The Next / Previous toolbar buttons (left and right arrows) become active. You can use them to view the phrase structures that match the line of content.

It is possible that the ambiguity is not in the viewable line of data, so you must use the left-right scroll bars at the bottom of the task pane to view the entire line of data.
Resolve the ambiguities that occur by merging, combining, and/or deleting rules so that you have certainty about how your data will be parsed.
After you have resolved the ambiguity, the ambiguity count returns to a value of 1 and there is no longer pink highlighting of the ambiguous term in your Sample Data Table pane. In addition, the Next / Previous buttons are no longer active.
The Edit Full Form option allows you to modify the full form of the selected term, as well as, generate term variants and plurals as previously described.
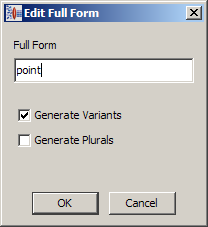
In addition to editing the full forms for each individual rule, you can view and edit the full forms for all term rules in your datalens. See "Editing Multiple Phrases and Terms".
You can add a new parent or insert a new parent node between existing nodes with these features. Simply select a node, right-click and select the appropriate function.
When adding or inserting a new parent, the New Phrase Name dialog appears and is used as previously described.
After disconnecting a node from its parent, the line connecting the two nodes disappears from the Graphical Rule Builder pane. However, the relationship between these two rules still remains in your data lens. You may need to edit the rules if you want to remove the child as a production from the parent.
Item Definitions are based on attributes, their values, and the relationships among Item Definitions within a lens. Data lens Item Definitions permit you to define an object in terms of its attributes. Item Definitions may be based on a hierarchical schema or taxonomy, either explicit or inferred. Item Definitions provide a highest level of the domain approach to defining products and their respective attributes.
The Item Definitions pane contains all of the items that have been defined in the data lens. It is a folder, hierarchical structure showing the product taxonomy top-level Item Definitions and all subordinate Item Definitions.
The following context-sensitive menus are available in this pane:
| Expand Node
Shows the entire hierarchical structure for the selected node. Create Top-Level Item Definition Creates a top-level definition as described in this section. Create Sub-Item Definition Creates a top-level definition as described in this section. Edit Item Definition Activates the Item Definition Attribute pane so that you can edit the selected node. See "Item Definition List Pane". |
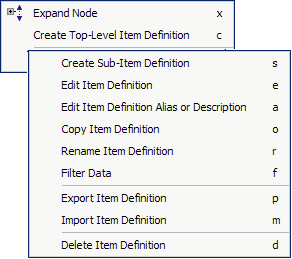 |
| Edit Item Definition Alias or Description
Allows you to edit the alias or description as described in this section. |
|
| Copy Item Definition
Copies the selected Item Definition to a new Item Definition, at the same level, using a name that you supply. |
|
| Rename Item Definition
Changes the name of the selected Item Definition to the one that you supply. |
|
| Filter Data
Filters the sample data in the Sample Data Table pane based on the selection. |
|
| Set Inactive for Production
Allows you to set the selected Item Definition to be inactive. See "Active vs. Inactive Item Definitions". |
|
| Activate this and all children for Production
Allows you to set the selected Item Definition and all of its children Item Definitions to be active for use in production. See "Active vs. Inactive Item Definitions". |
|
| Set Inactive this and all children for Production
Allows you to set the selected Item Definition to be inactive. See "Active vs. Inactive Item Definitions". |
|
| Export or Import Item Definition
Exports or imports an Item Definition into the data lens. See "Exporting and Importing Item Definitions". |
|
| Delete Item Definition
Displays a verification message prompting you to ensure that you want to delete the selected Item Definition. |
|
| Delete Item Definition and Children
Displays a verification message prompting you to ensure that you want to delete the selected Item Definition and all of its children Item Definitions. |
|
The columns are the similar to those in the Sample Data Table pane on the Define Phrases sub-tab (see "Define Phrases Sub-Tab") and operate the same way.
Indicates the number of Item Definitions recognized for the line of data.
Indicates the quality index for the line of data. This is a measure of the Attribute coverage based on the number of required and scoring attributes associated with the Item Definition.
The QI begins with 50 points for being in the Item Definition and 50 points for the total attribute coverage of required and scoring attributes, and then is computed as follows:
50 + 50 * (total number of required and scoring attributes/total number attributes)
For example, if you have ten total attributes with coverage of two required attributes and three scoring attributes, then the QI is 75 as follows:
50 + 50 (5/10) = 75 QI
A line of data having a QI of 100 has attribute values for each required and scoring attribute in the Item Definition.
Provides the name of the Item Definition for the line of data.
These fields are identical to those on the Define Phrases sub-tab (see "Define Phrases Sub-Tab".)
The Graphical Rule Builder pane operates identically to the same pane on the Define Phrases sub-tab (see "Define Phrases Sub-Tab".) However, the available context-sensitive menus in this Graphical Rule Builder pane that are different are as follows:
| Referenced By
Displays information about the rule (phrase or terminology) including the Item Definitions, rules, and classifications that reference the selected rule. |
|
| Match Attributes
Displays the matching phrase structure in the line of data with the attribute in the Item Definition (for example, the |
|
| Reverse Ghosting
Works as a toggle to show the terms that are not associated with an Item Definition as inactive (transparent); this is the default behavior. If you select the option these terms will appear active, selecting it again resets the behavior to the default. |
|
The following sections explain how to use these tools.
Use the following steps to create a new Item Definition.
To create a new Item Definition, right-click the Item Definitions folder in the left pane, and click Create Top-Level Item Definition.
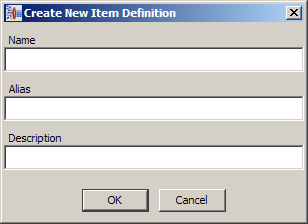
Enter a name for the Item Definition.
(Optional) Enter an alias (a label).
(Optional) Enter a description.
Click OK.
The new Item Definition is displayed in the Item Definition folder in the Item Definition pane on the left.
Creating a Sub-Item Definition uses the same process as described in the previous section though you must select the parent Item Definition first, and then select Create Sub-Item Definition.
The following sections describe the use of aliases an Item Definitions and attributes.
Aliases are convenient labels for Item Definition and attribute names. Use aliases, in particular, if you want downstream processing to reflect the label exactly (including spaces, capitalization, numerals, and special characters that are not available for Item Definition and attribute names).
Data lenses provide the input to other processes, and aliases help you match labels to standard labels used in the data.
You can use almost any characters you want for aliases. For attributes, you can use the same alias name more than once per Item Definition. Additionally, wherever the attribute occurs in the Item Definition (it may be used more than once), it must have the same alias. You should maintain the same alias for an attribute throughout the data lens.
If you do not follow the naming requirements for aliases, error messages will occur or in cases where there are no other errors, the Item Definition or attribute may be created without an alias. In such cases, you can add an acceptable alias by editing the alias after you have created the Item Definition or attribute.
You can edit aliases by right-clicking the item labeled by the alias, selecting Edit Alias (for Attributes) or Edit Item Definition Alias or Description (for Item Definitions) and modifying the label (or any other information) in the dialog that is displayed. Item definition aliases and descriptions can only be edited from the hierarchy list, whereas you can edit attribute aliases from the list of attributes on the Item Definition Edit pane.
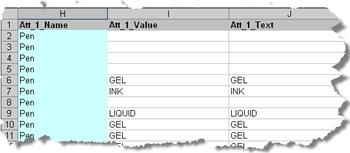
Aliases are not required. If you do not provide an alias, the attribute name is used.
If the alias is not the same as the attribute name, the alias will overwrite the attribute name in the output. In the following example, the attribute Att_1_Name was given the alias of Pen and thus appears in column H of the spreadsheet as in the following figure:
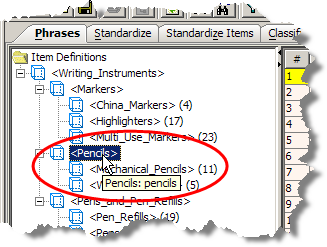
You can view alias information when you create or edit the alias information. Additionally, you can also view alias information in 'tooltips' by hovering over the object as in the following example:

The Item Definition alias precedes the Item Definition description.
Attribute alias name information is displayed as in the following figure:
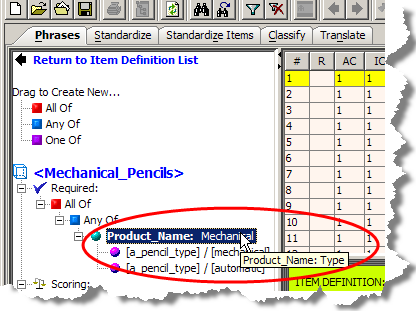
If the attribute also includes a description, that information follows the alias information. If only a description is provided for the attribute, only the description is visible when you hover your mouse over the attribute.
Aliases are also viewable with a mouse hover in the Item Definition List pane, as shown in the following figure:
The use of AutoBuild to create Item Definitions from your source data can be incomplete so if the Item Definitions are not closely reviewed during enhancement before the data lens is checked in for production use, the result is that a vast number of matches are found for the incomplete Item Definitions. This can also occur when you create an Item Definition and are in the process of populating it with phrases and term rules.
You can set the Item Definitions in your data lens to be included in the output data based on the active and inactive flags. The Knowledge Studio parses your data using all Item Definitions though does not standardize the output data in Production mode if the inactive flag is set. In other words, all Item Definitions are always used for recognition, but not always for output. This is applicable to Production and QA Oracle DataLens Servers only; Development servers ignore the inactive flag. By default, the Knowledge Studio operates the same as a Development server in that it ignores the inactive flag.
The Item Definition inactive flag can only be set from the Define Items sub-tab of the Phrases tab.
To avoid using an incomplete Item Definition when your data lens standardizes your output data, right-click the Item Definition then select one of the following options to set the inactive flag:
Only the selected Item Definition is set to inactive.
The selected Item Definition and all of its children are set to inactive.
The icon for the selected Item Definitions changes so that you can easily see which Item Definitions are set to inactive. Be sure to expand parent Item Definitions to see if children Item Definitions are also inactive.
To reactivate an Item Definition, including children if inactivated, select the Item Definition, right-click then select Activate this and all children for Production.
You can view the standardized output data of Item Definitions that you have set to inactive from the following tabs:
Standardize Items tab, Test Attributes sub-tab
Standardize Items tab, Test Item Standardization sub-tab
Translate tab, Test Translated Attributes sub-tab
Translate tab, Test Item Translation sub-tab
On any of these sub-tabs, from the View menu, select View as Production. The Item Definition output data that is set to inactive is displayed and marked 'Inactive in Production' as in the following example:
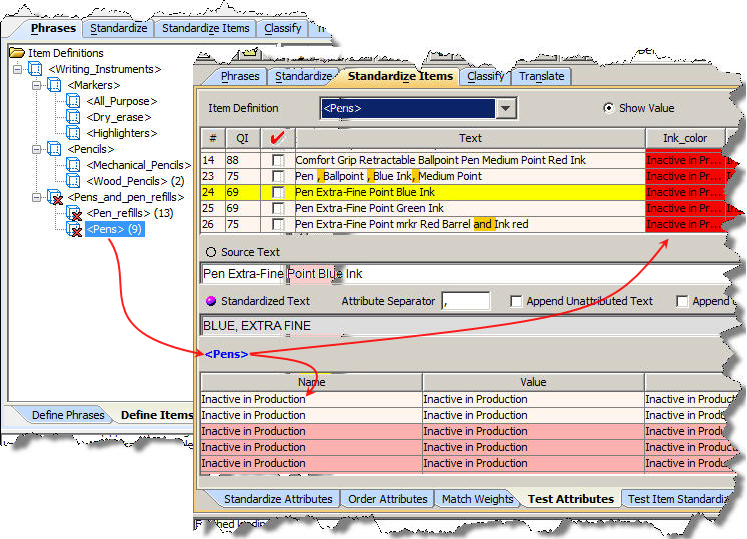
Note:
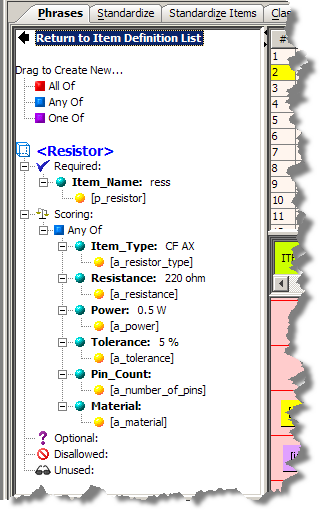
If your inactivated Item Definition participates in an Item Definition ambiguity, eliminate the ambiguity before proceeding.This pane is activated by double-clicking on an Item Definition or by selecting one and using the context-sensitive Edit Item Definition menu option. The icons and labels that appear in the Item Definition List pane are the building blocks of the Item Definition. You can set scoring attributes for the selected Item Definition in this pane.
The following Item Definition terms are used:
An attribute is a characteristic of an item. For example, point size, barrel color, and ink colors are all attributes of pens. Attribute values are things such as 'Fine point', 'black ink, and 'red ink'.
Not all attributes play the same role in helping to identify an object. For example the object name, 'pen', might be required for defining an object correctly though a barrel color may not be required. In Item Definitions, there are four ways to define attribute importance:
Required - the attribute must appear for the object to be defined.
Scoring - the attribute is not required; rather, it assists in defining the item through a scoring algorithm.
Optional - the attribute is neither required for the defining of the item nor does it participate in the scoring algorithm. Optional attributes do not disambiguate results. When a term is used in scoring or required attributes in Item Definitions, it generally should be used in scoring or required attributes in all Item Definitions in the same data lens.
Disallowed - must not appear for the item to be defined.
Unused - the attribute is not used. It can be used as a temporary storage area for attributes if you are not sure if or how you want to use them in the Item Definition and is more useful when your Item Definitions are more complex.
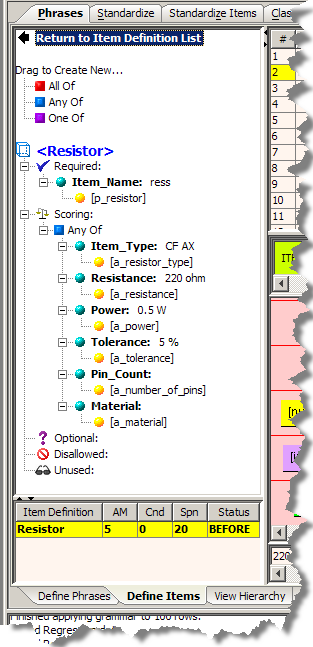
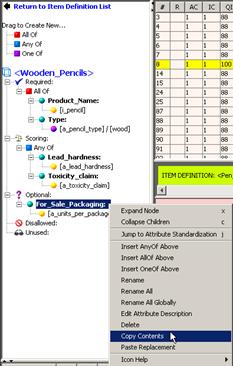
| Return to Item Definition List
Returns to the Item Definitions Pane. Drag to Create New… Use these options to set attribute importance. Selected Item Definition Displays the Item Definition and any attributes that are set and includes the attribute importance values. Item Definition Score Table This table, in the lower left hand corner of the pane, reports the Item Definition metrics the selected line of data. AM refers to the number of Required and Scoring attributes populated; Cnd refers to the number of Conditional attributes matched; Spn refers to the number of total characters spanned by the required and scoring attributes. If you have an line of data that results in an Item Definition ambiguity, reviewing the this table can help you to resolve it. |
 |
The following context-sensitive menus are available in the Item Definition List pane:
| Add Attribute
Adds an attribute. See "Adding Attributes". Append AnyOf Below Adds a node (boolean operator) that appends any of the attributes below the selected node. Append AllOf Below Adds a node (boolean operator) that appends all of the attributes below the selected node. |
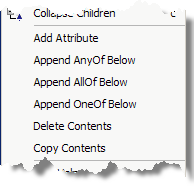 |
| Append OneOf Below
Adds a node (boolean operator) that appends only one of the attributes below the selected node. |
|
| Delete Contents
Deletes the selected attribute without verification when deleting one attribute. Ensure that you have selected the correct attribute before using this option since you will not be prompted to review your deletion. When you are deleting any of the Append nodes, a deletion confirmation prompt appears to verify that you want to delete the Append node and all the nodes it contains. |
|
| Copy Contents
Copies the contents of an attribute or hierarchy to paste it into another. See "Copying and Pasting Attributes across Item Definitions". |
|
| Paste Replacement
Pastes the copied contents of an attribute or hierarchy to paste it into another. See "Copying and Pasting Attributes across Item Definitions". |
|
The following context-sensitive menu is available when an attribute is selected.
| Jump to Attribute Standardization
Active when you select an attribute or a production associated with an attributes; advances you to the Standardize Attributes sub-tab of the Standardize Items tab with your selection so that you can edit it. Insert AnyOf Above Inserts an AnyOf node above the selected node. Insert AllOf Above Inserts an AllOf node above the selected node. Insert OneOf Above Inserts a OneOf node above the selected node. |
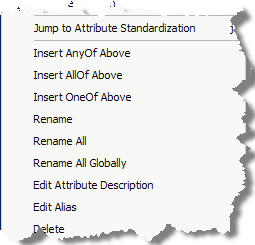 |
| Rename
Changes the name of the selected attribute to the one that you supply. |
|
| Rename All
Changes the name of the selected attribute and all other attributes of the same name in the Item Definition to the one that you supply. It is applicable only to the active sub-tab. |
|
| Rename All Globally
Changes the name of the selected attribute and all other attributes of the same name in the entire data lens to the one that you supply. |
|
| Edit Attribute Description
Changes the name of the selected attribute description to the one that you supply. |
|
| Edit Alias
Changes the name of the selected attribute alias to the one that you supply. |
|
The following context-sensitive menu is available when a phrase under an attribute is selected.
| Edit Value Logic
Allows you to edit the attribute value logic. See "Changing the Attributes Value Logic". |
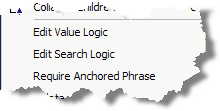 |
| Edit Search Logic
Allows you to edit the attribute search logic. See "Changing the Attributes Search Logic". This option is only available if you have selected the term or phrase rule for an attribute; it is not available if you select an attribute that the attribute contains. Require Anchored Phrase Requires that the attribute is anchored to a phrase rule; the selected phrase cannot have a parent. |
|
When you standardize using the Item Definition List pane, the changes only affect the selected Item Definition and any global standardizations are ignored for the selected phrase or term rule.
Although the Scoring attributes are not required to correctly recognize the data, they do participate in the scoring of an item.
As a best practice, you should have a full form included when you build terms. This will enhance predictions. For more information about predictions, see "Using Rule Predictions".
An attribute can be added to any of the Item Definitions by right-clicking on a node and selecting Add Attribute.
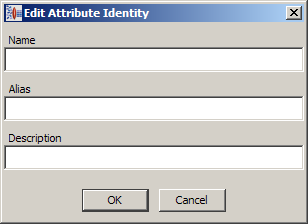
Enter a name for the new attribute, (optionally you can add an alias and text to describe the new attribute), and then click OK.
Copying attributes from one Item Definition to other Item Definitions can help save time. This section describes how to copy an attribute from an Item Definition to other Item Definitions.
The following sample steps copy For_Sale_Packaging from the <Wooden_Pencils> Item Definition to the other Item Definitions in the data lens.
Open the <Wooden_Pencils> Item Definition.
Select For_Sale_Packaging in the Optional attribute.
Right-click it and select Copy Contents.
Click Return to Item Definition List.
Right-click on the top-level Item Definition, <Writing_Instruments> and click Paste For_Sale_Packaging from <Wooden_Pencils> to Hierarchy.
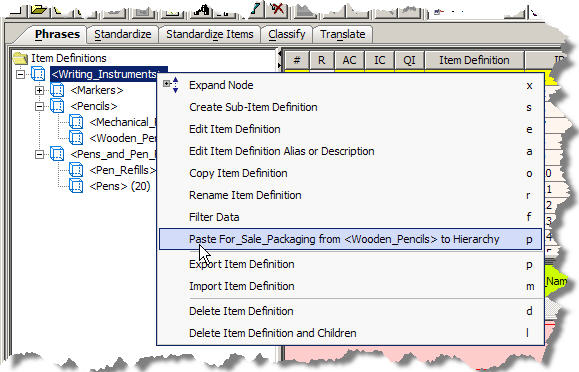
This pastes the attribute that you copied into the entire hierarchy below the top-level Item Definition.
Viewing any Item Definition shows that the For_Sale_Packaging node is part of the Item Definition. Attributes are copied with the same attribute importance that they are copied from.
It is possible that data is recognized erroneously by your data lens. For example, C and F are recognized as abbreviations for the temperature scales Celsius and Fahrenheit. However, C and F could also be term variants for other rules in the data lens. Value logic can be used to exclude invalid temperature values within the Item Definitions to rule out invalid temperature ranges.
Note:
When using value logic on numeric attribute values, your phrases must configured to use Unit Conversions, See "Creating a Unit Conversion for a Phrase".To change the logic that is used to evaluate an attribute, right-click on the attribute and select Edit Value Logic.
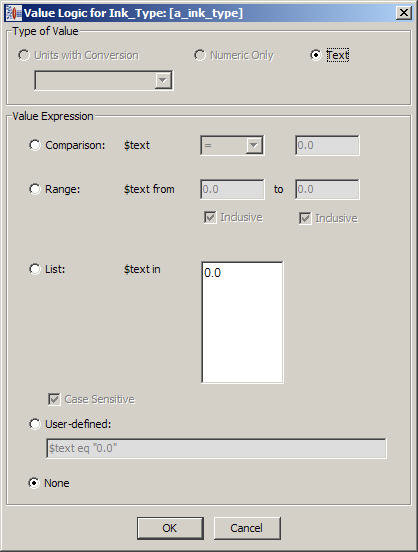
The default values for the attribute are displayed. Depending on the attribute, the Type of Value section may not allow editing.
You can change the way the attribute value is evaluated using the Value Expression section. Only one of the evaluation methods can be selected as follows:
The attribute is populated if the value associated with the production is within the defined comparison range.
The attribute is populated if the value associated with the production is within the range entered.
The value is evaluated to see if it is in the list entered.
An evaluation regular expression is entered.
No evaluation will be performed on this attribute.
Note:
When using value logic on numeric attribute values, your phrases must first configured for Unit Conversion. See "Deleting Unit Conversion Types".To change the logic that is used to evaluate an attribute when searching, right-click on the attribute in the and select Edit Search Logic.

The default values for the attribute are displayed. Depending on the attribute, the Type of Value section may not allow editing.
You can change the way the attribute value is evaluated during searches using the Search Function section. Only one of the search methods can be selected as follows:
The numeric values are sorted, and then the appropriate selection is made. The resulting value is the specified instance (for example, first, second, third, Nth, etc.) in the Sorted list.
The value is selected based on the order in which they occur in the line of data.
All values are searched.
The attribute is populated only if it occurs at the beginning of the line of data.
The attribute is populated only if it occurs at the end of the line of data.
This feature is deprecated.
You can review the relationship between terminology and phrase productions using the View Hierarchy sub-tab.
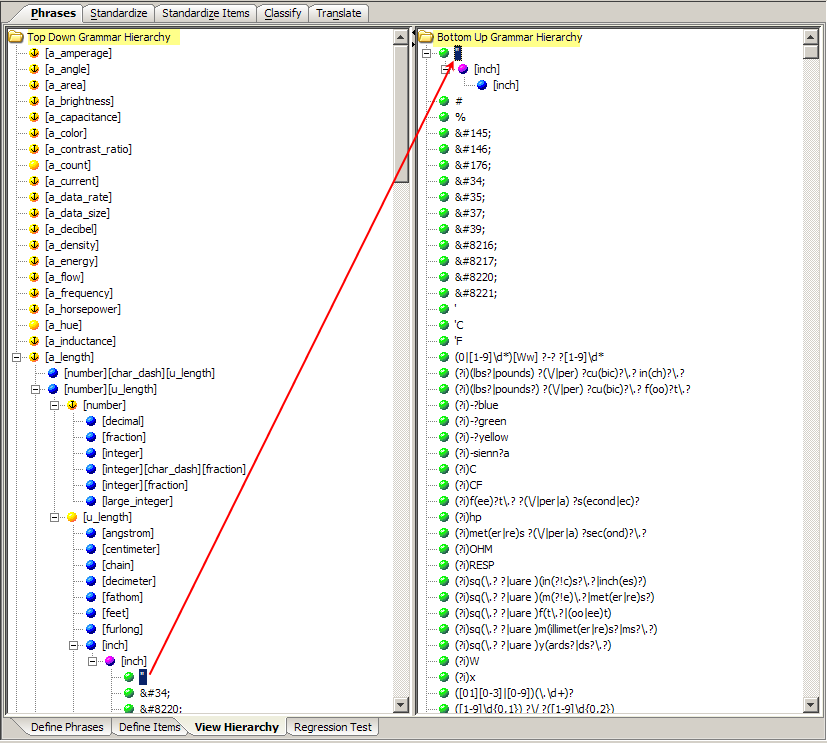
These panes present phrase productions in a top down hierarchy on the left and the related terminology productions presented in the reverse hierarchy on the right. You can select a production in the either pane and when the highest level production in the opposite pane is reached the production expands as in the previous figure.
The context-sensitive menus for either the Top Down Grammar Hierarchy or Bottom Up Grammar Hierarchy panes have the following possible menu options:
| Show Hierarchy From Here
Expands the entire hierarchy structure below the selected parent node. |
 |
| Show Hierarchy in Other Tree
The selection is located in the opposite hierarchy tree and automatically expanded so that you can view the entire node. Jump to Rule for Editing Active only when you select a phrase, term, or production and activate the Define Phrases sub-tab with your selection so that you can edit it. |
|
The purpose of regression testing is to validate that any maintenance to the data lens has not created ambiguities or issues compared to the phrases and terms that were previously defined. This is an important step that should be performed only when fine-tuning a mature data lens.
Regression sets are tied to the sample file they are created with. You should choose or create a sample file that covers a broad range of data so that you can best see what happens when changes are made. A good regression base is typically a large file, usually with more than a thousand lines in it.
Note:
The maximum number of lines for a sample data file is 5000 lines; ensure that regression base (whether it is 5000 lines or not) represents the full variability across your data set.Regression testing is most useful in the Standardize Items, Classify, and Standardize tabs; the usefulness with the Phrases tab is limited.
Open the data lens that you are working on and choose the sample data file that you want to run your regression test against.
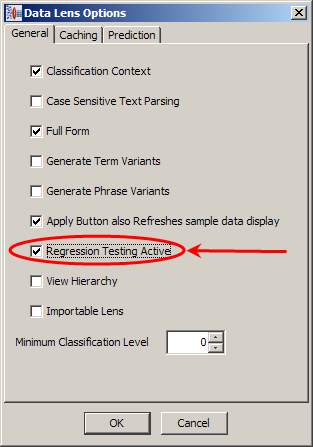
To activate the Regression Test sub-tab on this and all tabs, from the Data Lens menu, click Data Lens Options. Click the Regression Testing Active check box and click OK.
The Regression Test sub-tab is a graphical rule representation of the regression testing results.
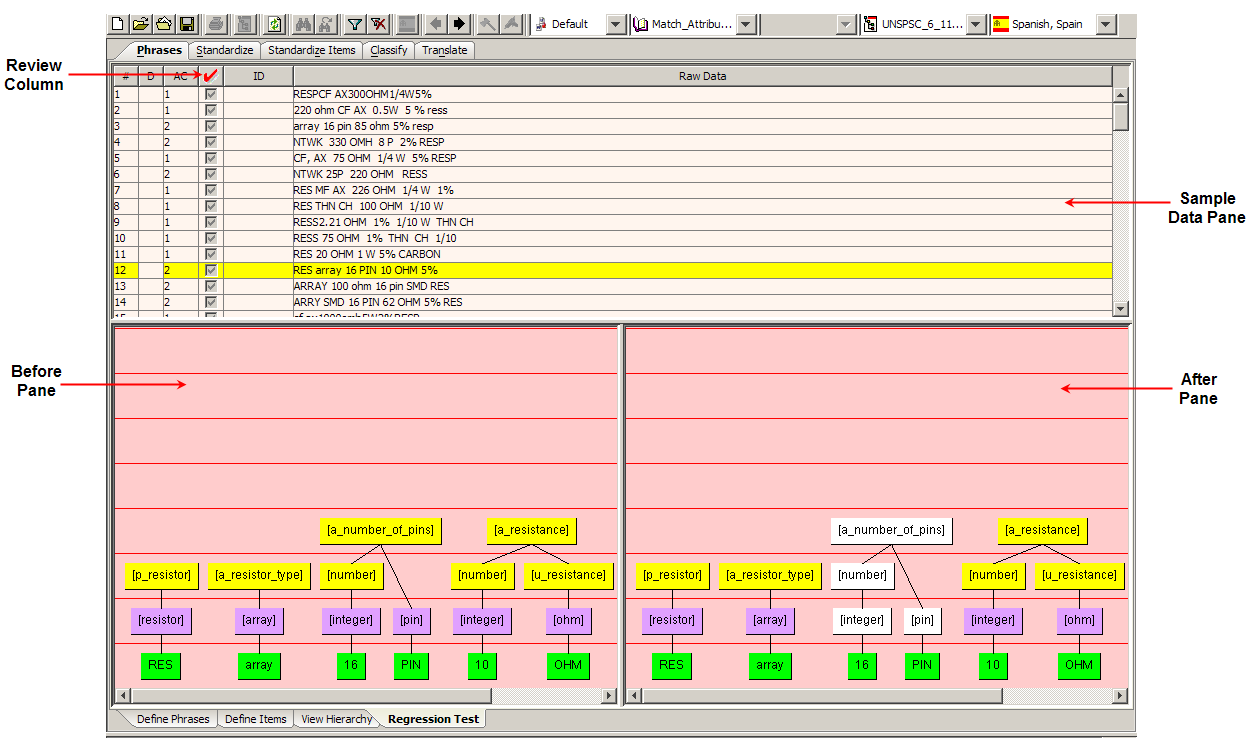
This pane contains a graphical representation of the phrase rules of the selected line of data in the Sample Data Table pane, as defined in the data lens before regression testing.
This pane contains a graphical representation of the phrase rules of the selected line of data in the Sample Data Table pane and displays the differences for your review.
If there is no data displayed in the Before and After panes, the sample data has not been initialized; a regression base does not exist. For information about initializing the regression base, see "Creating and Updating the Regression Base".
The red check mark or Review column indicates new or changed lines of data and the text on these lines should be reviewed. If the information in the Current Text column is correct and you want to accept the changes as valid progressions, select this check box so that the changes are incorporated in the regression testing.
The best practice in creating a regression base is to combine your sample data into a one file. Regression testing is most effective when performed on a mature data lens. See "Combining Sample Files".
Combining files does not remove any data; it simply combines the selected sample files into a new, larger file.
Next, make single changes to your regression base sample data file, check your regression sets, and update them as appropriate. Making multiple changes can make the regressions hard to read, which increases the chance that an error is overlooked or is much harder to fix.
To create the regression base, select the Create New Regression Base option on the File menu, and then select the sample data file that you want to use for regression testing. This initializes the regression base and displays the results in the After pane.
You can update the regression base with the reviewed and accepted lines of text (as previously described in Review Column) using the Update Regression Base option on the File menu.
Note:
You should only initialize or update the regression base if you have reviewed or accepted the sample data.
|
Copyright © 2001, 2013, Oracle and/or its affiliates. All rights reserved. Legal Notices |
|