| Oracle® Enterprise Data Quality for Product Data R12 PIM Connector User's Guide Release 11g R1 (11.1.1.6) Part Number E29140-01 |
|
|
PDF · Mobi · ePub |
| Oracle® Enterprise Data Quality for Product Data R12 PIM Connector User's Guide Release 11g R1 (11.1.1.6) Part Number E29140-01 |
|
|
PDF · Mobi · ePub |
The status of a newly created R12 PIM Connector batch is set to "Active" in EBS. When the batch is in process, the EBS automatically changes the batch status to "Pending" to ensure that the batch cannot be changed while it is in process. This is a critical step to ensure that the job can be correctly processed. The Governance Studio project will not produce any results if the status is not set to "Active".
There are two types of batches that can be created for processing. The first type of batch is from an external source (outside the PIM) using Excel. The second type of batch is a pull from production (within the PIM).
Note:
You can utilize the WebADI tool that is integrated into the EBS PIM Import Workbench to process external batches, however the two methods described in this chapter are the recommended methods.Using Excel, you can create a batch to process data that is external to PIM then load it into the following PIM interface tables:
EGO_ITM_USR_ATTR_INTRFC
MTL_SYSTEM_ITEMS_INTERFACE
MTL_ALT_CATEGORIES_INTERFACE
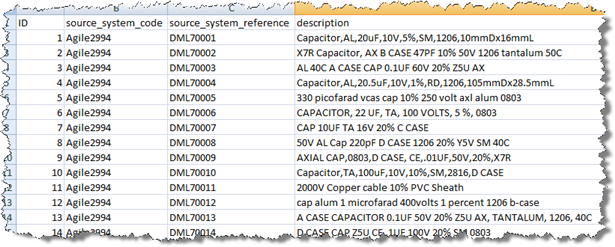
The external data must be in an Excel spreadsheet contain the following columns in order:
ID
source_system_code
source_system_reference
description
These columns are the defaults necessary to the AUPIM_PROCESS_EXTERNAL_DATA DSA that is used for processing the data.
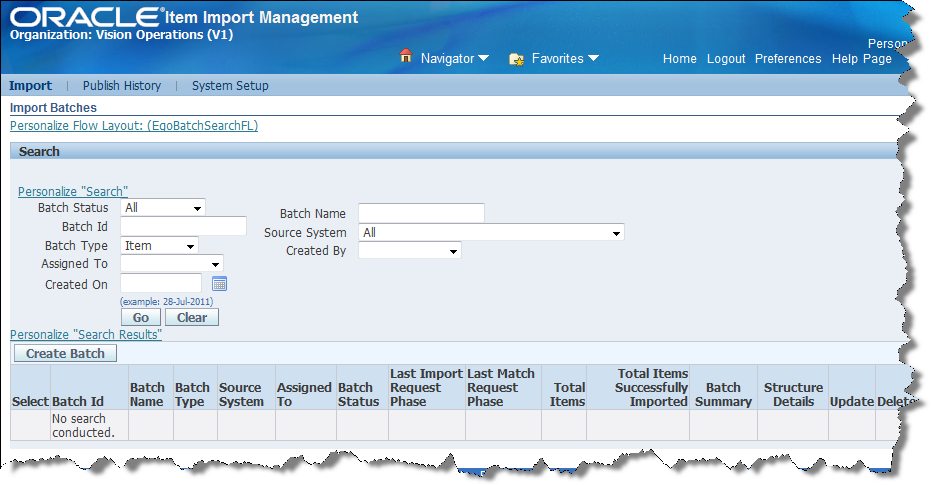
Log in to EBS.
The Oracle Applications Home Page is displayed.
For EBS 12.1.3, click Favorites to display the menu.
From the Favorites list, click:
On EBS 12.1.3: Import Batches
On EBS 12.1.1: Import Workbench
Click one of the following:
On EBS 12.1.3: System Setup
On EBS 12.1.1: Source System Setup
Ensure that the source_system_code you want to use exists in EBS:
From the Search list, select Source System Code, and then click Go.
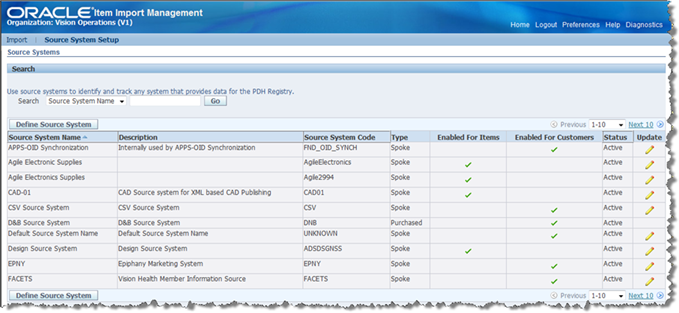
Review the list for the source_system_code you want to use. In this example, the 'Agile2994' Source System Code is used.
If it exists, ensure that there is a check mark in the Enabled for Items column. If necessary, click the Update pencil, select the Enabled for Items option, and then click Apply. Continue to step 6.
If it does not exist, go to step c.
Create a new Source System Code in EBS by clicking Define Source System.
Enter a Source System Name in the Name field.
Enter the Source System Code you want to use in the Code field.
Select the Enabled for Items option.
Click Apply.
The new Source System Code is created and the Source Systems page is refreshed to display it; you may need to click Go to refresh the page.
Open the Excel spreadsheet containing your external data. For this example, open the CapacitorsExternalBatchTestInput.xls template spreadsheet.

Modify the source_system_code column so that it matches the name you set in the System Profile Option. In this example, it is "Agile2994".
From the Services for Excel toolbar on the Add-Ins tab, click the Process Records button.
If you have not logged into your Oracle DataLens Server, the Oracle Enterprise Data Quality for Product Data Login dialog box appears. Login to the server displayed or use the Change Server button to login to a different server.
When you have successfully logged into the server, your data is processed, inserted in the PIM interface table, and the batch is created within PIM. A status dialog box is displayed that identifies the DSA that was processed and the JobID.
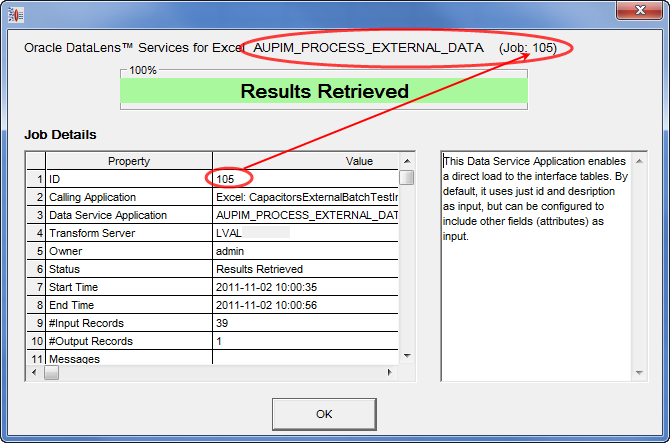
Click OK.
Review the 10_Job_Messages worksheet to verify that no processing errors occurred. If errors occur, resolve the errors in the DSA or data, and then reprocess the records.
Return to EBS.
Click Import to return to the Import Batches page.
Click Go.
All batches are displayed.
Review the list of batches and confirm that your external batch job is displayed. The JobID displayed in Excel is included in the Batch Name.

Optional: Select the Update pencil in the row of the batch you want to review, and then click the Confirmed tab to see the batch run details. 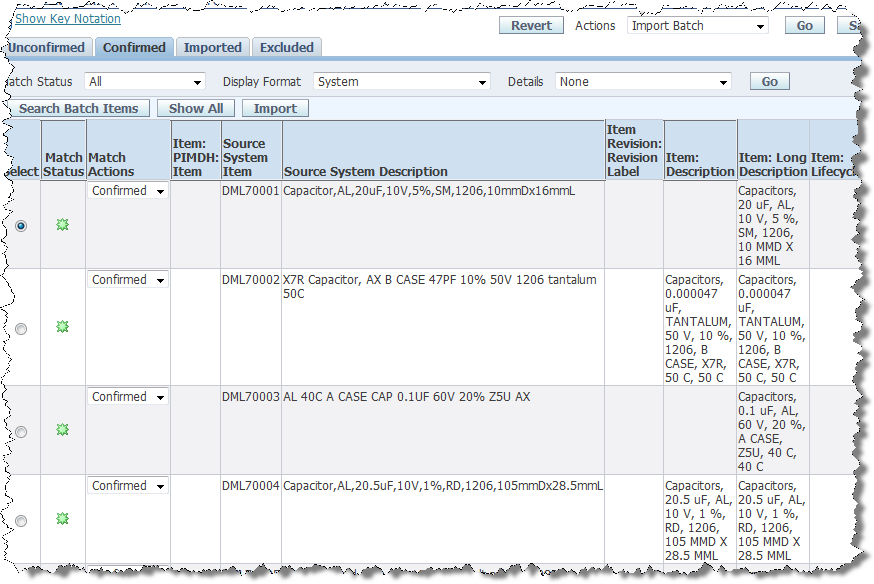
The AUPIM_Create_Production_Batch.ams Governance Studio project creates a new Batch, pulling data from the Production tables in the PIM.
Start EDQP and log in.
The EDQP Launch Pad is displayed.
Click Oracle DataLens Governance Studio.
For more information, see Oracle Enterprise Data Quality for Product Data Governance Studio Reference Guide.
Select the AUPIM_Create_Production_Batch project or click Cancel to import it as follows:
From the File menu, select Import.
Locate the AUPIM_Create_Production_Batch.ams file in the gov_studio_projects directory that you extracted during the R12 PIM Connector Connector installation. For installation information, see Oracle Enterprise Data Quality for Product Data PIM Connector Implementation Guide.
Select the file and click Open.
The project is imported and opened.
On the toolbar, click Transform Data to begin the production pull batch.
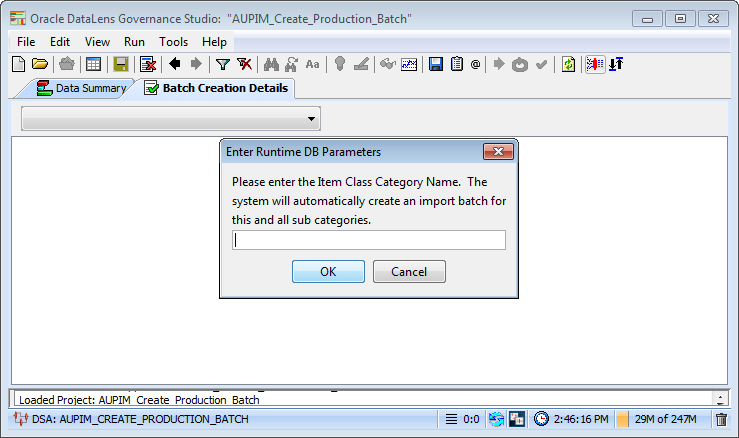
Enter the name of the Item Category, "Capacitors" for this example, and then click OK.
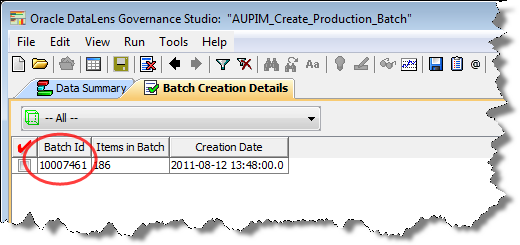
When the job finishes, it creates a new batch with data from the selected Item Category.
Select the Batch Creation Details tab to see the results of the job run, and note or copy the new Batch Id for later use.
Begin verifying the production batch, browse to your EBS website. For example:
http://rws32100.us.oracle.com:8095/OA_HTML/AppsLogin
Log in to EBS.
The Oracle Applications Home Page is displayed.
For EBS 12.1.3, click Favorites to display the menu.
From the Favorites list, click:
On EBS 12.1.3: Import Batches
On EBS 12.1.1: Import Workbench
Click Go.
All batches are displayed.
Review the list of batches and confirm that your external batch job is displayed. The JobID displayed in Excel is included in the Batch Name.
Review the newly created Batch in Oracle Batch Interface table. The new batch uses the following defaults:
| Field Name | Value |
|---|---|
| Batch Id | New Batch Number (System Generated) |
| Batch Name | DLS Production pull batch |
| Batch Type | Item |
| Source System | Agile9224 |
| Assigned To | Albert Bakker |
| Batch Status | Completed |
Note:
The batch is set to the "Active" status in order to allow the system to correctly process the batch; otherwise, you an error is generated.The results will be an Oracle batch with a set of imported rows in EBS that can be reviewed on the Confirmed tab created from the production PIM data for the selected item category as described in the previous section. These imported rows are considered "Confirmed" because they are the PIM.
Identify the EBS Batch Id for this production pull batch. You use the Batch Id to create a unique Governance Studio job to process the data pulled for the selected Category.
Return to Governance Studio.
Open the AUPIM_Cleansing_and_Matching project or a previously created project (for example, AUPIM_Cleansing_and_Matching-10003377).
From the File menu, select New Project From...
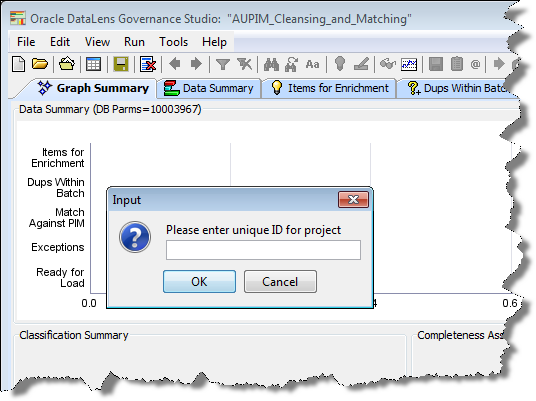
Enter the Governance Studio Batch Id number noted in step 6, click Run. In this example, it is "batch1396".
Click Refresh, and then Yes.
Click Transform Data, and then Yes.
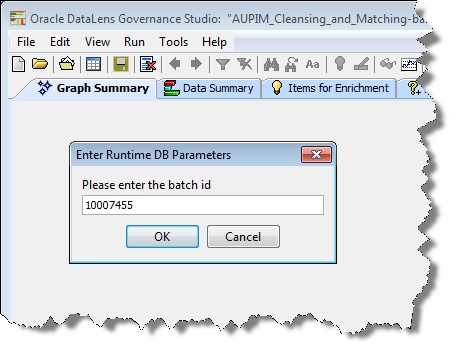
Enter the EBS Batch Id noted in step 14. In this example, it is "10007455".
The job runs and the Governance Studio tabs are populated with data.
Reviewing the R12 PIM Connector Production Pull Batch Results
Once the AUPIM_Cleansing_and_Matching Governance Studio job runs, it produces a series of output tabs that provide you with a way to process the batch using a series of processing tabs.
The logic used in each of the tabs is as follows:
| Tab Name | Description |
|---|---|
| Graph Summary | Provides a graphical summary of the state of the batch processing. |
| Data Summary | Displays the totals by processing category. As you process items, the numbers change and you can monitor this tab to verify the result. For example, if you enrich a record to the point where it can pass the quality threshold for import into the PIM, it will move from the Items for Enrichment category to the Confirmed New Review category. |
| Items for Enrichment | If a source record is not a duplicate and does not meet the Quality Index threshold, then it is displayed on this tab for you to enrich the records so that they may be of the necessary completeness to load into the PIM. |
| Dups Within Batch | The process checks for duplicates within the original source batch and presents them to you to determine what to do with them. |
| Match Against PIM | The process checks for the source with the records in the PIM using the Semantic index cache to determine if the source is a duplicate to an existing record in the PIM. |
| Exceptions | If the record falls below a Quality Index, (nothing is recognized) then it becomes an exception. |
| Ready for Load | Fully complaint, standardized, and enriched records ready to be imported into the PIM. |
| Release Batch | Provides a mechanism to change the Oracle batch from "Pending" to "Active", allowing you to review the completed changes. |
The following sections describe how to use each of these tabs.
The Governance Studio Items for Enrichment tab with AutoSuggest output is identified by a light bulb icon to the left of the tab name. Data in these tabs may access the Governance Studio AutoSuggest feature that automatically predicts attribute values that may have been missed due to misspellings and abbreviations or missing grammar. When this tab is not empty and there are suggestions available, the AutoSuggest light bulb button in the toolbar will be active; if no suggestions were found this button bar is dimmed.
After clicking on an AutoSuggest output tab, a list of rows of data that were designated for output by the respective output step in the DSA is displayed. To view suggestions, click the AutoSuggest light bulb button. Suggestions are now highlighted in green.
Several operations are allowed in the AutoSuggest table to process your data further and make it easy to edit, move, copy, or accept suggestions. In addition to the normal table functions available to output tables, an AutoSuggest table allows you to accept or reject suggestions by right click over it and select Switch Augmentation. The rejected suggestion is highlighted in pink showing that the attribute value has been rejected.
Additionally, if the DSA Enrichment Item Definition Transform output option is selected in the DSA, the remediation capabilities of the Governance Studio are active. Remediation allows you to enrich data by filling in missing category specific attributes assisted by a list of value (LOV) dialog box, the AutoSuggest feature, as well as, manually entering missing information.
Several operations are allowed in the tables of Data Remediation tabs to process your data further and make it easy to edit, move, copy, or remediate suggestions. In addition to the normal table functions available to output tables, Data Remediation tabs allow you to view a list of valid values for the attribute columns. By right-clicking an attribute cell, the resulting Attribute Value dialog box displays all of the valid values for the selected attribute; the attribute name is in the title of the dialog box. This LOV is retrieved from the corresponding data lens associated with the Item Definition of the item being remediated. You can change the term in the selected cell by double-clicking on one of the valid values in the list of value or suggest a new term value for the attribute.
For complete details about using the Governance Studio, see Oracle Enterprise Data Quality for Product Data Governance Studio Reference Guide.
When you have completed reviewing the suggestions by rejecting the bad ones, keeping the good ones and remediating your data, you may select the rows that you want to reprocess by clicking on the row then click Re-Run. After enriching, the item will follow the standard process and end up in one of the tabs depending on the outcome (for example, If the enrichment was sufficient then it will be of high enough quality to appear in the Exceptions tab).
Select the Items for Enrichment tab in the Governance Studio.
Make the process selections as previously described in this section.
Click the Re-Run button to process the selected rows.
Confirm that the enriched row appears in one of the other tabs. If the meets the quality standards and completeness, it will appear in the Exceptions tab; otherwise, it may appear Items for Enrichment tab or Match Against PIM tab.
The Governance Studio Dups Within Batch tab uses a split screen function that shows a set of record groups (rows) in the top pane, which are considered duplicates within the import batch. After a row in the top pane has been selected, the system presents the corresponding matched candidates for that row on the bottom pane.
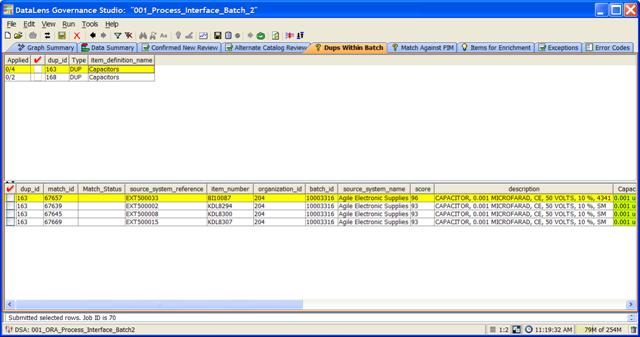
The duplicate rows are showed in the bottom pane. The system also displays color coding to highlight key attributes participating in the match. The system will color the attributes based on the type of match rule that has been triggered on the attribute. Following is the breakdown of the color coding:
Green Attributes: Denotes attributes that match to the parent row and that these attributes were set to required in the item specific match rules.
Blue Attributes: Denotes attributes that match to the parent row and that were set to participating but not required in the item specific match rules.
Blank and un-highlighted: Indicates that the matched row did not contain a value for that particular attribute and therefore that attribute did not participate in the match score.
Populated and un-highlighted: Indicates that the matched row contains a value for that attribute but that the attribute value for the matched row did not match the attribute value for the parent row.
The bottom child pane view allows you to choose either a single override row or create a combined value (blended) row by choosing a primary row with values from other rows. This survivorship process ends up with the one row or combined row that represents the set of values to be input into the system as the master record. The following steps should be used to create the master record:
Select the override row by right-clicking on the row and selecting Create Override Row. After the selection, the following will occur:
The override row will turn orange and the new master row will appear at the bottom on the set in red with a Match Status of "MO" (Manual Override). The override row check box will be selected and disabled.
All other rows will be automatically selected, but available to uncheck to exclude from processing.

Optionally, right-click an individual cell from any of the other rows to create an override cell by right-clicking from the desired cell and selecting "Set Override Cell". The override cell will turn orange and that row will be automatically selected (if unselected) and disabled while the cell in the original override row will be deselected and return to the original color. Finally, the value will appear in the master row.
Note:
If you want to enter a value, you must first enter the value prior to selecting that cell as an override cell; otherwise the change will not be reflected in the master row.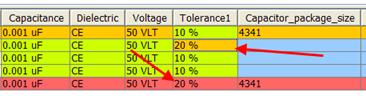
You can also change the override cell selection by right-clicking an orange highlighted cell and selecting another cell using the Set Override Cell option. You can select an unlimited number of override cells to create the blended record. To remove an override cell, you needs to right-click the cell from the red row and select Set Override Cell. You can also remove the override row selections by right-clicking any row and selecting Remove Override Row. Selecting Remove Override Row, resets the entire duplicate set and returns the set to the original state.
Once you completes the selection process, click the Re-Run button to reprocess the row(s).
The Override row (orange / red row) is reprocessed as a new row and could end up back in any of the tabs, but it is very unlikely that it will end up in the Enrich or Exception tabs because in order to participate in the Dedup process, the QI needed to be above the threshold. The other selected rows in the set, which Match Status is not changed by you, should be updated in the interface tables with a match status of "Ignore".
You may also override the system by entering a match status and sending the rows to be reprocessed. They may be one of the following:
Confirmed New: After reviewing the information, you may conclude that although the system thinks these are duplicates, they are not. The row(s) will be included as new items in the PIM.
Unconfirmed: (default value) - You must confirm the match status in order to import the item.
Ignore / Blank: Temporarily hold this item from import. The next time the same item data is uploaded within a batch, it appears in the Excluded tab for that batch.
Exclude: The row(s) will not be included as new items in the PIM and will be moved to an excluded region so that if the same item data row is loaded, it will be automatically moved to the Excluded tab.
Reprocess: Allow you to update the data so that the row can be reprocessed and removed as a duplicate.
Once you completes the selection process, click the Re-Run button to process the row(s). The only instance that the data in the PIM will actually be enriched is when you select the "Confirmed New" Match Status. The system will ignore all other rows that you enriched (for example, unselected, and selected and any match type including blank).
Use the following processing steps:
Select the Dups Within Batch tab in the Governance Studio.
Make the process selections as described previously in this section.
Click Re-run to process the selected rows.
For duplicate processing, confirm that the override row appears in one of the Process Interface Batch tabs. If the meets the quality standards and completeness, it will appear in the Confirmed New Review tab; otherwise, it may appear Items for Enrichment tab or Match Against PIM tab.
For override processing, once the processing is complete, you must run Release Batch process to reset the batch status from "Pending" to "Active" to review and confirm the changes made during this process. The job uses the batch id as input.
Confirm that the data is set correctly for the selected row(s) by going back into batch in the Oracle Item Import Workbench (Assumes batch set back to Active to review - see note in Introduction section).
Search for the batch.
Select Update to review the batch.
Select (for example, SemanticModel (Capacitors)) from Display Format list, and then click Go.
Select Apply.
Use the Previous and Next buttons to review the items for accuracy.
The override row is present on one of Process Interface Batch Governance Studio job tabs or for overridden rows in the Oracle Batch with the correct status.
The Governance Studio Match Against PIM tab uses a split screen function that shows a set of record groups (rows) in the top pane from the incoming records which are functionally equivalent (duplicate) with record(s) in the Product Data Hub. It allows the system to identify these incoming records as a cross-reference to an existing Product Data Hub record. Once a row is selected from the top pane, the system highlights the corresponding matched candidates for that row on the bottom pane. You select the row in the bottom pane that is the preferred match for the cross-reference.
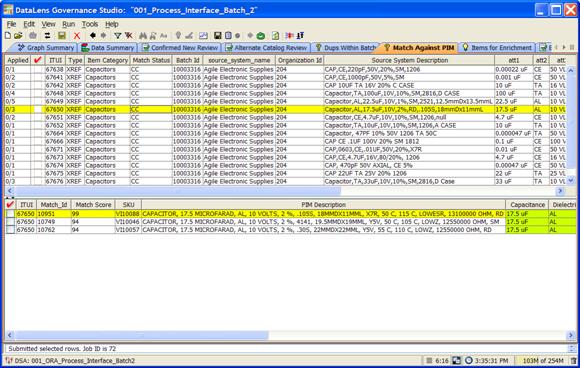
The matched row(s) are showed in the bottom pane. The system also displays color-coding to highlight key attributes participating in the match. The system will color the attributes based on the type of match rule that has been triggered on the attribute. Below is the breakdown of the color-coding:
Green Attributes: Denotes attributes that match to the parent row and that these attributes were set to required in the item specific match rules.
Blue Attributes: Denotes attributes that match to the parent row and that were set to participating but not required in the item specific match rules.
Blank and un-highlighted: Indicates that the matched row did not contain a value for that particular attribute and therefore that attribute did not participate in the match score.
Populated and un-highlighted: Indicates that the matched row contains a value for that attribute but that the attribute value for the matched row did not match the attribute value for the parent row.
You select a row in the top pane to see a set of candidate row(s) in the bottom pane to create a cross reference row. Once the cross reference row is selected, you can send the cross reference row to the Oracle Interface Table.
Note:
The ITUI (Interface Table Unique) ID / Match_Id relationship is used for the cross reference. The Match Status is set to "Confirmed Match" which denotes a cross reference to an existing item in the PIM.The system will automatically enter the PIMDH Item number (for example, VI10585) in the PIMDH Item field and will set the confirm status to "CM" (Confirmed Match).
Once you completes the selection process, you click the Re-Run button to process the row(s).
The cross reference appears in the batch.
Note:
The cross reference row(s) are removed from the list and the only way to confirm is by reviewing the Oracle batch.The Governance Studio Exceptions tab presents you with items that were unrecognized (did not meet the quality threshold). You has the opportunity to review and / or edit the description then make a decision about what to do with the item.
Select the Exceptions tab in the Governance Studio.
Make a Match Status selection from the following set of selections:
| IGNORE | Ignore the row |
| EXCLUDE | Exclude the row |
| CONFIRMED NEW | Confirm new row (allow into PIM) |
| UNCONFIRMED | Unconfirmed row that must be manually reviewed by you in the Oracle Batch |
| REPROCESS | Reprocess the row |
Click the Re-Run button to process the selected rows.
Confirm that the row appears in the Process Interface Batch tab with the correct status or in one of the Process Interface Batch tabs if reprocessed. If the meets the quality standards and completeness, it will appear in the Confirmed New Review tab; otherwise, it may appear in either the Items for Enrichment tab or Match Against PIM tab.
The Governance Studio Ready for Load tab provides a view of the fully complaint, standardized and enriched records that met the quality requirements and are "import ready" and will be moved into the PIM through the interface table (batch) process.
Once you have reviewed and handled all of the items on the other tabs, bringing the totals to zero, the remainder will appear on the Confirmed New Review tab. You select one or more rows to complete the process, which updates the Interface Batch with this set of standardized high quality data, using the Batch Id and the ITUI (Interface Table Unique Id) as the key as follows:
In the Governance Studio, select the Ready for Load tab.
Select on from one to all of the rows in the tab.
Click the Apply Checked Rows button to process the selected rows.
The selected rows turn blue indicating that the rows have been processed and that the rows are now unavailable for further processing.
Once the processing is complete, run the Release Batch process to reset the batch status from "Pending" to "Active" then review and confirm the changes made during this process. The job uses the batch id as input.
Confirm that the data is set correctly for the selected row(s) by going back into batch in the Oracle Item Import Workbench (assumes batch set back to Active to review).
Search for the batch.
Select Update to review the batch.
Select (for example, SemanticModel (Capacitors)) from the Display Format list.
Note:
If this does not exist, select More and search for SemanticModel. Select the correct SemanticModel (in the case where there are multiple and press Select.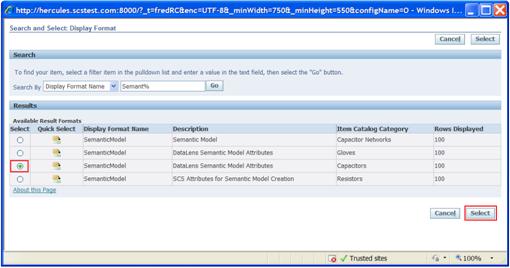
It then appears in the list as follows:
Select Go to apply it.
Select Previous or Next to review the items for correctness

The Standardized items are in place within the Oracle Interface Table for the selected rows from the Governance Studio job.
The Governance Studio Release Batch tab allows you to reset the batch from "Pending" to "Active" so the Oracle batch can be reviewed and imported. It also inactivates the current Governance Studio job to save the contents and prevent changes.
From the Governance Studio, select the Release Batch tab.
Click on the row.
Click on the ReRun button to process the selected row.
It will complete the current batch in the Governance Studio and set the project to read only (disabling most of the interface functions) and set from "Pending" to "Active".
To reactive the batch, from the File menu, select New Project From to reopen and process using a version number and the batch number as input.
|
Copyright © 2001, 2012, Oracle and/or its affiliates. All rights reserved. Legal Notices |
|