| Oracle® Real User Experience Insight User's Guide 12c Release 1 for Linux x86-64 Part Number E35689-02 |
|
|
PDF · Mobi · ePub |
| Oracle® Real User Experience Insight User's Guide 12c Release 1 for Linux x86-64 Part Number E35689-02 |
|
|
PDF · Mobi · ePub |
This chapter describes the role of user flows in monitoring network traffic. This includes an explanation of the components that comprise user flows (such as steps, conditions, and events), and their reporting within RUEI.
A user flow is a collection of Web pages that define a logical task. It consists of a number of steps that need to be performed in order to complete the task. For example, a booking user flow might have the following defined steps:
Route and date details.
Passengers and vehicle details.
Payment details.
Confirmation.
Individual steps can be consist of multiple Web pages. For example, in the above Payment details step, separate pages may be defined for each available payment method (such as credit card, bank transfer, and so on). The user flow is considered completed when the visitor reaches the final step. In addition, while steps are primarily defined in terms of pages, they can also be defined in terms of other dimensions, such as Siebel methods, or EBS responsibilities and actions.
In order to facilitate administration, user flows are grouped into categories. For example, you could define separate categories for bookings, requests for brochures, CRM activities, and so on.
User flow steps are defined in terms of conditions. These represent the requirements that must be met in order for the step to be considered reached. Each condition is defined in terms of events. These are specified in terms of dimension values.
For example, consider the Payment details step described above. Typically, this could have several different conditions defined for it, with each condition representing an alternative method of payment. Only one of these conditions would need to be met during a user session in order for the step to be considered reached. Each condition is defined in terms of the events (that is, the specific dimension values) that must be achieved in order for the condition to be considered met. Note that all events defined for a condition must be met in order for the condition to be considered achieved.
Steps within user flows can be configured to be optional or required. For example, a user flow could be defined with the steps A, B, C, and D, and allow the paths A > B > C > D, A > B > D, A > B, and A > C > D. In this case, steps B and C are optional, and steps A and D are required. In the case of a visitor who followed the part A > B > D, the user flows would be reported as A > B > C (skipped) > D. Note that the first and last steps in a user flow cannot be defined as optional.
While completing a user flow, a visitor might navigate to a page that is not defined as a step. These are referred to as outside pages. In this case, it is necessary to determine whether the visitor is actually aborting the user flow, or is still permitted to return to the user flow (for example, after seeking assistance from a Help page). However, you may want the user flow to be considered aborted when a visitor navigates to specific outside pages. These pages are referred to as abort pages.
Particular attention should be paid to the first step. If a visitor returns to the first step, you need to consider whether they are aborting the current user flow and starting a new one, or still intend to complete the current user flow. For example, in the booking user flow described earlier, if a visitor was on the Payment details step, and choose to return to the Route and date selection step, then it could probably be assumed that they were abandoning the current user flow, and starting a new one.
A visitor is expected to complete a user flow step within a certain period of time (for instance, five minutes). If they have not done so, then the user flow is considered to be idle. However, because some steps can taken longer to complete than others, (for example, they require more reading time by the visitor), the allowed visitor idle time can be configured for each step within a user flow.
Be aware that the session idle time (described in Section 12.8, "Controlling Session Reporting") specifies the amount of visitor inactivity after which a session is considered terminated. By default, this is 60 minutes. However, step idle time refers only to a visitor's period of inactivity within a specific user flow step. When the session idle time is elapsed within a user flow it is reported as timed out.
To define a new user flow, you must have Full Business level permission. Do the following:
Select Configuration, then Applications, and then User flows. The currently defined user flow categories are listed in the left-hand side of the window. Click the New user flow command button in the toolbar. The dialog shown in appears.
Add User Flow DialogNote:
Be aware that it is not possible to add or remove steps within existing user flows. The data access upon which a user flow is based can also not be modified. Therefore, it is recommended that you carefully design your user flows to reflect your requirements before configuring them.Specify a name for the user flow. This must be unique across all user flows, and can have a maximum length of 255 characters. Note that a maximum of 200 user flows can be defined.
Use the Category menu to select the category under which the user flow will be stored. If you want to store it under a new category, click the New category button, and specify the name of the new category.
Use the Data access menu to specify if the user flow will be bound to a specific application or suite, or if it will be generic. The use of data access filters is described in Section 14.7, "Managing the Scope of Authorized Data Within Modules".
Use the Report optional steps check box to specify whether optional steps should be included when reporting cumulative user flow information. By default, they are.
For each required user flow step, click Add new step. The dialog shown in Figure 9-1 appears. Note that a user flow can contain a maximum of 15 steps.
Specify a name for the step. This must be unique within the new user flow. It is recommended that step names are kept as short in order to improve readability within user flow reports (see Section 9.7, "Understanding how User Flows are Reported").
Specify the period (in minutes) of visitor inactivity after which the step is regarded as timed out. By default, this is 10 minutes. It is recommended that the step idle time is carefully considered in order to reflect the step's required reading time, as well as any other actions (such as calculations and selections) that the visitor is required to perform. The default user flow step idle time can be specified using the procedure described in Section 9.5, "Specifying the Default Step Idle Time".
If this is not the first or last step in the user flow, you can use the Optional check box to specify whether the visitor is required to complete this step as part of the user flow. By default, steps are mandatory (that is, unchecked).
Specify the initial step condition that must be met for the step to be considered reached. For each condition event, use the Dimension level and Value menus to select the dimension that should be checked, and the value that it must hold. Note that if the required value is not available within the Value menu, you can click the Search icon beside it to locate it.
Optionally, you can use the Exclude check box to specify that the defined dimension level=value pair should be negatively applied. That is, the event should be regarded as achieved if the defined event is not met. For example, a particular page is not viewed. When ready, click Save. You are returned to the dialog shown in .
Optionally, click Add new condition below the new step to define any additional conditions required for it. The dialog shown in Figure 9-2 appears.
Specify a dimension level=value pair for each required condition event. When ready, click Add. Note that while only one defined condition needs to be achieved in order for the step to be regarded as reached, all events within a condition must be met for it to be considered achieved. When ready, click Save. You are returned to the dialog shown in .
Click the Abort conditions tab in to specify the circumstances in which the user flow should be regarded as aborted. The dialog shown in Figure 9-3 appears.
Figure 9-3 User Flow Abort Conditions Section
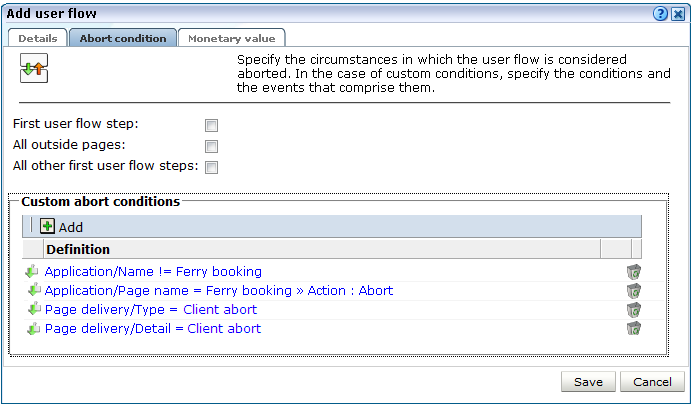
The following check boxes are available:
First user flow step: specifies whether the user flow is regarded as aborted if the visitor returns to the first step. The default is unchecked.
All outside pages: specifies whether the user flow is regarded as aborted if the visitor navigates to any page not defined as a step within the selected user flow. The default is unchecked.
All other first user flow steps: specifies whether the user flow is regarded as aborted if the visitor navigates to any page which is defined as the first step of another user flow. The default is unchecked.
Optionally, click Add to specify the specific pages (or other dimensions) to which if the visitor navigates the user flow is regarded as aborted.
Optionally, click the Monetary value tab, and use the Monetary source menu and the Source value fields shown in Figure 9-4 to specify the source upon which the user flow's reported monetary value should be based. The use of this facility is fully described in Section 9.6, "Assigning Monetary Values to User Flows".
The monetary value can be derived from a URL argument, an XPath expression, a header, a cookie, or a custom tag or function. More information about using XPath queries is available in Appendix F, "Working with XPath Queries".
When ready, click Save. Monitoring of the new user flow starts within five minutes. An overview of the new user flow appears.
Understanding how Event Steps are Handled
When analyzing reported user flow information, it is important to understand the sequence in which RUEI attempts to processes user flow activity. This can be summarized as follows:
RUEI first attempts to determine whether a visitor has made progress through the user flow. That is, whether they have moved to the next step. If so, the reported progress is updated to reflect this.
If there is no direct progress to the next step, then each of following steps (as long as they are optional) are checked for progress. If progress is determined, this is reported.
If no progress has been determined, then the current step is checked and, if this fails, all previous steps (as long as they are optional) are checked. Any determined progress is reported.
If all checks until now have failed to identify progress through the user transaction, then the abort conditions are checked. If met, the user flow is reported as aborted. Otherwise, the user flow's current status is reported as an outside activity.
It is recommended that you pay particular attention to the following points when defining your user flows:
Because a user flow is considered completed when a visitor reaches the last step, you should always define a confirmation or completion page as the final step.
When defining optional steps, ensure that the Web site is structured in order to regulate the approved navigation.
It is recommended that careful attention be paid to step idle times when defining your user flows. Note that if the step idle time is defined as longer than the session idle time, the session idle time takes precedence, and user flows that exceed it are reported as timed out.
When using the free-text facility, it is strongly recommended that you carefully review the user flow's definition to ensure that all its attributes lay within defined data access restrictions. If an attribute (such as a page name) is outside these restrictions, it will never be reached because of data access enforcement.
Be aware that it is not possible to add or remove steps within existing user flows. The data access upon which a user flow is based can also not be modified. Therefore, it is recommended that you carefully design your user flows to reflect your requirements before configuring them.
Note that it is possible to modify step conditions, as well as other user flow information (such as its name, location, abort conditions, and monetary value). To modify a user flow, do the following:
Select Configuration, then Application, and then User flows. Click the appropriate category and user flow on the left-hand side of the window. An overview of the selected user flow is displayed. An example is shown in Figure 9-5.
Click the Edit command button. A dialog similar to the one shown in appears.
Optionally, select Edit from a step's context menu to modify its name, idle time, or optional/mandatory setting. As explained earlier, a user flow must contain at least two steps, and the first and last steps are mandatory. When ready, click Save.
Optionally, you can also click individual step conditions to modify them, or click the Remove icon beside them to delete them. You can also click the Add new condition item within a step to define additional conditions for the step.
When ready, click Save. Any changes you make to a user flow definition take effect within five minutes.
Because only restricted changes can be made to existing user flows, it is very convenient to use the Copy option under the user flow context menu in the left-hand side of the window. In particular, it allows you to perform "what if" analysis of problem user flows.
For example, imagine that a particular step within a user flow has a high abort rate associated with it. You suspect that the problem may be related to visitors' browser language settings. Using the copy facility, you make a duplicate of the user flow, and modify the necessary step definition. Thereafter, you can compare the results of the original and modified user flows to see whether user flow conversions have improved.
If you change the data access settings when copying a user flow, it is strongly recommended that you carefully review the new user flow's definition to ensure that all its attributes lay within the new data access restrictions. If an attribute (such as a page name) is outside these restrictions, it will never be reached because of data access enforcement.
Each time a new user transaction is created, the steps within that transaction are assigned an idle time. That is, the period of visitor inactivity after which the step is regarded as timed out. This has a default of 10 minutes. However, this default can be modified by selecting Configuration, then General, then Advanced settings, then Session processing, and then Default user flow step time. Note that any change to this setting only applies to new user transaction definitions. Existing user flows are unaffected.
In order to provide insight into the real cost of performance issues, monetary values can be assigned to ended user flows. That is, user flows that are completed, timed out, or aborted. For example, using this facility, you could determine the cost of a server upgrade in terms of lost user flows. The source of the monetary value is specified in a similar way to custom dimensions (see Section 3.11, "Working With Custom Dimensions"). An example of a comparison between the monetary values of different user flows is shown in Figure 9-6.
Figure 9-6 Example Overview of User Flow Monetary Totals
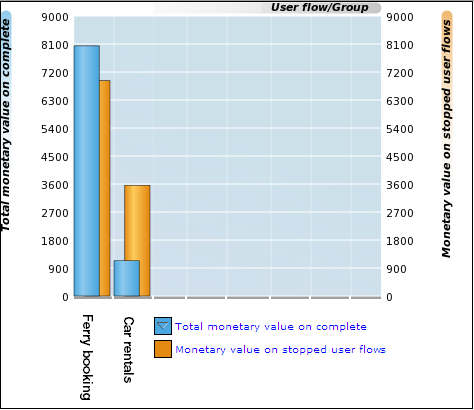
When assigning monetary values to user flows, you should consider the following:
When determining the monetary value form a selected element, all leading whitespace is removed from it. The value is taken from the first numeric character encountered up to the next non-numeric character. For example, the element ?Basket=99.99 US dollars would be calculated as 99.
If the value is determined to be negative, greater than 232, or a string, zero is returned.
The underlying element (such as a request header) can change over the course of the user flow. Consider the situation shown in Figure 9-7. When user flow A starts, it has a monetary value of 0. As the user flow progresses, it has values of 80, 120, and 90. Upon completion, the monetary value of 90 is reported for it.
Figure 9-7 Calculation of Reported Monetary Value

The funnel view provides the most generic information about a selected user flow. It indicates visitor transition through the user flow during the selected time period. An example is shown in Figure 9-8.
More detailed information about the current status of a selected user flow is available through the Funnel view. In particular, it highlights the number of visitors currently engaged within each step, how they experienced Web actions (such as page loading and errors) within those steps, as well as the number of timed out and aborted steps. An example is shown in Figure 9-9. Note that you can click each of the reported items (such as outside pages) to view them within the Session Diagnostics facility.
Figure 9-9 Example User Flow Status Details
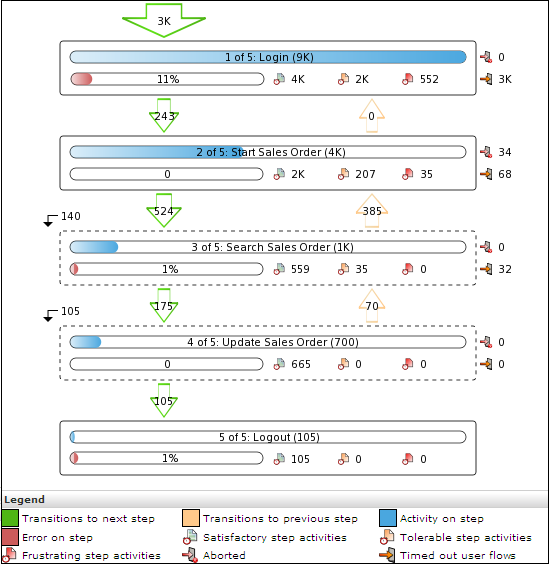
Optional steps within a user flow are indicated with dotted lines. Note that diagnostics information with full session information about specific errors experienced on steps is available by clicking the Error on step indicator within a step. Diagnostics information on the reported number of poor page views is also available. The use of this facility is fully explained in Section 9.1, "Understanding User Flows".
The most detailed information about a user flow is available via the Flow transitions view. An example is shown in Figure 9-10.
Figure 9-10 Example User Flow Transition Details
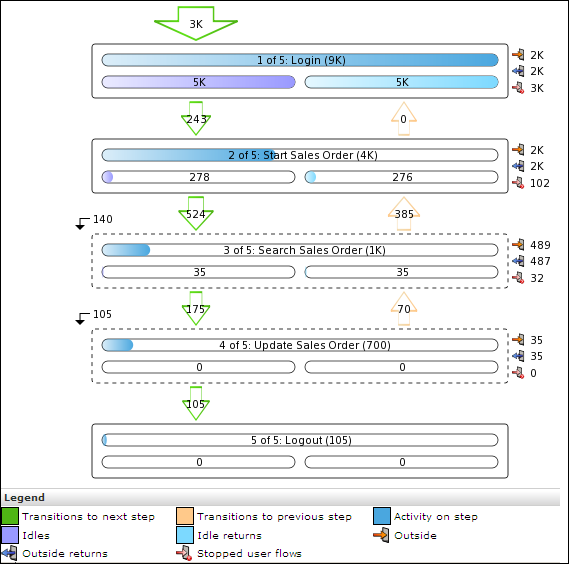
It provides extensive information about transitions between steps, including the level of outside activity within steps, aborts, time outs, and the skipping of optional steps. Note that the Idle item indicates the number of visitors engaged in a step but who have been inactive for longer than the defined step idle time. If these visitors resume activity within one hour, this is indicated via the Idle returns item. Otherwise, the step is considered timed out and stopped.
In order to understand how the numbers reported in the user flow status (Figure 9-9) and user flow transitions (Figure 9-10) are derived, consider the example session information shown in Figure 9-11. It shows the pages viewed by three users (X, Y, and Z). A user flow is monitored that comprises of three steps, which correspond to the pages P1, P2, and P3.
As each the user sessions proceed, the arrow directly above each step indicates the number of users entering the step, the number inside the step indicates the total number of step pages viewed, while the three numbers to its right indicate the number of outside, outsider returns, and stopped user flows. If the viewed page had an error associated with it, this is indicated by an asterisk (*) after the page name.
Note that P4 is a help page, while P5 is regarded as an abort page. Therefore, an outside is reported (in step A) when P4 is encountered, while a stopped user flow is reported when P5 is encountered. Note also that an outside return is reported when a user returns from P4.
The user flows for users X and Y are completed at 10:20, while that of user Z timed out. Therefore, one stopped user flow is reported at 11:20. Note that if you want timed out user flows to be included in reported data, a sufficient time period needs to be selected.
Cumulative Reporting of User Flows
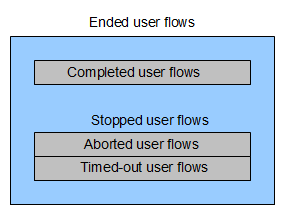
It is important to understand the difference between the reporting of user flows for a selected period, and the cumulative reporting of user flows. Consider the pageload time reported for a selected step. This would indicate the load time (in seconds) for a step's page views during the selected period. However, when the total pageload time for an aborted step is reported, this represents the total load time of all aborted page views for that step regardless of the selected period. Note that the total page load on stopped steps represents the sum of the pageload of timed out and aborted step page views.
Figure 9-12 Understanding how Ended User Flows are Reported
Within the funnel graph (available from the User flows view within the User flow completion group), the Show rolling sum open is available within the Values menu. When selected, an additional column is displayed showing the cumulative total of user flows. This column is also available when exporting.
A number of views within the User flow completion group provide insight into the duration of user flows. An example is shown in Figure 9-13.
Figure 9-13 User Flow Active/Idle Time View
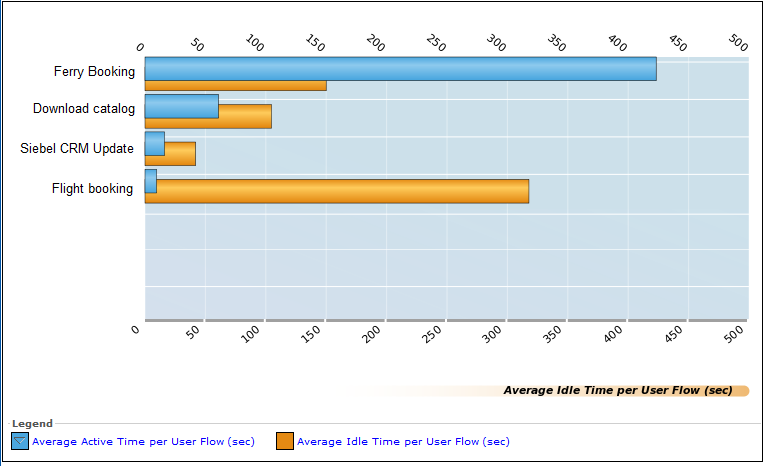
When using these views, be aware of the following:
When a user flow becomes idle (based on the defined step idle time), the time between the last page view and the step-idle time is marked as "active", while the time following this is reported as "idle". Therefore, two identical user flows with only a different defined step idle time would result in the same session being reported with different flow duration and flow idle times.
The step idle time is included as active time after the user becomes active after the step. The step idle time is also included as active time when a user went outside the user flow, and did not return. In this case, the session is reported as timed out.
Within the Service test diagnostics group (described in Section 8.5, "Reporting Service Test Traffic"), you can convert selected service test sessions into RUEI user flows. This offers the advantage that the monitored user flows would then be reported within the All user flows group. This not only allows immediate comparison with other monitored user flows, but also enhanced reporting facilities.
To convert a service test session into a RUEI user flow, you must have Full Business access level permission. Do the following:
Select Browse data, the Service tests group, and click the Service test diagnostics facility. Use the Calendar controls (described in Section 2.6, "Using the Calendar") to select the required period. The selected viewing range must be a single day (or less). If you attempt to search outside this limit, an error is reported. The search panel shown in Figure 9-14 appears.
Figure 9-14 Service Test Diagnostics Search Facility
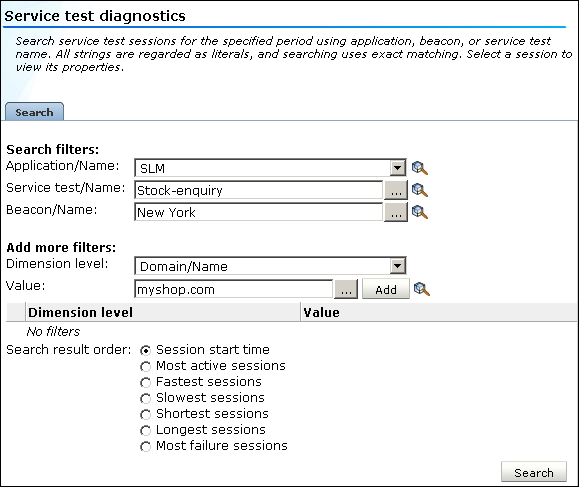
For a general explanation of the diagnostics facility, see Section 4.1, "Introduction".
Optionally, use the available criteria to restrict the service test sessions listed for the specified period. When ready, click Search. The results of the search are shown in the main part of the window. An example is shown in Figure 9-15.
Click to select the service test session you want converted into a user flow. Its session details are displayed. An example is shown in Figure 9-16.
Click the Create user flow command button in the toolbar to convert the selected service test session into a RUEI user flow. The dialog shown in Figure 9-17 appears.
Figure 9-17 Add User Flow From Service Test Session Dialog
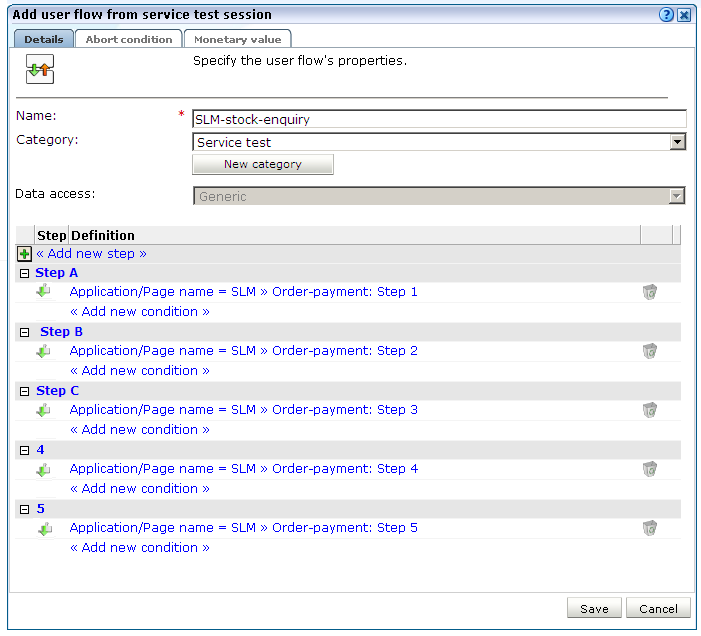
Specify a name for the new user flow. This must be unique within the selected user flow category. The default is the monitored service test name.
Specify the category within which the new user flow should be saved. This can either a be an existing category or a new one. The default is "Service test".
Be aware that the conversion process tries to construct a logical user flow from the underlying service test session. Hence, if the same page name appears multiple times within the step, these are consolidated by each page becoming a separate condition within the step. In addition, steps that appear to skip backwards or forwards in the service test session are presumed to be optional. Therefore, you should carefully review the new user flow's structure in order to ensure that it meets your requirements. When ready, click Save.
When converting service test sessions into user flows, be aware of the following:
The new user flow is limited to a maximum of 15 steps, and any service test session containing steps over is this limit are automatically truncated.
The converted user flow must contain at least two steps.