Table of Contents Previous Next PDF


Programming Security

Programming Security
The following sections describe how to build security for your Oracle Tuxedo ATMI application into your code.
What Programming Security Means
Programming security is the task of writing security code for Application-to-Transaction Monitor Interface (ATMI) applications. In addition to the code that expresses the logic of the program, application programmers use ATMI to link their application code with the Oracle Tuxedo transaction monitor. The ATMI programming interfaces enable communication among application clients and servers running under the control of the Oracle Tuxedo transaction monitor. C and COBOL implementations of the ATMI are available.
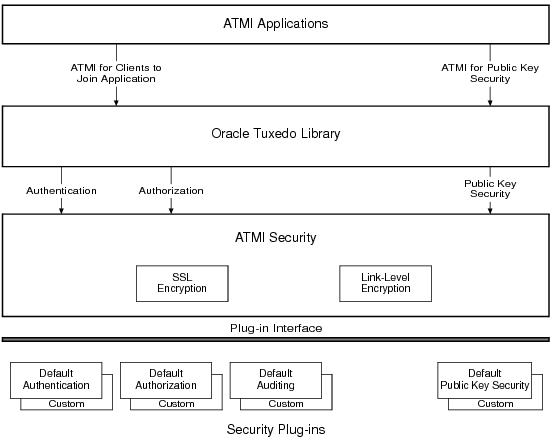
As shown in Figure 3‑1, application programmers have access to the ATMI functions for authenticating users and controlling user access, and for incorporating public key encryption techniques into their applications. Also shown is the absence, at the application level, of ATMI functions for auditing or link-level encryption. Auditing is accessed at the Oracle Tuxedo system level, and link-level encryption is configured by the application administrator.
Figure 3‑1 Programming Oracle Tuxedo Security
See Also
Programming an ATMI Application with Security
The Oracle Tuxedo system offers various ATMI functions for different security needs.
 
See Also
Setting Up the Programming Environment
To be able to write security code, an application programmer needs:
To obtain access to the required libraries and commands, you must set the TUXCONFIG, TUXDIR, APPDIR, and other environment variables in your environment. For details, see “How to Set Your Environment” on page 1‑2 in Administering an Oracle Tuxedo Application at Run Time.
The application administrator is responsible for setting the permissions on directories and files. See your administrator to get the permissions you need.
See Also
Writing Security Code So Client Programs Can Join the ATMI Application
Client programs are responsible for gathering data from outside the application or computer, bundling the data into messages, and forwarding the messages to servers for processing. Client programs are made available to users through devices such as automatic teller machines (ATMs), data entry terminals, and graphics devices.
For default authentication and authorization, application security may be set to one of five levels. At the lowest level, no authentication is performed. At the highest level, an access control checking feature determines which users can execute a service, post an event, or enqueue (or dequeue) a message on an application queue. Setting the security level for an ATMI application is the responsibility of the application administrator.
An application programmer needs to perform two tasks so that a client program can join an ATMI application:
The following pseudo-code in Listing 3‑1 summarizes the operation of a basic client program. The security-related statements are highlighted in bold.
Listing 3‑1 Pseudo-code for a Client
main()
 {
      
call tpchkauth() to check security level of ATMI application
      get usrname, cltname
      prompt for application password
      prompt for per-user password
      allocate a TPINIT buffer
      place initial client identification into TPINIT buffer
      call tpinit() to enroll as a client of the ATMI application
      allocate buffer
      do while true {
           place user input in buffer
           send service request
           receive reply
           pass reply to user }
      leave application
 }
 
Most of the statements in the preceding listing are implemented by ATMI functions in either C or COBOL. The preceding listing shows only the C language implementation.
A client program written in C uses tpinit(3c) to comply with the level of security set for the ATMI application and to join the application. The argument to tpinit() is a pointer to a TPINIT buffer. To perform the same tasks in a COBOL application, a client program calls TPINITIALIZE(3cbl), specifying a pointer to a TPINFDEF-REC record as an argument.
See Also
“Writing Clients” on page 4‑1 in Programming an Oracle Tuxedo ATMI Application Using C and Programming an Oracle Tuxedo ATMI Application Using COBOL
tpinit(3c) in Oracle Tuxedo ATMI C Function Reference
TPINITIALIZE(3cbl) in the Oracle Tuxedo ATMI COBOL Function Reference
Getting Security Data
For general-purpose client programs that are written to work with a variety of applications, the Oracle Tuxedo system provides an ATMI function that enables a client to determine the level of security required by the ATMI application that the client is trying to join. This ATMI function, implemented as tpchkauth(3c) for C and TPCHKAUTH(3cbl) for COBOL, is designed to work with ATMI applications using default authentication and authorization. The tpchkauth() and TPCHKAUTH() functions can also be used in ATMI applications in which custom authentication and/or authorization is used. How they are used, however, depends on how the custom security features are implemented. For the most part, this discussion focuses on default authentication and authorization.
An application programmer writing in C uses tpchkauth() to check the ATMI application’s security level before calling tpinit(3c), so that the client program can prompt for the application password and the user authentication data needed for the tpinit() call; tpchkauth() is called without arguments.
An application programmer writing in COBOL uses TPCHKAUTH() for the same purpose before calling TPINITIALIZE(3cbl). The syntax and functionality of TPCHKAUTH(3cbl) and TPINITIALIZE(3cbl) are the same as those of tpchkauth(3c) and tpinit(3c).
The tpchkauth() function (or TPCHKAUTH() routine) returns one of the following values.
TPNOAUTH
Nothing is required beyond the normal operating system login and file permission security. TPNOAUTH is returned for security level NONE.
TPSYSAUTH
An application password is required. The client program should prompt the user to provide the password, and should put it in the password field of the TPINIT buffer for C, or TPINFDEF-REC record for COBOL. TPSYSAUTH is returned for security level APP_PW.
The application administrator informs users of the application password, and the application programmer writes client-program code to prompt users for the application password and to put the user-supplied password, as plain text, in the password field of the TPINIT buffer or TPINFDEF-REC record. The password should not be displayed on the user’s screen.
Oracle Tuxedo system-supplied client programs, such as ud, wud(1), prompt for an application password. ud() allows fielded buffers to be read from standard input and sent to a service.
TPAPPAUTH
The application password is required. The client is expected to provide a value to be passed to the authentication service in the data field of the TPINIT buffer for C, or the TPINFDEF-REC record for COBOL. TPAPPAUTH is returned for security level USER_AUTH, ACL, or MANDATORY_ACL.
The application programmer writes client-program code to furnish additional information for the application authentication service, which is provided by the AUTHSVR server for default authentication and authorization. AUTHSVR is configured by the administrator to validate the per-user authentication information with client and usernames, indicating whether the client program is allowed to join the ATMI application.
See Also
“Writing Clients” on page 4‑1 in Programming an Oracle Tuxedo ATMI Application Using C and Programming an Oracle Tuxedo ATMI Application Using COBOL
tpinit(3c) and tpchkauth(3c) in the Oracle Tuxedo ATMI C Function Reference
TPINITIALIZE(3cbl) and TPCHKAUTH(3cbl) in the Oracle Tuxedo ATMI COBOL Function Reference
Joining the ATMI Application
In a secure ATMI application, it is necessary to pass security information to the Oracle Tuxedo system via a TPINIT buffer for C, or a TPINFDEF-REC record for COBOL. The TPINIT buffer is a special typed buffer used by a client program to pass client identification and authentication information to the system as the client attempts to join the ATMI application. The TPINFDEF-REC record serves the same purpose in a COBOL application.
TPINIT is defined in the atmi.h header file, and TPINFDEF-REC is defined in the COBOL COPY file. They have the following structures.
 
Note: MAXTIDENT may contain up to 30 characters.
The fields in the TPINIT buffer/ TPINFDEF-REC record are described in Table 3‑1.
 
tpinit() or TPINITIALIZE() validates this password by comparing it to the configured application password stored in the TUXCONFIG file.**
To get a size value for this field, writers of client programs written in C can call TPINITNEED with the number of bytes of user-specific data expected to be sent. TPINITNEED is a macro provided in the atmi.h header file.
tpinit() or TPINITIALIZE() forwards the user-specific data to the authentication server for validation. For default authentication, the authentication server is AUTHSVR.
  * This field is required for the USER_AUTH, ACL, and MANDATORY_ACL security levels provided by default authentication and authorization.
 ** The binary equivalent of the UBBCONFIG file; created using tmloadcf(1).
*** Usually a user password.
The client program calls tpalloc(3c) to allocate a TPINIT buffer. The following sample code in Listing 3‑2 prepares to pass eight bytes of application-specific data to tpinit() and enables the client to join an ATMI application.
Listing 3‑2 Allocating a TPINIT Buffer and Joining an ATMI Application
  .
  .
  .
TPINIT *tpinfo;
  .
  .
  .
if ((tpinfo = (TPINIT *)tpalloc("TPINIT",(char *)NULL,
     TPINITNEED(8))) == (TPINIT *)NULL){
     Error Routine
}
  .
  .
  .
tpinit(tpinfo)  /* join an ATMI application */
  .
  .
  .
 
When a Workstation client calls the tpinit() function or the TPINITIALIZE() routine to join an ATMI application, the following major events occur.
1.
The initiator Workstation client and the target workstation listener (WSL) exchange link-level encryption (LLE) min-max values to be used to set up LLE on the link between the initiator Workstation client and the target WSH. LLE is described in “Link-Level Encryption” on page 1‑22.
2.
3.
After a successful authentication, the initiator Workstation client sends another buffer to the target WSH containing the values of the usrname, cltname, and flags fields, to ensure that the target WSH receives this information for the authenticated Workstation client.
When a native client calls the tpinit() function or the TPINITIALIZE() routine to join an ATMI application, only authentication occurs. In essence, the native client authenticates with itself.
Transferring the Client Security Data
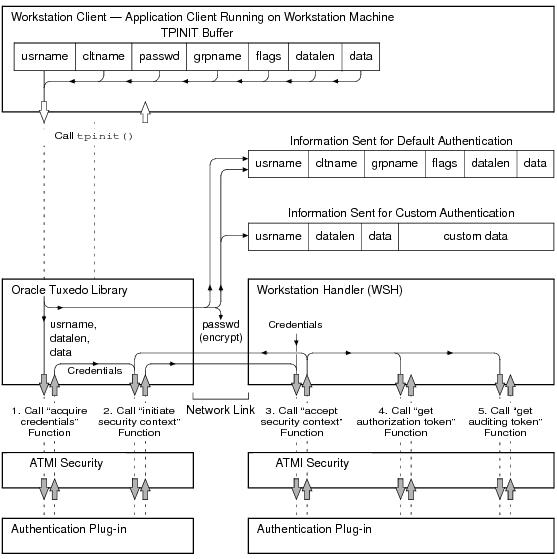
Listing 3‑2 demonstrate the transfer of data from the TPINIT buffer for a Workstation client. The transfer of data from the TPINFDEF-REC record is similar to what is shown in the figure.
Figure 3‑2 Transferring Data from the TPINIT Buffer for a Workstation Client
Note:
In the preceding diagram, notice that the information sent to the Oracle Tuxedo system differs between default and custom authentication. For default authentication, the values of the cltname, grpname, and flags fields are delivered to the default authentication plug-in at the Workstation client by a means other than through the plug-in interface. However, for custom authentication, writers of client programs can include these values as well as any other values they so choose in the variable length data field.
For a Workstation client and assuming default authentication, the authentication plug-in at the Workstation client uses the passwd/ PASSWD field to encrypt the information when transmitting the information over the network. The encryption algorithm used is 56-bit DES, where DES is an acronym for the Data Encryption Standard. The authentication plug-in at the target WSH uses the application password stored in the TUXCONFIG file to decrypt the information. For a native client, the system simply compares the passwd/ PASSWD field with the application password stored in the TUXCONFIG file.
Note:
At the Workstation client, the passwd/ PASSWD field is delivered to the authentication plug-in by a means other than through the authentication plug-in interface. At the WSH, the application password in the TUXCONFIG file is delivered to the authentication plug-in through the authentication plug-in interface during application booting.
After a successful authentication of a Workstation client, the tpinit() function ends with the sending of another buffer to the WSH containing the values of the usrname, cltname, and flags fields, to ensure that the WSH receives this information for the authenticated Workstation client. Similarly, the TPINITIALIZE() routine ends with the sending of another buffer containing the same information. A custom authentication plug-in might not send this information to the WSH during the authentication procedure, and the WSH needs this information for reporting purposes, that is, during an invocation of the tmadmin(1) printclient (pclt) command.
When a Workstation or native client passes the security check, it may initiate service requests and receive replies.
Calling a Service Request Before Joining the ATMI Application
If a client calls a service request (or any ATMI function) before invoking tpinit() or TPINITIALIZE() and assuming the SECURITY configuration for the target ATMI application is not set or is set to NONE, the Oracle Tuxedo system automatically invokes tpinit()/ TPINITIALIZE() with a NULL parameter. This behavior has the following consequences:
The TPINIT/ TPINFDEF-REC feature cannot be used.
If a client calls a service request (or any ATMI function) before invoking tpinit() or TPINITIALIZE() and assuming the SECURITY configuration for the target ATMI application is set to APP_PW, USER_AUTH, ACL, or MANDATORY_ACL, the Oracle Tuxedo system rejects the service request.
See Also
“Writing Clients” on page 4‑1 in Programming an Oracle Tuxedo ATMI Application Using C and Programming an Oracle Tuxedo ATMI Application Using COBOL
tpinit(3c) and tpalloc(3c) in the Oracle Tuxedo ATMI C Function Reference
TPINITIALIZE(3cbl) in the Oracle Tuxedo ATMI COBOL Function Reference
Writing Security Code to Protect Data Integrity and Privacy
Public key security comprises end-to-end digital signing and data encryption. Both features are supported by Oracle Tuxedo ATMI functions. ATMI applications protected by public key security are much safer for use across the Internet than programs in which this type of security is not used.
The capabilities that make end-to-end digital signing and data encryption possible are message-based digital signature and message-based encryption. Both capabilities are built upon the PKCS-7 standard, which is one of a set of Public-Key Cryptography Standards (PKCS) developed by RSA Laboratories in cooperation with several other leading communications companies.
Message-based digital signature ensures data integrity and non-repudiation by having the sending party bind proof of its identity to a specific message buffer. Message-based encryption protects the confidentiality of messages; only parties for whom messages are intended can decrypt and read them.
Because the unit of digital signing and encryption is an ATMI message buffer, both capabilities are compatible with existing ATMI programming interfaces and communication paradigms. It is possible for a message buffer to be both signed and encrypted. There is no required relationship between the number of digital signatures and the number of encryption envelopes associated with a message buffer.
Note:
ATMI Interface for Public Key Security
The ATMI interface for public key security is a compact set of functions used to:
The ATMI interfaces for public key security are available in both C and COBOL implementations. The ATMI COBOL language binding, however, does not support message buffers; thus, explicit signature, encryption, and query operations on individual buffers cannot be used in a COBOL application. However, key management interfaces do have a COBOL language binding, which enables signature generation in the AUTOSIGN mode and encryption-envelope generation in the AUTOENCRYPT mode. All operations related to automatic signature verification or automatic decryption apply to COBOL client and server processes.
Note:
The COBOL TPKEYDEF record is used to manage public-private keys for performing message-based digital signature and encryption operations. See “COBOL Language ATMI Return Codes and Other Definitions” in the introduction part of the Oracle Tuxedo ATMI COBOL Function Reference for a description of the TPKEYDEF record.
Table 3‑2 and Table 3‑3 summarize the ATMI interfaces for public key security. Each function is also documented in the Oracle Tuxedo ATMI C Function Reference and the Oracle Tuxedo ATMI COBOL Function Reference.
 
Signature Generation
The key identifies the calling process as being authorized to generate a digital signature under the principal’s identity. (A principal may be a person or a process.) Calling tpkey_open() with the principal’s name and either the TPKEY_SIGNATURE or TPKEY_AUTOSIGN flag returns a handle to the principal’s private key and digital certificate.
Signature Verification
The key represents the principal associated with a digital signature. Signature verification does not require a call to tpkey_open(); the verifying process uses the public key specified in the digital certificate accompanying the digitally signed message to verify the signature.
Encryption
The key represents the intended principal of an encrypted message. Calling tpkey_open() with the principal’s name and either the TPKEY_ENCRYPT or TPKEY_AUTOENCRYPT flag returns a handle to the principal’s public key via the principal’s digital certificate.
Decryption
The key identifies the calling process as being authorized to decrypt a private message for the intended principal. Calling tpkey_open() with the principal’s name and the TPKEY_DECRYPT flag returns a handle to the principal’s private key and digital certificate.
PRINCIPAL
The name of the principal associated with the specified key (key handle). A principal may be a person or a process, depending on how an application developer sets up public key security. Any principal specified in an ATMI application’s UBBCONFIG file using the SEC_PRINCIPAL_NAME parameter become the identity of one or more system processes. (See “Specifying Principal Names” on page 2‑11 and “Initializing Decryption Keys Through the Plug-ins” on page 2‑56 for more detail.)
PKENCRYPT_ALG
An ASN.1 Distinguished Encoding Rules (DER) object identifier of the public key algorithm used by the key for public key encryption. See the tpkey_getinfo(3c) reference page for details.
PKENCRYPT_BITS
The key length of the public key algorithm (RSA modulus size). The value must be within the range of 512 to 2048 bits, inclusive.
SIGNATURE_ALG
An ASN.1 DER object identifier of the digital signature algorithm used by the key for digital signature. See the tpkey_getinfo(3c) reference page for details.
SIGNATURE_BITS
The key length of the digital signature algorithm (RSA modulus size). The value must be within the range of 512 to 2048 bits, inclusive.
ENCRYPT_ALG
An ASN.1 DER object identifier of the symmetric key algorithm used by the key for bulk data encryption. See the tpkey_getinfo(3c) reference page for details.
ENCRYPT_BITS
The key length of the symmetric key algorithm. The value must be within the range of 40 to 128 bits, inclusive.
DIGEST_ALG
An ASN.1 DER object identifier of the message digest algorithm used by the key for digital signature. See the tpkey_getinfo(3c) reference page for details.
PROVIDER
The name of the cryptographic service provider.
VERSION
The version number of the cryptographic service provider’s software.
Set optional attribute parameters associated with a key handle. A core set of key handle attributes is identified in the preceding description of tpkey_getinfo(). Other attributes, specific to a certain cryptographic service provider, may also be available.
Close a previously opened key handle. A key handle may be opened explicitly using tpkey_open(), or implicitly (automatically) using tpenvelope().
Access the digital signature and encryption information associated with a typed message buffer. tpenvelope() returns status information about the digital signatures and encryption envelopes attached to a particular message buffer. It also returns the key handle associated with each digital signature or encryption envelope. The key handle for a digital signature identifies the signer, and the key handle for an encryption envelope identifies the recipient of the message.
Convert a typed message buffer into an exportable, machine-independent (externalized) string representation. tpexport() generates any digital signatures or encryption envelopes associated with a typed message buffer just before it converts that buffer into an externalized string representation.
Convert an externalized string representation back into a typed message buffer. During the conversion, tpimport() decrypts the message, if necessary, and verifies any associated digital signatures.
 
Signature Generation
The key identifies the calling process as being authorized to generate a digital signature under the principal’s identity. (A principal can be a person or a process.) Calling TPKEYOPEN() with the principal’s name and the TPKEY-SIGNATURE and TPKEY-AUTOSIGN settings returns a handle to the principal’s public key and enables signature generation in AUTOSIGN mode. The public key software generates and attaches the digital signature to the message just before the message is sent.
Signature Verification
The key represents the principal associated with a digital signature. Signature verification does not require a call to TPKEYOPEN(); the verifying process uses the public key specified in the digital certificate accompanying the digitally signed message to verify the signature.
Encryption
The key represents the intended principal of an encrypted message. Calling TPKEYOPEN() with the principal’s name and the TPKEY-ENCRYPT and TPKEY-AUTOENCRYPT settings returns a handle to the principal’s public key (via the principal’s digital certificate) and enables encryption in AUTOENCRYPT mode. The public key software encrypts the message and attaches an encryption envelope to the message; the encryption envelope enables the receiving process to decrypt the message.
Decryption
The key identifies the calling process as being authorized to decrypt a private message for the intended principal. Calling TPKEYOPEN() with the principal’s name and the TPKEY-DECRYPT setting returns a handle to the principal’s private key and digital certificate.
PRINCIPAL
The name of the principal associated with the specified key (key handle). A principal may be a person or a process, depending on how an ATMI application developer sets up public key security. Any principal specified in an ATMI application’s UBBCONFIG file using the SEC_PRINCIPAL_NAME parameter become the identity of one or more system processes. (See “Specifying Principal Names” on page 2‑11 and “Initializing Decryption Keys Through the Plug-ins” on page 2‑56 for more detail.)
PKENCRYPT_ALG
An ASN.1 Distinguished Encoding Rules (DER) object identifier of the public key algorithm used by the key for public key encryption. See the TPKEYGETINFO(3cbl) reference page for details.
PKENCRYPT_BITS
The key length of the public key algorithm (RSA modulus size). The value must be within the range of 512 to 2048 bits, inclusive.
SIGNATURE_ALG
An ASN.1 DER object identifier of the digital signature algorithm used by the key for digital signature. See the TPKEYGETINFO(3cbl) reference page for details.
SIGNATURE_BITS
The key length of the digital signature algorithm (RSA modulus size). The value must be within the range of 512 to 2048 bits, inclusive.
ENCRYPT_ALG
An ASN.1 DER object identifier of the symmetric key algorithm used by the key for bulk data encryption. See the TPKEYGETINFO(3cbl) reference page for details.
ENCRYPT_BITS
The key length of the symmetric key algorithm. The value must be within the range of 40 to 128 bits, inclusive.
DIGEST_ALG
An ASN.1 DER object identifier of the message digest algorithm used by the key for digital signature. See the TPKEYGETINFO(3cbl) reference page for details.
PROVIDER
The name of the cryptographic service provider.
VERSION
The version number of the cryptographic service provider’s software.
Set optional attribute parameters associated with a key handle. A core set of key handle attributes is identified in the preceding description of TPKEYGETINFO(). Other attributes, specific to a certain cryptographic service provider, may also be available.
Recommended Uses of Public Key Security
Use tpkey_close() to release key handles used for digital signature generation or for data decryption as soon as they are no longer needed.
See Also
Sending and Receiving Signed Messages
Message-based digital signature provides end-to-end authentication and message integrity protection. For a diagram that illustrates how it works, see the figure “ATMI PKCS-7 End-to-End Digital Signing” on page 1‑37.
To add a digital signature to an ATMI message buffer, the originating process or user signs the message buffer. This signature contains a cryptographically secure checksum of the message buffer’s content and a timestamp based on the signer’s local clock.
Any party with access to the message buffer can verify that the signing party’s signature is authentic, that the message buffer content is unchanged, and that the timestamp is within a configured tolerance of the verifier’s local clock. In addition, time-independent verification by a third party guarantees non-repudiation: the originating process or user cannot later deny authorship or claim the message was altered.
Writing Code to Send Signed Messages
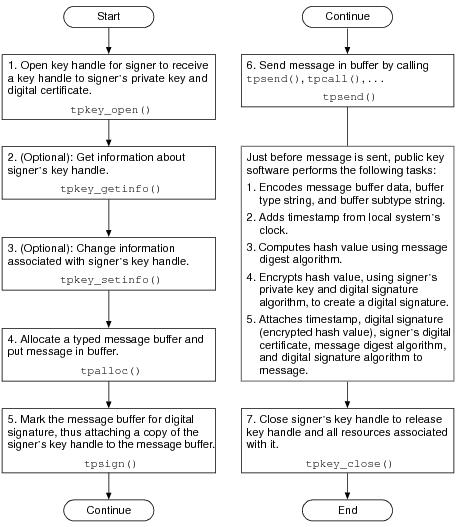
Figure 3‑3 provides the procedure for writing code to send signed messages.
Figure 3‑3 Procedure for Sending Signed Messages
For details about these steps and insight into how the system signs a message buffer, see the following topics.
Step 1: Opening a Key Handle for Digital Signature
Call the tpkey_open(3c) function or TPKEYOPEN(3cbl) routine to make the private key and the associated digital certificate of the signer available to the originating process. The private key is highly protected, and possession of it is equivalent to possessing the signer’s identity.
In order to access the signer’s private key, the originating process must prove its right to act as the signer. Proof requirements depend on the implementation of the public key plug-in interface. The default public key implementation requires a secret password from the calling process.
When the originating process calls tpkey_open() to open the key handle, it specifies either the TPKEY_SIGNATURE or TPKEY_AUTOSIGN flag to indicate that the handle will be used to digitally sign a message buffer. Typically, a client makes this call after calling tpinit(), and a server makes this call as part of initializing through tpsvrinit().
Opening a key handle with the TPKEY_AUTOSIGN flag enables automatic signature generation: subsequently, the originating process signs message buffers automatically whenever they are sent. Using the TPKEY_AUTOSIGN flag is beneficial for three reasons:
Listing 3‑3 shows how to open a signer’s key handle. TPKEY is a special data type defined in the atmi.h header file.
Listing 3‑3 Opening a Signer’s Key Handle Example
main(argc, argv)
int argc;
char *argv[];
#endif
{
   TPKEY sdo_key;
   char *sdo_location;
  .
  .
  .
   if (tpkey_open(&sdo_key, “sdo”, sdo_location,
      NULL, 0, TPKEY_SIGNATURE) == -1) {
      (void) fprintf(stderr, “tpkey_open sdo failed
         tperrno=%d(%s)\n”, tperrno, tpstrerror(tperrno));
      exit(1);
   }
  .
  .
  .
}
 
Step 2 (Optional): Getting Key Handle Information
You may want to get information about a signer’s key handle to establish the validity of the key. To do so, call the tpkey_getinfo(3c) function or TPKEYGETINFO(3cbl) routine. While some of the information returned may be specific to a cryptographic service provider, a core set of attributes is common to all providers.
The default public key implementation supports the following signature modes for computing signatures on a message buffer:
The message digest algorithm is controlled by the DIGEST_ALG key attribute, and the public key signature is controlled by the SIGNATURE_ALG key attribute. Public key sizes from 512 to 2048 bits are supported, to allow a wide range of safety and performance options. The public key size is controlled by the SIGNATURE_BITS key attribute.
The default public key implementation recognizes only those digital certificate signatures that are created with these algorithm and key size choices.
Listing 3‑4 shows how to get information about a signer’s key handle.
Listing 3‑4 Getting Information About a Signer’s Key Handle Example
main(argc, argv)
int argc;
char *argv[];
#endif
{
   TPKEY sdo_key;
   char principal_name[PNAME_LEN];
   long pname_len = PNAME_LEN;
  .
  .
  .
   if (tpkey_getinfo(sdo_key, “PRINCIPAL”,
      principal_name, &pname_len, 0) == -1) {
      (void) fprintf(stdout, “Unable to get information
         about principal: %d(%s)\n”,
            tperrno, tpstrerror(tperrno));
  .
  .
  .
      exit(1);
   }
  .
  .
  .
}
 
Step 3 (Optional): Changing Key Handle Information
To set optional attributes associated with a signer’s key handle, call the tpkey_setinfo(3c) function or TPKEYSETINFO(3cbl) routine. Key handle attributes vary, depending on the cryptographic service provider.
The following example code shows how to change information associated with a signer’s key handle.
Listing 3‑5 Changing Information Associated with a Signer’s Key Handle Example
main(argc, argv)
int argc;
char *argv[];
#endif
{
   TPKEY sdo_key;
   static const unsigned char sha1_objid[] = {
      0x06, 0x05, 0x2b, 0x0e, 0x03, 0x02, 0x1a
   };
  .
  .
  .
   if (tpkey_setinfo(sdo_key, “DIGEST_ALG”, (void *) sha1_objid,
      sizeof(sha1_objid), 0) == -1) {
      (void) fprintf(stderr, “tpkey_setinfo failed
         tperrno=%d(%s)\n”,
            tperrno, tpstrerror(tperrno));
      return(1);
   }
  .
  .
  .
}
 
Step 4: Allocating a Buffer and Putting a Message in the Buffer
To allocate a typed message buffer, call the tpalloc(3c) function. Then put a message in the buffer.
Step 5: Marking the Buffer for Digital Signature
To mark, or register, the message buffer for digital signature, call the tpsign(3c) function. By calling this function, you attach a copy of the signer’s key handle to the message buffer. If you open the key with the TPKEY_AUTOSIGN flag, each message that you send is automatically marked for digital signature without an explicit call to tpsign(); signature parameters are stored and associated with the buffer for later use.
Note:
In COBOL applications, use the AUTOSIGN settings member to create a digital signature. See TPKEYOPEN(3cbl).
The following example code shows how to mark a message buffer for digital signature.
Listing 3‑6 Marking a Message Buffer For Digital Signature Example
main(argc, argv)
int argc;
char *argv[];
#endif
{
   TPKEY sdo_key;
   char *sendbuf, *rcvbuf;
  .
  .
  .
   if (tpsign(sendbuf, sdo_key, 0) == -1) {
      (void) fprintf(stderr, “tpsign failed tperrno=%d(%s)\n”,
         tperrno, tpstrerror(tperrno));
      tpfree(rcvbuf);
      tpfree(sendbuf);
      tpterm();
      (void) tpkey_close(sdo_key, 0);
      exit(1);
   }
  .
  .
  .
}
 
Step 6: Sending the Message
After the message buffer has been marked for digital signature, transmit the message buffer using one of the following C functions or COBOL routines:
tpcall() or TPCALL
tpbroadcast() or TPBROADCAST
tpconnect() or TPCONNECT
tpenqueue() or TPENQUEUE
tpnotify() or TPNOTIFY
tppost() or TPPOST
tpreturn() or TPRETURN
tpsend() or TPSEND
Step 7: Closing the Signer’s Key Handle
Call the tpkey_close(3c) function or TPKEYCLOSE(3cbl) routine to release the signer’s key handle and all resources associated with it.
How the System Generates a Digital Signature
Just before a message buffer is sent, the public key software digitally signs the message. If a signed buffer is transmitted more than once, the software generates a new signature for each communication. This process makes it possible to modify a message buffer after marking the buffer to be digitally signed.
The public key software generates a digital signature by performing the following three-step procedure.
1.
2.
3.
The notation digest[something] means that a hash value has been computed for something using a message digest algorithm—in this case, MD5 or SHA-1. The notation {something}key means that something has been encrypted or decrypted using key. In this case, the computed hash value is encrypted using the signer’s private key.
Signature Timestamp
A digital signature includes a timestamp from the local system’s clock. Inclusion of such a timestamp ensures that any tampering with the timestamp value will be detected when the recipient verifies the signature. In addition, a copy of the timestamp accompanies the digitally signed message when the message is routed to its destination.
Time resolution is to the second. Timestamps are stored in PKCS-9 SigningTime format.
Multiple Signatures
More than one signature can be associated with a message buffer, which means that any number of signers can sign a message buffer in parallel. A signer can be a person or a process. Each signer signs the message buffer using his, her, or its private key.
Different signatures may be based on different message digest or digital signature algorithms. If two signers use the same message digest and digital signature algorithm, the hash value is computed for only one of them.
Signed Message Content
A digitally signed message buffer is represented in the PKCS-7 format as a version 1 SignedData content type. The SignedData content type, as used by the Oracle Tuxedo system, consists of the following items:
As shown in Figure 3‑4, the message content is enveloped by SignedData content type.
Figure 3‑4 SignedData Content Type
How a Signed Message Is Received
No ATMI application code is needed to receive a signed message buffer. The public key software automatically verifies the attached digital signatures and passes the message to the receiving process.
Upon receiving a signed message buffer, the public key software, operating on behalf of the receiving process, performs the following tasks.
1.
2.
3.
a.
b.
The notation digest[something] means that a hash value has been computed for something using a message digest algorithm—in this case, MD5 or SHA-1.
4.
5.
6.
Note:
If none of the attached digital signatures can be verified, the receiving process does not receive the message buffer. Moreover, the receiving process has no knowledge of the message buffer.
Verifying Digital Signatures
The public key software automatically verifies digital signatures whenever a signed message buffer enters a client process, server process, or any system process that needs to access the content of the message buffer. If a system process is acting as a conduit (that is, if it is not reading the content of the message), then the attached digital signatures need not be verified. Bridges and workstation handlers (WSHs) are examples of system processes acting as conduits.
The signature timestamp is based on an unsynchronized clock, and therefore cannot be fully trusted, especially if the signature is performed on a PC or personal workstation. However, a server may reject requests with timestamps that are too old or dated too far into the future. The capability to reject a request based on the timestamp provides a measure of protection against replay attacks.
Verifying and Transmitting an Input Buffer’s Signatures
If a message buffer is passed to an ATMI function (such as tpacall()) as an input parameter, the public key software verifies any signatures previously attached to the message and then forwards the message. This behavior enables a secure, verified transfer of information with signatures from multiple processes.
If a server modifies a received message buffer and then forwards the buffer, the original signature is no longer valid. In this case, the public key software detects the invalid signature and silently discards it. For an example of the process, see “Discarding an Input Buffer’s Encryption Envelopes” on page 3‑47.
Replacing an Output Buffer’s Signatures
If a message buffer is passed to an ATMI function (such as tpgetreply()) as an output parameter, the public key software deletes any signature information associated with the buffer. This information includes any pending signatures and signatures from previous uses of the buffer. (A pending signature is a signature that is registered with a message buffer.)
New signature information might be associated with the new buffer content after successful completion of this operation.
See Also
Sending and Receiving Encrypted Messages
Message-based encryption provides end-to-end data privacy. For a diagram that illustrates how it works, see the figure “ATMI PKCS-7 End-to-End Encryption” on page 1‑42.
A message is encrypted just before it leaves the originating process, and remains encrypted until it is received by the final destination process. It is opaque at all intermediate transit points (including operating system message queues, system processes, and disk-based queues) and during network transmission over inter-server network links.
Writing Code to Send Encrypted Messages
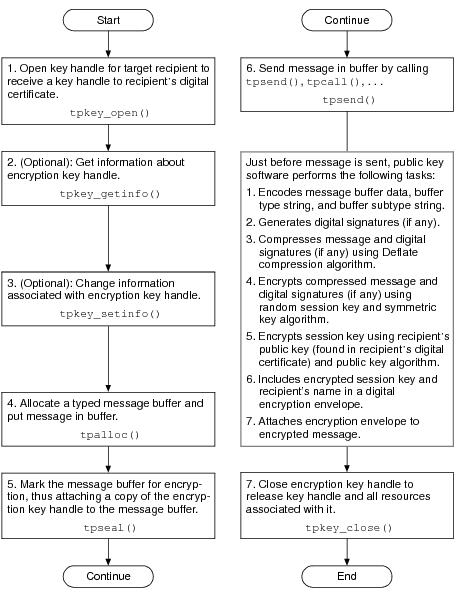
Figure 3‑5 provides the procedure for writing code to send encrypted messages.
Figure 3‑5 Procedure for Sending Encrypted Messages
For details about these steps and insight into how the system encrypts a message buffer, see the following topics.
Step 1: Opening a Key Handle for Encryption
Call the tpkey_open(3c) function or TPKEYOPEN(3cbl) routine to make the digital certificate of the target recipient available to the originating process. The target recipient might be a client, a service, a server group, a gateway group, a server machine, or an entire domain of servers.
When the originating process calls tpkey_open() to open the key handle, it specifies either the TPKEY_ENCRYPT or TPKEY_AUTOENCRYPT flag to indicate that the handle will be used to encrypt a message buffer. Typically, a client makes this call after calling tpinit(), and a server makes this call as part of initializing through tpsvrinit().
Opening a key handle with the TPKEY_AUTOENCRYPT flag enables automatic encryption: subsequently, the originating process encrypts message buffers automatically whenever they are sent. Using the TPKEY_AUTOENCRYPT flag is beneficial for three reasons:
Listing 3‑7 shows how to open an encryption key handle. TPKEY is a special data type defined in the atmi.h header file.
Listing 3‑7 Opening an Encryption Key Handle Example
main(argc, argv)
int argc;
char *argv[];
#endif
{
   TPKEY tu_key;
  .
  .
  .
   if (tpkey_open(&tu_key, “TOUPPER”, NULL,
      NULL, 0, TPKEY_ENCRYPT) == -1) {
      (void) fprintf(stderr, “tpkey_open tu failed
         tperrno=%d(%s)\n”, tperrno, tpstrerror(tperrno));
      exit(1);
   }
  .
  .
  .
}
 
Step 2 (Optional): Getting Key Handle Information
You may want to get information about an encryption key handle to establish the validity of the key. To do so, call the tpkey_getinfo(3c) function or TPKEYGETINFO(3cbl) routine. While some of the information returned may be specific to a cryptographic service provider, a core set of attributes is common to all providers.
The default public key implementation supports three algorithms for bulk data encryption of message content:
Encryption strength is controlled by the ENCRYPT_BITS key attribute, and the algorithm is controlled by the ENCRYPT_ALG key attribute. When an algorithm with fixed key length is set in ENCRYPT_ALG, the value of ENCRYPT_BITS is automatically adjusted to match.
Listing 3‑8 shows how to get information about an encryption key handle.
Listing 3‑8 Getting Information About an Encryption Key Handle Example
main(argc, argv)
int argc;
char *argv[];
#endif
{
   TPKEY tu_key;
   char principal_name[PNAME_LEN];
   long pname_len = PNAME_LEN;
  .
  .
  .
   if (tpkey_getinfo(tu_key, “PRINCIPAL”,
      principal_name, &pname_len, 0) == -1) {
      (void) fprintf(stdout, “Unable to get information
         about principal: %d(%s)\n”,
            tperrno, tpstrerror(tperrno));
  .
  .
  .
      exit(1);
   }
  .
  .
  .
}
 
Step 3 (Optional): Changing Key Handle Information
To set optional attributes associated with an encryption key handle, call the tpkey_setinfo(3c) function or TPKEYSETINFO(3cbl) routine. Key handle attributes vary, depending on the cryptographic service provider.
Listing 3‑9 shows how to change information associated with an encryption key handle.
Listing 3‑9 Changing Information Associated with an Encryption Key Handle Example
main(argc, argv)
int argc;
char *argv[];
#endif
{
   TPKEY tu_key;
   static const unsigned char rc2_objid[] = {
      0x06, 0x08, 0x2a, 0x86, 0x48, 0x86, 0xf7, 0x0d, 0x03, 0x02
   };
  .
  .
  .
   if (tpkey_setinfo(tu_key, “ENCRYPT_ALG”, (void *) rc2_objid,
      sizeof(rc2_objid), 0) == -1) {
      (void) fprintf(stderr, “tpkey_setinfo failed
         tperrno=%d(%s)\n”,
            tperrno, tpstrerror(tperrno));
      return(1);
   }
  .
  .
  .
}
 
Step 4: Allocating a Buffer and Putting a Message in the Buffer
To allocate a typed message buffer, call the tpalloc(3c) function. Then put a message in the buffer.
Step 5: Marking the Buffer for Encryption
To mark, or register, the message buffer for encryption, call the tpseal(3c) function. By calling this function, you attach a copy of the encryption key handle to the message buffer. If you open the key with the TPKEY_AUTOENCRYPT flag, each message that you send is automatically marked for encryption without an explicit call to tpseal().
Note:
In COBOL applications, use the AUTOENCRYPT settings member to encrypt a message buffer. See TPKEYOPEN(3cbl).
Listing 3‑10 shows how to mark a message buffer for encryption.
Listing 3‑10 Marking a Message Buffer for Encryption Example
main(argc, argv)
int argc;
char *argv[];
#endif
{
   TPKEY tu_key;
   char *sendbuf, *rcvbuf;
  .
  .
  .
   if (tpseal(sendbuf, tu_key, 0) == -1) {
      (void) fprintf(stderr, “tpseal failed tperrno=%d(%s)\n”,
         tperrno, tpstrerror(tperrno));
      tpfree(rcvbuf);
      tpfree(sendbuf);
      tpterm();
      (void) tpkey_close(tu_key, 0);
      exit(1);
   }
  .
  .
  .
}
 
Step 6: Sending the Message
After the message buffer has been marked for encryption, transmit the message buffer using one of the following C functions or COBOL routines:
tpcall() or TPCALL
tpbroadcast() or TPBROADCAST
tpconnect() or TPCONNECT
tpenqueue() or TPENQUEUE
tpnotify() or TPNOTIFY
tppost() or TPPOST
tpreturn() or TPRETURN
tpsend() or TPSEND
Step 7: Closing the Encryption Key Handle
Call the tpkey_close(3c) function or TPKEYCLOSE(3cbl) routine to release the encryption key handle and all resources associated with it.
How the System Encrypts a Message Buffer
Just before a message buffer is sent, the public key software encrypts the message and attaches an encryption envelope; the encryption envelope enables the target recipient to decrypt the message. If a sealed buffer is transmitted more than once, encryption is performed for each transmission. This process makes it possible to modify a message buffer after marking the buffer to be encrypted.
The public key software encrypts the content of the message buffer and generates an encryption envelope for the recipient of the encrypted message by performing the following two-step procedure.
1.
2.
The notation {something}key means that something has been encrypted or decrypted using key. In Step 1, a message buffer is encrypted using the session key, and in step 2, the session key is encrypted using the recipient’s public key.
Multiple Message Recipients
More than one encryption envelope can be associated with a message buffer, which means that multiple recipients, with different private keys, can receive and decrypt an encrypted message. A recipient can be a person or a process. When a message is encrypted for multiple recipients, it is encrypted only once, but the session key is encrypted with the public key of each recipient. All encryption envelopes are attached to the encrypted message.
If several encryption envelopes are associated with one message buffer, all of them must use the same symmetric key algorithm and the same key size for that algorithm.
Encrypted Message Content
An encrypted message buffer is represented in the PKCS-7 format as a version 0 EnvelopedData content type. The EnvelopedData content type, as used by the Oracle Tuxedo system, consists of the following items:
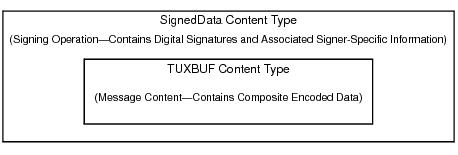
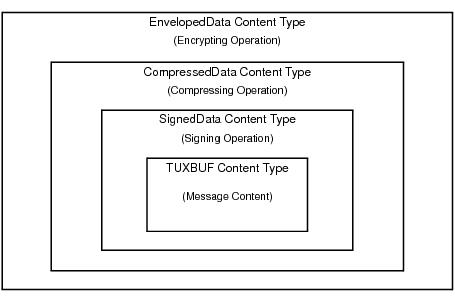
Figure 3‑6 shows the envelope hierarchy for the EnvelopedData content type. The SignedData content type is part of the hierarchy only if the message to which it belongs has one or more associated digital signatures.
Figure 3‑6 EnvelopedData Content Type
As shown in the preceding figure, a message buffer may be both signed and encrypted. No relationship is required between the number of digital signatures and the number of encryption envelopes associated with a message buffer.
When both processes are performed on a message buffer, signatures are generated first, on unencrypted data. The number of attached signatures and the identity of signing parties are then obscured by the bulk data encryption.
Note:
Writing Code to Receive Encrypted Messages
The procedure for writing code to receive encrypted messages consists of the following steps.
1.
Call tpkey_open() to open a key handle for the target recipient. tpkey_open returns a key handle to the recipient’s private key and digital certificate.
2.
(Optional): Call tpkey_getinfo() to get information about the decryption key handle.
3.
(Optional): Call tpkey_setinfo() to change information associated with the decryption key handle.
4.
Call tpkey_close() to close the decryption key handle. tpkey_close() releases the key handle and all resources associated with it.
For details about these steps and insight into how the system decrypts a message buffer, see the following topics.
Step 1: Opening a Key Handle for Decryption
Call the tpkey_open(3c) function or TPKEYOPEN(3cbl) routine to make the private key and the associated digital certificate of the target recipient available to the receiving process. The receiving process might be a client, a service, a server group, a gateway group, a server machine, or an entire domain of servers.
An application administrator can configure the ATMI application’s UBBCONFIG file such that decryption key handles are opened automatically when the ATMI application is booted. No more than one decryption key handle per server may be used with this method. See “Initializing Decryption Keys Through the Plug-ins” on page 2‑56 for details.
If an ATMI application is not configured to open a decryption key handle for the receiving process during booting, the receiving process initiates its own tpkey_open() call. Or, if the receiving process wants to open another decryption key handle, the receiving process makes an additional tpkey_open() call.
In order to access the target recipient’s private key, the receiving process must prove its right to act as the target recipient. Proof requirements depend on the implementation of the public key plug-in interface. The default public key implementation requires a secret password from the calling process.
When the receiving process calls tpkey_open() to open the key handle, it specifies the TPKEY_DECRYPT flag to indicate that the handle will be used to decrypt a message buffer. Typically, a client makes this call after calling tpinit(), and a server makes this call as part of initializing through tpsvrinit().
Listing 3‑11 shows how to open a decryption key handle. TPKEY is a special data type defined in the atmi.h header file.
Listing 3‑11 Opening a Decryption Key Handle Example
TPKEY tu_key;
tpsvrinit(argc, argv)
int argc;
char **argv;
#endif
{
   char  *tu_location;
  .
  .
  .
   if (tpkey_open(&tu_key, “TOUPPER”, tu_location,
      NULL, 0, TPKEY_DECRYPT) == -1) {
      userlog(“Unable to open private key: %d(%s)”,
         tperrno, tpstrerror(tperrno));
   return(-1)
   }
  .
  .
  .
}
 
Step 2 (Optional): Getting Key Handle Information
You may want to get information about a decryption key handle to establish the validity of the key. To do so, call the tpkey_getinfo(3c) function or TPKEYGETINFO(3cbl) routine. While some of the information returned may be specific to a cryptographic service provider, a core set of attributes is common to all providers.
Listing 3‑12 shows how to get information about a decryption key handle.
Listing 3‑12 Getting Information About a Decryption Key Handle Example
TPKEY tu_key;
tpsvrinit(argc, argv)
int argc;
char **argv;
#endif
{
   char principal_name[PNAME_LEN];
   long pname_len = PNAME_LEN;
  .
  .
  .
   if (tpkey_getinfo(tu_key, “PRINCIPAL”,
      principal_name, &pname_len, 0) == -1) {
      (void) fprintf(stdout, “Unable to get information
         about principal: %d(%s)\n”,
            tperrno, tpstrerror(tperrno));
  .
  .
  .
      exit(1);
   }
  .
  .
  .
}
 
Step 3 (Optional): Changing Key Handle Information
To set optional attributes associated with a decryption key handle, call the tpkey_setinfo(3c) function or TPKEYSETINFO(3cbl) routine. Key handle attributes vary, depending on the cryptographic service provider.
Listing 3‑13 shows how to change information associated with a decryption key handle.
Listing 3‑13 Changing Information Associated with a Decryption Key Handle Example
TPKEY tu_key;
tpsvrinit(argc, argv)
int argc;
char **argv;
#endif
{
   TM32U mybits = 128;
  .
  .
  .
   if (tpkey_setinfo(tu_key, “ENCRYPT_BITS”, &mybits,
      sizeof(mybits), 0) == -1) {
      (void) fprintf(stderr, “tpkey_setinfo failed
         tperrno=%d(%s)\n”,
            tperrno, tpstrerror(tperrno));
      return(1);
   }
  .
  .
  .
}
 
Step 4: Closing the Decryption Key Handle
Call the tpkey_close(3c) function or TPKEYCLOSE(3cbl) routine to release the decryption key handle and all resources associated with it.
How the System Decrypts a Message Buffer
The public key software automatically decrypts an encrypted message buffer whenever it enters an Oracle Tuxedo client process, server process, or any system process that needs to access the content of the message buffer. For automatic decryption to succeed, the receiving process must have opened a decryption key (type TPKEY_DECRYPT) corresponding to a recipient identified in one of the attached encryption envelopes.
Upon receiving an encrypted message, the public key software, operating on behalf of the receiving process, performs the following tasks.
1.
2.
3.
4.
5.
Verifies digital signatures if any. (See “How a Signed Message Is Received” on page 3‑31.)
6.
Note:
If none of the attached digital signatures can be verified or the message buffer cannot be decrypted, the receiving process does not receive the message buffer. Moreover, the receiving process has no knowledge of the message buffer.
If a system process is acting as a conduit (that is, if it is not reading the content of the message), then the message need not be decrypted. Bridges and workstation handlers (WSHs) are examples of system processes acting as conduits.
The WSH is a special example of a conduit. If a WSH is configured for data-dependent routing, it needs to read the received message buffer to determine how to route the buffer. The public key software makes a copy of the received message buffer, decrypts the copy, and then passes the decrypted copy to the WSH. The WSH analyzes the decrypted copy to determine how to route the buffer, and then routes the original message buffer unchanged to the appropriate server. (For more detail about the interaction between data-dependent routing and public key security, see “Compatibility/Interaction with Data-dependent Routing” on page 1‑61.)
Discarding an Input Buffer’s Encryption Envelopes
If a message buffer is passed to an ATMI function (such as tpacall()) as an input parameter, the public key software discards any encryption envelopes previously attached to the message. This behavior prevents the target recipients for the original message from receiving any modifications made by an intermediate process.
As an example of this process, consider the scenario shown in Figure 3‑7.
Figure 3‑7 Forwarding a Signed and Encrypted Message Example
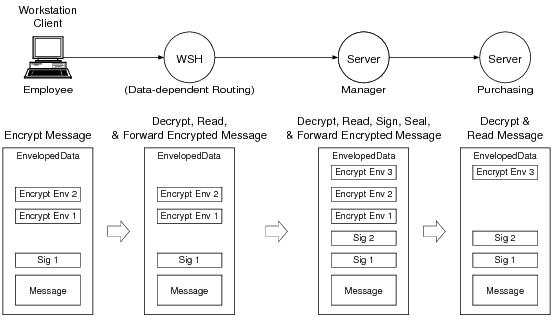
A server process named Manager receives a signed and encrypted message buffer from a client process named Employee, decrypts and reads the received message buffer, signs and seals it for a service named Purchasing, and then forwards the message to Purchasing.
The following is a detailed description of how this operation is performed.
1.
The WSH process is configured for data-dependent routing, which is briefly described in “How the System Decrypts a Message Buffer” on page 3‑46. The public key software uses a decryption key previously opened for the WSH process to decrypt a copy of the received message buffer, and then passes the decrypted copy to the WSH. After analyzing the decrypted copy, the WSH routes the received message buffer to the Manager process as is.
If the WSH process is not configured for data-dependent routing, the Employee process does not need to tpseal() the message buffer for the WSH process, and the WSH process does not need to open a decryption key.
Regardless of how it is configured, the WSH does not verify digital signatures.
2.
When the message buffer arrives at the Manager process, the public key software:
a.
b.
c.
Passes the message without digital signature or encryption information to the Manager.
When a process receives a message buffer, it receives only the message content. Any digital signatures or encryption envelopes associated with the message buffer are not included.
3.
The Manager calls tpenvelope() repeatedly to find out about the digital signature and encryption information associated with the message buffer. tpenvelope() returns:
4.
The Manager calls tpkey_getinfo() with the signer’s public key as an argument, to obtain more information about the signer, including the signer’s principal name.
5.
If the Manager determines that the signer is a known employee and that the employee’s request (as stated in the message content) is valid, the Manager proceeds as follows.
a.
Calls tpsign() to mark the message buffer for digital signature by the Manager.
a.
Calls tpseal() to mark the message buffer to be encrypted for Purchasing.
b.
Calls tpforward() (or some other function used to transmit data) to send the message to Purchasing.
Just before the message is transmitted, the public key software performs the following tasks.
1.
2.
3.
4.
Replacing an Output Buffer’s Encryption Envelopes
If a message buffer is passed to an ATMI function (such as tpgetrply()) as an output parameter, the public key software deletes any encryption information associated with the buffer. This information includes any pending seals, or seals from previous uses of the buffer. (A pending seal is a recipient’s seal that is registered with a message buffer.)
New encryption information might be associated with the new buffer content after successful completion of the operation.
See Also
Examining Digital Signature and Encryption Information
The public key software maintains the order in which:
A process obtains this information by calling the tpenvelope() function with the target message buffer as an argument. tpenvelope() is described on the tpenvelope(3c) reference page in the Oracle Tuxedo ATMI C Function Reference.
There may be multiple occurrences of digital-signature registration requests, digital signatures, encryption registration requests, and encryption envelopes associated with a message buffer. The occurrences are stored in sequence, with the first item at the zero position and subsequent items in consecutive positions. The occurrence input parameter for tpenvelope() indicates which item is being requested. When the value of occurrence is beyond the position of the last item, tpenvelope() fails with the TPENOENT error condition. A process can examine all items by calling tpenvelope() repeatedly until TPENOENT is returned.
In an originating process, digital signature and encryption information is generally in a pending state, waiting until the message is sent. In a receiving process, digital signatures have already been verified, and encryption and decryption have already been performed.
What Happens When an Originating Process Calls tpenvelope
When an originating process calls tpenvelope() with the originating message buffer as an argument, tpenvelope() reports:
Any digital signature request explicitly registered with the message buffer as being in the TPSIGN_PENDING state. The originating process explicitly registers a digital signature request by calling the tpsign(3c) function.
Any digital signature request implicitly registered with the message buffer as also being in the TPSIGN_PENDING state. The originating process implicitly registers a digital signature request by calling tpkey_open(3c) with the TPKEY_AUTOSIGN flag specified.
Any encryption (seal) request explicitly registered with the message buffer as being in the TPSEAL_PENDING state. The originating process explicitly registers an encryption request by calling the tpseal(3c) function.
Any encryption (seal) request implicitly registered with the message buffer as also being in the TPSEAL_PENDING state. The originating process implicitly registers an encryption request by calling tpkey_open() with the TPKEY_AUTOENCRYPT flag specified.
In addition to the status, tpenvelope() returns the key handle associated with a digital signature or encryption registration request. A process can call the tpkey_getinfo(3c) function with the key handle as an argument, to get more information about the key handle.
What Happens When a Receiving Process Calls tpenvelope
When a process receives a message buffer, it receives only the message content. Any digital signatures or encryption envelopes associated with the message buffer are not included. The receiving process must call tpenvelope() to obtain information about any attached digital signatures or encryption envelopes.
When a receiving process calls tpenvelope() with the received message buffer as an argument, tpenvelope() reports:
Digital signature has been verified.
Digital signature is not valid because the content of the message buffer has been altered.
Digital signature is not valid because the signer’s digital certificate has been altered.
Digital signature is not valid because the signer’s digital certificate has been revoked.
Digital signature is not valid because its timestamp is too far into the future.
Digital signature is not valid because the signer’s digital certificate has expired.
Digital signature is not valid because its timestamp is too old.
Digital signature is not valid because the signer’s digital certificate was issued by an unknown Certification Authority (CA).
Encryption envelope is valid.
Encryption envelope is not valid because the target recipient’s digital certificate has been altered. (Target recipient will not receive the message buffer.)
Encryption envelope is not valid because the target recipient’s digital certificate has been revoked. (Target recipient will not receive the message buffer.)
Encryption envelope is not valid because the target recipient’s digital certificate has expired. (Target recipient will not receive the message buffer.)
Encryption envelope is not valid because the target recipient’s digital certificate was issued by an unknown CA. (Target recipient will not receive the message buffer.)
In addition to the status, tpenvelope() returns the key handle associated with a digital signature or encryption envelope. A process can call the tpkey_getinfo(3c) function with the key handle as an argument, to get more information about the key handle.
If a receiving process calls tpsign() to register a digital signature request after receiving the message buffer, tpenvelope() reports the status of the registration as TPSIGN_PENDING. Similarly, if a receiving process calls tpseal() to register an encryption (seal) request after receiving the message buffer, tpenvelope() reports the status of the registration as TPSEAL_PENDING.
If a receiving process modifies the content of a signed message buffer after receiving it, the attached signatures are no longer valid. As a result, tpenvelope() cannot verify the signatures, and reports a signature status of TPSIGN_TAMPERED_MESSAGE.
Understanding the Composite Signature Status
For a message buffer with multiple digital signatures, the public key software calls an internal function equivalent to tpenvelope() to examine the state of each digital signature. Then, by observing certain rules, the public key software forms a composite signature status. The rules for forming a composite signature status are shown in Table 3‑4.
 
Any incoming message buffer without a composite signature status of TPSIGN_OK or TPSIGN_UNKNOWN is discarded as if it were never received. If the SIGNATURE_REQUIRED parameter is set to Y (yes) in the ATMI application’s UBBCONFIG file, then any incoming message buffer without a composite signature status of TPSIGN_OK is discarded as if it were never received. See “Enforcing the Signature Policy for Incoming Messages” on page 2‑50 for more detail.
An exception to the handling of signed message buffers described in the previous paragraph is the tpimport(3c) function. The tpimport(3c) function delivers an incoming message buffer regardless of the composite signature status.
Example Code for tpenvelope
Listing 3‑14 shows how to use tpenvelope() to examine the digital signature and encryption information associated with a message buffer.
Listing 3‑14 Using tpenvelope Example
main(argc, argv)
int argc;
char *argv[];
#endif
{
   TPKEY tu_key;
   TPKEY sdo_key;
   TPKEY output_key;
   char *sendbuf, *rcvbuf;
   int ret;
   int occurrence = 0;
   long status;
   char principal_name[PNAME_LEN];
   long pname_len = PNAME_LEN;
   int found = 0;
  .
  .
  .
   output_key = NULL;
   ret = tpenvelope(rcvbuf, 0, occurrence, &output_key,
      &status, NULL, 0);
   while (ret != -1) {
      if (status == TPSIGN_OK) {
         if (tpkey_getinfo(output_key, “PRINCIPAL”,
            principal_name, &pname_len, 0) == -1) {
            (void) fprintf(stdout, “Unable to get information
               about principal: %d(%s)\n”,
                  tperrno, tpstrerror(tperrno));
            tpfree(sendbuf);
            tpfree(rcvbuf);
            tpterm();
            (void) tpkey_close(tu_key, 0);
            (void) tpkey_close(sdo_key, 0);
            (void) tpkey_close(output_key, 0);
            exit(1);
         }
         /* Do not forget to free resources */
         (void) tpkey_close(output_key, 0);
         output_key = NULL;
         found = 1;
         break;
      }
      /* Do not forget to free resources */
      (void) tpkey_close(output_key, 0);
      output_key = NULL;
      occurrence++;
      ret = tpenvelope(rcvbuf, 0, occurrence, &output_key,
         &status, NULL, 0);
   }
  .
  .
  .
}
 
See Also
Externalizing Typed Message Buffers
An externalized representation is a message buffer that does not include any ATMI header information that is normally added to a message buffer just before the buffer is transmitted. An externalized representation of a signed message buffer enables “pass through” transmission of signed data and long-term storage of the signed buffer for non-repudiation. It also enables an encrypted message buffer to be transported through intermediate processes without access to a decryption key.
How to Create an Externalized Representation
An ATMI process converts a typed message buffer into an externalized representation by calling the tpexport(3c) function. Pending signatures associated with a message buffer are generated at the time tpexport() is called, just as if the buffer were being transmitted to another process by an ATMI function. Similarly, pending seals associated with a message buffer are generated at the time tpexport() is called, just as if the buffer were being transmitted to another process by an ATMI communication function.
The externalized representation of a message buffer is stored in the PKCS-7 format, which is a binary format. If a string format is required, the calling process must call tpexport() with the TPEX_STRING flag specified.
Note:
The ability to create an externalized representation of a typed message buffer is not unique to public key security. A process may call tpexport() to externalize a typed message buffer regardless of whether a message buffer is marked for digital signature or encryption.
How to Convert an Externalized Representation
A receiving process calls the tpimport(3c) function to convert the externalized representation of a message buffer into a typed message buffer. The tpimport() function also performs decryption, if necessary, and verifies any associated digital signatures.
Example Code for tpexport and tpimport
Listing 3‑15 shows how to use tpexport() to convert a typed message buffer into an externalized representation, and how to use tpimport() to convert the externalized representation back into a typed message buffer.
Listing 3‑15 Using tpexport and tpimport Example
static void hexdump _((unsigned char *, long));
#define MAX_BUFFER 80000
main(argc, argv)
int argc;
char *argv[];
#endif
{
   char  *databuf;
   char  exportbuf[MAX_BUFFER];
   long  exportbuf_size = 0;
   char  *importbuf = NULL;
   long  importbuf_size = 0;
   int go_on = 1;
  .
  .
  .
   exportbuf_size = 0;
   while (go_on == 1) {
      if (tpexport(databuf, 0, exportbuf, &exportbuf_size, 0)
         == -1) {
         if (tperrno == TPELIMIT) {
            printf(“%d tperrno is TPELIMIT, exportbuf_size=%ld\n”,
               __LINE__, exportbuf_size);
            if (exportbuf_size > MAX_BUFFER) {
               return(1);
            }
         }
         else {
            printf(“tpexport(%d) failed: tperrno=%d(%s)\n”,
               __LINE__, tperrno, tpstrerror(tperrno));
            return(1);
         }
      }
      else {
         go_on = 0;
      }
   }
  .
  .
  .
   hexdump((unsigned char *) exportbuf, (long) exportbuf_size);
   if (tpimport(exportbuf, exportbuf_size, &importbuf,
      &importbuf_size, 0) == -1) {
      printf(“tpimport(%d) failed: tperrno=%d(%s)\n”,
         __LINE__, tperrno, tpstrerror(tperrno));
      return(1);
   }
  .
  .
  .
}
 
See Also

Copyright © 1994, 2017, Oracle and/or its affiliates. All rights reserved.