2 Synchronization
The mobile client database contains a subset of data stored in the Oracle database. This subset is stored in snapshots in the mobile client database. Unlike a base table, a snapshot keeps track of changes made to it in a change log. Users can make changes in the mobile client database and can synchronize these with the Oracle database.
The following sections describe how synchronization functions between the mobile clients and an Oracle database using the mobile server. This chapter discusses how you can programmatically initiate the synchronization both from the client or the server side.
-
Section 2.1, "How Oracle Database Mobile Server Synchronizes"
-
Section 2.3, "What is The Process for Setting Up a User For Synchronization?"
-
Section 2.4, "Creating Publications Using Oracle Database Mobile Server APIs"
-
Section 2.7, "Customize What Occurs Before and After Synchronization Phases"
-
Section 2.11, "Using the Sync Discovery API to Retrieve Statistics"
-
Section 2.12, "Customizing Synchronization With Your Own Queues"
-
Section 2.15, "Register a Remote Oracle Database for Application Data"
-
Section 2.16, "Create a Synonym for Remote Database Link Support For a Publication Item"
-
Section 2.20, "Set DBA or Operational Privileges for the Mobile Server"
2.1 How Oracle Database Mobile Server Synchronizes
In Oracle Database Mobile Server, the synchronization is used for multiple clients—rather than a single user. In order to accommodate a large number of concurrent users, the application tables on the back-end database cannot be locked by a single user. Thus, the synchronization process involves using queues to manage the information between the mobile clients and the application tables in the database.
Oracle Database Mobile Server uses a synchronization model that maintains data integrity between the mobile server and the mobile client. In addition, the synchronization is asynchronous and that as a result, change propagation is not immediate. The benefit, however, is that the clients do not stay connected for long while the changes are being applied.
You can specify if the synchronization occurs automatically or by manual request. For more details, see Section 2.1.3, "Deciding on Automatic or Manual Synchronization".
A simplified view of synchronization is as follows:
-
On the client—The mobile application communicates through the Sync Server with the mobile server and uploads the changes made in the client machine. It then downloads the changes for the client that are already prepared by the mobile server.
-
On the mobile server—A background process called the Message Generator and Processor (MGP), which runs in the same tier as the mobile server, periodically collects all the uploaded changes from many mobile users and then applies them to the server database. Next, MGP prepares changes that need to be sent to each mobile user. This step is essential because the next time the mobile user synchronizes with the mobile server, these changes can be downloaded to the client and applied to the client database.
Figure 2-1 illustrates the architecture for Oracle Database Mobile Server applications.
Note:
This section describes how the synchronization is performed across several components and enterprise tiers to complete successfully. For more details on each component, see Section 1.2, "Oracle Database Mobile Server Application Model and Architecture".Figure 2-1 Oracle Database Mobile Server Architecture
Description of "Figure 2-1 Oracle Database Mobile Server Architecture"
The mobile server replicates data between the mobile clients with their client databases and the application tables, which are stored on a back-end Oracle database.
Thus, the more detailed description of how synchronization is performed within the separate components of Oracle Database Mobile Server is demonstrated by Figure 2-2.
Figure 2-2 Data Synchronization Architecture
Description of "Figure 2-2 Data Synchronization Architecture"
-
A synchronization is initiated on the mobile client either by the user or from automatic synchronization.
-
The mobile client software gathers all of the client changes into a transaction and the Sync Client uploads the transaction to the Sync Server on the mobile server.
-
Sync Server places the transaction into the In-Queue.
Note:
When packaging your application, you can specify if the transaction is to be applied at the same time as the synchronization. If you set this option, then the transaction is immediately applied to the application tables. However, note that this may not be scaleable and you should only do this if the application of the transaction immediately is important and you have enough resources to handle the load. -
Sync Server gathers all transactions destined for the mobile client from the Out-Queue.
-
The mobile client applies all changes for client database. If this is the first synchronization, the client database is created.
-
All transactions uploaded by all mobile clients are gathered by the MGP out of the In-Queue. The MGP executes independently and periodically based upon an interval specified in the Job Scheduler in the mobile server.
-
The MGP executes the apply phase by applying all transactions for the mobile clients to their respective application tables to the back-end Oracle database. The MGP commits after processing each publication. If any conflicts occur during this phase, most are resolved by the MGP or by the conflict resolution rules. If the conflict cannot be resolved, the transaction is moved into the Error Queue. See Section 1.3.1, "Defining the Weight and Conflict Resolution for Publication Items" for more information.
Note:
The behavior of the apply/compose phase can be modified. See Section 5.1.1, "Defining Behavior of Apply/Compose Phase for Synchronization" in the Oracle Database Mobile Server Administration and Deployment Guide for more information. -
MGP executes the compose phase by gathering the client data into outgoing transactions for mobile clients.
-
MGP places the composed data for mobile clients into the Out-Queue, where the Sync Server downloads these updates to the client on the next client synchronization.
Overall, synchronization involves two parties: the mobile client using the Sync Client/Server to upload and download changes and the MGP process interacting with the queues and the application tables to apply and compose transactions. These are displayed separately in the Data Synchronization section of the Mobile Manager.
The following sections describe synchronization activity:
-
Section 2.1.1, "Mobile Client Database Created on First Synchronization"
-
Section 2.1.2, "Using Multiple Databases for Application Data"
-
Section 2.1.3, "Deciding on Automatic or Manual Synchronization"
-
Section 2.1.5, "Synchronizing to a File With File-Based Sync"
-
Section 2.1.6, "How Downloaded Data is Processed on the Mobile Client"
-
Section 2.1.7, "How Updates Are Propagated to the Back-End Database"
2.1.1 Mobile Client Database Created on First Synchronization
When a user synchronizes a mobile client for the first time, the mobile client creates a database on the client machine for each subscription that is provisioned to the user. The mobile client then creates a snapshot in this database for each publication item contained in the subscription, and populates it with data retrieved from the server database by running the SQL query (with all the variables bound) associated with the publication item. Once installed, Oracle Database Mobile Server is transparent to the end user; it requires minimal tuning or administration.
As the user accesses and uses the application, changes made to the data in the client database are captured by the snapshots. When the connection to the mobile server is available, the changes can be synchronized with the mobile server.
2.1.2 Using Multiple Databases for Application Data
By default, the repository metadata and the application data are stored on the same database. However, if for performance or other reasons, you may store application data on a separate database other than the main database where the repository exists. In this manner, the repository exists on the main database and the data for one or more applications may exist on the main database or another database of your choosing.
Figure 2-3 Separating Application Data from Repository
Description of "Figure 2-3 Separating Application Data from Repository"
You can register one or more databases to host the application data. Once registered, you can specify during publication creation where to host the application data. Synchronization is executed on a per publication basis rotating through the databases.
2.1.3 Deciding on Automatic or Manual Synchronization
In the past, all that was available was manual synchronization. That is, a client manually requests a synchronization either through an application program executing an API or by a user manually pushing the Sync button.
Currently, you can configure for synchronization to automatically occur under specific circumstances and conditions. When these conditions are met, then Oracle Database Mobile Server automatically performs the synchronization for you without locking your database, so you can continue to work while the synchronization happens in the background. This way, synchronization can happen seamlessly without the client's knowledge.
Note:
Automatic synchronization is enabled on per-publication basis. A publication can be enabled for automatic synchronization. The publications that are not enabled for automatic synchronization can only be synchronized manually. A publication contains one or more publication items that can be marked as either manual or automatic.Currently, you can enable automatic synchronization for a publication by marking one or more of its publication items automatic. Once you do that, all publication items within that publication are synchronized automatically. A publication without automatic publication items is enabled only for manual synchronization.
Manual Synchronization may be initiated, as follows:
-
The user initiates the Mobile Sync (mSync) application directly.
-
The application programmatically invokes the Mobile Sync API.
Automatic Synchronization can be configured to automatically occur under specific circumstances and conditions. When these conditions are met, then Oracle Database Mobile Server automatically performs the synchronization for you without locking your database, so you can continue to work while the synchronization happens in the background. This way, synchronization can happen seamlessly without the client's knowledge.
For example, you may choose to enable automatic synchronization for the following scenarios:
-
If you have a user who changes data on their handheld device, but does not sync as often as you would prefer.
-
If you have multiple users who all sync at the same time and overload your system.
These are just a few examples of how automatic synchronization can make managing your data easier, be more timely, and occur at the moment you need it to be uploaded.
Synchronization is closely tied to how you define the snapshot for your application. See Section 1.3, "Creating the Publish-Subscribe Model for Mobile Users" for a description of a snapshot and its components. One of the components is a publication item. If you want automatic synchronization, you define it at the publication item level.
Note:
When a manual synchronization is requested by the client, ALL publications are synchronized at that time - including those defined as manual and automatic synchronization.The differences between the two types of synchronization are as follows:
Table 2-1 Difference Between Automatic and Manual Synchronization
| Manual Synchronization | Automatic Synchronization | |
|---|---|---|
|
Initiation |
After the snapshot is set up, you can initiate either by the user initiating mSync or by an application invoking one of the synchronization APIs. |
All of the set up for automatic synchronization is configured. Once configured, it happens automatically, so there is no synchronization API. Configuration for automatic synchronization can be defined when you create the publication item, publication or the platform. |
|
Controlling synchronization |
Synchronization occurs exactly when the user/application requests it. |
Synchronization occurs without the user being aware of it occurring. You can start, stop, pause, resume and query the status of automatic synchronization using Sync Agent Control APIs. For more information see, Section 3.2, "Manage Automatic Synchronization on the Mobile Client" |
|
All |
The following objects are not synchronized by an automatic synchronization: sequences, DDL scripts, indexes and automatic synchronization rules and conditions. |
Manual synchronization supports selective sync option where the user can choose which publications need to be synchronized instead of synchronizing all publications on the client. See Section 3.1.1.1.4, "Selective Synchronization".
Automatic synchronization also uses selective sync, but this is done automatically without user's interference. Automatic synchronization is driven by rules: events and conditions, which determine if, when and which publications need to be synchronized. See Section 2.2.2, "Define the Rules Under Which the Automatic Synchronization Starts"for details on events and conditions.
2.1.3.1 Synchronization Priorities
Sometimes, some data records may need to be sent from client to server and from server to client in more expedient manner than the rest of the data. In other words, some data may have higher priority and needs to be synchronized first without having to wait for the rest of the data. Synchronization allows to define the priority of data for every record. Two priorities are supported: high and normal. Usually most of the data is of normal priority and only some data is of high priority. Data priority can be set on per-record basis. See Section 3.5.1.2, "Data Priority Handling" of the Mobile Client Guide on how to set record priorities on the client.Both manual and automatic synchronization support priority setting: high priority sync synchronizes only records of high priority and normal priority sync synchronizes all records including high and normal priorities. Section 3.1, "Invoke Manual Synchronization on the Mobile Client" indicates how sync priority can be set in all types of manual synchronization that the APIs supported.Automatic synchronization manages sync priority using different rules for high and normal priority data: high priority rules and normal priority rules. Usually high priority rules are defined such that they allow high priority data to be synchronized quicker. For example, there may be a network condition rule that restricts normal priority synchronization to a time where high network bandwidth is available. But same kind of rule for high priority synchronization may allow synchronization with any network bandwidth. For more information see, Section 2.2.2, "Define the Rules Under Which the Automatic Synchronization Starts".
2.1.4 Deciding on Synchronization Refresh Option
How or when data changes are applied to either the mobile server or the mobile client depends upon the synchronization refresh option at the publication item level. Synchronization refresh options may ease the cost burden for resources, such as wireless connectivity, bandwidth and network availability, personnel loss of time during the synchronization process, and so on.
Oracle Database Mobile Server employs synchronization refresh options that may be utilized to synchronize data between the Oracle enterprise database and the mobile client. With the following Oracle Database Mobile Server refresh options, you can maintain data accuracy and integrity between the Oracle database and mobile client:
2.1.4.1 Fast Refresh
The most common method of synchronization is a fast refresh publication item where changes are uploaded and downloaded by the client. Meanwhile, the MGP periodically collects changes uploaded by all clients and applies them to the back-end Oracle database tables. Then, the MGP composes new data, ready to be downloaded to each client during the next synchronization, based on pre-defined subscriptions.
2.1.4.2 Complete Refresh
During a complete refresh, all data for a publication is downloaded to the client. For example, during the first synchronization session, all data on the client is refreshed from the Oracle database. This form of synchronization takes longer because all rows that qualify for a subscription are transferred to the client device, regardless of existing client data.
The complete refresh model is resource intensive as all aspects of synchronization are performed. This model should only be utilized for snapshots/publication items where it is an absolute requirement.
2.1.4.3 Queue-Based Refresh
The developer creates their own queues to handle the synchronization data transfer. There is no synchronization logic created with a queue-based refresh; instead, the synchronization logic is implemented solely by the developer. A queue-based publication item is ideally suited for scenarios that require synchronization to behave in a different manner than normally executed. For instance, data collection on the client; all data is collected on the client and pushed to the server.
With data collection, there is no need to worry about conflict detection, client state information, or server-side updates. Therefore, there is no need to add the additional overhead normally associated with a fast refresh or complete refresh publication item.
2.1.4.4 Forced Refresh
This is not a refresh option; however, we discuss it here because it is often mistaken for a refresh option—specifically, it is often confused with the complete refresh option. The Forced Refresh is a one-time execution request made from within Mobile Manager, the GUI interface for the mobile server. The forced refresh option may result in a loss of critical data on the client.
The forced refresh option is an emergency only synchronization option. This option is used when a client is corrupt or malfunctioning, so that you decide to replace the mobile client data with a fresh copy of data from the enterprise data store with the forced refresh. When this option is selected, any data transactions that have been made on the client are lost.
When a forced refresh is initiated all data on the client is removed. The client then brings down an accurate copy of the client data from the enterprise database to start fresh with exactly what is currently stored in the enterprise data store.
2.1.5 Synchronizing to a File With File-Based Sync
There are times when you do not have network access to the mobile server, but there is a way you can use removable media to transport a file between the mobile server and the client. In this instance, you may want to use File-Based Sync, which saves all transactions in an encrypted file either for the upload from the client for the mobile server or the download from the mobile server for the client.
Once saved within the encrypted file, the file is manually transported and copied onto the desired recipient—whether mobile client or mobile server. This file is uploaded and the normal synchronization steps are performed. The only difference is that the interim transmission of the data is through a file copied to the correct machine—rather than transmitted over a network.
For full details on file-based synchronization, see Section 5.10, "Synchronizing to a File with File-Based Sync" in the Oracle Database Mobile Server Administration and Deployment Guide. To enable and perform file-based synchronization through the APIs, see Chapter 3, "Managing Synchronization on the Mobile Client".
2.1.6 How Downloaded Data is Processed on the Mobile Client
The client processes the downloaded data. By default, the steps taken to process the received data on the client is as follows:
-
Process each publication item
-
Commit
-
Process each DDL statement
-
Commit
Note:
The acknowledgment is sent only in the subsequent synchronization.In addition, the configuration could effect how the data is processed on the client. Low memory may cause a commit before all of the publication items are processed. If the client is on a WIN32 device and available memory is running low, then an auto commit is performed. However, if the client is on a Windows Mobile device and if memory is getting low, the synchronization throws and error and exits error. In this situation, the commit is not performed.
2.1.7 How Updates Are Propagated to the Back-End Database
The synchronization process applies client operations to the tables in the back-end database, as follows:
-
The operations for each publication item are processed according to table weight. The publication creator assigns the table weight to publication items within a specific publication. This value can be an integer between 1 and 1023. For example, a publication can have more than one publication item of weight "2" which would have
INSERToperations performed after those for any publication item of a lower weight within the same publication. You define the order weight for tables when you add a publication item to the publication. See Section 2.4.1.7.2, "Using Table Weight" for more information. -
Within each publication item being processed, the SQL operations are processed as follows:
-
Client
INSERToperations are executed first, from lowest to highest table weight order. -
Client
DELETEoperations are executed next, from highest to lowest table weight order. -
Client
UPDATEoperations are executed last, from highest to lowest table weight order.
-
For details and an example of exactly how the weights and SQL operations are processed, see Section 2.4.1.7.2, "Using Table Weight".
Note:
This order of executing operations can cause constraint violations. See Section 2.9, "Synchronizing With Database Constraints" for more information.In addition, the order in which SQL statements are executed against the client database is not the same as how synchronization propagates these modifications. Instead, synchronization captures the end result of all SQL modifications as follows:
-
Insert an employee record 4 with name of Joe Judson.
-
Update employee record 4 with address.
-
Update employee record 4 with salary.
-
Update employee record 4 with office number
-
Update employee record 4 with work email address.
When synchronization occurs, all modifications are captured and only a single insert is performed on the back-end database. The insert contains the primary key, name, address, salary, office number and email address. Even though the data was created with multiple updates, the Sync Server only takes the final result and makes a single insert.
2.1.8 Oracle Database Mobile Server (DMS) Encryption
DMS combines RSA asymmetric encryption with the 128-bit Advanced Encryption Standard (AES). RSA public/private key encryption is used to transport user credentials and session key info, while the data payload itself is encrypted with AES. This allows for both fast and secure mobile data exchange. The communication between the client and the server is initiated by the client with the following message format:
[RSA_HEADER(usr/pwd/session_key)][ENCRYPTED_PAYLOAD]
In the formula above, RSA_HEADER contains a mobile client's username, password, as well as a session key. While the username and password are provided by the client, each session key is randomly generated. The key is calculated using cryptographically-safe random number generator where the choice of the generator is OS-dependent. Combined username, password and session key are encrypted using the server's public key.
ENCRYPTED_PAYLOAD is encrypted with the 128-bit AES algorithm in Cipher-Block Chaining (CBC ) mode using session_key included in the RSA_HEADER. The server, upon receiving a client's encrypted request, decrypts the RSA_HEADER with the server's private key, authenticates the client based on the included credentials, and finally decrypts the ENCRYPTED_PAYLOAD using the included session_key.
The server's response to the client is then encrypted with the same session_key.
Note:
Both RSA and AES encryptions are FIPS 140-2 approved.Note:
The user can select either SSL or AES for data encryption.2.2 Enabling Automatic Synchronization
Automatic synchronization occurs in the background, so that the user does not have to perform a synchronization; thus, the client appears continually connected to the back-end database without user interaction. All modifications to each record are saved in a log within the client database. When you requested synchronization manually, Oracle Database Mobile Server locked the database while processing your request. However, with automatic synchronization, it could be occurring while you are performing other tasks to the client database.
When synchronization occurs, all of the modified records stored in the log are uploaded to the server. In addition, any modified records from the server are downloaded into the client database. This occurs in the same manner as manual synchronization. The only difference is when the synchronization is executed and how the modified records are stored.
The following are details about automatic synchronization:
Table 2-2 Automatic Synchronization
| Steps for Automatic Synchronization | See the Following for Details |
|---|---|
|
The developer enables the publication item to use automatic synchronization. |
Section 2.2.1, "Enable Automatic Synchronization at the Publication Level" |
|
The client can disable and enable automatic synchronization with the Sync Control API. |
Section 3.2, "Manage Automatic Synchronization on the Mobile Client" |
|
You can configure under what rules the automatic synchronization occurs. |
Section 2.2.2, "Define the Rules Under Which the Automatic Synchronization Starts" |
|
The server can notify the client of data waiting for download. |
Section 2.12.3, "Selecting How and When to Notify Clients of Composed Data" |
|
The client application can request status of the outcome of an automatic synchronization. |
Section 2.2.4, "Retrieve Status for Automatic Synchronization Events" |
The following sections detail how you can configure for automatic synchronization:
-
Section 2.2.1, "Enable Automatic Synchronization at the Publication Level"
-
Section 2.2.2, "Define the Rules Under Which the Automatic Synchronization Starts"
-
Section 2.2.4, "Retrieve Status for Automatic Synchronization Events"
2.2.1 Enable Automatic Synchronization at the Publication Level
Automatic synchronization can be enabled at publication level. Within a publication, you can have one or more publication items. If automatic synchronization is enabled for one of the publication items, by default all the publication items in the same publication would be enabled with automatic synchronization.
Do not define a publication where some of the publication items are automatic synchronization enabled but the others are not. See Section 4.4, "Create a Publication Item" for details of how to enable synchronization in a publication item using MDW or Section 2.4.1.3, "Create Publication Items"using the API.
To manage automatic synchronization, see Section 3.2, "Manage Automatic Synchronization on the Mobile Client".
2.2.2 Define the Rules Under Which the Automatic Synchronization Starts
You can configure under what circumstances a synchronization should occur and then Oracle Database Mobile Server performs the synchronization for you automatically. The circumstances under which an automatic synchronization occurs is defined within the synchronization rules, which includes the following:
-
Events—An event is variable, as follows:
-
Data events: For example, you can specify that a synchronization occurs when there are a certain number of modified records in the client database.
-
System events: For example, you can specify that if the battery drops below a predefined minimum, you want to synchronize before the battery is depleted.
-
-
Conditions—A condition is an aspect of the client that needs to be present for a synchronization to occur. This includes conditions such as battery life or network availability.
The relationship between events and conditions when evaluating if an automatic synchronization occurs is as follows:
when EVENT and if (CONDITIONS), then SYNC
So, if an event occurs, the conditions are evaluated. If the conditions are valid, then the synchronization occurs; if the conditions are not met, then the synchronization is queued until the conditions are valid.
For example, if the event for new data inserted and the condition specified is that the network must be available, then a synchronization occurs when the network is available and there is new data.
You can define the rules for automatic synchronization within certain parts of the normal snapshot setup and platform configuration, as follows:
-
Publication level: Within the publication, you specify the rules under which the synchronization occurs for all publication items in that publication.
-
Platform level: Some of the rules are specific to the platform of the client, such as battery life, network bandwidth, and so on. These rules apply to all enabled publication items that exist on this particular platform, such as Windows Mobile.
If after defining these rules and publishing the application, you want to modify the rules, you can do so through MDW. However, you must perform a manual synchronization. The manual synchronization restarts the automatic Sync Agent, which then uses the new rules. The new settings are NOT applied during automatic synchronization.
The following sections detail all of the rules you can configure for automatic synchronization:
-
Section 2.2.2.2, "Configure Publication-Level Automatic Synchronization Rules"
-
Section 2.2.2.3, "Configure Platform-Level Automatic Synchronization Rules"
2.2.2.1 Default vs Custom Rules
Default rules are used to bootstrap the syncagent if user-defined rules are not present. For each database, there is a default database level event which triggers sync after any database commit, where 1 or more records were modified. Additionally, there is a default platform level condition that allows sync only if network is detected on the client. User-defined rules override these default rules as follows:
-
The database level event above are overridden (and removed) if a publication level event is defined for the same database.
-
All default database level events are removed if a platform level event is defined.
-
The default platform level network condition are overridden (and removed) if another network condition is defined.
Note:
The rules, events and conditions, at publication level and at platform level, are defined separately for high priority sync and normal priority sync. High priority rules apply only to high priority records and only trigger/allow/forbid high priority sync.Two default database level events are created for each database: for high and normal priorities. This results in high priority sync being triggered after commit (if high priority record(s) are modified) and normal sync being triggered after commit (if normal record(s) are modified). Likewise, 2 default platform level network conditions are created as well that apply to high and normal priority syncs correspondingly.
Note:
The user-defined rules override default rules, as described above, separately for each of the priorities. For example, if you define a high priority platform level event, it overrides all high priority default database events, but not normal priority default database events. So in this case sync is still triggered on commit if normal priority records are modified.2.2.2.2 Configure Publication-Level Automatic Synchronization Rules
Within the publication, you specify the rules under which the synchronization occurs for all publication items in that publication. These rules are defined when you create the publication either using MDW or programmatically with the APIs. To create this through MDW, see Section 4.5, "Define the Rules Under Which the Automatic Synchronization Starts" ; to add publication-level automatic synchronization rules with the API, see Section 2.4.1.4, "Define Publication-Level Automatic Synchronization Rules".
When you are creating the publication, you can define events that causes an automatic synchronization. Although these are defined at the publication level, they enable only the publication items within this publication that has automatic synchronization enabled.
Table 2-3 describes the publication level events for automatic synchronization. The lowest value that can be provided is 1.
Table 2-3 Automatic Events for the Publication
| Events | Description |
|---|---|
|
Client commit |
For mobile client only. Upon commit to the client database, the mobile client detects the total number of record changes in the transaction log. If the number of modifications is equal to or greater than your pre-defined number, automatic synchronization occurs. This rule is on by default and set to start an automatic synchronization if only one record is changed. You must modify this rule if you do not want the automatic synchronization to occur after every commit. |
|
Server MGP compose |
If after the MGP compose cycle, the number of modified records for a user is equal to or greater than your pre-defined number, then an automatic synchronization occurs. Thus, if there are a certain number of records contained in an Out Queue destined for a client on the server, these modifications are synchronized to the client. |
Note:
If you want to modify the publication-level automatic synchronization rules after you publish the appliation, you can do so through the Mobile Manager, as follows:-
Click Data Synchronization.
-
Click Repository.
-
Click Publications.
-
Select the publication and click Automatic Synchronization Rules.
2.2.2.3 Configure Platform-Level Automatic Synchronization Rules
Some of the rules are specific to the platform of the client, such as battery life, network bandwidth, and so on. These rules apply to all enabled publication items that exist on this particular platform, such as Windows Mobile. You configure these rules through Mobile Manager or MDW. This section describes Mobile Manager.
The platform-level synchronization rules apply to a selected client platform and all publications that exist on that platform. You can specify both platform events and conditions using the Mobile Manager.
To assign platform-level automatic synchronization rules, perform the following in Mobile Manager:
-
Click Data Synchronization.
-
Click Platform Settings, which brings up a page with the list of all the platforms that support automatic synchronization.
-
Click on the desired platform.
-
You can modify the following for each platform:
-
Event Rules—See Section 2.2.2.3.1, "Event Rules for Platforms".
-
Conditions—See Section 2.2.2.3.2, "Condition Rules for Platforms".
-
Network settings—See Section 2.2.2.3.4, "Network Configuration for the Client Platform".
-
2.2.2.3.1 Event Rules for Platforms
Table 2-4 shows the platform events for automatic synchronization.
Table 2-4 Automatic Event Rules for the Client Platform
| Event | Description |
|---|---|
|
Network bandwidth |
If the mobile client detects that it is connected to a network with a pre-defined minimum bandwidth, then automatic synchronization occurs. Refer to Section 2.2.2.3.3, "Network Speed of SyncAgent" |
|
Battery life |
If the battery life drops below a pre-defined minimum, then synchronization is automatically triggered. |
|
AC Power |
As soon as AC power is detected, then synchronization is automatically triggered. |
|
Time |
Synchronize at a specific time or time interval. You can configure an automatic synchronization to occur at a specific time each day or as an interval.
|
2.2.2.3.2 Condition Rules for Platforms
Table 2-5 shows the platform conditions for automatic synchronization.
Table 2-5 Automatic Condition Rules for Client Platform
| Condition | Description |
|---|---|
|
Battery level |
Specify the minimum battery level required in order for an automatic synchronization to start. The battery level is specified as a percentage. |
|
Network conditions |
Network quality can be specified using several properties. This condition enables you to specify a minimum value for the following network properties:
For example, you can define a rule where all high priority data is automatically synchronized at a specified network bandwidth. The ping delay is optional. If not specified, the ping is not calculated. |
2.2.2.3.3 Network Speed of SyncAgent
For some platforms, there are APIs to determine network type and optionally subtype but for some platforms like the Windows CE (Windows Mobile) and Android, there is no API to query the exact network speed. For these platforms, syncagent has a hardcoded set of values for network speed based on the network type/subtype to determine the network type/subtype and choose the hardcoded value based on that.
There are 2 ways network speed is used:
-
It is reported in syncagent status (see BGAgentStatus) in bits per second (bps).
-
It is used by syncagent to evaluate network rules. The network rules are created by the user and set up on the server. They include network speed as a threshold parameter (for example, sync is allowed only if network speed >= specified value). Since for the aforementioned platforms, the network speed cannot be exactly determined, the user needs to decide on how to create a network rule based on network type/subtype. The user can choose the network speed value based on the network type/subtype to allow sync, for example.
For example, the user wants to allow only sync on Windows Mobile device if the network is UMTS or faster, the user can set network speed threshold in the rule to be 2000000. Sync would then only be allowed on networks such as UMTS and 1xRTT, BLUETOOTH, HSPDI, WIFI which are considered faster than UMTS. For some other platforms like PJ client SE and OJEC syncagent currently has no network management, so network rules are ignored.
2.2.2.3.4 Network Configuration for the Client Platform
You can set proxy information for your network provider, if required for accessing the internet.
Note:
If you are not using a proxy, then you do not need to define proxy information on this page.You could have two types of networks, as follows:
-
Always-on: Define the proxy and port number. Click Apply when finished.
-
Dial-up:
-
Click Add Dial-up Network to add a a new entry for dial-up configuration.
-
To edit an existing configuration, select the name of the existing configuration.
-
To delete an existing configuration, select the checkbox next to the desired configuration and click Delete.
-
If the platform has an always-on network, then this network is always tried first for the connection. If this network is not available, then the dial-up networks are tried in the order specified. You can rearrange the order of the dial-up networks by selecting one of the networks and clicking the up or down button. For dial-up, Oracle Database Mobile Server can automatically establish the network connection before initiating the synchronization.
2.2.3 Enable the Server to Notify the Client to Initiate a Synchronization to Download Data
If you have designed the compose yourself—that is, you do not use the MGP—then, you can notify the client if any data exists on the server that can be downloaded to the client through enqueue notification APIs. You can also use these APIs to manage the automatic synchronization schedule for your clients.
For more information on enqueue notification APIs, see Section 2.12.3, "Selecting How and When to Notify Clients of Composed Data".
2.2.4 Retrieve Status for Automatic Synchronization Events
You can develop your client application retrieve status for the Sync Agent and automatic synchronization events or to be notified of the stage for automatic synchronization. For full details, see Section 3.2.1, "OSE APIs for Managing Automatic Synchronization" and Section 3.2.3, "OCAPI Notification APIs for the Automatic Synchronization Cycle Status".
2.3 What is The Process for Setting Up a User For Synchronization?
Before you can perform the synchronization, the publication must be created, the user created and granted access to the publication, and optionally, the publication packaged up with an application and published to the mobile server. This is referred to as the publish and subscribe model, which can be implemented in one of two ways:
-
Declaratively, using MDW to create the publication and the Packaging Wizard to package and publish the applications. This is the recommended method. See Section 2.3.1, "Creating a Snapshot Definition Declaratively" for details.
-
Programmatically, using the Resource Manager and the Consolidator Manager APIs to invoke certain advanced features or customize an implementation. This technique is recommended for advanced users requiring specialized functionality. See Section 2.3.2, "Creating the Snapshot Definition Programmatically" for details.
Once created and subscribed, the user can be synchronized, as follows:
-
Using manual synchronization where the user initiates it from the device or programmatically from within an application. This chapter discusses how to start the synchronization programmatically in Section 3.1, "Invoke Manual Synchronization on the Mobile Client".
-
Using automatic synchronization which is enabled within the publication item itself or the platform configuration. For more informationon automatic synchronization, see Section 2.2, "Enabling Automatic Synchronization".
On the back-end of the synchronization process, you have the option to customize how the apply and compose phase are executed. See Section 2.6, "Customize the Compose Phase Using MyCompose".
2.3.1 Creating a Snapshot Definition Declaratively
Use the Mobile Database Workbench (MDW), a GUI based tool of Oracle Database Mobile Server—described fully in Chapter 4, "Using Mobile Database Workbench to Create Publications"—to create snapshots declaratively. The convenience of a graphical tool is a safer and less error prone technique for developers to create a mobile application. Before actual application programming begins, the following steps must be executed:
-
Verify that the base tables exist on the server database; if not, create the base table.
-
Use MDW to define an application and the snapshot with the necessary publicatino and its publication items. See Chapter 4, "Using Mobile Database Workbench to Create Publications" for details.
-
Use the Packaging Wizard to publish the application to the mobile server. This creates the publication items associated with the application. See Chapter 5, "Using the Packaging Wizard" for details.
-
Use the Mobile Manager to create a subscription for a given user.
-
Install the application on the development machine.
-
If using manual synchronization, initiate synchronization for the mobile client with the mobile server to create the client-side snapshots. For the mobile client, create the client database automatically.
2.3.1.1 Manage Snapshots
The mobile server administrator can manage a snapshot, which is a full set or a subset of rows of a table or view. Create the snapshot by executing a SQL query against the base table. Snapshots are either read-only or updatable.
The following sections describes how to manage snapshots using MDW:
2.3.1.1.1 Read-only Snapshots
Read-only snapshots are used for querying purposes only. The data is downloaded from the Oracle server to the client; no data on the client is ever uploaded to the server. Any data added on the client in a read-only snapshot can be lost, since it is never uploaded to the server. Changes made to the master table in the back-end Oracle database server are replicated to the mobile client. See Section 4.8.2, "Publication Item Tab Associates Publication Items With the Publication" for instructions on how to define the publication item as read-only.
Note:
A subscription created as complete refresh and read-only is light weight; thus, to keep the subscription light weight, the primary keys are not included in the replication. If you want to include primary keys, then create them with thecreatePublicationItemIndex API.
Also, because read-only does not upload any data from the client, there are no conflicts. Thus, when specified within MDW, you can only select Custom for conflict resolution.
2.3.1.1.2 Updatable Snapshots
When you define a snapshot as updatable, then the data propagated within a synchronization is bi-directional. That is, any modifications made on the client are uploaded to the server; any modifications made on the back-end Oracle server are downloaded to the client. See Section 4.8.2, "Publication Item Tab Associates Publication Items With the Publication" for instructions on how to define the publication item as updatable.
A snapshot can only be updated when all the base tables that the snapshot is based on have a primary key or virtual primary key. If the base tables do not have a primary key, a snapshot cannot be updated and becomes read-only. Table 2-6 shows each refresh method type and whether it is updatable or read-only depending on primary key or virtual primary key:
Table 2-6 Which Refresh Methods Can Be Updatable or Read-Only
| Fast | Complete | Queue-Based | |
|---|---|---|---|
|
Table Uses a Primary Key |
Updatable or Read-Only |
Updatable or Read-Only |
Updatable or Read-Only |
|
Table Uses a Virtual Primary Key |
Updatable or Read-Only |
Updatable or Read-Only |
Updatable or Read-Only |
|
No Primary Key or Virtual Primary Key Used |
Not applicable since all Fast Refresh tables use a primary or virtual primary key. |
Read-Only |
Read-Only |
2.3.1.1.3 Refresh a Snapshot
Your snapshot definition determines whether an updatable snapshot uses the complete or fast refresh method.
-
The complete refresh method recreates the snapshot every time it is refreshed. Note that when it recreates the snapshot, all of the data on the client database is erased and then the snapshot for this user on the back-end Oracle database is brought down to the client.
-
The fast refresh method refreshes only the modified data within the snapshot definition on both the client and server. In general, the simpler your snapshot definition, the faster it is updated. All fast refresh methods require a primary key or a virtual primary key.
See Section 4.4, "Create a Publication Item" and Section 2.8, "Understanding Your Refresh Options"
2.3.1.1.4 Snapshot Template Variables
Snapshots are application-based. In some cases, you may quantify the data that your application downloads for each user by specifying all of the returned data match a predicate. You can accomplish this by using snapshot templates.
A snapshot template is an SQL query that contains data subsetting parameters. A data subsetting parameter is a colon (:), followed by an identifier name, as follows:
:var1
Note:
If the subsetting parameter is on a CHAR column of a specified length, then you should either preset all characters to spaces before setting the value or pad for the length of the column with spaces after setting the parameter.When the mobile client creates snapshots on the client machine, the mobile server replaces the snapshot variables with user-specific values. By specifying different values for different users, you can control the data returned by the query for each user.
You can use MDW to specify a snapshot template variable in the same way that you create a snapshot definition for any platform.
Data subsetting parameters are bind variables and so should not be enclosed in quotation marks ('). If you want to specify a string as the value of the data subsetting parameter, then the string contains single quotation marks. You can specify the values for the template variables within the Mobile Manager.
The following examples specify a different value for every user. By specifying a different value for every user, the administrator controls the behavior and output of the snapshot template.
select * from emp where deptno = :dno
You define this select statement in your publication item. See Section 4.4.1, "Create SQL Statement for Publication Item" for instructions. Then, modify the user in the Mobile Manager to add the value for :dno. Then, when the user synchronizes, the value defined for the user is replaced in the select script. See Section 4.5, "Managing Application Parameter Input (Data Subsetting)" in the Oracle Database Mobile Server Administration and Deployment Guide for information on how to define the value of the variable. This value can only be defined after the application is published and the user is associated with it.
Table 2-7 provides a sample set of snapshot query values specified for separate users.
Table 2-7 Snapshot Query Values for Separate Users
| User | Value | Snapshot Query |
|---|---|---|
|
John |
10 |
|
|
Jane |
20 |
|
select * from emp where ename = :ename
Table 2-8 provides another sample snapshot query value.
2.3.2 Creating the Snapshot Definition Programmatically
You can use the Resource Manager or Consolidator Manager APIs to programmatically create the publication items on the mobile server. Create publication items from views and customize code to construct snapshots.
Note:
The Consolidator Manager API can only create a publication, which cannot be packaged with an application. In addition, a publication created with the Consolidator Manager API cannot be packaged with an application. See Section 2.4, "Creating Publications Using Oracle Database Mobile Server APIs" for information on the Consolidator Manager API. Use the Resource Manager APIs to create the publication, package it with an application, and publish it to the mobile server. See theoracle.mobile.admin.ResourceManager in the Oracle Database Mobile Server JavaDoc, which you can link to off the ORACLE_HOME/Mobile/doc/index.htm page.The base tables must exist before the Consolidator Manager API can be invoked. The following steps are required to create a a subscription:
-
Create a publication
-
Create a publication item and add it to the publication
-
Create a user
-
Creating a subscription for the user based on the publication
The details of how to create a publication are documented in Chapter 4, "Using Mobile Database Workbench to Create Publications". Anything that you can do with the MDW tool, you can also perform programmatically using the Consolidator Manager API. Refer to the Oracle Database Mobile Server JavaDoc for the syntax.
2.4 Creating Publications Using Oracle Database Mobile Server APIs
The mobile server uses a publish and subscribe model to centrally manage data distribution between Oracle database servers and mobile clients. Basic functions, such as creating publication items and publications, can be implemented easily using the Mobile Development Workspace (MDW). See Chapter 4, "Using Mobile Database Workbench to Create Publications" for more information.
These functions can also be performed using the Consolidator Manager or Resource Manager APIs by writing Java programs to customize the functions as needed. Some of the advanced functionality can only be enabled programmatically using the Consolidator Manager or Resource Manager APIs.
The publish and subscribe model can be implemented one of two ways:
-
Declaratively, using MDW to create the publication and the Packaging Wizard to package and publish the applications. This is the recommended method. This method is described fully in Chapter 4, "Using Mobile Database Workbench to Create Publications" and Chapter 5, "Using the Packaging Wizard".
-
Programmatically, using the Consolidator Manager or Resource Manager APIs to invoke certain advanced features or customize an implementation. This technique is recommended for advanced users requiring specialized functionality.
-
Publications created with the Consolidator Manager API cannot be packaged with an application. See Section 2.4.1, "Defining a Publication With Java Consolidator Manager APIs".
-
Use the Resource Manager APIs to create the publication, package it with an application, and publish it to the mobile server. See the
oracle.mobile.admin.MobileResourceManagerin the Oracle Database Mobile Server JavaDoc, which is located off theORACLE_HOME/Mobile/doc/index.htmpage.
-
2.4.1 Defining a Publication With Java Consolidator Manager APIs
While we recommend that you use MDW (see Chapter 4, "Using Mobile Database Workbench to Create Publications") for creating your publications, you can also create them, including the publication items and the user, with the Consolidator Manager API. Choose this option if you are performing more advanced techniques with your publications.
After creating the database tables in the back-end database, create the Resource Manager and Consolidator Manager objects to facilitate the creation of your publication:
-
The Resource Manager object enables you to create users to associate with the subscription.
-
The Consolidator Manager object enables you to create the subscription.
The order of creating the elements in the publication is the same as if you were using MDW. You must create a publication first and then add the publication items and other elements to it. Once the publications are created, subscribe users to them. See the Oracle Database Mobile Server JavaDoc for full details on each method. See Chapter 4, "Using Mobile Database Workbench to Create Publications" for more details on the order of creating each element.
Note:
The following sections use thesample11.java sample to demonstrate the Resource Manager and Consolidator Manager methods used to create the publication and the users for the publication. The full source code for this sample can be found in the following directories:
On UNIX: <ORACLE_HOME>/mobile/server/demos/consolidator_api
On Windows: <ORACLE_HOME>\Mobile\Server\demos\consolidator_api
-
Section 2.4.1.4, "Define Publication-Level Automatic Synchronization Rules"
-
Section 2.4.1.5, "Data Subsetting: Defining Client Subscription Parameters for Publications"
-
Section 2.4.1.8, "Creating Client-Side Sequences for the Downloaded Snapshot"
-
Section 2.4.1.11, "Bringing the Data From the Subscription Down to the Client"
-
Section 2.4.1.13, "Callback Customization for DML Operations"
Note:
To call the Publish and Subscribe methods, the following JAR files must be specified in yourCLASSPATH.
-
<
ORACLE_HOME>\jdbc\lib\ojdbc6.jar -
<
ORACLE_HOME>\Mobile\classes\consolidator.jar -
<
ORACLE_HOME>\Mobile\classes\classgen.jar -
<
ORACLE_HOME>\Mobile\classes\servlet.jar -
<
ORACLE_HOME>\Mobile\classes\xmlparserv2.jar -
<
ORACLE_HOME>\Mobile\classes\jssl-1_2.jar -
<
ORACLE_HOME>\Mobile\classes\javax-ssl-1_2.jar -
<
ORACLE_HOME>\Mobile\classes\share.jar -
<
ORACLE_HOME>\Mobile\classes\oracle_ice.jar -
<
ORACLE_HOME>\Mobile\classes\phaos.jar -
<
ORACLE_HOME>\Mobile\classes\jewt4.jar -
<
ORACLE_HOME>\Mobile\classes\jewt4-nls.jar -
<
ORACLE_HOME>\Mobile\classes\wtgpack.jar -
<
ORACLE_HOME>\Mobile\classes\jzlib.jar -
<
ORACLE_HOME>\Mobile\Sdk\bin\devmgr.jar
2.4.1.1 Create the Mobile Server User
Use the createUser method of the MobileResourceManager object to create the user for the publication.
-
Create the
MobileResourceManagerobject. A connection is opened to the mobile server. Provide the schema name, password, and JDBC URL for the database the contains the schema (the repository). -
Create one or more users with the
createUsermethod. Provide the user name, password, the user's real name, and privilege, which can be one of the one of the following: "O" for publishing an application, "U" for connecting as user, or "A" for administrator. If NULL, no privilege is assigned.Note:
Always request a drop user before you execute a create, in case this user already exists. -
Commit the transaction, which was opened when you created the
MobileResourceManagerobject, and close the connection.
MobileResourceManager mobileResourceManager =
    new MobileResourceManager(CONS_SCHEMA, DEFAULT_PASSWORD, JDBC_URL);
mobileResourceManager.createUser("S11U1", "manager", "S11U1", "U");
mobileResourceManager.commitTransaction();
mobileResourceManager.closeConnection();
Note:
If you do not want to create any users, you do not need to create theMobileResourceManager object.2.4.1.1.1 Change Password
You can change passwords for mobile server users with the setPassword method, which has the following syntax:
public static void setPassword
   (String userName,
    String newpwd) throws Throwable
Note:
Both user name and passwords are limited to a maximum of 28 characters.Execute the setPassword method before you commit the transaction and release the connection. The following example changes the password for the user MOBILE:
mobileResourceManager.setPassword("MOBILE","MOBILENEW");
2.4.1.2 Create Publications
A subscription is an association of publications and the users who access the information gathered by the publications. Create any publication through the ConsolidatorManager object.
-
Create the
ConsolidatorManagerobject. -
Connect to the database using the
openConnectionmethod. Provide the schema name, password, and JDBC URL for the database the contains the schema. -
Create the publication with the
createPublicationmethod, which creates an empty publication. An example of thecreatePublicationmethod syntax is as follows:createPublication( java.lang.String name, java.lang.String db_inst, int client_storage_type, java.lang.String client_name_template, java.lang.String enforce_ri, int dev_types_flg)The
createPublicationmethod can have some of the following input parameters:-
name—A character string specifying the new publication name.
-
db_inst—
NULL,unless you are using a registered database for application data. If using a registered database, provide the application database name in this field. -
client_storage_type—An integer specifying the client storage type for all publication items in the new publication. If you are defining a publication exclusively for a Berkeley DB or SQLite Mobile Client, specify the
Consolidator.BDB_CREATOR_IDorConsolidator.SQLITE_CREATOR_IDappropriately as the storage type.Other values are
Consolidator.DFLT_CREATOR_ID and Consolidator.OKPI_CREATOR_ID. -
client_name_template—A template for publication item instance names on client devices. This parameter contains the following predefined values:
-
%s—Default. -
DATABASE.%s—Causes all publication items to be instantiated inside an OKAPI database with the nameDATABASE. -
SFT-EE_%s—Must be used for Satellite Forms-based applications.
-
-
enforce_ri—Reserved for future use. Use
NULLor an empty string. -
dev_types_flg—Specifies which device types or platforms the publication supports. The default flag is set to
Consolidator.DEV_FLG_GEN, which includes all device platforms. If a publication is for more than one platform, use the sum of the platform flags.Available platforms are as follows:
-
SQLite DB: "SQLite LINUX", SQLite WCE", "SQLite WIN32", "SQLiteJava"
-
Berkeley DB: "BDB LINUX", "BDB WCE", "BDB WIN32", "SQLiteJava"
Note:
For Pure Java Client, Android and BlackBerry platforms, "SQLiteJava" should be specified.
To retrieve the device flag for a platform, call the
getPlatformDevFlgfunction. The syntax for this function is as follows:int getPlatformDevFlg(java.lang.String platform)
-
-
Note:
Always request a drop publication before you execute a create, in case this publication already exists.
ConsolidatorManager consolidatorManager = new ConsolidatorManager();
consolidatorManager.openConnection(CONS_SCHEMA, DEFAULT_PASSWORD, JDBC_URL);
consolidatorManager.createPublication("T_SAMPLE11", NULL
             Consolidator.SQLITE_CREATOR_ID, "Orders.%s", NULL);
Note:
Special characters including spaces are supported in publication names. The publication name is case-sensitive.2.4.1.3 Create Publication Items
An empty publication does not have anything that is helpful until a publication item is added to it. Thus, after creating the publication, it is necessary to create the publication item, which defines the snapshot of the base tables that is downloaded for your user.
Note:
You can create a publication using MDW. To see more details on publications and publication items, refer to Section 4.4, "Create a Publication Item".When you create each publication item, you can specify the following:
-
Column data: When you specify column data in the publication item, you should first verify what data types are supported and how others are modified when brought down to the client database.
Also, the publication item query must select primary keys in the same order as they are defined in the base table.
-
Automatic or Manual Synchronization: Whether the publication item is to be synchronized automatically or manually.
-
Refresh Mode: The refresh mode of the publication item is specified during creation to be either fast, complete-refresh, or queue-based.
-
Data-Subsetting Parameters: You can also establish the data-subsetting parameters when creating the publication item, which provides a finer degree of control on the data requirements for a given client.
-
If you are using a registered database for application data.
Note:
For full details on the method parameters, see the Oracle Database Mobile Server JavaDoc.Publication item names are limited to twenty-six characters and must be unique across all publications. The publication item name is case-sensitive. The following examples create a publication item named P_SAMPLE11-M.
Note:
Always drop the publication item in case an item with the same name already exists.The following example uses the createPublicationItem method, which creates a manual synchronization publication item P_SAMPLE11-M based on the ORD_MASTER database table with fast refresh. Use the addPublicationItem method to add this publication item to the publication.
Note:
For full details on the method parameters, see the Oracle Database Mobile Server JavaDoc.
consolidatorManager.createPublicationItem("P_SAMPLE11-M", "MASTER",
    "ORD_MASTER", "F", "SELECT * FROM MASTER.ORD_MASTER", NULL, NULL);
When you create a publication item that uses automatic synchronization through the createPublicationItem method, you can also define the following:
-
Automatic Synchronization: Set the publication to use automatic synchronization by setting the
isLogBasedflag to true. -
Server-initiated change notifications: If you set the
doChangeNtfflag to true, then the mobile server sends a notification to the client if any changes are made on the server for this publication item. -
Set what constraints are replicated to the client: If you set the
setDfltColOptionsflag to true, the default values andNOT NULLconstraints are replicated to the client. However, if you are using a SQLite Mobile Client, then you might want to set thesetDfltColOptionsflag to false, as SQLite does not support the same SQL functions as Oracle. IfsetDfltColOptionsis set to true (default) when the publication item is created, synchronization automatically uses the default clause from Oracle meta data, which is not supported by SQLite. Alternatively, you can execute theConsolidatorManager.setPubItemColOptionmethod to set a supported SQLite expression. -
Create a client sub-query to return unique client ids in the
cl2log_rec_stmtparameter. The client sub-query correlates the primary key of the changed records in the log table with the Consolidator client id. The log table contains the changes for the table and is namedclg$<tablename>.Notes:
-
If you are creating a fast refresh publication item on a table with a composite primary key, the snapshot query must match the primary key columns in the order that they are present in the table definition. This automatically happens during the column selection when MDW is used or when a SELECT * query is used. Note that the order of the primary key columns in the table definition may be different from those in the primary key constraint definition.
-
A subscription created as complete refresh and read only is light weight; thus, to keep the subscription light weight, the primary keys are not included in the replication. If you want to include a primary key, then you can create it with the
createPublicationItemIndexAPI.
For example, if the publication item SQL query is as follows:
SELECT * FROM scott.emp a
   WHERE deptno in
       (select deptno from scott.emp b
        where b.empno = :empno )
Assuming that the Consolidator client id is
empnoand the snapshot table isemp, then the client sub-query queries for data changes in theclg$emplog table as follows:SELECT empno as clid$$cs FROM scott.clg$emp UNION SELECT empno as clid$$cs FROM scott.emp WHERE deptno in (select deptno from scott.clg$dept) -
The following example uses the automatic synchronization version of createPublicationItem method, which uses the PubItemProps class to define all publication item definitions, including automatic synchronization, as follows:
PubItemProps pi_props = new PubItemProps();
pi_props.db_inst = NULL;          // Provide registered db instance name or NULL
pi_props.owner = "MASTER";                  // owner schema
pi_props.store = STORES[i][0];              // store
pi_props.refresh_mode = "F"; //default      // uses fast refresh
pi_props.select_stmt =                  // specify select statement for snapshot
   "SELECT * FROM "+"MASTER"+"."+STORES[i][0]+ " WHERE C1 =:CLIENTID";
pi_props.cl2log_rec_stmt = "SELECT base.C1 FROM "   // client sub-query to
      + "MASTER"+"."+STORES[i][0] + " base,"        // return unique clientids
      + "MASTER"+".CLG$"+STORES[i][0] + " log"
      + "  WHERE base.ID = log.ID";
// Setting "isLogBased" to True enables automatic sync for this pub item.
pi_props.isLogBased = true;
// If doChangeNtf is true, automatic publication item sends notifications
// from server about new/modified records
pi_props.doChangeNtf = true;

cm.createPublicationItem(PUBITEMS[i], pi_props);
cm.addPublicationItem(PUB,PUBITEMS[i],NULL,NULL,"S",NULL,NULL);
2.4.1.3.1 Defining Publication Items for Updatable Multi-Table Views
Publication items can be defined for both tables and views. When publishing updatable multi-table views, the following restrictions apply:
-
The view must contain a parent table with a primary key defined.
-
INSTEAD OFtriggers must be defined for data manipulation language (DML) operations on the view. See Section 2.8, "Understanding Your Refresh Options" for more information. -
All base tables of the view must be published.
2.4.1.4 Define Publication-Level Automatic Synchronization Rules
Once the publication is created, you can create and add automatic synchronization rules that apply to all enabled publication items in this publication. Perform the following to add a rule to a publication:
-
The rule is made up of a rule name and a
Stringthat contains the rule definition. The rules can be created using theRulesclasses andRuleInfoobjects.-
Define the rule and convert it to a
Stringusing theRuleInfoobject and thesetSyncRuleParamsmethod.RuleInfo ri = Rules.RULE_MAX_DB_REC_ri; ri.params.put(Rules.PARAM_NREC,"5"); String ruleText = cm.setSyncRuleParams(ri.type,ri.params);
There are
RuleInfoobjects for all of the main automatic synchronization rules. So, in order to specify a rule, you obtain the appropriateRuleInfoobject from the Rules class and then define the variable. Table 2-9, "Automatic Synchronization Rule Info Objects" describe the different types of rules you can specify for triggering automatic synchronization:Note:
See the Oracle Database Mobile Server JavaDoc for syntax and the parameters that you need to set for each rule.Table 2-9 Automatic Synchronization Rule Info Objects
Rule Info Object Description RULE_MAX_DB_REC_riFor mobile clients only. An automatic synchronization is triggered if the client transaction log contains more than NREC modified records.
RULE_NOTIFY_MAX_PUB_REC_riSynchronize if the Out Queue contains more than
NRECmodified records, where you specify theNRECof modifed records in the server database to trigger an automatic synchronization.RULE_MAX_PI_REC_riClient automatically synchronizes if the number of modified records for a publication item is greater than
NREC.RULE_HIGH_BANDWIDTH_riSynchronize when the network bandwidth is greater than
<number>bits/second. Where<number>is an integer that indicates the bandwidth bits/seconds. When the bandwidth is at this value, the synchronization occurs.RULE_LOW_PWR_riSynchronize when the battery level drops to
<number>%, where<number>is a percentage. Often you may wish to synchronize before you lose battery power.RULE_AC_PWR_riSynchronize when the AC power is detected; that is, when the device is plugged in.
RULE_MIN_MEM_riSpecify the minimum battery level required in order for an automatic synchronization to start. The battery level is specified as a percentage.
RULE_NET_PRIORITY_riNetwork conditions can be specified using the following properties: data priority, ping delay and network bandwidth.
RULE_MIN_PWR_riIf the battery life drops below a pre-defined minimum, then synchronization is automatically triggered.
NET_CONFIG_riConfigure network parameters (currently only the network specific proxy configuration is supported) The configuration rule contains a vector of hashtables with a hashtable representing properties of each individual network.
RULE_TIME_INTERVAL_riSchedule sync at a given time of day with a certain frequency (interval).
Specify the time (
PARAM_START_TIME) for an automatic synchronization to start. The format of time is standard date string: H24:MI:SS e.g. 00:00:00 or 23:59:00 The time is GMT. If not set, the synchronization starts when the Sync Agent starts and all other conditions are satisfied Set the period (PARAM_PERIOD), in seconds, to specify the frequency of scheduled synchronization events. -
Define a name for the rule, which should be a name not attached to any particular publication, so you can use the rule for several publications.
-
-
Create the rule with the
createSyncRulemethod, which creates the rule with the name, theStringcontaining the rule, and a boolean on whether to replace the rule if it already exists. Once completed, then this rule can be associated with any publication.boolean replace = true; cm.createSyncRule ( ruleName, ruleText, replace );
-
Associate the rule with the desired publication or platform using the
addSyncRulemethod. This method can add any existing rule to a designated publication. To add to a publication, use the publication name as the first parameter, as follows:cm.addSyncRule( PUB, ruleName );
To add a rule to a client platform—Win32 or Windows Mobile platform—perform the following:
cm.addSyncRule( Consolidator.DEFAULT_TEMPLATE_WIN32, rulename );
Where the platform name is a constant defined in the Consolidator class as either
DEFAULT_TEMPLATE_WIN32orDEFAULT_TEMPLATE_WCE.
You can also perform the following:
2.4.1.4.1 Retrieve All Publications Associated with a Rule
Just as you can with scripts and sequences that are associated with publications, you can retrieve all publications that are associated with a rule with the getPublicationNames method. The following retrieves all publications that are associated with the rule within the ruleName variable. The object type is defined as Consolidator.RULES_OBJECT.
String[] pubs = cm.getPublicationNames ( ruleName , Consolidator.RULES_OBJECT);
2.4.1.4.2 Retrieve Rule Text
You can retrieve the text of the rule using the getSyncRule and providing the rule name. This is useful if you are not sure what the rule is and need to discover the text before associating it with another publication.
String retStr = cm.getSyncRule ( ruleName );
2.4.1.4.3 Check if Rule is Modified
You can compare the rule within the repository with a provided string to see if the rule has been modified with the isSyncRuleModified method. A boolean value of true is returned if the provided ruleText is different from what exists in the repository.
boolean ismod = cm.isSyncRuleModified ( ruleName, ruleText );
2.4.1.4.4 Remove Rule
You can remove the association of a rule from a publication by using the removeSyncRule method. You can delete the entire rule from the repository by using the dropSyncRule method. If you drop the rule and it is still associated with one or more publications, the rule is automatically unassociated from these publications.
2.4.1.5 Data Subsetting: Defining Client Subscription Parameters for Publications
Data subsetting is the ability to create specific subsets of data and assign them to a parameter name that can be assigned to a subscribing user. When creating publication items, a parameterized Select statement can be defined. Subscription parameters must be specified at the time the publication item is created, and are used during synchronization to control the data published to a specific client.
Creating a Data Subset Example
consolidatorManager.createPublicationItem("CORP_DIR1",
   "DIRECTORY1", "ADDRLRL4P", "F" ,
   "SELECT LastName, FirstName, company, phone1, phone2, phone3, phone4,
    phone5, phone1id, phone2id, phone3id, displayphone, address, city, state,
    zipcode, country, title, custom1, custom2, custom3, note
    FROM directory1.addrlrl4p WHERE company = :COMPANY", NULL, NULL);
In this sample statement, data is being retrieved from a publication named CORP_DIR1, and is subset by the variable COMPANY.
Note:
Within the select statement, the parameter name for the data subset must be prefixed with a colon, for example:COMPANY.When a publication uses data subsetting parameters, set the parameters for each subscription to the publication. For example, in the previous example, the parameter COMPANY was used as an input variable to describe what data is returned to the client. You can set the value for this parameter with the setSubscriptionParameter method. The following example sets the subscription parameter COMPANY for the client DAVIDL in the CORP_DIR1 publication to DAVECO:
consolidatorManager.setSubscriptionParameter("CORP_DIR1", "DAVIDL",
       "COMPANY", "'DAVECO'");
Note:
This method should only be used on publications created using the Consolidator Manager API. To create template variables, a similar technique is possible using MDW.2.4.1.6 Create Publication Item Indexes
The mobile server supports automatic deployment of indexes on mobile clients. The mobile server automatically replicates primary key indexes from the server database. The Consolidator Manager API provides calls to explicitly deploy unique, regular, and primary key indexes to clients as well.
By default, the primary key index of a table is automatically replicated from the server. You can create secondary indexes on the snapshot table for a publication item. If you do not want the primary index, you must explicitly drop it from the publication item.
If you want to create and associate other indexes on any columns in your application tables in the publication item, then use the createPublicationItemIndex method. You can drop an index from the publication item and from the snapshot table with the dropPublicationItemIndex method.
The following demonstrates how to set up indexes on the name field in our publication item P_SAMPLE11-M:
consolidatorManager.createPublicationItemIndex("P_SAMPLE11M-I3",
   "P_SAMPLE11-M", "I", "NAME");
An index can contain more than one column. You can define an index with multiple columns, as follows:
consolidatorManager.createPublicationItemIndex("P_SAMPLE11D-I1", "P_SAMPLE11-D",
      "I", "KEY,NAME");
Note:
All indexes created by this API can be viewed within theCV$ALL_PUBLICATIONS_INDEXES view.2.4.1.6.1 Define Client Indexes
Client-side indexes can be defined for existing publication items. There are three types of indexes that can be specified:
-
P - Primary key is an index based off of the primary keys.
-
U - Unique enforces the unique constraint on the indexed columns, which ensures that duplicate values do not exist in the columns being indexed.
-
I - Regular does not provide the UNIQUE constraint on the indexed columns.
Note:
When an index of type 'U' or 'P' is defined on a publication item, there is no check for duplicate keys on the server. If the same constraints do not exist on the base object of the publication item, synchronization may fail with a duplicate key violation. See the Oracle Database Mobile Server API Specification for more information.2.4.1.7 Adding Publication Items to Publications
Once you create a publication item, you must associate it with a publication using the addPublicationItem method, as follows:
consolidatorManager.addPublicationItem("T_SAMPLE11", "P_SAMPLE11-M",
     NULL, NULL, "S", NULL, NULL);
See Section 2.4.1.12, "Modifying a Publication Item" for details on how to change the definition.
2.4.1.7.1 Defining Conflict Rules
When adding a publication item to a publication, the user can specify winning rules to resolve synchronization conflicts in favor of either the client or the server. See Section 2.10, "Resolving Conflicts with Winning Rules" for more information.
2.4.1.7.2 Using Table Weight
Table weight is an integer associated with publication items that determines in what order the transactions for all publication items within the publication are processed. For example, if three publication items exist—one that contains SQL to modify the emp table, one that modifies the dept table, and one that modifies the mgr table, then you can define the order in which the transactions associated with each publication item are executed. In our example, assign table weight of 1 to the publication item that contains the dept table, table weight of 2 to the publication item that contains the mgr table, and table weight of 3 to the publication item that contains the emp table. In doing this, you ensure that the publication item that contains the master table dept is always processed first, followed by the publication item that modifies the mgr table, and lastly by the publication item that modifies the emp table.
The insert, update, and delete client operations are executed in the following order:
-
Client
INSERToperations are executed first, from lowest to highest table weight order. This ensures that the master table entries are added before the details table entries. -
Client
DELETEoperations are executed next, from highest to lowest table weight order. Processing the delete operations ensures that the details table entries are removed before the master table entries. -
Client
UPDATEoperations are executed last, from highest to lowest table weight order.
In our example with dept, mgr, and emp tables, the execution order would be as follows:
-
All insert operations for
deptare processed. -
All insert operations for
mgrare processed. -
All insert operations for
empare processed. -
All delete operations for
empare processed. -
All delete operations for
mgrare processed. -
All delete operations for
deptare processed. -
All update operations for
empare processed. -
All update operations for
mgrare processed. -
All update operations for
deptare processed.
A publication can have more than one publication item of weight 2. In this case, it does not matter which publication is executed first.
Define the order weight for publication items when you add it to the publication.
2.4.1.8 Creating Client-Side Sequences for the Downloaded Snapshot
A sequence is a database schema object that generates sequential numbers. After creating a sequence, you can use it to generate unique sequence numbers for transaction processing. These unique integers can include primary key values. If a transaction generates a sequence number, the sequence is incremented immediately whether you commit or roll back the transaction. For full details of what a sequence is and how Oracle Database Mobile Server creates them, see Section 4.6, "Create a Sequence".
Note:
Sequences are only supported in Berkeley DB Mobile Clients.If you do not want to use MDW to create a sequence, you can use the Consolidator Manager API to manage the sequences with methods that create/drop a sequence, add/remove a sequence from a publication, modify a sequence, and advance a sequence window for each user. All of the same behavior exists for the Consolidator Manager APIs as are available through MDW.
Note:
The sequence name is case-sensitive.Once you have created the sequence, you place it into the publication with the publication item to which it applies.
Note:
If the sequences do not work properly, check your parent publications. All parent publications must have at least one publication item. If you do not have any publication items for the parent publication, then create a dummy publication item within the parent.See the Oracle Database Mobile Server API Specification for a complete listing of the APIs to define and administrate sequences.
2.4.1.9 Subscribing Users to a Publication
Subscribe the users to a publication using the createSubscription function. The following creates a subscription between the S11U1 user and the T_SAMPLE11 publication:
consolidatorManager.createSubscription("T_SAMPLE11", "S11U1");
2.4.1.10 Instantiate the Subscription
After you subscribe a user to a publication, you complete the subscription process by instantiating the subscription, which associates the user with the publication in the back-end database. The next time that the user synchronizes, the data snapshot from the publication is provided to the user.
consolidatorManager.instantiateSubscription("T_SAMPLE11", "S11U1");

//Close the connection.
consolidatorManager.closeConnection();
|
Note: If you need to set subscription parameters for data subsetting, this must be completed before instantiating the subscription. See Section 2.4.1.5, "Data Subsetting: Defining Client Subscription Parameters for Publications" for more information. |
2.4.1.11 Bringing the Data From the Subscription Down to the Client
You can perform the synchronization and bring down the data from the subscription you just created. The client executes SQL queries against the client database to retrieve any information. This subscription is not associated with any application, as it was created using the low-level Consolidator Manager APIs.
2.4.1.12 Modifying a Publication Item
You can add additional columns to existing publication items. These new columns are pushed to all subscribing clients the next time they synchronize. This is accomplished through a complete refresh of all changed publication items.
-
An administrator can add multiple columns, modify the WHERE clause, add new parameters, and change data type.
-
This feature is supported for all mobile client platforms.
-
The client does not upload snapshot information to the server. This also means the client cannot change snapshots directly on the client database.
-
Publication item upgrades are deferred during high priority synchronizations. This is necessary for low bandwidth networks, such as wireless, because all publication item upgrades require a complete refresh of changed publication items. While the high priority flag is set, high priority clients continues to receive the old publication item format.
-
The server needs to support a maximum of two versions of the publication item which has been altered.
To change the definition, use one of the following:
-
If the publication item is read-only, then modify the publication item either with the
reCreatePublicationItemmethod or by dropping and creating the publication item with thedropPublicationItemandcreatePublicationItemAPIs. -
If the publication item is updatable, then you can use the
alterPublicationItemmethod. This method enables a smooth transition of changing any table structure on both the client and the server for updatable publications.If you use the
alterPublicationItemmethod, you must follow it up by executing theresetCachemethod. The metadata cache should be reset every time a change is made to the publication or publication items. If you make the change though Mobile Manager, then the Mobile Manager calls theresetCachemethod. You can reset the metadata cache from the Mobile Manager or execute theresetCachemethod, part of theConsolidatorManagerclass.You may use the
alterPublicationItemmethod for schema evolution to add columns to an existing publication item. The WHERE clause may also be altered. If additional parameters are added to the WHERE clause, then these parameters must be set before the alter occurs. See thesetSubscriptionParamsmethod. However, if you are creating a fast refresh publication item on a table with a composite primary key, the snapshot query must match the primary key columns in the order that they are present in the table definition. This automatically happens during the column selection when MDW is used or when a SELECT * query is used. Note that the order of the primary key columns in the table definition may be different from those in the primary key constraint definition.consolidatorManager.alterPublicationItem("P_SAMEPLE1", "select * from EMP");Note:
If the select statement does not change, then the call to thealterPublicationItem()method has no effect.
2.4.1.13 Callback Customization for DML Operations
Once a publication item has been created, a user can use the Consolidator Manager API to specify a customized PL/SQL procedure that is stored in the mobile server repository to be called in place of all DML operations for that publication item. There can be only one DML procedure for each publication item. The procedure should be created as follows:
AnySchema.AnyPackage.AnyName(DML in CHAR(1), COL1 in TYPE, COL2 in TYPE,
   COLn.., PK1 in TYPE, PK2 in TYPE, PKn..)
Note:
You can use thegenerateMobileDMLProcedure to generate the procedure specification for a given publication item. This specification can be used as a starting point in creating your own custom DML handling logic in a PL/SQL procedure. See the Oracle Database Mobile Server API Specification for more information.The parameters for customizing a DML operation are listed in Table 2-10:
Table 2-10 Mobile DML Operation Parameters
| Parameter | Description |
|---|---|
|
|
DML operation for each row. Values can be "D" for DELETE, "I" for INSERT, or "U" for UPDATE. |
|
|
List of columns defined in the publication item. The column names must be specified in the same order that they appear n the publication item query. If the publication item was created with "SELECT * FROM exp", the column order must be the same as they appear in the table "exp". |
|
PK1 ... PKn |
List of primary key columns. The column names must be specified in the same order that they appear in the base or parent table. |
The following defines a DML procedure for publication item exp:
select A,B,C from publication_item_exp_table
Assuming A is the primary key column for exp, then your DML procedure would have the following signature:
any_schema.any_package.any_name(DML in CHAR(1), A in TYPE, B in TYPE, C
                  in TYPE,A_OLD in TYPE)
During runtime, this procedure is invoked with 'I', 'U', or 'D' as the DML type. For insert and delete operations, A_OLD is NULL. In the case of updates, it is set to the primary key of the row that is being updated. Once the PL/SQL procedure is defined, it can be attached to the publication item through the following API call:
consolidatorManager.addMobileDmlProcedure("PUB_exp","exp",
                                           "any_schema.any_package.any_name")
where exp is the publication item name and PUB_exp is the publication name.
Refer to the Oracle Database Mobile Server API Specification for more information.
2.4.1.13.1 DML Procedure Example
The following piece of PL/SQL code defines an actual DML procedure for a publication item in one of the sample publications. As described below, the ORD_MASTER table. The query was defined as:
SELECT * FROM "ord_master", where ord_master has a single
              column primary key on "ID"
SQL> desc ord_master
Name                                      Null?    Type
----------------------------------------- -------- -------------
ID                                        NOT NULL NUMBER(9)
DDATE                                              DATE
STATUS                                             NUMBER(9)
NAME                                               VARCHAR2(20)
DESCRIPTION                                        VARCHAR2(20)
CREATE OR REPLACE  PACKAGE "SAMPLE11"."ORD_UPDATE_PKG"  AS
 procedure  UPDATE_ORD_MASTER(DML CHAR,ID NUMBER,DDATE DATE,STATUS
NUMBER,NAME VARCHAR2,DESCRIPTION VARCHAR2, ID_OLD NUMBER);
END ORD_UPDATE_PKG;
/
CREATE OR REPLACE  PACKAGE BODY "SAMPLE11"."ORD_UPDATE_PKG" as
  procedure  UPDATE_ORD_MASTER(DML CHAR,ID NUMBER,DDATE DATE,STATUS
NUMBER,NAME VARCHAR2,DESCRIPTION VARCHAR2, ID_OLD NUMBER) is
  begin
    if DML = 'U' then
     execute immediate 'update ord_master set id = :id, ddate = :ddate,
status = :status, name = :name, description = '||''''||'from
ord_update_pkg'||''''||' where id = :id_old'
      using id,ddate,status,name,id_old;
    end if;
    if DML = 'I' then
 begin
      execute immediate 'insert into ord_master values(:id, :ddate,
:status, :name, '||''''||'from ord_update_pkg'||''''||')'
        using id,ddate,status,name;
 exception
  when others then
   NULL;
 end;
    end if;
    if DML = 'D' then
     execute immediate 'delete from ord_master where id = :id'
      using id;
    end if;
  end UPDATE_ORD_MASTER;
end ORD_UPDATE_PKG;
/
The API call to add this DML procedure is as follows:
consolidatorManager.addMobileDMLProcedure("T_SAMPLE11",
          "P_SAMPLE11-M","SAMPLE11.ORD_UPDATE_PKG.UPDATE_ORD_MASTER")
where T_SAMPLE11 is the publication name and P_SAMPLE11-M is the publication item name.
2.4.1.14 Restricting Predicate
A restricting predicate can be assigned to a publication item as it is added to a publication.The predicate is used to limit data downloaded to the client. The parameter, which is for advanced use, can be NULL. For using a restricting predicate, see Section 1.2.10 "Priority-Based Replication" in the Oracle Database Mobile Server Troubleshooting and Tuning Guide.
2.5 Client Device Database DDL Operations
The first time a client synchronizes, Oracle Database Mobile Server automatically creates the snapshot tables for the user subscriptions on the mobile client. If you would like to execute additional DDL statements on the database, add the DDL statements as part of your publication. Oracle Database Mobile Server executes these DDL statements when the user synchronizes.
This is typically used for adding constraints and check values.
For example, you can add a foreign key constraint to a publication item. In this instance, if the Oracle Database Mobile Server created snapshots S1 and S2 during the initial synchronization, where the definition of S1 and S2 are as follows:
S1 (C1 NUMBER PRIMARY KEY, C2 VARCHAR2(100), C3 NUMBER);
S2 (C1 NUMBER PRIMARY KEY, C2 VARCHAR2(100), C3 NUMBER);
If you would like to create a foreign key constraint between C3 on S2 and the primary key of S1 , then add the following DDL statement to your publication item:
ALTER TABLE S2
   ADD CONSTRAINT S2_FK FOREIGN KEY (C3)
   REFERENCES S1 (C1);
Then, Oracle Database Mobile Server executes any DDL statements after the snapshot creation or, if the snapshot has already been created, after the next synchronization.
See the Oracle Database Mobile Server API Specification for more information on these APIs.
2.6 Customize the Compose Phase Using MyCompose
The compose phase takes a query for one or more server-side base tables and puts the generated DML operations for the publication item into the Out Queue to be downloaded into the client. The Consolidator Manager manages all DML operations using the physical DML logs on the server-side base tables. This can be resource intensive if the DML operations are complex—for example, if there are complex data-subsetting queries being used. The tools to customize this process include an extendable MyCompose with compose methods which can be overridden, and additional ConsolidatorManager APIs to register and load the customized class.
Note:
See the Oracle Database Mobile Server API Specification for more information on these APIs.When you want to customize the compose phase of the synchronization process, you must perform the activities described in the following sections:
-
Section 2.6.1, "Create a Class That Extends MyCompose to Perform the Compose"
-
Section 2.6.2, "Implement the Extended MyCompose Methods in the User-Defined Class"
-
Section 2.6.3, "Use Get Methods to Retrieve Information You Need in the User-Defined Compose Class"
-
Section 2.6.4, "Register the User-Defined Class With the Publication Item"
2.6.1 Create a Class That Extends MyCompose to Perform the Compose
The MyCompose class is an abstract class, which serves as the super-class for creating a user-written sub-class, as follows:
public class ItemACompose extends oracle.lite.sync.MyCompose
{ ... }
All user-written classes—such as ItemACompose—produce publication item DML operations to be sent to a client device by interpreting the base table DML logs. The sub-class is registered with the publication item, and takes over all compose phase operations for that publication item. The sub-class can be registered with more than one publication item—if it is generic—however, internally the Composer makes each instance of the extended class unique within each publication item.
2.6.2 Implement the Extended MyCompose Methods in the User-Defined Class
The MyCompose class includes the following methods—needCompose, doCompose, init, and destroy—which are used to customize the compose phase. One or more of these methods can be overridden in the sub-class to customize compose phase operations. Most users customize the compose phase for a single client. In this case, only implement the doCompose and needCompose methods. The init and destroy methods are only used when a process is performed for all clients, either before or after individual client processing.
The following sections describe how to implement these methods:
Note:
To retrieve information, use the methods described in Section 2.6.3, "Use Get Methods to Retrieve Information You Need in the User-Defined Compose Class".2.6.2.1 Implement the needCompose Method
The needCompose method to identifies a client that has changes to a specific publication item that is to be downloaded. Use this method as a way to trigger the doCompose method.
public int needCompose(Connection conn, Connection rmt_conn, String clientid)
 throws Throwable
The parameters for the needCompose method are listed in Table 2-11:
Table 2-11 needCompose Parameters
| Parameter | Definition |
|---|---|
|
|
Database connection to the Main mobile server repository. |
|
|
Database connection to the remote database for application. Set to NULL if the base tables are on the Main database where the repository exists. |
|
|
Specifies the client that is being composed. |
The following example examines a client base table for changes—in this case, the presence of dirty records. If there are changes, then the method returns MyCompose.YES, which triggers the doCompose method.
public int needCompose(Connection conn, Connection rmtConn, String clientid)
 throws Throwable{
        boolean baseDirty = false;
        String [][] baseTables = this.getBaseTables();

        for(int i = 0; i < baseTables.length; i++){
            if(this.baseTableDirty(baseTables[i][0], baseTables[i][1])){
                baseDirty = true;
                break;
            }
        }

        if(baseDirty){
            return MyCompose.YES;
        }else{
            return MyCompose.NO;
        }
    }
This sample uses subsidiary methods discussed in Section 2.6.3, "Use Get Methods to Retrieve Information You Need in the User-Defined Compose Class" to check if the publication item has any tables with changes that need to be sent to the client. In this example, the base tables are retrieved, then checked for changed, or dirty, records. If the result of that test is true, a value of Yes is returned, which triggers the call for the doCompose method.
2.6.2.2 Implement the doCompose Method
The doCompose method populates the DML log table for a specific publication item, which is subscribed to by a client.
public int doCompose(Connection conn, Connection rmt_conn,
   String clientid) throws Throwable
The parameters for the doCompose method are listed in Table 2-12:
Table 2-12 doCompose Parameters
| Parameter | Definition |
|---|---|
|
|
Database connection to the Main mobile server repository. |
|
|
Database connection to the remote database for application. Set to NULL if the base tables are on the Main database where the repository exists. |
|
|
Specifies the client that is being composed. |
The following example contains a publication item with only one base table where a DML (Insert, Update, or Delete) operation on the base table is performed on the publication item. This method is called for each client subscribed to the publication item.
public int doCompose(Connection conn, Connection rmtConn, String clientid)
              throws Throwable {
        int rowCount = 0;

        Connection auxConn = rmtConn;
        if(auxConn == NULL)
            auxConn = rmtConn;

        String[][] baseTables = getBaseTables();
        String baseTableDMLLogName =
            getBaseTableDMLLogName(baseTables[0][0], baseTables[0][1]);
        String baseTablePK =
            getBaseTablePK(baseTables[0][0], baseTables[0][1]);
        String pubItemDMLTableName = getPubItemDMLTableName();
        String pubItemPK = getPubItemPK();
        String mapView = getMapView(clientid);

        Statement st = auxConn.createStatement();
        String sql = NULL;

        // insert
        sql = "INSERT INTO " + pubItemDMLTableName + " SELECT " + baseTablePK +
             ", DMLTYPE$$ FROM " + baseTableDMLLogName;

        rowCount += st.executeUpdate(sql);

        st.close();
        return rowCount;
    }
This code uses subsidiary methods discussed in Section 2.6.3, "Use Get Methods to Retrieve Information You Need in the User-Defined Compose Class" to create a SQL statement. The MyCompose method retrieves the base table, the base table primary key, the base table DML log name and the publication item DML table name using the appropriate get methods. You can use the table names and other information returned by these methods to create a dynamic SQL statement, which performs an insert into the publication item DML table of the contents of the base table primary key and DML operation from the base table DML log.
2.6.2.3 Implement the init Method
The init method provides the framework for user-created compose preparation processes. The init method is called once for all clients before the individual client compose phase. The default implementation has no effect.
public void init(Connection conn)
The parameter for the init method is described in Table 2-13:
2.6.2.4 Implement the destroy Method
The destroy method provides the framework for compose cleanup processes. The destroy method is called once for all clients after to the individual client compose phase. The default implementation has no effect.
public void destroy(Connection conn)
The parameter for the destroy method is described in Table 2-14:
2.6.3 Use Get Methods to Retrieve Information You Need in the User-Defined Compose Class
The following methods return information for use by primary MyCompose methods.
-
Section 2.6.3.1, "Retrieve the Publication Name With the getPublication Method"
-
Section 2.6.3.2, "Retrieve the Publication Item Name With the getPublicationItem Method"
-
Section 2.6.3.3, "Retrieve the DML Table Name With the getPubItemDMLTableName Method"
-
Section 2.6.3.4, "Retrieve the Primary Key With the getPubItemPK Method"
-
Section 2.6.3.5, "Retrieve All Base Tables With the getBaseTables Method"
-
Section 2.6.3.6, "Retrieve the Primary Key With the getBaseTablePK Method"
-
Section 2.6.3.7, "Discover If Base Table Has Changed With the baseTableDirty Method"
-
Section 2.6.3.8, "Retrieve the Name for DML Log Table With the getBaseTableDMLLogName Method"
-
Section 2.6.3.9, "Retrieve View of the Map Table With the getMapView Method"
2.6.3.1 Retrieve the Publication Name With the getPublication Method
The getPublication method returns the name of the publication.
public String getPublication()
2.6.3.2 Retrieve the Publication Item Name With the getPublicationItem Method
The getPublicationItem method returns the publication item name.
public String getPublicationItem()
2.6.3.3 Retrieve the DML Table Name With the getPubItemDMLTableName Method
The getPubItemDMLTableName method returns the name of the DML table or DML table view, including schema name, which the doCompose or init methods are supposed to insert into.
public String getPubItemDMLTableName()
You can embed the returned value into dynamic SQL statements. The table or view structure is as follows:
<PubItem PK> DMLTYPE$$
The parameters for getPubItemDMLTableName are listed in Table 2-15:
2.6.3.4 Retrieve the Primary Key With the getPubItemPK Method
Returns the primary key for the listed publication in comma separated format in the form of <col1>,<col2>,<col3>.
public String getPubItemPK() throws Throwable
2.6.3.5 Retrieve All Base Tables With the getBaseTables Method
Returns all the base tables for the publication item in an array of two-string arrays. Each two-string array contains the base table schema and name. The parent table is always the first base table returned, in other words, baseTables[0].
public string [][] getBaseTables() throws Throwable
2.6.3.6 Retrieve the Primary Key With the getBaseTablePK Method
Returns the primary key for the listed base table in comma separated format, in the form of <col1>, col2>,<col3>.
public String getBaseTablePK (String owner, String baseTable) throws Throwable
The parameters for getBaseTablePK are listed in Table 2-16:
2.6.3.7 Discover If Base Table Has Changed With the baseTableDirty Method
Returns the a boolean value for whether or not the base table has changes to be synchronized.
public boolean baseTableDirty(String owner, String store)
The parameters for baseTableDirty are listed in Table 2-17:
2.6.3.8 Retrieve the Name for DML Log Table With the getBaseTableDMLLogName Method
Returns the name for the physical DML log table or DML log table view for a base table.
public string getBaseTableDMLLogName(String owner, String baseTable)
The parameters for getBaseTableDMLLogName are listed in Table 2-18:
Table 2-18 getBaseTableDMLLogName Parameters
| Parameter | Definition |
|---|---|
|
|
The schema name of the base table owner. |
|
|
The base table name. |
You can embed the returned value into dynamic SQL statements. There may be multiple physical logs if the publication item has multiple base tables. The parent base table physical primary key corresponds to the primary key of the publication item. The structure of the log is as follows:
<Base Table PK> DMLTYPE$$
The parameters for getBaseTableDMLLogName view structure are listed in Table 2-19:
2.6.3.9 Retrieve View of the Map Table With the getMapView Method
Returns a view of the map table which can be used in a dynamic SQL statement and contains a primary key list for each client device. The view can be an inline view.
public String getMapView() throws Throwable
The structure of the map table view is as follows:
CLID$$CS <Pub Item PK> DMLTYPE$$
The parameters of the map table view are listed in Table 2-20:
2.6.4 Register the User-Defined Class With the Publication Item
Once you have created your sub-class, it must be registered with a publication item. The Consolidator Manager API now has two methods registerMyCompose and deRegisterMyCompose to permit adding and removing the sub-class from a publication item.
-
The
registerMyComposemethod registers the sub-class and loads it into the mobile server repository, including the class byte code. By loading the code into the repository, the sub-class can be used without having to be loaded at runtime. -
The
deRegisterMyComposemethod removes the sub-class from the mobile server repository.
2.7 Customize What Occurs Before and After Synchronization Phases
You can customize what happens before and after certain synchronization processes by creating one or more PL/SQL packages. The following sections detail the different options you have for customization:
2.7.1 Customize What Occurs Before and After Every Phase of Each Synchronization
You can customize the MGP phase of the synchronization process through a set of predefined callback methods that add functionality to be executed before or after certain phases of the synchronization process. These callback methods are defined in the CUSTOMIZE PL/SQL package. Note that these callback methods are called before or after the defined phase for every publication item.
Note:
If you want to customize certain activity for only a specific publication item, see Section 2.7.2, "Customize What Occurs Before and After Compose/Apply Phases for a Single Publication Item" for more information.Manually create this package in the mobile server repository and any remote database that has publication items that are relevant for the customization.
The methods and their respective calling sequence are as follows:
Note:
Some of the procedures in the package are invoked for each client defined in your mobile server, such as theBeforeClientCompose and AfterClientCompose methods.2.7.1.1 NullSync
The NullSync procedure is called at the beginning of every synchronization session. It can be used to determine whether or not a particular user is uploading data.
procedure NullSync (clientid varchar2, isNullSync boolean);
2.7.1.2 BeforeProcessApply
The BeforeProcessApply procedure is called before the entire apply phase of the MGP process.
procedure BeforeProcessApply;
2.7.1.3 AfterProcessApply
The AfterProcessApply procedure is called after the entire apply phase of the MGP process.
procedure AfterProcessApply;
2.7.1.4 BeforeProcessCompose
The BeforeProcessCompose procedure is called before the entire compose phase of the MGP process.
procedure BeforeProcessCompose;
2.7.1.5 AfterProcessCompose
The AfterProcessCompose procedure is called after the entire compose phase of the MGP process.
procedure AfterProcessCompose;
2.7.1.6 BeforeProcessLogs
The BeforeProcessLogs procedure is called before the database log tables (CLG$) are generated for the compose phase of the MGP process. This log tables capture changes for MGP and should not be confused with the trace logs.
procedure BeforeProcessLogs;
2.7.1.7 AfterProcessLogs
The AfterProcessLogs procedure is called after the database log tables (CLG$) are generated for the compose phase of the MGP process. This log tables capture changes for MGP and should not be confused with the trace logs.
procedure AfterProcessLogs;
2.7.1.8 BeforeClientCompose
The BeforeClientCompose procedure is called before each user is composed during the compose phase of the MGP process.
procedure BeforeClientCompose (clientid varchar2);
2.7.1.9 AfterClientCompose
The AfterClientCompose procedure is called after each user is composed during the compose phase of the MGP process.
procedure AfterClientCompose (clientid varchar2);
2.7.1.10 BeforeSyncMapCleanup
For every publication item, Oracle Database Mobile Server maintains a map table, where the MGP inserts the DML operations to be carried out on the client database or new records to be inserted in the case of a complete refresh. At the end of the every synchronization session, the map tables are cleaned up where all old entries are deleted.
During this cleanup, if the connection properties are not ideal, then you may have performance issues. The callbacks added before and after the map cleanup operation enable you to optimize the connection properties and revert back to old connection properties after the operation is complete.
The BeforeSyncMapCleanup procedure is called at the beginning of the cleanup; the AfterSyncMapCleanup procedure is called after cleanup is finished. You can configure the connection settings can be changed in the BeforeSyncMapCleanup and reverted back in the AfterSyncMapCleanup procedure. These methods are invoked only once during the synchronization cycle.
The properties you can manage in these callback procedures are as follows:
-
Any session level hints
-
You can set the
OPTIMIZER_INDEX_CACHINGandOPTIMIZER_INDEX_COST_ADJsession parameters, as follows:-
ALTER SESSION SET OPTIMIZER_INDEX_CACHING=0; -
ALTER SESSION SET OPTIMIZER_INDEX_COST_ADJ=100;
-
Note:
In theCONSOLIDATOR section of the mobile.ora file, you may want to modify the MAX_U_COUNT parameter before the synchronization starts.
The MAX_U_COUNT parameter controls the number of SQL statements that are executed together in a SQL batch statement while performing the map cleanup. The default value for the MAX_U_COUNT parameter is 256. However, if the value is 256 during the map cleanup, then a maximum of 256 SQL statements can be executed together in a batch. Modify this parameter and restart the mobile server to enable a larger batch of SQL statements to be processed during map cleanup.
2.7.1.11 AfterSyncMapCleanup
The AfterSyncMapCleanup procedure is called at the end of the map cleanup. If you set any parameters in the BeforeSyncMapCleanup callback, you can set them back to the original settings in this procedure. See Section 2.7.1.10, "BeforeSyncMapCleanup" for more information.
2.7.1.12 Example Using the Customize Package
If a developer wants to use any of the procedures listed above, perform the following:
-
Manually create the
CUSTOMIZEpackage in the mobile server schema. -
Define all of the methods with the following specification:
create or replace package CUSTOMIZE as
    procedure NullSync (clientid varchar2, isNullSync boolean);
    procedure BeforeProcessApply ;
    procedure AfterProcessApply ;
    procedure BeforeProcessCompose ;
    procedure AfterProcessCompose ;
    procedure BeforeProcessLogs ;
    procedure AfterProcessLogs ;
    procedure BeforeClientCompose(clientid varchar2);
    procedure AfterClientCompose(clientid varchar2);
    end CUSTOMIZE;
WARNING:
It is the developer's responsibility to ensure that the package is defined properly and that the logic contained does not jeopardize the integrity of the synchronization process.
2.7.1.13 Error Handling For CUSTOMIZE Package
Errors are logged for the CUSTOMIZE package only if logging is enabled for the MGP component for the finest level for all event types. Thus, you should set the logging level to ALL and the type to ALL.
If any errors occur due to an invalid CUSTOMIZE package, they are logged only on the first MGP cycle after the mobile server restarts. On subsequent synchronizations, the errors are not re-written to the logs, sine the MGP does not attempt to re-execute the CUSTOMIZE package until the mobile server is restarted.
Note:
One requirement is that theCUSTOMIZE package can only be executed as user mobileadmin.To locate these errors easily within the MGP_<x>.log files, search for the MGP.callBoundCallBack method. Another option is to restart the mobile server and check the MGP log right after the next synchronization.
2.7.2 Customize What Occurs Before and After Compose/Apply Phases for a Single Publication Item
When creating publication items, the user can define a customizable PL/SQL package that MGP calls during the Apply and Compose phase of the MGP background process for that particular publication item. To customize the compose/apply phases for a publication item, perform the following:
-
Create the PL/SQL package with the customized before/after procedures.
-
Register this PL/SQL package with the publication item.
Note:
If you are using a remote database for application data, then the callbacks must be defined on the same database as the application.
Then when the publication item is being processed, MGP calls the appropriate procedures from your package.
Client data is accumulated in the In Queue before being processed by the MGP. Once processed by the MGP, data is accumulated in the Out Queue before being pulled to the client by Mobile Sync.
You can implement the following PL/SQL procedures to incorporate customized code into the MGP process. The clientname and tranid are passed to allow for customization at the user and transaction level.
-
The
BeforeApplymethod is invoked before the client data is applied:procedure BeforeApply(clientname varchar2)
-
The
AfterApplymethod is invoked after all client data is applied.procedure AfterApply(clientname varchar2)
-
The
BeforeTranApplymethod is invoked before the client data withtranidis applied.procedure BeforeTranApply(tranid number)
-
The
AfterTranApplymethod is invoked after all client data withtranidis applied.procedure AfterTranApply(tranid number)
-
The
BeforeComposemethod is invoked before the Out Queue is composed.procedure BeforeCompose(clientname varchar2)
-
The
AfterComposemethod is invoked after the Out Queue is composed.procedure AfterCompose(clientname varchar2)
The following is a PL/SQL example that creates a callback package and registers it when creating the P_SAMPLE3 publication item. The BeforeApply procedure disables constraints before the apply phase; the AfterApply procedure enables these constraints. Even though you are only creating procedures for the before and after apply phase of the MGP process, you still have to provide empty procedures for the other parts of the MGP process.
-
Create PL/SQL package declaration with callback owner/schema name of
SAMPLE3and callback package name ofSAMP3_PKG. -
Create the package definition, with all MGP process procedures with callback owner.callback package name of
SAMPLE3.SAMP3_PKG. Provide aNULLprocedure for any procedure you do not want to modify. -
Register the package as the callback package for the
SAMPLE3publication item. If you are creating the publication item, provide the callback schema/owner and the callback package names as input parameters to thecreatePublicationItemmethod. If you want to add the callback package to an existing publication item, do the following:-
Retrieve the template metadata with
getTemplateItemMetaDatafor the publication item. -
Modify the attributes that specify the callback owner/schema (
cbk_owner) and the callback package (cbk_name). -
Register the package by executing the
setTemplateItemMetaDatamethod.
-
// create package declaration
  stmt.executeUpdate("CREATE OR REPLACE PACKAGE SAMPLE3.SAMP3_PKG as"
  + " procedure BeforeCompose(clientname varchar2);"
  + " procedure AfterCompose(clientname varchar2);"
  + " procedure BeforeApply(clientname varchar2);"
  + " procedure AfterApply(clientname varchar2);"
  + " procedure BeforeTranApply(tranid number);"
  + " procedure AfterTranApply(tranid number);"
  + " end;"
  );
// create package definition
  stmt.executeUpdate("CREATE OR REPLACE PACKAGE body SAMPLE3.SAMP3_PKG as"
  + " procedure BeforeTranApply(tranid number) is"
  + " begin"
    + " NULL;"
  + " end;"
  + " procedure AfterTranApply(tranid number) is"
  + " begin"
    + " NULL;"
  + " end;"
  + " procedure BeforeCompose(clientname varchar2) is"
  + " begin"
        + "   NULL;"
  + " end;"
  + " procedure AfterCompose(clientname varchar2) is"
  + " begin"
  + "   NULL;"
  + " end;"
  + " procedure BeforeApply(clientname varchar2) is"
  + "   cur integer;"
  + "   ign integer;"
  + "   begin"
  + "     cur := dbms_sql.open_cursor;"
  + "     dbms_sql.parse(cur,'SET CONSTRAINT SAMPLE3.address14_fk DEFERRED',
                             dbms_sql.native);"
  + "     ign := dbms_sql.execute(cur);"
  + "     dbms_sql.close_cursor(cur);"
  + "   end;"
  + " procedure AfterApply(clientname varchar2) is"
  + "   cur integer;"
  + "   ign integer;"
  + "   begin"
  + "     cur := dbms_sql.open_cursor;"
  + "     dbms_sql.parse(cur, 'SET CONSTRAINT SAMPLE3.address14_fk IMMEDIATE',
                              dbms_sql.native);"
  + "     ign := dbms_sql.execute(cur);"
  + "     dbms_sql.close_cursor(cur);"
  + "   end;"
  + " end;"
  );
Then, register the callback package with the createPublicationItem method call, as follows:
// register SAMPLE3.SAMP3_PKG as the callback for MGP processing of
// P_SAMPLE3 publication item.

cm.createPublicationItem("P_SAMPLE3","SAMPLE3","ADDRESS", "F",
    "SELECT * FROM SAMPLE3.ADDRESS", "SAMPLE3", "SAMP3_PKG");
In the previous code example, the following is required:
-
stmt, which is used when creating the package definition, is an instance ofjava.sql.Statement -
cm, which is used when registering the callback package, is an instance oforacle.lite.sync.ConsolidatorManager -
The callback package must have the following procedures defined:
-
BeforeCompose (clientname varchar2); -
AfterCompose (clientname varchar2); -
BeforeApply (clientname varchar2); -
AfterApply (clientname varchar2); -
BeforeTranApply (tranid number); -
AfterTranApply (tranid number);
-
2.8 Understanding Your Refresh Options
The mobile server supports several refresh options. During a fast refresh, incremental changes are synchronized. However, during a complete refresh, all data is refreshed with current data. The refresh mode is established when you create the publication item using the createPublicationItem API call. In order to change the refresh mode, first drop the publication item and recreate it with the appropriate mode.
The following sections describe the types of refresh for your publication item that can be used to define how to synchronize:
-
Fast Refresh: The most common method of synchronization is a fast refresh publication item where changes are uploaded by the client, and changes for the client are downloaded. Meanwhile, the MGP periodically collects the changes uploaded by all clients and applies them to database tables. It then composes new data, ready to be downloaded to each client during the next synchronization, based on predefined subscriptions.
-
Complete Refresh: During a complete refresh, all data for a publication is downloaded to the client. For example, during the very first synchronization session, all data on the client is refreshed from the client database. This form of synchronization takes longer because all rows that qualify for a subscription are transferred to the client device, regardless of existing client data.
-
Queue-Based: The developer creates their own queues to handle the synchronization data transfer. This can be considered the most basic form of publication item, for the simple reason that there is no synchronization logic created with it. The synchronization logic is left entirely in the hands of the developer. A queue-based publication item is ideally suited for scenarios that do not require actual synchronization, but require something somewhere in between. For instance, data collection on the client. With data collection, there is no need to worry about conflict detection, client state information, or server-side updates. Therefore, there is no need to add the additional overhead normally associated with a fast refresh or complete refresh publication item.
-
Forced Refresh: This is actually NOT a refresh option; however, we discuss it here in order to inform you of the consequences of performing a forced refresh. When a Forced Refresh is initiated all data on the client is removed. The client then brings down an accurate copy of the client data from the enterprise database to start fresh with exactly what is currently stored in the enterprise data store.
The following sections describe the refresh options in more detail:
2.8.1 Fast Refresh
Publication items are created for fast refresh by default. Under fast refresh, only incremental changes are replicated. The advantages of fast refresh are reduced overhead and increased speed when replicating data stores with large amounts of data where there are limited changes between synchronization sessions.
The mobile server performs a fast refresh of a view if the view meets the following criteria:
-
Each of the view base tables must have a primary key.
-
All primary keys from all base tables must be included in the view column list.
-
If the item is a view, and the item predicate involves multiple tables, then all tables contained in the predicate definition must have primary keys and must have corresponding publication items.
The view requires only a unique primary key for the parent table. The primary keys of other tables may be duplicated. For each base table primary key column, you must provide the mobile server with a hint about the column name in the view. You can accomplish this by using the primaryKeyHint method of the Consolidator Manager object. See the Oracle Database Mobile Server JavaDoc for more information.
2.8.2 Complete Refresh for Views
A complete refresh is simply a complete execution of the snapshot query. When application synchronization performance is slow, tune the snapshot query. Complete refresh is not optimized for performance. Therefore, to improve performance, use the fast refresh option. The Consperf utility analyzes only fast refresh publication items.
Publication items can be created for complete refresh using the C refresh mode in the createPublicationItem API from the Consolidator Manager API. When this mode is specified, client data is completely refreshed with current data from the server after every sync. An administrator can force a complete refresh for an entire publication through an API call. This function forces complete refresh of a publication for a given client.
See the Oracle Database Mobile Server JavaDoc for more information.
The following lists what can cause a complete refresh, ordered from most likely to least likely:
-
The same mobile user synching from multiple devices on the same platform, or synching from different platforms when the publications are not platform specific.
-
Republishing the application.
-
An unexpected server apply condition, such as constraint violations, unresolved conflicts, and other database exceptions.
-
Modifying the application, such as changing subsetting parameters or adding/altering publication items. This refresh only affects the publication items.
-
A force refresh requested by server administrator or a force refresh requested by the client.
-
On mobile clients, restoring an old client database.
-
Two separate applications using the same back-end store.
-
An unexpected client apply conditions, such as a moved or deleted database, database corruption, memory corruption, other general system failures.
-
Loss of transaction integrity between the server and client. The server fails post processing after completing the download and disconnects from the client.
-
Data transport corruptions.
2.8.3 Queue-Based Refresh
You can create your own queues. The mobile server uploads and downloads changes from the user. Perform customized apply/compose modifications to the back-end database with your own implementation. See the Section 2.12, "Customizing Synchronization With Your Own Queues" for more information.
2.8.4 Forced Refresh
This is actually NOT a refresh option; however, we discuss it here in order to inform you of the consequences of performing a forced refresh. Out of all the different synchronization options, the Forced Refresh synchronization architecture is probably the most misunderstood synchronization type. This option is commonly confused with the Complete Refresh synchronization. This confusion may result in tragic consequences and the loss of critical data on the client.
The Forced Refresh option is an emergency only synchronization option. This option is for when a client is so corrupt or malfunctioning so severely that the determination is made to replace the mobile client data with a fresh copy of data from the enterprise data store. When this option is selected, any data transactions that have been made on the client are lost.
When a Forced Refresh is initiated all data on the client is removed. The client then brings down an accurate copy of the client data from the enterprise database to start fresh with exactly what is currently stored in the enterprise data store.
2.9 Synchronizing With Database Constraints
When you have database constraints on your table, you must develop your application in a certain way to facilitate the synchronization of the data and keeping the database constraints.
The following sections detail each constraint and what issues you must take into account:
2.9.1 Synchronization And Database Constraints
Oracle Database Mobile Server does not keep a record of the SQL operations executed against the database; instead, only the final changes are saved and synchronized to the back-end database.
For example, if you have a client with a unique key constraint, where the following is executed against the client database:
-
Record with primary key of one and unique field of ABC is deleted.
-
Record with primary key of 4 and unique field of ABC is inserted.
When this is synchronized, according the Section 2.4.1.7.2, "Using Table Weight" discussion, the insert is performed before the delete. This would add a duplicate field for ABC and cause a unique key constraint violation. In order to avoid this, you should defer all constraint checking until after all transactions are applied. See Section 2.9.3.2, "Defer Constraint Checking Until After All Transactions Are Applied".
Another example of how synchronization captures the end result of all SQL modifications is as follows:
-
Insert an employee record 4 with name of Joe Judson.
-
Update employee record 4 with address.
-
Update employee record 4 with salary.
-
Update employee record 4 with office number
-
Update employee record 4 with work email address.
When synchronization occurs, all modifications are captured and only a single insert is performed on the back-end database. The insert contains the primary key, name, address, salary, office number and email address. Even though the data was created with multiple updates, the Sync Server only takes the final result and makes a single insert.
Note:
If you want these constraints to apply on the mobile client, see Section 2.9.6, "Generating Constraints on the Mobile Client".2.9.2 Primary Key is Unique
When you have multiple clients, each updating the same table, you must have a method for guaranteeing that the primary key is unique across all clients. Oracle Database Mobile Server provides you a sequence number that you can use as the primary key, which is guaranteed to be unique across all mobile clients.
For more information on the sequence number, see Section 2.4.1.8, "Creating Client-Side Sequences for the Downloaded Snapshot".
2.9.3 Foreign Key Constraints
A foreign key exists in a details table and points to a row in the master table. Thus, before a client adds a record to the details table, the master table must first exist.
For example, two tables EMP and DEPT have referential integrity constraints and are an example of a master-detail relationship. The DEPT table is the master table; the EMP table is the details table. The DeptNo field (department number) in the EMP table is a foreign key that points to the DeptNo field in the DEPT table. The DeptNo value for each employee in the EMP table must be a valid DeptNo value in the DEPT table.
When a user adds a new employee, first the employee's department must exist in the DEPT table. If it does not exist, then the user first adds the department in the DEPT table, and then adds a new employee to this department in the EMP table. The transaction first updates DEPT and then updates the EMP table. However, Oracle Database Mobile Server does not store the sequence in which these operations were executed.
Oracle Database Mobile Server does not keep a record of the SQL operations executed against the database; instead, only the final changes are saved and synchronized to the back-end database. For our employee example, when the user replicates with the mobile server, the mobile server could initiate the updates the EMP table first. If this occurs, then it attempts to create a new record in EMP with an invalid foreign key value for DeptNo. Oracle database detects a referential integrity violation. The mobile server rolls back the transaction and places the transaction data in the mobile server error queue. In this case, the foreign key constraint violation occurred because the operations within the transaction are performed out of their original sequence.
In order to avoid this violation, you can do one of two things:
2.9.3.1 Set Update Order for Tables With Weights
Set the order in which tables are updated on the back-end Oracle database with weights. To avoid integrity constraints with a master-details relationship, the master table must always be updated first in order to guarantee that it exists before any records are added to a details table. In our example, you must set the DEPT table with a lower weight than the EMP table to ensure that all records are added to the DEPT table first.
You define the order weight for tables when you add a publication item to the publication. For more information on weights, see Section 2.4.1.7.2, "Using Table Weight".
2.9.3.2 Defer Constraint Checking Until After All Transactions Are Applied
You can use a PL/SQL procedure avoid foreign key constraint violations based on out-of-sequence operations by using DEFERRABLE constraints in conjunction with the BeforeApply and AfterApply functions. DEFERRABLE constraints can be either INITIALLY IMMEDIATE or INITIALLY DEFERRED. The behavior of DEFERRABLE INITIALLY IMMEDIATE foreign key constraints is identical to regular immediate constraints. They can be applied interchangeably to applications without impacting functionality.
The mobile server calls the BeforeApply function before it applies client transactions to the server and calls the AfterApply function after it applies the transactions. Using the BeforeApply function, you can set constraints to DEFFERED to delay referential integrity checks. After the transaction is applied, call the AfterApply function to set constraints to IMMEDIATE. At this point, if a client transaction violates referential integrity, it is rolled back and moved into the error queues.
To prevent foreign key constraint violations using DEFERRABLE constraints:
-
Drop all foreign key constraints and then recreate them as
DEFERRABLEconstraints. -
Bind user-defined PL/SQL procedures to publications that contain tables with referential integrity constraints.
-
The PL/SQL procedure should set constraints to
DEFERREDin theBeforeApplyfunction andIMMEDIATEin theAfterApplyfunction as in the following example featuring a table namedSAMPLE3and a constraint namedaddress.14_fk:
     procedure BeforeApply(clientname varchar2) is
     cur integer;
     begin
       cur := dbms_sql.open_cursor;
       dbms_sql.parse(cur,'SET CONSTRAINT SAMPLE3.address14_fk
                       DEFERRED', dbms_sql.native);
       dbms_sql.close_cursor(cur);
     end;
     procedure AfterApply(clientname varchar2) is
     cur integer;
     begin
       cur := dbms_sql.open_cursor;
       dbms_sql.parse(cur, 'SET CONSTRAINT SAMPLE3.address14_fk
                       IMMEDIATE', dbms_sql.native);
       dbms_sql.close_cursor(cur);
     end;
2.9.4 Unique Key Constraint
A unique key constraint enforces uniqueness of data. However, you may have multiple clients across multiple devices updating the same table. Thus, a record may be unique on a single client, but not across all clients. Enforcing uniqueness is the customer's reponsibility and depends on the data.
How do you guarantee that the records added on separate clients are unique? You can use the sequence numbers generated on the client by Oracle Database Mobile Server. See Section 2.4.1.8, "Creating Client-Side Sequences for the Downloaded Snapshot" for more information.
2.9.5 NOT NULL Constraint
When you have a NOT NULL constraint on the client or on the server, you must ensure that this constraint is set on both sides.
-
On the server—Create a NOT NULL constraint on the back-end server table using the Oracle database commands.
-
For the client—Set a column as NOT NULL by executing the
setPubItemColOptionmethod in theConsolidatorManagerAPI. ProvideConsolidator.NOT_NULLas the input parameter fornullType. The constraint is then enforced on the table in the client database.
2.9.6 Generating Constraints on the Mobile Client
The Primary Key, Foreign Key, Not Null and Default Value constraints can be synchronized to the mobile client; the Unique constraints cannot be synchronized. For foreign key constraints, you decide if you want the foreign key on the mobile client. That is, when you create a foreign key constraint on a table on the back-end server, you may or may not want this constraint to exist on the mobile client.
-
Each publication that is defined is specific to a certain usage. For example, if you have a foreign key constraint between two tables, such as department and employee, your publication may only specify that information from the employee table is downloaded. In this situation, you would not want the foreign constraint between the employee and department table to be enforced on the client.
-
If you do have a master-detail relationship or other constraint relationships synchronized down to the client, then you would want to have the constraint generated on the client.
In order to generate the constraints on the mobile client, perform the following:
-
Within the process for creating or modifying an existing publication using the APIs, invoke the
assignWeightsmethod of theConsolidatorManagerobject, which does the following tasks:-
Calculates a weight for each of the publication items included in the publication.
-
Creates a script that, when invoked on the client, generates the constraints on the client. This script is automatically added to the publication.
-
-
On the mobile client, perform a synchronization for the user, which brings down the snapshot and the constraint script. The script is automatically executed on the mobile client.
Once executed on the client, all constraints on the server for this publication are also enforced on the mobile client.
2.9.6.1 The assignWeights Method
The assignWeights method automatically calculates weights for all publication items belonging to a publication. If a new publication item is added or if there is a change in the referential relationships, the API should be called again.
The following defines the assignWeights method and its parameters:
public void assignWeights(java.lang.String pub, boolean createScripts)
                   throws ConsolidatorException
Where:
-
pub- Publication name -
createScripts- If true, creates refrential constraints scripts and adds them to the publication to be propagated to subscribed clients.
2.10 Resolving Conflicts with Winning Rules
When you have a conflict, you need to determine which party wins. The following are the settings that you can choose for conflict resolution on the server:
-
Client wins—When the client wins, the mobile server automatically applies client changes to the server. And if you have a record that is set for
INSERT, yet a record already exists, the mobile server automatically modifies it to be anUPDATE. -
Server wins—If the server wins, the client updates are not applied to the application tables. Instead, the mobile server automatically composes changes for the client. The client updates are placed into the error queue, just in case you still want these changes to be applied to the server—even though the winning rules state that the server wins.
The mobile server uses internal versioning to detect synchronization conflicts. A separate version number is maintained for each client and server record. When the client updates are applied to the server, then the mobile server checks the version numbers of the client against the version numbers on the server. If the version does not match, then the conflict resolves according to the defined winning rules—such as client wins or server wins, as follows:
The mobile server does not automatically resolve synchronization errors. Instead, the mobile server rolls back the corresponding transactions, and moves the transaction operations into the mobile server error queue. It is up to the administrator to view the error queue and determine if the correct action occurred. If not, the administrator must correct and re-execute the transaction. If it did execute correctly, then purge the transaction from the error queue.
One type of error is a synchronization conflict, which is detected in any of the following situations:
-
The client and the server update the same row.
-
The client deletes the same row that the server updates.
-
The client updates a row at the same time that the server deletes it when the "server wins" conflict rule is specified. This is considered a synchronization error for compatibility with Oracle database advanced replication.
-
Both the client and server create rows with the same primary key values.
-
Two separate clients update the same row.
-
Two clients insert a row with the same primary key.
-
One client deletes a row that a second client updates.
Note:
In the case where two clients conflict, then the client whose data gets applied first effectively becomes the server and the other client becomes the client in resolving this conflict. -
For systems with delayed data processing, where the client data is not directly applied to the base table—for instance, in a three-tiered architecture—a situation could occur when a client inserts a row and then updates the same row, while the row has not yet been inserted into the base table. In that case, if the
DEF_APPLYparameter inC$ALL_CONFIGis set toTRUE, anINSERToperation is performed, instead of theUPDATE. It is up to the application developer to resolve the resulting primary key conflict. If, however,DEF_APPLYis not set, a "NO DATA FOUND" exception is thrown.
All the other errors, including nullity violations and foreign key constraint violations are synchronization errors. See Section 2.9, "Synchronizing With Database Constraints" for more information.
On the server, synchronization errors and conflicts are placed into the error queue. For each publication item created, a separate and corresponding error queue is created. The purpose of this queue is to store transactions that fail due to unresolved conflicts. The administrator can attempt to resolve the conflicts, either by modifying the error queue data or that of the server, and then attempt to re-apply the transaction.
The administrator can resolve the errors, and then re-execute or purge transactions from the error queue using either of the following:
-
Resolve errors and conflicts in the error queue using the Mobile Manager GUI—See Section 5.12.4.3, "Viewing Server-Side Synchronization Conflicts and Errors in the Error Queue" in the Oracle Database Mobile Server Administration and Deployment Guide on how to update the client transaction in the error queue and re-execute the statement using the Mobile Manager GUI.
-
Resolve errors and conflicts programmatically with the Consolidator Manager API. You can access the mobile server error queue tables directly and customize the conflict rules, as described in the following sections:
2.10.1 Resolving Errors and Conflicts on the Mobile Server Using the Error Queue
The error queue stores transactions that fail due to synchronization errors or unresolved conflicts. For unresolved conflicts, only the "Server Wins" conflicts are reported. If you have set your conflict rules to "Client Wins", then these are not reported. The administrator can do one of the following:
-
Attempt to correct the error by modifying the error queue data or that of the server, and re-apply the transaction through the
executeTransactionmethod of the Consolidator Manager object. -
If a conflict was reported and resolved to your satisfaction, then you can purge the transaction from the error queue with the
purgeTransactionmethod of the Consolidator Manager object. Otherwise, you can override the default conflict resolution by modifying the error queue data and re-apply the transaction.
View the error queue through the Mobile Manager GUI, where you can see what the conflict was. You can fix the problem and reapply the data by modifying the DML operation appropriately and then re-executing. See Section 5.12.4.3, "Viewing Server-Side Synchronization Conflicts and Errors in the Error Queue"" in the Oracle Database Mobile Server Administration and Deployment Guide for directions.
2.10.2 Customizing Synchronization Conflict Resolution Outcomes
You can customize synchronization conflict resolution by doing the following:
-
Configure the winning rule to Client Wins.
-
Perform only ONE of the following:
-
Create and attach one or more triggers on the back-end Oracle database base tables to execute before the
INSERT,UPDATE, orDELETEDML statements. The triggers should be created to evaluate the data and handle the conflict. Triggers are created to compare old and new row values and resolve client changes as defined by you. See the Oracle Database documentation for full details on how to create and attach triggers. -
Create a custom DML procedure. See Section 2.4.1.13, "Callback Customization for DML Operations" for an example of how to create a custom DML procedure.
You can use the
generateMobileDMLProcedureto generate the procedure specification for a given publication item. This specification can be used as a starting point in creating your own custom DML handling logic in a PL/SQL procedure. You use theaddMobileDMLProcedureAPI to attach the PL/SQL procedure to the publication item. See the Oracle Database Mobile Server API Specification for more information.
-
2.11 Using the Sync Discovery API to Retrieve Statistics
The Sync Discovery feature is used to request an estimate of the size of the download for a specific client, based on historical data. The following statistics are gathered to maintain the historical data:
-
The total number of rows send for each publication item.
-
The total data size for these rows.
-
The compressed data size for these rows.
The following sections contain methods that can be used to gather statistics:
2.11.1 getDownloadInfo Method
The getDownloadInfo method returns the DownloadInfo object. The DownloadInfo object contains a set of PublicationSize objects and access methods. The PublicationSize objects carry the size information of a publication item. The method Iterator iterator() can then be used to view each PublicationSize object in the DownloadInfo object.
DownloadInfo dl = consolidatorManager.getDownloadInfo("S11U1", true, true);
Note:
See the Oracle Database Mobile Server JavaDoc for more information.2.11.2 DownloadInfo Class Access Methods
The access methods provided by the DownloadInfo class are listed in Table 2-21:
Table 2-21 DownloadInfo Class Access Methods
| Method | Definition |
|---|---|
|
|
Returns an Iterator object so that the user can traverse through the all the |
|
|
Returns the size information of all |
|
|
Returns the size of all publication items that belong to the publication referred to by the string |
|
|
Returns the number of all records of all the publication items that belong to the publication referred by the string |
|
|
Returns the size of a particular publication item referred by
|
|
|
Returns the number of records of the publication item referred by |
Note:
See the Oracle Database Mobile Server JavaDoc for more information.2.11.3 PublicationSize Class
The access methods provided by the PublicationSize class are listed in Table 2-22:
Table 2-22 PublicationSize Class Access Methods
| Parameter | Definition |
|---|---|
|
|
Returns the name of the publication containing the publication item. |
|
|
Returns the name of the publication item referred to by the |
|
|
Returns the total size of the publication item referred to by the |
|
|
Returns the number of rows of the publication item that is synchronized in the next synchronization. |
Note:
See the Oracle Database Mobile Server JavaDoc for more information.
import   java.sql.*;
import   java.util.Iterator;
import   java.util.HashSet;

import   oracle.lite.sync.ConsolidatorManager;
import   oracle.lite.sync.DownloadInfo;
import   oracle.lite.sync.PublicationSize;

public class TestGetDownloadInfo{

   public static void main(String argv[]) throws Throwable
   {
// Open Consolidator Manager connection
      try
      {
// Create a ConsolidatorManager object
         ConsolidatorManager cm = new ConsolidatorManager ();
// Open a Consolidator Manager connection
         cm.openConnection ("MOBILEADMIN", "MANAGER",
                      "jdbc:oracle:thin:@server:1521:orcl", System.out);
// Call getDownloadInfo
         DownloadInfo dlInfo = cm.getDownloadInfo ("S11U1", true, true);
// Call iterator for the Iterator object and then we can use that to transverse
// through the set of PublicationSize objects.
         Iterator it = dlInfo.iterator ();
// A temporary holder for the PublicationSize object.
         PublicationSize ps = NULL;
// A temporary holder for the name of all the Publications in a HashSet object.
         HashSet pubNames = new HashSet ();
// A temporary holder for the name of all the Publication Items in a HashSet
// object.
         HashSet pubItemNames = new HashSet ();
// Traverse through the set.
         while (it.hasNext ())
         {
// Obtain the next PublicationSize object by calling next ().
            ps = (PublicationSize)it.next ();

// Obtain the name of the Publication this PublicationSize object is associated
// with by calling getPubName ().
            pubName = ps.getPubName ();
            System.out.println ("Publication: " + pubName);

// We save pubName for later use.
            pubNames.add (pubName);

// Obtain the Publication name of it by calling getPubName ().
            pubItemName = ps.getPubItemName ();
            System.out.println ("Publication Item Name: " + pubItemName);

// We save pubItemName for later use.
            pubItemNames.add (pubItemName);

// Obtain the size of it by calling getSize ().
            size = ps.getSize ();
            System.out.println ("Size of the Publication: " + size);

// Obtain the number of rows by calling getNumOfRows ().
            numOfRows = ps.getNumOfRows ();
            System.out.println ("Number of rows in the Publication: "
                                + numOfRows);
         }

// Obtain the size of all the Publications contained in the
// DownloadInfo objects.
         long totalSize = dlInfo.getTotalSize ();
         System.out.println ("Total size of all Publications: " + totalSize);

// A temporary holder for the Publication size.
         long pubSize = 0;

// A temporary holder for the Publication number of rows.
         long pubRecCount = 0;

// A temporary holder for the name of the Publication.
         String tmpPubName = NULL;

// Transverse through the Publication names that we saved earlier.
         it = pubNames.iterator ();
         while (it.hasNext ())
         {
// Obtain the saved name.
            tmpPubName = (String) it.next ();

// Obtain the size of the Publication.
            pubSize = dlInfo.getPubSize (tmpPubName);
            System.out.println ("Size of " + tmpPubName + ": " + pubSize);

// Obtain the number of rows of the Publication.
            pubRecCount = dlInfo.getPubRecCount (tmpPubName);
            System.out.println ("Number of rows in " + tmpPubName + ": "
                                + pubRecCount);
         }

// A temporary holder for the Publication Item size.
         long pubItemSize = 0;

// A temporary holder for the Publication Item number of rows.
         long pubItemRecCount = 0;

// A temporary holder for the name of the Publication Item.
         String tmpPubItemName = NULL;

// Traverse through the Publication Item names that we saved earlier.
         it = pubItemNames.iterator ();
         while (it.hasNext ())
         {
// Obtain the saved name.
            tmpPubItemName = (String) it.next ();

// Obtain the size of the Publication Item.
            pubItemSize = dlInfo.getPubItemSize (tmpPubItemName);
            System.out.println ("Size of " + pubItemSize + ": " + pubItemSize);

// Obtain the number of rows of the Publication Item.
            pubItemRecCount = dlInfo.getPubItemRecCount (tmpPubItemName);
            System.out.println ("Number of rows in " + tmpPubItemName + ": "
                               + pubItemRecCount);
         }
         System.out.println ();

// Close the connection
         cm.closeConnection ();
      }
      catch (Exception e)
      {
         e.printStackTrace();
      }
   }}
2.12 Customizing Synchronization With Your Own Queues
Application developers can manage the synchronization process programmatically by using queue-based publication items. By default on the server-side, the MGP manages both the In Queues and the Out Queues by gathering all updates posted to the In Queue, applying these updates to the relevant tables, and then composing all new updates created on the server that are destined for the client and posting it to the Out Queue. This is described in Section 2.1, "How Oracle Database Mobile Server Synchronizes".
However, you can bypass the MGP and provide your own solution for the apply and compose phases on the server-side for selected publication items. You may wish to bypass the MGP for the publication item if one or more of the following are true:
-
If you want to facilitate synchronous data exchange, use queue-based publication items.
-
If you have complex business rules for data subsetting, in how you decide what data each user receives, then use queue-based publication items. You can incorporate these business rules into generation of the client's queue data. This is especially true if the rules are dynamically evaluated during runtime.
-
If your client collects large amounts of data only for upload to the server, never receives data from the server, and it does not require conflict resolution, then use the data collection queues.
Figure 2-4 shows how the Sync Server invokes the UPLOAD_COMPLETE PL/SQL procedure when the client upload is complete. And before it downloads all composed updates to the client, the Sync Server invokes the DOWNLOAD_INIT PL/SQL procedure.
Figure 2-4 Queue-Based Synchronization Architecture
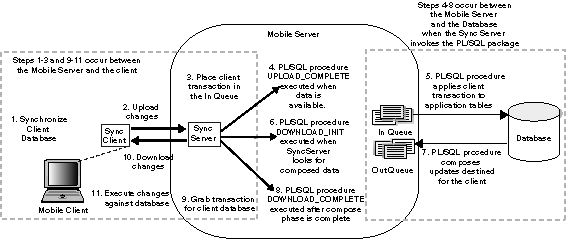
Description of "Figure 2-4 Queue-Based Synchronization Architecture"
To bypass the MGP, do the following:
-
Define your publication item as queue-based or data collection. Then, the MGP is not aware of the queues associated with this publication item. You can do this when creating the publication item either through MDW or Consolidator APIs.
-
If queue-based, then create a package, either PL/SQL or Java, that implements the queue interface callback methods. This includes the following callback methods:
-
UPLOAD_COMPLETEto process the incoming updates from the client. -
DOWNLOAD_INITto complete the compose phase. -
DOWNLOAD_COMPLETEif you have any processing to perform after the compose phase.
-
-
Create the queues. The In Queue,
CFM$<publication_item_name>is created by default for you. Create the Out Queue asCTM$<publication_item_name>.
The following sections describe the methods for customizing the server-side apply/compose phases-++:
-
Section 2.12.1, "Customizing Apply/Compose Phase of Synchronization with a Queue-Based Publication Item"—You can define both the apply and compose phases using queue-based publication items.
-
Section 2.12.2, "Creating Data Collection Queues for Uploading Client Collected Data"—You use the data collection queue for uploading data from the client. The queues are optimized for when a client collects data to upload to the server and never receives data from the server.
-
Section 2.12.3, "Selecting How and When to Notify Clients of Composed Data"—You can notify a client that there is new data on the server ready to be downloaded to initiate a synchronization.
2.12.1 Customizing Apply/Compose Phase of Synchronization with a Queue-Based Publication Item
Note:
The sample for queue-based publication items is located in<ORACLE_HOME>/Mobile/Sdk/samples/Sync/win32/QBasedPI.When you want to substitute your own logic for the apply/compose phase of the synchronization process, use a queue-based publication item. The following briefly gives an overview of how the process works internally when using a queue-based publication item:
-
When data arrives from the client it is placed in the publication item In Queues. The Sync Server calls
UPLOAD_COMPLETE, after which the data is committed. All records in the current synchronization session are given the same transaction identifier. The Queue Control Table (C$INQ) indicates which publication item In Queues have received new transactions with the unique transaction identifier. Thus, this table shows which queues need processing. -
If you have a queue-based publication item, you must implement the compose phase, if you have one. The MGP is unaware of queue-based publication items and so is not able to perform any action for this publication item. When you implement your own compose logic, you decide when and how the compose logic is invoked. For example, you could do the following:
-
You could have a script execute your compose logic at a certain time of the day.
-
You could schedule the compose procedure as a job in the Job Scheduler.
-
You could include the compose logic as part of the
DOWNLOAD_INITfunction, so that it executes before the client downloads.
Note:
If you decide to implement the compose phase independent of theDOWNLOAD_INITfunction; then once the compose is finished, you may want the client to receive the data as soon as possible. In this case, invoke theEN_QUEUE_NOTIFICATIONfunction to start an automatic synchronization from the client. For more information on this function, see Section 2.12.3, "Selecting How and When to Notify Clients of Composed Data".Before the Sync Server begins the download phase of the synchronization session, it calls
DOWNLOAD_INIT. In this procedure, you can customize the compose or develop any pre-download logic for the client. The Sync Server finds a list of the publication items, which can be downloaded based on the client's subscription. A list of publication items and their refresh mode, ('Y' for complete refresh, 'N' for fast refresh) is inserted into a temporary table (C$PUB_LIST_Q). Items can be deleted or the refresh status can be modified in this table since the Sync Server refers toC$PUB_LIST_Qto determine the items that are downloaded to the client. -
Similar to the In Queue, every record in the Out Queue should be associated with it a transaction identifier (TRANID$$). The Sync Server passes the last_tran parameter to indicate the last transaction that the client has successfully applied. New Out Queue records that have not been downloaded to the client are be marked with the value of curr_tran parameter. The value of curr_tran is always greater than that of last_tran, though not sequential. The Sync Server downloads records from the Out Queues when the value of TRANID$$ is greater than last_tran. When the data is downloaded, the Sync Server calls DOWNLOAD_COMPLETE.
When you decide to use queue-based publication items, you need to do the following:
-
Create both the In and Out Queues used in the apply and compose phases.
-
You can use the default In Queue, which is named
CFM$<publication_item_name>. Alternatively, you can create the queue of this name manually. For example, if you wanted the In Queue to be a view, then you would create the In Queue manually. -
Create the Out Queue for the compose phase as
CTM$<publication_item_name>.
-
-
Create the publication item and define it as a queue-based publication item. This can be done either through MDW or the Consolidator APIs.
-
Create the PL/SQL or Java callback methods for performing the apply and compose phases. Since the MGP has nothing to do with the queues used for these phases, when you are finished processing the data, you must manage the queues by deleting any rows that have completed the necessary processing.
-
Register the package to be used for all of the queue processing for a particular publication item.
Note:
Normally, you define the package on the Main database where the repository is located. However, if you are using a remote database for your application data, then the package must be defined on the remote database.2.12.1.1 Queue Creation
If a queue-based publication item is created, it always uses a queue by the name of CFM$<publication_item_name>. However, if you want to customize how the In Queue is defined—for example, by defining certain rules, making it a view or designating the location of the queue—then you can create your own In Queue. The Out Queue is never defined for you, so you must create an Out Queue named CTM$<publication_item_name> in the mobile server repository manually using SQL.
These queues are created based upon the publication item tables. For example, the following table ACTIVESTATEMENT has five columns, as follows:
create table ACTIVESTATEMENT(
        StatementName varchar2(50) primary key,
        TestSuiteName varchar2(50),
        TestCaseName varchar2(50),
        CurrLine varchar2(4000),
        ASOrder integer) nologging;
The application stores its data in these five columns. When synchronization occurs, this data must be uploaded and downloaded. However, there is also meta-information necessary for facilitating the synchronization phases. Therefore, the Out Queue that you create contains the meta-information in the CLID$$CS, TRANID$$ and DMLTYPE$$ columns, as well as the columns from the ACTIVESTATEMENT table, as follows:
create table CTM$AUTOTS_PUBITEM(
CLID$$CS VARCHAR2 (30),
StatementName varchar2(50) primary key,
TestSuiteName varchar2(50),
TestCaseName varchar2(50),
CurrLine varchar2(4000),
ASOrder integer,
TRANID$$ NUMBER (10),
DMLTYPE$$ CHAR (1) CHECK (DMLTYPE$$ IN ('I','U','D'))) nologging;
Thus, before you can create the queues, you must already know the structure of the tables for the publication item, as well as the publication item name.
The following shows the structure and creation of the queues:
All In Queues are named CFM$<name> where name is the publication item name. It contains the application publication item table columns, as well as the fields listed in Table 2-23:
Table 2-23 In Queue Interface Creation Parameters
| Parameter | Description |
|---|---|
|
|
A unique string identifying the client. |
|
|
A unique number identifying the transaction. |
|
|
A unique number for every DML language operation per transaction in the inqueue (CFM$) only. |
|
|
Checks the type of DML instruction:
|
The following designates the structure when creating the In Queue:
create table 'CFM$'+name
(
CLID$$CS   VARCHAR2 (30),
TRANID$$   NUMBER (10),
SEQNO$$    NUMBER (10),
DMLTYPE$$  CHAR (1) CHECK (DMLTYPE$$  IN ('I','U','D'),
publication item column definitions
)
Note:
You must have the parameters in the same order as shown above for the In Queue. It is different than the ordering in the Out Queue.All Out Queues are named CTM$<name> where name is the publication item name. It contains the application publication item table columns, as well as the fields listed in Table 2-24:
Table 2-24 Out Queue Interface Creation Parameters
| Parameter | Description |
|---|---|
|
|
A unique string identifying the client. |
|
|
A unique number identifying the transaction. |
|
|
Checks the type of DML instruction:
|
The following designates the structure when creating the In Queue:
create table 'CTM$'+name
(
CLID$$CS   VARCHAR2 (30),
publication item column definitions
TRANID$$   NUMBER (10),
DMLTYPE$$  CHAR (1) CHECK (DMLTYPE$$  IN ('I','U','D'),
)
Note:
You must have the parameters in the same order as shown above for the Out Queue. It is different than the ordering in the In Queue.Another example of creating an Out Queue is in the FServ example, which uses the default In Queue of CFM$PI_FSERV_TASKS and creates the CTM$PI_FSERV_TASKS Out Queue for the PI_FSERV_TASKS publication item, as follows:
create table CTM$PI_FSERV_TASKS(
                   CLID$$CS     varchar2(30),
                   ID           number,
                   EMP_ID       number,
                   CUST_ID      number,
                   STAT_ID      number,
                   NOTES        varchar2(255)
                   TRANID$$     number(10),
                   DMLTYPE$$    char(1) check(DMLTYPE$$ in ('I','U','D')),
);
Note:
The application publication item table for the FServ example contains columns for ID, EMP_ID, CUST_ID, STAT_ID, and NOTES.The Sync Server automatically creates a queue control table, C$INQ, and a temporary table, C$PUB_LIST_Q. You can process the information in the queue control table in the PL/SQL or Java callout methods to determine which publication items have received new transactions.
The parameters for the control table queue are listed in Table 2-25:
Table 2-25 Queue Control Table Parameters
| Parameter | Description |
|---|---|
|
|
A unique string identifying the client. |
|
|
A unique number identifying the transaction. |
|
|
Represents the publication item name in the queue control table. |
The control table has the following structure:
'C$INQ'
(
CLIENTID   VARCHAR2 (30),
TRANID$$   NUMBER,
STORE      VARCHAR2 (30),
)
The DOWNLOAD_INIT procedure uses the Temporary Table C$PUB_LIST_Q for determining what publication items to download in the compose phase.
'C$PUB_LIST_Q'
(
NAME   VARCHAR2 (30),
COMP_REF   CHAR(1),
CHECK(COMP_REF IN('Y','N'))
)
The parameters for the manually created queues are listed in Table 2-26:
2.12.1.2 Queue-Based PL/SQL Callouts
The PL/SQL package for the queue-based publication callouts is in a package where the UPLOAD_COMPLETE, DOWNLOAD_INIT, DOWNLOAD_COMPLETE, and POPULATE_Q_REC_COUNT procedures are defined. The signatures for both callout procedures are as follows:
CREATE OR REPLACE PACKAGE CONS_QPKG AS
/*
 * notifies that In Queue has a new transaction by providing the client
 * identifier and the transaction identifier.
*/
PROCEDURE UPLOAD_COMPLETE(
     CLIENTID      IN     VARCHAR2,
     TRAN_ID      IN     NUMBER     -- IN queue tranid
     );
/*
 * initializes client data for download. provides the compose phase for the
 * client. The input data for this procedure is the client id, the last
 * and current transaction markers and the priority.
*/
PROCEDURE DOWNLOAD_INIT(
     CLIENTID      IN     VARCHAR2,
     LAST_TRAN     IN     NUMBER,
     CURR_TRAN     IN     NUMBER,
     HIGH_PRTY     IN     VARCHAR2
     );
/*
 *  notifies when all the client's data is sent
*/
PROCEDURE DOWNLOAD_COMPLETE(
     CLIENTID     IN     VARCHAR2
     );

PROCEDURE POPULATE_Q_REC_COUNT(
     CLIENTID     IN     VARCHAR2
     );

END CONS_QPKG;
/
2.12.1.2.1 In Queue Apply Phase Processing
Within the UPLOAD_COMPLETE procedure, you should develop a method of applying all changes from the client to the correct tables in the repository. The FServ example performs the following:
-
From the Master Table
C$INQ, locates the rows for the designated client and transaction identifiers that have been marked for update. -
Retrieves the application publication item data and the
DMLTYPE$$from the In Queue, based on the client and transaction identifiers. -
Performs insert, update, or delete (determined by the value in
DMLTYPE$$) for updates in the application tables in the repository. -
After updates are complete, delete the rows in the
C$INQand the In Queue that you just processed.
PROCEDURE UPLOAD_COMPLETE(CLIENTID IN VARCHAR2, TRAN_ID IN NUMBER) IS
/*create cursors for execution later */
/* PI_CUR locates the rows for the client out of the master table */
CURSOR PI_CUR(C_CLIENTID VARCHAR2, C_TRAN_ID NUMBER ) IS
   SELECT STORE FROM C$INQ
       WHERE CLID$$CS = C_CLIENTID AND TRANID$$ = C_TRAN_ID FOR UPDATE;
/* TASKS_CUR retrieves the values for the client data to be updated */
/*   from the In Queue */
CURSOR TASKS_CUR(C_CLIENTID varchar2, C_TRAN_ID number ) IS
   SELECT ID, EMP_ID, STAT_ID, NOTES, DMLTYPE$$ FROM CFM$PI_FSERV_TASKS
       WHERE CLID$$CS = C_CLIENTID AND TRANID$$ = C_TRAN_ID FOR UPDATE;
/* create variables */
TASK_OBJ TASKS_CUR%ROWTYPE;
PI_OBJ PI_CUR%ROWTYPE;
INSERT_NOT_ALLOWED EXCEPTION;
DELETE_NOT_ALLOWED EXCEPTION;
UNKNOWN_DMLTYPE EXCEPTION;

BEGIN

   OPEN PI_CUR(CLIENTID, TRAN_ID);
   /* C$INQ is used to find out which publication items have received data
      from clients. The publication item name is available in the STORE column
    */
   LOOP
     FETCH PI_CUR INTO PI_OBJ;
     EXIT WHEN PI_CUR%NOTFOUND;

   /* Locate the updates for the publication item PI_FSERV_TASKS */
     IF PI_OBJ.STORE = 'PI_FSERV_TASKS' THEN
       OPEN TASKS_CUR(CLIENTID, TRAN_ID);
       LOOP
         /* Process the In Queue for PI_FSERV_TASKS */
         FETCH TASKS_CUR INTO TASK_OBJ;
         EXIT WHEN TASKS_CUR%NOTFOUND;

         /* Discover the DML command requested. For this publication, only
             updates are allowed.
         IF TASK_OBJ.DMLTYPE$$ = 'I' THEN
            RAISE INSERT_NOT_ALLOWED;
         ELSIF TASK_OBJ.DMLTYPE$$ = 'U' THEN
            FSERV_TASKS.UPDATE_TASK(TASK_OBJ.ID, TASK_OBJ.EMP_ID,
                 TASK_OBJ.STAT_ID, TASK_OBJ.NOTES);
         ELSIF TASK_OBJ.DMLTYPE$$ = 'D' THEN
            RAISE DELETE_NOT_ALLOWED;
         ELSE
            RAISE UNKNOWN_DMLTYPE;
         END IF;

         /* after processing, delete the update request from the In Queue */
         DELETE FROM CFM$PI_FSERV_TASKS WHERE CURRENT OF TASKS_CUR;
       END LOOP;
       close TASKS_CUR;
     END IF;

     /* after completing all updates for the client apply phase, delete from
        master queue */
     DELETE FROM C$INQ WHERE CURRENT OF PI_CUR;
   END LOOP;
END;
2.12.1.2.2 Out Queue Compose Phase Processing
Within the DOWNLOAD_INIT procedure, develop a method of composing all changes from the server that are destined for the client from the publication item tables in the repository. The FServ example performs the following:
-
From the Temporary Table
C$PUB_LIST_Q, discover the publication items that you should download data for the user using the client id, current and last transaction. -
Retrieves the application publication item data into the Out Queue. This example always uses complete refresh.
PROCEDURE DOWNLOAD_INIT( CLIENTID IN VARCHAR2,
                         LAST_TRAN IN NUMBER,
                         CURR_TRAN IN NUMBER,
                         HIGH_PRTY IN VARCHAR2 ) IS
 /*create cursor used later in procedure which retrieves the publication name
  from the temporary table to perform compose phase.*/
 CURSOR PI_CUR IS SELECT NAME from C$PUB_LIST_Q;
 /*create variables*/
 PI_NAME VARCHAR2(50);
 STATID_CLOSE NUMBER;

 BEGIN

   OPEN PI_CUR;
   /* C$PUB_LIST_Q (the temporary table) is used to find out which pub items
      have data to download to clients through the publication item Out Queue.
      The publication item name is available in the NAME column
    */
   LOOP
     FETCH PI_CUR INTO PI_NAME;
     EXIT WHEN PI_CUR%NOTFOUND;

     /* Populate the Out Queue of pub item PI_FSERV_TASKS with all
        unclosed tasks for the employee with this CLIENTID using a complete
        refresh. COMP_REF is always reset to Y since partial refresh has
        not been implemented.
      */
     /* if the PI_FSERV_TASKS publication item has data ready for the client,
        then perform a complete refresh and place all data in the Out Queue */
     IF PI_NAME = 'PI_FSERV_TASKS' THEN
        UPDATE C$PUB_LIST_Q SET COMP_REF='Y' where NAME = 'PI_FSERV_TASKS';
        SELECT ID INTO STATID_CLOSE FROM MASTER.TASK_STATUS
             WHERE DESCRIPTION='CLOSED';
        INSERT INTO CTM$PI_FSERV_TASKS(CLID$$CS, ID, EMP_ID, CUST_ID,
             STAT_ID, NOTES, TRANID$$, DMLTYPE$$)
             SELECT CLIENTID, a.ID, a.EMP_ID, a.CUST_ID, a.STAT_ID, a.NOTES,
               CURR_TRAN, 'I' FROM MASTER.TASKS a, MASTER.EMPLOYEES b
               WHERE a.STAT_ID < STATID_CLOSE AND b.CLIENTID = CLIENTID
               AND a.EMP_ID = b.ID;
     END IF;
   END LOOP;
 END;
If, however, you want to perform another type of refresh than a complete refresh, such as an incremental refresh, then do the following:
-
Read the value of
COMP_REF -
If the value is N, insert only the new data into the Out Queue.
In this situation, the LAST_TRAN parameter becomes useful.
2.12.1.3 Create a Publication Item as a Queue
You create the publication item as you would normally, with one change: define the publication item as queue-based. See Section 4.4, "Create a Publication Item" for directions on how to define the publication item as queue-based when using MDW.
If you are using the Consolidator APIs, then the createQueuePublicationItem method creates a publication item in the form of a queue. This API call registers the publication item and creates CFM$<name> table as an In Queue, if one does not exist.
Note:
See the Oracle Database Mobile Server JavaDoc for more information.You must provide the Consolidator Manager with the primary key, owner and name of the base table or view in order to create a queue that can be updated or refreshed with fast-refresh. If the base table or view name has no primary key, one can be specified in the primary key columns parameter. If primary key columns parameter is NULL, then Consolidator Manager uses the primary key of the base table.
2.12.1.4 Register the PL/SQL Package Outside the Repository
Once you finish developing the PL/SQL package, register the package in the MOBILEADMIN schema with the registerQueuePkg method. This method registers the package separately from the mobile server repository; although it refers to the In Queues, Out Queues, queue control table and temporary table that are defined in the repository.
The following methods register or remove a procedure, or retrieve the procedure name.
-
The
registerQueuePkgmethod registers the stringpkgas the current procedure. The following registers the FServ package.Note:
The developer used Consolidator Manager APIs to create the subscription, so this was included in the Java application that created the subscription./* Register the queue package for this publication */ consolidatorManager.registerQueuePkg(QPKG_NAME, PUB_FSERV);
-
The
getQueuePkgmethod returns the name of the currently registered procedure. -
The
unRegisterQueuePkgmethod removes the currently registered procedure.
Note:
See the Oracle Database Mobile Server JavaDoc for more information.2.12.2 Creating Data Collection Queues for Uploading Client Collected Data
If you have an application that collects data on a client, such as taking inventory or the amount collected on a parking meter, then you can use data collection queues to improve the performance of uploading the data collected to the server. Since the data only flows from the client to the server, then synchronous communication is the best method for uploading massive amounts of data.
Note:
If you are collecting data on the client, but still need updates from the server, you can use the default method for synchronization or create your own queues. See Section 2.12.1, "Customizing Apply/Compose Phase of Synchronization with a Queue-Based Publication Item" for more information.Data collection queues can be used for the following two types of data collection:
-
New records that are inserted on the client.
-
Existing records that are downloaded to the client in order that the user can modify and upload these records.
An example of the second type is a supply counting application. If you want to count the number of items in stock, then you could design the application table with the columns: Item and Count. Initially, populate the Item column and synchronize the data to the device, as follows:
The user on the client updates each item with the inventory amount, as follows:
The Data Collection Queue is lightweight and simple to create. Data collection queues are the same as regular queues with the exception that they provide automatic apply of the data uploaded by the client. However, you can customize whether the data is implicitly applied or not. This queue does not require the MGP to apply the changes. It does not create objects in the application schema or map data.
Data Collection Queues are easier to implement than a Queue-Based publication item. There is no need to create a package with callback methods, as Oracle Database Mobile Server takes care of automatically uploading any new data from the client. In addition, you configure how Oracle Database Mobile Server handles if there is any data to be downloaded or if you want the data on the client to be erased when it is uploaded to the server.
When you create the Data Collection Queue, the following is performed for you:
-
Automatically generates the in-queue when the publication item is created, which is named as follows:
CFM$<publication_item_name>. -
Optionally, enables the developer to choose automatic removal of client data once captured to the server. This is specified when you create the publication item.
-
Optionally, if you need an out-queue, then the developer can specify the out-queue or to have Oracle Database Mobile Server automatically generate an out-queue, which would be named as follows:
CTM$<publication_item_name>.
Just like for regular queues, users can create their own Out Queue logic. By default, the Out Queue created is an empty view with the name of (CTM$<publication_item>). An empty view is a view that selects zero records. Therefore, by default, data collection queues do not pick up any data from the server.
You can modify how the data collection queue behaves when you create it using the ConsolidatorManager.createDataCollectionQueue method. The following parameters effect the behavior of your data collection queue:
-
Specify an Out Queue—Out Queue creation is affected by the
isOutViewboolean input parameter. IfisOutViewis TRUE, then creates the Out Queue as an empty view; if FALSE, then creates the Out Queue as a table. -
Automatic Removal of Data on the Client—Users can customize the default behavior of data purging on the client by setting the
purgeClientAfterSyncparameter to either true or false.-
If TRUE, then the client uploads its data changes and removes the records from the client database. At this point, the table on the client is empty. If the Out Queue on the server is empty, the client no longer has any records. If the Out Queue is not empty, the client downloads these records and the table on the client contains only these records.
-
If FALSE, then the client records remain on the device after synchronization unless the server explicitly sends the
DELETEcommand, in the same manner as a normal publication item.
-
2.12.2.1 Creating a Data Collection Queue
When you create a data collection queue, you perform the following:
Note:
AllConsolidatorManager methods are fully documented in the Oracle Database Mobile Server Javadoc. This section provides context of the order in which to execute these methods.-
Create the tables for the data that the queue updates on the back-end Oracle database.
-
Create the data collection queue and its publication item using the
ConsolidatorManagercreateDataCollectionQueuemethod, where the input parameters are as follows:-
name—A character string specifying a new publication item name. -
owner—A string specifying the base schema object owner. -
store—A string specifying the table name that it is based on. -
inq_cols—A string specifigying columns in the order in which to replicate them. IfNULL, then defaults to*, which makes the SQL statement,select * from <table>. -
pk_columns—A string specifying the primary keys. -
purgeClientAfterSync—If true, removes client data from the mobile device when uploaded to the server. -
isOutView—If true, then creates Out Queue as an empty view, otherwise creates Out Queue as a table.
The following creates the
PI_CUSTOMERSdata collection queue:cm.createDataCollectionQueue( "PI_CUSTOMERS", /* Publication Item name */ MYSCHEMA, /* Schema owner */ "CUSTOMERS", /* store */ NULL, /* inqueue_columns NULL, /* NULL selects all pk_columns true, /* removes old data after sync true ); /* isOutView */ -
-
Create the publication that is to be used by the data collection queue. Use the
ConsolidatorManagercreatePublicationmethod. The following creates thePUB_CUSTOMERSpublication that is used by thePI_CUSTOMERSdata collection queue:cm.createPublication("PUB_CUSTOMERS",0, "sales.%s", NULL); -
Add the publication item created within step 1 within this publication with the
ConsolidatorManageraddPublicationItemmethod. The following adds a publication item to the publication:cm.addPublicationItem("PUB_CUSTOMERS", "PI_CUSTOMERS", NULL, NULL, "S", NULL, NULL); -
If you want to have data download from the server to the mobile client, create an Out Queue with a name that consists of
CTM$<publication_item_name>. The following replaces the default Out Queue view forCUSTOMERwith a view that selects all customers assigned to theEMP_IDassociated with current sync session.stmt.executeUpdate( "CREATE OR REPLACE VIEW CTM$"+pubIs[0]+" ( CLID$$CS, TRANID$$, DMLTYPE$$,"+" CUST_ID, CNAME, CCOMPANY, CPHONE, CCONTACT_DATE )"+"\n AS SELECT CONS_EXT.GET_CURR_CLIENT, 999999999, 'I',cust.* FROM CUSTOMERS cust "+"\n WHERE cust.CUST_ID IN (SELECT CUST_ID FROM CUSTOMER_ASSIGNMENT WHERE EMP_ID IN "+"\n (SELECT EMP_ID FROM SESSION_EMP WHERE SESSION_ID = DBMS_SESSION.UNIQUE_SESSION_ID))" );Note:
See the Oracle Database Mobile Server samples page for the full data collection queue example from which these snippets were taken. The example demonstrates both a regular queue and a data collection queue.
2.12.3 Selecting How and When to Notify Clients of Composed Data
If you have created your own compose logic, such as in the queue-based publications, then you may want the server to notify the client that there is data to be downloaded. You can take control of starting an automatic synchronization from the server using the enqueue notification APIs.
There are other situations where you may want to control how and when clients are notified of compose data from the synchronization process. For example, if you have so many clients that to notify all of them of the data waiting for them would overload your system, you may want to control the process by notifying clients in batches.
In the normal synchronization process, when the compose phase is completed, all clients that have data in the Out Queue are notified to download the data. If, for example, you have 2000 clients, having all 2000 clients request a download at the same time could overrun your server and cause a performance issue. In this scenario, you could take control of the notification process and notify 100 clients at a time over the span of a couple of hours. This way, all of the clients receive the data in a timely fashion and your server is not overrun.
You can use the enqueue notification functionality, as follows:
-
If you implement queue-based publications for the compose phase, you can notify the clients with the
EN_QUEUE_NOTIFICATIONfunction within the Queue-basedDOWNLOAD_INITfunction. -
If you write your own compose function, use the
enQueueNotificationmethod to notify the client that there is data to download.
This starts an automatic synchronization process for the intended client.
The enqueue notification APIs enable the server to tell the client that there is data to be downloaded and what type of data is waiting. Notifying the client of what type of data is waiting enables the client to evaluate whether it conforms to any automatic synchronization rules. For example, if the server has 10 records of low priority data, but the client has set the Server MGP Compose rule to only start an automatic synchronization if 20 records of low priority data exist, then the automatic synchronization is not started. So, the notification API input parameters include parameters that enable the server to describe the data that exists on the server.
A notification API is provided for you in both PL/SQL and Java, as follows:
-
Java: the
ConsolidatorManagerenQueueNotificationmethodpublic long enQueueNotification(java.lang.String clientid, java.lang.String publication, java.lang.String pubItems, int recordCount, int dataSize, int priority) throws ConsolidatorException -
PL/SQL: the
EN_QUEUE_NOTIFICATIONfunctionFUNCTION EN_QUEUE_NOTIFICATION( CLIENTID IN VARCHAR2, PUBLICATION IN VARCHAR2, PUB_ITEMS IN VARCHAR2, RECORD_COUNT IN NUMBER, DATA_SIZE IN NUMBER, PRIORITY IN NUMBER) RETURN NUMBER;
Where the parameters for the above are as follows:
Table 2-29 Enqueue Notification Parameters
| Parameters | Description |
|---|---|
|
|
Consolidator client id, which is normally the user name on the client device. This identifies the client to be notified. If the client does not have any automatic synchronization rules, this is the only required paramter for an automatic synchronization to start. |
|
|
Name of the publication for which you want notification control. This tells the client for which publication the data is destined. |
|
|
One or more publication items for which you want notification. Separate multiple publication items with a comma. This notifies the clients for which publication items the data applies. |
|
|
This notifies the client how many records exist on the server for the download. |
|
|
Reserved for future expansion. |
|
|
This notifies the client of the priority of the data that exists on the server. The value is 0 for high and 1 for low. |
The enqueue notification API returns a unique notification ID, which can be used to query notification status in the isNotificationSent method, which is as follows:
-
JAVA
public boolean isNotificationSent(long notificationId)
  throws ConsolidatorException
-
PL/SQL
FUNCTION NOTIFICATION_SENT(
   NOTIFICATION_ID IN NUMBER)
RETURN BOOLEAN;
If the notification has been sent, a boolean value of TRUE is returned.
2.13 Synchronization Performance
There are certain optimizations you can do to increase performance. See Section 1.2 "Increasing Synchronization Performance" in the Oracle Database Mobile Server Troubleshooting and Tuning Guide for a full description.
2.14 Troubleshooting Synchronization Errors
The following section can assist you in troubleshooting any synchronization errors:
2.14.1 Foreign Key Constraints in Updatable Publication Items
Replicating tables between Oracle database and clients in updatable mode can result in foreign key constraint violations if the tables have referential integrity constraints. When a foreign key constraint violation occurs, the server rejects the client transaction.
-
Section 2.14.1.1, "Foreign Key Constraint Violation Example"
-
Section 2.14.1.2, "Avoiding Constraint Violations with Table Weights"
-
Section 2.14.1.3, "Avoiding Constraint Violations with BeforeApply and After Apply"
2.14.1.1 Foreign Key Constraint Violation Example
For example, two tables EMP and DEPT have referential integrity constraints. The DeptNo (department number) attribute in the DEPT table is a foreign key in the EMP table. The DeptNo value for each employee in the EMP table must be a valid DeptNo value in the DEPT table.
A mobile server user adds a new department to the DEPT table, and then adds a new employee to this department in the EMP table. The transaction first updates DEPT and then updates the EMP table. However, the database application does not store the sequence in which these operations were executed.
When the user replicates with the mobile server, the mobile server updates the EMP table first. In doing so, it attempts to create a new record in EMP with an invalid foreign key value for DeptNo. Oracle database detects a referential integrity violation. The mobile server rolls back the transaction and places the transaction data in the mobile server error queue. In this case, the foreign key constraint violation occurred because the operations within the transaction are performed out of their original sequence.
Avoid this violation by setting table weights to each of the tables in the master-detail relationship. See Section 2.14.1.2, "Avoiding Constraint Violations with Table Weights" for more information.
2.14.1.2 Avoiding Constraint Violations with Table Weights
The mobile server uses table weight to determine in which order to apply client operations to master tables. Table weight is expressed as an integer and are implemented as follows:
-
Client
INSERToperations are executed first, from lowest to highest table weight order. -
Client
DELETEoperations are executed next, from highest to lowest table weight order. -
Client
UPDATEoperations are executed last, from lowest to highest table weight order.
In the example listed in Section 2.14.1.1, "Foreign Key Constraint Violation Example", a constraint violation error could be resolved by assigning DEPT a lower table weight than EMP. For example:
(DEPT weight=1, EMP weight=2)
You define the order weight for tables when you add a publication item to the publication. For more information on setting table weights in the publication item, see Section 2.4.1.7.2, "Using Table Weight".
2.14.1.3 Avoiding Constraint Violations with BeforeApply and After Apply
You can use a PL/SQL procedure to avoid foreign key constraint violations based on out-of-sequence operations by using DEFERRABLE constraints in conjunction with the BeforeApply and AfterApply functions. See Section 2.9.3.2, "Defer Constraint Checking Until After All Transactions Are Applied" for more information.
2.15 Register a Remote Oracle Database for Application Data
By default, the repository metadata and the application schemas are present in the same database. However, it is possible to place the application schemas in a database other than the MAIN database where the repository exists. This can be an advantage from a performance or administrative viewpoint.
Thus, you can spread your application data across multiple databases.
Note:
We refer to the database where the application schema resides as remote because it is separate from the MAIN database that contains the repository. It does not mean that the database is geographically remote. It can be local or remote. For performance reasons, the mobile server must have connectivity to all databases involved in the synchronization—MAIN and remote.This section describes how to register a remote Oracle database containing application schemas, using the ConsolidatorManager APIs. However, it is recommended that you use the Oracle Database Mobile Server GUI tools for this task unless you have a specific need to use the API. For concepts and description of how to perform this with the Oracle Database Mobile Server GUI tools, see Section 5.8.1, "Register or Deregister an Oracle Database for Application Data" in the Oracle Database Mobile Server Administration and Deployment Guide.
To use an Oracle database other than the Oracle database used for the repository, perform the following:
-
Use the
apprepwizardscript to setup a remote application repository. See Section 2.15.1, "Set up a Remote Application Repository With the APPREPWIZARD Script" for details. -
Register the Oracle database as described in Section 2.15.2, "Register or Deregister a Remote Oracle Database for Application Data".
-
When creating the publication and publication items, specify the name of the registered Oracle database that contains the application schemas. All data for a single application—that is, all publication items for the publication—must be contained in the same Oracle database.
2.15.1 Set up a Remote Application Repository With the APPREPWIZARD Script
Use the apprepwizard script to setup a remote application repository. This script creates and initializes an administrator schema with the same name as the adminstrator schema in the Main database. For example, if the administrator schema name in the Main database is mobileadmin, then the apprepwizard script creates a mobileadmin schema on the remote database.
The apprepwizard script is located in the ORACLE_HOME/Mobile/Server/admin. The usage of this script is as follows:
apprepwizard.bat <MAIN_Repository_Schema_Name> <MAIN_Repository_Schema_Password>
 <Application_Database_Administrator_User_Name>
 <Application_Database_Administrator_Password>
 <Application_Database_JDBC_URL> <Application_Database_Schema_Password>
 [<DB_name>]
Where each parameter is as follows:
-
MAIN_Repository_Schema_Name: Provide the repository schema name, which exists on the Main database. The default isMOBILEADMIN. -
MAIN_Repository_Schema_Password: Provide the password for the repository administrator schema. -
Application_Database_Administrator_User_Name: Any user with administrator privileges at the application database. such asSYSTEM. -
Application_Database_Administrator_Password: Password of the administrator user for the application database. -
Application_Database_JDBC_URL: JDBC URL of the application database. -
Application_Database_Schema_Password: Password of the schema, which is created at the application database. The user name is the same as the repository schema name. -
DB_Name: Optionally, the user can provide a name to identify this database. This name is used in logging. By default, the log is sent to the console. If this name is provided as the last parameter, then the log is generated in the By default, the log is sent to the console. If the database name is provided as the last parameter, then the log is generated in theORACLE_HOME/Mobile/Server/<DB_NAME>/apprepository.logfile.
This script installs silently. Thus, If you execute this script without any arguments, nothing is performed.
2.15.2 Register or Deregister a Remote Oracle Database for Application Data
Use the following ConsolidatorManager APIs to register, deregister, or alter the properties of the remote Oracle database:
void registerDatabase(String name, Consolidator.DBProps props)
void deRegisterDatabase(String name)
void alterDatabase(String name, Consolidator.DBProps props)
Where:
-
Name—An identifying name for the database where the application schema resides. Once defined, this name cannot be modified. This name must be unique across all registered database names.
-
DBProps—A class that contains the JDBC URL, password and description, as follows:
public static class DBProps { public String jdbcUrl; public String adminPassword; public String description; }-
JDBC URL—The JDBC URL can be one of the following formats:
-
The URL for a single Oracle database has the following structure:
jdbc:oracle:thin:@<host>:<port>:<SID> -
The JDBC URL for an Oracle RAC database can have more than one address in it for multiple Oracle databases in the cluster and follows this URL structure:
jdbc:oracle:thin:@(DESCRIPTION=
 (ADDRESS_LIST=
   (ADDRESS=(PROTOCOL=TCP)(HOST=PRIMARY_NODE_HOSTNAME)(PORT=1521))
   (ADDRESS=(PROTOCOL=TCP)(HOST=SECONDARY_NODE_HOSTNAME)(PORT=1521))
 )
 (CONNECT_DATA=(SERVICE_NAME=DATABASE_SERVICENAME)))
-
-
Password—The administrator password is used to logon to the database. The administrator name is the same as what was defined for the main database.
When defining, the password must conform to the following restrictions:
-
not case sensitive
-
cannot contain white space characters
-
maximum length of 28 characters
-
must begin with an alphabet
-
can contain only alphanumeric characters
-
cannot be an Oracle database reserved word
-
-
Description—A user-defined description to help identify this database.
-
Refer to the ConsolidatorManager in the Oracle Database Mobile Server JavaDoc for more details.
The following code example registers a database as APP1. The registerDatabase API stores access information for the application repository and provides a name so that publications, publication items, and MGP Jobs can be created against this repository. It does not define the administrator schema.
Consolidator.DBProps props = new Consolidator.DBProps();
props.jdbcUrl = "jdbc:oracle:thin:@apphost:1521:app1";
props.description="App database 1"
props.adminPassword = "secret";
consMgr.registerDatabase("APP1", props);
The following code example deregisters the APP1 database.
consMgr.deRegisterDatabase("APP1");
You can retrieve the names of all of the registered databases with the getDatabaseInstances method, which is as follows:
Map getDatabaseInstances()
The Map returned by getDatabaseInstances method contains a keyset of the application database names and the entry for each key is a Consolidator.DBProps class where the adminPassword is always NULL for security purposes.
2.15.3 Create Publication, Publication Item, Hints and Virtual Primary Keys on a Remote Database
You must have already registered the remote database before defining publications, publication items, hints, and virtual primary keys that use the application data schemas and tables on the remote database. In the ConsolidatorManager API calls, the registered name of the remote database is required.
Note:
The publication and publication item names are unique irrespective of where the data resides.All publication items within a publication must be defined on tables within the same database.
The following example illustrates the creation of a publication and a publication item against a remote database registered as APP1. Refer to the ConsolidatorManager in the Oracle Database Mobile Server JavaDoc for more details.
ConsolidatorManager consMgr = new ConsolidatorManager();
consMgr.openConnection("mobileadmin", "mobileadmin",
 "oracle:jdbc:thin:@host1:1521:master");
consMgr.createPublication( "PUB1","APP1",Consolidator.DFLT_CREATOR_ID,
 "ddb.%s", NULL);

Consolidator.PubItemProps taskPIProps = new Consolidator.PubItemProps();
taskPIProps.db_inst = "APP1"; // Remote App database name as registered
taskPIProps.owner = "APPUSER1";
taskPIProps.store = "TASKS";
taskPIProps.refresh_mode = "F";
taskPIProps.select_stmt = "select id, emp_id, cust_id, stat_id, notes
 from APPUSER1.TASKS";
taskPIProps.cbk_owner = "MOBILEADMIN";
taskPIProps.cbk_name = "TASKSPI_PKG";
consMgr.createPublicationItem( "PI_1_TASKS", taskPIPProps);

consMgr.addPublicationItem("PUB1", "PI_1_TASKS", NULL, NULL, "S", NULL, NULL);
consMgr.createSubscription( "PUB1", "USER1");
consMgr.instantiateSubscription("PUB1", "USER1");
consMgr.closeConnection();
Other API calls for managing data collection queues, hints, and virtual primary keys that require the remote database name are shown below. Refer to the ConsolidatorManager in the Oracle Database Mobile Server JavaDoc for more details.
-
Data Collection Queue
void createDataCollectionQueue(String name, String db_inst, String owner, String store, String inq_cols, String pk_columns, boolean purgeClientAfterSync, boolean isOutView) -
Hint
void parentHint(String db_inst, String owner, String store, String owner_d,
    String store_d)
void dependencyHint(String db_inst, String owner, String store,
    String owner_d, String store_d)
void removeDependencyHint(String db_inst, String owner, String store,
    String owner_d, String store_d)
-
Virtual Primary Key
public void createVirtualPKColumn(String db_inst, String owner,
    String store, String column)
public void dropVirtualPKColumns(String db_inst, String owner,
    String store)
The APIs used for creating a publication and publication item is the same except for the addition of the remote database name. Following is an example that provides the remote database name, APP1, in bold for creating a publication and publication item:
ConsolidatorManager consMgr = new ConsolidatorManager();
consMgr.openConnection("mobileadmin", "mobileadmin", "oracle:jdbc:thin:@host1:1521:master");
consMgr.createPublication( "PUB1","APP1",Consolidator.DFLT_CREATOR_ID,
       "ddb.%s", NULL);
Consolidator.PubItemProps taskPIProps = new Consolidator.PubItemProps();
taskPIProps.db_inst = "APP1"; // Remote APP instance name as registered
taskPIProps.owner = "APPUSER1";
taskPIProps.store = "TASKS";
taskPIProps.refresh_mode = "F";
taskPIProps.select_stmt = "select id, emp_id, cust_id, stat_id, notes from APPUSER1.TASKSî;
taskPIProps.cbk_owner = "MOBILEADMIN";
taskPIProps.cbk_name = "TASKSPI_PKG";
consMgr.createPublicationItem( "PI_1_TASKS", taskPIPProps);
consMgr.addPublicationItem("PUB1", "PI_1_TASKS", NULL, NULL, "S", NULL, NULL);
consMgr.createSubscription( "PUB1", "USER1");
consMgr.instantiateSubscription("PUB1", "USER1");
consMgr.closeConnection();
2.15.4 Using Callbacks on Remote Databases
The following sections describe how the synchronization callbacks, described in Section 2.7, "Customize What Occurs Before and After Synchronization Phases", must be handled for the remote database:
-
Section 2.15.4.1, "Customize Callbacks on the Remote Database"
-
Section 2.15.4.2, "Publication Item Level Callbacks for the MGP Apply/Compose Phases"
2.15.4.1 Customize Callbacks on the Remote Database
The Customize callbacks, as described in Section 2.7.1, "Customize What Occurs Before and After Every Phase of Each Synchronization", are created to perform defined tasks before or after any phase of synchronization.
Most of the callbacks pertain to MGP processing. Since an MGP Job executes against a database, these callbacks are invoked separately by each job against the corresponding database. Callbacks that are not related to the MGP are invoked against the MAIN database. Thus, the callback PL/SQL package must be created on the MAIN database as well as on the appropriate remote databases.
2.15.4.2 Publication Item Level Callbacks for the MGP Apply/Compose Phases
Define the MGP publication item level callbacks on the database against which the publication item is defined. Then, these can access the base tables on that database.
For full details on the MGP publication item level callbacks, see Section 2.7.2, "Customize What Occurs Before and After Compose/Apply Phases for a Single Publication Item".
2.15.4.3 Customizing the Apply/Compose Phase for a Queue-Based Publication Item on a Remote Database
When you customize the apply/compose phase for a queue-based publication item, as described in Section 2.12.1, "Customizing Apply/Compose Phase of Synchronization with a Queue-Based Publication Item", then these packages must be defined on the database where the queue-based publication item base tables exist. Thus, if the base tables exist on a remote database, then the packages must be defined on the remote database.
2.16 Create a Synonym for Remote Database Link Support For a Publication Item
Publication items can be defined for database objects existing on remote databases outside of the mobile server repository. Local private synonyms of the remote objects can be created in the Oracle database. However, we recommend that you use the remote database functionality as described in Section 2.15, "Register a Remote Oracle Database for Application Data".
If you still decide to use database links for defining publication items on remote databases, then you can execute the following SQL script located in the <ORACLE_HOME>\Mobile\server\admin\consolidator_rmt.sql directory on the remote schema in order to create Consolidator Manager logging objects.
The synonyms should then be published using the createPublicationItem method of the ConsolidatorManager object. If the remote object is a view that needs to be published in updatable mode and/or fast-refresh mode, the remote parent table must also be published locally. Parent hints should be provided for the synonym of the remote view similar those used for local, updatable and/or fast refreshable views.
Two additional methods have been created, dependencyHint and removeDependencyHint, to deal with non-apparent dependencies introduced by publication of remote objects.
Remote links to the Oracle database must be established before attempting remote linking procedures, please refer to the Oracle SQL Reference for this information.
Note:
The performance of synchronization from remote databases is subject to network throughput and the performance of remote query processing. Because of this, remote data synchronization is best used for simple views or tables with limited amount of data.The following sections describe how to manage remote links:
2.16.1 Publishing Synonyms for the Remote Object Using CreatePublicationItem
The createPublicationItem method creates a new, stand-alone publication item as a remote database object. If the URL string is used, the remote connection is established and closed automatically. If the connection is NULL or cannot be established, an exception is thrown. The remote connection information is used to create logging objects on the linked database and to extract metadata.
Note:
See the Oracle Database Mobile Server JavaDoc for more information.
consolidatorManager.createPublicationItem(
     "jdbc:oracle:oci8:@oracle.world",
     "P_SAMPLE1",
     "SAMPLE1",
     "PAYROLL_SYN",
     "F"
     "SELECT * FROM sample1.PAYROLL_SYN"+"WHERE SALARY >:CAP", NULL, NULL);
Note:
Within the select statement, the parameter name for the data subset must be prefixed with a colon, for example:CAP.2.16.2 Creating or Removing a Dependency Hint
Use the dependencyHint method to create a hint for a non-apparent dependency.
Given remote view definition
        create payroll_view as
        select p.pid, e.name
        from payroll p, emp e
        where p.emp_id = e.emp_id;

Execute locally
        create synonym v_payroll_syn for payroll_view@<remote_link_address>;
        create synonym t_emp_syn for emp@<remote_link_address>;
Where <remote_link_address> is the link established on the Oracle database. Use dependencyHint to indicate that the local synonym v_payroll_syn depends on the local synonym t_emp_syn:
consolidatorManager.dependencyHint("SAMPLE1","V_PAYROLL_SYN","SAMPLE1","T_EMP_SYN");
Use the removeDependencyHint method to remove a hint for a non-apparent dependency.
Note:
See the Oracle Database Mobile Server JavaDoc for more information.2.17 Parent Tables Needed for Updateable Views
For a view to be updatable, it must have a parent table. A parent table can be any one of the view base tables in which a primary key is included in the view column list and is unique in the view row set. If you want to make a view updatable, provide the mobile server with the appropriate hint and the view parent table before you create a publication item on the view.
To make publication items based on a updatable view, use the following two mechanisms:
-
Parent table hints
-
INSTEAD OFtriggers or DML procedure callouts
2.17.1 Creating a Parent Hint
Parent table hints define the parent table for a given view. Parent table hints are provided through the parentHint method of the Consolidator Manager object, as follows:
consolidatorManager.parentHint("SAMPLE3","ADDROLRL4P","SAMPLE3","ADDRESS");
See the Oracle Database Mobile Server JavaDoc for more information.
2.17.2 INSTEAD OF Triggers
INSTEAD OF triggers are used to execute INSTEAD OF INSERT, INSTEAD OF UPDATE, or INSTEAD OF DELETE commands. INSTEAD OF triggers also map these DML commands into operations that are performed against the view base tables. INSTEAD OF triggers are a function of the Oracle database. See the Oracle database documentation for details on INSTEAD OF triggers.
2.18 Manipulating Application Tables
If you need to manipulate the application tables to create a secondary index or a virtual primary key, you can use ConsolidatorManager methods to programmatically perform these tasks in your application, as described in the following sections:
2.18.1 Creating Secondary Indexes on Client Device
The first time a client synchronizes, the mobile server automatically enables a mobile client to create the database objects on the client in the form of snapshots. By default, the primary key index of a table is automatically replicated from the server. You can create secondary indexes on a publication item through the Consolidator Manager APIs. See the Oracle Database Mobile Server Javadoc for specific API information. See Section 2.4.1.6, "Create Publication Item Indexes" for an example.
2.18.2 Virtual Primary Key
You can specify a virtual primary key for publication items where the base object does not have a primary key defined. This is useful if you want to create a fast refresh publication item on a table that does not have a primary key.
A virtual primary key must be unique and not NULL. A virtual primary key can consist of a single or multiple columns, where each column included in the virtual primary key must not NULL. If a NULL value is entered into any column of a virtual primary key, this results in an error. If the virtual primary key is on a single column, it must be unique; if the virtual primary key consists of a composite of multiple columns, then the composite must be unique.
If you want to create a virtual primary key for more than one column, then the API must be called separately for each column that you wish to assign to that virtual primary key.
Use the createVirtualPKColumn method to create a virtual primary key column.
consolidatorManager.createVirtualPKColumn("SAMPLE1", "DEPT", "DEPT_ID");
Use the dropVirtualPKColumns method to drop a virtual primary key.
consolidatorManager.dropVirtualPKColumns("SAMPLE1", "DEPT");
Note:
See the Oracle Database Mobile Server JavaDoc for more information.2.19 Facilitating Schema Evolution
You can use schema evolution when adding or altering a column in the application tables for updatable publication items. You do not use schema evolution for read-only publication items.
If you do alter the schema, then the client receives a complete refresh on the modified publication item, but not for the entire publication.
Note:
You should stop all synchronization events and MGP activity during a schema evolution.The following types of schema modifications are supported:
-
Add new columns
-
Change the type of a column—You can only modify the type of a column in accordance to the Oracle Database limitations. In addition, you CANNOT modify a primary key or virtual primary key column
-
Increase the width of a column
Note:
You cannot modify the definition of any primary key or virtual primary key using this method. Instead, use the directions provided in Section 2.19.1, "Schema Evolution Involving a Primary Key".For facilitating schema evolution, perform the following:
-
If necessary, modify the table in the back-end Oracle database.
-
Modify the publication item directly on the production repository through MDW or the
alterPublicationItemAPI. Modifying the SQL query of the publication item causes the schema evolution to occur.A schema evolution only occurs if the SQL query is modified. If the SQL query does not change, then the evolution does not occur. If your modification only touched the table, then you must modify the SQL query by adding an additional space to force the schema evolution to occur.
Note:
If you decide to republish the application to a different repository, then update the publication definition in the packaging wizard. -
Once you alter the SQL query, then either use Mobile Manager to refresh the metadata cache or restart the mobile server. To refresh the metadata cache through the mobile server, select Data Synchronization->Administration->Reset Metadata Cache or execute the
resetCachemethod of theConsolidatorManagerclass.
Note:
Use of the high priority flag during synchronization overrides any schema evolution, as a result, the new table definition does not come to the client.When you modify the table in the repository, the client snapshot is no longer. Thus—by default—a complete refresh occurs the next time you synchronize, because a new snapshot must be created on the client.
2.19.1 Schema Evolution Involving a Primary Key
What if you want to perform a schema evolution that does include a modification to the primary key. Normally, you would drop the entire publication and recreate it. However, there is a way that you can modify the primary key constraint and recreate the publication item without dropping the entire publication.
The following steps describe how to remove the primary key constraint, add a new column and identify it as the primary or virtual primary key and then recreate the publication item. The steps below must be followed in the order listed:
-
Using MDW, remove the publication item from the publication and drop the publication item from the repository.
-
Modify the table in the back-end Oracle database, as described in the following steps:
-
Drop the Primary Key constraint. For example, if
table1has primary key constraint ofpk_constraint, then drop this constraint, as follows:alter table table1 drop constraint pk_constraint;
-
Add a new column to perform as the new primary key or virtual primary key, as follows:
alter table table1 add my_new_col number(5,0) not null;
-
Populate the new column with values that can be used (solely or as part of) the new the primary key or virtual primary key.
-
Alter the table to create a primary key or virtual primary key constraint on the new column. If you want to create the primary key constraint on the new column
my_new_colfortable1, use theALTER TABLESQL command. If you want to define a virtual primary key onmy_new_colfortable1, use MDW.
-
-
In MDW, create a new publication item for
table1. This should be a duplicate of the previously dropped publication item, but with teh new column included. When creating the publication item, verify the my_new_col appears as teh primary key. -
Add the publication item to the publication.
-
Reset the Metadata Cache using the Mobile Manager by selecting Data Synchronization -> Administration -> Reset Metadata Cache.
-
Verify in the Parent Table Primary Key and Base table Primary Key fields in the Publication Item detail screen in the Mobile Manager that the new primary key is in effect.
-
Synchronize on the existing client device to bring down the new publication.
-
After the synchronization is complete, then verify that the new column is present and that it is functioning as the primary key on the client device.
2.20 Set DBA or Operational Privileges for the Mobile Server
You can set either DBA or operational privileges for the mobile server with the following Consolidator Manager API:
void setMobilePrivileges( String dba_schema, String dba_pass, int type )
        throws ConsolidatorException
where the input parameter are as follows:
-
dba_schema—The DBA schema name -
dba_pass—The DBA password -
type—Define the user by setting this parameter to eitherConsolidator.DBAorConsolidator.OPER
If you specify Consolidator.DBA, then the privileges needed are those necessary for granting DBA privileges that are required for publish/subscribe functions of the mobile server.
If you specify Consolidator.OPER type, then the privileges needed are those necessary for executing the mobile server without any schema modifications. The OPER is given DML and select access to publication item base objects, version, log, and error queue tables.
The mobile server privileges are modified using the C$MOBILE_PRIVILEGES PL/SQL package, which is created for you automatically after the first time you use the setMobilePrivileges procedure. After the package is created, the mobile server privileges can be administered from SQL or from this Java API.