4 Managing Users and Groups
This chapter describes how to manage users and groups using the Mobile Manager. The following topics are covered in this chapter:
-
Section 4.2, "Guide to Creating User and Administrator Types"
-
Section 4.4, "Managing Access Privileges for Users and Groups"
-
Section 4.5, "Managing Application Parameter Input (Data Subsetting)"
-
Section 4.7, "Configuring How the Device Receives Software Updates for the User"
4.1 What Are the Types of Mobile Server Users?
The mobile server user types are described in the following sections:
Note:
Do not confuse mobile server users with database users. Each mobile server user is authenticated by the mobile server for access to applications and appropriate publications. The mobile server users are not used to access data on the database.4.1.1 Mobile Server User Privilege: Administrator
Any user created with the user privilege of administrator can perform any of the following functions:
-
The administrator user can be a general user when logging in to a mobile application on a device, which is the same as described in Section 4.1.3, "Mobile Server User Privilege: User".
-
The administrator can publish applications either through the Packaging Wizard or through the Mobile Manager.
-
The administrator has authorization to use the Mobile Manager.
Once an administrator user is created, it must be associated with the Mobile Manager in the same manner that an ordinary mobile server user is associated with any application. See Section 4.3.1.3, "Associating Mobile Server Users With Published Applications" for more information on this process.
4.1.2 Mobile Server User Privilege: Organizer
The organizer can perform the following tasks.
-
The organizer user can use organizer as the user name and password when logging in to a mobile server application on a device.
-
The organizer can publish applications through the Packaging Wizard only. A user with this privilege cannot log in to the Mobile Manager and perform administration tasks.
4.1.3 Mobile Server User Privilege: User
The mobile server user with privilege of user is created only for accessing and synchronizing published applications and its data. The user has a specific user name/password for synchronizing the application from a device.
Note:
See Section 4.3.1.2.1, "Define User Name and Password" for conventions for creating the user name or password.Thus, this mobile server user enables access to a particular mobile application and its publication items. That is, in order for the Windows CE or other devices to be able to synchronize and retrieve a snapshot of data from the database, the mobile server validates that the user name/password that is entered is valid for the application. If it is, then mobile server enables the device to retrieve the snapshot that is indicated by the publication items packaged with the application.
After creating the user, the administrator associates the user with the published applications from which this user will receive data. In addition, if any of the publication items require a parameter to be set, the administrator also sets this parameter for each user. See Section 4.3.1.3, "Associating Mobile Server Users With Published Applications" for more information.
Note:
You can swap out users for a single device. See Section 4.3.1.5, "Swap Users on a Device" for more information.4.2 Guide to Creating User and Administrator Types
The following sections provide an overview of how to create all user types:
4.2.1 Creating a User to Access a Published Application
To create any user, including administrators, to access published applications, perform the following:
-
Create one or more users or groups that will use the application to retrieve data from the database down to a device. See Section 4.3.1.2, "Adding New Users" for more information.
-
Associate the new user with the application as described in Section 4.3.1.3, "Associating Mobile Server Users With Published Applications".
-
Associate the users or groups with the application. See Section 4.4, "Managing Access Privileges for Users and Groups" for more information.
Note:
You can share a device among several users by swapping out users on that device. For more information, see Section 4.3.1.5, "Swap Users on a Device". -
Optionally, if the application has a parameter, also known as data subsetting, that is set for each user or group, define the parameters for each user or group. See Section 4.5, "Managing Application Parameter Input (Data Subsetting)" for more information.
You now have a new user or group that is associated with an application.
4.2.2 Creating an Administrator
In order to log in as an administrator with a user name/password that is different from the administrator created upon installation, perform the following:
-
As described in Section 4.2.1, "Creating a User to Access a Published Application", create a user with the name of the administrator that you want, with the privilege of administrator.
-
Navigate to the Access tab for this new administrator and check the checkbox next to Mobile Manager.
You now have a new administrator user. You can log into your Mobile Manager with this user's name and password.
4.3 Managing Users and Groups
The following sections discuss how to manage users:
4.3.1 Managing Mobile Server Users
The following sections define the user types and describe how to manage your users:
-
Section 4.3.1.3, "Associating Mobile Server Users With Published Applications"
-
Section 4.3.1.7, "Providing Your Own Authentication for a User"
4.3.1.1 Displaying Users
You can see what users and groups have been created with all information relevant to users—such as user names and so on.
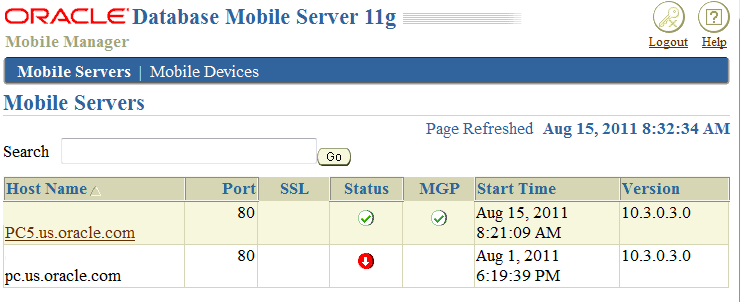
To display individual users, logon to the Mobile Manager and click the Mobile Manager link in the Workspace. As displayed in Figure 4-1, the mobile servers farm page is displayed.
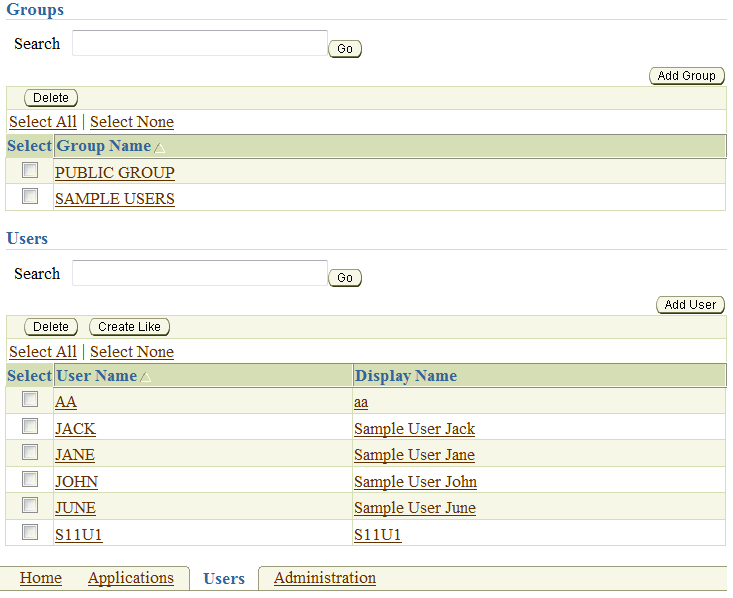
Click your mobile server name link. Your mobile server home page appears. Click the Users link. As Figure 4-2 displays, the Users page lists existing groups and individual users.
4.3.1.1.1 Enabling OID Users
By default, the users defined for access within mobile server are contained within the mobile server repository. However, you can specify to use OID as the repository for all users. In this case, you can migrate any existing users from the mobile server repository into OID. For more details, see Section 4.3.1.6, "Managing OID Users in the Mobile Server".
The mobile server is aware of which users were migrated into OID and marks them as "enabled" for use within Oracle Database Mobile Server. By default, all users created within OID are not "enabled" for use within Oracle Database Mobile Server. All OID users are displayed, but are not enabled for the mobile server. You can enable these users within OID by checking the Enabled box next to the name on the Users screen. This box is only displayed in the case where OID is used as the repository for the users.
4.3.1.2 Adding New Users
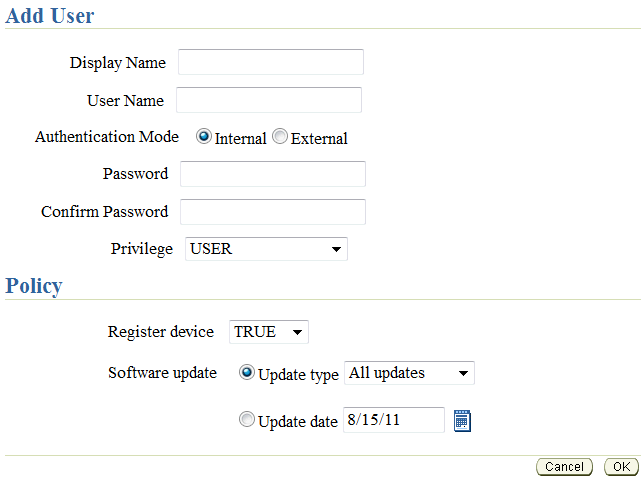
To add a new user, navigate to the Users page and click Add User. As Figure 4-3 displays, the Add User page appears and lists the requisite criteria to register user properties.
To register user properties for new users, enter the following:
4.3.1.2.1 Define User Name and Password
To add a new user, enter data as described in the following table.
Table 4-1 Add User Page Description
| Field | Description |
|---|---|
|
Display Name |
Name used to display as mobile server user name. |
|
User Name |
Name used to logon to the mobile server. The following are the restrictions when defining the user name: |
|
Authentication |
Select whether this user will be using Oracle Database Mobile Server authentication or if the user will be providing their own.
|
|
Password |
For internal authentication, enter password used to logon to the mobile server. When defining, the password must conform to the following restrictions:
|
|
Password Confirm |
To confirm the above mentioned password for internal authentication, re-enter your password. |
|
Privilege |
Lists available privileges for the mobile server user.
For a description of each privilege type, see Section 4.1, "What Are the Types of Mobile Server Users?" and Section 4.3.1.2.2, "User Type Assigns Privileges". |
4.3.1.2.2 User Type Assigns Privileges
Users can be assigned either the administrator or user privileges.
-
Administrator—The administrator manages the mobile server and its components, publishes and manages applications, and provides application access to groups and users. Once an administrator user is created, it must be associated with the Mobile Manager in the same manner that an ordinary mobile server user is associated with any application. The Mobile Manager is similar to any other mobile application. It provides the following privileges to the administrator.
-
To logon to an application on a device, the administrator can use administrator as the user name and password.
-
The administrator can publish applications either through the Packaging Wizard or through the Mobile Manager.
-
The administrator has authorization to use the Mobile Manager.
-
-
User—The User type can access published applications. The mobile server user is assigned user privileges and is created for being associated with published applications. The user is provided a user name and password for logging in to a mobile client and accessing applications from a device. When a user synchronizes with the mobile server, the mobile server validates the user name and password that is provided by a user and downloads the corresponding applications and snapshots to the client.
After creating a user, the administrator associates the user with a published application. The user can then access such applications and receive data. If any of the publication items require a data subsetting parameter to be set, the administrator sets this parameter for each user.
4.3.1.2.3 Specify Device Policy for Receiving Updates for this User
Specify the device policy as follows:
Note:
For full details on the device policy for receiving updates, see Section 7.6.1, "Configuring the Device to Receive Required Software Updates"-
Delete Device: Normally, when the device associated with the user is de-installed, the device is deregistered in the Mobile Server. If you select Yes on this pull-down, then the device object is removed when the device is de-installed. This option is enabled only on a specific user's page, which is shown when you select the user name on the User's Page as shown in Figure 4-2.
-
Register Device: To indicate device registration for the group, select True.
-
Software Update: To indicate the device software update type, select the appropriate option. For example, to update the user's devices with major updates, select this option. To indicate the update date, select the date pulldown and choose the software update date.
To add the new user and record the device policy, click OK.
4.3.1.3 Associating Mobile Server Users With Published Applications
Any user that wants to use an application must be associated with that application by an administrator user in the Mobile Manager. In order to associate mobile server users with applications, a mobile server administrator performs the following:
-
Package and publish an application with appropriate publications.
-
Create one or more users or groups that will use the application to retrieve data from the database down to a device. See Section 4.3.1.2, "Adding New Users" for more information.
-
Associate the users or groups with the application. See Section 4.4.1, "Grant or Revoke Application Access to Users" for more information.
-
Optionally, if the application has parameters, also known as data subsetting, that are set for each user or group, define these parameters for each user or group. See Section 4.5, "Managing Application Parameter Input (Data Subsetting)" for more information.
4.3.1.4 Duplicating Existing Users
You can duplicate the privilege and device policy of an existing user in creating a new user. On the main User page, as shown in Figure 4-2, select the user that you want to duplicate and then click Create Like. This brings you to a screen where you can enter the following:
Table 4-2 Add User Page Description
| Field | Description |
|---|---|
|
Display Name |
Name used to display as mobile server user name. |
|
User Name |
Name used to logon to the mobile server. |
|
Authentication |
Select whether this user will be using Oracle Database Mobile Server authentication or if the user will be providing their own.
|
|
Password |
For internal authentication, enter password used to logon to the mobile server. When defining, the password must conform to the following restrictions:
|
|
Password Confirm |
To confirm the above mentioned password for internal authentication, re-enter your password. |
For more information on privileges and device policy, see Section 4.3.1.2, "Adding New Users".
4.3.1.5 Swap Users on a Device
Normally, you install a single user on a device for that user's business needs. Other users cannot use the device unless one of the following is true:
-
All users on the device share the same credentials. This is not secure.
-
The mobile client can have any number of users, where each provides their respective credentials. The current user swaps in its identity for that device by registering the user before using the mobile device. Swapping in a new user de-registers the current user, brings down all of the new user's applications and bootstraps the device with the new user's configuration.
For example, a mobile device that is shared between many employees of a company every day. Each employee selects any device that is pre-loaded with a mobile client installation and uses that device for all daily responsibilities. The employee does not need to retrieve the same device the next day.
Note:
All users must be registered with the mobile server before you can swap in a new user.For Win32, and Windows mobile platforms, you explicitly register the swapped in user with the olregister.exe utility. This utility de-registers the current user, brings down all of the new user's applications and bootstraps the device with the new user's configuration.
When you execute olregister.exe, a GUI screen appears. You provide the new user name, password, and the server URL for the mobile server. In addition, you can de-register only the current user from the device. This removes the current user's data from the device, but leaves the mobile client installation intact.
Alternatively, you can execute olregister.exe on the command-line. The syntax is as follows:
olregister.exe /deregister=yes
olregister.exe /register=yes /user=<username> /password=<pwd> /server=<URL>
4.3.1.6 Managing OID Users in the Mobile Server
If you want, you can use the Oracle Internet Directory (OID) for storing and retrieving user information instead of the mobile server repository. To facilitate using OID, you must first migrate all user information from the repository into OID. Once migrated, you can use OID instead of the repository.
If you decide to use OID users, then—after you install the application server and Oracle Database Mobile Server—perform the following:
-
If you currently have installed the mobile server and have existing users in the mobile server, then you must migrate any existing mobile users to OID as described in Section 4.3.1.6.1, "Migrate Your Users From the Mobile Server Repository to Oracle Internet Directory (OID)".
-
Enable OID users for the mobile server. See Section 4.3.1.1.1, "Enabling OID Users".
Note:
When you navigate to the Users page in the Mobile Manager, all OID users are displayed. Add any new users through OID. On this page, you can only enable OID users for use within the mobile server or change the password.To enable OID users for the mobile server, select the user and click Enable.
-
Assign the appropriate application to these users. As with any mobile server user, you must grant access to the appropriate applications. See Section 4.4.1, "Grant or Revoke Application Access to Users" for more information.
4.3.1.6.1 Migrate Your Users From the Mobile Server Repository to Oracle Internet Directory (OID)
You can use the Oracle Internet Directory (OID), which is part of the Oracle application server, for storing and retrieving user information instead of the mobile server repository. To use OID, you must migrate all user information from the existing repository into OID.
When you migrate users from a mobile server repository into OID, you cannot have duplicate users in OID. So, if you migrate users from two repositories into a single OID and you have users with the same name, but different passwords on two separate repositories, the user that is first migrated into OID is the one that is valid. The second attempt to migrate an existing user name into OID from a different repository will not migrate and no message is provided. This can be a problem if you have two users in different repositories with different passwords.
Migrate existing users in the repository to OID through the oiduser tool, which is located in ORACLE_HOME\Mobile\Server\bin. The oiduser tool migrates existing users with either randomly-generated passwords or a common password.
Perform the following to migrate your users to OID:
-
Set the
IAS_MODEparameter in themobile.orafile toYES. -
Migrate the user information using the
oidusertool, for either randomly-generated passwords or a common password, as follows:-
To use randomly-generated passwords for each user, execute the
oidusertool without the-Poption, as follows:oiduser <ORACLE_HOME> <Mobile Server Repository username> <Mobile Server Repository password> <OID port number> <OID host name> <OID password> <OID admin name> <OID subscriber name>For example, the default setting would be:
oiduser <ORACLE_HOME> mobileadmin manager 389 ldap://myhost-pc1.com welcome1 orcladmin dc=us,dc=oracle,dc=com -
To use a common password for all users, provide the common password with the
-Poption, as follows:oiduser <ORACLE_HOME> <Mobile Server Repository username> <Mobile Server Repository password> <-P> <common password> <OID port number> <OID host name> <OID password> <OID admin name> <OID subscriber name>where the common password is specified by you.
-
All users from the mobile server repository are now migrated to the OID with the required passwords.
If you want to enable Oracle Single Sign on on the mobile server then perform the following:
-
Login to Mobile Manager as the administrator and select the appropriate server.
-
Click on the Administration tab.
-
Click Edit Config File to edit the
mobile.orafile for this server. -
If
SSO_ENABLEDhas a hash mark (#) before it, then eliminate the hash mark and setSSO_ENABLEDtoYES. Click Apply. -
Restart both the application server and the mobile server.
4.3.1.7 Providing Your Own Authentication for a User
By default, Oracle Database Mobile Server provides authentication through the user name and password to both the mobile server. However, if you want to add your own external authentication for the user, such as a fingerprint pad and so on, then you can use APIs to designate what authenticator to use.
For logging on and access to the mobile server, external authentication can be added. For full details, see Section 8.1, "Providing Your Own Authentication Mechanism for Authenticating Users for the Mobile Server" in the Oracle Database Mobile Server Developer's Guide.
4.3.2 Adding New Groups
If you have several users that require access to the same application, you can bypass adding access rights for each user by including these users in a group. Once all of the users are included in a group, then assign access to the intended application to the group; at this point, all users in the group have access to the application.
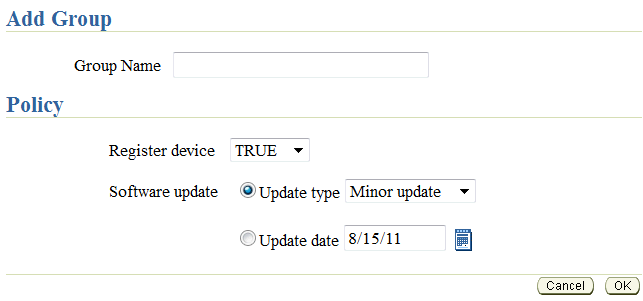
As an administrator, you can add a new group that accesses the mobile server. To add a new group, navigate to the Users page and click Add Group. As Figure 4-4 displays, the Add Group page appears and lists the requisite criteria to register user group properties.
Enter the new group name in the Group Name field. The device policy for the group has the same options as for a single user. For more information on device policy, see Section 4.3.1.2.3, "Specify Device Policy for Receiving Updates for this User". When finished, click OK.
4.3.3 Deleting Groups or Individual Users
As an administrator, you can delete groups or individual users from the system. To permanently delete groups or individual users from the system, select the Delete check box against the group name or individual user name that you want to delete, and click Delete. The Mobile Manager seeks your confirmation to delete the chosen group or user name. Click Yes. You will be returned to the Users page.
4.4 Managing Access Privileges for Users and Groups
The mobile server administrator grants access privileges to mobile applications by designating the users that can access these applications. The following sections describe the access feature of the mobile server:
-
Section 4.4.1, "Grant or Revoke Application Access to Users"
-
Section 4.4.2, "Include or Exclude Users from Group Based Access"
-
Section 4.4.3, "Grant or Revoke Application Access to Groups"
4.4.1 Grant or Revoke Application Access to Users
The following sections describe how an administrator can grant or revoke application access to users and groups:
4.4.1.1 Grant Application Access to Users
The administrator can grant access to applications for specific users within the Mobile Manager, as follows:
-
Navigate to the Users page. Click the specific user name to which you wish to give access. This user's Properties page appears.
-
Click Access. The Access page displays a list of published applications.
-
Select the checkbox next to each application that you wish to give access to for this particular user.
-
Click Save.
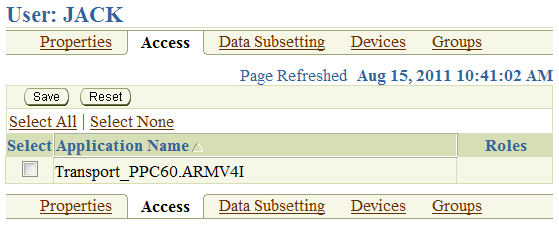
As Figure 4-5 displays, the Access page displays a list of available applications for the user Jack. Select the applications that you want Jack to have access to and click Save. In this example, Jack is given access to Sample1, Sample3, Sample4, Sample6, and Sample7 applications.
4.4.1.2 Revoke Application Access to Users
To revoke application access to any user, clear the check box displayed against an application name and click Save.
Note:
Granting application access to an entire group gives each user in the group, access to the application. For directions on how to include or exclude any user from a group, see Section 4.4.2, "Include or Exclude Users from Group Based Access".4.4.2 Include or Exclude Users from Group Based Access
The following sections describe how the administrator can include or exclude users from group based access:
Using the Mobile Manager, you can modify group based access privileges to include or exclude users requiring access to mobile applications. To modify group based access privileges, click the Users link. The Users page lists existing groups and individual users.
4.4.2.1 Include Users in a Group
To include users into a group, do the following:
-
Navigate to the Users page. Click the name of the user you wish to include in a group. The user Properties page appears.
-
Click Groups.
-
Select the group name that you want to include the user into.
-
Click Save.
Note:
Existing users with privileges for group based access only can be excluded from group based access.Now the user takes on the access for all applications to which the group has access. In order for the group to be given access to additional applications, follow the instructions in Section 4.4.1, "Grant or Revoke Application Access to Users". However, instead of selecting a particular user, select the group instead.
4.4.2.2 Exclude Users from a Group
To remove a user from any group, do the following:
-
Navigate to the Users page. Click on the name of the user you wish to exclude from a group. The user Properties page appears.
-
Click Groups.
-
Clear the group name that you want to exclude the user from.
-
Click Save.
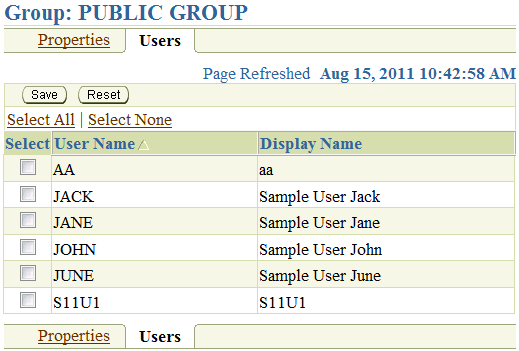
Figure 4-6 displays the Clear Group page for the Public Group. If you wanted to clear Jack from this group, you would uncheck the checkbox next to Jack's name and click Save.
4.4.3 Grant or Revoke Application Access to Groups
Once you have the users that you want in a group, you must indicate what applications that the group has access to. In order to assign application access to groups, you have to add the access rights off the application page. See Section 3.6.1, "Granting Application Access to Users and Groups" for directions.
4.5 Managing Application Parameter Input (Data Subsetting)
If the application that this user accesses requires one or more parameters to determine what data is retrieved from the database, you set these parameters, also known as data subsetting, within the user configuration in Mobile Manager.
Note:
You can only set the parameter values once a user has been granted access to the application. See Section 4.4, "Managing Access Privileges for Users and Groups" for instructions.For example, if you have an application that retrieves the customer base for each sales manager, the application needs to know the sales manager's identification number to retrieve the data specific to each manager. The identification number, in this example, is the application parameter required that is associated with this user. Thus, if you set up each sales manager as a unique user and set their identification number in the data subsetting screen, then the application is given that unique information and can replace it appropriately in the application.
-
Navigate to the Users page. Click the specific user name to which you wish to give access. This user's Properties page appears.
-
Click Data Subsetting. The Data Subsetting page enables the administrator to add parameter input for this user. This displays all of the applications that the user is associated with.
-
Select the application for which you want to add the parameter value.
-
Enter the parameter values for the application.
-
Click Save.
4.6 Manually Adding Devices for a User
Normally, when you download and install a client, the device is registered automatically for the user. There are two instances where you may need to manually add the device:
-
As an administrator, you could hand a device that is fully loaded with the mobile client software, but is not assigned to any user or application. After handing the device to your user, you can add their user information, application access, and device that they are using manually.
-
When you hand someone the mobile client software on an installation CD, then the installation does not register the device manually—since it is not connected to mobile server. Thus, for each user that you provide the mobile client software from an install CD, you will have to add the device to this user.
To add a device for an individual user, navigate to the specific user's page and perform the following:
-
On the Users page, select the user for which you want to add a device.
-
Click Devices. All currently registered devices for this user appear.
-
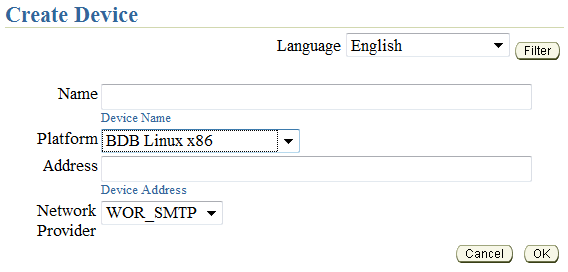
Click Add. The Create Device screen (as shown in Figure 4-7) appears.
-
Enter the device information, as described in Figure 4-7, and click OK to add the device for this user:
| Device Field | Description |
|---|---|
|
Language |
Select the language that the platform will use. The default is English. |
|
Name |
Configure a user-defined name for the device. |
|
Platform |
Select the platform for this device. |
|
Address |
The device address indicates the unique network identifier of a device. The device address must have a corresponding Network Provider associated with it. To transmit data to a device, the DMS uses the Network Provider associated with the address object. For example, RAPI, HTTP, WOR, SMTP. To enable a communication link between the DMS and the DMC, the administrator must create a proper device address for all devices. In the Address field, enter the device address. |
|
Network Provider |
To specify the network provider, click the Network Provider box and choose the required network provider from the list displayed. |
Once added, the user can now synchronize the device to retrieve their applications and related snapshots.
4.7 Configuring How the Device Receives Software Updates for the User
You can control whether a new version of an application software is downloaded on each client. See Section 4.3.1.2.3, "Specify Device Policy for Receiving Updates for this User" for full details on how the device policy is implemented for receiving updates for this user.
