| Oracle® Communications Services Gatekeeper Installation Guide Release 5.1 E37539-02 |
|
|
PDF · Mobi · ePub |
| Oracle® Communications Services Gatekeeper Installation Guide Release 5.1 E37539-02 |
|
|
PDF · Mobi · ePub |
This chapter describes how to use domain configuration tools to set up Oracle WebLogic Server for use with Oracle Communications Services Gatekeeper. This chapter covers the following topics:
Configuring a Domain With the Graphical Mode Configuration Wizard
Configuring a Domain with Oracle WebLogic Scripting Tool Scripts
Before you follow the instructions in this chapter to configure a domain, you should have:
Read "Task Overview" for an overview of the entire process.
Read "Installing the Database" and "Installing Oracle Communications Services Gatekeeper" and have the database administrator username and password available.
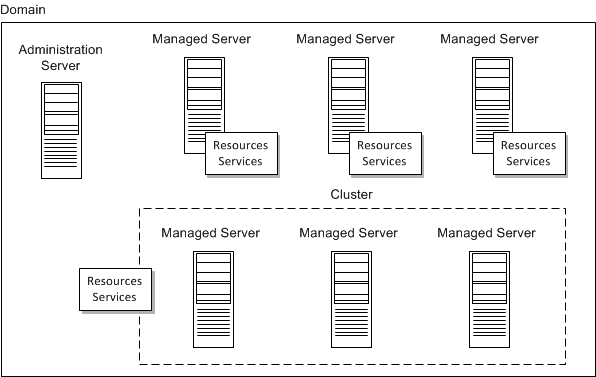
In order to run Services Gatekeeper, its container, WebLogic Server, must be given basic information about the various parts of the system. This is called configuring the domain. A domain is the basic administrative unit in WebLogic Server. It consists of an administration server and, usually, one or more Managed Servers, which may be associated into clusters, as illustrated in Figure 6-1.
The administration server provides a central point for managing the domain and providing access to the WebLogic Server administration tools.
A single WebLogic Server instance can function as both the administration server and a managed server, depending on the needs of the installation. For example, developers creating communication service extensions using the Platform Development Studio commonly might run both the administration server and managed servers on a single machine.
Managed servers are often grouped together into clusters. Clusters are groups of server instances that work together to provide scalability and high availability. Clusters improve performance and provide failover should a server instance become unavailable. The servers within a cluster can run on the same machine, or they can reside on different machines. To the client, a cluster appears as a single WebLogic Server instance.
Managed servers, or the clusters into which they are linked, host application components—in this case, the communication services—and resources, which are also deployed and managed as part of the domain.
Each server instance is also assigned to a machine, a logical representation of actual hardware. The machine representation is used by the administration server to start and stop remote servers using the Node Manager. Multiple server instances can run in a single machine.
For more information on WebLogic Server domains, see the introduction and the following sections in Oracle Fusion Middleware Creating Domains Using the Configuration Wizard at:
http://download.oracle.com/docs/cd/E15523_01/web.1111/e14140/toc.htm
All servers must have their domains configured. You can either use one of the methods below to manually configure each server in your installation, or you can configure the domain on your administration server and then use the pack and unpack commands provided by WLS to package the configuration data for copying to all the other servers. For more information on pack and unpack, see the discussion on overview of the pack and unpack commands in Oracle Fusion Middleware Creating Templates and Domains Using the Pack and Unpack Commands at:
http://download.oracle.com/docs/cd/E15523_01/web.1111/e14144/intro.htm
The scripts are located in the common/bin directory. In the default installation, this would be Services_Gatekeeper_Home\wlserver_10.3\common\bin where Services_Gatekeeper_Home is the home directory of your Services Gatekeeper installation.
Use the following instructions explain how to use the Services Gatekeeper GUI-based Configuration Wizard to configure WebLogic Server for Services Gatekeeper.
To do so, the console attached to the domain configuration system must support a Java-based GUI. All consoles for Windows systems support Java-based GUIs, but not all consoles for UNIX/Linux systems do. If you attempt to start the configuration program in graphical mode on a system that cannot support a graphical display, the configuration program automatically starts console-mode installation.
If you are running Services Gatekeeper on an IPv6 network, and you intend to use the Graphical Mode Domain Configuration Wizard, you will need to map host names to your IPv6 addresses to your etc/hosts (Linux or Solaris) file or \Windows\System32\drivers\etc\hosts (Windows), since the Wizard cannot accept IPv6 addresses.
To map IPv6 addresses to host names, do the following:
Open the file /etc/hosts (Linux or Solaris) or \Windows\System32\drivers\etc\hosts (Windows) in a plain text editor.
Add your IPv6 address to hostname mappings to the file in the format:
<IPv6 Address> <host name> ## Optional comment
Once added, your mappings should look similar to the following example:
2001:db8:0:f101::1     host-admin.example.com    ## Admin Server
2001:db8:0:f101::1     host-at1.example.com      ## Application Tier 1
2001:db8:0:f101::2     host-at2.example.com      ## Application Tier 2
2001:db8:0:f101::1     host-nt1.example.com      ## Network Tier 1
2001:db8:0:f101::2     host-nt2.example.com      ## Network Tier 2
Save the file and restart the machine for the settings to take effect.
When using the Graphical Domain Wizard, you should then use the host names in place of the IPv6 addresses.
You can start the Configuration Wizard in graphical mode from either the Windows Start menu or from the command line.
To start the GUI Configuration Wizard from the Windows Start menu, choose the Configuration Wizard option from the Oracle program group in the Windows Start Menu:
Start->Programs->Oracle Communications Services Gatekeeper 5.1-> OCSG 5.1->Tools->Configuration Wizard
Note:
If you have used the GUI-based installer, and the Run Quickstart box is checked in the Installation Complete window, the Quickstart window opens automatically. Simply click Start Domain Configuration Wizard to launch the Wizard.See "Configuring Domain Settings" for details on how to fill in the domain settings.
To start the GUI Configuration Wizard from the command line:
Log in to the target system.
Open a command prompt window.
Go to the Middleware_Home\common\bin subdirectory. For example:
cd c:\Middleware_Home\wlserver_10.3\common\bin
At the prompt, type config and press Enter.
The Configuration Wizard starts in graphical mode and the Welcome screen appears. See "Configuring Domain Settings" for details on how to fill in the domain settings.
Note:
You can also use Explorer to find the config.cmd file in c:\Middleware_Home\wlserver_10.3\common\bin, and simply double-click it.To start the GUI Configuration Wizard on a UNIX/Linux system:
Log in to the target system.
Open a command shell window.
Go to the /common/bin subdirectory. For example:
cd Services_Gatekeeper_Home/wlserver_10.3/common/bin
Invoke the following script:
sh config.sh
The Configuration Wizard starts in graphical mode and the Welcome screen appears. See "Configuring Domain Settings" for details on how to fill in the domain settings.
This section assumes that you have followed the instruction in either "Configuring a Domain with the GUI Configuration Wizard - Windows" or "Configuring a Domain with the GUI Configuration Wizard - UNIX/Linux" and launched the GUI Configuration Wizard and have the Welcome screen. The GUI Configuration Wizard screens prompt you to enter specific information about your system and configuration. For instructions on responding to the prompts during installation, see the following sections.
To complete this section you need the name of the database host, the database instance name, any listening port numbers, and the name and password of a database user to use. Services Gatekeeper domains require this connection information.
The following sections describe the configuration options in each Configuration Wizard screen.
Note:
If you are going to be using any CORBA-based functionality that in one way or another connects to a machine other than your own, you should not use the value ”localhost” in any of your configuration choices.Do one of the following:
Select Create a new WebLogic domain to create a new domain.
Select Extend an existing WebLogic domain to extend an existing domain with additional components.
Click Next to proceed with the installation.
You may cancel the installation at any time by clicking Exit and you may go back to a previous window by clicking Previous.
Select Generate a domain configured automatically to support the following products. This option offers you these standard options for pre-configured domains based on popular products and options:
Select the appropriate template depending on your needs:
Basic Oracle Communications Services Gatekeeper Domain
Creates an all-in-one domain, with the Access and Network Tier and the administration server all on a single machine. This configuration is common for development machines.
OCSG Basic HA configuration
Creates a basic domain with two servers, each with an Access Tier (AT) and an Network Tier (NT) instance and a database. This configuration can be expanded later in the process.
OCSG Domain with Access and Network Clusters
Creates a basic distributed domain, with a two instance Access cluster and a two instance Network cluster. This configuration can be expanded later in the process.
OCSG Domain with Access and Network Clusters with Oracle RAC Configuration
Creates a basic distributed domain, with a two instance Access cluster and a two instance Network cluster. This configuration can be expanded later in the process. It also creates the additional data sources required for use with an Oracle RAC based installation.
OCSG OSB Integration Configuration
Creates a domain for integration with Oracle Service Bus (OSB), using the Service Oriented Architecture (SOA) Facade. If you are using this template, you need additional special information. See "Installing SOA Facades" for more information.
Accept the default domain name or create a new name in the Domain Name text box.
Accept the default domain location or click the Browse button to change the location.
Click Next to save your changes and continue.
Specify the main administrative user in the Name text box.
This name is used to boot the administration server and connect to it. For setup and testing, Oracle suggests that you use weblogic. User names are case sensitive. Do not use commas or any characters in the following comma-separated list:
\t, < >, #, |, &, ?, ( ), { }
Specify the password for the administrative user in the User password text box.
The password must contain a minimum of eight case-sensitive characters, at least one of which is not alphabetic.
Re-enter the password in the Confirm user password text box.
(Optional) Enter an informal description for this username in the Description text box.
Click Next to save your changes and continue.
On the left side of the window, select the appropriate startup mode for your installation:
Development Mode
Production Mode (This is the only supported mode for 64-bit Solaris environments.)
Note: If you select Production Mode, you should not enable SSL unless you have a trusted key. For more information on startup modes, see the discussion on development vs. production mode default tuning values in Oracle Fusion Middleware Performance and Tuning for Oracle WebLogic Server at:
http://download.oracle.com/docs/cd/E15523_01/web.1111/e13814/wls_tuning.htm
On the right side of the window, select Available JDKs.
Highlight the appropriate JDK you wish to use.
Click Next to save your changes and continue.
This screen appears if you are installing a non-Oracle RAC based Services Gatekeeper configuration.
Use this screen to specify connection information between Services Gatekeeper and the JDBC data sources (databases). A JDBC data source contains a pool of database connections that are created when the data source instance is created - when it is deployed or targeted, or at server startup. Applications look up a data source on the JNDI tree, and then request a connection.
Configure wlng.datasource, wlng.localTX.datasource, and wlng.localTX.datasource.
Select the wlng.datasource, wlng.localTX.datasources, and (for SOA domains) wlng.localTX.datasource check boxes to configure these data sources simultaneously. To configure these data sources separately, make adjustments in the data source for the transactional data source.
Typically, fields you may need to edit include:
Vendor: Select the database vendor from the list; the default is Oracle.
Driver: Select the driver for your database type from the list; the default is Oracle's Driver (Thin) for Instance connections. Non-Oracle RAC domains need to use the non-XA thin driver for wlng.localTX.datasource, and the XA driver for wlng.datasource.
Username: The Services Gatekeeper user name you created when you installed the database. The default is SETME_DBUSER.
Password: The Services Gatekeeper password you created when you installed the database (it is not be echoed on the screen).
DBMS/Service: Enter name of the database you created in "Installing the Database" The default database name is SLEE_DB.
Host Name: Where the database is located; the default is localhost.
Port: Enter the port number for contacting the database. For Oracle, the default is 1521. For MySQL, the default is 3306.
Configure selected data sources as RAC multi data sources in the next panel. Check this check box if you are using Real Application Cluster features.
Click Next to save your changes and continue.
The Test JDBC Data Sources screen appears and automatically tests your data source configurations.
A green check displayed in the Status column indicates that the configuration is valid. A red circle and slash indicates a problem. To correct any problems, click Previous to return to the Configure JDBC Data Sources screen and make the necessary changes and Click Next. When the Test JDBC Data Sources screen reappears, click Test Connections to retest the configurations.
If you checked the Configure selected data sources as RAC multi data sources in the next panel box in the Configure JDBC Data Sources screen, this screen appears next. Follow these steps to configure JDBC data sources:
Check the boxes next to wlng.datasource, wlng.TX.datasources and (if applicable) wlng.localTX.datasource to configure them all at the same time.
Enter the service name of a database to connect to in the Service Name text box.
Enter a database user account name in the Username text box.
Enter the password for the user account password in the Password text box.
Enter the IP address or DNS name of the server that hosts the database in the Host Name field.
Enter the database name in the Instance Name text box. Naming schemes vary by database.
Enter a port on which the database listens for connection requests in the Port text field.
Click Add to add the data source.
Add as many data sources as you need. Typically only one is configured per database.
Click Next to save your changes an continue to the next screen.
Leave these boxes unchecked to accept the default values for the se options. These settings are described in "Optional Configuration Screens".
Oracle RAC domains require that you at least configure an administration server using "Configure the Administration Server (Administration Server Screen)".
Displays the domain details. Use the Summary View drop-down list to choose a category view to use. The options vary with your configuration and my include:
Deployment
Application
Service
Cluster
Machine
JDBC Multi Data Source
JMS Server
Click Create to accept the domain details and start creating the domain.
The following sections explain how to configure options for the Optional Configuration screens. A few of these settings are required for certain domain configurations.
Replace AdminServer with the name of your administration server in the Name text box.
Replace host-admin.bea.com with the IP address or DNS name of your administration server in the Listen address text box.
Replace 7001 with an available port number on your administration server to use as a listening port in the Listen Port text box.
(Optional) Enter an available port number to use as an SSL listening port in the SSL listen port text box.
(Optional) check the SSL enabled check box to use SSL.
Do not enable SSL unless you have a trusted key.
Click Next to save your changes and continue.
Select Uniform distribution Destination (UDD) or Weighted Distributed Destination (WDD) settings for each of your JSM system resources.
See the screen text for more information.
Click Next to save your changes and continue.
Use this window to add or change connection information for managed servers. Each managed server is an instance of WebLogic Server. Some information may already be filled in.
Change the Listen address of each of your servers, based on your installation values. You can add managed server instances at this time. (You can also do this using the Administration Console at any time.).
Note: The Listen address and Listen port per server combination must be unique. The values for the listen address can include alphanumeric characters, dots [.], and dashes [-] only.
Replace 7001 with a port number on your administration server to use as a listening port. in the Listen Port text box.
(Optional) Enter a port number to use as an SSL listening port in the SSL listen port text box.
(Optional) check the SSL enabled check box to use SSL.
Do not enable SSL unless you have a trusted key
Click Next to save your changes and continue.
When finished, configure the new system by returning to the Select Optional Configuration screen, checking the Deployments and Services checkbox, and then clicking Next.
The Target Deployments to Clusters or Server screen appears. See "Deployments and Services (Target Deployments to Clusters or Server Screen)" for details.
Assign services to servers or clusters
This window does not appear if you selected Create Oracle Communications Services Gatekeeper Basic Domain.
Use this window to add any additional managed servers you listed in the Configure Managed Servers window to clusters configured in the Configure Clusters window. Select the appropriate cluster in the right pane, the appropriate managed server in the left pane, and assign them to each other by clicking the right arrow button.
Configure Machines/Configure Unix Machines
Use this window to add or change information about machines. In the context of WebLogic Server, a machine is the logical representation of the system that hosts one or more WebLogic Server instances, for the purposes of starting and stopping remote servers using the Node Manager. In a domain, machine definitions identify a particular, physical piece of hardware and are used to associate a computer with the managed servers it hosts.
For more information about the various fields, see the discussion on configuring machines in Oracle Fusion Middleware Creating Domains Using the Configuration Wizard at:
http://download.oracle.com/docs/cd/E15523_01/web.1111/e14140/custom.htm
Click Next to continue.
Assign Servers to Machines
This window does not appear if you selected Create Oracle Communications Services Gatekeeper Basic Domain
Use this window to assign servers (either administration or managed) to their appropriate machines, if necessary. Select the appropriate machine in the right pane and the server(s) in the left pane and assign them to each other by clicking the right arrow button.
Click Next to continue.
Select a Database Type from the drop-down list.
A driver is automatically entered in the Driver text box. If necessary, select another driver from the drop-down list.
The correct Class Name for the driver is automatically filled in.
Enter a database session identifier in the DBMS SID text box.
Enter a database name in the DBMS Host text box.
(As needed) Replace the default port number in the DBMS Port text box.
Enter a DBMS administrator user name in the User Name text box.
Enter a password for the DBMS administrator in the User Password text box.
Confirm the password.
Add any required items to the Additional Properties text box.
Click Next to save your changes and continue.
Use the following instructions if you wish to use the Console-based Configuration Wizard to configure WebLogic Server for Services Gatekeeper.
To start the Console Configuration Wizard:
Log in to the target system.
Open a command prompt window.
Go to the Services_Gatekeeper_Home\common\bin subdirectory where Services_Gatekeeper_Home is the home directory of your Services Gatekeeper installation. For example:
cd c:\Services_Gatekeeper_Home\wlserver_10.3\common\bin
At the prompt, type config -mode=console and press Enter.
The Configuration Wizard starts in console mode.
To start the console Configuration Wizard:
Log in to the target system.
Open a command shell window.
Go to the Services_Gatekeeper_Home/common/bin subdirectory where Services_Gatekeeper_Home is the home directory of your Services Gatekeeper installation. For example:
cd c:\Services_Gatekeeper_Home\wlserver_10.3\common\bin
Invoke the following script:
sh config.sh -mode=console
The Configuration Wizard starts in console mode.
To create your domain, respond to the prompts in each section by entering the number associated with your choice, pressing Enter, or typing Next (or n) to accept the current selection. See "Configuring Domain Settings" for more information. The screen names are the same for both the graphical and console Domain Configuration Wizards.
Note:
If you are going to be using any CORBA based functionality that in one way or another connects to a machine other than your own, you should not use the value ”localhost” in any of your configuration choices.The right arrow (->) indicates the value currently selected. To quit the Configuration Wizard, enter Exit in response to any prompt. To review or change your selection, enter Previous at the prompt.
Instead of typing complete words when you want to enter [Exit], [Previous], and [Next], you can use the following one-letter shortcuts: x, p, and n, respectively.
This section explains how to monitor and manage WebLogic Server instances and domains using the WebLogic Scripting Tool (WLST) instead of the Configuration Wizard GUI.
The WLST scripting environment is based on the Java scripting interpreter, Jython. For more general information on WLST, see the discussion on introduction and road map in Oracle Fusion Middleware Oracle WebLogic Scripting Tool at: http://download.oracle.com/docs/cd/E12839_01/web.1111/e13715/intro.htm
Caution:
WLST is a powerful, flexible tool, and has a significant learning curve. If you do not know how to use WLST and do not wish to spend the time to become familiar with it, consider using one of the Configuration Wizards to set up your domains instead.You must set a number of environment variables for WLST to run properly. To simplify this, the Services Gatekeeper installer provides shell/cmd scripts that must be run before WLST is invoked. The scripts are located in Services_Gatekeeper_Home/wlserver_10.3/server/bin where Services_Gatekeeper_Home is the home directory of your Services Gatekeeper installation.
Services Gatekeeper provides both setWLSEnv.sh and setWLSEnv.cmd versions for use with UNIX/Linux and Windows. It is usually enough simply to run the appropriate script, but some shells may require using source, as in:
source Services_Gatekeeper_Home/wlserver10.3/server/bin/setWLSEnv.sh
If this still does not work, you may need to change shells. There have been some issues reported with bash, particularly on HPUX machines. If you are having problems with your shell, change to an sh shell before running the script.
Services Gatekeeper provides five WLST scripts to set up your environment. The scripts are located in Services_Gatekeeper_Home/wlserver10.3/common/templates/scripts/wlst/ directory, and the templates are located in Services_Gatekeeper_Home/wlserver10.3/common/templates/domains where Services_Gatekeeper_Home is the home directory of your Services Gatekeeper installation. The following scripts are provided:
basic-ocsg-ha.py uses the domain template basic-ocsg-ha-domain.jar for its basic setup. This creates a domain with two servers, each with an AT and an NT instance and a database. Database replication must be set up separately.
ocsg-cluster.py uses the domain template ocsg-domain.jar for its basic setup. This creates an all-in-one domain typical of development environments.
access-network-cluster.py uses the domain template ocsg-access-network-domain.jar for its basic setup. This creates a domain with separate Access and Network clusters.
access-network-rac-cluster.py uses the domain template ocsg-access-network-rac-domain.jar for its basic setup. This creates a domain with separate Access and Network clusters with the additional data sources that an Oracle RAC installation requires.
ocsg-osb-integ.py uses the domain template ocsg-osb-integ-domain.jar for its basic setup. This creates a domain for integration of Oracle Communications Services Gatekeeper with Oracle Service Bus.
If you are configuring an HP-UX installation, you must run the script using the -Djava.security.egd flag. For example, you would invoke the basic-ocsg-ha.py script by typing:
java -Djava.security.egd=/dev/random weblogic.WLST basic-ocsg-ha.py
The wlng-cluster.py script sets up a development machine, use this script as is.
If you are using one of the other four scripts, you must set a few variables found at the top of the script, and, in some situations, edit a few other values. See "Configure Multi-cluster Settings" for details.
If you are using one of the two other scripts and you also wish to create additional servers, you must make more complex edits. See "Adding Servers to a Multi-cluster Configuration" for details.
If you wish to prevent communication services from ever being deployed, you may edit whichever script you are using. See "Keep Unused Communication Services From Being Deployed" for details.
It is also possible to remove communication services after the initial deployment. See the Oracle Services Gatekeeper System Administrator's Guide for information on accomplishing this.
If you are setting up the standard version of one of the multi-cluster domains, only a few variables need to be set at the top of the script, in the section called Configuration (INPUT) Parameters.
Example 6-1 The Configuration (INPUT) Parameters Section from Access-Network-rac.py
#=========================================================================
# Configuration (INPUT) Parameters
#=========================================================================

# listen address input parameters
# example: hostname can be DNSName or IPAddress

AdminServerListenAddress = "host-admin.bea.com"
AdminServerListenPort    =  7001
NT1ServerListenAddress   = "host-nt1.bea.com"
NT1ListenPort            =  8001
NT2ServerListenAddress   = "host-nt2.bea.com"
NT2ListenPort            =  8001
AT1ServerListenAddress   = "host-at1.bea.com"
AT1ListenPort            =  8001
AT2ServerListenAddress   = "host-at2.bea.com"
AT2ListenPort            =  8001

NTClusterAddress         = "host-nt1.bea.com:8001,host-nt2.bea.com:8001"
ATClusterAddress         = "host-at1.bea.com:8001,host-at2.bea.com:8001"

NTClusterMultiCastAddress = '237.0.0.101'
NTClusterMultiCastPort    = 8050
ATClusterMultiCastAddress = '237.0.0.102'
ATClusterMultiCastPort    = 8050

# DataSource Settings

# RAC Node-1 Settings

RACNode1URL      = "SETME_URL"

# RAC Node-2 Settings

RACNode2URL      = "SETME_URL"

# Database settings

OracleXADriver    = "SETME_XADRIVER"
OracleNonXADriver = "SETME_nonXADRIVER"
DBUser            = "SETME_USER"
DBPassword        = "SETME_PASSWORD"
Set the Listen Address and Listen Port for the administration server, the two Access Tier servers, and the two Network Tier servers.
Replace the host*.bea.com values with either the DNS name or the IP Address of the appropriate servers.
Replace the Listen Port values as necessary. The Listen Address:Port combinations must be unique.
Fill in the appropriate Listen Address:Port combinations to assign the servers to the appropriate clusters. The entry should be comma delimited, with no spaces.
Fill in the appropriate Multicast Addresses per cluster.
Set the appropriate URLs for each of the Oracle RAC instances (only in Oracle RAC scripts)
Set the appropriate values for the transactional (XA) and localTX(nonXA) datasources (in Oracle RAC scripts).
Set the appropriate values for the wlng.datasource (in non-Oracle RAC scripts)
Set the appropriate values for the wlng.localTX.datasource. The values should be non-XA (only in non-Oracle RAC scripts).
The following change may also need to be made:
If you want to be able to use the Administration Console and Node Manager to start remote servers, you must change the NodeManager ListenAddress values in the Configure Managed Servers section. To do so edit the following line for each managed server
set('ListenAddress','localhost')
to change localhost to the correct ListenAddress.
The default domain user (weblogic) and password. You can modify these values in the script.
If you want to use the WLST script to set up a multi-cluster domain and, at the same time, to add additional servers, first make the edits in "Configure Multi-cluster Settings" section. Then make the following additional edits listed in this section. The specific edits depends on how your particular installation is set up.
WLST in offline mode, which is the mode that Services Gatekeeper scripts use, can access and update only those configuration objects that have been previously persisted to a configuration file. All the provided WLST scripts create this configuration file automatically as they run, but each adds only those objects that are specified in the domain templates. If you need to add more configuration objects, such as additional managed servers or machines, you must add statements to the script to create them before you can configure them.
You can also add servers and machines using the Administration Console after you set up your core domain. This is a simpler way of accomplishing the same goal.
The following sections describe script actions and their related edits.
For example, if you need to add additional machines, you must create them in the script before you assign managed servers to them.
Table 6-1 Code to Create Additional Machines
| Comment Section | Code to add | Value |
|---|---|---|
|
Configure managed servers |
|
Add as many of these statements as you need, replacing |
After you create the machine, you can assign managed servers to them. You can also add new managed servers. In the code below, the new managed server WLNG_NT3 is created and then assigned to new_Machine_5, created above.
Table 6-2 Code to Create Additional Managed Servers
| Comment Section | Statement to edit | Value |
|---|---|---|
|
Configure managed servers |
|
Create new servers as needed, and set the ListenAddress |
You must also add a section to configure any new machine (and its Node Manager) being added.
Table 6-3 Setting Listen Address for Node Manager
| Comment Section | Statement to add | Value |
|---|---|---|
|
Configure managed servers |
|
One section per added Machine. |
You can remove communication services after the initial deployment of Services Gatekeeper. If you know that your installation is not using one or more communication services and you prefer that they not be deployed at all in your system, you can add the following information to your configuration script.
Remember that all communication services consist of two EAR files, an Access Tier version and a Network Tier version. You will need to address both files to completely remove the communication service.
For example, to keep the PX 3.0 Third Party Call communication service from being deployed, add the following to your script:
#===================================================================
# Unassign applications to target
#===================================================================
cd(’/')
unassign('Application', ’wlng_at_third_party_call_px30#4.0 ', 'Target', 'WLNG_AT_Cluster')
unassign('Application', ’wlng_nt_third_party_call_px30#4.0 ', 'Target', 'WLNG_NT_Cluster')
You must now complete Services Gatekeeper post installation tasks. See "Completing Post-Installation" for more information.
|
Copyright © 2007, 2014, Oracle and/or its affiliates. All rights reserved. Legal Notices |
|