11g Release 7 (11.1.7)
Part Number E20388-06
Home
Contents
Book
List
Contact
Us
|
Oracle® Fusion Applications CRM Extensibility Guide 11g Release 7 (11.1.7) Part Number E20388-06 |
Home |
Contents |
Book List |
Contact Us |
|
Previous |
Next |
This chapter contains the following:
Creating Custom Subject Areas : Overview
Custom Subject Areas : Explained
Objects in Custom Subject Areas: Explained
Fields or Attributes in Custom Subject Areas: Explained
Measures in Custom Subject Areas: Explained
Implicit Fact Column in Custom Subject Areas: Explained
Date Leveling in Custom Subject Areas: Explained
Creating and Editing Custom Subject Areas: Explained
Securing Custom Subject Areas: How It Works
Publishing Custom Subject Areas: Explained
Creating a Custom Object and Associating it With a Custom Dynamic Choice List Field : Worked Example
Creating Custom Fields for a Standard Object: Explained
Extensibility and Reporting : Example
Extensibility Analytics: Worked Example
Custom Subject Areas: Frequently Asked Questions
In this chapter, you will learn about:
The concepts and terminology used in custom subject areas.
Creating or editing, configuring, securing, and publishing custom subject areas and the various considerations involved.
Creating and viewing reports using published custom subject areas using examples covered in this chapter.
Before you begin to create your own custom subject areas, review these topics:
Objects in Custom Subject Areas
Fields or Attributes in Custom Subject Areas
Measures in Custom Subject Areas
Date Leveling in Custom Subject Areas
Implicit Fact Column in Custom Subject Areas
Creating and Editing Custom Subject Areas
Securing Custom Subject Areas
Publishing Custom Subject Areas
Objects: Object within Oracle Fusion CRM represents an entity; it can be, for example, a sales account or an opportunity.
Standard object: An object that is delivered when the Oracle Fusion CRM is first used is called standard object, for example, opportunity.
Custom object: A new object that is added during the deployment of Oracle Fusion CRM is called a custom object.
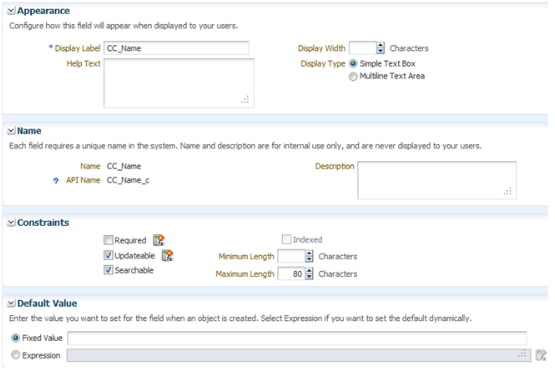
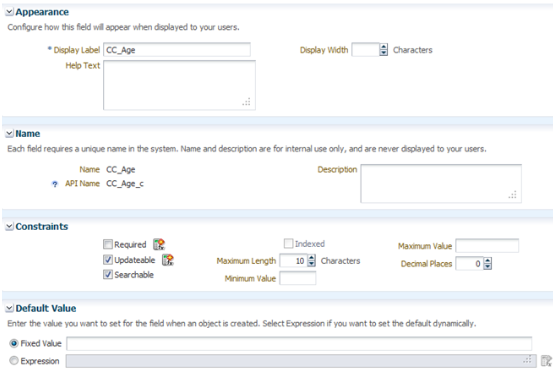
Fields or attributes: A field, also called an attribute, is where entity information is stored in Oracle Fusion CRM. An opportunity name is stored in a field under the opportunity entity or object.
Measures: Measures are a set of functions that you can apply on date, numeric, or currency type fields of the selected primary, child, or related objects while defining a custom subject area.
Date Leveling: Date leveling is a date hierarchy representation between dates and the associated measures. For example, total revenue by month.
Implicit Facts: Implicit Fact column defines the join path that should be used when running a report with only dimension attributes from a subject area that has measures from different facts or entities.
Oracle Fusion CRM also allows the creation of objects to store specific information that is not delivered with the application. For example, one may want to track trouble tickets and would then create a custom object called Trouble Tickets.
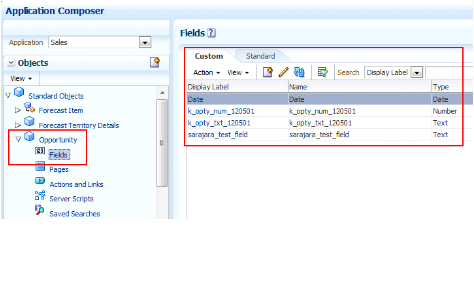
In the Application Composer, when you select the desired Application, the standard and custom objects are shown in two groups on an object's navigation tree in the left pane.
Any configuration performed by the customer and later added to Oracle Fusion CRM is considered custom. If a new object or subject area is added during the deployment of Oracle Fusion CRM, it is then custom or called a custom object, custom field or custom attribute, or custom subject area.
When planning the design of your custom subject area, use the Application Composer to identity standard and custom objects or fields within Oracle Fusion CRM.
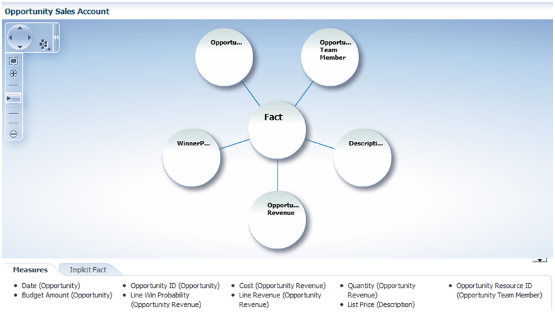
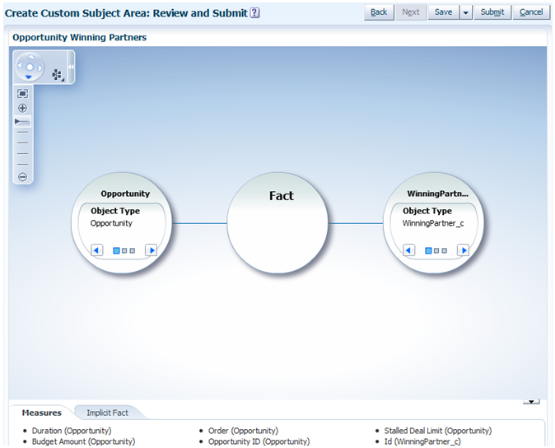
This figure shows the Opportunity object as the primary object for a custom subject area that is created to report on opportunities and winning partner.

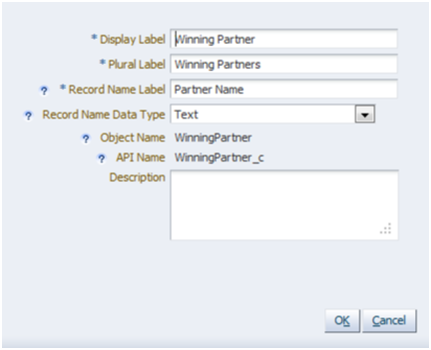
This figure shows the Edit Dynamic Choice List page for the custom Winning Partner dynamic choice list field.

Note
After you save or submit a custom subject area, you cannot change its primary object; however, you can create a custom subject area with a different primary object.
The list of available primary objects includes all reportable objects. Reportable objects are either top-level, custom objects, or standard objects that have been configured to be reportable by the owning Oracle Fusion CRM application.
Note
The common object Notes and Tasks are not reportable. They cannot be included in a custom subject area.
Note
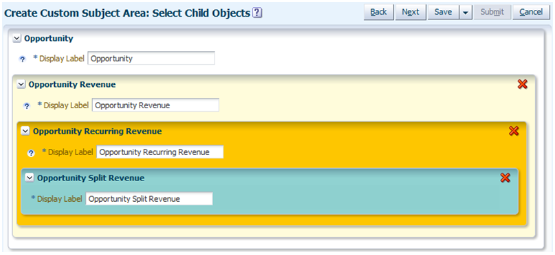
You can add only one child to each parent, up to four levels.
Note
Once you publish a custom subject area, you cannot add new child objects; however, you can create a (separate or another) custom subject area with a different primary object if desired
Custom subject areas support objects related to parent, child, grandchild or grand grandchild objects. It is possible to add one or more related objects to a custom subject area. For example, Opportunity being the primary object, the administrator user could select the Opportunity object and then click Select Fields to add Opportunity related objects.
When the Select Fields screen is displayed the administrator user can add or remove Opportunity fields and also add or remove related objects and its fields to the custom subject area.
The same process is followed for any other child object added to the custom subject area.
The Application Composer displays custom and standard fields in separate tabs on the Fields page.
Text
Number
Date
Percentage
Date time
Currency
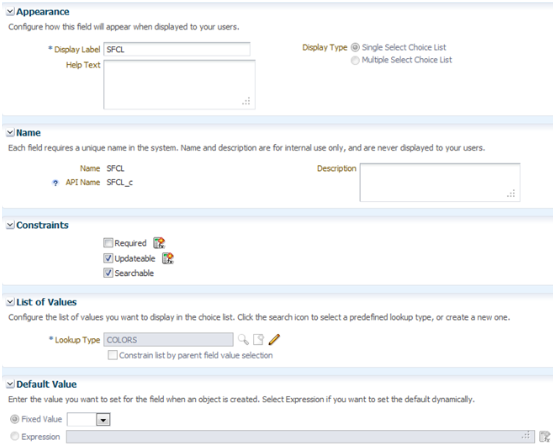
Fixed choice lists
Dynamic choice lists
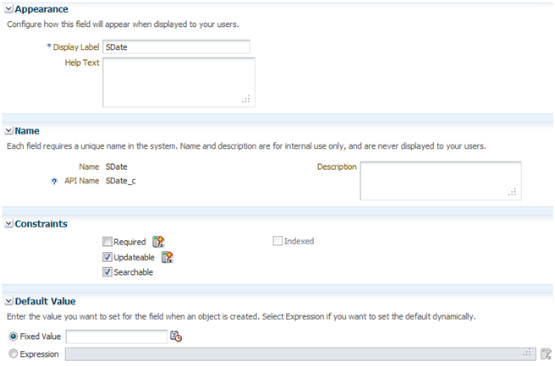
When you create a custom field, you can create reports for the following data types:
Boolean
Number
Currency
Date
String
Percentage
Phone
Date time
To create reports using extension dimension attributes:
Navigate to the Application Composer.
Create custom fields for standard objects, and ensure that the custom fields are exposed on the user interface. This enables users to enter data for these new attributes.
Navigate to Oracle Business Intelligence Composer through Reports and Analytics option in the Navigator Menu.
Select a real time or Oracle Transactional Business Intelligence (OTBI) subject area that includes the predefined extension dimension.
Create a report.
When you select report columns, you can see that custom fields automatically appear under the extension dimension folder.
This figure shows the extensible Opportunity object with a custom Date field available for reporting automatically after its sandbox is published
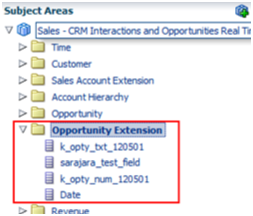
The custom Date field is available in the Opportunity Extension folder in the predefined or standard Opportunity subject areas.
Measures available to a particular type of field may differ depending on the field type. Once you define the measures for the desired fields and publish a custom subject area, you can view and select these fields along with the applied measures when defining the report data in the Oracle Business Intelligence Composer.
Here are some measures you can apply to numeric, currency, or date type fields.
For numeric and currency fields, a measure can be:
All
Sum
Average
Total
Count
Count Distinct
Maximum
Minimum
First
Last
Median
Standard Deviation
Standard Deviation Population
For date fields, a measure can be:
All
Maximum
Minimum
For more information about selecting the data for a report using the Oracle Business Intelligence Composer, see "Using BI Composer to Work with Analyses" in Oracle Fusion Middleware User's Guide for Oracle Business Intelligence Enterprise Edition (Oracle Fusion Applications Edition)on Oracle Technology Network at http://www.oracle.com/technetwork/indexes/documentation.
You can select measures based on your reporting needs. For example, you can use measures to view product sales per store, state, or country. Or, to view the number of support tickets opened or closed per day, week, or month, and so on.
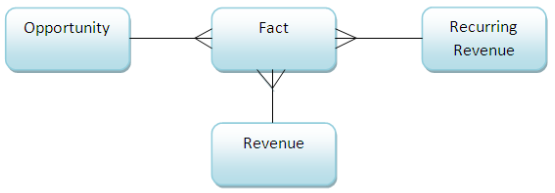
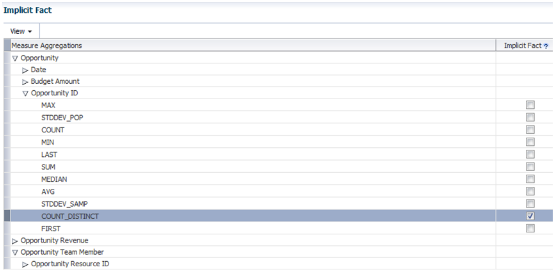
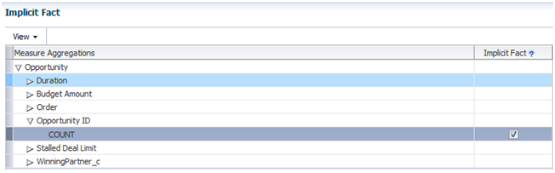
In the following logical business intelligence representation example, there are several paths to be chosen when reporting only on attributes from the included dimensions. The implicit fact column tells the desired path that will represent the data and join all the three entities correctly.
Note
Only one implicit fact column can be selected per custom subject area.
This figure illustrates the date hierarchy linking a year with its quarters, months, weeks, and days.

To use this hierarchy, create a report that shows total opportunity sales amount for each year. Drill down from year to show sales per quarter, sales per month, sales per week and the sales per day, and then drill back up to sales per year. The date hierarchy will aggregate the measures by desired hierarchy or leveling period.
To configure date leveling when defining a custom subject area, use the Configure Date Leveling step of the custom subject area wizard to either allow or disallow leveling. You may have to expand the field list in the Date field to select or clear the Date Leveling check box, as applicable.
To access the custom subject area wizard in Oracle Fusion Applications:
Navigate to Application Composer from the Navigator menu.
On the main Overview page, select an application from the Application choice list.
Select the Custom Subject Areas link in the Common Setup pane, or in the local area of the main Overview page.
Click the new icon to create a custom subject area.
The custom subject area wizard is displayed.
Enter the following values for the custom subject area:
Label: Opportunity Sales Account
Description: Opportunity and sales account information.
Primary Object: Opportunity
Click Next.
Note
Subject areas usually have names or labels that correspond to the type of information that they contain, such as service requests and orders. Display labels have the Custom: prefix added automatically.
Select the objects that are part of the custom subject area and its label.
Click Next.
When you select related objects for your custom subject area, consider the following points:
For a one-to-many primary-child relationship, you can add only one child for up to four levels like parent-child-grandchild-grand grandchild.
For a many-to-one primary-related relationship, you can add as many multiple related objects as you want.
The primary object is added and displayed in this step automatically.
Choose the primary object's Display Label as Opportunity Sales Account.
If the primary object has child objects, then the + icon is available.
Click the + icon.
The Add Child Object screen is displayed. If the added child object has children objects then the + icon will be available again. The + icon is available up to four levels of child objects.
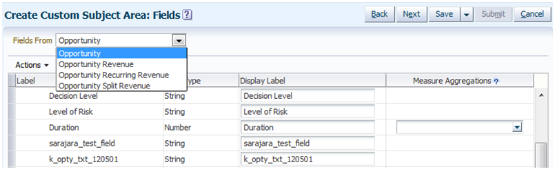
All fields from the added objects in the previous steps are automatically added as part of the custom subject area.
To remove undesired fields perform the following steps:
Select the opportunity object in the Fields From drop down list.
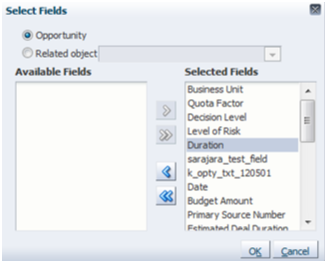
Click Select Fields to display the Select Fields screen
Select and click on the < to remove the selected field.
Using the Select Fields screen, you can also add any available related object from the selected parent object.
To add a related object:
On the Select Fields dialog, select Related object and select the desired related object from the list.
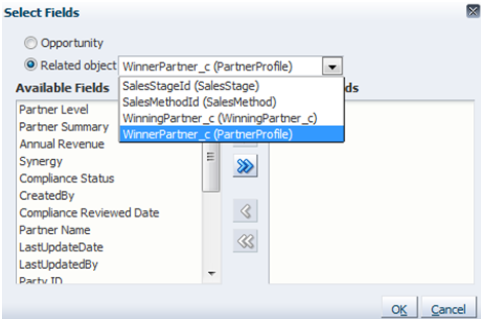
Select the fields in the Available Fields list to be added to the custom subject area and click > button.
After all related objects and fields are added, click OK.
For each field you added, you can change its Display Label as desired. This label is used when creating a field as an attribute in a folder within the custom subject area.
Repeat steps 1 to 4 for removing undesired fields or adding related objects from each object that is added to the custom subject area.
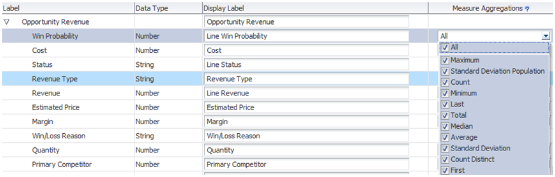
Select the desired measures to be generated for number, date, or currency fields type from all available objects added to the custom subject area.
Note
Fields in the Fields list are automatically added to their object folder in the custom subject area. If measures are defined for the fields, those fields are also created as measures in the Fact folder in the custom subject area.
Select the Implicit Fact column as desired.
Click Next.
If required, select the Date columns for date leveling functionality in the custom subject area.
Select the desired security level for the Everyone Role Name, which is added by default or add additional Role Names by clicking in the + icon and define the security level for each one of them.
Note
Note: The security definition here only control who can access the custom subject area definition to create reports. It does not control data visibility which is automatically controlled based on the user running the reports.

Review the custom subject area configuration for all added objects, attributes, and measures, and if satisfied, click Submit. If changes are required click on Back to navigate back to the desired screen and perform the desired changes.
When submitted, the custom subject area configuration is prepared for publishing.
Note
You can create and submit a custom subject area, either immediately, or save and close the custom subject area at any point and submit it later. You must first submit for publishing a custom subject area before you can select it from within Oracle BI Composer. Once you save or submit a custom subject area, you cannot modify its primary object. Custom subject areas are prefixed with Custom:.
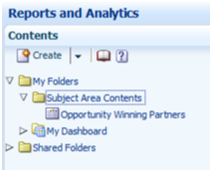
To access the published custom subject area, use the Navigator menu to go to Reports and Analytics under Tools category.
In the Contents page, select Create and then select Analysis:
Select the published custom subject area and start creating your report.
To edit a custom subject area, perform the following:
Select Application Composer from the Navigator menu, under the Tools category.
On the main Overview page, select an application from the Application choice list.
Select the Custom Subject Areas link in the Common Setup pane, or in the local area of the main Overview page.
Select the custom subject area that you want to edit and click the Edit icon.
Make the desired changes. When you are done with your changes, click the Submit button to republish the custom subject area.
When editing a custom subject area, it is not possible to:
Change the primary object.
Add or remove child objects.
Remove previously added measures.
Add more aggregation types for measures that are already published.
Note
You cannot modify a predefined report subject area that is delivered with Oracle Fusion CRM application. Instead, you must create separate custom subject areas to meet your reporting needs. Before you create a custom subject area, be sure to review all the included subject areas to see if the one you want is already available.
While defining a custom subject area using the wizard, you can use the Actions list in the Configure Security step to manage role names and access rights as follows:
Select and add role names for a custom
subject area from a predefined list of role names. This predefined
list also provides the description for each role name. You can also
select and add multiple role names from this predefined list using
either the Shift or Ctrl keys. Once you add a new role name, you can select
appropriate access for that role name.
Select and delete role names listed
for a custom subject area. You can also select and delete multiple
role names using either the Shift or Ctrl keys.
Note
You cannot delete the role name listed as Everyone.
Read access is granted by default to each role name you add. If you want to revoke Read access from a listed role name, select No access for that role name.
Note
You can create custom subject areas even for the objects in which you do not have access to the data, which allows you to build custom subject areas without compromising data security.
When you submit a custom subject area for publishing, two processes occur in the background. The first process is synchronous and creates Oracle Applications Development Framework (Oracle ADF) artifacts. You must wait until this first process is over. The second process is asynchronous and creates centralized metadata repository (RPD) fragments and submits them to the Oracle BI server.
Note
You must refresh the status to know whether the custom subject area is submitted successfully. You may have to refresh the status multiple times, as the Oracle ADF and RPD artifacts creation may require longer time.
After the status of a custom subject area changes to OK, you can use Oracle BI Composer to create reports using the objects, attributes, and measures that you configured for the subject area.
A custom subject area can have one of the following submission statuses:
Pending: Save and close a custom subject area at any point before publishing is completed. You can return to the pending custom subject area to complete the configuration process. This status may also indicate a failure in the background processes while creating Oracle ADF and RPD artifacts for a custom subject area.
In Process: The data is in the process of being published to Oracle BI.
Note
If the in-process status does not change to OK, even after multiple refresh attempts, then there could be an error in publishing.
OK: A custom subject area is published successfully and is available to the Oracle BI Composer for report configuration and analyses.
For more information about selecting the data for a report using the Oracle Business Intelligence Composer, see "Using BI Composer to Work with Analyses" in Oracle Fusion Middleware User's Guide for Oracle Business Intelligence Enterprise Edition (Oracle Fusion Applications Edition) on Oracle Technology Network at http://www.oracle.com/technetwork/indexes/documentation.
This example covers these tasks:
Winning Partner Custom Object configuration
Winning Partner Dynamic Choice List
Opportunity Winning Partner Custom Subject Area
Viewing the Published Custom Subject Area
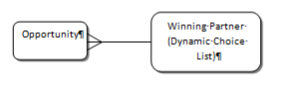
This figure illustrates the proposed transactional model.
In this section, you are creating a custom object called "Winning Partner". Before making any customization in Oracle Fusion CRM application, you should have a sandbox session active.
For more information on sandboxes and how to use them, refer Guidelines for customizing Oracle Fusion CRM using Application Composer and Sandboxes (Doc ID 1484889.1) on My Oracle Support (MOS) at https://support.oracle.com/.
You are on the main page of the Application Composer. You are adding an attribute to a standard object that belongs to the Sales application.
The following standard fields are created automatically for new custom objects:

Enter Winning Partner in the Menu Item Display Label.
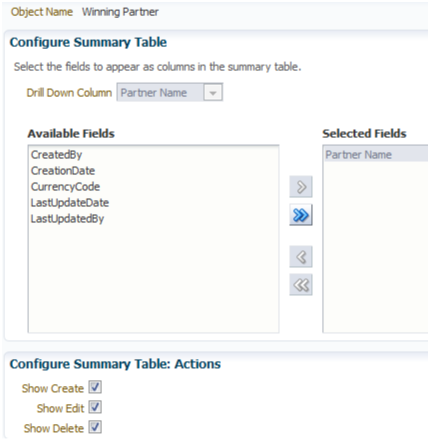
Define the Summary Table as shown:
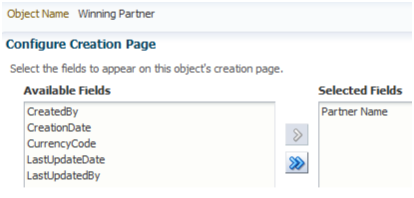
Define the Creation Page as shown:
Define the Details Page, just the Default Summary

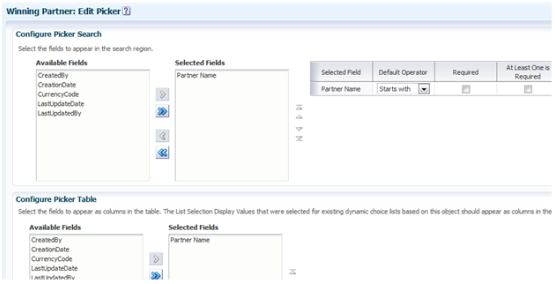
In this section, you are creating a custom dynamic choice list under the Opportunity object based on the created Winning Partner custom object.
To do this, navigate to the Application Composer and perform the following:


At this point you have associated your custom object with the standard Opportunity object as a related object.
At this point, everything is ready for the custom subject area creation.
In this section, you are creating a custom subject area to enable reporting on Opportunities and Winning Partners.
To do this, navigate to Application Composer and perform the following:

Note
By default, all supported types fields are automatically included; however, if you want to remove some of the fields, you can remove them by clicking on the Select Fields button.
Wait until you are navigated back to the custom subject area table.
In this section, you first create a report using the published custom subject and then view it.
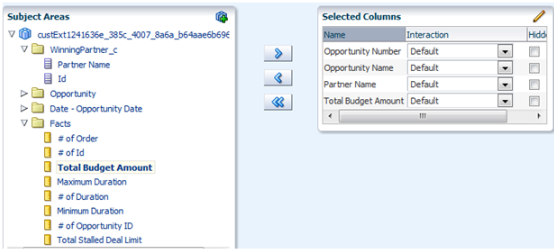
Add the attributes and measures to the selected columns list.
Click Next.
Select Table and Graph to be included in the report.
Click Next.
Define the Table layout options.

Click Next.
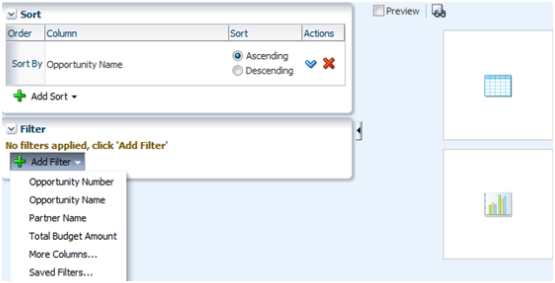
Define how data will be sorted or filtered in the report.
Click Next.
Define any desired column format.
Click Next.
Enter the Analysis Name as Opportunity Winning Partners.
Click Submit and wait until the Confirmation screen is displayed.
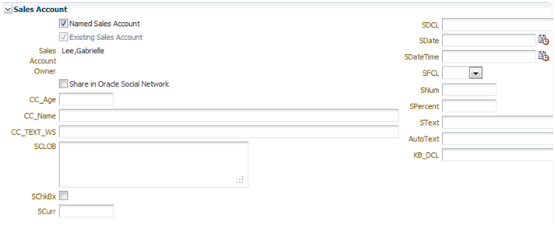
You will create several custom fields under the Sales Account standard object. Before making any customization in Oracle Fusion CRM application, you should have a sandbox session active.
You will create the following types of fields under the Sales Account standard object:
Text
Number
Choice List (Fixed)
Date
Percentage
For more information on sandboxes and how to use them, see Guidelines for customizing Oracle Fusion CRM using Application Composer and Sandboxes (Doc ID 1484889.1) on My Oracle Support (MOS) at https://support.oracle.com/.
To add custom fields:
When your sandbox session is active, click the Navigator menu.
Click Application Composer.
You are on the main page of the Application Composer. You are adding an attribute to a standard object that belongs to the Customer Center application.
In the left pane, click the Application list.
Click the Customer Center list item.
In the Objects pane, expand the Standard Objects node.
Expand the Sales Account node and select the Fields node.
The Custom tab is displayed on the Fields screen
Click the create a custom field icon to start adding the following fields:
Add a Text field.
Add a Number field.
Add a Fixed Choice List field
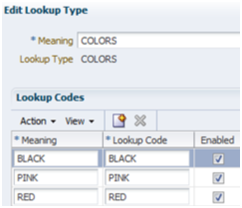
Create the Lookup Values for the Fixed Choice List.
Create a Date field.
Create a Percentage field.

You will now expose these new custom fields in the Sales Account Workarea.
To expose the custom fields in the workarea:
In the Objects pane, click in the Pages node to display the Page configuration screen.
Click the Edit Creation Page link and add the created custom fields.
Click Save and Close to return to the Page configuration screen.
Click in the Edit Summary Form link and add the created custom fields.
Click Save and Close to return to the Page configuration screen
Click the Navigator menu item.
Under the Sales category, click the Customers link.
Click the Manage Customers link in the Tasks regional pane.
Edit or Create a Customer using the Sales Account screen. Ensure your custom fields are exposed correctly in the user interface.
Enter sample values for each custom field.
Click Save and Close to return to the Sales Account Workarea.
Test your customizations to ensure they work properly.
Publish your sandbox.
At this point, everything is ready for the report creation.
In this section, you create a report using the custom fields that you have created for the Sales Account standard object.
Note
After the sandbox is published, you can access the custom fields for Sales Account object to create a report.
To create a report:
Click the Navigator menu.
Navigate to Reports and Analytics under Tools category.
In the Contents page, select Create and then select Analysis.
Select a Subject Area, in our example, select Sales - CRM Sales Activity.
The Create Report screen is displayed.
Expand the Sales - CRM Sales Activity subject area and navigate to the Sales Account Extension folder. This folder contains the created custom fields that you will use for reporting.
Start adding fields from the subject area as desired. Make sure to include the custom fields from the Sales Account Extension folder in your report.

Click Next.
In the Create Analysis: Select Views step of the wizard, enter the Title as Sales Account Extension and select the Table format.
Click Next.
In the Create Analysis: Edit Table step, review the Table Layout.
Click Next.
In the Create Analysis: Sort and Filter step, define how to want to sort the columns or apply filters.
Click Next until the Save screen is displayed.
In the Create Analysis: Save step, enter the Analysis Name as Sales Account Extension.
In the Save In area, select the folder where you want to save the analysis.
Click Submit.
To access your created report:
Locate your report under Folders in the Contents regional pane.
Click Sales Account Extension, which is the report you created.
Click the View link.
The report is run and displayed.
In this example, you will add a custom, fixed-choice field called Strategic Value to the opportunity object.
You are on the main page of the Application Composer. You are adding an attribute to a standard object that belongs to the Sales application.
You are on the Fields page.
You are on the Create Fixed Choice List page.
In the Search region, enter "Yes" in the Meaning field.
You have added an attribute to a standard object.
In this example, you will view the attribute that you added to the opportunity object, which is now reportable in the related subject area at run time.
You are on the Reports and Analytics page. Use the toolbar in the left pane to navigate to Oracle Business Intelligence Answers.
You are on the Oracle Business Intelligence Answers page. Use the Folders pane on the left to navigate to the extensions created for the opportunity object.
The left pane lists the standard and extended objects used for the Sales - CRM Pipeline subject area. Locate the Opportunity Extension tree item to see the attribute you added.
You have completed the activity of verifying that a custom attribute is reportable at run time.
In this example, you will create a custom subject area using the opportunity object.
You are on the main page of the Application Composer. You are creating a custom subject area using the opportunity object, which belongs to the Sales application; therefore, you will select the Sales application for your activity
You are on the Custom Subject Areas page. You can use this page to search or create custom subject areas.
You will now define measures for date and numeric fields for the Opportunity primary object. You do not need measures applied to all Date and Numeric fields, which is currently selected by default; therefore, first remove the default selection, and then add measures to the fields you require for your custom subject area.
In this activity, you will not be applying measures for fields in the OpportunityContact child object.
You have successfully created a custom subject area.
In this example, you will create a report in Oracle Business Intelligence Composer (BI Composer) using the Sales - CRM Pipeline subject area.
From the Select Subject Area popup that appears, you must first select a subject area to build your report. In this activity, you are building a report using the Sales - CRM Pipeline subject area.
Employee Name under Employee tree.
Opportunity Name under Opportunity tree.
Sales Stage Name under Opportunity tree.
Status under Opportunity tree.
# of Opportunities from Pipeline Facts tree.
You are in the Select Views step of the wizard.
Sales Stages to display in your report
The Customer for which these Sales Stages should be displayed.
Select these options:
02 - Negotiation
07 - Closed
Short List
Solution Presentation
You have successfully created a report in BI Composer using CRM - Sales Pipeline subject area.
Specify the aggregate formula to apply a measure so that the subject area is better defined and includes only the measures that you are interested in analyzing. Aggregated measures include CURRENCY data type measures, DATE data type measures, and NUMBER data type measures. You can only specify aggregate formulas to apply to a measure when creating a custom subject area. It is not possible to change predefined measures or edit an already published custom subject area measure.
Use implicit facts to ensure the data representation displayed in the report is presented correctly when using only dimensional data in the report. An implicit fact is a fact that has been specified for a subject area to be used as part of any dimensional browsing query. The Oracle Fusion application then uses this fact as part of the query during dimensional browsing. Typically, the most frequently used fact or the functionally most relevant fact is specified as the implicit fact. For example, a revenue fact is stamped as the implicit fact in the Pipeline subject area, and a sales account fact is marked as an implicit fact in the Customers subject area.
Make ID Fields available for reporting by selecting ID fields as part of the Custom Subject Area. You can then run reports on the ID fields.
The following example scenario demonstrates how to configure these enhancements.
Navigate to the specific opportunity or partner page and use the ID as a parameter to run reports on the ID fields.
Note
You cannot edit a primary object when you modify a custom subject area. Should you need to do so, create a new custom subject area using a different (new) primary object.