11g Release 7 (11.1.7)
Part Number E20388-06
Home
Contents
Book
List
Contact
Us
|
Oracle® Fusion Applications CRM Extensibility Guide 11g Release 7 (11.1.7) Part Number E20388-06 |
Home |
Contents |
Book List |
Contact Us |
|
Previous |
Next |
This chapter contains the following:
Oracle Fusion Marketing Extensibility : Overview
Customizing Sales Campaigns in Oracle Fusion Marketing: Explained
Creating a Sales Lead Validation Rule Using Application Composer : Worked Example
Sales Lead Approval Flow : Worked Example
Extending Simplified Pages for Leads : Explained
Extending Simplified Pages for Leads using Oracle Fusion CRM Application Composer : Worked Example
How to extend the sales campaign object using Oracle Fusion CRM Application Composer
How to create a sales lead validation rule using Application Composer
Follow these steps:
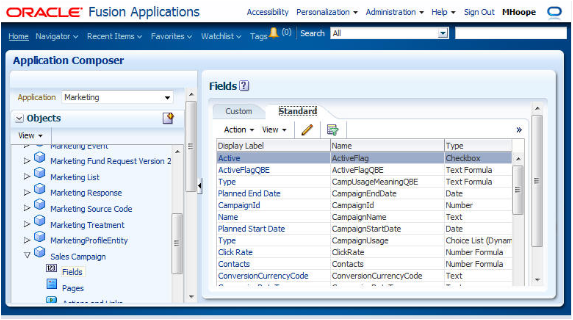
Navigate to the Application Composer, select Marketing as the Application, expand the Standard Objects tree node, then select Sales Campaign.
Choose the Fields node to create custom fields, or modify standard fields.
Choose the Pages node to show or hide fields, either custom or standard.
Test your work by navigating to the Sales Campaign work area to view your changes.
You can extend only the region at the top of the Sales Campaign page. The panel will adjust based on how many fields you add. The name of the region changes depending on where you are in the sales campaign flow.
Depending on the sales campaign status, the fields that you add to this region might or might not be editable. The following list shows which regions and pages are extensible, along with some notes for each:
|
Region and Page |
Are the fields editable? |
|---|---|
|
Campaign Summary region on the Create Sales Campaign: Enter Campaign Details page |
Yes |
|
Campaign Summary regions on other Sales Campaign pages |
Only if the campaign is in Draft status. Otherwise, not editable. |
|
Campaign Details region (displays on Sales Campaign pages for completed campaigns) |
No |
The following screen shot shows some of the page sections that can be customized. The regions that you can customize are indicated by red boxes.

To add custom fields to the Sales Campaign regions listed above, first create your custom fields by selecting the Fields node under the sales campaign object. Then, select either a standard field to modify, or create a custom field.
For standard fields, you can modify these options:
Display Label
Required check box
Short Description
Updateable
Depends On
After you've created custom fields for the sales campaign object, use the Application Composer's configuration pages to add those custom fields to the extensible regions listed above. You access the configuration pages in the Application Composer from the Pages node under the Sales Campaign object.
To access the Pages Overview page:
Select the Marketing application on the main Overview page.
In the object tree, select the Sales Campaign object.
Select the Pages node.
On the Enterprise Pages tab, select the configuration page hyperlink related to the Sales Campaign page that you want to customize.

Import and export (you cannot import sales campaigns)
Object workflow
E-mail templates
Business processes
The following customization options do not apply to sales campaigns:
Role security
Custom subject area.
To do this, use the Oracle Fusion CRM Application Composer to create validation rules to enforce certain criteria before allowing a sales lead status to be changed to Qualified.
In this example, you will use the Application Composer to create a validation rule that ensures a primary product and sell-to address exist, before a lead's status can be changed to Qualified.
isSellToExists In the Returns field, select Boolean.
if(null
!= CustomerId){      def partySites = newView('Address');       def criteria = partySites.createViewCriteria();       def criteriaRow = criteria.createRow();       criteria.insertRow(criteriaRow);       def
criteriaItem = criteriaRow.ensureCriteriaItem('PartyId');       criteriaItem.setValue(CustomerId)       partySites.appendViewCriteria(criteria)       partySites.executeQuery();
while(partySites?.hasNext()) {          def partySite
= partySites.next();           def partySiteUses =
partySite?.getAttribute('PartySiteUse');
 while (partySiteUses?.hasNext()) {
def partySiteUse = partySiteUses.next();
     if ('SELL_TO' == partySiteUse?.getAttribute('SiteUseType')) {
                  return true;               }
       }       }
 }   return false;
Next, you want to create a rule for enforcing the primary product association for the sales lead as follows:
isPrimaryProductAssigned. In the Returns field, select Boolean.
if((null
!= PrimaryInventoryOrgId && null != PrimaryInventoryItemId)
|| null  != PrimaryProductGroupId)     return true;   else     return false;
qualifyLead
if(isAttributeChanged('StatusCode') && getAttribute('StatusCode')
==   'QUALIFIED')     return (isPrimaryProductAssigned()
&& isSellToExists());   else     return true;
Primary Product and Sell to Address are required for
qualifying a Lead.
If the Primary Product andSell to Address fields contain no data, you should receive the following error message text:
Primary Product
and Sell to Address are required for qualifying a Lead.
In this example, you are a sales administrator and your management has asked you to create a workflow to automate the approval process as follows:
The approval process should be triggered when a sales representative creates a sales lead with a deal amount greater than $100000.
When the approval process is triggered, the sales manager of that representative should automatically receive a request for approving the deal.
As a sales administrator, you will also test this approval process.
In this step, you will create a field to track the status of the approval and add this field to the desired pages.
Sign in to Oracle Fusion Applications as an administrator.
Create a sandbox and activate it.
Sandboxes in Oracle Fusion Applications provide robust out-of-the-box functionality to help isolate and control customization efforts without impacting other users' configuration or production environment, or both. For more information on sandboxes, see Sandboxes: Explained topic.
Navigate to Application Composer.
The Sales Lead object belongs to marketing application; therefore, select Marketing from the Application drop down.
In the left pane, open the Standard Objects tree.
Select the Sales Lead object.
Select the Fields node.
In the Custom tab, click Create under the Action menu.
A Select Field Type popup appears.
Select Text in the popup.
Click OK.
This opens a Create Text Field page.
In the Appearance region, enter the Display Label as Large Deal Approval.
Click Save and Close.
In the left pane, select the Pages node of the Sales Lead object.
Under Enterprise Pages tab, click Create Lead.
In the Create Lead page, move the Large Deal Approval field from the Available Fields box to the Selected Fields box.
Click Save and Close.
You have now added the custom approval field to the create lead page.
Under Enterprise Pages tab, click Show Details.
In the Show Details page, move the Large Deal Approval field from the Available Fields box to the Selected Fields box.
Click Save and Close.
You have now added the custom approval field to the show details page.
At this point, you are working within your sandbox. You have created a custom field and have added that field to two pages.
Note
Configurations done within a sandbox for object workflows and business processes are not available to the mainline application unless published.
Publish your sandbox to make these changes available for use in the mainline application.
In this step, you will publish your sandbox and verify that the Large Deal Approval field has been added to the Create Lead and Show Details pages.
When publishing a sandbox, the included application customizations overwrite the mainline application's existing configuration. For more information on creating and managing sandboxes, and the considerations involved when working with sandboxes, see Sandboxes: Explained topic and its related topics.
To publish the sandbox and verify the addition of the fields:
Under the Administration menu, select Manage Sandboxes....
Select your sandbox and click Publish.
Click the Navigator menu at the top.
Click Lead Qualification under Sales.
Click Create Lead.
Verify that Large Deal Approval field has been added to the Create Lead page.
Click Cancel. You will be creating a deal later in this example.
To create and deploy a process using Oracle Business Process Composer:
Navigate to the Application Composer using the main menu of Oracle Fusion Applications.
From the Overview page of the Application Composer:
Select the Business Processes option.
On the Business Processes page, click Create under the Actions menu.
Enter the Name as Sales Lead Approval in the popup.
Click OK.
If a popup blocker is enabled on your browser, the business process composer may not open after you click OK, and your browser may get locked. As a workaround, use the browser back button to go back to the Business Processes option in the application composer, and click Edit for the business process that you were creating.
This opens the Oracle Business Process Composer in a separate Window.

This process is based on seeded template ExtnBusinessProcess, which uses the basic CrmCommonSerialApprovalProcess flow.
Click Deploy Project using the main menu.
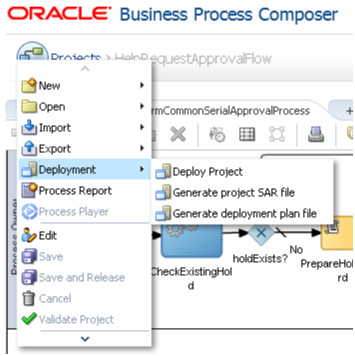
In the Deploy Project popup enter the following information:
|
Field |
Value |
|---|---|
|
Revision ID |
Provide an identifiable ID. |
|
Deployer Username |
Your sign in name for Oracle Fusion Applications. |
|
Password |
Your password for Oracle Fusion Applications. |
|
Mark composite revision as default |
Select this option. |
For more information about the options in this popup and deploying business processes, refer "Deploying a BPM Project" in Oracle Fusion Middleware Business Process Composer User's Guide for Oracle Business Process Management on Oracle Technology Network, at http://www.oracle.com/technetwork/indexes/documentation/index.html.
Click Deploy.
A confirmation message appears when your project has been deployed successfully.
Close the Oracle Business Process Composer.
Verify whether the project has been deployed successfully.
On the overview page of the application composer, select the Business Processes option.
On the Business Processes page, verify that a green check-mark appears under the Deployed column for the project you created.
You have now deployed a project with the name Sales Lead Approval. You will now configure an object workflow to call this process.
To configure an object workflow:
From the Overview page of the application composer, select Object Workflows.
Select Create from the Actions menu.
On the Create Object Workflows Page, select the Sales Lead object.
In the Name field, enter Deal amount more than USD 10000..
Select When a record is created event point.
Click on the Groovy Builder icon.
In the groovy builder, enter the following event condition:
if(DealAmount>10000 &&
CurrencyCode=='USD') return true;
Click OK.
In the Actions region, select Business Process Flow and configure the event action as follows:
On the Create Action: Business Process Flow page, enter Sales Lead Approval in the Name field.
In the Project Name field, search and select Sales Lead Approval project that you deployed.
This figure shows how you search and select a deployed business process. You can also create or edit a business process using this popup.

Click OK.
In the Inputs region, specify the input parameters that you want to pass to the deployed approval flow using the Select Default Value button. You can also type-in these parameters. .
You must mark these values as Literal so as to pass the actual name.
|
Name |
Default Value |
|---|---|
|
approvers |
'SALES_MANAGER' |
|
heldEntityStatusField |
'LargeDealApproval_c' |
Note
You can map only approvers and heldEntityStatusField values.
After inserting the input parameters, click Save to save the business process event action.
Click Save to save the object workflow.
You have now configured the object workflow to trigger the approval flow.
Sign in to Oracle Fusion Applications using SALES_REPRESENTATIVE role.
Click the Navigator menu at the top.
Click Lead Qualification under Sales.
Click Create Lead.
Enter the Name as New Deal.
Create a lead with a Deal Size of 120000 USD.
Click Save.
This action triggers the object workflow, because the deal size you have just entered is greater than 10000 USD.
To verify whether the workflow has been triggered, you may check the status in the approval field.
Edit New Deal lead.
Note the status in the Large Deal Approval field, which has been set to APPROVALPENDING by default.
You are currently signed in with a sales representative role. You must first sign out and then sign in as a sales manager to approve the request.
Sign out of Oracle Fusion Applications.
Sign in to Oracle Fusion Applications using SALES_MANAGER role.
A new task or request appears on the Home page under the Worklist region.
Approve the request.
At this point, you are signed in as a sales manager. You must first sign out and then sign in as a sales representative to verify whether the status in the Large Deal Approval field has changed.
Sign out of Oracle Fusion Applications.
Sign in to Oracle Fusion Applications with a SALES_REPRESENTATIVE role.
Navigate to Lead Qualification.
Edit New Deal.
Verify that the status in the Large Deal Approval has been set to APPROVED.
You have now verified that the approval process was successfully triggered via object workflows.
The pages that are available for extensibility using Application Composer are listed below, and are described in this topic.
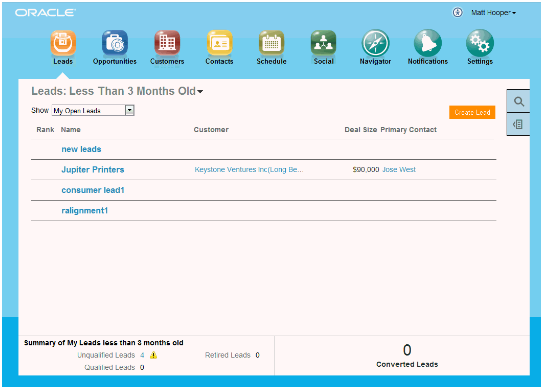
Leads overview table
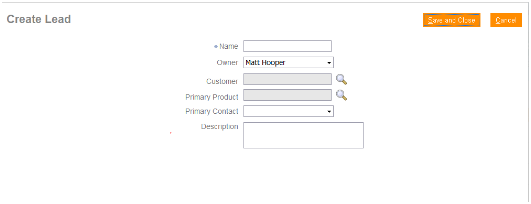
Create Lead page
Edit Lead page (Summary page)
Note
Use the Sales Lead Version 2 object in Application Composer, available with the Marketing application, to extend the simplified set of pages that are available for leads.
You can extend the following items in the Leads overview table:
Hide or show existing fields.
Reorder columns.
Change column labels.
Add custom fields (all types).
Note that you cannot make changes to these components on the page:
Show filter
Leads: Date filter
Search
Actions menu (cannot add or hide and show)
Custom column widgets:
Rank
Custom font size for Name
Drilldown
Embedded analytics
Custom buttons and actions
You can extend the following items on the Create Lead page:
Hide or show existing fields.
Reorder fields.
Change field labels.
Add custom fields (all types).
Note that you cannot add custom buttons and actions to this page.
These regions on the Edit Lead page (Summary page) are extensible:
Edit Lead region
Basic Qualification region
Contacts subtab
In Application Composer, add custom fields to the Sales Lead Contacts object. Then, navigate to the Pages node for the Sales Lead Version 2 object, and edit the Contacts subtab in the Leads tabs component region.
Sales Team subtab
In Application Composer, add custom fields to the Sales Lead Resorces object. Then, navigate to the Pages node for the Sales Lead Version 2 object, and edit the Sales Team subtab in the Leads tabs component region.
Notes subtab
In Application Composer, the Note object is available under the Common application.
Interactions subtab
In Application Composer, the Interaction object is available under the Common application.
You can extend the following items on the Edit Lead page (Summary page):
Hide or show existing fields.
Reorder fields.
Change display labels.
Add custom fields (all types).
Note that you cannot make changes to these components on the page:
Products table region
Subtab regions
Full Qualification
Notes overview page
Tasks
Appointments
Actions button
Custom buttons and actions
You cannot create new subtabs.
This example demonstrates how you can extend the lead object by:
Adding a check box to identify strategic leads
Adding a Groovy script that checks if the size of the deal is greater than 1000 USD when a user saves a lead with this check box selected. If the deal is smaller than this amount, then users are prevented from saving the lead and receive an error message instead.
Follow these steps to create the Strategic Deal check box and add the validation check:
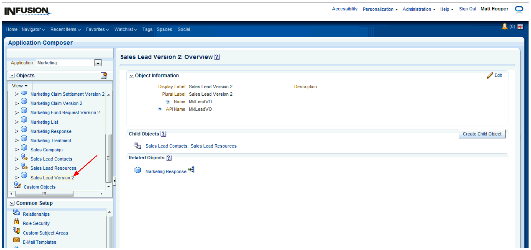
This figure shows the Sales Lead Overview page in Application Composer.
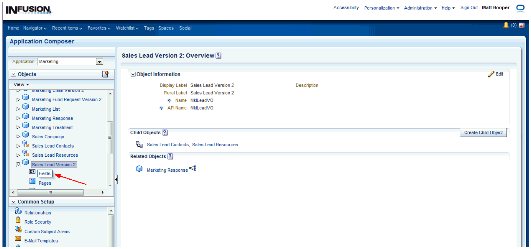
This figure shows the Sales Lead Overview page with the Fields object selected for a Lead.
This figure shows the Select Field Type window with the Checkbox option selected.

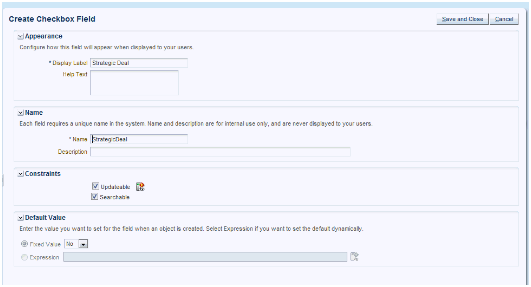
This figure shows the Create Checkbox Field page.
Here is the Groovy logic that you can use:
def retVal
if (StrategicDeal_c == 'Y')
{
 if (DealAmount >= 1000)
 {
   retVal = true
 }
 else
 {
   retVal = false
 }
}

if (StrategicDeal_c
 == null || StrategicDeal_c
 == 'N')
{
 retVal = true
}
   return(retVal)
This figure shows the Server Scripts object selected for a lead.
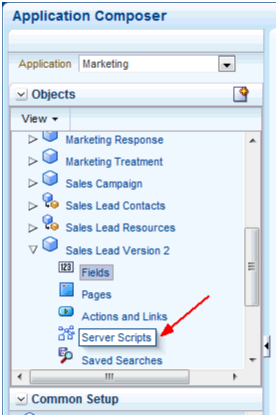
This figure shows the Validation Rules tab in the Server Scripts Lead page.

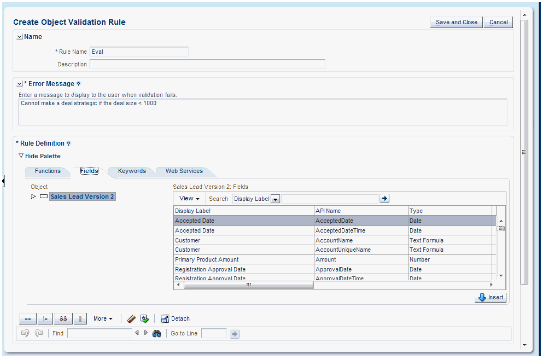
This figure shows the Create Object Validation Rule page.
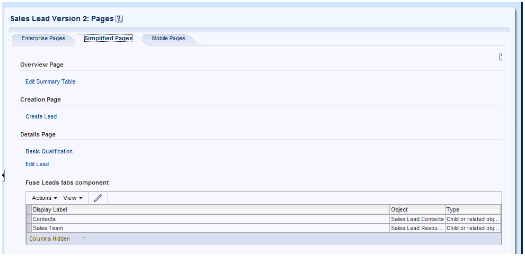
This figure shows the Simplified Pages tab.
This figure shows the Edit Details Page Summary Form page.

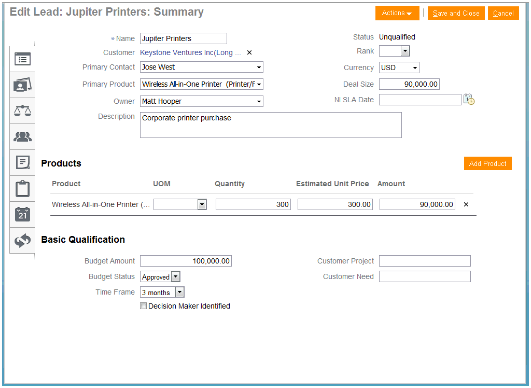
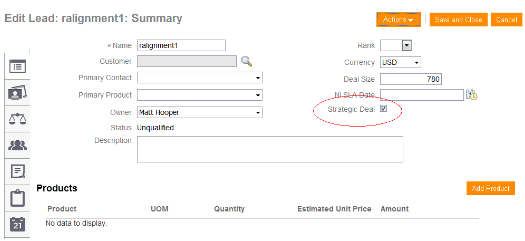
This figure shows the Edit Lead Summary page with the Strategic Deal check box selected.
You have successfully extended a simplified page and added Groovy logic.