11g Release 7 (11.1.7)
Part Number E22380-08
Home
Contents
Book
List
Contact
Us
|
Oracle® Fusion Applications Post-Installation Guide 11g Release 7 (11.1.7) Part Number E22380-08 |
Home |
Contents |
Book List |
Contact Us |
|
Previous |
Next |
This chapter contains the following:
Integrating with Other Products
Setting Up Financial Reporting Center
For more information on completing the post-installation setup for coexistence with Oracle E-Business Suite General Ledger see:
Configuring Oracle Golden Gate to Integrate the E-Business Suite Ledger with Fusion Accounting Hub on My Oracle Support
Oracle Fusion Accounting Hub Implementation Guide
Oracle General Ledger Implementation Guide Release 12.2: See this guide for information on loading and transferring data from Oracle E-Business Suite to the Oracle Fusion Accounting Hub.
For more information on completing the post-installation setup for coexistence with Oracle PeopleSoft General Ledger, see:
Oracle Fusion Accounting Hub Implementation Guide
PeopleSoft General Ledger 9.1 Documentation Update: Integrating PeopleSoft General Ledger with Oracle Fusion Accounting Hub
PeopleSoft General Ledger 9.1 Integration to Oracle Fusion Accounting Hub Implementation Guide
Note
The Oracle Data Integrator (ODI) component (extract file for manual import) is currently available via My Oracle Support only in note id: 1365971.1.
You can specify a unique journal source per instance. For Oracle E-Business Suite, you can limit which instance and balancing segments may post to a particular Oracle Fusion General Ledger.
For Oracle E-Business Suite, determine the Function ID to move data from Oracle Fusion General Ledger to Oracle E-Business Suite General Ledger. You must include the Function ID at the end of the drill down URL that is provided during the registration of the Oracle E-Business Suite instance.
To find the Oracle E-Business Suite Function ID:
Login as a System Administrator and navigate to Function page
Query for the function name: GL_FUSION_EBS_DRILL
Go to the Help menu, click Diagnostics > Examine
Select the FUNCTION_ID field. The value box shows the value of the Function ID.
For Oracle E-Business Suite: The URL format for the
non-dynamic portion needs to be in the following format: http://<domain>:<port>/OAA_HTML/RF.jsp?function_id=<function_id>.
In the above URL format, the domain, port, and function_id are for the Oracle E-Business Suite Instance.
For Oracle PeopleSoft: The URL format for the non-dynamic
portion needs to be in the following format: http://server/servlet_name/SiteName/PortalName/NodeName/c/PROCESS_JOURNALS.FUS_DRILLBACK_JRNL.GBL
In the above URL format:
http://server/: Scheme (http or https) and the web server name.
servlet_name/: Name of the physical servlet that the web server invokes to handle the request.
SiteName/: Site name specified during Oracle PeopleSoft Pure Internet Architecture setup.
PortalName/: Name of the portal to use for this request.
NodeName/: Name of the node that contains the content for this request.
For more information on completing the post-installation setup for Data Relationship Management, see the Oracle Hyperion Data Relationship Management Oracle General Ledger Integration Guide Release 11.1.2.2 on My Oracle Support at https://support.oracle.com.
For other implementations, Oracle Fusion Applications provides integration between Oracle Fusion Accounting Hub and Oracle Hyperion Planning through Oracle Financial Data Quality Management ERP Integrator adapter. To complete the post-installation setup for the ERP Integrator adapter, see Oracle Hyperion Financial Data Quality Management ERP Integrator Adapter for Oracle Applications Administrator's Guide.
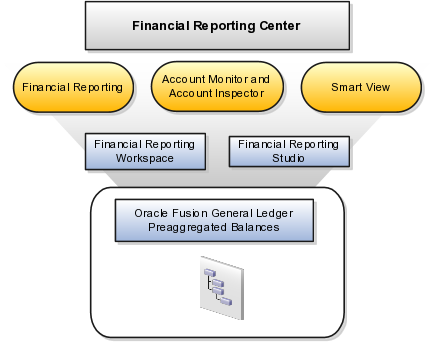
Financial Reporting Center is comprised of numerous components:
Financial Reporting: Financial users and analysts access live reports and books or published snapshot reports and books from previously scheduled batches in a variety of formats. Other functionality includes:
Refreshing report data using runtime points of view or parameters
Drill through capability from parents to other parents
Drill down to detail balances, journal lines, and subledger transactions.
Oracle Hyperion Smart View: Financial analysts view, import, manipulate, distribute, and share data from your Oracle Fusion General Ledger balances in Microsoft Excel.
Account Monitor and Account Inspector: Financial analysts monitor and track key account balances in real time at every level of your dimensions and hierarchies. These tools provide multidimensional account analysis and drill down capability.
Workspace: Reporting administrators create, open, save, and delete folders and store report objects, reports, and snapshot reports.
Oracle Hyperion Financial Reporting Studio: Report authors use an object-oriented graphical report layout with report objects, such as text boxes, grids, images, and charts, to design reports.
Configuring Financial Reporting Center
Installing and configuring Financial Reporting Studio, performed by your end users.
Installing Smart View, performed by your end user.
Configuring Workspace Database Connection, performed by your administrator.
Configuring Oracle Fusion Transactional BI Dimensions
Open Navigator > Financial Reporting Center > Open Workspace for Financial Reporting.
Edit the Workspace URL and remove workspace/index.jsp.
Following are two examples of Server URLs:
If the Workspace URL is https://fusionsystemtest-p-external-bi.us.oracle.com/workspace/index.jsp, the Server URL is https://fusionsystemtest-p-external-bi.us.oracle.com.
If the Workspace URL is https://fusionsystemtest-p-external-bi.us.oracle.com:10622/workspace/index.jsp, the Server URL is https://fusionsystemtest-p-external-bi.us.oracle.com:10622.
Copy the modified URL to the Server URL field.
Note
For end users installing the Oracle Fusion Financials Reporting Studio, the installer launches a separate console window that continues to run for a brief time after the installation completes the setup tasks. The process is normal, expected, and applies to Oracle Hyperion Reporting Studio installations in both the Oracle Fusion Applications and Enterprise Performance Manager modes.
Note
You must save a new report before attempting to preview it with Web Preview.
Prerequisites needed for installing the Financial Reporting Studio are:
Financial Reporting Studio Client Certifications that are found at: http://www.oracle.com/technetwork/middleware/bi-foundation/hyperion-supported-platforms-085957.html
Microsoft Office installed on your end-users computers.
Note
For more information, see:
Oracle Enterprise Performance Management System Installation and Configuration Guide
Oracle Hyperion Enterprise Performance Management System EPM System Standard Deployment Guide
Note
Since Smart View is an add-in to Microsoft Office products, you can install Smart View only on a Windows operating system.
Once Smart View is installed, it must be configured to connect to Oracle Fusion Applications. This is done using the Smart View Shared Connections URL. You can derive the Shared Connections URL by following the steps below:
Open Workspace for Financial Reporting from the Financial Reporting Center task panel.
Edit the Workspace URL, for example, if the Workspace URL is https://fusionsystemtest-p-external-bi.us.oracle.com/workspace/index.jsp. Remove index.jsp and add SmartViewProviders at the end of the URL.
Note
This is another example for a Cloud based environment: If the Workspace URL is https://efops-rel5st4-cdrm-external-bi.us.oracle.com:10622/workspace/index.jsp, the Shared Connections URL is https://efops-rel5st4-cdrm-external-bi.us.oracle.com:10622/workspace/SmartViewProviders.
Copy the URL.
Launch Excel.
Navigate to the Smart View menu > Options > Advanced.
Paste the URL in the Shared Connections URL field.
Click on the OK button.
For more information on configuring Smart View client for users, see Oracle Hyperion Smart View for Office User's Guide for Oracle Hyperion Smart View.
To connect Oracle Fusion General Ledger Balances cubes in Smart View:
Open Smart View from your Start menu > Programs > Microsoft Office > Microsoft Excel 2007.
Go to the Smart View menu > Open, in the Start on the ribbon > click on Smart View Panel that appears in the drop down box under the ribbon. This launches a task pane.
Click on the Shared Connections button on the task pane.
Sign in with your user name and password.
Click on the Select Server to proceed drop down.
Note
If the Essbase Server is not there, then it has to be added. Use the following steps:
Click on the Add Essbase Server link on the bottom of the spreadsheet.
Specify the Essbase Server login and password.
Expand the Essbase sever and locate the cube under it.
Select Oracle Essbase from the list of shared connections.
Click the Expand to expand the list of cubes.
Expand your cube (name of your chart of accounts).
Click on db. A list of functions appears on the bottom of the panel.
Click the Ad hoc analysis.
Note
You need to perform these steps only once for a new server and database.
To set how the name and alias of the Essbase database appears:
Click on the Options on the ribbon > select the Member Options > select Member Name Display.
Set one of these three options:
Distinct Member Name: Only shows the full Essbase distinct path.
Member Name and Alias: Shows both the member name and the alias.
Member Name Only: Shows only the member name.
Note
The Smart Slice feature is not supported in Oracle Fusion General Ledger. For all other documentation, refer to the Oracle Hyperion Smart View for Office User's Guide for Oracle Hyperion Smart View.
Note
Ledger setup has to be completed before the database connection can be created. Oracle Fusion General Ledger balances cubes are created as part of ledger setup. There is a separate cube for each combination of chart of accounts and accounting calendar. A database connection is needed for each cube.
Steps to define a database connection are:
Start at the Navigator by selecting Financial Reporting Center.
From the Financial Reporting Center task panel select Open Workspace for Financial Reporting.
From within Workspace select the Navigator menu > BI Catalog.
Select Tools menu > Database Connection Manager.
Select New button.
Enter a user friendly name for the Database Connection Name.
Enter Essbase as the Type, your server, user name, and password.
Select Application (cube) and Database from the list of values. Expand the Application name to see the related Database, for example, db.
Click the OK button twice to save your selections.
Click Close button in the Database Connection Manager window to save your connection.
For more information on configuring Essbase database connections in Workspace see: Oracle Essbase Database Administrator's Guide for Oracle Essbase.
Note
The database connection is available in both Workspace and Financial Reporting Studio. Optionally, it can be setup in Financial Reporting Studio when putting grids on a report. This should only be done by an administrator.
Note
For information on setting up General Ledger accounting segments, see the Oracle Fusion Transactional Business Intelligence Administrator's Guide.