3 Configuring the Audit Vault Server
About Configuring the Audit Vault Server
This chapter explains how to do the initial configuration of an Audit Vault Server.
There are four main steps involved in the configuration process:
-
Perform the initial configuration tasks at the Audit Vault Server, for example, confirm system services and network settings, and set the date and time.
-
(Optional) Define resilient pairs of servers for high availability.
-
(Optional) Add each Database Firewall at the Audit Vault Server.
-
Check that the system is functioning correctly.
Each of these steps is described next.
To understand the high-level workflow for configuring the Oracle AVDF system, see "Summary of Configuration Steps".
Note:
If you plan to configure a resilient pair of Audit Vault Servers for a high availability configuration, do the initial configuration described in this chapter for both Audit Vault Servers in the pair.See "Configuring a Resilient Pair of Audit Vault Servers" for more information.
Logging In to the Audit Vault Server
For login instructions, see "Logging in to the Audit Vault Server Console UI".
Specifying Initial System Settings and Options (Required)
Specifying the Server Date, Time, and Keyboard Settings
Super administrators can change the date, time, and keyboard settings in the Audit Vault Server. It is important to ensure that the date and time set for the Audit Vault Server are correct because events performed by the Server are logged with the date and time at which they occur. In addition, archiving occurs at specified intervals based on the Server time settings.
Audit Vault Server stores all data in UTC. Time stamps are displayed as follows:
-
If you are accessing data interactively, for example using the Audit Vault Server UI or AVCLI command line, all time stamps are in your time zone. In the UI, the time zone is derived from the browser time zone. If using AVCLI, the time zone is derived from the "shell" time zone (usually set by the TZ environment variable).
-
If you log in to the Audit Vault Server as
rootorsupport, time stamps are displayed in UTC, unless you change the TZ environment variable for that session. -
If you are looking at a PDF or XLS report or email generated by the system, time stamps displayed reflect the Time Zone Offset setting in the Audit Vault Server Manage page (see procedure below).
WARNING:
Do not change the Audit Vault Server's database time zone or change the time zone through any configuration files. Doing so will cause serious problems in the Audit Vault Server.
-
If you are looking at the Database Firewall UI, all time zones are displayed in UTC. See "Setting the Date and Time in the Database Firewall" for more information.
To set the server date, time, and keyboard settings:
-
Log in to the Audit Vault Server console as a super administrator.
-
Click the Settings tab.
-
From the System menu, click Manage.
-
From the Timezone Offset drop-down list, select your local time in relation to Coordinated Universal Time (UTC).
For example, -5:00 is five hours behind UTC. You must select the correct setting to ensure that the time is set accurately during synchronization.
-
From the Keyboard drop-down list, select the keyboard setting.
-
In the System Time field, select Manually Set or NTP Synchronization.
Selecting NTP Synchronization keeps the time synchronized with the average of the time recovered from the time servers specified in the Server 1/2/3 fields.
-
If you selected NTP Synchronization, select Enable NTP Time Synchronization in order to start using the NTP Server time.
If you do not enable time synchronization in this step, you can still enter NTP Server information in the steps below, and enable NTP synchronization later.
-
(Optional) Select Synchronize Time After Save if you want the time to be synchronized when you click Save.
-
In the Server 1, Server 2, and Server 3 sections, use the default server addresses, or enter the IP addresses or names of your preferred time servers.
If you specify a name, the DNS server specified in the System Services page is used for name resolution.
Click Test Server to display the time from the server,
Click Apply Server to update the Audit Vault Server time from this NTP server. The update will not take effect until you click Save.
-
Click Save.
To enable time synchronization, you may also need to specify the IP address of the default gateway and a DNS server, as described in "Setting or Changing the Audit Vault Server Network Configuration", and "Configuring or Changing the Audit Vault Server Services".
Specifying the Audit Vault Server System Settings
Setting or Changing the Audit Vault Server Network Configuration
The Oracle AVDF installer configures initial network settings for the Audit Vault Server during installation. You can change the network settings after installation.
For a list of default Audit Vault Server port numbers, see "Ports Used by Audit Vault and Database Firewall".
Note:
If you change the Audit Vault Server network configuration, you must also do the following:-
Restart all audit trails.
-
If you have configured a resilient pair of Database Firewalls, reconfigure the pair. See "Configuring a Resilient Pair of Database Firewalls".
-
If you change the Audit Vault Server's IP address, update this information in the Database Firewall. See "Specifying the Audit Vault Server Certificate and IP Address".
To configure the Audit Vault Server network settings:
-
Log in to the Audit Vault Server console as an administrator or super administrator.
-
Click the Settings tab.
-
In the System menu, click Network.
-
Edit the following fields as necessary, then click Save.
-
IP Address: The IP address of the Audit Vault Server. An IP address was set during the installation of the Audit Vault Server; if you want to use a different address, you can change it now. The IP address is static and must be obtained from the network administrator. Note: Changing the IP address requires a reboot.
The specified IP Address may need to be added to routing tables to enable traffic to go between the Audit Vault Server and Database Firewalls.
-
Network Mask: (Super Administrator Only) The subnet mask of the Audit Vault Server.
-
Gateway: (Super Administrator Only) The IP address of the default gateway (for example, to access the management interface from another subnet). The default gateway must be on the same subnet as the Audit Vault Server.
-
Host Name: Enter the host name for the Audit Vault Server. The host name must start with a letter, can contain a maximum number of 24 characters, and cannot contain spaces in the name.
Note: Changing the host name requires a reboot. After you click Save, the system asks you to confirm if you want to reboot, or cancel. If you confirm, the system will reboot and the Audit Vault Server will be unavailable for a few minutes.
-
Link properties: Do not change the default setting unless your network has been configured not to use auto negotiation.
-
Configuring or Changing the Audit Vault Server Services
To configure the Audit Vault Server services:
-
Log in to the Audit Vault Server console as a super administrator.
-
In the System tab, from the System menu, click Services.
-
Complete the following fields as necessary, then click Save.
Caution:
When allowing access to Oracle AVDF you must be careful to take proper precautions to maintain security. See "Protecting Your Data" for a list of recommendations before completing this step.-
DNS Servers 1, 2, 3: (Optional) Select IP Address(es) and enter the IP address(es) of up to three DNS servers on the network. These IP addresses are used to resolve any host names that may be used by Audit Vault Server. Keep the fields disabled if there is no DNS server, otherwise system performance may be impaired.
-
Web Access: If you want to allow only selected computers to access the Audit Vault Server console, select IP Address(es) and enter specific IP addresses in the box, separated by spaces. Using the default of All allows access from any computer in your site.
-
SSH Access: You can specify a list of IP addresses that are allowed to access Audit Vault Server from a remote console by selecting IP Address(es) and entering them in this field, separated by spaces. Using a value of All allows access from any computer in your site. Using a value of Disabled prevents console access from any computer.
-
SNMP Access: You can specify a list of IP addresses that are allowed to access the network configuration of Audit Vault Server through SNMP by selecting IP Address(es) and entering them in this field, separated by spaces. Selecting All allows access from any computer. Selecting the default value of Disabled prevents SNMP access. The SNMP community string is
gT8@fq+E.
-
Configuring the Audit Vault Server Syslog Destinations
Use the following procedure to configure the types of syslog messages to send from the Audit Vault Server. The message categories are Debug, Info, or System. Starting in Oracle AVDF 12.1.2, you can also forward Alert messages.
Caution:
Ensure that the IP addresses you provide for Syslog destinations are on a different host than the Audit Vault Server.-
Log in to the Audit Vault Server console as an administrator, and click the Settings tab.
-
From the System menu, click Connectors. and scroll down to the Syslog section.
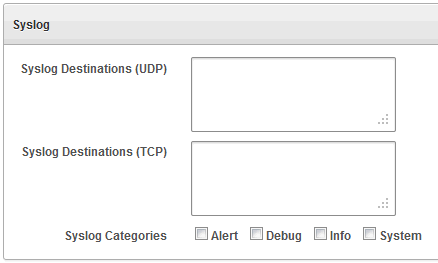
Description of the illustration ''syslog_settings.gif''
-
Complete the fields, as necessary:
-
Syslog Destinations (UDP): Use this box if you are using User Datagram Protocol (UDP) to communicate syslog messages from the Audit Vault Server. Enter the IP address of each machine that is permitted to receive the syslog messages, separated by spaces.
-
Syslog Destinations (TCP): Use this box if you are using Transmission Control Protocol (TCP) to communicate syslog messages from the Audit Vault Server. Enter the IP address and port combinations of each server that is permitted to receive the syslog messages, separated by spaces.
-
Syslog Categories: You can select the types of syslog messages to generate as follows:
-
Alert: (AVDF 12.1.2 Only) Alerts based on alert conditions that an AVDF auditor specifies.
To forward AVDF alerts to syslog, in addition to this setting, the AVDF auditor must configure alert forwarding. See Oracle Audit Vault and Database Firewall Auditor's Guide for detailed instructions and AVDF syslog alert format.
-
Debug: Engineering debug messages (for Oracle support use only).
-
Info: General Oracle AVDF messages and property changes (Oracle AVDF syslog message IDs 1, 4 and 8).
-
System: System messages generated by Oracle AVDF or other software that have a syslog priority level of at least "INFO".
-
-
-
Click Save.
If you are using two Audit Vault Servers as a resilient pair, repeat "Specifying Initial System Settings and Options (Required)" for the second Audit Vault Server.
Configuring the Email Notification Service
About Email Notifications in Oracle AVDF
An auditor can configure Oracle AVDF to send users email notifications when alerts or reports are generated. An administrator must configure an SMTP server in order to enable email notifications. The email notifications can be sent in text format to mobile devices, or routed through an SMS gateway if you already have one.
Note the following:
-
You can configure one SMTP (or ESMTP) server for each Oracle AVDF installation.
-
You can configure Oracle AVDF to work with both unsecured SMTP servers as well as secured and authenticated SMTP servers.
See Oracle Audit Vault and Database Firewall Auditor's Guide for information on configuring alerts and generating reports.
Configuring the Email Notification Service
To configure the email notification service:
-
Click the Settings tab, and in the System menu, click Connectors.
-
In the SMTP Server Address field, enter the IP address of the SMTP server.
-
In the SMTP Port field, enter the SMTP server port.
-
In the From Username field, enter the user name used as the sender of the email.
-
In the From Address field, enter the sender's address that appears in the email notifications.
-
If this SMTP server requires it, select Require Credentials, then supply a Username, Password, and Re-enter Password.
-
If this SMTP server requires authentication, select Require Secure Connection, and then select the authentication protocol (SSL or TLS).
Configuring Archive Locations and Retention Policies
About Archiving and Restoring Data in Oracle AVDF
You can archive data files in Oracle AVDF as part of your information life cycle strategy. To do so, you must create archiving (or retention) policies, and configure archive locations to which data will be transferred according to the policies. We recommend that you archive regularly in accordance with your corporate policy. If required, you can create different data file archives for each secured target.
Note: As of Oracle AVDF 12.1.2, there are additional space requirements for archiving if you use Secure Copy (scp) or Windows File Sharing (SMB) transfer methods. Therefore, configure archiving as part of the initial Audit Vault Server configuration if you use these methods to transfer data to archive locations.
You can create many data archiving policies, each specifying the number of months to retain audit data online in Oracle AVDF, and how many months to retain data in the archives before purging. The Oracle AVDF auditor can then select a specific retention policy for each secured target, as well as for scheduled reports. If the auditor does not select a retention policy for a secured target or scheduled report, the default retention policy will be used (12 months retention online and 12 months in archives before purging).
You start archive jobs by selecting data files from those that are ready for archiving according to specified retention policies. Retention times are based on the time that the audit events occurred in the secured target.
Once data files become ready for archiving, the data is no longer visible in reports. When the administrator archives these data files, the data is physically removed from the Audit Vault Server. Data in the archive location can be restored to the Audit Vault Server if necessary, and this data then becomes visible in reports. It is up to the administrator to manually purge data from the archive locations according to the retention policy.
You can restore data for a specific secured target and time range. For archive and restore procedures, see "Archiving and Restoring Audit Data".
Defining Archiving Locations
You must define one or more locations as destinations for archive files before you can start an archive job. An archiving destination specifies the archive storage locations and other settings.
Oracle recommends that you use NFS to transfer data to an archive location. If you use Secure Copy (SCP) or Windows File Sharing (SMB) to transfer data to an archive location, then your data files are first copied to a staging area in the Audit Vault Server. Therefore, you must ensure that there is additional space in the file system. Otherwise the data file copying may fail. Be aware that transferring large files using SCP or SMB may take a long time.
To create an archive location:
-
Log in to the Audit Vault Server as an administrator.
-
Click the Settings tab, and under Archiving, click Manage Archive Locations.
A list of existing archive locations is displayed.
-
Click the Create button, and complete the following fields:
-
Transfer Method: The method used to transfer data from the Audit Vault Server to the machine that archives the data:
-
Location Name: The name of the archiving destination. This name is used to select the archiving destination when starting an archive.
-
Remote Filesystem: (AVDF 12.1.2 Only) If you use the Network File System (NFS) transfer method, you can select an existing filesystem, or one will be created automatically based on the details of this archive location.
You can register a remote filesystem using the
AVCLIutility, so that the filesystem can be selected here. See "REGISTER REMOTE FILESYSTEM" for details. -
Address: The name or IP address of the machine that archives the data. If Windows File Sharing is the transfer method, specify an IP address.
-
Export Directory: (AVDF 12.1.2 Only) If you use the Network File System (NFS) transfer method, enter the NFS server's export directory, for example,
/export_dir. -
Path: The path to the archive storage location. Enter a path to a directory (not a file), noting the following for these transfer methods:
-
Secure Copy (scp): If there is no leading slash character, the path is relative to the user's home directory. If there is a leading slash, the path is relative to the
rootdirectory. -
Windows File Sharing (SMB): Enter the sharename, followed by a forward slash and the name of the folder (for example,
/sharename/myfolder). -
Network File System (NFS): (AVDF 12.1.2 Only) Enter the path relative to the export directory. For example if the export directory is
/export_dir, and the full path to the directory you want to designate as an archive location is/export_dir/dir1/dir2, then enter/dir1/dir2in the Path field. If you want to put archives directly in the NFS server's export directory, then enter/(forward slash) for the Path.You can click the Test button to validate the NFS location when done.
-
-
Port: This is the port number used by the secure copy or Windows fileshare service on the machine that archives the data. You can normally use the default port number.
If you selected Windows File Sharing as the Transfer Method, it is recommended you use port 445.
-
Username: The account name on the machine to which the archive data will be transferred.
-
Authentication Method: If Secure Copy (scp) is the transfer method, you can select Password and enter the login password. If a Linux machine is used, you can select Key Authentication.
If using Key Authentication, the administrator of the remote machine must ensure that the file that contains the RSA key (~/.ssh/authorized_keys) has permissions set to 664.
-
Password and Confirm Password: If you use Windows file sharing, or you selected Password as the authentication method, this is the password to log into the machine that archives the data.
-
Public Key: This field appears if you selected Key Authentication. Copy this public key and add it to the public keys file on the machine that archives the data. For example, add the key in
~/.ssh/authorized_keys.
-
-
Click Save.
Creating or Deleting Archiving Policies
Creating Archiving (Retention) Policies
After you create a retention policy, an Oracle AVDF auditor can apply it to secured targets. For detailed instructions, see Oracle Audit Vault and Database Firewall Auditor's Guide.
To create an archiving (retention) policy:
-
Log in to the Audit Vault Server console as an administrator.
-
Click the Settings tab.
-
Under Archiving, select Manage Policies, and then click the Create button.
-
Enter a Name for this policy.
-
In the Months Online field, enter the number of months to retain audit data in the Audit Vault Server before it is marked for archiving. The default value is 1.
For example, if you enter 2, then audit data for secured targets that use this retention policy will be available for archive jobs after two months online in the Audit Vault Server. After the months online period has expired, the data is no longer visible in reports.
-
In the Months Archived field, enter the number of months to retain audit data in the archive location. The default value is 6.
This value determines how long data is available to restore to the Audit Vault Server, but does not cause the data to be purged from the archive location. For example if you enter 4, data can be restored from archives for a period of four months after it has been archived.
Deleting Archiving Policies
You can only delete a user-defined archiving policy.
To delete an archiving (retention) policy:
-
Log in to the Audit Vault Server console as an administrator.
-
Click the Settings tab.
-
Under Archiving, click Manage Policies.
-
Select the user-defined policy you want to delete, and then click Delete.
Defining Resilient Pairs for High Availability
You can define resilient pairs of Audit Vault Servers, Database Firewalls, or both. For these procedures, see "Configuring High Availability".
When you define a resilient pair of Audit Vault Servers, you do all configuration tasks, such as adding Database Firewalls to the server and registering secured targets, on the primary Audit Vault Server.
Registering a Database Firewall in the Audit Vault Server
If you are deploying Database Firewalls, you must register each one in the Audit Vault Server in order to enable communication between the two. We suggest you first configure the Database Firewall using the instructions in "Configuring the Database Firewall".
Database Firewalls must be registered in the Audit Vault Server before you can pair them for high availability. See "Configuring a Resilient Pair of Database Firewalls" for more information.
To register a Database Firewall in the Audit Vault Server:
-
If you have not done so, provide the Audit Vault Server's certificate and IP address to the Database Firewall you are registering. See "Specifying the Audit Vault Server Certificate and IP Address".
-
Log in to the Audit Vault Server as an administrator.
If there is a resilient pair of Audit Vault Servers, log in to the primary server.
-
Click the Firewalls tab.
The Firewalls page displays the currently registered firewalls and their status.
-
Click Register.
-
Enter a Name for the Database Firewall, and its IP Address.
-
Click Save.
If there is a message that indicates that there is a problem with the certificate, check that the date and time are set consistently across both the Database Firewall and the Audit Vault Server.
Testing the Audit Vault Server System Operation
You should verify that the system is fully operational before commencing normal day-to-day operations.
To test the system operation:
-
Log in to the Audit Vault Server as an administrator.
-
Check the date and time of the Audit Vault Server
-
Click the Settings tab.
-
In the System menu, click Status.
-
Click the Test Diagnostics button to run a series of diagnostic tests and see the results.
These diagnostics include testing:
-
Existence and access permissions of configuration files
-
File system sanity
-
Network configuration
-
Status of various process that are required to run on the system, for example, database server process(es), event collection process, Java framework process, HTTP server process, etc.
-
-
Click the Home tab, and check the status of Database Firewalls and Hosts.