45 Integrating JBoss with Access Manager
Oracle provides a J2EE-type JBoss Agent and JBoss Login Module for a smooth integration between Access Manager and JBoss. This chapter provides the following information to assist you with this integration:
45.1 Introduction to JBoss with Access Manager
JBoss application server is an open source alternative to IBM WebSphere and SAP NetWeaver application servers. The JBoss application server and related services are a J2EE platform used for developing and deploying enterprise Java applications, Web applications services, and portals. J2EE allows the use of standardized modular components and enables the Java platform to handle many aspects of programming automatically.
For integration with JBoss, Oracle provides:
-
Access Manager JBoss Agent (a J2EE type agent)
-
JAAS-compliant Login Module, which can be used with any client to authenticate against Access Manager
Note:
There is no special processing within (or by) Access Manager with (or for) the JBoss Agent.Integration with JBoss and Access Managerenables you to:
-
Protect Web applications and establish user single sign-on
-
Secure EJB access by configuring the login module for EJBs
-
Secure Web Services using the login module with Web service handlers to authenticate and authorize the caller
There are no client interfaces. For more information, see the following topics:
-
About Configuration and Processing by Access Manager JBoss Agent
-
About Configuration and Processing by Access Manager Login Module
45.1.1 About Configuration and Processing by Access Manager JBoss Agent
The JBoss Agent is a fully capable agent running on the JBoss Server.
This JBoss Agent supports Access Manager Web single sign-on flows with (or without) a Webgate. Authentication and authorization are based on resource URLs defined within Access Manager policies. The JBoss Agent intercepts every incoming request to the OAM Server and checks for access permissions for the requested resource. If the resource is protected by an OAM policy, the JBoss Agent initiates authentication and authorization for the user trying to access the resource.
Whenever an unauthenticated user requests access to any protected resource, the JBoss Agent redirects the user to the credential collector for a username and password. The username and password that is entered is authenticated by the OAM Server. The JBoss Agent then establishes user session on the JBoss Container using the login module for the user. The login module queries the LDAP directory and fetches the authenticated user principals to set the subject.
The JBoss Agent depends on the Pure Java ASDK classes and APIs for accessing and communicating with the OAM Server. The JBoss Agent implements the javax.servlet.Filter interface. For more information, see the Oracle Fusion Middleware Access SDK Java API Reference for Oracle Access Management Access Manager.
The JBoss Agent requires OAM Server communication details, certificate store, and more, which can be configured as:
-
A properties file containing all configuration details (the path to this file can be set as a filter parameter)
-
The absolute path of the properties file added within the filter configuration in web.xml
Note:
The custom headers that are defined by the Oracle Access Management Administrator can only be defined using these methods.The application filter should log messages at different logging levels (FATAL, ERROR, WARNING, DEBUG, TRACE). Each level indicates the severity of information logged, in descending order. The filter should be able to log the detailed trace of an incoming message as one set. The JBoss Agent and the Login Module are both equipped with messages for various log levels. For logging in the same log file (server.log):
<category name="<<Component_code_package>>">
 <priority value="FINEST" class="org.jboss.logging.log4j.JDKLevel"/>
</category>
For example, for ASDK, the category name in the previous tag is oracle.security.am.asdk, as shown:
<category name="<<oracle.security.am.asdk>>">
 <priority value="FINEST" class="org.jboss.logging.log4j.JDKLevel"/>
</category>
The following overview outlines processing functions for the Access Manager JBoss Agent.
Process overview: Access Manager JBoss Agent functions
-
Query the OAM Server to check whether the requested resource is protected.
-
Call the OAM Server to retrieve the authentication scheme.
-
Analyze the authentication scheme for the protected resource, and redirect the request to the credential collector.
-
Authenticate the user credentials.
-
Successful Authentication: Set the authentication token generated from the OAM Server in the cookie.
-
Authentication Token: Validate the integrity of the token before servicing the request. Request the OAM Server to verify the user is authorized to access the protected resource and handle the response from the OAM Server accordingly.
-
Depending upon the user requests and OAM Server responses, the JBoss Agent identifies where user requests should be redirected to allow or deny access to the protected resource.
45.1.2 About Configuration and Processing by Access Manager Login Module
The JAAS-compliant OAM Login Module is a pluggable authentication module using JAAS APIs provided by the Access Manager javax.security.* package. The JAAS-compliant Access Manager Login Module interfaces enable the client to pass authentication data to the server. The login module is configured with the JBoss server and application to integrate the module with the JBoss application server.
The JAAS-compliant Access Manager Login Module implementation class is:
public class OAMLoginModule implements LoginModule
The standard JAAS packages required by this class are javax.security.* . The login module class is stored in a jar file: $JBOSS_HOME/server/default/lib
The Login Module operates in two modes:
-
usernamePassword: Authenticates the user based on username and password or a user and certificate combination that forms a security identity and credential pair. The login module does not directly query the LDAP. Instead the login module uses the OAM Java ASDK to communicate and authenticate the user credentials with the OAM Server; user and group information is retrieved as responses.
-
tokenBased: Sets the Subject by validating the SSO token
The JAAS-compliant Access Manager Login Module consumes username, password, or Access Manager token. This module authenticates and validates the credentials or token with the OAM Server (using the Access Manager Java ASDK APIs) and populates the JAAS subject with user and group information obtained from the OAM Server.
JAAS-compliant Access Manager Login Module Configuration
The login-config.xml file is the default JBoss Login Module configuration file. This Login Module requires a JAAS security domain name (OAMLoginModule, for instance). Information is stored in login-config.xml as a list of named security domains, each of which specifies a number of JAAS Login Modules that are used for authentication within that domain. For example, you add this manually and then restart the JBoss Server:
 <application-policy name="OAMLoginModule">
    <authentication>
      <login-module code="oracle.security.am.agent.common.jaas.login.OAMLoginModule"
        flag="required">
      <module-option name="loginType">tokenBased</module-option>
      <module-option name="configPath">D:/agentconfig</module-option>
      <module-option name="publicAuthnResourceName">/Authen/Basic</module-option>
      <module-option name="rolesParam">OAM_GROUPS</module-option>
      <module-option name="publicAuthzResourceName">/Authen/SSOToken</module-option>
      </login-module>
    </authentication>
</application-policy>
Security Domains and Deployment Descriptors
Whenever an application requires security, you must specify the domain name to use in the application's JBoss-specific deployment descriptors (either one or both):
-
jboss.xml: Defines JBoss-specific configurations for an application.
-
jboss-web.xml: Defines JBoss for a Web application. This file must declare the security domain and should be placed in the WEB-INF folder.
The JAAS-compliant OAM Login Module operates as outlined in the following overviews.
Process overview: JAAS-compliant OAM Login Module in usernamePassword mode
-
Fetches login information.
-
Authenticates the user with Access Manager based on credentials collected by the JBoss Agent.
-
Creates the container session for the client on the server.
-
Sets the JAAS subject with the userID and roles.
-
On logout, clears the principal settings of the subject in the session and removes the privilege settings associated with the roles of the subject.
Although the Login Module processing that occurs in token based mode is similar to usernamePassword mode, the differences are outlined in the next overview.
Process overview: JAAS-compliant OAM Login Module in tokenBased mode
-
Fetches login information.
-
Validates the SSO authentication token generated from the OAM Server in the cookie.
-
Creates the container session for the client on the server.
-
Sets the JAAS subject with the userID and roles fetched using the existing SSO session token.
-
On logout, clears the principal settings of the subject in the session and removes the privilege settings associated with the roles of the subject.
45.2 Integration Topology
This section provides the following topics:
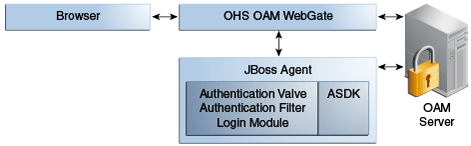
45.2.1 Access Manager JBoss Agent Functionality
The JBoss Agent is comprised of components described in Table 45-1. Each component uses the Access ASDK to communicate with the OAM Server.
Table 45-1 JBoss Agent Composition
| Component | Description |
|---|---|
|
Authentication Valve |
Invoked during the JBoss Authentication phase for all incoming requests. If the resource is marked as protected by security constraints in the application's Web descriptor, the Authentication Valve checks for the presence of a user principal in the HTTP session:
|
|
Authentication Filter |
Invoked for each incoming request following the JBoss authentication phase. For each incoming request, the filter verifies whether a token is present.
|
|
Access Manager Login Module |
Used internally by the JBoss Agent to authenticate the user based on the SSO token. Any client (stand alone or deployed within the JBoss Container) can use the Login Module to authenticate the incoming user based on username and password or a valid token. |
45.2.2 Topology: Access Manager with JBoss Agent
Figure 45-1 illustrates the various clients (whether browser, EJB, or Webserivce) that can securely access any J2EE application deployed on the JBoss Application Server. The JBoss Agent is configured for this access and is deployed within the JBoss Application Server.

45.2.3 Topology: JBoss Agent Behind Web Server Configured with Webgate
In addition to operating alone, the JBoss Agent can be also work in conjunction with an Oracle HTTP Server (proxy) configured with a WebGate, as shown in Figure 45-2.
Applications are deployed in the JBoss Application Server protected with the JBoss Agent. Additionally the request comes through an Oracle HTTP Server instance that is configured with a WebGate. Both the WebGate and the JBoss Agent are configured against the same Access Manager deployment. Here, the JBoss Agent plays the role of an Identity Asserter that simply validates that the token forwarded by the Webgate is valid and uses the identity established by the WebGate.
45.2.4 Sample Integration Topology
Figure 45-3 illustrates the topology used in this chapter for integration between Access Manager and JBoss.
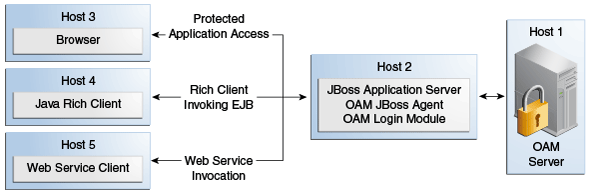
Details for this deployment are described in "Preparing Your Environment for JBoss Integration".
The topology in Figure 45-3 supports:
-
Protecting Web Applications
This use case is Application specific and JBoss specific. It uses Access Manager SSO with the JBoss Agent and an authorization policy for browsers accessing Web applications on JBoss (with local EJB invocation, if any).
-
Access Manager (Host 1)
-
Application hosted on JBoss Application Server (Host 2)
-
-
Invoking Secured EJBs using Rich Java Clients
The client can access an EJB in different ways depending on the client architecture, as follows:
-
Configure the JAAS-compliant Access Manager Login Module on the JBoss Container to secure access to the EJB. The client can then make use of JBoss-specific mechanism to propagate the Access Manager SSO token to the JBoss Container.
The client can either make use of an already procured Access Manager SSO token or the client can use the JAAS-compliant Access Manager Login Module to obtain the SSO token based on user's credentials.
-
Alternatively, the Access Manager SSO token can be obtained using a custom HTTP Web server-based Access Manager Authentication Service exposed to Rich Java clients.
-
-
EJB invocation as a Web Service Provider (WSP)
JAAS-compliant Access Manager Login Module can be configured on the Web Service Provider side to validate the Username and Password or the SSO Token.
Alternatively: If only the Username is available for Web Services Consumption (WSC), you need the WSP requiring the SAML token issued by Security Token Service asserting the Username, followed by invocation of JAAS-compliant Access Manager Login Module with extra username-only assertion capability).
-
Secure EJB access using the JAAS-compliant Access Manager Login Module on (Host 2)
-
Host the EJB Application on the JBoss server (Host 2)
-
Access Manager (Host 1)
-
Remaining sections in this chapter describe how to complete this integration.
45.3 Preparing Your Environment for JBoss Integration
The following procedure describes how to prepare your environment for integrating JBoss Application Server with Access Manager, which includes:
-
Oracle Access Management Console and OAM Server
-
JBoss Application Server 5.1.0
-
Access Manager Access SDK
-
Access Manager Jboss Agent
To prepare for integrating JBoss Application Server with Access Manager
-
Check the latest support information on:
http://www.oracle.com/technetwork/middleware/ias/downloads/fusion-certification-100350.html
-
Host 1:
-
Install Access Manager as described in Oracle Fusion Middleware Installation Guide for Oracle Identity Management
-
-
Host 2:
-
Install JBoss 5.1.0 Application Server, as described in your JBoss installation guide.
-
Edit JBoss server.xml to change <Engine name="jboss.web" defaultHost="localhost"> to <Engine name="jboss.web" defaultHost="0.0.0.0">. For example:
JBoss_install_directory\server\default\deploy\jbossweb.sar\server.xml
From
<Engine name="jboss.web" defaultHost="localhost">
To
<Engine name="jboss.web" defaultHost="0.0.0.0">
-
-
Host 2, Install Access ManagerAccess SDK, as described in the Oracle Fusion Middleware Installation Guide for Oracle Identity and Access Management.
-
Host 2, Install OAM JBoss Agent. For example:
-
Extract
oam-j2eeagent.zip:From
/agentconfig/oam_config.propertiesfile -
Copy
oam-authenticatorvalve.jarandj2eeagent.jar:To
JBoss_install_directory\server\default\lib
-
-
Proceed to "Protecting JBoss-Specific Resources":
45.4 Protecting JBoss-Specific Resources
This task is JBoss specific and is required for all JBoss integration use cases: protecting applications, Web Services, or EJBs.
This section describes how to create an Agent registration and how to add resources and configure authorization policies for use with the Access Manager JBoss Agent. For details, see:
45.4.1 Registering the JBoss Agent with Automatic Policy Creation
For this task, you can use either the Oracle Access Management Console as described here, or remote registration as described in Oracle Fusion Middleware Administrator's Guide for Oracle Access Management.
For communication between Access Manager and the JBoss Agent, you can use Open, Simple, or Cert Security Mode. Configuring the JBoss Agent to use Simple or Cert mode signals the Java ASDK to operate in the same mode. During registration, a new file system directory is created for the agent on the Oracle Access Management Console host (AdminServer). After registration, you copy artifacts to the Agent directory path:
-
ObAccessClient.xml
-
password.xml (Simple or Cert mode only)
-
oamclient-keystore.jks (see "Setting Up The Keystore" in: Oracle Fusion Middleware Developer's Guide for Oracle Access Management
In the following procedure, replace variables with values for your environment. This example uses Cert mode. Your deployment will be different.
To create a fresh registration for a 10g OAM Agent
-
Go to the Oracle Access Management Console (host 1) and log in using Administrator credentials. For example:
https://host1:port/oamconsole
User: adminuserID
Password ********
-
From the Welcome page, SSO Agent panel, click New OAM 10g Agent to open a fresh page.
-
On the Create: OAM Agent page, enter the following (and required details) to register this OAM Agent. For example:
-
Name: JBoss
-
Security: Cert (see Oracle Fusion Middleware Developer's Guide for Oracle Access Management Oracle Fusion Middleware Developer's Guide for Oracle Access Manager and Oracle Security Token Service)
-
User-defined Parameter:
logoutRedirectUrl=http://OAM_Server.domain.com:14100/oam/server/logout -
-
Protected Resource List: Click the Add (+) button in this table and enter the resources you want protected by the default Authentication and Authorization policies:
/Authen/Basic
/Authen/SSOToken
-
Auto Create Policies: Check to create fresh policies and an Application Domain.
-
Click Apply to submit the registration.
-
Check the Confirmation window for the location of generated artifacts and then close the window.
-
In the navigation tree, confirm the Agent name is listed.
-
Copy ObAccessClient.xml from the AdminServer to the JBoss Agent installation directory path:
From:
$WLS_HOME/middleware/user_projects/domains/base_domain/output/AGENTNAMETo:
D:\agentconfig -
Proceed with "Creating a Custom Policy for JBoss Resource Protection".
45.4.2 Creating a Custom Policy for JBoss Resource Protection
In this task, you create a custom Authorization Policy and add responses that return the user groups as header variables. For example, name the response OAM_GROUPS (with value $user.groups).
Note:
For this custom authorization policy, the success and failure redirect URLs are not needed because the single purpose of this policy is to provide responses for an authorized user. If redirect URLs are provided, no redirection occurs with the processing logic of the JBoss Agent or Login Module.See Also:
Chapter 18Skip Step 1 if the JBoss Application Domain is open in the Console.
To create a custom authorization policy to protect JBoss Agent-specific resources
-
From the Oracle Access Management Console Policy Configuration tab, open the JBoss Application Domain:
Application Domains
JBoss -
Authorization Policies:
-
Click the Authorization Policies node and click the Create (+) button.
-
In the Name field of the Summary tab, enter a unique name. For example:
Custom Authorization Policy
-
-
Add Resources: JBoss Agent-specific resources were defined during agent registration.
-
Click the Resources tab on the Authorization Policy page.
-
Click the Add (+) button.
-
Click the Search button.
-
Choose a URL from the list, then click Add Selected:
/Authen/Basic
-
Repeat Steps a through d to add:
/Authen/SSOToken
-
Click Apply
-
-
Add Responses: Click the Responses tab, click the Add (+) button and:
-
In the Name field, enter a unique name for this response:
OAM_GROUPS. -
From the Type list, choose a response type (Header).
-
In the Value field, enter a value for this response. For example:
$user.groups
-
-
Click Apply to save changes and close the Confirmation window.
-
Proceed to the proper topic for your deployment:
45.5 Protecting Web Applications with the JBoss Agent
This section provides the following tasks required to protect Web Applications with the JBoss Agent:
Deploy the application as usual.
45.5.1 Creating Configuration Properties for the JBoss Agent
In this task, you copy Jboss Agent registration artifacts from the AdminServer to the JBoss host and create a filter configuration properties file that is referenced later.
Note:
The JBoss Agent relies on the 11g Java ASDK which operates in the same mode as the registered JBoss Agent.The JBoss Agent requires a configuration file (oam_config.properties) that defines a number of critical properties. These include the file system path to the agent's registration artifact (ObAccessClient.xml), the security domain defined in the JBoss server's login configuration file, parameters and values that return to the JBoss Agent during authentication, and an optional attribute to check for the presence of authToken in the request.
To create configuration properties for the JBoss Agent
-
Create a JBoss Agent configuration file named oam_config.properties using the following sample as a guide:
##Path of the folder containing the ObAccessClient.xml
configPath=D:\\agentconfig

##Name of the security domain as configured in JBoss's login-config.xml
realmName=oamrealm

##Optional. If not specified then defaults to /Authen/Basic
##publicAuthnResourceName=/Authen/Basic

##Optional. If not specified then defaults to http
##publicAuthnResourceType=http

##Optional. If not specified then defaults to GET
##publicAuthnResourceOperation=GET

##Optional. If not specified then defaults to /Authen/SSOToken
##publicAuthzResourceName=/Authen/SSOToken

##Optional. If not specified then defaults to http
##publicAuthzResourceType=http

##Optional. If not specified then defaults to GET
##publicAuthzResourceOperation=GET

rolesParam=OAM_GROUPS

##Optional. This attribute is responsible to check whether the credential in
##the subject / callback handler is an authn token. Defaults to authnToken.
authToken=authToken

####################################
##### OAM logout related properties #####
####################################
##Host name of the OAM 11g Server
##oamHost=abchost.us.example.com

##Managed server port number of the OAM 11g Server
##oamPort=Port_value
-
Save oam_config.properties on the JBoss host:
/agentconfig/oam_config.properties -
Proceed to "Configuring the Authentication Valve".
45.5.2 Configuring the Authentication Valve
This procedure must be performed to configure the authentication valve. There are two methods to perform this task. Choose the one that is best suited to your environment:
-
To add the Authentication Valve to context.xml: This global configuration causes the Authentication Valve to intercept all requests to the Jboss Agent.
-
To add the Valve to the application's deployment: This configuration affects only the concerned application (the Authentication Valve intercepts requests coming only to this specific application).
To add the Authentication Valve to context.xml
-
Locate and open for editing the JBoss Agent context.xml file in:
JBoss_install_dir\server\default\deploy\jbossweb.sar\context.xml -
Add the following Valve entry and save the file:
<Valve className="oracle.security.am.agent.common.authenticator.OAMAuthenticatorValve" configFile="<full_path_to_oamagent_config_properties_file> " />
-
Proceed to "Mapping the Filter in the Application's web.xml File".
Rather than adding the Authentication Valve to context.xml for global use, you can instead perform the following task to add a context.xml as part of the application's deployment.
To add the Valve to the application's deployment
-
Create a fresh context.xml file and store it under WEB-INF with web.xml:
JBoss_install_dir\server\default\deploy\jbossweb.sar\context.xml -
Add the following Valve entry:
<?xml version="1.0" encoding="UTF-8"?>

<Context privileged="true">
   <Valve className="oracle.security.am.agent.common.authenticator.OAMAuthenticatorValve" configFile="<full_path_to_oamagent_config_properties_file> " />

</Context>
-
Redeploy the application.
-
Proceed to "Mapping the Filter in the Application's web.xml File".
45.5.3 Mapping the Filter in the Application's web.xml File
In this procedure, you add filter mapping for this integration to the application's web.xml. You also add the name of the filter's configuration properties file.
To add filter mapping to web.xml
-
Locate the web.xml file in the application EAR file:
my_app/WEB-INF/web.xml -
Add the following filter mapping to the application's web.xml. For example:
<filter> <filter-name>OAMFilterAgent</filter-name> <filter-class> oracle.security.am.agent.common.filter.OAMAuthenticationFilter </filter-class> <init-param> <param-name>configFile</param-name> <param-value>D:/oam_config.properties</param-value> </init-param> </filter> <filter-mapping> <filter-name>OAMFilterAgent</filter-name> <url-pattern>/*</url-pattern> </filter-mapping> -
Save the file.
-
Proceed to Configuring the JBoss Login Module to Use Access Manager Policies.
45.5.4 Configuring the JBoss Login Module to Use Access Manager Policies
This procedure describes the required login module entry for JBoss to use Access Manager policies.
After you add filter mapping to web.xml, you redeploy the application and start the JBoss Server.
Note:
Starting JBoss Server using -b 0.0.0.0 allows the user to access the server by the host name rather thanlocalhost / 127.0.0.1. Without this parameter, JBoss Server can be accessed using localhost / 127.0.0.1 as well as the host name.To configure the login module that enables JBoss to use OAM policies
-
Locate and open the login-config.xml file:
JBoss_install_dir\server\default\conf\login-config.xml -
Add a new entry for the login module, as follows:
<application-policy name="oamrealm">
  <authentication>
    <login-module code="oracle.security.am.agent.common.jaas.login.OAMLoginModule"       flag="required">
      <module-option name="loginType">tokenBased</module-option>
      <module-option name="configPath">D:/agentconfig</module-option>
      <module-option>
      <module-option name="publicAuthnResourceName">/Authen/Basic</module-option>
      <module-option name="rolesParam">OAM_GROUPS</module-option>
      <module-option name="publicAuthzResourceName">/Authen/SSOToken</module-option>
    </login-module>
  </authentication>
</application-policy>
The name of
application-policyin this entry should have the same value as that defined for therealmnameproperty inoam_config.properties. -
Deploy the application.
-
Start JBoss as follows using the following command:
JBoss_install_dir\bin\run –b 0.0.0.0See "Configuring JBoss Server to Access a Host Name (not localhost)".
45.6 Configuring JBoss Server to Access a Host Name (not localhost)
This procedure is optional. Perform this only to access the JBoss Server using the host name (rather than localhost/127.0.0.1).
Note:
Starting JBoss Server using -b 0.0.0.0 allows the user to access the server using host name rather than localhost / 127.0.0.1. Otherwise, JBoss Server can be accessed using localhost / 127.0.0.1 as well as host name.To access the JBoss Server using the host name
-
On the JBoss Server host, locate the server.xml file in the following path:
JBoss_install_dir\server\default\deploy\jbossweb.sar\server.xml -
Edit server.xml to change the default host, as follows:
From:
<Engine name="jboss.web" defaultHost="localhost">
To:
<Engine name="jboss.web" defaultHost="defaultHost="0.0.0.0"> -
Save server.xml.
45.7 Configuring the Login Module to Secure EJBs
This task involves both the server-side and client-side configuration, as explained in following topics:
45.7.1 Configuring the Server to Secure EJBs
On the server side, you must add the security domain annotation to the EJB and add descriptors to jboss.xml. You also add a new entry to the JBoss server configuration file for the Login Module.
Securing EJBs, Web applications or a Web Service based on roles requires additional configuration in login-config.xml as follows:
<module-option name="rolesParam">OAM_GROUPS</module-option>
Here OAM_GROUPS is the response configured when "Creating a Custom Policy for JBoss Resource Protection".
You can use either the agent configured in previous steps or a new agent.
Note:
To use a new agent you must copy the ObAccessClient.xml from the /agent directory on the JBoss host, to another directory.To configure the server to secure EJBs
-
Copy ObAccessClient.xml as follows (one or the other):
-
From: $WLS_HOME/middleware/user_projects/domains/base_domain/output/agent_name.
-
To: A directory on the JBoss host.
-
-
Add the
@SecurityDomain("oamrealm")annotation to the EJB. For example, if the EJB class is DemoEJB the following should be added at the code level:import org.jboss.security.annotation.SecurityDomain; @SecurityDomain("oamrealm") public class DemoEJB{ ... }The
application-policydefined as the value of@SecurityDomain(in this example,oamrealm) should have the same value as that defined for therealmnameproperty inoam_config.properties. -
Option: Add the following descriptor to the
jboss.xmlfile to define the security domain.META-INF/jboss.xml
<jboss>
    <security-domain>java:/jaas/myother</security-domain>
</jboss>
The application-policy name defined in this descriptor (myother) should have the same value as the realmname property defined in oam_config.properties.
Note:
The name associated with the security domain annotation should be specified in the Login Module to be used, as described in Step 4. See Also: Configuring the JBoss Login Module to Use Access Manager Policies. -
JBoss Server Login Configuration: Add an entry for the Login Module class name, which must be part of the login mechanism:
JBoss_install_dir\server\default\conf\login-config.xml
<application-policy name="oamrealm">
  <authentication>
    <login-module code="oracle.security.am.agent.common.jaas.login.OAMLoginModule"
      flag="required">
      <module-option name="loginType">tokenBased</module-option>
      <module-option name="configPath">D:/agentconfig</module-option>
      <module-option name="rolesParam">OAM_GROUPS</module-option>
      <module-option name="publicAuthnResourceName">/Authen/Basic</module-option>
      <module-option name="publicAuthzResourceName">/Authen/SSOToken</module-option>
    </login-module>
  </authentication>
</application-policy>
Note:
Thenamevalue in theapplication-policyelement should match therealmnameproperty value defined inoam_config.properties. -
Deploy the application.
-
Start JBoss using the following command:
JBoss_install_dir\bin\run –b 0.0.0.0See "Configuring JBoss Server to Access a Host Name (not localhost)".
45.7.2 Configuring the Client Side to Secure EJBs
This procedure describes how to create a client-login configuration file.
To configure the client side for the Login Module to secure EJBs
-
Copy ObAccessClient.xml as follows (one or the other):
-
New Agent: From $MW_HOME/middleware/user_projects/domains/base_domain/output/agent_name to a folder on the Agent host.
-
Existing Agent: From its location on the JBoss host to another directory on the Agent host.
-
-
On the client host, create a client-login configuration text file as follows:
oamauth { oracle.security.am.agent.common.jaas.login.OAMLoginModule required loginType="usernamePassword " configPath="D:/agentconfig" publicAuthzResourceName="/Authen/Basic" publicAuthzResourceName="/Authen/SSOToken"; }; -
Add the following to your entry to configure the login module to propagate identity to the EJB Container:
propagate { org.jboss.security.ClientLoginModule required restore-login-identity="true"; }; -
Save the file.
Note:
Perform Step 5 while invoking EJBs from a Rich Client to ensure that Access Manager performs authentication (using the Pure Java ASDK) and then propagates the credentials to the EJB Application Server. -
Rich Client: Add the following to the client code before invoking the EJB from the Client side:
System.setProperty("java.security.auth.login.config", authFile);
MyCallbackHandler handler = new MyCallbackHandler(<USERNAME>,<PASSWORD>);
LoginContext lc = new LoginContext("oamauth", handler);
lc.login();
//Fetch the private credentials of type String.class
Set<String> set = lc.getSubject().getPrivateCredentials(String.class);

//Set the SSO Token in callback handler along with the username
handler = new MyCallbackHandler(<USERNAME>, set.iterator().next());
LoginContext lc2 = new LoginContext("propagate", handler);
lc2.login();
45.8 Configuring the Login Module to Secure Web Service Access
The Web Service Provider may provide for one of the various mechanisms to intercept and handle the incoming web service SOAP message in order to enforce security on the web service invocation.
This task involves both the server-side and client-side configuration, as explained in following topics:
45.8.1 Configuring the Server to Secure Web Services Access
Configuring the Server to Secure Web Services Access involves copying Agent registration artifacts, and adding the Access Manager JAAS-compliant Login Module for Web Service security to the JBoss Server login-configuration file.
You can use either the agent configured in previous steps or a new agent. To use a new agent you must copy the ObAccessClient.xml from the /agent directory on the JBoss host, to another directory on this host.
No specific details are provided for configuring or deploying a Web Service because any of several frameworks can be used to create a Web Service. The provider of the Web Services deployed on the JBoss Container should adhere to the following guidelines in general:
-
Include functionality to look for specific headers injected by the client order to retrieve the OAM SSO token.
-
Use the OAM JAAS Login Module to validate the OAM SSO token
-
If any EJB Session Beans are exposed as Web Services, the JBoss-specific JAAS Login Module
ClientLoginModulemust be used to propagate the OAM token to the EJB container.
To configure the server to secure Web Services access
-
Copy ObAccessClient.xml as follows (one or the other):
-
Existing Agent: From its location on the JBoss host to another directory on the Agent host.
-
New Agent: From $MW_HOME/middleware/user_projects/domains/base_domain/output/agent_name to another directory on the Agent host.
-
-
Register the SOAP Handler with the Web Service (ideally using the .wsdd file).
The .wsdd file is generated when the WS stubs are created (and is located inside the application's WEB-INF folder).
-
Edit the JBoss Server login-configuration file to add an entry for the Access Manager JAAS-compliant Login Module for Web Service security, as follows:
JBoss_install_dir\server\default\conf\login-config.xml
<application-policy name="WSRealm"> <authentication> <login-module code="oracle.security.am.agent.common.jaas.login.OAMLoginModule" flag="required"> <module-option name="loginType">tokenBased</module-option> <module-option name="configPath">D:/agentconfig</module-option> <module-option name="rolesParam">OAM_GROUPS</module-option> <module-option name="publicAuthnResourceName">/Authen/Basic</module-option> <module-option name="publicAuthzResourceName">/Authen/SSOToken</module-option> </login-module> </authentication> </application-policy> -
Save the JBoss Server login configuration file.
-
Deploy the application.
-
Start JBoss using the following command:
JBoss_install_dir\bin\run –b 0.0.0.0See "Configuring JBoss Server to Access a Host Name (not localhost)".
-
Proceed to "Configuring the Client to Secure Web Services Access".
45.8.2 Configuring the Client to Secure Web Services Access
In this task, you configure user authentication with the OAM Server and then create a security header element, containing the SSO token, for the SOAP message.
Note:
Ideally, this step is performed before invoking a Web Service method, which means that this code must be added in the client code while invoking the Web Service.To configure the client to secure Web Services Access
-
On the WS-client: Perform user authentication with OAM Server and then create a security header element, containing the SSO token, for the SOAP message.
-
Invoke the Web service, as usual.
-
Proceed with "Configuring Logging for the JBoss Agent and Login Module".
45.9 Configuring Logging for the JBoss Agent and Login Module
The JBoss Agent and the Login Module are both equipped with logging messages at various log levels. To log these messages, you must edit the jboss-log4j.xml file as described in this procedure.
To configure logging for the JBoss Agent and Login Module
-
Locate the jobss-log4j.xml file in the following path:
$JBOSS_HOME/server/default/conf/jboss-log4j.xml
-
Open the file in an editor and add the following information:
<appender name="J2EEAGENT" class="org.jboss.logging.appender.DailyRollingFileAppender"> <errorHandler class="org.jboss.logging.util.OnlyOnceErrorHandler"/> <param name="File" value="${jboss.server.log.dir}/j2eeagent.log"/> <param name="Append" value="true"/> <param name="DatePattern" value="'.'yyyy-MM-dd"/> <layout class="org.apache.log4j.PatternLayout"> <param name="ConversionPattern" value="%d %-5p [%c] (%t) %m%n"/> </layout> </appender> <category name="oracle.security.am.agent.common"> <appender-ref ref="J2EEAGENT"/> </category> <root> ... <appender-ref ref="J2EEAGENT"/> </root> -
Save the file.
45.10 Validating Your Configuration
There is no specific mechanism to validate your configuration. However, you can manually determine whether the configuration is correctly functioning.
To validate your configuration
-
Authorized User: Invoke the Web Service manually by providing the SSO token generated for the user who is authorized to invoke the Web Service.
-
Success: The authorized user is granted access.
-
Failure: The authorized user is denied access.
-
Error: The configuration is incorrect. Review the OAM Server logs for the entries generated by the Login Module.
-
-
Unauthorized User: Invoke the Web Service manually and provide the SSO token for a non-authorized user.
-
Success: The unauthorized user is denied access.
-
Failure: The unauthorized user is granted access.
-
Error: If any error occurs, the configuration is incorrect. Review the OAM Server logs for the entries generated by the Login Module.
-