47 Integrating Access Manager with Outlook Web Application
In a Windows environment, after a user authenticates, the authenticating application can impersonate that user's identity. The primary purpose of impersonation is to trigger access checks against a client's identity.
This chapter focuses on how to enable impersonation in Access Manager to override impersonation enabled with IIS. The following topics are provided:
47.1 What is New in This Release?
Support for integration between Access Manager and Outlook Web Application (OWA) 2010.
This chapter illustrates:
47.2 Introduction to Integration with Outlook Web Application
This section provides the following information to introduce the integration described in this chapter:
47.2.1 About Impersonation Provided by Microsoft Windows
When running in a client's security context, a service can to an extent become a client. After the user authenticates, the service can take on that user's identity through impersonation. One of the service's threads uses an access token, known as an impersonation token, to obtain access to objects the client can access. The access token is a protected object that represents the client's credentials.
The impersonation token identifies the client, the client's groups, and the client's privileges. The information in the token is used during access checks when the thread requests access to resources on the client's behalf. When the server is impersonating the client, any operations performed by the server are performed using the client's credentials.
Impersonation ensures that the server can or cannot do exactly what the client can or cannot do. Access to resources can be restricted or expanded, depending on what the client has permission to do. Impersonation requires the participation of both the client and the server. The client must indicate its willingness to let the server use its identity, and the server must explicitly assume the client's identity programmatically.
When impersonation concludes, the thread uses the primary token to operate using the service's own security context rather than the client's. The primary token describes the security context of the user account associated with the process (the person who started the application).
Services run under their own accounts and act as users in their own right. For example, system services that are installed with the operating system run under the Local System account. You can configure other services to run under the Local System account, or separate accounts on the local system or in Active Directory.
The IIS Web server provides impersonation capabilities. However, the OAM Server overrides IIS authentication, authorization, and impersonation functions. For more information, see "About Access Manager 11g Support for Windows Impersonation" in the next section.
47.2.2 About Access Manager 11g Support for Windows Impersonation
You can enable support for Windows impersonation to provide additional access control for protected applications. You bind a trusted user to a Webgate and protect the application with a application domain that includes an impersonation action in the authorization rule. During the authorization process, the protected application creates an impersonation token.
For more information, see, "Enabling Impersonation With a Header Variable". It provides prerequisites and details about implementing impersonation using header variables.
47.2.3 About Single Sign-On for Authenticated Access Manager Users into Exchange
This is also supported using the Windows Impersonation feature. Outlook Web Access (OWA) provides Web access to Exchange mail services and may be configured on either of the following:
-
An IIS Web server that does not reside on the same host as the Exchange server, which is also known as a front-end server
-
An IIS Web server running on the same host as the Exchange server, which is also known as the back-end server
In a front-end server configuration, the front-end OWA server authenticates the user, determines the back-end Exchange server that hosts the user's mailbox, then proxies the request to the appropriate back-end Exchange server. No additional credential information is passed. No delegation is performed. Setting up Impersonation on the back-end Exchange server ensures that the Exchange server does not need to request credentials before granting access.
For more information, see "Setting Up Impersonation for Outlook Web Application (OWA)" .
47.2.4 About Confirming Requirements
The example in this chapter illustrates setting up the impersonation feature for the OAM Server to Microsoft Exchange Server 2010 integration. The principles are the same regardless of your application.
Any references to specific versions and platforms in this chapter are for demonstration purposes. For the latest Access Manager certification information, see Oracle Technology Network at:
http://www.oracle.com/technetwork/middleware/ias/downloads/fusion-certification-100350.html
47.3 Enabling Impersonation With a Header Variable
Enabling impersonation with a header variable involves the following procedures.
Task overview: Enabling impersonation with a header variable includes
-
Reviewing all Requirements for Impersonation with a Header Variable
47.3.1 Requirements for Impersonation with a Header Variable
Prepare the environment and confirm that it is operating properly before implementing Windows impersonation with the OAM Server.
Table 47-1 identifies the Access Manager platform requirements when you enable impersonation using a header variable.
Table 47-1 Requirements for Impersonation with a Header Variable
| Item | Platform |
|---|---|
|
10g Webgate (and Impersonation dll) |
Microsoft IIS 7.x and Windows Server 2008 |
|
Impersonation dll |
Webgate_install_dir\access\oblix\apps\webgate\bin\IISImpersonationModule.dll
|
|
Kerberos Key Distribution Center (KDC) and Active Directory |
Windows Server 2008 |
|
Client and Server machines |
|
|
Security context |
Must have Act as operating system privileges. Note: IWAM_Machine is not recommended |
|
Mutual authentication is required |
Mutual authentication is supported remotely. |
47.3.2 Creating an Impersonator as a Trusted User
Whether you enable impersonation using a HeaderVar or user profile attribute, the return value must be a trusted user in Active Directory. This special user should not be used for anything other than impersonation.
The example in the following procedure uses SPPSImpersonator as the New Object - User. With OWAImpersonator as SPPSImpersonator denotes SharePoint impersonation specifically. Your environment will be different.
To create a trusted user account
-
Perform the steps for your environment on the computer hosting your Microsoft Exchange Server 2010 installation:
-
Windows 2008: Select Start, Programs, Administrative tools, Active Directory Users and Computers.
-
-
In the Active Directory Users and Computers window, right-click Users on the tree in the left pane, then select New; User.
-
In the First name field of the pane entitled New Object - User, enter an easy-to-remember name such as SPPSImpersonator.
-
Copy this same string to the User logon name field, then click Next.
-
In succeeding panels, you are asked to choose a password and then retype it to confirm.
Note:
Oracle recommends that you choose a very complex password, because your trusted user is being given very powerful permissions. Also, be sure to check the box marked Password Never Expires. Since the impersonation module should be the only entity that ever sees the trusted user account, it would be very difficult for an outside agency to discover that the password has expired.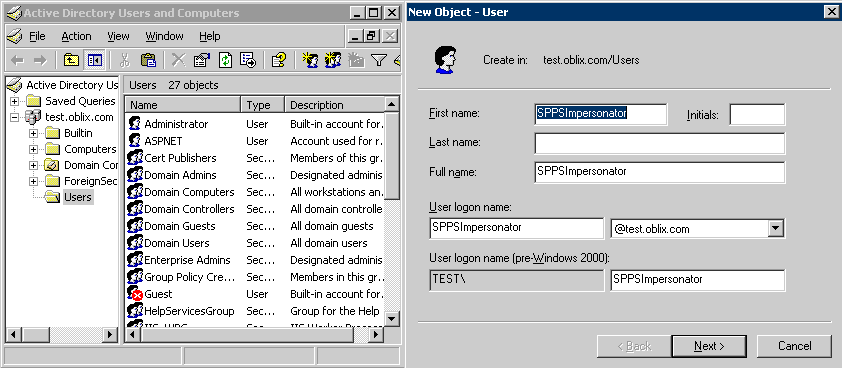
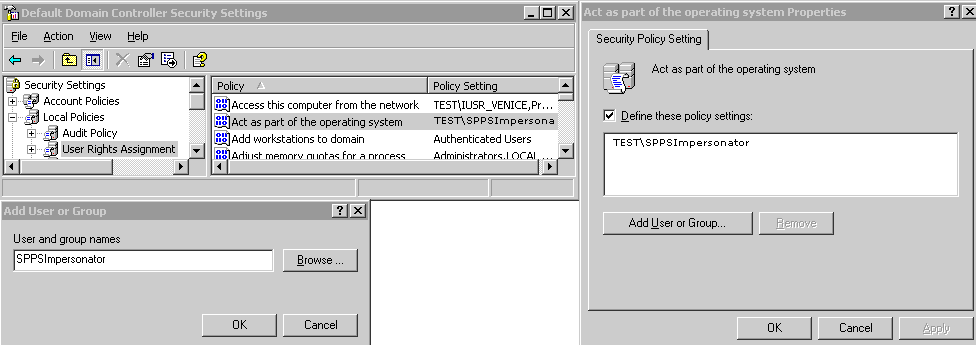
47.3.3 Assigning Rights to the Trusted User
You need to give the trusted user the right to act as part of the operating system
To give appropriate rights to the trusted user
-
Perform the appropriate step for your environment:
-
Windows 2008: Select Start > Programs > Administrative tools > Local Security Policy.
You must modify the group policy object that applies to the computer where the Webgate is installed.
-
-
On the tree in the left pane, click the plus icon (+) next to Local Policies.
-
Click User Rights Assignment on the tree in the left pane.
-
Double-click "Act as part of the operating system" in the right pane.
-
Click Add User or Group.
-
In the Add User or Group panel, type the User logon name of the trusted user (Microsoft Exchange Server 2010 Impersonator in our example) in the User and group names text entry box, then click OK to register the change.
47.3.4 Binding the Trusted User to Your Webgate
You need to bind the trusted user to the Webgate by supplying the authentication credentials for the trusted user, as described in here.
The following procedure presumes that you have registered a 10g Webgate with Access Manager. The values in the following procedure are provided as an example only. Your environment will be different.
See Also:
Chapter 23, "Registering and Managing 10g Webgates with Access Manager 11g" in the Oracle Fusion Middleware Administrator's Guide for Oracle Access Management .To bind your trusted user to your Webgate
-
Go to the Oracle Access Management Console .
For example:
http://hostname:port/oamconsolewhere hostname is the fully-qualified DNS name of the computer hosting the Oracle Access Management Console ; port is the listening port configured for the OAM Server; oamconsole leads to the Oracle Access Management Console .
-
From the Oracle Access Management Console , open the:
System Configuration tab
Access Manager Settings section
SSO Agents node
OAM Agents node -
Find the desired 10g Webgate registration to modify for this integration:
-
Find All Enabled: Select State All, click the Search button, click the desired Webgate name in the results list.
-
-
On the Webgate registration page, enter the SharePoint username and password for the trusted user account, which you created earlier.
-
Click Apply to commit the changes.
A bind has been created for the Webgate and the trusted user. The Webgate is now ready to provide impersonation on demand. The demand is created by an Authorization Success Action in the application domain created for impersonation.
47.3.5 Adding an Impersonation Response to An Application Domain
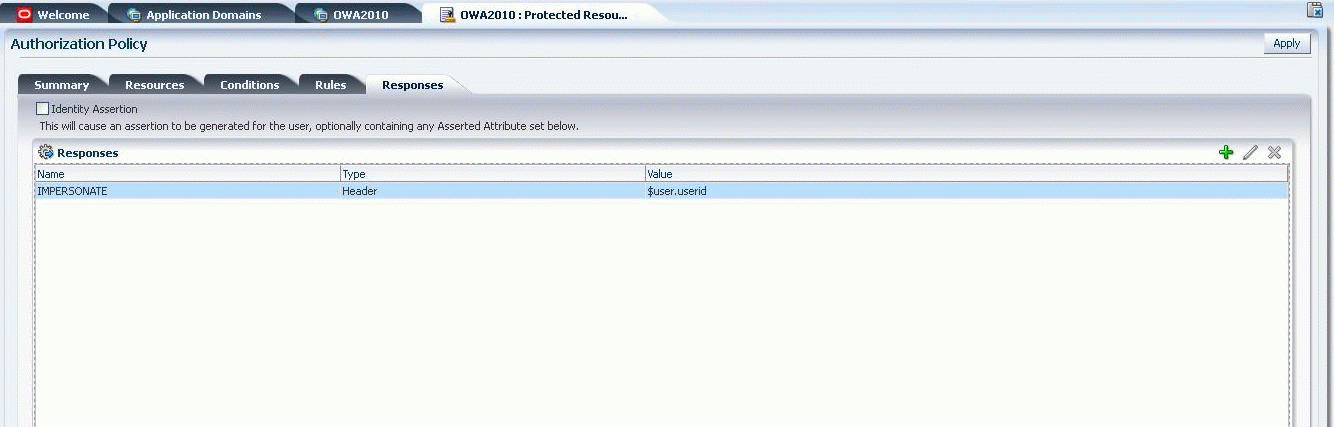
You must create or configure an application domain to protect your OWA resources. For this you must add Responses in Authorization Policies (Header type Responses), as described here and shown in Figure 47-4.
See Also:
Chapter 18, "Managing Policies to Protect Resources and Enable SSO" in the Oracle Fusion Middleware Administrator's Guide for Oracle Access Management.The procedure here presumes that you have an application domain created for the 10g Webgate you registered. The application domain in this example is MyImpersonationDomain. Your environment will be different.
To add an impersonation action to your application domain (type headerVar)
-
In the Oracle Access Management Console , navigate as follows:
Policy Configuration tab
Application Domains (Double-click to open).
Click Search in the Application Domains tab.
-
Open the OWA2010 Application Domain (the relevant application domain for impersonation).
Navigate as follows:
Authorization Policies
Protected Resource Policy
Responses -
Click the Add button, then Add Response.
Complete the form as follows:
-
From the Type list, choose Header.
-
In the Name field, type a unique name for this response. For example, IMPERSONATE.
-
In the Value field, type a value for this response. For example, $user.userid.
-
-
Click Add, then click Apply to submit the changes.
This Response is used for the second Webgate request (for authorization).
47.3.6 Adding an Impersonation DLL to IIS
You are ready to configure IIS by adding the IISImpersonationModule.dll to your IIS configuration.
To configure and register ImpersonationModule to IIS
-
Select Start > Administrative Tools > Internet Information Services (IIS) Manager.
-
In the left pane of IIS 7.x, click the hostname.
-
In the middle pane, under the "IIS" header, double click on "Modules".
-
In the right pane, click "Configure Native Modules" and click "Register".
-
In the window, provide a module Name (for example, Oracle Impersonation Module).
-
In the Path field, type the full path to
IISImpersonationModule.dll.By default, the path is:
Webgate_install_dir\access\oblix\apps\webgate\bin\IISImpersonationModule.dllWhere Webgate_install_dir is the directory of your Webgate installation.
Note:
If any spaces exist in the path (for example,C:\Program Files\Oracle\...) surround the entire string with double quotes (" "). -
Click OK to register the module.
-
Check the name of the newly created module and click OK to apply the module across the Web sites.
-
Remove the module from the Default site level (otherwise, it inherits when you add it on the machine level).
-
Ensure that the
IISImpersonationModule.dllfile added in these steps is applied only to "owa" and "ecp" applications and removed from the site level.Go to OWA, double-click modules, Configure Native Modules, and check the desired module (for example, Oracle Impersonation Module).
Go to (ecp): Double-click modules, Configure Native Modules, and check the desired module (for example, Oracle Impersonation Module).
47.3.7 Testing Impersonation
You can test Impersonation in the following two ways:
47.3.7.1 Creating an IIS Virtual Site
To test the impersonation feature outside the Microsoft OWA 2010 context or to test single sign-on, you will need a target Web page on an IIS virtual Web site You create such a virtual Web site by performing the following task.
-
Click Start > Administrative Tools > Internet Information Services (IIS) Manager.
-
Click the plus icon (+) to the left of the local computer icon on the tree in the left pane.
-
Right-click Web Sites on the tree in the left pane, then select New, then select Web Site on the menu.
-
Respond to the prompts by the Web site creation wizard.
-
After you create the virtual site, you must protect it with an application domain, as described elsewhere in this guide.
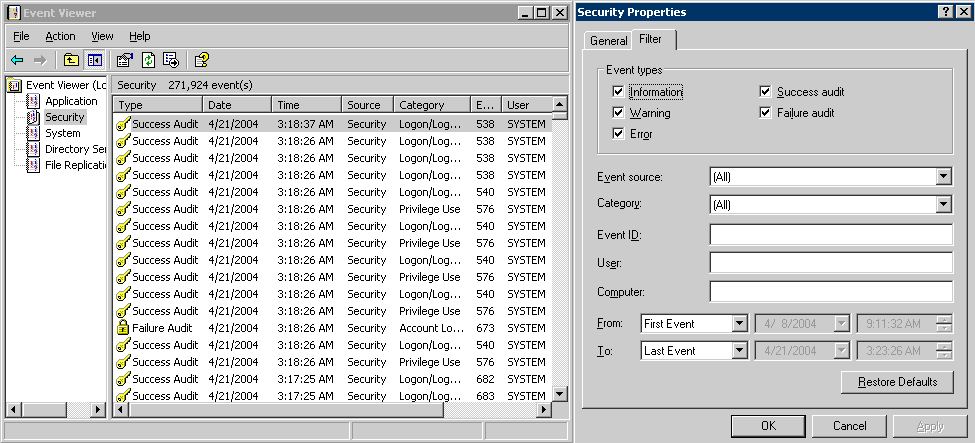
47.3.7.2 Testing Impersonation Using the Event Viewer
When you perform impersonation testing using the Windows 2008 Event Viewer, you must configure the event viewer before conducting the actual test.
To test impersonation through the Event Viewer
-
Select Start Menu > Event Viewer.
-
In the left pane, right-click Security, then click Properties.
-
Click the Filter tab on the Security property sheet.
-
Verify that all Event Types are checked and the Event Source and Category lists are set to All, then click OK to dismiss the property sheet.
Your Event Viewer is now configured to display information about the headerVar associated with a resource request.
-
Create a new IIS virtual server (virtual site).
-
Place a target Web page anywhere in the tree on the virtual site.
-
Point your browser at the Web page
If impersonation is working correctly, the Event Viewer will report the success of the access attempt.
47.3.7.3 Testing Impersonation using a Web Page
You can also test impersonation using a dynamic test page, such as a.asp page or a Perl script, that can return and display information about the request.
To test impersonation through a Web page that displays server variables
-
Create a
.asppage or Perl script that will display the parameters AUTH_USER and IMPERSONATE. It can resemble the sample page presented in the following listing:<TABLE border=1> <TR> <TD>Variable</TD> <TD>  </TD> <TD>Value</TD></TR> <%for each servervar in request.servervariables%> <TR> <TD><%=servervar%></TD> <TD>  </TD> <TD><%=request.servervariables(servervar)%> </TD> </TR>
-
Create an IIS virtual site, or use the one you created for the previous task.
-
Place a
.asppage or Perl script (such as the sample in the preceding listing) anywhere in the tree of the new virtual site. -
Point your browser at the page. The page should display, with both AUTH_USER and IMPERSONATE set to the name of the user making the request.
47.4 Setting Up Impersonation for Outlook Web Application (OWA)
In a distributed Exchange/OWA single sign-on environment, each server needs Access Manager to impersonate the current user. When you enable Impersonation, you need to include additional HTTP headers in the "Response" tab of the Authorization Policy of your impersonation application domain.
The following solution has been tested in both standalone and distributed OWA environments.
Task overview: Setting up impersonation for OWA
-
Install Access Manager 11g, as described in the Oracle Fusion Middleware Installation Guide for Oracle Identity and Access Management.
-
Install a 10g Webgate on all OWA client servers, as described in the Oracle Fusion Middleware Administrator's Guide for Oracle Access Management.
-
On the Webgate registration page, Disable IP Checking for Webgates on the back-end server using the AccessGate (because the request comes from the front-end server, not from the user's browser).
-
Ensure that OWA is not using Integrated Windows Authentication, as described in "Prerequisites to Setting Impersonation for Outlook Web Application".
-
Create a trusted user account for only impersonation in the Active Directory, as described in "Creating a Trusted User Account for Outlook Web Application".
-
Give the trusted user the special right to act as part of the operating system, as described in "Assigning Rights to the Outlook Web Application Trusted User".
-
Bind the trusted user to the Webgate by supplying the authentication credentials for the trusted user, as described in "Binding the Trusted Outlook Web Application User to Your Webgate".
-
Add a header variable named impersonate to the Authorization Policy Response tab (in the impersonation application domain), as described in, as described in "Adding an Impersonation Action to an Application Domain for Outlook Web Application".
-
Configure IIS by adding
IISImpersonationModule.dllto your IIS configuration, as described in "Adding an Impersonation dll to IIS". -
Test Impersonation, as described in "Testing Impersonation for Outlook Web Application".
47.4.1 Prerequisites to Setting Impersonation for Outlook Web Application
Before setting Impersonation for Outlook Web Application, ensure that OWA is not using Integrated Windows (or any other) Authentication. If it is not, you can use the following steps to get this working.
To set up OWA with Windows Authentication
-
Open Exchange Management console.
-
Go to Server Configuration and click Client Access.
-
Select Outlook Web Access and click Properties.
-
In the Properties dialog box, click the Authentication tab.
-
Clear (unselect) all the authentication methods.
-
Click Apply, and click OK.
-
Restart the IIS server.
-
Proceed with "Creating a Trusted User Account for Outlook Web Application."
47.4.2 Creating a Trusted User Account for Outlook Web Application
This special user should not be used for anything other than impersonation.
Oracle recommends that you chose a very complex password, because your trusted user is being given very powerful permissions. Also, be sure to check the box marked Password Never Expires. Since the impersonation module should be the only entity that ever sees the trusted user account, it would be very difficult for an outside agency to discover that the password has expired.
To create a trusted user account for OWA
-
On the Windows 2008 machine, select Start; Programs; Administrative tools, Active Directory Users and Computers.
-
In the Active Directory Users and Computers window, right-click Users on the tree in the left pane, then select New; User.
-
In the First name field of the pane entitled New Object - User, enter an easy-to-remember name such as OWAImpersonator.
-
Copy this same string to the User logon name field, then click Next.
-
In succeeding panels, you will be asked to choose a password and then retype it to confirm.
-
Proceed to "Assigning Rights to the Outlook Web Application Trusted User".
47.4.3 Assigning Rights to the Outlook Web Application Trusted User
You need to give the trusted user the right to act as part of the operating system.
To give appropriate rights to the trusted user
-
Select Control Panel, Administrative Tools; and click either the Domain Controller Security Policy (if the computer is a domain controller) or Local Security Policy.
-
On the tree in the left pane, click the plus icon (+) next to Local Policies.
-
Click User Rights Assignment on the tree in the left pane.
-
Double-click "Act as part of the operating system" in the right pane.
-
Click Add User or Group.
-
In the Add User or Group panel, type the User logon name of the trusted user (OWAImpersonator in our example) in the User and group names text entry box, then click OK to register the change.
-
Proceed to "Binding the Trusted Outlook Web Application User to Your Webgate."
47.4.4 Binding the Trusted Outlook Web Application User to Your Webgate
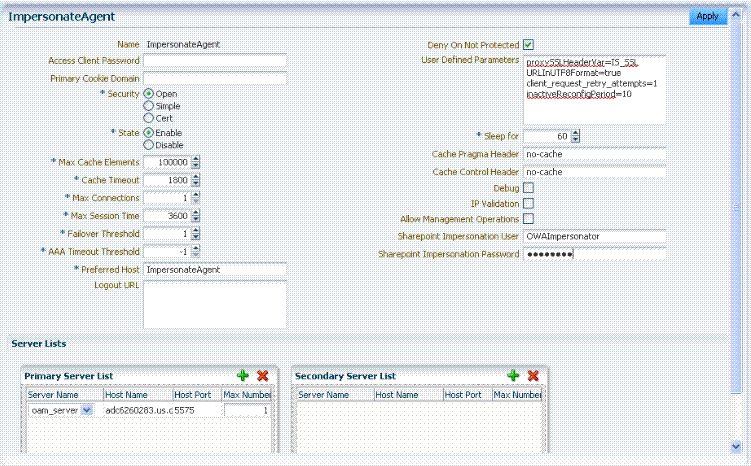
You need to bind the trusted user to the Webgate by supplying the authentication credentials for the trusted user, as described in the following procedure.
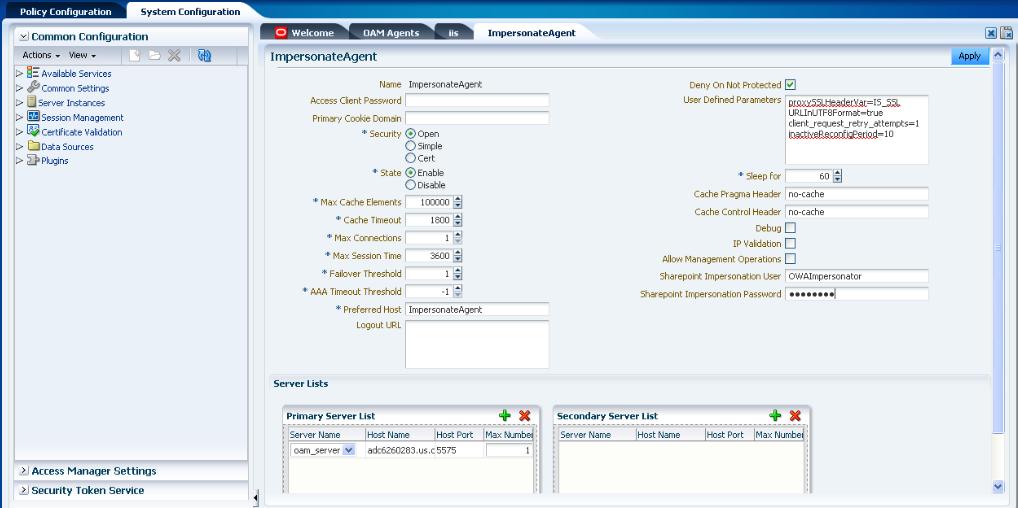
When the bind has been created for the Webgate and the trusted user, Webgate is ready to provide impersonation on demand. The demand is created by a Response set in the Authorization Policy of application domain created for impersonation.
The following procedure presumes that you have registered a 10g Webgate (ImpersonateAgent) with Access Manager. The values in the following procedure are provided as an example only. Your environment will be different.
See Also:
Chapter 23, "Registering and Managing 10g Webgates with Access Manager 11g" in the Oracle Fusion Middleware Administrator's Guide for Oracle Access Management .To bind your trusted OWA user to your Webgate
-
Go to Oracle Access Management Console .
For example:
http://hostname:port/oamconsolewhere hostname is the fully-qualified DNS name of the computer hosting the Oracle Access Management Console ; port is the listening port configured for the OAM Server; oamconsole leads to the Oracle Access Management Console .
-
From the Oracle Access Management Console , open the:
System Configuration tab
Access Manager Settings section
SSO Agents node
OAM Agents node -
Find the desired 10g Webgate registration to modify for this integration. For example: ImpersonateAgent.
-
Find All Enabled: Select State All, click the Search button, click the desired Webgate name in the results list.
-
-
Open the Webgate registration page and enter the SharePoint username and password for the trusted user account, which you created earlier.
-
Click Apply to commit the changes.
A bind has been created for the Webgate and the trusted user. The Webgate is now ready to provide impersonation on demand. The demand is created by an Authorization Success Action in the application domain created for impersonation.
47.4.5 Adding an Impersonation Action to an Application Domain for Outlook Web Application
You must create or configure a application domain to protect your OWA resources (/owa and /ecp only).
Note:
Ensure thatIISImpersonation Module.dll is applied only to "owa" and "ecp" applications in IIS7.x, and removed from the site level.The Authorization policy must set several HTTP Header variables (Header type Responses in the Authorization policy).
This procedure presumes that you have an existing application domain for the 10g Webgate (ImpersonateAgent) you registered with Access Manager.
See Also:
The chapter on managing policies to protect resources and enable SSO in the Oracle Fusion Middleware Administrator's Guide for Oracle Access ManagementTo add an impersonation action to your application domain
-
In the Oracle Access Management Console , navigate as follows:
Policy Configuration tab
Application Domains (Double-click to open).
Click Search in the Application Domains tab.
-
Open the OWA2010 Application Domain (the relevant application domain for impersonation).
Navigate as follows:
Authorization Policies
Protected Resource Policy
Responses -
Click the Add button, then Add Response.
Complete the form as follows:
-
From the Type list, choose Header.
-
In the Name field, type a unique name for this response. For example, IMPERSONATE.
-
In the Value field, type a value for this response. For example, $user.userid.
-
-
Click Add, then click Apply to submit the changes.
-
Go to the next section, "Adding an Impersonation DLL to IIS."
This Response is used for the second Webgate request (for authorization).
47.4.6 Adding an Impersonation dll to IIS
You are ready to configure IIS by adding the IISImpersonationModule.dll to your IIS configuration. You also need to set Enable Anonymous Access because this is required for impersonation of a user.
To configure IIS by adding the IISImpersonationModule.dll
-
Select Start, Administrative Tools, Internet Information Services (IIS) Manager.
-
In the left pane of IIS 7.x, click the hostname.
-
In the middle pane, under the "IIS" header, double click on "Modules".
-
In the right pane, click "Configure Native Modules" and click "Register".
-
In the window, provide a module Name (for example, Oracle Impersonation Module).
-
In the Path field, type the full path to
IISImpersonationModule.dll.By default, the path is:
Webgate_install_dir\access\oblix\apps\webgate\bin\IISImpersonationModule.dllWhere Webgate_install_dir is the directory of your Webgate installation.
Note:
If any spaces exist in the path (for example,C:\Program Files\Oracle\...) surround the entire string with double quotes (" "). -
Click OK to register the module.
-
Check the name of the newly created module and click OK to apply the module across the Web sites.
47.4.7 Configuring IIS Security
Be sure to configure IIS Security before you continue. Figure 47-7 shows an example.
To configure IIS Security for the Exchange Server integration
-
Select Start, Administrative Tools, Internet Information Services (IIS) Manager.
-
Click the plus icon (+) to the left of the local computer icon on the tree in the left pane.
-
Click Web Sites on the tree in the left pane.
-
In the center pane, double-click Authentication under IIS.
-
Ensure that Anonymous Authentication is enabled and Windows Authentication is disabled.
47.4.8 Testing Impersonation for Outlook Web Application
The following options are provided to test the Impersonation configuration for OWA.
47.4.8.1 Testing Impersonation Using the Event Viewer
To test impersonation through the Event Viewer
-
Select Start Menu; Event Viewer.
-
In the left pane, right-click Security, then click Properties.
-
Click the Filter tab on the Security property sheet.
-
Verify that all Event Types are checked, and the Event Source and Category lists are set to All, then click OK to dismiss the property sheet.
-
Your Event Viewer is now configured to display information about the headerVar associated with a resource request.
-
Create a new IIS virtual server (virtual site).
-
Place a target Web page anywhere in the tree on the virtual site.
-
From your browser, enter the URl to the Web page.
If impersonation is working correctly, the Event Viewer will report the success of the access attempt.
47.4.8.2 Testing Impersonation using a Web Page
You can also test impersonation using a dynamic test page, such as a.asp that can return and display information about the request.
To test impersonation through a Web page
-
Create a
.asppage or Perl script that will display the parametersAUTH_USERandIMPERSONATE, which can resemble the sample page presented in the following listing:<TABLE border=1> <TR> <TD>Variable</TD> <TD>  </TD> <TD>Value</TD></TR> <%for each servervar in request.servervariables%> <TR> <TD><%=servervar%></TD> <TD>  </TD> <TD><%=request.servervariables(servervar)%> </TD> </TR>
-
Create an IIS virtual site, or use the one you created for the previous task.
-
Place a
.asppage or Perl script (such as the sample in the preceding listing) anywhere in the tree of the new virtual site. -
Point your browser at the page, which should appear, with both
AUTH_USERandIMPERSONATEset to the name of the user making the request.
47.4.8.3 Negative Testing for Impersonation
To conduct negative testing for impersonation, you need to unbind the trusted user from the Webgate, as explained in the following procedure.
To unbind the trusted user from your Webgate
-
In the Oracle Access Management Console, locate the Webgate Search page. For example:
System Configuration tab
Access Manager Settings section
SSO Agents node
OAM Agents node -
In the text field, enter the exact name of the desired instance. For example:
ImpersonateAgentand click Search. -
Open the desired Webgate registration page and Remove the credentials for the trusted user.
-
Click Apply to save the change.
-
Restart the IIS server and in a browser window, go to a protected code page (previously accessible to the trusted user).
-
Confirm that you receive a message page. Values for
AUTH_USERandIMPERSONATEare necessary for impersonation credentials to be bound to a Webgate. -
Restore the trusted user to the Webgate registration page.
47.5 Setting Up Access Manager WNA for Outlook Web Application
Access Manager11g interoperates with Windows Native Authentication (WNA). This section describes setting up Access Managerwith Windows Native Authentication (WNA) for Outlook Web Application (OWA).
Enabling Windows Authentication for the IIS Site front-ending OWA is described here.
A fully-configured Microsoft Active Directory authentication service should be set up with user accounts to map Kerberos services, Service Principal Names (SPNs) for those accounts, and key tab files. For more information, see Oracle Fusion Middleware Securing Oracle WebLogic Server 11g Release 1 (10.3.3) E13707-03.
You need to configure Access Managerto use Windows Native Authentication (WNA), as described in Chapter 44, "Configuring Access Manager for Windows Native Authentication."
To enable WNA for IIS Outlook Web Application (OWA)
-
Perform all prerequisite tasks.
-
Open IIS Authentication (OWA on the front-ending Site).
-
Enable Windows authentication.
-
Click on Provider.
-
Add Negotiate to Provider and move it to the top of the list.
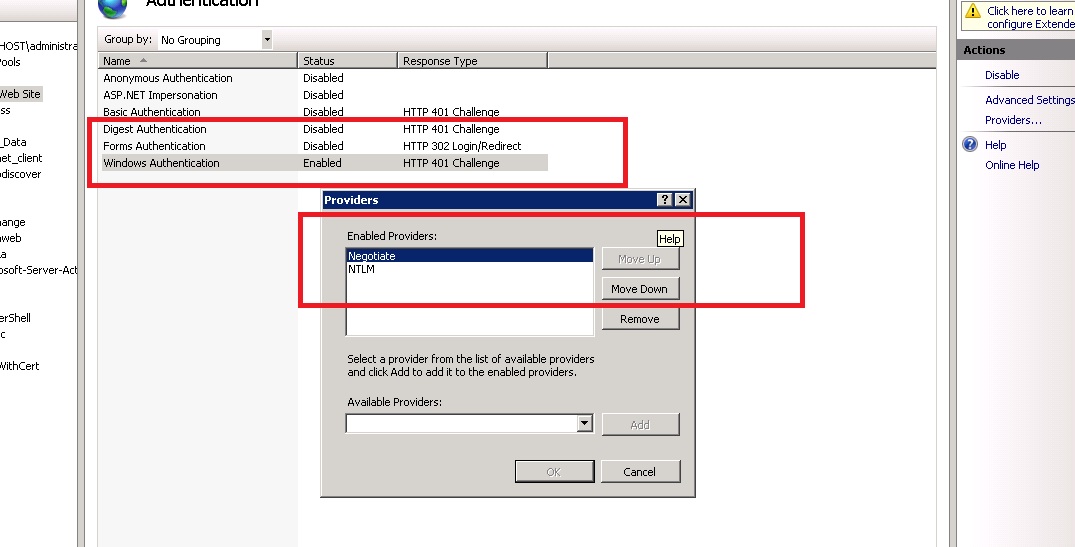
-
Create an Access Manager policy to protect OWA in IIS, as described in the Oracle Fusion Middleware Administrator's Guide for Oracle Access Management.