14 Configuring ICF Connectors
This chapter provides the information about the common customization procedures that needs to be performed for all ICF connectors.
The following are the topics discussed under this chapter:
-
Section 14.2, "Configuring Validation of Data During Reconciliation and Provisioning"
-
Section 14.3, "Configuring Transformation of Data During User Reconciliation"
14.1 Configuring Connector Load Balancer
A connector server is an application that enables remote execution of an Identity Connector. If there are multiple connector servers, then you must ensure the high availability of the connector server for the remote execution of the Identity connector and failover management. Therefore, you must configure a load balancer for a connector server. Figure 14-1 depicts the typical configuration for a cluster of connector servers. The flow in the figure is based on the assumption that the required connector bundle is deployed across all the connector servers.
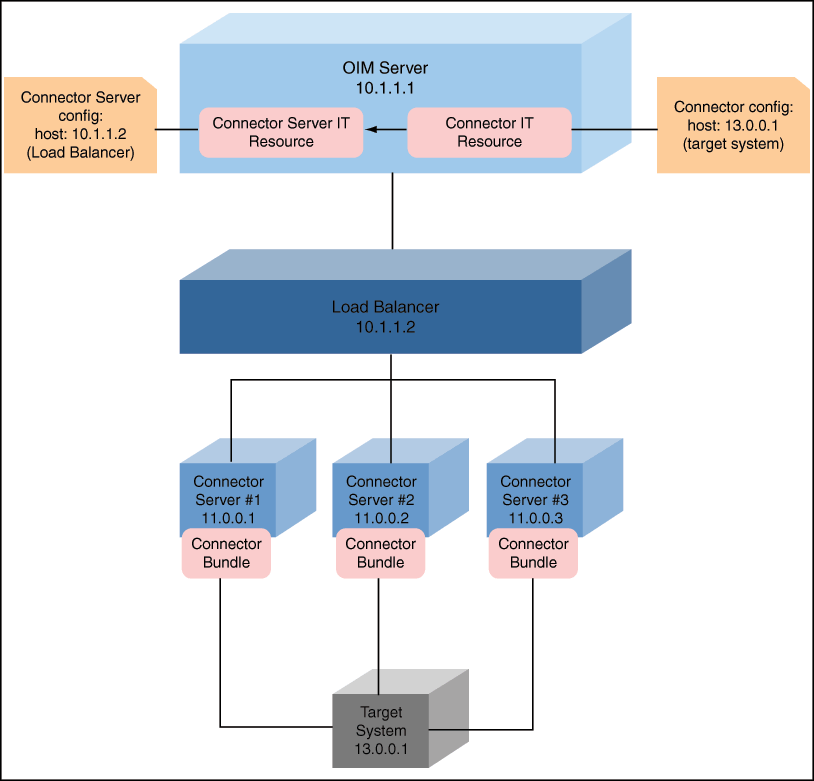
To configure the load balancer for a connector server:
-
Install connector server on nodes including the connector bundle. This involves copying and running the server binaries on all nodes.
-
Setup your load balancer so that every request on port 8759 (default for connector server, which is configurable) is being load balanced across the nodes created in Step 1.
-
Create a connector server IT resource, and point it to your host deployed with load balancer.
-
Configure your connector IT resource with the following details:
-
host: target address
-
connector server name: use the name created in Step 3.
Note:
You must make sure to double-check that the incoming port of load balancer is same as the one given in connector server IT resource. In addition, you must check that the ports set up for cluster nodes match the one used for configuring your load balancer.
-
14.2 Configuring Validation of Data During Reconciliation and Provisioning
The Lookup.CONNECTOR_NAME.ProvValidations and Lookup.CONNECTOR_NAME.UM.ReconValidations lookup definitions hold single-valued data to be validated during provisioning and reconciliation operations, respectively.
For example, you can validate data fetched from the First Name attribute to ensure that it does not contain the number sign (#). In addition, you can validate data entered in the First Name field on the process form so that the number sign (#) is not sent to the target system during provisioning operations.
Note:
The Lookup.CONNECTOR_NAME.UM.ProvValidations and Lookup.CONNECTOR_NAME.UM.ReconValidations lookup definitions are optional and do not exist by default.You must add these lookups as decode values to the Lookup.CONNECTOR_NAME.UM.Configuration lookup definition to enable exclusions during provisioning and reconciliation operations. See the respective connector guide for more information about setting up the lookup definition for user operations.
To configure validation of data:
-
Write code that implements the required validation logic in a Java class with a fully qualified domain name (FQDN), such as
org.identityconnectors.CONNECTOR_NAME.extension.CONNECTOR_NAMEValidator.This validation class must implement the validate method. The following sample validation class checks if the value in the First Name attribute contains the number sign (#):
package com.validationexample; import java.util.HashMap; public class MyValidator { public boolean validate(HashMap hmUserDetails, HashMap hmEntitlementDetails, String sField) throws ConnectorException { /* You must write code to validate attributes. Parent * data values can be fetched by using hmUserDetails.get(field) * For child data values, loop through the * ArrayList/Vector fetched by hmEntitlementDetails.get("Child Table") * Depending on the outcome of the validation operation, * the code must return true or false. */ /* * In this sample code, the value "false" is returned if the field * contains the number sign (#). Otherwise, the value "true" is * returned. */ boolean valid = true; String sFirstName = (String) hmUserDetails.get(sField); for (int i = 0; i < sFirstName.length(); i++) { if (sFirstName.charAt(i) == '#') { valid = false; break; } } return valid; } } -
Log in to the Design Console.
-
Create one of the following new lookup definitions:
-
To configure validation of data for reconciliation:
Lookup.CONNECTOR_NAME.UM.ReconValidations -
To configure validation of data for provisioning:
Lookup.CONNECTOR_NAME.UM.ProvValidations
-
-
In the Code Key column, enter the resource object field name that you want to validate. For example,
Alias. -
In the Decode column, enter the class name. For example,
org.identityconnectors.CONNECTOR_NAME.extension.CONNECTOR_NAMEValidator. -
Save the changes to the lookup definition.
-
Search for and open the Lookup.CONNECTOR_NAME.UM.Configuration lookup definition.
-
In the Code Key column, enter one of the following entries:
-
To configure validation of data for reconciliation:
Recon Validation Lookup -
To configure validation of data for provisioning:
Provisioning Validation Lookup
-
-
In the Decode column, enter one of the following entries:
-
To configure validation of data for reconciliation:
Lookup.CONNECTOR_NAME.UM.ReconValidations -
To configure validation of data for provisioning:
Lookup.CONNECTOR_NAME.UM.ProvValidations
-
-
Save the changes to the lookup definition.
-
Create a JAR with the class and upload it to the Oracle Identity Manager database as follows:
Run the Oracle Identity Manager Upload JARs utility to post the JAR file created in Step 7 to the Oracle Identity Manager database. This utility is copied into the following location when you install Oracle Identity Manager:
Note:
Before you use this utility, verify that theWL_HOMEenvironment variable is set to the directory in which Oracle WebLogic Server is installed.For Microsoft Windows:
OIM_HOME/server/bin/UploadJars.bat
For UNIX:
OIM_HOME/server/bin/UploadJars.sh
When you run the utility, you are prompted to enter the login credentials of the Oracle Identity Manager administrator, URL of the Oracle Identity Manager host computer, context factory value, type of JAR file being uploaded, and the location from which the JAR file is to be uploaded. Select 1 as the value of the JAR type.
See Also:
"Migrating JARs and Resource Bundle" for detailed information about the Upload JARs utility -
Run the PurgeCache utility to clear content related to request datasets from the server cache.
-
Perform reconciliation or provisioning to verify validation for the field, for example, Alias.
14.3 Configuring Transformation of Data During User Reconciliation
The Lookup.CONNECTOR_NAME.UM.ReconTransformations lookup definition holds single-valued user data to be transformed during reconciliation operations. For example, you can use First Name and Last Name values to create a value for the Full Name field in Oracle Identity Manager.
Note:
The Lookup.CONNECTOR_NAME.UM.ReconTransformations lookup definition is optional and does not exist by default.You must add this lookup as decode value to the Lookup.CONNECTOR_NAME.UM.Configuration lookup definition to enable exclusions during provisioning and reconciliation operations. See the respective connector guide for more information about setting up the lookup definition for user operations.
To configure transformation of single-valued user data fetched during reconciliation:
-
Write code that implements the required transformation logic in a Java class with a fully qualified domain name (FQDN), such as
org.identityconnectors.CONNECTOR_NAME.extension.CONNECTOR_NAMETransformation.This transformation class must implement the transform method. The following sample transformation class creates a value for the Full Name attribute by using values fetched from the First Name and Last Name attributes of the target system:
package com.transformationexample; import java.util.HashMap; public class MyTransformer { public Object transform(HashMap hmUserDetails, HashMap hmEntitlementDetails, String sField) throws ConnectorException { /* * You must write code to transform the attributes. * Parent data attribute values can be fetched by * using hmUserDetails.get("Field Name"). * To fetch child data values, loop through the * ArrayList/Vector fetched by hmEntitlementDetails.get("Child Table") * Return the transformed attribute. */ String sFirstName = (String) hmUserDetails.get("First Name"); String sLastName = (String) hmUserDetails.get("Last Name"); return sFirstName + "." + sLastName; } } -
Log in to the Design Console.
-
Create a new lookup definition, Lookup.CONNECTOR_NAME.UM.ReconTransformations.
-
In the Code Key column, enter the resource object field name you want to transform. For example,
Alias. -
In the Decode column, enter the class name. For example,
org.identityconnectors.CONNECTOR_NAME.extension.CONNECTOR_NAMETransformation. -
Save the changes to the lookup definition.
-
Search for and open the Lookup.CONNECTOR_NAME.UM.Configuration lookup definition.
-
In the Code Key column, enter
Recon Transformation Lookup. -
In the Decode column, enter
Lookup.CONNECTOR_NAME.UM.ReconTransformations. -
Save the changes to the lookup definition.
-
Create a JAR with the class and upload it to the Oracle Identity Manager database as follows:
Run the Oracle Identity Manager Upload JARs utility to post the JAR file created in Step 7 to the Oracle Identity Manager database. This utility is copied into the following location when you install Oracle Identity Manager:
Note:
Before you use this utility, verify that theWL_HOMEenvironment variable is set to the directory in which Oracle WebLogic Server is installed.For Microsoft Windows:
OIM_HOME/server/bin/UploadJars.bat
For UNIX:
OIM_HOME/server/bin/UploadJars.sh
When you run the utility, you are prompted to enter the login credentials of the Oracle Identity Manager administrator, URL of the Oracle Identity Manager host computer, context factory value, type of JAR file being uploaded, and the location from which the JAR file is to be uploaded. Select 1 as the value of the JAR type.
See Also:
"Migrating JARs and Resource Bundle" for detailed information about this utility. -
Run the PurgeCache utility to clear content related to request datasets from the server cache.
-
Perform reconciliation to verify transformation of the field, for example, Alias.
14.4 Configuring Resource Exclusion Lists
The Lookup.CONNECTOR_NAME.UM.ProvExclusionList and Lookup.CONNECTOR_NAME.UM.ReconExclusionList lookup definitions hold user IDs of target system accounts for which you do not want to perform provisioning and reconciliation operations, respectively.
Note:
The Lookup.CONNECTOR_NAME.UM.ProvExclusionList and Lookup.CONNECTOR_NAME.UM.ReconExclusionList lookup definitions are optional and do not exist by default.You must add these lookups as decode values to the Lookup.CONNECTOR_NAME.UM.Configuration lookup definition to enable exclusions during provisioning and reconciliation operations. See the respective connector guide for more information about setting up the lookup definition for user operations.
The following is the format of the values stored in these lookups:
| Code Key | Decode | Sample Values |
|---|---|---|
| User Login Id resource object field name | User ID of a user | Code Key: User Login Id
Decode: User001 |
| User Login Id resource object field name with the [PATTERN] suffix | A regular expression supported by the representation in the java.util.regex.Pattern class |
Code Key: User Login Id[PATTERN]
To exclude users matching any of the user ID 's User001, User002, User088, then: Decode: User001|User002|User088 To exclude users whose user ID 's start with 00012, then: Decode: 00012* See Also: For information about the supported patterns, visit |
To add entries in the lookup for exclusions during provisioning operations:
-
On the Design Console, expand Administration and then double-click Lookup Definition.
-
Create a new lookup definition, Lookup.CONNECTOR_NAME.UM.ProvExclusionList.
Note:
To specify user IDs to be excluded during reconciliation operations, create a new lookup definition called Lookup.CONNECTOR_NAME.UM.ReconExclusionList and add entries to that lookup. -
Click Add.
-
In the Code Key and Decode columns, enter the first user ID to exclude.
Note:
The Code Key represents the resource object field name on which the exclusion list is applied during provisioning operations. -
Repeat Steps 3 and 4 for the remaining user IDs to exclude.
For example, if you do not want to provision users with user IDs User001, User002, and User088 then you must populate the lookup definition with the following values:
Code Key Decode User Login Id User001 User Login Id User002 User Login Id User088 You can also perform pattern matching to exclude user accounts. You can specify regular expressions supported by the representation in the
java.util.regex.Patternclass.See Also:
For information about the supported patterns, visithttps://download.oracle.com/javase/6/docs/api/java/util/regex/Pattern.htmlFor example, if you do not want to provision users matching any of the user IDs User001, User002, and User088, then you must populate the lookup definition with the following values:
Code Key Decode User Login Id[PATTERN] User001|User002|User088 If you do not want to provision users whose user IDs start with 00012, then you must populate the lookup definition with the following values:
Code Key Decode User Login Id[PATTERN] 00012* -
Click Save.
14.5 Setting SSL for Connector Server and OIM
To set up the SSL communication between Connector Server and Oracle Identity Manager:
-
Generate a new SSL key (or you can reuse your existing key):
keytool -genkey -alias keyconnserv -keyalg dsa -keystore <yourKeyStore.jks> -storepass <yourPassword> -validity 360
-
Export the newly generated public key:
keytool -export -keystore <yourKeyStore.jks> -storepass <yourPassword> -alias keyconnserv -file icfkey-public.cer
-
Configure your Connector Server for SSL, and start using the new keystore set in Step 1.
-
Import the public key generated in Step 2 (icfkey-public.cer) to OIM keystore.
-
Configure IT Resource such as host, port, and so on. These parameters will be passed on to Connector Server (an extra field of IT Resource).
-
Configure Connector Server, using SSL:
-
Deploy an SSL certificate to the Connector Server's system.
-
Configure your Connector Server to provide SSL sockets.
-
Configure your application to communicate with the Connector Server using SSL.
Refer to the target system's manual for specific notes on configuring connections to identity connector servers. You will indicate to your application that an SSL connection is required when establishing a connection for each SSL-enabled connector server. Additionally, if any of the SSL certificates used by your connector servers are issued by a non-standard certificate authority, your application must be configured to respect the additional authorities. Refer to your manual for notes regarding certificate authorities.
Note:
Java applications may solve the issue of non-standard certificate authorities by expecting the following Java system properties to be passed when launching the application:
-
javax.net.ssl.trustStorePassword
For example:
-Djavax.net.ssl.trustStorePassword=changeit
-
javax.net.ssl.trustStore
For example:
-Djavax.net.ssl.trustStore=/usr/myApp_cacerts
Alternately, the non-standard certificate authorities may be imported to the standard ${JAVA_HOME}/lib/security/cacerts directory.
-
-
-
Import the public key generated in Step 2 to OIM keystore.
If you follow to choose the default Weblogic keystore, perform the following:
keytool -import -trustcacerts -alias icfkey -file icfkey-public.cer -keystore <pathToYouKeystore>
For example default Weblogic keystores are: server/lib/DemoTrust.jks and server/lib/DemoIdentity.jks.
14.5.1 Troubleshooting SSL
The following is an example of exception in connector server logs:
java.net.SocketException: Default SSL context init failed: null
This means that the path to keystore is incorrect. To handle this exception, make sure you provide the following full/absolute path:
For UNIX
./connectorserver.sh /run "-J-Djavax.net.ssl.keyStore=/path/to/mykeystore.jks" "-J-Djavax.net.ssl.keyStorePassword=changeit"
For Windows
./connectorserver.sh /run "-J-Djavax.net.ssl.keyStore=C:\path\to\mykeystore.jks" "-J-Djavax.net.ssl.keyStorePassword=changeit"
You must also ensure the following check points:
-
Check your configuration folder for the setting of connector server configuration to use SSL
-
Restart your WLS after importing public keys from the connector server, if the public key present in OIM keystore
14.6 Adding Target System Attributes
Adding target system attributes includes the following subsections:
-
Section 14.6.1, "Adding Target System Attributes for Provisioning"
-
Section 14.6.2, "Adding Target System Attributes for Target Reconciliation"
-
Section 14.6.3, "Adding Target System Attributes for Trusted Reconciliation"
Note:
If you add an attribute with a Date type field, make sure that you add the[Date] suffix in the Lookup definition code key.
For example, if you add _LAST_PASSWORD_CHANGE_DATE_, when you make changes in the code key for Lookup.CONNECTOR_NAME.UM.ReconAttrMap or Lookup.CONNECTOR_NAME.UM.ProvAttrMap, specify the attribute as:
_LAST_PASSWORD_CHANGE_DATE_[Date]
14.6.1 Adding Target System Attributes for Provisioning
By default, the target system attributes are mapped for provisioning between Oracle Identity Manager and the target system. If required, you can map additional attributes for provisioning by performing these steps.
Note:
In this section, the term "attribute" refers to the identity data fields that store user data.To add a target system attribute for provisioning, follow these steps:
-
Add a new form field. To add a new field to the Process form:
-
Open the Form Designer form. This form is in the Development Tools folder of the Oracle Identity Manager Design Console.
-
Query for the UD_CONNECTOR_NAMECON form.
-
Click Create New Version. The Create a New Version dialog box is displayed.
-
In the Label field, enter the name of the version.
-
Click Save and close the dialog box.
-
From the Current Version box, select the version name that you entered in the Label field in Step 4.
-
On the Additional Columns tab, click Add.
-
Specify the new field name and other values.
-
Click Save.
-
Click Make Version Active to make the new form field visible to the user.
Now, if you go to Oracle Identity Manager and try to provision a new user to Connector, you should see the new form field. Next, you must add the new form field to the Provisioning Mapping Lookup.
-
-
Add the new field to the Provisioning Mapping Lookup. After creating a new form field, you must add that field to the Provisioning Mapping Lookup, as follows:
-
Expand Administration and then double-click Lookup Definition.
-
In the Lookup Definition window, search for CONNECTOR_NAME.
The Design Console returns Lookup.CONNECTOR_NAME.UM.ProvAttrMap.
-
Select the Lookup Definition Table tab, and select Lookup.CONNECTOR_NAME.UM.ProvAttrMap.
The Lookup Code Information tab maps the Oracle Identity Manager form field names and the CONNECTOR_NAME Identity Connector attributes. Where the Code Key column contains the Oracle Identity Manager field labels and the Decode column contains the attribute names supported by the CONNECTOR_NAME identity connector.
-
Add a new record for the new form field. Type the new form field name into the Code Key column and type the CONNECTOR_NAME identity connector attribute name into the Decode column.
-
Click Save.
Now, when you create a new CONNECTOR_NAME user, the connector will get the new attribute as part of the create operation.
At this point, the process task only handles creates. Next, you must change the process task to also handle updates. Instructions are described in the next steps.
-
-
Change the process task to handle updates, as follows:
-
In the Design Console, expand Process Management and then double-click Process definition.
-
Search for and select process CONNECTOR_NAME User.
-
In the Task column, look for an update task that is similar to the one you want to add and select that entry.
-
Click Add.
-
In the Creating New Task dialog, select the General tab and enter a Task Name and a Task Description.
The Task Name is important because it will be the form name field. Be sure to include the event you want the task to handle. For example, if you add the Building field for provisioning, then add the Building Updated task. Now, this update event will be triggered when the Building field is updated.
-
In the Task Properties section, set the following properties as noted:
-Conditional: Enabled
-Required for Completion: Disabled
-Disable Manual Insert: Disabled
-Allow Cancellation while Pending: Enabled
-Allow Multiple Instances: Enabled
You do not have to change any of the remaining properties.
-
Save your changes.
-
To add an Event Handler, select the Integration tab, and then click Add.
-
When the Handler Select dialog box displays, select Adapter as the handler type and then perform the following steps:
Select adapter adpCONNECTOR_NAMECONNECTORUPDATEATTRIBUTEVALUE and click Save.
Map all of the variables that are configured for the event adapter.
In the Adapter Variables section, double-click a variable name to open the Edit Data Mapping For Variable dialog box. Specify the following values for each variable in turn. Be sure to save your changes after each mapping.
Variable Name Map To Qualifier Literal Value itResourceFieldName Literal String UD_CONNECTOR_NAMECON_SERVER processInstanceKey Process Data Process Instance Adapter return value Response Code objectType Literal String User attrName Literal String Enter your new label -
Save and close the Creating New Task dialog.
-
Check the Task column on the Process Definition tab to verify that the new process task is listed. Also verify that the new form field is available and working in Oracle Identity Manager.
-
14.6.2 Adding Target System Attributes for Target Reconciliation
By default, the target system attributes are mapped for reconciliation between Oracle Identity Manager and the target system. If required, you can map additional attributes for target reconciliation as described in this section.
Note:
-
Perform this procedure only if you want to add new target system attributes for reconciliation.
-
In the following steps, a new attribute called BUILDING will be added, its connector attribute name is BUILDING, and the form field name is Building. Names are case-sensitive.
To add a new target system attribute for target reconciliation, follow these steps:
-
In the resource object definition, add a reconciliation field corresponding to the new attribute, as follows:
-
Open the Resource Objects form. This form is in the Resource Management folder.
-
Click Query for Records.
-
On the Resource Objects Table tab, double-click the CONNECTOR_NAME User resource object to open it for editing.
-
On the Object Reconciliation tab, click Add Field to open the Add Reconciliation Field dialog box.
-
Specify a value for the field name that is the name of the new Attribute on your Form.
For example: Building
-
From the Field Type list, select a data type for the field.
For example: String
-
Save the values that you enter, and then close the dialog box.
-
If required, repeat Steps d through g to map more fields.
-
Click Create Reconciliation Profile. This copies changes made to the resource object into the MDS.
-
-
If a corresponding field does not exist in the process form, then add a new column in the process form, as follows:
-
Open the Form Designer form. This form is in the Development tools folder.
-
Query for the UD_CONNECTOR_NAMECON form.
-
Click Create New Version. The Create a New Version dialog box is displayed.
-
In the Label field, enter the name of the version.
-
Click Save and close the dialog box.
-
From the Current Version box, select the version name that you entered in the Label field in Step 3.
-
On the Additional Columns tab, click Add.
-
In the Name field, enter the name of the data field and then enter the other details of the field.
Note: Repeat Steps g and h if you want to add more attributes.
-
Click Save and then click Make Version Active.
-
-
Modify the process definition to include the mapping between the newly added attribute and the corresponding reconciliation field:
-
Open the Process Definition form. This form is in the Process Management folder of the Design Console.
-
Click the Query for Records icon.
-
On the Process Definition Table tab, double-click the CONNECTOR_NAME User process definition.
-
On the Reconciliation Field Mappings tab, click Add Field Map to open the Add Reconciliation Field Mapping dialog box.
-
From the Field Name list, select the name of the resource object that you added in Step 2e.
-
Double-click Process Data Field and select the corresponding process form field from the Lookup dialog box. Then, click OK.
-
Click Save and close the dialog box.
-
If required, repeat Steps c through g to map more fields.
-
-
Go to the reconciliation lookup, Lookup.CONNECTOR_NAME.UM.ReconAttrMap, and add a new record for the new attribute using the following values:
-
Code Key - Name of the reconciliation field
-
Decode - Name of the CONNECTOR_NAME attribute
-
-
In the Design Console, regenerate the reconciliation profile for the Resource Object.
14.6.3 Adding Target System Attributes for Trusted Reconciliation
By default, the attributes for trusted source reconciliation are mapped between Oracle Identity Manager and the target system. If required, you can map additional attributes for trusted reconciliation as described in this section.
Note:
-
Perform this procedure only if you want to add new target system attributes for reconciliation.
-
In the following steps, a new attribute called BUILDING will be added, its connector attribute name is BUILDING, and the form field name is Building. Names are case-sensitive.
To add a new target system attribute for trusted reconciliation, follow these steps:
-
In the resource object definition, add a reconciliation field corresponding to the new attribute, as follows:
-
Open the Resource Objects form. This form is in the Resource Management folder.
-
Click Query for Records.
-
On the Resource Objects Table tab, double-click the CONNECTOR_NAME Trusted User resource object to open it for editing.
-
On the Object Reconciliation tab, click Add Field to open the Add Reconciliation Field dialog box.
-
Specify a value for the field name that is the name of the new Attribute on your Form.
For example: Building
-
From the Field Type list, select a data type for the field.
For example: String
-
Save the values that you enter, and then close the dialog box.
-
If required, repeat Steps d through g to map more fields.
-
Click Create Reconciliation Profile. This copies changes made to the resource object into the MDS.
-
-
If a corresponding field does not exist in the process form, then add a new column in the process form, as follows:
-
Open the Form Designer form. This form is in the Development tools folder.
-
Query for the UD_CONNECTOR_NAMECON form.
-
Click Create New Version. The Create a New Version dialog box is displayed.
-
In the Label field, enter the name of the version.
-
Click Save and close the dialog box.
-
From the Current Version box, select the version name that you entered in the Label field in Step 3.
-
On the Additional Columns tab, click Add.
-
In the Name field, enter the name of the data field and then enter the other details of the field.
Note: Repeat Steps g and h if you want to add more attributes.
-
Click Save and then click Make Version Active.
-
-
Modify the process definition to include the mapping between the newly added attribute and the corresponding reconciliation field:
-
Open the Process Definition form. This form is in the Process Management folder of the Design Console.
-
Click the Query for Records icon.
-
On the Process Definition Table tab, double-click the CONNECTOR_NAME Trusted User process definition.
-
On the Reconciliation Field Mappings tab, click Add Field Map to open the Add Reconciliation Field Mapping dialog box.
-
From the Field Name list, select the name of the resource object that you added in Step 2e.
-
Double-click Process Data Field and select the corresponding process form field from the Lookup dialog box. Then, click OK.
-
Click Save and close the dialog box.
-
If required, repeat Steps c through g to map more fields.
-
-
Go to the reconciliation lookup, Lookup.CONNECTOR_NAME.UM.ReconAttrMap.Trusted, and add a new record for the new attribute using the following values:
-
Code Key - Name of the reconciliation field
-
Decode - Name of the CONNECTOR_NAME attribute
-