9 Managing Requests
In Oracle Identity Manager, various operations, such as adding a role to self or provisioning an application instance, is performed through requests. A request is an entity created by the users or administrators performing a specific action that requires a discretionary permission to be gained by someone or some process before the action can be performed. For example, a user can create a request to gain access to a laptop computer, and a manager can create an open requisition based on the request.
A request has a requester, a beneficiary (optional), and a target entity. A requester is an entity that creates or raises a request. A requester can be a user or the system itself. The functional component decides on the requester for system-generated requests. An example of a system-generated request is a request created by the system based on access policy. Here, the functional component is access policy. For unauthenticated requests, the requester is not authenticated to Oracle Identity Manager and is therefore, not present in the system.
A beneficiary is an entity that benefits from the action performed after the request is completed and the request is completed only if it is executed successfully.
In Oracle Identity Manager, terms such as role, application instance, and entitlements are defined as entities. Each one of these entities maintains a list of attributes belonging to this entity. Each entity also defines a list of operations that it supports.
Target entity is the resource or entity that is requested for the beneficiary.
For instance, you create a request to provision a UNIX account for the user John Doe. Here, you are the requester, John Doe is the beneficiary, and the UNIX account is the target entity that is requested for John Doe.
As discussed earlier in this guide, Oracle Identity Manager supports requesting for entities such as roles, application instances, and entitlements. You can request for these entities by using a request catalog.
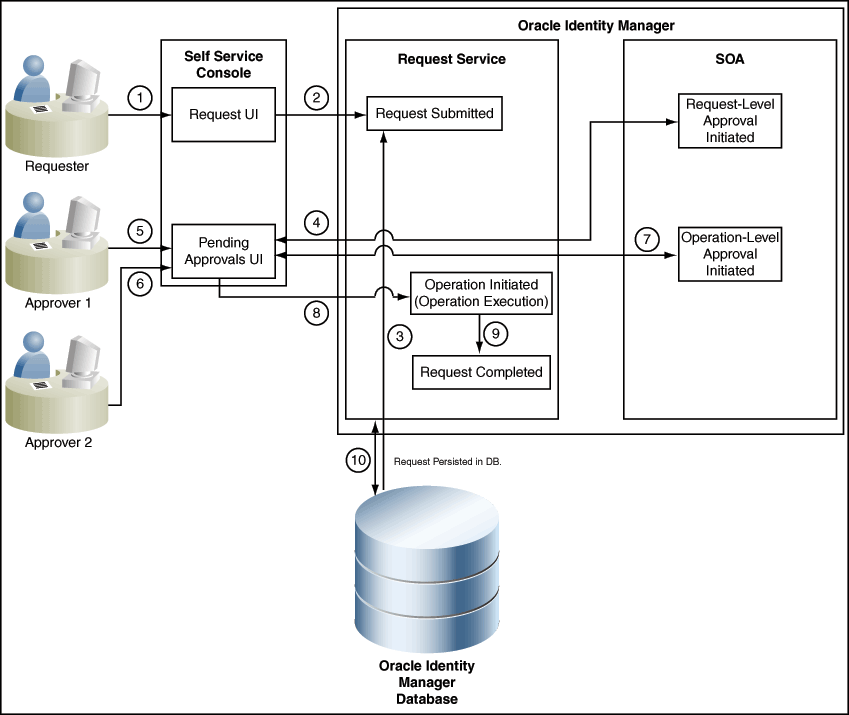
Each request goes through a specific lifecycle after it is created in the system. This lifecycle is managed and controlled by the Request Service. The lifecycle transitions the request through various stages. The stage that a request is in determines what action the controller takes in that step, what operations are available on the request, and what possible stage the transitions are in at that time. Figure 9-1 outlines the process flow of a request:
The request process flow is described with the help of an example of provisioning a laptop computer to a user through a request. The steps are:
-
The requester raises a request to assign a laptop computer to a user by using the Request UI.
Note:
Requests can be raised by using Oracle Identity Self Service.
-
The request is submitted to the request service.
-
The request is also stored in Oracle Identity Manager database.
-
Request-Level Approval workflow is initiated by request service in Service-Oriented Architecture (SOA). Based on the workflow configuration, associated tasks are assigned to the corresponding approvers.
See Also:
"Developing Workflows for Approval and Manual Provisioning" for information about approval workflows in the Oracle Fusion Middleware Developer's Guide for Oracle Identity Manager
-
The request-level approver approves the request by using the Inbox in Identity Self Service. In this example, the requester's manager (Approver 1) is the request-level approver who decides whether to assign a laptop to user 1. If the request-level approver rejects the request, the request goes to a Rejected stage.
Note:
When a user requests for an item, Oracle Identity Manager checks if the requester can view the catalog items, but does not check if the items can be granted to the beneficiary. When the request is approved, then Oracle Identity Manager checks if the requested access can be granted to the beneficiary.
-
If the Approver1 has designated his role to Approver 2, then Approver 2 is the request-level approver who decides whether to assign a laptop to user 1. If Approver 2 rejects the request, the request goes to a Rejected stage.
-
The operation-level approver approves the request by using the Inbox. In this example, the IT admin for the organization is the operation-level approver (Approver 2) who is responsible for issuing a laptop to the user. If the operation-level approver rejects the request, then the request goes to a Rejected stage.
Note:
Operation-level request is not initiated if the request is rejected at the request level.
-
The request operation is initiated in the request service, and the request is executed.
-
The request operation is completed. At this stage, the request operation has the Completed status.
-
The request status is updated in Oracle Identity Manager database.
This chapter describes request management in the following sections:
9.1 Request Stages
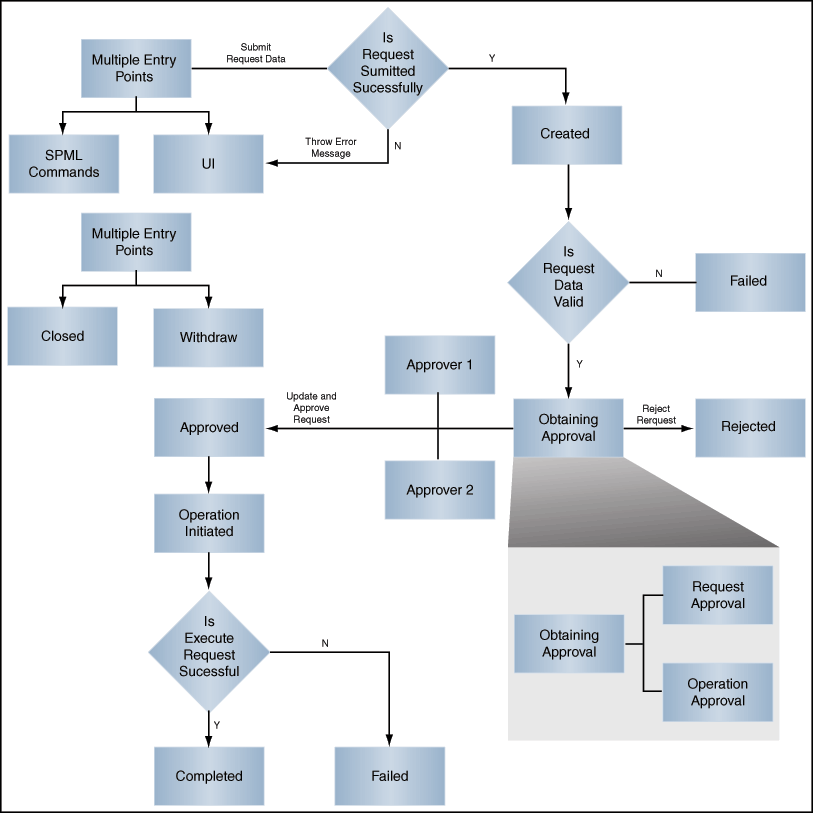
Each request goes through a specific lifecycle after it is created in the system. This lifecycle is managed and controlled by the request service. The lifecycle transits the request through various stages. The stage a request is in determines what action the controller takes in that step, what operations are available on the request at that time, and what the possible stage transitions are. Figure 9-2 outlines the lifecycle flow of a request in the request service:
Note:
If a request is not submitted successfully, then the error messages are displayed in the UI. For SPML-initiated requests, the error messages are thrown to SPML.
Figure 9-2 shows all the stages that a request can go through. This diagram specifies stages for a simple request. For information about bulk request, refer to Figure 9-3, "Bulk Request and Child Request Stages".
Each stage represents the logical next step in the request lifecycle. Only the successful execution of an operation can take the request from one stage to the next.
Table 9-1 describes how a request functions at various stages through its life cycle and how a request attains these stages:
| Request Stage | Description |
|---|---|
|
Request Created |
After successful submission of the request, the request moves to the Request Created stage. |
|
Obtaining Approval |
After the request is created, the request engine moves the request to "Obtaining Approval" stage automatically if there are approvals defined for this request. At this stage, the corresponding approvals are initiated through the request service. Upon completion of the same, the request engine looks at the model defined for this request to find out the approval selection methodology to find out the exact approval process to instantiate. When the request engine finds out the approvals that are required to be initiated, it again calls request service to instantiate the workflow. If a request is withdrawn or closed at this stage, then the request engine calls cancel workflow on each workflow instance. Notifications are sent to approvers about the withdrawn tasks. For request notification level 2, notifications are sent for request creation and change of status to any of the Request End statuses. Request End statuses include Request Failed and other failure related statuses, Request Completed, Request Withdrawn, and Request Closed. Note: Configuration of notification can be done in the human task of a SOA composite. The following request statuses are associated with Obtaining Approval stage:
For information about these request statuses, refer "Bulk Requests and Child Requests". After the request successfully completes these statuses, it will attain the Request Approved stage. If an SoD validation check is plugged-in after the request has been successfully created, the request is associated with the following statuses.
Note: These SoD request statuses are possible in case the request is any of the following request types:
|
|
Approved |
Only after an Operation Approval is approved, the request is moved to the next stage and the request engine is updated with the current status. The outcome that the request engine finds is Approved, Rejected, or Pending. The following request statuses are associated with this stage:
|
|
Rejected |
Each time a workflow instance is updated, request service updates the request engine with the current status of that instance. The outcome that the request engine expects from request service is Approved or Rejected. If any of the workflow instances that are instantiated are rejected, then request engine moves the request to Rejected stage. If any workflow instance is rejected, then the controller calls cancel on all the pending workflows and moves the request to Rejected stage. The following request statuses are associated with this stage:
|
|
Operation Initiated |
After the request is approved, the request engine moves the request to the Operation Initiated stage and initiates the operation. The following request statuses are associated with this stage:
Note: In case of a bulk operation, child requests are created after request level approval, and the parent request moves to the "Request Awaiting Child Requests Completion" status. |
|
Request Failed |
When the associated operations specified in the request fails to execute, the request cancels any pending operations and moves the request to the Request Failed stage. The following request statuses are associated with this stage:
|
|
Withdrawn |
A request can be withdrawn by the requester. At this stage, the request is associated to the Request Withdrawn status, and the initiation of all approvals are canceled. Note:
|
|
Completed |
After the execution of all operations specified in the request are completed, the request engine moves the request to the Request Completed stage. The following request statuses are associated with this stage:
|
The successful attainment of a stage also results in the status of the request being updated to the corresponding status.
Operations can be executed manually or automatically by the system in response to an event. Examples of manual operations are:
-
Submit request
-
Close/cancel (withdraw) request
-
Approve request when the service is notified that the approval workflow is successfully approved
Examples of automatic operations are:
-
Start approvals when the request is submitted
-
Execute request when the request is approved and execution date is in the future or not specified
9.2 Bulk Requests and Child Requests
A bulk request is a request with multiple beneficiaries, multiple entities, or both. For example, a request to assign multiple roles to user John Doe generates a bulk request. Provisioning requests to provision a resource, such as AD User, to users John Doe and Jane Doe also generates a bulk request. A bulk request has two parts:
-
Parent requests: A request submitted with multiple beneficiaries, multiple target entities, or both is a parent request
-
Child requests: When the request level approval happens for a parent request, multiple child requests are created. The parent request is divided into multiple child requests containing one beneficiary and one target entity.
The entity data in bulk requests must be same for different beneficiaries specified in the request. For example, for a 'provision application instance' type of request, if multiple beneficiaries are selected, then the form field that is marked as 'Bulk-update' will only be shown and that value is common for all beneficiaries.
The number of child requests generated depends on the number of target entities associated with each beneficiary. For each beneficiary, one of its associated target entities is used to generate for each child request. A child request contains only one beneficiary and one target entity.
For a request with no beneficiaries, each child request is spawned for each target entity. Consider the following example:
For a modify-user bulk request that modifies the attributes of two users, two child requests are created (one for each user).
Consider another example. For a "provision application instance" type of request, there are two beneficiaries. Two application instances are to be provisioned for each beneficiary. In this scenario, there are two child requests for the first beneficiary and two child requests for the second beneficiary. Each application instance and its associated beneficiary are present in each child request. Therefore, for this bulk request, there are a total of one parent request and four child requests.
Request-level approval is performed as a part of parent request. After the parent request spawns child requests, the parent request goes to the Request Awaiting Child Requests Completion stage, where in the request awaits for the child requests to complete the operation-level approval. After all the child requests complete, the parent request moves to the Completed stage.
Operation-level approval is performed for child requests only. Approvers can approve or reject child requests individually. If all the child requests are approved or rejected, then the parent request attains the Completed stage. If one or more (but not all) of the child requests fail, then the parent request attains the Request Partially Failed stage. If all the child requests fail, the parent request attains the Failed stage.
Figure 9-3 outlines the lifecycle flow of a request in the request service:
Figure 9-3 Bulk Request and Child Request Stages
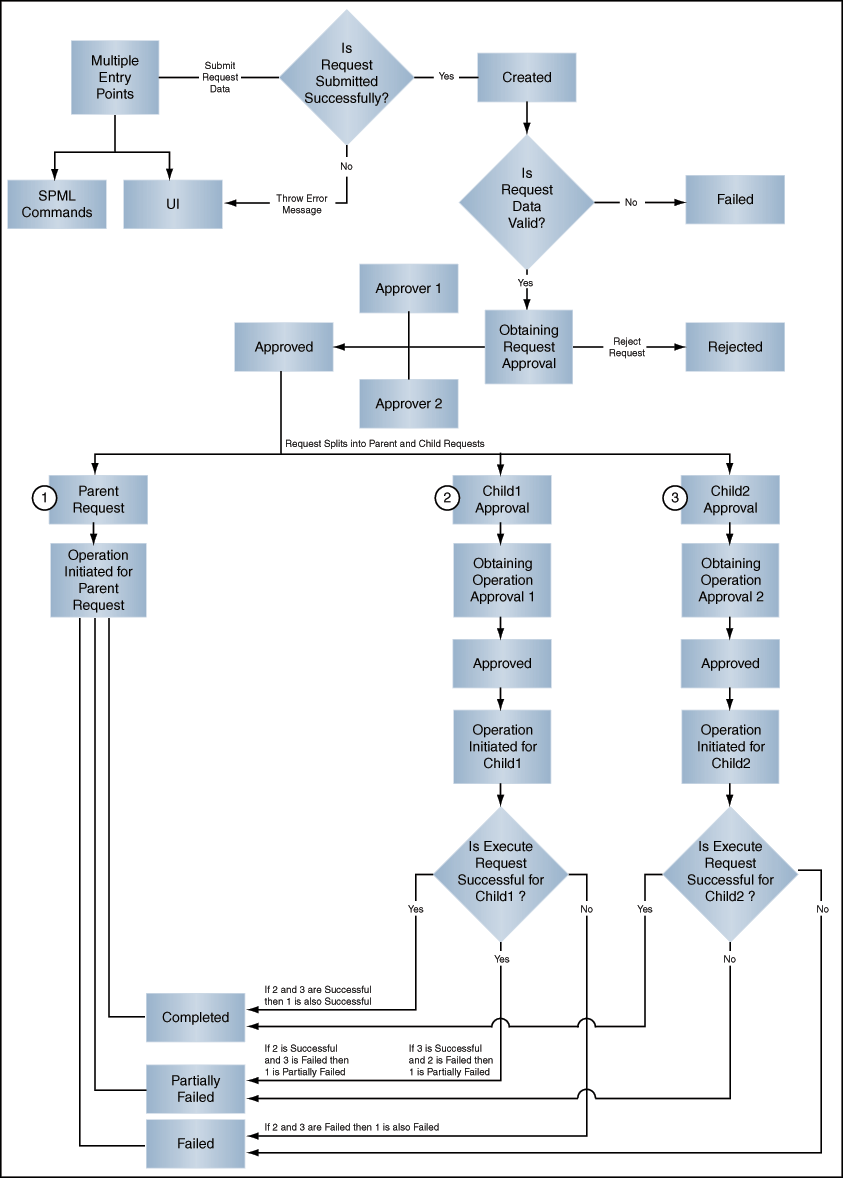
Description of "Figure 9-3 Bulk Request and Child Request Stages"
See Also:
Table 9-1, "Request Stages" for information about request stages
9.3 Heterogeneous Requests
Heterogeneous request is a request created for entities of different types. Oracle Identity Manager supports requesting roles, application instances, and entitlements in a single request, which is heterogeneous in nature.
The following request types are supported in a heterogeneous request:
-
Provision Application Instance
-
Assign Role
-
Provision Entitlement
For a request that is submitted for different entities, the request type is set as "Heterogeneous request". For example, if you submit a single request for two separate entities such as roles and entitlements, then the request type is "Heterogeneous request".
For a request that is submitted for multiple entities of same type, the request type is set according to the entity selected. For example, if you submit a request for multiple roles, then the request type is "Assign Roles".
9.4 Request vs. Direct Operation
Users in Oracle Identity Manager can perform various operations in the application. Any operation that you can perform in Oracle Identity Manager is controlled by the authorization policies that have been defined. The admin roles granted to a user in an organization determine whether an operation that a user can perform in Oracle Identity Manager happens directly or through a request. For example, if you are a user administrator, then all operations such as create user, modify user, grant account, enable user account, and so on are direct operations. Similarly, if you have been assigned the User Viewer admin role, then operations such as create user, enable user, delete user, grant role, revoke entitlements, and so on result in a request being created. For more information about admin roles in Oracle Identity Manager, the corresponding permissions allowed to users of that admin role and whether the operation is direct or results in a request, see the "Security Architecture" chapter in Oracle Fusion Middleware Developer's Guide for Oracle Identity Manager.
Whether an operation results in a request or is performed directly depends on:
-
The admin roles granted to the user who is performing the operation. Based on the admin roles granted to the user, an authorization check is performed to determine whether the operation results in a request or direct operation.
-
Whether it is a bulk operation or single operation. Irrespective of the admin roles granted to the user, a bulk operation always results in a request.
-
Whether a value has been provided in the Effective Date field. If a value is specified in the Effective Date field, the operation results in a request, irrespective of single or bulk operation.
For a single operation without effective date:
-
If you are performing an operation on yourself, then it results in a request.
-
If you are performing an operation on others and you are an authorizer, then the operation is direct.
-
All operations in Oracle Identity Manager do not go through the authorization check to determine if it is a direct operation or a request. Determining whether an operation is a request or not will be done only for requestable operations. See the tables in "Request Categories" for information about default requestable operations.
The check for direct operation or request is applicable to an operation only if it has a corresponding request model. As a result, this authorization check is performed for creating a user, but not for creating an organization because there is no request model for creating an organization. Similarly, locking and unlocking user accounts are also operations that do not go through the authorization check to determine request or direct operation. Therefore, these operations are direct.
Note that creation of a request does not always mean that the SOA workflow is invoked and manual approval is obtained. There are scenarios in which a request is created, but approval is not required. Consider the following sample scenarios:
Scenario 1:
A request is created when the operation is bulk, but at the operational level, if the requester is determined to be the admin of the entity, then it is considered auto-approved.
Scenario 2:
If an SoD check is enabled, then the approval workflow has to be initiated always. This is because SoD check happens in the approval workflow only.
End users can submit request for entities such as application instances, entitlements, and roles published to home organization for self or others in the same organization. To submit requests for users in other organizations, you must be granted the User Viewer admin role (in each of the organizations to which the users belong), and the corresponding Application Instance Viewer, Entitlement Viewer, or Role Viewer roles.
9.5 Request Categories
There are two categories of request in Oracle Identity Manager:
-
Catalog-based requests: This type of request focuses on granting access to users by using the access request catalog. A catalog-based request is a request created for entities such as roles, application instances, and entitlements. The following are the types of catalog-based requests:
-
Role request: This is a request for enterprise role, which in turn has one or more access policies associated with it.
-
Application instance request: This is a request for accounts in target applications. An application instance represents an account in a target application, typically known as an IT resource instance in Oracle Identity Manager. Requesting for and provisioning an application instance means that an account has been created for you in the target application.
-
Entitlement request: This is a request for additional access in target applications. For example, for an E-Business Suite account, you can request for entitlements such as CRM administrator or payroll supervisor. When a user requests for entitlements, the entitlements are appended to the primary account. See "Requesting for an Account" for information about primary and non-primary accounts.
By default, the catalog is categorized by the type of entity. You can modify catalog items and specify your own category. See "Using the Access Request Catalog" for more information on viewing and modifying catalog items.
You create catalog-based requests by adding request items to a request cart. The request cart can contain items of the same or different entity types.
After you add the request items to the cart, you proceed to checkout where you select the target users and then submit the request. The users that you can select (in other words, beneficiaries of the request) depends on the User Viewer admin role that you have across organizations.
Some application instances have forms associated with them for which you have to provide additional information. You cannot submit such application instance requests without completing the form.
Oracle Identity Manager provides a set of predefined request types. Table 9-2 lists the operations and request types that Oracle Identity Manager supports by default for catalog-based requests.
-
-
Non-catalog-based requests: This type of request is created without using the request catalog. Examples of non-catalog-based requests include self registration, create user, modify user, modify account, revoke account, enable or disable an account, enable or disable users, and bulk modification of users.
Oracle Identity Manager provides a set of predefined request types. Table 9-3 lists the operations and request models that Oracle Identity Manager supports by default for non-catalog-based requests.
Table 9-3 Default Operations and Request Types for Non-Catalog-Based Requests
Category Request Type Bulk Beneficiary User Management
Create User
N
N
Self-Register User
N
N
Modify User Profile
Y
N
Enable User
Y
N
Disable User
Y
N
Delete User
Y
N
Provisioning
Modify Account
Y
Y
Enable Account
Y
Y
Disable Account
Y
Y
Revoke Account
Y
Y
Role Management
Create Role
N
N
Delete Role
Y
N
Modify Role
Y
N
Assign Roles
Y
Y
Remove from Roles
Y
Y
Note:
The following request types are deprecated in the current release:
-
Request types related to "Self"
-
Request types related to "Resource"
No new requests can be created based on these deprecated request types.
-
9.6 Common Reasons for Request Failure
When the associated operations specified in a request fail to execute, the request cancels any pending operations and moves the request to the Request Failed stage. Clicking the Request Failed hyperlink displays the reason for request failure.
A request can fail for any one of the following reasons:
-
If you are requesting a role, then your request can fail due to an SoD violation.
-
If you are requesting an application instance and that application instance depends on another application instance, then the request moves to 'Request Approved Fulfillment Pending' status because the parent application instance is not provisioned. For example, to successfully provision a user to a Microsoft Exchange account, the user must have a Microsoft Active Directory account in the domain controller that is managing the users of the Exchange server.
-
When you request for an entitlement, the entitlement is provisioned to the primary account. Therefore, if you are requesting an entitlement, but you do not have a primary account provisioned to you, the entitlement request fails.
In addition to the preceding reasons, failures can occur because of incorrect password, password policy violation, target system being unavailable, and so on.
9.7 Request Profiles
When you select catalog items for requesting, the items are added to a request cart. The request cart is similar to the shopping cart in Web sites that sell products to customers. You can view the selected items in the cart, or edit the request cart to add or remove items.
Request profiles are request carts that are saved for future reuse by the users. The request cart is saved by the catalog administrator or system administrator so that the user can use it to request for entities without searching through thousands of catalog items.
Note:
When a user creates a request through request profile, the items are filtered based on authorization policies. This means that the items for which the user does not have the required privileges to request, are automatically removed from the cart. If the user is not authorized to request any item in the profile, then the cart items will be empty.
This section discusses the following topics:
Note:
Creating, modifying, or deleting a request profile can be performed only by catalog administrators or system administrators.
9.7.1 Creating a Request Profile
To create a request profile:
-
In the Catalog page, select one or more catalog items, and click Add to Cart. The catalog items are added to the request cart.
-
Click Checkout. The Cart Details page is displayed. The select catalog items are displayed in the Cart Items section.
-
Click Save As Profile. The Request Cart dialog box is displayed with the catalog items in the request profile.
-
In the Save Profile Name field, enter a name for the request profile.
-
In the Description field, enter a description of the request profile.
-
Click Save. The request profile is created.
9.7.2 Modifying a Request Profile
To modify a request profile:
-
In the Request Profiles section of the Catalog page, click the request profile that you want to modify. The Cart details page is displayed.
-
In the Cart Items section, select a cart item to display the details of the item.
-
In the Details section, modify the request details, if required. To do so, set or modify values in the Details section, and then click Ready to Submit.
-
If you want to add more items to the cart, then:
-
Click Back to Catalog.
-
On the Catalog page, search for and select items to be added to the cart, and the click Add to Cart.
-
-
Click Checkout. The Cart Details page is displayed.
-
Click Save As Profile. The Save as Profile dialog box is displayed.
-
In the Save Profile Name field, enter the name for the request profile that is being modified. If you enter a new name, then a new request profile is created. If you enter the name of an existing request profile, then that request profile is updated with the latest changes.
-
In the Description field, enter a description of the request profile.
-
Click Save. Depending on whether you have entered the name of an existing request profile or new name, the request profile is created or updated, respectively.
Note:
Values that you add or specify for Target Users, Justification, or Effective Date will not saved in a request profile.
9.8 Creating Requests
This section describes how to create requests in the following topics:
9.8.1 Creating a Request to Register Yourself in Oracle Identity Manager
Using the login page of Identity Self Service, you can create a request to register yourself in Oracle Identity Manager. This is called a self-registration request and can be raised by users not present in Oracle Identity Manager (anonymous users). To create a self-registration request, see "Submitting Registration Requests". After submitting the self-registration request, you can track it by navigating to the login page, and clicking Track My Registration.
9.8.2 Creating a Request By Using the Request Catalog
Note:
The procedure discussed in this section is applicable for requesting roles, entitlements, and application instances.
In Identity Self Service, you can create requests from various pages, such as the Home page, My Access page, and the entity detail pages for users and roles. Irrespective of the page or tab from where you are creating the request, you go through the request catalog to create requests.
To create a request by using the request catalog:
-
Log in to Identity Self Service.
-
Under Requests, click Catalog. The Catalog page is displayed.
-
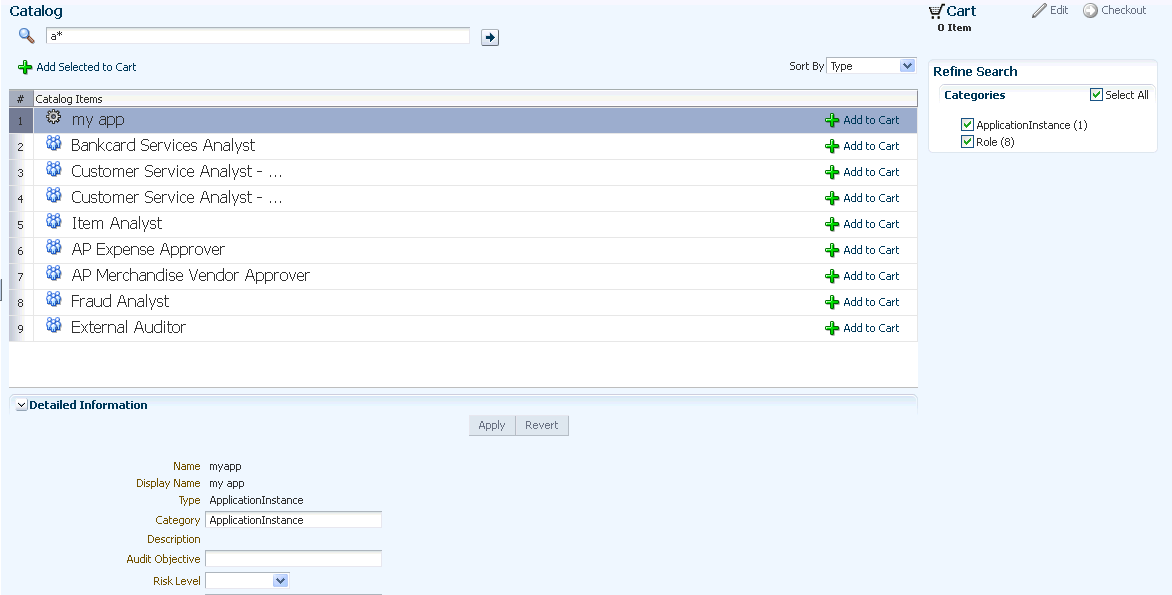
Search for the item that you want to request. To do so, enter a keyword in the search field, and click the search icon on the right. The search results are displayed. The catalog items that match the search condition are listed in the Catalog Items section, as shown in Figure 9-4:
-
In the Refine Search section, select one or more categories to display the catalog items of those categories. You can click Select All to display or hide all the items belonging to the categories.
-
Select a catalog item that you want to request. The summary information of the item is displayed below the Catalog Items section.
You can also select multiple items by pressing Ctrl and clicking the items.
-
Click Add Selected to Cart.
The selected items are added to the request cart.
-
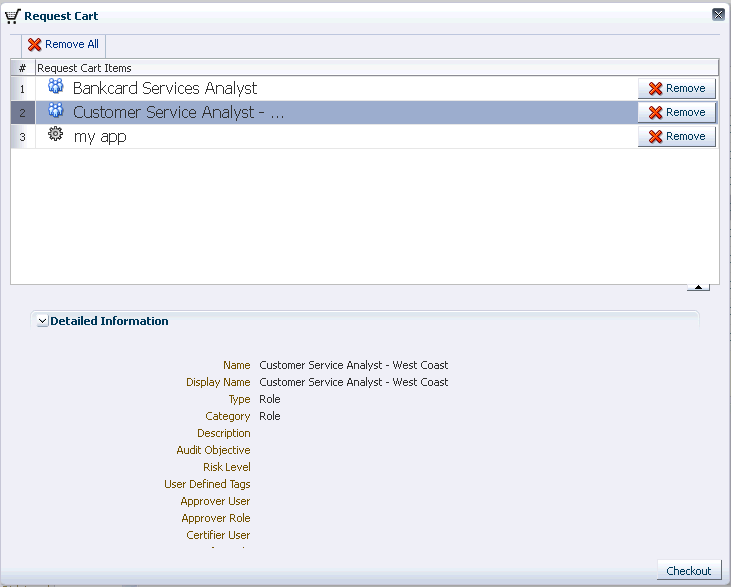
Optionally, click Edit to view the catalog items added to the cart. The Request Cart dialog box is displayed with a list of catalog items in the cart, as shown in Figure 9-5:
-
If required, select a catalog item to display detailed information about the item. Review the details, and if required, you can remove the item from the cart by clicking Remove for the corresponding item.
Alternatively, click Remove All to delete all items from the cart.
-
Click Checkout. Alternatively, you can click Checkout on the Catalog page.
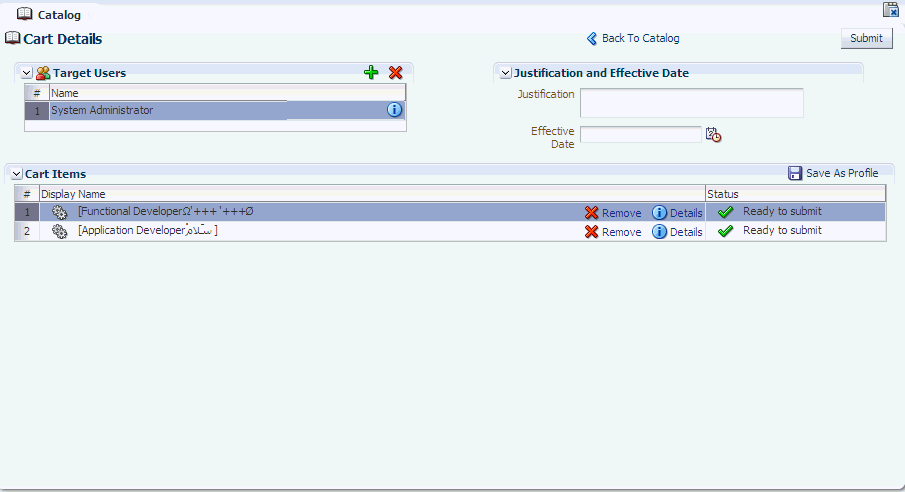
The Cart Details page is displayed, as shown in Figure 9-6:
-
The Target Users section displays the usernames of beneficiaries for the request. You can click user details icon for a user to view the details of the user.
-
To add beneficiaries to the request:
-
Click the green plus symbol. The Advanced Search for Target Users dialog box is displayed.
-
Search and select one or more users that you want to add.
-
Click Add Selected to add the selected users to the Selected Users list. Alternatively, click Add All to add all the users in the Selected Users list.
-
Click Add. The selected users or beneficiaries are added to the Target Users section of the Request Cart Details page.
You can also select a user that you want to remove from the list of beneficiaries, and click Remove.
-
-
If required, in the Justification and Effective Date section, in the respective fields, specify a justification and effective date when the request will be active.
-
In the Cart Items section, if required, select a cart item and click Details to display the details of the item.
-
After reviewing and modifying the details or each item in the cart, click Submit.
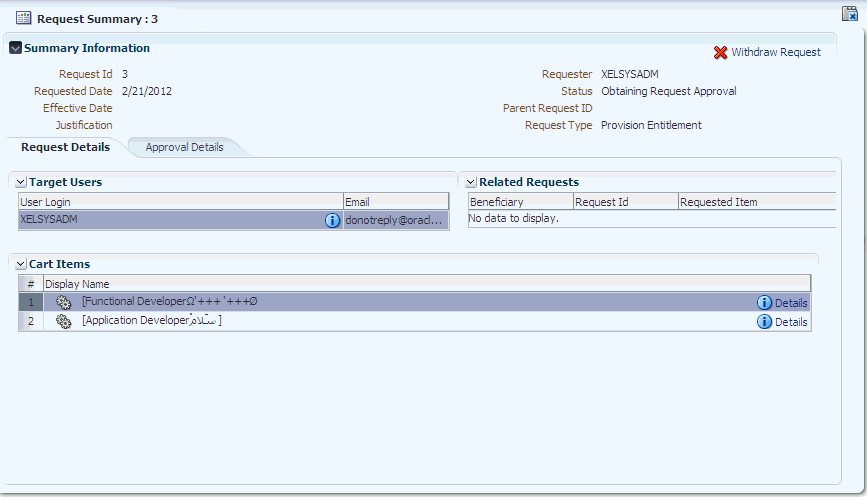
The request is submitted for approval, and the Request Summary page is displayed with summary information, target user or beneficiary information, and request and approval details. Figure 9-7 shows the Request Summary page:
Note:
In the Request Summary page, if you want to withdraw the request, then click Withdraw Request, and click Yes to confirm. To withdraw requests from other pages in Identity Self Service, see "Withdrawing a Request".
9.8.3 Creating a Request By Using a Request Profile
To create a request by using the request profile:
-
In Identity Self Service, under Requests, click Catalog. The Catalog page is displayed with the request profiles created for you.
-
Click the request profile name that you want to use to create the request. The Cart Details page is displayed.
-
The Target Users section displays the usernames of beneficiaries for the request. You can click information icon against each user to view the details.
-
To add beneficiaries to the request:
-
Click the Add icon. The Advanced Search for Target Users dialog box is displayed.
-
Search and select one or more users that you want to add.
-
Click Add Selected to add the selected users to the Selected Users list. Alternatively, click Add All to add all the users in the Selected Users list.
-
Click Add. The selected users or beneficiaries are added to the Users section of the Request Cart Details page.
You can also select a user that you want to remove from the list of beneficiaries, and click the Remove icon.
-
-
If required, in the Justification and Effective Date section, in the respective fields, specify a justification and effective date when the request will be active.
-
In the Cart Items section, select a cart item to display the details of the item.
-
After reviewing and modifying the details or each request in the cart, click Submit.
The request is submitted for approval, and the Request Summary page is displayed with summary information, target user or beneficiary information, and request and approval details.
9.9 Tracking a Request
To track a request:
-
In Identity Self Service, under Requests, click Track Requests. The Track Requests page is displayed.
-
Search for the requests you want to track. To do so:
-
Select any one of the following:
-
All: On selecting this option, the search is performed with the AND condition. This means that the search operation returns requests that match all the search criteria that is specified.
-
Any: On selecting this option, the search is performed with the OR condition. This means that the search operation returns requests that match the search criterion that is specified.
-
-
In the searchable request attribute fields, such as Request ID, specify a value. You can include wildcard characters (*) in the attribute value.
For some attributes, select the attribute value from the lookup. For example, to search all requests with the Obtaining Operation Approval status, from the Status list, select the Equals search operator, and the select Obtaining Operation Approval from the adjacent list.
-
For each attribute value that you specify, select a search operator from the list. For example, the following search operators are available for Request ID:
-
Starts with
-
Ends with
-
Equals
-
Does not equal
-
Contains
-
Does not contain
For other fields, for example Status or Request Type, only Equals and Does not equal operators are available.
For fields of date type, the search operators are:
-
Equals
-
Does not equal
-
Before
-
After
-
On or before
-
On or after
-
-
To add a searchable request attribute to the Track Requests page, click Add Fields, and select the attribute from the list of attributes.
For example, if you want to track all requests by a requester, then you can add the Requester attribute as a searchable field and specify a search condition.
-
Optionally, click Reset to reset the search conditions that you specified. Typically, you perform this step to remove the specified search conditions and specify a new search condition.
-
Click Search. The search results is displayed in a tabular format.
-
-
If the request search you performed displays a large number of records, then you can filter the request search result. To do so:
-
From the Show list, select any of the following:
-
Requests Raised By Me: This is selected by default. Returns requests created by logged-in user.
-
Requests Raised For Me: Returns requests where login user exists as beneficiary or target user.
-
For Reportee: This option is available if the logged-in user is a manager of a user.
-
For User: This option is available if the logged-in user has been granted the User Administrator or the HelpDesk admin role.
-
All: Returns all requests in the search result. This option is available if the logged-in user has been granted the System Administrator role.
-
-
To sort the requests in the search result by any of the columns such as Request ID or Status, click the Sort Ascending or Sort Descending arrows in the column. The requests in the search result are sorted by the selected column.
-
-
In the request search result, click a request to view the details of the request. The details of the request is shown in a page with the following information:
-
Summary information: This section shows general request details, such as request ID, request status, and effective date.
-
Target Users: This section lists the beneficiaries or target users for the request.
-
Related Requests: This section lists requests that are related to the open request, if any.
-
Request Details: This tab lists the requested catalog items. You can select an item to display a summary information of the item.
-
Approval Details: This tab displays the status of request approval by each approver to whom the request has been assigned.
-
9.10 Withdrawing a Request
A request can be withdrawn by the requester and only the requests that have not started the execution phase can be withdrawn. Also, beneficiaries cannot withdraw requests. Requests having the following stages can be withdrawn:
-
Obtaining Approval
-
Approved
Note:
Approved requests cannot be closed unless the request has the Request Awaiting Completion status.
To withdraw a request:
-
In Identity Self Service, under Requests, click Track Requests. The Track Requests page is displayed.
-
Search for the requests that you want to withdraw. The search results display a list of requests that match your search criteria with a Withdraw Request button for each request.
-
For a request that you want to withdraw, click Withdraw Request. Alternatively, you can open the details of a request by clicking the request ID, and subsequently clicking Withdraw Request on the request details page.
-
Click Yes in the confirmation message box. The request is withdrawn and a notification is sent to the beneficiary and requester of the request. If the withdrawal is successful, then request moves to the Request Withdrawn stage. Any pending approval tasks associated with the request are canceled.
Note:
-
Configuration of notification can be done in the human task of a SOA composite.
-
For more information about request-related tasks, such as approving a request, reassigning a task, and rejecting a task, see "Managing Tasks".
-
9.11 Closing a Request
Administrators can prematurely close any request that has not started the execution phase. This includes all requests waiting for approvals or has completed approvals but no operation has been started. Requests with the following state can be closed:
-
Obtaining Approval
-
Approved
Note:
-
Approved requests cannot be closed unless the request has the Request Awaiting Completion status.
-
If a request is closed while the request is in the Obtaining Approval stage, then all the approvals that are still pending in the approver task list are removed.
To close a request:
-
In Identity Self Service, under Requests, click Track Requests. The Track Request page is displayed.
-
Search for the requests that you want to close. The requests that match the search condition are displayed in a tabular format.
-
Select the request that you want to close.
-
From the Actions menu, select Close Request. Alternatively, you can click the Close Request icon on the toolbar.
-
Click Yes in the confirmation message box. The request is closed and a notification is sent to the requestor and target user of this request. When a request is closed successfully, the request moves to the Request Closed stage.
Note:
-
Configuration of notification can be done in the human task of a SOA composite.
-
For more information about request-related tasks, such as approving a request, reassigning a task, and rejecting a task, see "Managing Tasks".
-
