| Oracle® Communications Service Broker System Administrator's Guide Release 6.1 Part Number E29444-01 |
|
|
PDF · Mobi · ePub |
| Oracle® Communications Service Broker System Administrator's Guide Release 6.1 Part Number E29444-01 |
|
|
PDF · Mobi · ePub |
This chapter describes how to use Simple Network Management Protocol (SNMP) to monitor Service Broker.
You can monitor Service Broker remotely using the Simple Network Management Protocol (SNMP). The Service Broker supports SNMP Version 1 (SNMPv1), SNMP Version 2 (SNMPv2c), and SNMP Version 3 (SNMPv3).
SNMP management is based on the agent/manager model. The agent resides on the managed resource and provides information to one or more remote managers. In a Service Broker domain monitored by SNMP, an agent runs on each Signaling Server and Processing Server.
An SNMP agent provides information to managers by responding to queries or by sending unsolicited notifications (traps). SNMP queries can retrieve information on Service Broker activities, such as the number of SIP transactions processed and the length of time a module has been running.
The SNMP agent generates a trap when it detects certain predefined events or system conditions. For example, the Service Broker agent can send a trap when the server starts up or when an application error occurs. The agent sends traps to any SNMP manager that you specify as a trap destinations.
By default, the Service Broker SNMP agent sends notifications as SNMPv2c traps. It can also send traps in the format of SNMPv1 or SNMPv3 traps. Trap-forwarding groups enable you to send traps in different format, so that different trap destinations can receive traps in the version it supports.
The Service Broker domain allows you to individually configure SNMP settings for each Processing or Signaling Server in your deployment, as described in the following sections.
Service Broker SNMP messages are based on JMX notifications. Any JMX notification that is generated by the managed servers can be mapped to an SNMP trap. As long as the notification type is known it can be mapped.
A management information base (MIB) module defines the properties of the system that can be monitored by SNMP. When imported into MIB browsers or management systems, the MIB allows for automated discovery of the properties (or managed objects) that can be monitored.
You are required to create your own Service Broker and Axia MIBs. For backward compatibility, legacy MIBs are included in the Oracle Communications Service Broker Media Pack.
The Service Broker MIB modules are:
ocsb.mib: Defines managed objects associated with Service Broker runtime and management components.
axia.mib: Defines managed objects associated with the underlying Axia platform.
Note:
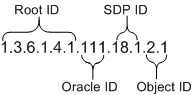
Service Broker MIB objects are read-only. You cannot modify a Service Broker configuration using SNMP.Each managed object defined in a MIB has a unique object identifier (OID). An OID consists of a series of dot-delimited numbers. Figure 16-1 shows the elements of an OID.
The example shows the four parts of the full object identifier. The parts first specify the Root ID which is 1.3.6.1.4.1. Next is the Oracle ID, which is 1.1.1. The SDP ID is 18.1. The final part is the Object identifier, which in this example is 2.1.
All OIDs for Service Broker objects have the same root ID (1.3.6.1.4.1) and Oracle enterprise ID (111). The remaining parts of the OID identify the product group (Service Delivery Platform (SDP) in this case) and the object ID, which may be qualified by an object group.
For example, the OID for the object group relating to statistics on SIP activity is:
sipNetworkChannelStatistics: 1.3.6.1.4.1.111.18.1.5
A managed object within the sipNetworkChannelStatistics group that provides statistics for TCP connections is:
sipNetworkChannelStatisticsTcpConnections: 1.3.6.1.4.1.111.18.1.5.4
You can use a MIB browser to view the structure and contents of the Service Broker MIB modules, including information on each managed object, such as its OID, syntax, and status.
The MIB modules that are shipped with Service Broker define both queriable objects and traps. Queriable objects provide extensive information on the activities of Service Broker and its components, including those of Interworking Modules, the Orchestration Engine, the Diameter adaptor, and management components.
Traps provide information on events associated with Service Broker. The Supported traps are:
serverRunningNotification
serverStoppingNotification
serverJoinNotification
serverLeavingNotification
bundleStartNotification
bundleActiveNotification
bundleStopNotification
bundleErrorNotification
diameterConnectionUpNotification
diameterConnectionDownNotification
You can use the Administration Console to create your own mappings from JMX notifications to SNMP traps. The Administration Console settings include the available JMX notifications, general SNMP settings for Managed Servers, and trap destinations.
The legacy, out-of-the-box SNMP traps do not populate the Administration Console GUI panels. You can optionally use them or re-write them in the Administration Console where they will be visible and editable.
The essential steps for creating a JMX-based SNMP trap definition are as follows:
Determine which runtime MBeans you want to use as the basis for your SNMP traps. See the Oracle Communications Service Broker Configuration and Runtime MBean Java API Reference.
For the runtime MBeans you selected in the above step, configure the runtime MBean notification criteria for these indicators: counters, gauges, statuses. See "Understanding Notifications" for more information.
Register the runtime MBeans to receive notifications. See "Registering for Notifications" for more information.
Use the Administration Console to specify JMX notification types you want to map to SNMP traps and to configure other SNMP settings. See Table 16-7 for examples of JMX Notification types.
Create a Service Broker MIB based on the SNMP traps you have configured. Obtain a MIB registration point from the IANA (Internet Assigned Numbers Authority).
To access the SNMP configuration settings in the Administration Console, follow these steps:
In the domain navigation tree, expand the OCSB node.
Expand Domain Management.
Select the SNMP node.
The SNMP configuration pane appears.
The SNMP agent configuration determines the SNMP behavior for each Processing and Signaling Server in the managed domain.
By default, the domain defines an existing SNMP agent configuration in which the agent is disabled by default. Since it does not specify a target Managed Server, it applies to all servers in the cluster. To enable the SNMP agent on the servers, you enable the agent in the existing configuration or add your own, as described below.
To enable the default SNMP agent configuration:
In the SNMP node, click the Agent tab.
Select the existing agent configuration instance in the table.
In the Enabled field, enter true.
Modify other settings as desired. See Table 16-1 for information on the configuration settings.
Click OK.
To add SNMP agent definitions:
In the SNMP node, click the Agent tab if it does not already appear.
Click New.
In the New dialog, provide values for the fields listed in Table 16-1.
Table 16-1 SNMP Agent Configuration Settings
| Fields | Description |
|---|---|
|
Target |
The name of the Managed Server to which the SNMP configuration applies. If you leave this field empty, the configuration applies to all Managed Servers in the domain. |
|
Enabled |
Boolean value that indicates whether the SNMP agent is active. Required. Possible values are:
By default, the agent is disabled. |
|
Port |
The number of the port on which the Service Broker SNMP agent listens for queries from managers. Required. Conventionally, SNMP agents listen for requests on port 161. The default value is 8001. |
|
Version |
The SNMP version to use for the agent. Required. The default version is SNMPv2. Possible values are:
|
|
Logging Level |
The SNMP agent logging level as an integer. Required. Possible values are from 1 through 6, with the values corresponding to the following logging levels:
|
Click Save to save your settings.
The new agent configuration appears in the table.
The access control table specifies access control restrictions that apply to queries to SNMP agents. The agent can authenticate incoming requests based on the community string provided in the request or by the IP address of the source. This access control mechanism applies to SNMPv1 and SNMPv2c.
To configure SNMP-related access control items, follow these steps:
In the SNMP configuration pane, click the Access Control Table tab.
From the Parent menu, choose the SNMP agent instance to which this configuration applies. The parent menu references an agent in the following form:
SnmpConfig.configuration[n]
Where n is the ID of the agent configuration as shown in the Agent Configuration pane.
Click the New button.
Provide values for the following fields.
Table 16-2 SNMP Access Control Settings
| Fields | Description |
|---|---|
|
aclCommunity |
The community string required for query access. Required. In SNMP, the community string is used to establish trust between the agent and manager. |
|
aclAccess |
The authorization level for SNMP managers who match this community. Required. Possible values are
Because the Service Broker SNMP MIB defines all objects as read-only, option 2, read/write, is not supported. |
|
aclManagers |
The IP address or host name of managers who are allowed to access the agent. Required. Requests that provide the correct community string but originate from a source IP not specified in this parameter are blocked. Use 0.0.0.0 as the IP address to allow access to any manager who provides a matching community string, or provide a specific IP address. Use semi-colons (;) to separate multiple addresses. |
Click OK to save your settings.
The new access control item appears in the table.
The V1V2 trap forwarding table identifies SNMP manager trap destinations for traps in SNMPv1 and SNMPv2c format.
To configure SNMPv1 or SNMPv2c trap destinations, follow these steps:
In the SNMP configuration pane, click the V1V2 Trap Forwarding Table tab.
From the Parent menu, choose the SNMP agent instance to which this configuration applies. The parent menu references an agent in the following form:
SnmpConfig.configuration[n]
Where n is the ID of the agent configuration as shown in the Agent Configuration pane.
Click the New button.
Provide values for the following fields.
Table 16-3 V1V2 Trap Forwarding Table Settings
| Fields | Description |
|---|---|
|
Manager Host |
The IP address or host name of the SNMP manager to which the agent sends SNMPv1 or SNMPv2c traps. Required. |
|
Manager Port |
The port number on which the SNMP manager listens for traps. Conventionally, managers listen for traps on port 162. Required. |
|
Version |
The SNMP protocol version to use for the traps. Required. Possible values are:
|
|
Community |
The community string for the trap destination manager. The community string is used to establish trust between the agent and manager. |
|
Timeout |
The notification transmission timeout period, in milliseconds. If the time expires, the agent considers the transmission to have failed and may re-attempt the transmission based on the retries value. |
|
Retries |
The number of attempts that the agent makes to send a notification. If set to 0 or the maximum number or retries has been reached, the notification is not re-attempted and the notification is considered to have failed. |
Click OK to save your settings.
The new trap forwarding settings appear in the table.
The V3 trap forwarding table identifies SNMP manager trap destinations for traps in SNMPv3 format.
To configure SNMPv3 trap destinations:
In the SNMP configuration pane, click the V3 Trap Forwarding Table tab.
From the Parent menu, choose the SNMP agent instance to which this configuration applies. The parent menu references an agent in the following form:
SnmpConfig.configuration[n]
Where n is the ID of the agent configuration as shown in the Agent Configuration pane.
Click the New button.
Provide values for the following fields.
Table 16-4 V3 Trap Forwarding Table Settings
| Fields | Description |
|---|---|
|
Manager Host |
The IP address or hostname of the SNMP manager to which the agent sends SNMPv3 traps. Required. |
|
Manager Port |
The port number on which the SNMP manager listens for traps. Conventionally, managers listen for traps on port 162. Required. |
|
Version |
The SNMP protocol version to use for the traps. Required. Possible values are:
|
|
Community |
The community string for the trap destination manager. The community string is used to establish trust between the agent and manager. |
|
Username |
The string specifying the user name of the manager user. |
|
User Security Model |
An integer value that specifies the manager's user security model. The only value supported by the Service Broker SNMP agent is 3, which specifies USM (User Security Model). |
|
Security Level |
An integer that indicates which security features are applied to the message. You can require authentication and encryption of the trap content. Set the level using one of these options:
|
|
User Context Name |
A string specifying the context of the manager user. |
|
timeout |
The notification transmission timeout period, in milliseconds. If the time expires, the agent considers the transmission to have failed and may re-attempt the transmission based on the retries value. |
|
Retries |
The number of attempts that the agent makes to send a notification. If set to 0 or the maximum number or retries has been reached, the notification is not re-attempted and the notification is considered to have failed. |
Click OK to save your settings.
The new trap forwarding settings appear in the table.
The SNMP mappings determine which JMX notifications are used as the basis for your SNMP traps.
The General tab is where you define general settings for the mappings. You need to fill in at least one parent setting definition before you can configure the trap mappings.
The Trap Mappings tab is used to map an available JMX notification to a KeyId, Name, and Trap sub OID that you can use in your MIB to define an SNMP trap.
To configure SNMP traps General settings, follow these steps:
In the SNMP configuration pane, click the Mappings tab.
Click the New button.
Provide values for the following fields.
Table 16-5 General SNMP Mappings Settings
| Fields | Description |
|---|---|
|
Name |
Name to identify the mapping. This value has no functional meaning. |
|
Enterprise OID |
Corresponds to the OID that is assigned by IANA. Typically this is an OID that is already owned by the enterprise. Example: The Oracle Enterprise OID is 111. |
|
Module OID |
Corresponds to the OID of a module defined in the scope of the enterprise. The value can be a single number or multiple numbers separated by a dot. For example '45' or '18.1'. |
|
Notifications OID |
This is a number that defines the OID that is used for all notifications in the scope of the module. For example: '1' or '94'. |
To configure SNMP Trap Mappings settings, follow these steps:
In the SNMP configuration pane, click the Mappings tab then the Trap Mappings tab.
Click the New button.
Provide values for the following fields.
Table 16-6 JMX Notifications Mapping Settings
| Fields | Descriptions |
|---|---|
|
Name |
Name to identify the mapping. This value has no functional meaning. |
|
Notification type |
The notification type using this dotted string syntax: abbreviated_mbean_name.attribute.cause Where: abbreviated_mbean_name is the name of a runtime MBean with the get prefix and mbean suffix removed. attribute is an attribute of the runtime MBean. cause is the type of change that caused the notification from Table 14-6 and Table 14-7. See "Examples of JMX Notification Types" for examples, and "Notification Structure" for more information on the syntax. |
|
Trap sub OID |
The sub OID of the trap. The complete OID format for the trap is as follows (example): 1.3.6.1.4.1.[enterpriseOID].[moduleOID].[notificationsOID].[subOID] |
Table 16-7 provides examples of some JMX Notification types. Any JMX notification generated by the managed servers can be mapped to an SNMP trap. As long as the notification type is known it can be mapped.
Table 16-7 JMX Notification Type Examples
| Notification Type | Description |
|---|---|
|
SsuRemotePointCodeRuntime.Status.StateEntered |
This notification is sent when the SS7 Remote Pointcode Status Changed. |
|
NetworkEntity.Status.StateEntered |
This notification is sent when the SIP Network Entity Status Changed. |
|
SystemCountersRuntime.InitialRequestCount.highThresholdCrossed |
This notification is sent when the number of Initial Requests Crossed High Threshold Value. |
|
SystemCountersRuntime.InitialRequestCount.clearedHighThreshold |
This notification is sent when the number of Initial Requests Ceased High Threshold Value. |
|
SystemGaugeRuntime.SessionGauge.highThresholdCrossed |
This notification is sent when the number of Open Sessions Crossed High Threshold Value. |
|
SystemGaugeRuntime.SessionGauge.clearedHighThreshold |
This notification is sent when the number of Open Sessions Ceased High Threshold Value. |
|
OeRuntime.UnsuccessfulApplicationTriggeringCount.highThresholdCrossed |
This notification is sent when the number of Unsuccessful Application Triggering that the OE attempted Crossed High Threshold Value. |
|
OeRuntime.UnsuccessfulApplicationTriggeringCount.clearedHighThreshold |
This notification is sent when the number of Unsuccessful Application Triggering that the OE attempted Ceased High Threshold Value. |
|
OprRuntime.UnsuccessfulQueryCount.highThresholdCrossed |
This notification is sent when the number of Unsuccessful Queries that an OPR attempted to execute Crossed High Threshold Value |
|
OprRuntime.UnsuccessfulQueryCount.clearedHighThreshold |
This notification is sent when the number of Unsuccessful Queries that an OPR attempted to execute Ceased High Threshold Value |
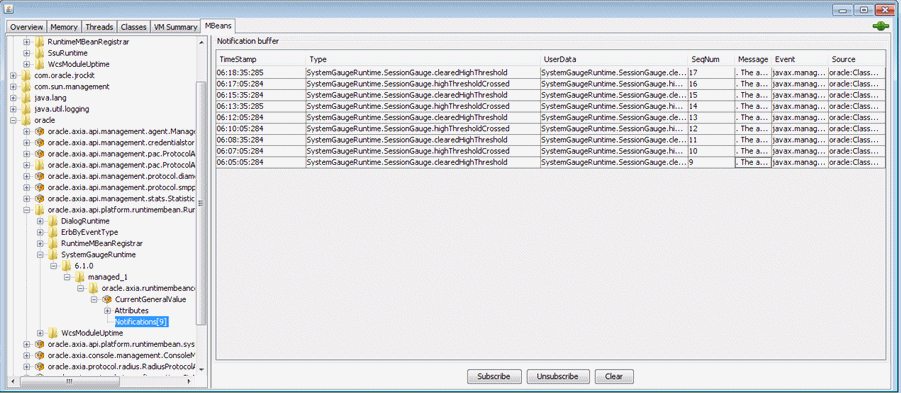
Figure 16-2 shows an example of a notifications buffer registered on an attribute of the runtime MBean SystemGaugeRuntime. The indicator monitored is a gauge that periodically crosses and ceases to cross a defined threshold.
|
Copyright © 2010, 2013, Oracle and/or its affiliates. All rights reserved. Legal Notices |
|